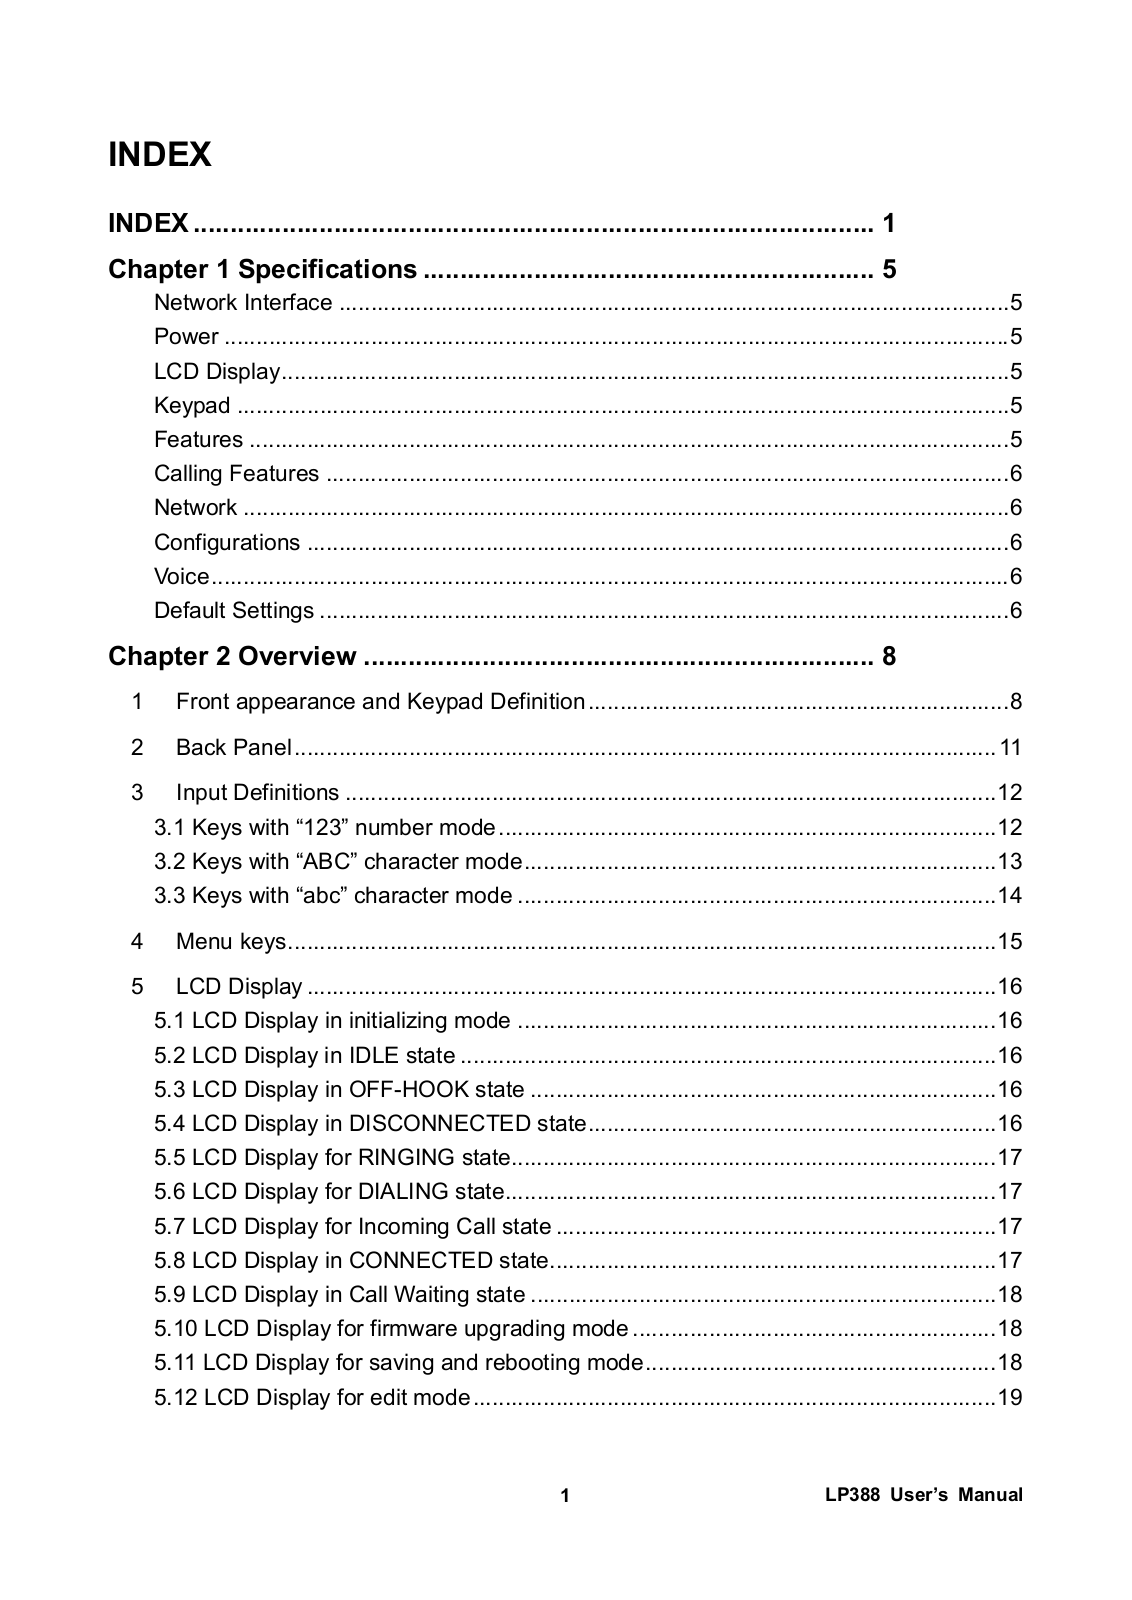
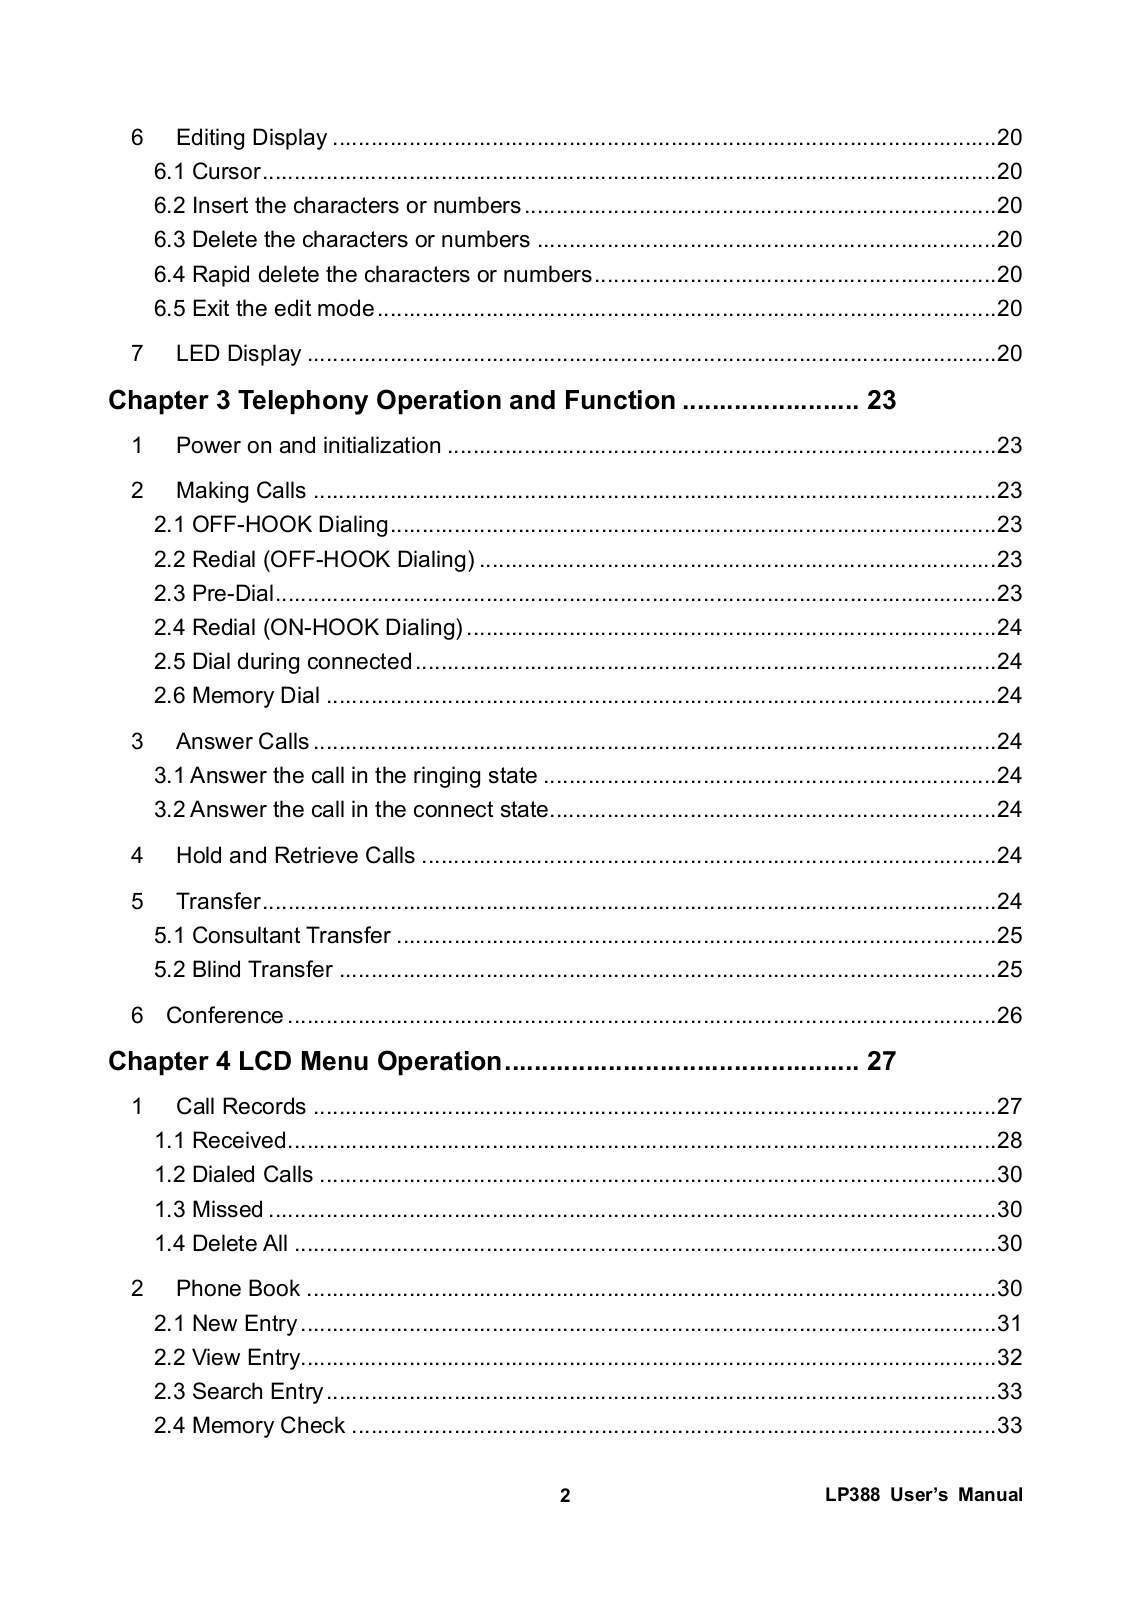
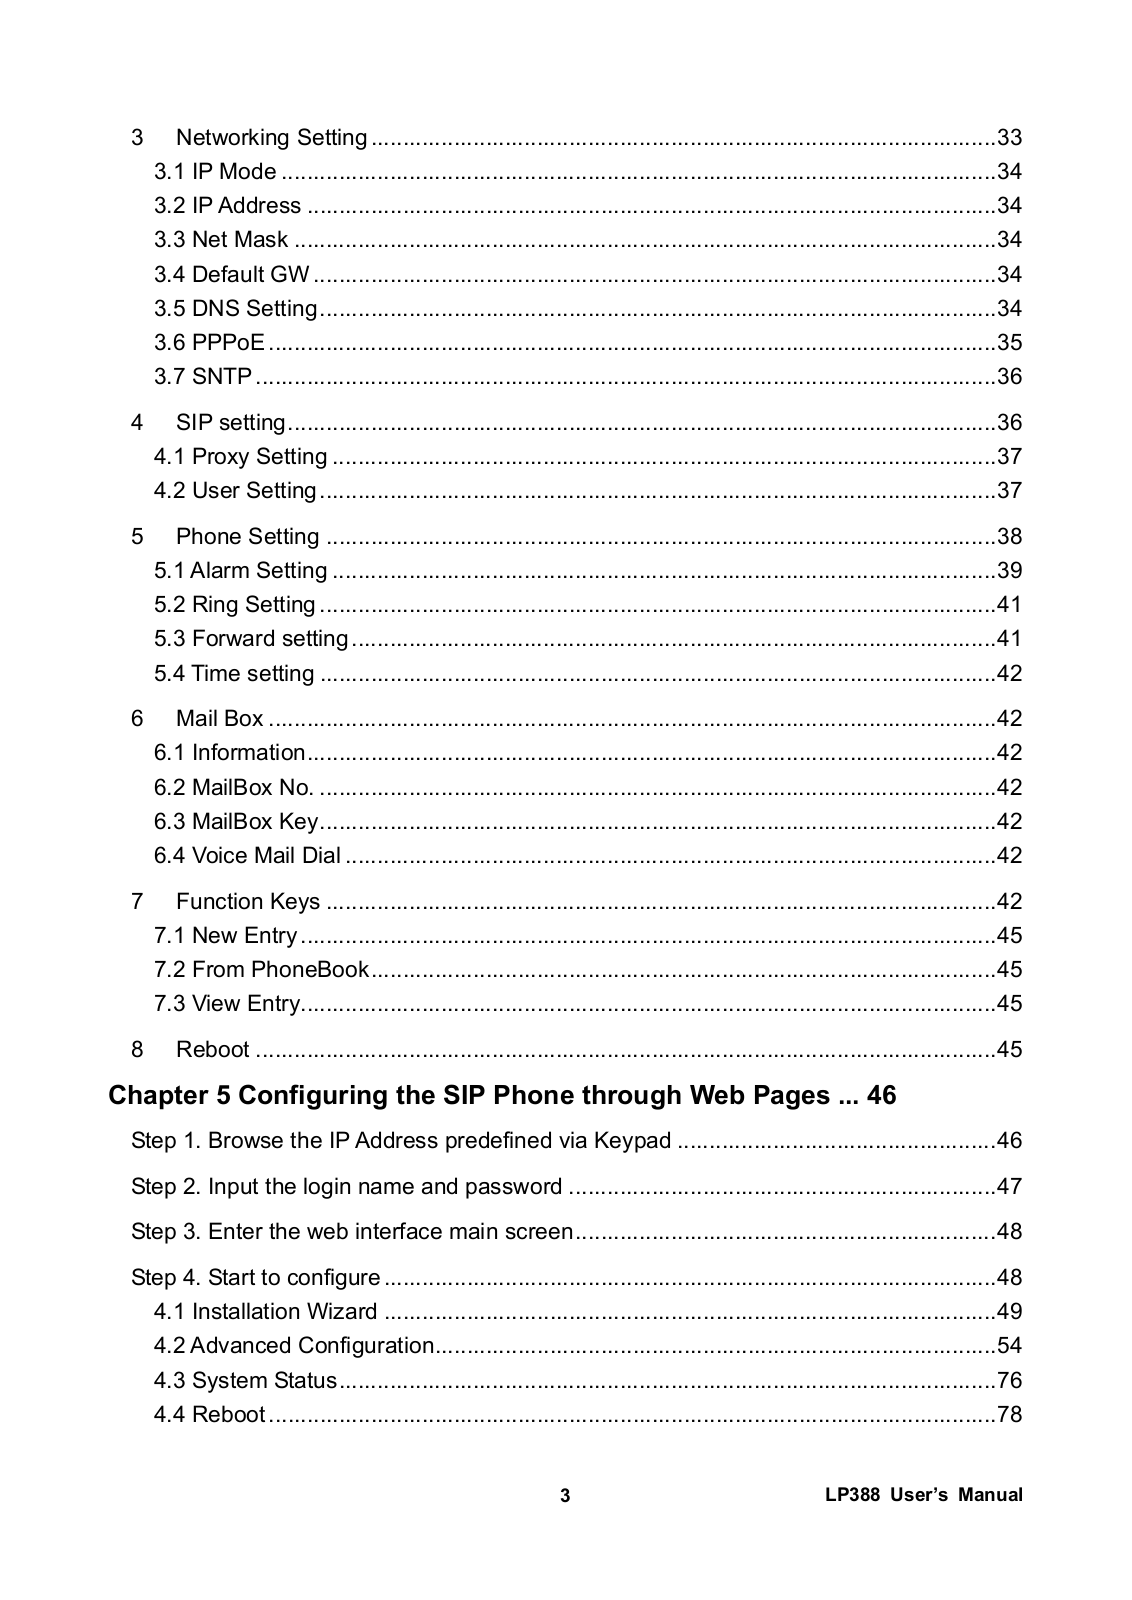
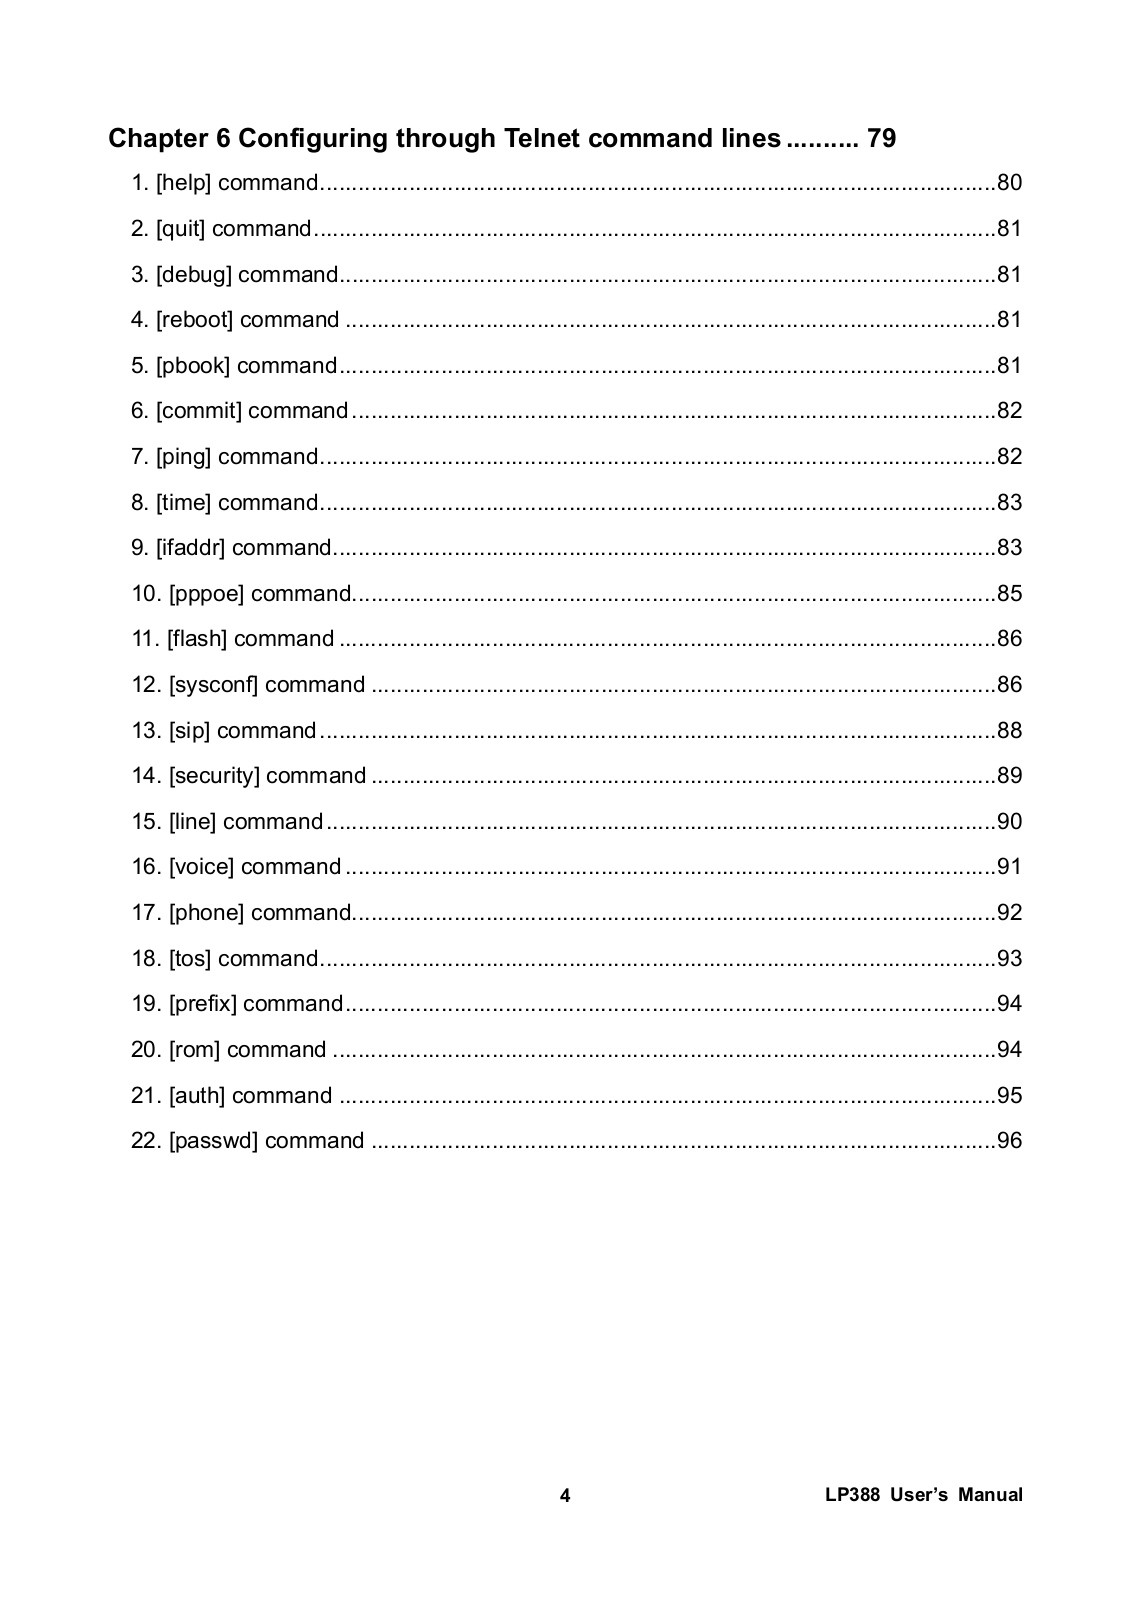
LP388 User’s Manual
Release 103
INDEX ............................................................................................ |
1 |
Chapter 1 Specifications ............................................................. |
5 |
Network Interface ......................................................................................................... |
5 |
Power ........................................................................................................................... |
5 |
LCD Display.................................................................................................................. |
5 |
Keypad ......................................................................................................................... |
5 |
Features ....................................................................................................................... |
5 |
Calling Features ........................................................................................................... |
6 |
Network ........................................................................................................................ |
6 |
Configurations .............................................................................................................. |
6 |
Voice............................................................................................................................. |
6 |
Default Settings ............................................................................................................ |
6 |
Chapter 2 Overview ..................................................................... |
8 |
||
1 |
Front appearance and Keypad Definition.................................................................. |
8 |
|
2 |
Back Panel.............................................................................................................. |
11 |
|
3 |
Input Definitions ...................................................................................................... |
12 |
|
|
3.1 |
Keys with “123” number mode.............................................................................. |
12 |
|
3.2 |
Keys with “ABC” character mode.......................................................................... |
13 |
|
3.3 |
Keys with “abc” character mode ........................................................................... |
14 |
4 |
Menu keys............................................................................................................... |
15 |
|
5 |
LCD Display ............................................................................................................ |
16 |
|
|
5.1 |
LCD Display in initializing mode ........................................................................... |
16 |
|
5.2 |
LCD Display in IDLE state .................................................................................... |
16 |
|
5.3 |
LCD Display in OFF-HOOK state ......................................................................... |
16 |
|
5.4 |
LCD Display in DISCONNECTED state................................................................ |
16 |
|
5.5 |
LCD Display for RINGING state............................................................................ |
17 |
|
5.6 |
LCD Display for DIALING state............................................................................. |
17 |
|
5.7 |
LCD Display for Incoming Call state ..................................................................... |
17 |
|
5.8 |
LCD Display in CONNECTED state...................................................................... |
17 |
|
5.9 |
LCD Display in Call Waiting state ......................................................................... |
18 |
|
5.10 LCD Display for firmware upgrading mode ......................................................... |
18 |
|
|
5.11 LCD Display for saving and rebooting mode....................................................... |
18 |
|
|
5.12 LCD Display for edit mode.................................................................................. |
19 |
1 |
LP388 User’s Manual |
6 Editing Display ........................................................................................................ |
20 |
|
6.1 |
Cursor................................................................................................................... |
20 |
6.2 |
Insert the characters or numbers.......................................................................... |
20 |
6.3 |
Delete the characters or numbers ........................................................................ |
20 |
6.4 |
Rapid delete the characters or numbers............................................................... |
20 |
6.5 |
Exit the edit mode................................................................................................. |
20 |
7 LED Display ............................................................................................................ |
20 |
Chapter 3 Telephony Operation and Function |
........................ 23 |
||
1 |
Power on and initialization ...................................................................................... |
23 |
|
2 |
Making Calls ........................................................................................................... |
23 |
|
|
2.1 |
OFF-HOOK Dialing............................................................................................... |
23 |
|
2.2 |
Redial (OFF-HOOK Dialing) ................................................................................. |
23 |
|
2.3 |
Pre-Dial................................................................................................................. |
23 |
|
2.4 |
Redial (ON-HOOK Dialing) ................................................................................... |
24 |
|
2.5 |
Dial during connected ........................................................................................... |
24 |
|
2.6 |
Memory Dial ......................................................................................................... |
24 |
3 |
Answer Calls ........................................................................................................... |
24 |
|
|
3.1 Answer the call in the ringing state ....................................................................... |
24 |
|
|
3.2 Answer the call in the connect state...................................................................... |
24 |
|
4 |
Hold and Retrieve Calls .......................................................................................... |
24 |
|
5 |
Transfer................................................................................................................... |
24 |
|
|
5.1 |
Consultant Transfer .............................................................................................. |
25 |
|
5.2 |
Blind Transfer ....................................................................................................... |
25 |
6 |
Conference ............................................................................................................... |
26 |
|
Chapter 4 LCD Menu Operation................................................ |
27 |
||
1 |
Call Records ........................................................................................................... |
27 |
|
|
1.1 |
Received............................................................................................................... |
28 |
|
1.2 |
Dialed Calls .......................................................................................................... |
30 |
|
1.3 |
Missed .................................................................................................................. |
30 |
|
1.4 |
Delete All .............................................................................................................. |
30 |
2 |
Phone Book ............................................................................................................ |
30 |
|
|
2.1 |
New Entry ............................................................................................................. |
31 |
|
2.2 |
View Entry............................................................................................................. |
32 |
|
2.3 |
Search Entry......................................................................................................... |
33 |
|
2.4 |
Memory Check ..................................................................................................... |
33 |
|
|
2 |
LP388 User’s Manual |
3 |
Networking Setting .................................................................................................. |
33 |
|
|
3.1 |
IP Mode ................................................................................................................ |
34 |
|
3.2 |
IP Address ............................................................................................................ |
34 |
|
3.3 |
Net Mask .............................................................................................................. |
34 |
|
3.4 |
Default GW ........................................................................................................... |
34 |
|
3.5 |
DNS Setting.......................................................................................................... |
34 |
|
3.6 PPPoE .................................................................................................................. |
35 |
|
|
3.7 SNTP .................................................................................................................... |
36 |
|
4 |
SIP setting............................................................................................................... |
36 |
|
|
4.1 |
Proxy Setting ........................................................................................................ |
37 |
|
4.2 |
User Setting.......................................................................................................... |
37 |
5 |
Phone Setting ......................................................................................................... |
38 |
|
|
5.1 Alarm Setting ........................................................................................................ |
39 |
|
|
5.2 |
Ring Setting .......................................................................................................... |
41 |
|
5.3 |
Forward setting..................................................................................................... |
41 |
|
5.4 Time setting .......................................................................................................... |
42 |
|
6 |
Mail Box .................................................................................................................. |
42 |
|
|
6.1 |
Information............................................................................................................ |
42 |
|
6.2 |
MailBox No. .......................................................................................................... |
42 |
|
6.3 |
MailBox Key.......................................................................................................... |
42 |
|
6.4 |
Voice Mail Dial ...................................................................................................... |
42 |
7 |
Function Keys ......................................................................................................... |
42 |
|
|
7.1 |
New Entry ............................................................................................................. |
45 |
|
7.2 |
From PhoneBook.................................................................................................. |
45 |
|
7.3 |
View Entry............................................................................................................. |
45 |
8 |
Reboot .................................................................................................................... |
45 |
|
Chapter 5 Configuring the SIP Phone through Web Pages ... 46 |
|||
Step 1. Browse the IP Address predefined via Keypad .................................................. |
46 |
||
Step 2. Input the login name and password ................................................................... |
47 |
||
Step 3. Enter the web interface main screen.................................................................. |
48 |
||
Step 4. Start to configure ................................................................................................ |
48 |
||
|
4.1 |
Installation Wizard ................................................................................................ |
49 |
|
4.2 Advanced Configuration........................................................................................ |
54 |
|
|
4.3 |
System Status....................................................................................................... |
76 |
|
4.4 |
Reboot .................................................................................................................. |
78 |
|
|
3 |
LP388 User’s Manual |
Chapter 6 Configuring through Telnet command lines .......... |
79 |
||
1. |
[help] command.......................................................................................................... |
80 |
|
2. |
[quit] command........................................................................................................... |
81 |
|
3. |
[debug] command....................................................................................................... |
81 |
|
4. |
[reboot] command ...................................................................................................... |
81 |
|
5. |
[pbook] command....................................................................................................... |
81 |
|
6. |
[commit] command..................................................................................................... |
82 |
|
7. |
[ping] command.......................................................................................................... |
82 |
|
8. |
[time] command.......................................................................................................... |
83 |
|
9. |
[ifaddr] command........................................................................................................ |
83 |
|
10. |
[pppoe] command..................................................................................................... |
85 |
|
11. [flash] command ....................................................................................................... |
86 |
||
12. |
[sysconf] command .................................................................................................. |
86 |
|
13. |
[sip] command.......................................................................................................... |
88 |
|
14. |
[security] command .................................................................................................. |
89 |
|
15. |
[line] command......................................................................................................... |
90 |
|
16. |
[voice] command ...................................................................................................... |
91 |
|
17. |
[phone] command..................................................................................................... |
92 |
|
18. |
[tos] command.......................................................................................................... |
93 |
|
19. |
[prefix] command...................................................................................................... |
94 |
|
20. |
[rom] command ........................................................................................................ |
94 |
|
21. |
[auth] command ....................................................................................................... |
95 |
|
22. |
[passwd] command .................................................................................................. |
96 |
4 |
LP388 User’s Manual |
zPC: connect to PC, the interface type is RJ45
zLAN: connect to network, the interface type is RJ45
zInput: AC 110 – 220v
zOutput: DC 9V/1A
2 × 16 characters
38Keys
2 keys for the OK or Cancel function
4 navigation keys for the menu setting
12 keys for the number dialing
2 keys for the volume setting
1 key for the hand free function
13 keys for the call features control
2 keys for the line operation
zDo Not Disturb
zMute
zUser-defined function keys
zSpeed Dial function keys.
zPhone Books: 90 entries
zCall Log: 10 missed calls, received calls, dialed calls
zPre-dial
zRedial
zUser-defined function key: F1~F3.
zVolume: 10 Levels (1 ~ 10)
zRing Volume: 9 Levels (1 ~ 9)
zRing Method: 3 rings, melody
zKey Tone
5 |
LP388 User’s Manual |
z |
Date / Time: |
Display date and time in idle state (SNTP) |
z |
Alarm Clock: |
3 alarm clocks |
zCall waiting
zCall Conference (3-way): Local Conference
zCall hold / retrieve
zCall forward (Busy, No-Answer and Unconditional)
zCall transfer (attended / unattended)
zCall pickup (Group Pick up & Specific Pick up)
zMWI
zTwo 10/100Mb Ethernet with full duplex (RJ-45)
zSupport Static IP / DHCP / PPPoE
zSoftware remote upgrade through TFTP/FTP server
zKeypad configuration with the LCD menu
zWeb Browser Configuration
zTelnet Configuration
zDTMF detection and generation
zAcoustic Echo cancellation
zG.711a/u-Law, G.729A/B
zJitter buffer control
zDTMF via RFC2833
zSIP INFO for DTMF
z |
IP: |
10.1.1.3 |
z |
Net Mask: |
255.255.0.0 |
zDefault Gateway: 10.1.1.254
z |
SIP Proxy: |
10.1.1.2 |
z |
SIP account: |
1001 |
z |
SIP Port: |
5060 |
z |
Proxy Port: |
5060 |
6 |
LP388 User’s Manual |
z RTP Port: |
16384 |
zDigit Timeout: 5 s
z Call waiting: On z Call transfer: On
7 |
LP388 User’s Manual |
8 |
LP388 User’s Manual |
|
|
|
Keypads |
|
Function description |
|||||||
|
|
|
|
|
|
|
|
|
|
|
1. Cancel for the menu setting or number typing. |
|
|
|
|
|
|
|
|
|
|
|
|
2. Reject the incoming calls |
|
|
|
|
|
OK |
OK for the menu setting |
|||||||
|
|
|
|
|
|
|
|
|
|
|
||
|
|
|
|
|
|
|
|
|
|
|
|
|
|
|
… |
|
|
|
|
|
|
|
|
Number, * and # keys |
|
|
|
|
|
|
|
|
|
|
|
|||
|
|
|
|
|
|
|
|
|
|
|
|
|
|
|
|
|
|
|
|
|
|
|
|
|
|
|
|
|
|
|
|
|
|
|
|
|
Reduce the voice volume |
|
|
|
|
|
|
|
|
||||||
|
|
|
|
|
|
Hands free and Handset switching key |
||||||
|
;)) |
|
|
|
|
|||||||
|
|
|
|
|
|
|
|
|
|
|
|
|
+ |
|
|
|
|
|
Enhance the voice volume |
||||||
|
|
|
|
|
|
|
|
|
|
|
||
|
|
|
|
|
|
|
||||||
|
|
|
U |
UP arrow key |
||||||||
|
|
|
Y |
Left arrow and return key for the menu setting |
||||||||
|
|
|
Z |
1. |
Right arrow |
|||||||
|
|
|
|
|
|
|
|
|
|
|
||
|
|
|
|
|
|
|
|
|
|
|
2. Enter key for the menu setting |
|
|
|
|
V |
1. |
Down arrow key |
|||||||
|
|
|
|
|
|
|
|
|
|
|
||
|
|
|
|
|
|
|
|
|
|
|
2. Enter Phone Book directory |
|
|
|
|
|
|
Line1 switch key |
|||||||
|
|
|
Line 1 |
|||||||||
|
|
|
|
|
||||||||
|
|
|
|
|
Line2 switch key |
|||||||
|
|
|
Line 2 |
|||||||||
|
|
|
|
|
||||||||
|
|
|
|
|
Memory Function key 1 |
|||||||
|
|
|
|
F1 |
||||||||
|
|
|
|
|
|
|||||||
|
|
|
|
|
Memory Function key 2 |
|||||||
|
|
|
|
F2 |
||||||||
|
|
|
|
|
|
|||||||
|
|
|
|
|
Memory Function key 3 |
|||||||
|
|
|
|
F3 |
||||||||
|
|
|
|
|
|
|||||||
|
|
|
|
|
Enter Unconditional Forward directory |
|||||||
|
|
|
Forward |
|||||||||
|
|
|
|
|
||||||||
|
|
|
|
|
DND function key |
|||||||
|
|
|
DND |
|||||||||
|
|
|
|
|
9 |
LP388 User’s Manual |
|
|
Missed calls key |
||
|
Missed |
|||
|
|
|||
|
|
Voice Mail System key |
||
|
VMS |
|||
|
|
|||
|
|
Blind transfer Key |
||
Blind Tran. |
||||
|
||||
|
|
Mute key |
||
|
Mute |
|||
|
|
|||
|
|
Headset mode switch key |
||
Headset |
||||
|
||||
|
|
|
|
|
|
Conf |
|
Conference key |
|
|
|
|
|
|
|
|
|
||
|
Pick |
|
Call Pick Up key |
|
|
|
|
|
|
|
|
|
||
|
Trans |
|
Consultant Transfer key |
|
|
|
|
|
|
|
|
|
||
|
Redial |
|
Redial key |
|
|
|
|
|
|
|
|
|
||
|
Hold |
|
Call hold / Call retrieve key |
|
|
|
|
|
10 |
LP388 User’s Manual |
♦DC 9V: DC 9V power input outlet
♦PC: RJ-45 connector, connected directly to the PC through the straight CAT-5 cable
♦LAN: RJ-45 connector, connected directly to the Hub through the straight CAT-5 cable.
♦Headset: headset jack to connect with headset. Please contact with your distributor for optional headset.
♦Handset: handset jack to connect with handset.
11 |
LP388 User’s Manual |
This phone could support three methods for the text input, such like this: “123”, “ABC”, “abc”. “123” is for the number inputs, “ABC” is for the uppercase character inputs; “abc” is for the lowercase character inputs.
User could press the |
# |
button to exchange these three methods. |
|
Users could only enter the digits in the “123” mode as following:
|
Key |
Numbers in “123” input method |
|
|
|
|
1 |
|
|
|
|
|
|
|
|
|
|
|
2 |
|
|
|
|
|
|
|
|
|
|
|
3 |
|
|
|
|
|
|
|
|
|
|
|
4 |
|
|
|
|
|
|
|
|
|
|
|
5 |
|
|
|
|
|
|
|
|
|
|
|
6 |
|
|
|
|
|
|
|
|
|
|
|
7 |
|
|
|
|
|
|
|
|
|
|
|
8 |
|
|
|
|
|
|
|
|
|
|
|
9 |
|
|
|
|
|
|
|
|
|
|
|
. |
|
|
|
|
|
|
|
|
|
|
|
0 |
|
|
|
|
|
|
|
|
|
|
|
Input method switch key |
|
# |
|
|
|
|
|
|
12 |
LP388 User’s Manual |
Users could enter the characters with the uppercase in this mode. The key could only input the special symbols and press more times to pick up the symbols you want. If
users press two times on the key , the input character will be E.
|
Key |
Characters with uppercase in “ABC” input method |
||||
|
|
|
|
|
|
|
|
|
|
|
|
|
|
|
|
|
|
|
|
|
|
|
|
A |
B |
C |
|
|
|
|
|
|||
|
|
|
|
|
|
|
|
|
|
D |
E |
F |
|
|
|
|
|
|||
|
|
|
|
|
|
|
|
|
|
G |
H |
I |
|
|
|
|
|
|||
|
|
|
|
|
|
|
|
|
|
J |
K |
L |
|
|
|
|
|
|||
|
|
|
|
|
|
|
|
|
|
M |
N |
O |
|
|
|
|
|
|||
|
|
|
|
|
|
|
|
|
|
P |
Q |
R |
S |
|
|
|
||||
|
|
|
|
|
|
|
|
|
|
T |
U |
V |
|
|
|
|
|
|||
|
|
|
|
|
|
|
|
|
|
W |
X |
Y |
Z |
|
|
|
||||
|
|
|
|
|
|
|
|
|
|
|
|
|
|
|
|
|
|
|
|
|
|
|
|
|
|
|
|
|
|
|
Space |
|
|
|
|
|
|
|
|
||
|
|
|
|
|||
|
|
|
|
|
|
|
|
# |
|
Input method switch key |
|||
|
|
|
|
|
|
|
13 |
LP388 User’s Manual |
Users could enter the characters with the uppercase in this mode. The key could only input the special symbols and press more times to pick up the symbols you want. If
users press two times on the key , the input character will be e.
|
Key |
|
Characters with uppercase in “ABC” input method |
|||
|
|
|
|
|
|
|
|
|
|
|
|
|
|
|
|
|
|
|
|
|
|
|
|
a |
b |
c |
|
|
|
|
|
|||
|
|
|
|
|
|
|
|
|
|
d |
e |
f |
|
|
|
|
|
|||
|
|
|
|
|
|
|
|
|
|
g |
h |
i |
|
|
|
|
|
|||
|
|
|
|
|
|
|
|
|
|
j |
k |
l |
|
|
|
|
|
|||
|
|
|
|
|
|
|
|
|
|
m |
n |
o |
|
|
|
|
|
|||
|
|
|
|
|
|
|
|
|
|
p |
q |
r |
s |
|
|
|
||||
|
|
|
|
|
|
|
|
|
|
t |
u |
v |
|
|
|
|
|
|||
|
|
|
|
|
|
|
|
|
|
w |
x |
y |
z |
|
|
|
||||
|
|
|
|
|
||
|
|
|
|
|
|
|
|
|
|
|
|
|
|
|
|
|
|
|
||
|
|
|
Space |
|
||
|
|
|
|
|||
|
|
|
|
|||
|
|
|
Input method switch key |
|||
|
|
|
||||
|
|
|
|
|
|
|
14 |
LP388 User’s Manual |
There are four keys to help users enter, exit or pick up the configuration tables for changing. Please check out the following info:
Key Functions descriptions
ZPress the right arrow key in the IDLE mode to enter the main menu.
YPress the left arrow key will help users to return the original table or exit the main menu
UPress the up arrow key to scroll up configuration items.
V1. Press the down arrow key to scroll down configuration items. 2. Enter Phone Book directory.
Enter the selected configuration table.
C |
Return to the original table or exit the main menu key. |
|
15 |
LP388 User’s Manual |
1970/01/01 00:00 |
Status during the system initializing |
|
Initializing… |
||
|
||
|
|
2006/05/10 10:10 <line number>
2006/05/10 10:10 Register Fail
2006/05/10 10:10 Network Fail
Displaying in the IDLE mode while the network and registration were ok. (User can change display name from SIP configuration, if user doesn’t input display name date it will display its Line number)
Registrations fail during the IDLE mode
Network fail during the IDLE mode (LAN port detection or get IP failed with DHCP and PPPoE)1
Line 1 Dial…
Line 2 Dial…
LCD displaying while the phone was in the OFFHOOK state.
16 |
LP388 User’s Manual |
2006/05/10 10:10 |
After the remote side sends the BYE message, LP388 |
<Line number> |
will automatically return IDLE state. |
|
|
|
Incoming call… |
|
Incoming call with the calling name or number |
|
|
208 |
|
||
|
|
|
|
|
|
|
|
|
|
|
|
|
|
|
5.6 LCD Display for DIALING state |
||||
|
|
|
|
|
|
Line 1 Dialing… |
Making a outgoing call with the dialed number |
||
|
9999 |
|
||
|
|
|
|
|
|
|
|
|
|
Line 2 Dialing… |
Making a outgoing call with the dialed number |
|
9999 |
||
|
||
|
|
Jason |
When it received incoming call, it will show incoming |
65605 |
call display name and phone number |
|
|
Line 1 Talking…
00:00:10
Line 2 Talking… 00:00:10
Mute…
00:00:10
During the talking state and running the timer
The timer will still go on while the mute function was enabled during the conversation.
17 |
LP388 User’s Manual |
Transfer…
Hold…
In Conference….. 00:10:10
Transfer action during the call.
Hold the established call.
Enable the conference function and start the timer from the beginning.
Line 1 Talking.…… 65605
Under conversation and LP388 received incoming call. LCD of LP388 will display incoming call number and hears call waiting tone.
User can press blinking Line button to pick up call waiting or presses C button to reject call waiting.
Download… |
Firmware file downloading mode |
|
|
||
|
|
|
|
|
|
Download… |
Writing the firmware after the firmware downloading |
|
Writing… |
||
|
||
|
|
Completed… |
Request for the rebooting after the firmware |
Please reboot |
upgrading |
|
|
Saving…
Saving the configurations while users had be changed
18 |
LP388 User’s Manual |
Rebooting…
Users reboot this unit from the remote side
Rebooting?
Request for the keypad pressing to reboot
Please Wait…
Users reboot this unit by the keypad pressing
The characters and digits were entered from the left to the right side. The cursor will be blinking every 500ms just like the example as above:
John |
|
|
→ |
John |
||
|
||||||
|
|
|
|
|
|
|
208 |
|
|
→ |
208 |
|
|
|
|
|
||||
|
|
|
|
|||
|
|
|
|
|
|
|
If the users enter the incorrect info, the LCD will show as following:
Invalid Input…
19 |
LP388 User’s Manual |
Under the characters or digits, the cursor will be displayed and the characters or digits will be blinking. It was shown as “_” with the LCD showing. Users could press the right or left arrow keys to make the cursor move to the right or left side. The blinking time for the on and off will be 500ms.
All the characters and numbers were entered from the left to the right side. While users enter a new character, the cursor will move to the right side of the entered character or numbers and wait for the next one.
User could use the cancel key for erasing the entered characters or digits. It will only erase the characters or digits, which are in the left side of the cursor.
All the info will be dropped while users press the keypad c |
for 3 seconds and all the |
entered info will be deleted and exit the edit mode. |
|
Users could press the keypad c for 3 seconds to exit the edit mode during the editing. Or move the cursor to the left side of the LCD and without any characters and numbers; press the cancel key to exit the edit mode.
While users power on this phone set, all the LED will be lighted up before the system initializing procedure finished. The function LED will be light while users press the function keys; and will be blink while users press the function keys for twice. The following definitions are for the LED:
20 |
LP388 User’s Manual |
LED |
|
Function description |
|
|
1 |
Flashing for register fail and network fail. |
|
System Indicator LED |
|
Flash time: 200ms on; 200ms off |
|
2 |
Lighting for the OFF HOOK. |
||
|
|||
|
|
|
|
|
1 |
Flashing for the line holding and incoming call. |
|
|
Flash time: 500ms on; 500ms off |
||
Line 1 |
|
||
2 |
Lighting for the line in use. |
||
|
|||
|
1 |
Flashing for the line holding and incoming call. |
|
|
Flash time: 500ms on; 500ms off |
||
Line 2 |
|
||
2 |
Lighting for the line in use. |
||
|
Light up while user had configured data in this function
F1 key.
Light up while user had configured data in this function
F2 key.
Light up while user had configured data in this function
F3 key.
1. Light up while user enabled forward function (unconditional/ No Answer/ Busy).
Forward |
2. Light off when user disable forward function. |
|
1. Light up while users enable the DND function
DND |
2. |
Light Off while users disable the DND function |
|||
|
1. |
Light up while user has missed call. |
|
|
|
2. |
Light Off while users checked out |
the |
miss called |
||
Missed |
|||||
|
records |
|
|
||
|
|
|
|
||
|
1. |
Light up while users have the voice mail |
|
||
2. |
Light Off while users checked out |
the |
voice mail |
||
VMS |
|||||
|
records |
|
|
||
|
|
|
|
||
|
Press during communication to do blind transfer. |
1.A communicate with B→Blind Tran. + C’s number→
hear nothing (C ring) → Blind transfer
2.A communicate with B→Blind Tran. + C’s number→C
Blind Tran. |
Busy → hear special tone then retrieve B immediately |
|
3. A communicate with B→Blind Tran. + C’s number (not
21 |
LP388 User’s Manual |
|
|
|
|
|
|
|
finished) → |
Blind Tran. |
Retrieve call |
|
|
|
||
|
1. |
Light up while users enable the mute |
||
Mute |
2. |
Off while users cancel the mute |
||
|
1. |
Light up when user is using headset mode. |
||
|
2. |
HEADSET button works the same like hook/speaker |
||
|
|
button. When having incoming call, press HEADSET |
||
|
button can pick up call and press again can hang up |
|||
Headset |
|
call. |
||
|
3. |
When in communication, press HEADSET button can |
||
|
|
switch voice path to headset. |
||
|
|
|
|
|
22 |
LP388 User’s Manual |
During the initialization procedure:
1All the LED will light on till the initialization procedure was finished.
2All the LED will light on if there is error during the procedure.
3On LCD will show “Initializing”.
There are some ways to make outgoing calls:
1OFF HOOK Dialing
2Redial (OFF-HOOK Dialing)
3Pre-Dial (ON-HOOK Dialing)
4Redial (ON-HOOK Dialing)
5Dial during connected
6Memory Dial
The maximum digit is 32. But users enter more than 16 digits, the number will move on the LCD displaying. User can press Speaker button, pick up handset, or press line button to
dial out. The |
C |
button could delete the digits. |
User can press redial button during off-hook mode, phone will dial out the latest record of the dialed list.
User can press the numbers while the phone is in the IDLE state then pressing the
C
button will change to OFF-HOOK state and dial out this number. The button could delete the digits as same as the OFF-HOOK dialing mode.
During the Pre-dial function:
1This is permitted to enter and dial out the digits “*” and “#”.
2If the dialed number could be matched with the list in the phone book, LCD will display the name of this record.
23 |
LP388 User’s Manual |
This will show all the records of the dialed list. After the records selected, pressing the
or |
OK |
button, the number will be dialed out. |
Pressing the Line 1 or Line 2 buttons could switch the Line 1 and Line 2. If the Line 1 was connected, it will be put on hold.
If the line has been put on hold, it can not dial out another call.
The memory dial function could support the dialing from the IDLE of OFF-HOOK state. User can press memory function key or make phone off-hook first to dial out memory key.
The LCD will show up the name if the incoming calls could be matched with the records from the phone book; or show the phone number if couldn’t find out the records.
User can press Speaker button, Line button, or pick up handset to answer the incoming call.
During the call was established, press the button Line 1 and Line 2 to hold the current line and answer another incoming call.
There are two ways to hold the current calls and retrieve them back:
1Press another idle line button Line 1 or Line 2 to hold the current line and switch to another IDLE line.
2Press the Hold function keys to hold the current calls.
During the hold status, the LED of Line will flash.
388 could support the call transfer with two types, one is the Consultant, and another is the
24 |
LP388 User’s Manual |
Blind transfer.
The transfer could be initialized only for the state as above.
iDial another call during the connect state
iiAnswer another call during the connect state
Consultant Transfer scenario:
A.A communicate with B→Tranf or Line hear dial tone+ C’s number→C pick up → A hangs up → B communicate with C
B.A communicate with B→Tranf or Line hear dial tone+ C’s number → C busy/ring →Tranf or original Line →Retrieve call with B
C.A communicate with B→Tranf or Line hear dial tone+ C’s number → C reject →Tranf →Retrieve call with B
D.A communicate with B→Tranf or Line hear dial tone+ C’s number→C reject → press Line to hang up C and hear dial tone again → press original Line to retrieve call
E.A communicate with B→Tranf or Line hear dial tone+ C’s number→C ring → A hangs up → Blind transfer
Blind Transfer Scenario:
A.A communicate with B→Blind Tran. + C’s number→hear nothing (C ring) → Blind transfer
B.A communicate with B→Blind Tran. + C’s number→C Busy → hear special tone then retrieve B immediately
C.A communicate with B→Blind Tran. + C’s number (not finished) →Blind
Tran. Retrieve call
25 |
LP388 User’s Manual |
User needs to specify conference function to be local conference or server-based conference.
Conference Scenario:
A.Local Conference:
(1)A communicate with B→Conf or Line hear dial tone+ C’s number→C pick up → press Conf again to build conference
(2)A communicate with B→Conf or Line hear dial tone+ C’s number→C refuse to join conference → press Line to hang up C and hear dial tone again → press original Line to retrieve call
B.Server-based Conference:
A communicate with B→Conf implement sever-based conference scenario
26 |
LP388 User’s Manual |
During the menu operation, there is no cursor for the configuration tables selecting. The LCD will show just like this:
>Call Records
>Phone Book
Users could press the up or down arrow keys to move on different item. This sign will guide you to choose the configuration tables. In the main menu, it will exit the menu and back to the IDLE mode if there is no action for 30 seconds.
The LCD menu includes eight tables in the menu tree: Call Records, Phone Book, Networking setting, SIP setting, Phone setting, Mail Box, Function Keys, and reboot.
Received Calls
Call Record List
Dial Out
Detail
Add to Book
Delete
Dialed Calls
Call Record List
Dial Out
Detail
Add to Book
Delete
Missed Calls
Call Record List
Dial Out
Detail
Add to Book
Delete
Delete All
Delete all?
This phone set could support 10 entries for the received / dialed / missed calls.
The sorting will be based on the latest period. If there could be matched with the phone book, LCD will show the name; or show the number only.
27 |
LP388 User’s Manual |
|
|
|
M4 |
|
M1 |
|
|
Showing the received calls; pressing the |
and |
button to check out the other |
|||||
|
|||||||
received calls. |
|
|
|
|
|
|
|
|
|
|
|
|
|
|
|
>Received Calls |
→ OK |
→ |
>John |
|
|
|
|
>Dialed Calls |
>12345678 |
|
|
||||
|
|
|
|
||||
|
|
|
|
|
|
|
The LCD will show as following while there is no any record for the received calls:
No Records!!
Dial out |
|
|
|
|
|
|
|
|
|
|
|
>John |
|
|
|
>John |
→ |
V → |
→ |
→ |
|||
>12345678 |
|||||||
>12345678 |
|||||||
|
|
|
|
|
|
||
|
|
|
|
|
|
|
|
|
|
|
|
|
|
|
|
>Dial Out |
→ |
OK |
→ |
Line 1 Dialing.. |
|
|
|
>Detail |
John |
|
|
||||
|
|
|
|
|
|||
|
|
|
|
|
|
|
The Detail will show the date and time for the calls as following:
>John |
→ |
→ |
>Dial Out |
→ |
V → |
|
>12345678 |
>Detail |
|||||
|
|
|
|
|||
|
|
|
|
|
|
|
|
|
|
|
|
|
|
>Dial Out |
→ OK |
→ |
2006/05/10 |
|
|
|
>Detail |
10:10:10 |
|
|
|||
|
|
|
|
|||
|
|
|
|
|
|
28 |
LP388 User’s Manual |
This allow user add the unknown number into the phone book. After the new entry added,
show all the entries in the phone book to verify by users. If users press the |
OK |
button, |
|
the flow will be just like the actions in the phone book |
|
>John >12345678
>Dial Out >Detail
Entry name
>John >12345678
>Dial Out >Detail
>Add to Book >Delete
Delete ok…
→ |
OK |
→ |
>Dial Out |
→ |
V → |
|
|
|
>Detail |
|
|
|
|
|
|
|
|
|
|
|
|
|
|
→ |
V |
→ |
>Detail |
→ |
OK → |
|
|
|
>Add to Book |
|
|
|
|
|
|
|
|
→ |
OK |
→ |
>Dial Out |
→ |
V → |
|
|
|
>Detail |
|
|
|
|
|
|
|
|
|
|
|
|
|
|
→ |
V |
→ |
>Detail |
→ |
V → |
|
|
|
>Add to Book |
|
|
|
|
|
|
|
|
|
|
|
|
|
|
→ |
|
→ |
Delete it? |
→ |
→ |
|
|
||||
|
|
|
|
|
|
→>12345678
29 |
LP388 User’s Manual |