


Welltech WG5260 User Manual

Welltech Computer Co., Ltd.
WellGate 5260
Universal VoIP Gateway
User Guide
Version 6.2.0
dian;88
WellGate 5260 User Guide – V6.2.0 - 1 -

Welltech Computer Co., Ltd.
CONTENTS
WELLGATE 5260 INTRODUCTION....................................................................................4
SYSTEM DESCRIPTION .......................................................................................................4
TECHNICAL SPECIFICATION ................................................................................................. 5
AUDIO FEATURE.................................................................................................................5
WELLGATE 5260 V6.2 DETAIL SPEC...................................................................................6
WELLGATE 5260 APPEARANCE DESCRIPTION ...................................................................12
CHAPTER 2 LOGON WELLGATE 5260...........................................................................13
LOGON WELLGATE 5260..................................................................................................13
NETWORK CONFIGURATION .............................................................................................. 14
SYSTEM TIME CONFIGURATION .........................................................................................14
ACCOUNT MANAGER ........................................................................................................ 16
RELOGIN .........................................................................................................................17
CHAPTER 3 H.323 GATEKEEPER AND SIP PROXY MODE CONFIGURATION ...........18
ENVIRONMENT USED IN THIS CHAPTER............................................................................... 18
INTERFACE CONFIGURATION .............................................................................................18
T1/E1 TRUNK CONFIGURATION ......................................................................................... 20
H.323 CONFIGURATION....................................................................................................21
SIP CONFIGURATION........................................................................................................22
DIGIT MANIPULATION ........................................................................................................23
CHAPTER 4 CALL FLOW EDITOR .................................................................................. 27
CONFIG MANAGER ........................................................................................................... 37
APPLY CHANGE................................................................................................................38
CHAPTER 5 PEER TO PEER MODE CONFIGURATION.................................................39
ENVIRONMENT USED IN THIS CHAPTER............................................................................... 39
NETWORK CONFIGURATION .............................................................................................. 39
ACCOUNT MANAGER ........................................................................................................ 39
INTERFACE CONFIGURATION .............................................................................................39
H.323 CONFIGURATION....................................................................................................40
VOIP HUNTING................................................................................................................40
DIGIT MANIPULATION ........................................................................................................43
CALL FLOW EDITOR..........................................................................................................43
CONFIG MANAGER ........................................................................................................... 44
APPLY CHANGE................................................................................................................44
CHAPTER 6 SIP TO H.323 MODE CONFIGURATION ..................................................... 44
ENVIRONMENT USED IN THIS CHAPTER............................................................................... 44
NETWORK CONFIGURATION .............................................................................................. 45
ACCOUNT MANAGER ........................................................................................................ 45
INTERFACE CONFIGURATION .............................................................................................45
H.323 CONFIGURATION....................................................................................................45
SIP CONFIGURATION........................................................................................................45
VOIP HUNTING ................................................................................................................45
DIGIT MANIPULATION ........................................................................................................45
CALL FLOW EDITOR..........................................................................................................45
CONFIG MANAGER ........................................................................................................... 46
APPLY CHANGE................................................................................................................46
CHAPTER 7 ADVANCE CONFIGURATION REFERENCE...............................................46
CONFIGURATION .............................................................................................................. 46
System Configuration.................................................................................................46
Interface Configuration...............................................................................................49
WellGate 5260 User Guide – V6.2.0 - 2 -

Welltech Computer Co., Ltd.
Maintain Configuration ............................................................................................... 58
H.323 Configuration ...................................................................................................59
SIP Configuration.......................................................................................................61
Access Control........................................................................................................... 67
Number Replace........................................................................................................70
Data Base Number ....................................................................................................71
Routing Plan ..............................................................................................................71
AAA............................................................................................................................73
Apply Change ............................................................................................................74
CHAPTER 8 SYSTEM CONTROL ....................................................................................75
SYSTEM .......................................................................................................................... 75
SYSTEM TIME ..................................................................................................................75
NETWORK........................................................................................................................77
SNMP ............................................................................................................................77
PROMPT MANAGER..........................................................................................................78
CALL FLOW EDITOR..........................................................................................................84
ACCOUNT MANAGER ........................................................................................................ 84
UPGRADE ........................................................................................................................84
RELOGIN .........................................................................................................................84
CHAPTER 9 SYSTEM MONITOR ..................................................................................... 85
LINE SUMMARY STATUS ....................................................................................................85
LINE DETAIL.....................................................................................................................85
SYSTEM STATU S ..............................................................................................................86
EVENT LOG .....................................................................................................................86
DEBUG INFO .................................................................................................................... 88
PING ...............................................................................................................................88
CHAPTER 10 TELNET & RS-232 CONFIGURATION ......................................................90
LOGON WELLGATE 5260 BY TELNET.................................................................................90
CHAPTER 11 LCD DISPLAY CONFIGURATION..............................................................97
APPENDIX 1 CALL FLOW EXAMPLE ...........................................................................100
ONE STAG E DIALING (GATEKEEPER MODE) .....................................................................100
ONE STAG E DIALING (SIP PROXY MODE) ........................................................................ 102
ONE STAG E DIALING (PEER TO PEER MODE)...................................................................104
TWO STAGE DIALING (VOIP, PSTN MIXED CALL) .............................................................. 106
TWO STAGE DIALING WITH AAA (IP SIDE AAA)................................................................ 109
APPENDIX 2 JAVA PLUG-IN INSTALLATION ............................................................... 114
APPENDIX 3 RETRIEVE CDR INFORMATION .............................................................. 115
APPENDIX 4 INTERFACE LED DESCRIPTION............................................................. 117
APPENDIX 5 BUILD-IN VOICE PROMPT INDEX........................................................... 118
APPENDIX 6 TIME ZONE TO COUNTRY MAPPING LIST............................................. 119
APPENDIX 7 IP BANDWIDTH REQUIREMENT.............................................................121
APPENDIX 8 RELEASE COMPLETE CAUSE CODE ....................................................122
APPENDIX 9 RADIUS FORMAT ATTRIBUTES.............................................................. 125
APPENDIX 10 QUICK START CHECK LIST ..................................................................129
WELLGATE 5260 FAQ.................................................................................................... 133
WellGate 5260 User Guide – V6.2.0 - 3 -

Welltech Computer Co., Ltd.
WellGate 5260 Introduction
System Description
A Universal VOIP Gateway – more than PSTN to VOIP
Wellgate 5260 is a UNIVERSAL VOIP GATEWAY which navigates the
calls in between H.323, SIP and PSTN freely, not simple PSTN to VOIP calls
or voice verse. It can easily implement SIP and PSTN, H.323 and PSTN, SIP
and H.323, SIP and SIP, H.323 and H.323 calls simultaneously. With built-in
PSTN/VOIP IVR helps service provider to create their own voice service very
quick.
Wellgate 5260 provides an easy to use web-based managing interface.
Administrator can use the web based drag and drop call-flow editor to
design their VOIP service very quick and without losing any flexibilities. A webbased voice prompt management GUI is also provides to simplify the
deployment of IVR related service.
Key Features
Navigate Call Freely in SIP, H.323 and PSTN
Support SIP RFC 3261 and ITU-T H.323 V5 Simultaneously
Up to 4 Programmable E1/T1 Trunks
PSTN Signaling: ISDN/PRI, CAS, MFC R2, SS7
Support Audio Codec G.711, G.723.1, G.729A, GSM, ILBC (13K)*
SIP to PSTN Call and vice versa
H.323 to PSTN Call and vice versa
H.323 to SIP Call and vice versa
SIP to SIP Call
H.323 to H.323 Call
Support up-to 16 Multiple SIP Proxy Servers
Support SIP Proxy, Gatekeeper and P2P Calls Simultaneously
Built-in Phone Book
Support Early Media and SIP Delay Media
Support RADIUS Authentication, Authorization and Accounting
Intelligent PSTN Call Routing and in-Trunk Hunting
Support Flexible IP Routing and Account Code
Flexible Digit Manipulation Plan
Support Calling/Called Number Replacement
In-band and out of Band DTMF Transmission
T.38 Fax Relay up to 14400 bps
Dynamic Call Treatment Based on Drag and Drop Call Flow Editor
Built-in PSTN and VOIP IVR
Provides Call Detail Record
Full Web Management Interface
When enable iLBC codec, the VoIP to VoIP calls will not able to be used.
Also the G.723.1 and GSM codec will be disabled due the lacking of DSP
resource.
WellGate 5260 User Guide – V6.2.0 - 4 -

Welltech Computer Co., Ltd.
Technical Specification
Interface
- Two 10/100MB Ethernet Ports (Host & VoIP stream)
- Up to 4 T1/E1 (120 Ohm-RJ48C connectors)
75 Ohm needs external 3rd party BNC/RJ-48C adapter cables
Protocol and Standard
- ITUT H.323 v5
- SIP RFC 2543/3261 compliance
Audio Feature
- Codec -- G.711 A/μ-Law, G.723.1 (5.3K/6.3K), G.729A, GSM
- Support G.168 echo cancellation (128ms)
- Configurable audio payload size & adaptive jitter buffer
- Support silent suppression for G.729A, G.723, G.729
- VAD (Voice Activity Detection)
- CNG (Comfort Noise Generation)
DTMF Transmission
- Transparent
- H.245 signal/alphanumeric
- H.323 Q.931
- RFC 2833
- SIP INFO
FAX Support
- Automatic voice/fax detection
- T.38 fax relay based on H.323 Annex D
- SIP T.38 fax relay
- Up to G3 fax
- ECM support
- Redundant T.38 packet (0-2)
- CISCO compatible
Built-in IVR & call-flow controller
- Web-based GUI Drag and Drop interface
- Full control of call behavior (one-stage or two-stage dialing)
- IVR functions
- Support time duration play back (Chinese & English)
- Power call information branch
- Collected information validation
- Active disconnect & reconnect without hang up
- Selected disconnect cause code & behavior
Management Feature
- OS and program upgradeable
- Console port: RS-232 port
- TELNET
- Full Web management interface & real time monitor
- Front panel LCD
- SNMP v2 (H.341) and SNTP v4 support
- User account management
- Time zone and day light saving support
WellGate 5260 User Guide – V6.2.0 - 5 -

Welltech Computer Co., Ltd.
- Support fixed IP and DHCP
- Support DNS and dynamic DNS
LED indicators for system status
- Power/Storage access indicators
- Front panel LCD (2
lines
X 16) status display
Power
- 90~240V auto switch
Environmental
- Operation temp: 0° C to 60° C
- Relative humidity: 5% to 95%
Dimension
- 483mm(L) x 450 mm(W) x 44mm(H)
Certification
- CE
Wellgate 5260 V6.2 Detail Spec.
Feature Wellgate 5260 V 6.2
Physical Dimension
1 Width
2 Height
3 Depth
4 Industrial rack mount
5 Color
6 Weight
Power / Environmental
1 Power
2 Operating temperature
3 Relative humidity
Processors & Storage
1 DSP vendor
2 Operation System
3 RAM
4 Program/Data Storage
5 OS Upgradeable
7 Program Upgradeable
Front Panel Display
1 LED status
2 LCD status
LAN Interface
1 10/100 Base Ethernet
2 IP Address Required
PSTN Interface
Customizable E1/T1 CAS
1
E1 CAS DTMF
2
483mm
44mm
450mm
Yes
Black
8Kg
90-240V auto switch
0~60 C
5%~95%
Intel Pentium, Audio Codes DSP
XP Embedded
512 MB
256 MB DOM
Yes
Yes
Power/DOM/System
Yes
10/100MB Ethernet ports *2 (host &
RTP)
2
Yes
Loop Start FXO Hot-Line
WellGate 5260 User Guide – V6.2.0 - 6 -
Welltech Computer Co., Ltd.
Argentina, Bolivia, Brazil, Chile,
China, Czech-Republic, Egypt,
3 E1 CAS R2 MF
4 E1 ISDN PRI Support
5 E1/T1 Interface Selectable
PCM law Support
6
7 T1 CAS DTMF/R1MF
8 T1 ISDN PRI Support
Trunk Spans
9
Default Trunk Channel Mask
10
PSTN Line Hunting
11
PSTN Line Hunting Channel Selection
12
On the Fly Reset Channel/Trunk
13
Audio Codec Support
1 G.711 A-law/u-Law
2 ILBC (13K)
3 G.723.1
4 G.729A
5 GSM
5 Selectable Payload Size – G.711
6 Selectable Payload Size – G.723
7 Selectable Payload Size – G.729
Fax Transmission
1 T.38 Fax Relay
2 CISCO Compatible
3 ECM Support
4 FAX auto-detection
5 H.323 Annex D Support
6 SIP- T.38 Re-invite
7 T.38 During fast connect
8 T.38 Redundant Packet
9 Transparent mode
10 Up to G3 FAX
India, Indonesia, Israel, ITU, Korea,
Malaysia, Mexico, Philippines,
Thailand, Uruguay, Venezuela,
RomTelcom
Euro, Australia, Hong Kong, Korea,
New Zealand, QSIC
Alaw/Mulaw selectable
E&M Bell Core Feature Group D,
Wink Start, E&M Delay Start, E&M
Feature Group A Immediate Start,
E&M Feature Group B Wink Start,
E&M Feature Group D Wink
Start(ANI B4 ADDR), E&M Feature
Group D Wink Start, E&M
Immediate Start, E&M Wink Start,
Ground Start FXO, Ground Start
FXS, Loop Start FXO, Loop Start
FXS, Loop Start FXO Hot-Line
NI2 ISDN,5ESS 10 ISDN,DMS100
ISDN, NTT ISDN (INS-1500), Hong
Kong, QSIC
1,2,4 (T1/E1s) per chassis
Yes
Yes
Yes
Yes
Yes
Yes
Yes (5.3/6.3K)
Yes
Yes
20, 40, 60 ms
30, 60, 90 ms
20, 40, 60 ms
Yes
Yes
Yes
Yes
Yes
Yes
Yes
0-2
Yes
Yes (up to 14400 bps)
WellGate 5260 User Guide – V6.2.0 - 7 -
Welltech Computer Co., Ltd.
DTMF Transmission
1 RFC 2833
2 H.245 Alphanumeric mode
3 H.245 Signal mode
4 Q.931 UUI Yes
5 SIP INFO Yes
6 Transparent mode Yes
Voice Quality & Echo Cancellation
1 Adaptive Jitter Buffer
2 CNG
3 G.168 (Echo Cancellation)
4
Gain Control Yes
5 Improved Echo Tail Suppression
6 Silence Suppression
VAD
7
Maintenance
1 Administrative Log
2 Auto Daylight Saving
3 Customizable Time Zone
4 Front Panel LCD Setup
5 FTP Server
6 HTTP server
7 HTTP SSL support
8 Multiple configuration
9 NTP time synchronization
10 Password Security
11 RS232
12 System Event Log
13 Telnet
14 Time Zone Support
15 User Account Manager
16 Web-based GUI
17 Web-based Real Time Monitor
18 Web-based Voice File Management
Network Management
1 Fixed IP
2 DNS
3 Dynamic DNS
4 Ping
5 TOS field setting
6 SNMP V2 MIB I & II
7 SNMP get command
8 SNMP set command
9 SNMP Trap
10 SysLog Support
H.323 Protocol Support
1 H.323 V5
Yes
Yes
Yes
Yes
Yes
Yes (32ms)
Yes
Yes
Yes
Yes
Yes
Yes
Yes
Yes
Yes
Yes
Yes
Yes
Yes
Yes
Yes
Yes
Yes
Yes
Yes
Yes
Yes
Yes
Yes
Yes
Yes
Yes (RTP only)
Yes
Yes
Yes
Yes
Yes
Yes
WellGate 5260 User Guide – V6.2.0 - 8 -

Welltech Computer Co., Ltd.
2 H.323 ID
3 E.164 ID
4 Fast Connect
5 H.245 Tunneling
6 Early H.245
7 Cause Code Mapping
SIP Protocol Support
1 Cause Code Mapping
2 HTTP Digest Authentication
3 SIP Call on Hold
4 SIP Early Media/Delay Media
5 SIP Overload Redirect
6 SIP Transfer (unattended)
7 SIP Transfer (attend)
8 SIP/TCP
9 SIP/UDP
10 SIP-180/SDP
11 SIP-183/SDP
12 SIP-PRACK
13 SIP-RFC 3261
14 SIP-RFC 3264 (Offer/Answer)
H.323 Gatekeeper Support
1 Gatekeeper Register
2 Direct call
3 Routed call
4 Light weight RRQ
5 Gatekeeper Call only
SIP Proxy Sever Support
1 SIP Outbound Proxy Support
2 SIP Redirect Server Support
3 SIP Register Server Support
4 Redundant SIP Proxy Server
5 Auto Fail Over
Dial Plan
1 P2P H.323/SIP Call
2 GK Call
3 SIP Call
4 PSTN Call
5 Mixed SIP, P2P, GK call
6 Build-in Phone Book
7 P2P Prefix Routing
8 Digits Manipulation
9 ISDN Dial Plan by Prefix
10 Overlap Sending Dial Plan
Call Type Support
Yes
Yes
Yes (selectable for
incoming/outgoing)
Yes
Yes
Yes
Yes
Yes
Yes
Yes
Yes
Yes
Yes
Yes
Yes
Yes
Yes
Yes
Yes
Yes
Yes
Yes
Yes
Yes
Yes
Yes
Yes
Yes
Yes
Yes
Yes
Yes
Yes
Yes
Yes
Yes
Yes
Yes
Yes (Source & Destination)
Yes
WellGate 5260 User Guide – V6.2.0 - 9 -
Welltech Computer Co., Ltd.
1 Call Decision
2 H.323 to H.323 Call
3 H.323 to H.323 Fax Relay
4 H.323 to PSTN Call
5 H.323 to SIP Call
6 H.323 to SIP FAX Relay
7 H.323 to SIP FAX Relay
8 PSTN to H.323 Call
9 PSTN to PSTN Call
10 PSTN to SIP Call
11 SIP to H.323 Call
12 SIP to PSTN Call
13 SIP to SIP Call
14 SIP to SIP Fax Relay
15 VoIP to VoIP RTP unRouted
16 VoIP to VoIP RTP Routed
Enhance Service
1 ANI Access List
2 DNIS Access List
3 DID/DOD
4 PSTN Two Stage Dialing
5 VoIP Two Stage Dialing
6 Intelligent PSTN Call Routing
7 In-trunk hunting method
8 Ring Back Tone Generation
9 Call Progress Tone Support
10 Web-based Call Flow GUI
11 Play Credit Time Duration
12 Play Credit Balance
13 Almost-time-expired notify tone
14 IVR for PSTN
15 IVR for SIP
16 IVR for H.323
17 IP Access List
18 ANI Replacement
19 DNSI Replacement
AAA
Dynamic Decided by Call Flow
Yes
Yes
Yes
Yes
Yes
Yes
Yes
Yes
Yes
Yes
Yes
Yes
Yes
Yes
Yes
Yes
Yes
Yes
Yes
Yes
Yes (Random, Round Robin,
Priority)
cyclic, random, rotary, reverse
cyclic, reverse rotary
Yes (per trunk enable/disable)
Yes
Drag and Drop interface, Full
control of call behavior (one-stage
or two-stage dialing), IVR functions,
Support time duration play back
(Chinese & English), Power call
information branch, Collected
information validation, Active
disconnect & reconnect without
hang up, Selected disconnect
cause code & behavior
Yes (Chinese & English)
Yes (Chinese & English)
Yes
Yes
Yes
Yes
Yes
Yes
Yes
WellGate 5260 User Guide – V6.2.0 - 10 -
Welltech Computer Co., Ltd.
1 Call detail record (CDR)
2 RADIUS Authentication
3 RADIUS Authorization
4 RADIUS Accounting
5 Redundant RADIUS Server Support
6 PSTN Prepaid Support
7 VoIP Prepaid Support
Embedded AAA
1 Embedded Prepaid Service
2 Embedded Postpaid Service
3 Point/second Calculation
4 Second/point calculation
5 Auto Disable/Clean User
6 PSTN Prepaid Support
7 VoIP Prepaid Support
System Limitation
1 Max DM
2 Max IP ACL
3 Max DNIS ACL
4 Max ANI ACL
5 Max Phone Book Entries
6 Max Call Flow Component
7 Max CDR Keep Days
8 Max Voice File Storage
Manual
1 English User Guide
Yes
Yes
Yes
Yes
Yes, Active/Standby/Auto Failover
Yes
Yes
Yes
Yes
Yes
Yes
Yes
Yes
Yes
4096
2048
4096
4096
10000
256
5
10 hours
Yes
WellGate 5260 User Guide – V6.2.0 - 11 -
Welltech Computer Co., Ltd.
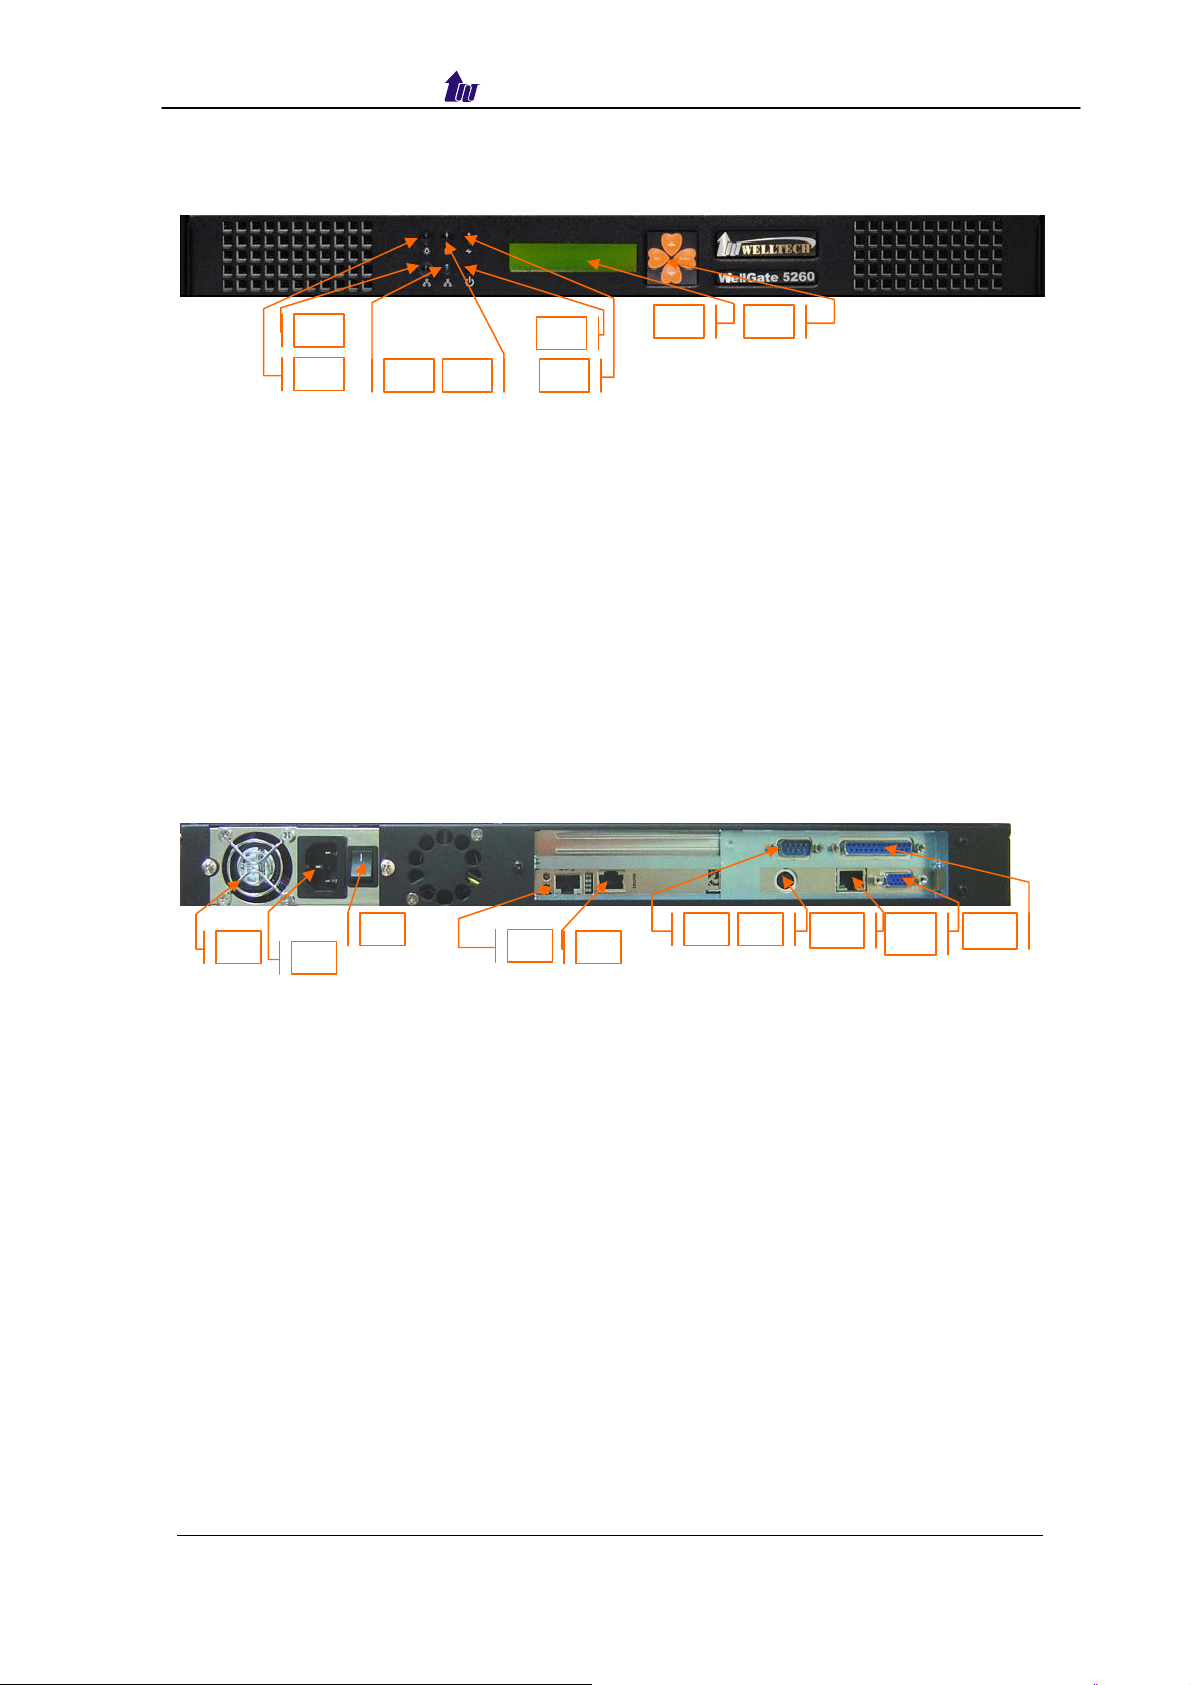
WellGate 5260 Appearance Description
WellGate 5260 Front Panel:
2
1
3
4
5
6
Functions:
1: Power LED
2: Network1 Interface LED
3: Network2 Interface LED (not used)
4: H/D LCD
5: Power Switch
6: System Status LED
7: LCD Panel
8: LCD Touch Panel
WellGate 5260 Rear Panel:
7
8
1
2
3
Functions:
1: Electric Fan
2: AC Power outlet
3: AC Power switch
4: Trunk E1/T1 port
5: VoIP Enternet port
6: Keyboard/Mouse
7: Com1 port
8: Ethernet port
9: VGA
10: print port (not available)
5
4
7 6
9 108
WellGate 5260 User Guide – V6.2.0 - 12 -
Welltech Computer Co., Ltd.
Chapter 2 Logon WellGate 5260
After connected E1/T1 & Ethernet cables into the WellGate 5260, turned
on the power. The first step is to logon the system and set up the IP address.
Before you can use the Browser to configure WellGate 5260, you need to
have Java Standard Runtime (1_4_1_02) to make it work. Please refer to
Appendix 2 Java plug-in Install for detail.
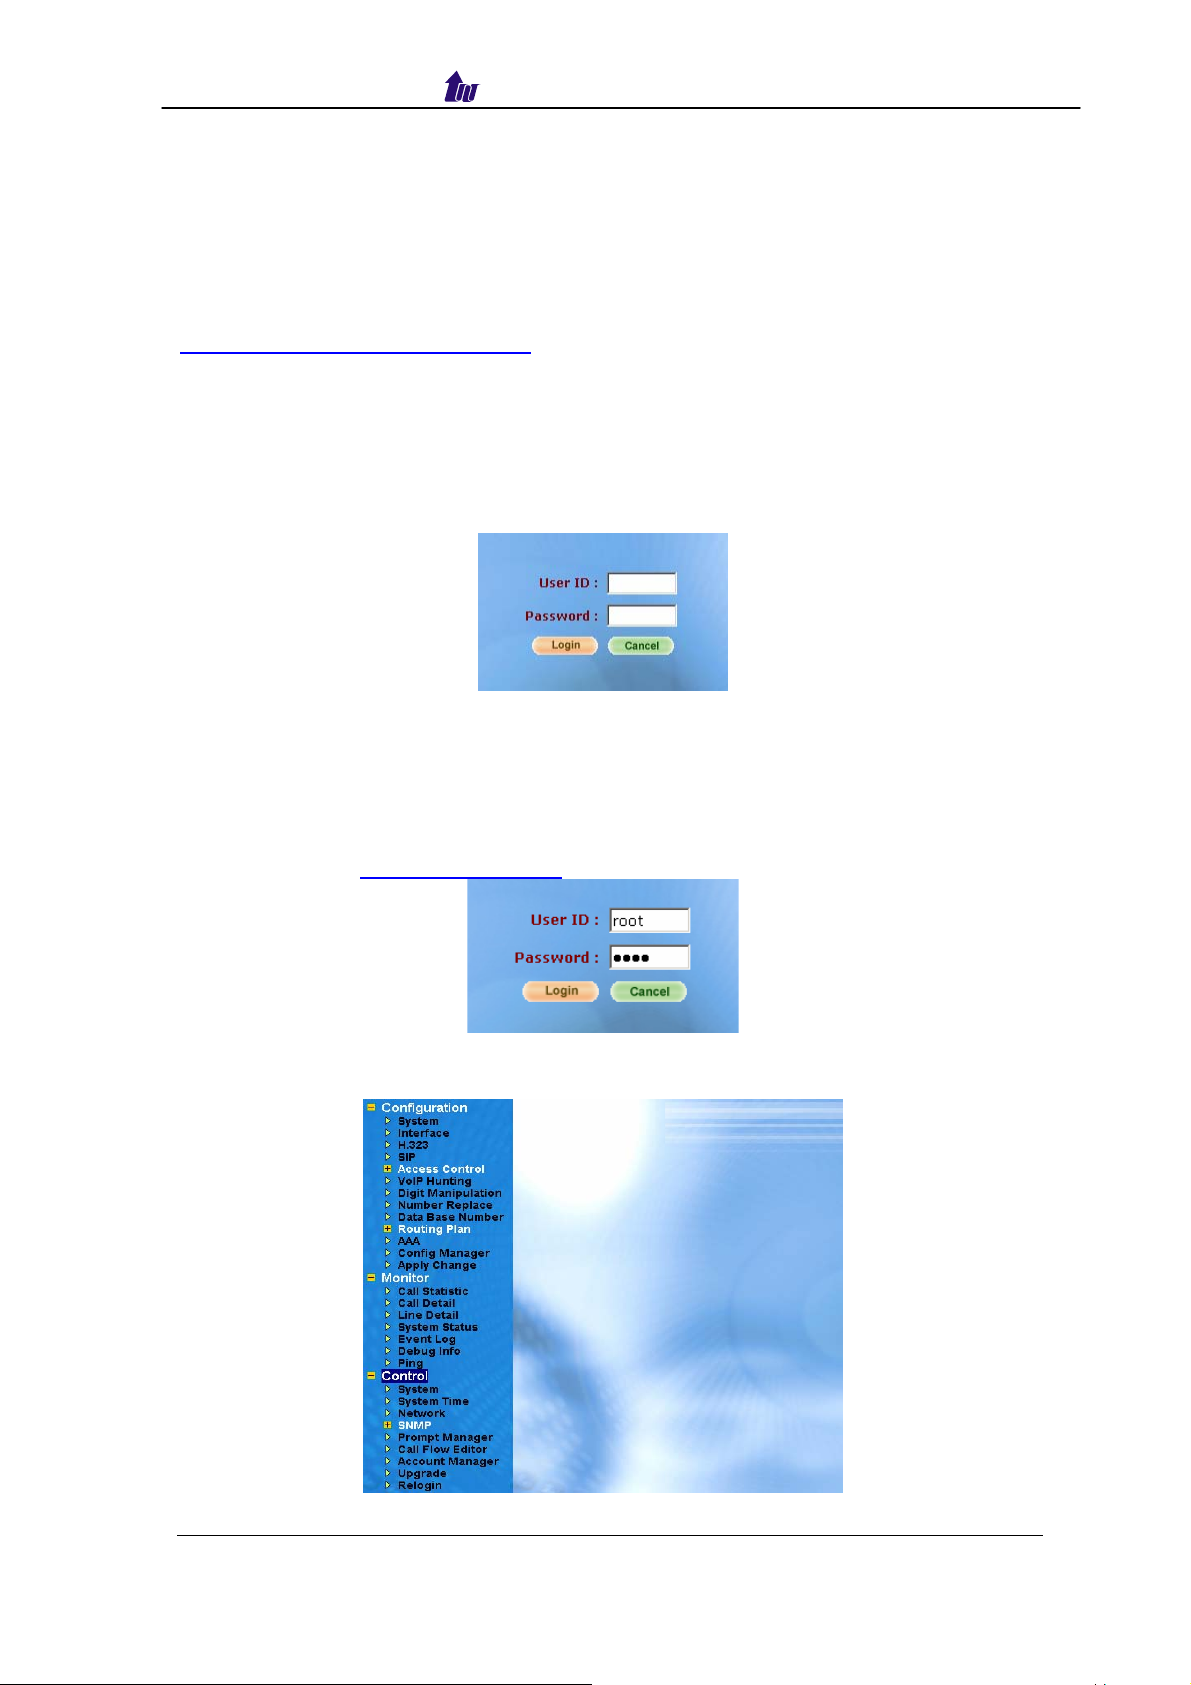
Logon WellGate 5260
Setp1: Start IE6.0 (or later version) to navigate WellGate 5260 Management
System by typing the default IP addresses (the default URL is
http://192.168.111.111:10087). The screen will display User ID and
Password as figure 2.1-1.
Figure 2.1-1
☻Note: The default network IP address is 192.168.111.111 and subnet
mask is 255.255.255.0
Step 2: Enter log user name and password (the default user id is root and user
password is root). You can manage your user account via web (refer to
Section “Account Manager”) later.
Figure 2.1-2
Step 3: The screen shows the Home Page of WellGate 5260 as figure 2.1-3.
Figure 2.1-3
WellGate 5260 User Guide – V6.2.0 - 13 -
Welltech Computer Co., Ltd.
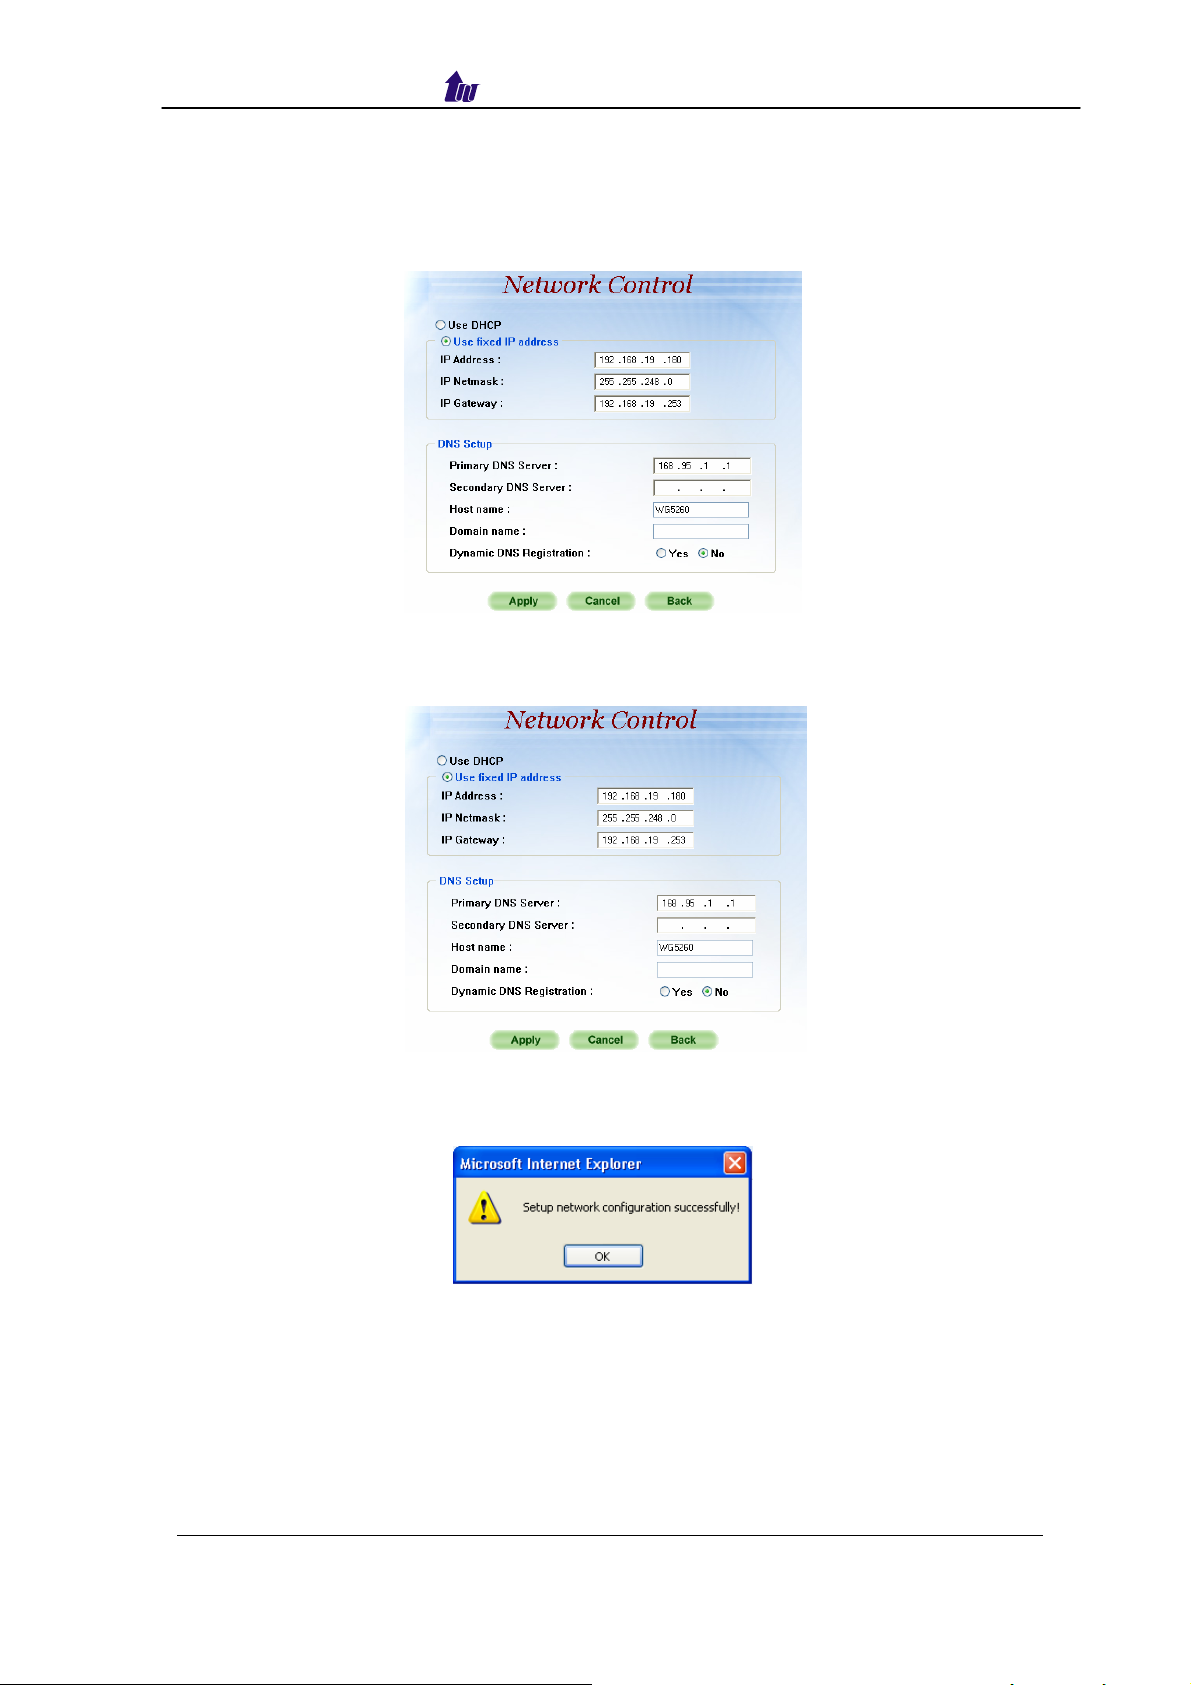
Network Configuration
Step 1: After successfully logon to the system, we need to change the network
configuration. Click Control > Network to setup the network parameters
as figure 2.2-1.
Figure 2.2-1
Step 2: Enter the deserved IP address, Submask and default gateway. Apply
the change by clicking apply button as figure 2.2-2.
Figure 2.2-2
Step 3: When screen shows “Setup network configuration successfully!” It
means the IP Network setting is successfully changed as figure 2.2-3.
Figure 2.2-3
☻Note: “Network Control” takes around 5-second to apply the new
network configuration. Please logon again with new IP address
after 5 seconds.
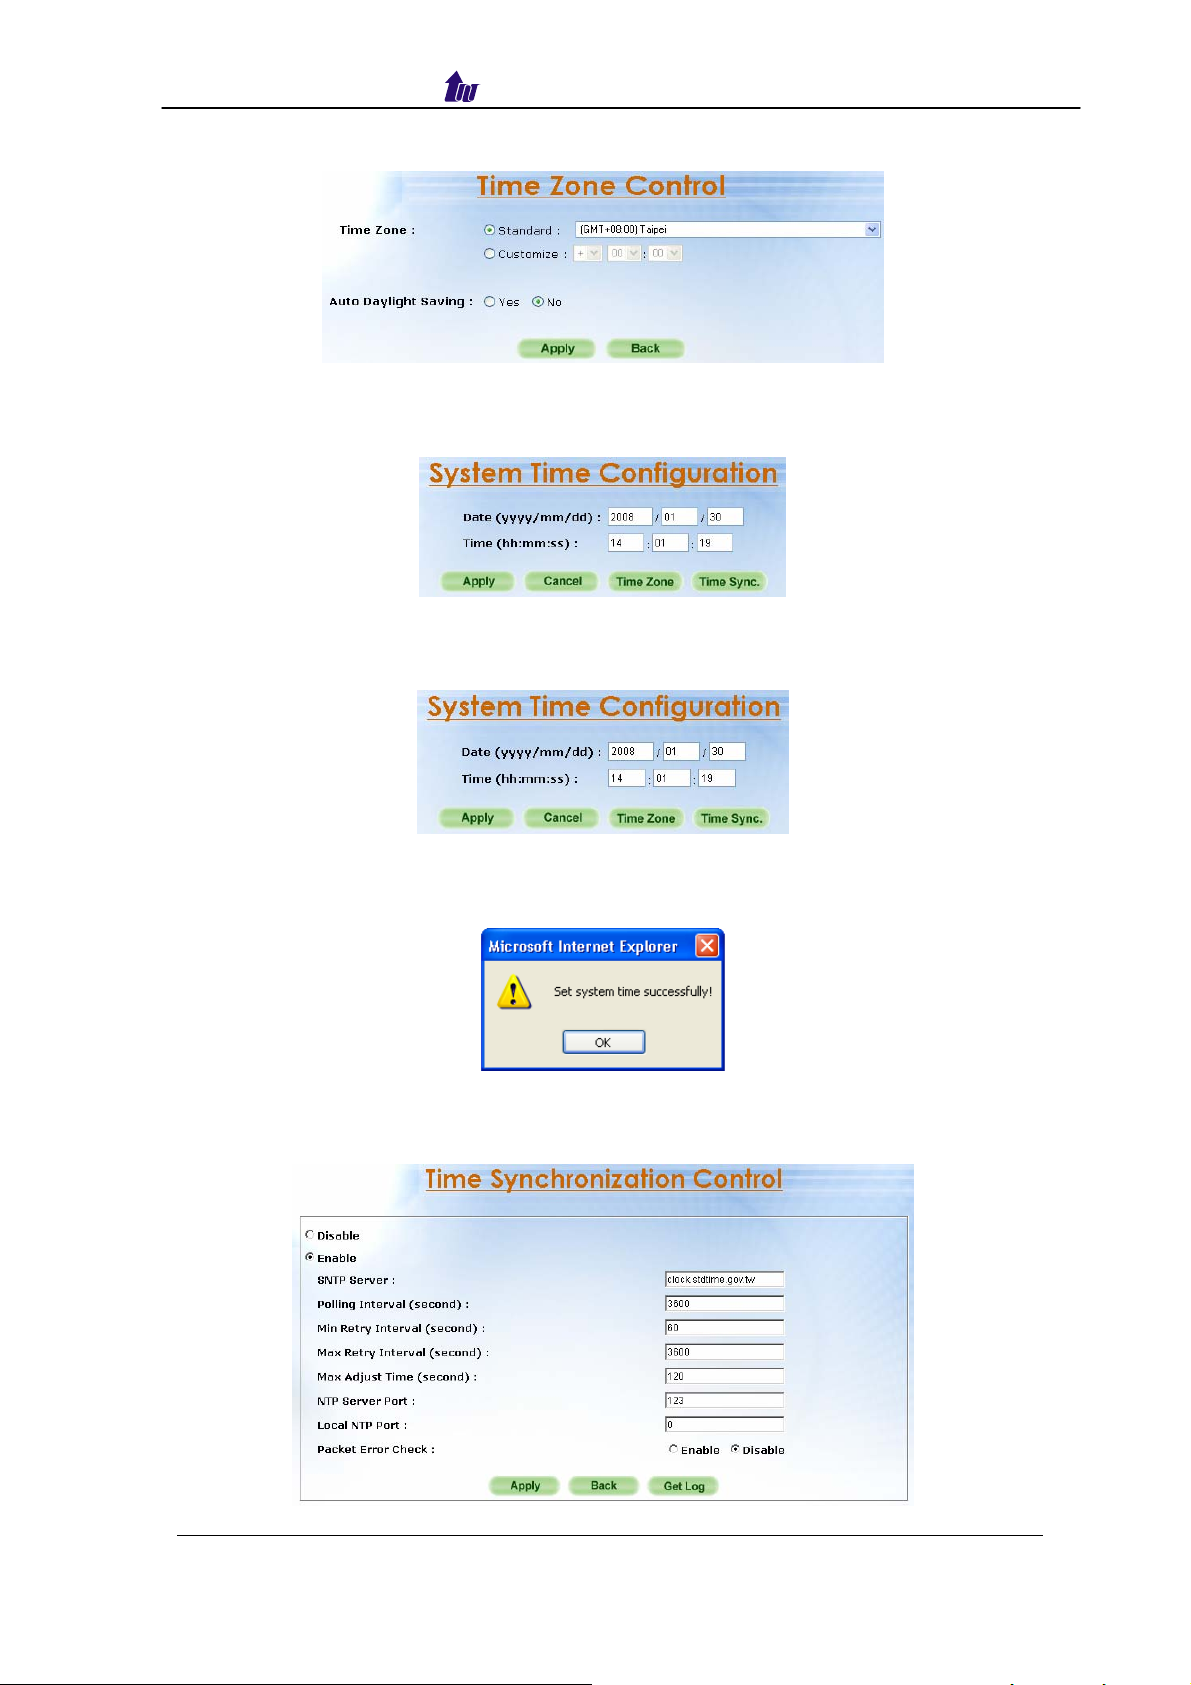
System Time Configuration
Step 1: When re-logon to the new IP address, the next is to setup the system
time zone. Click Control > System Time to setup the system time zone
WellGate 5260 User Guide – V6.2.0 - 14 -
Welltech Computer Co., Ltd.
as figure 2.3-1.
Figure 2.3-1
Step 2: After apply the new time zone, click Back to adjust the date and time
as figure 2.3-2.
Figure 2.3-2
Step 3: Enter current date and time. Apply the change by clicking Apply button
as figure 2.3-3.
Figure 2.3-3
Step 4: The screen will shows “Setup system time successfully!” It means
the System Time setting is successfully changed as figure 2.3-4.
Figure 2.3-4
Step 5: If you would like to use SNTP to sync time with a SNTP V4 Server, click
Time Sync button to setup it as figure 2.3-5.
Figure 2.3-5
WellGate 5260 User Guide – V6.2.0 - 15 -
Welltech Computer Co., Ltd.
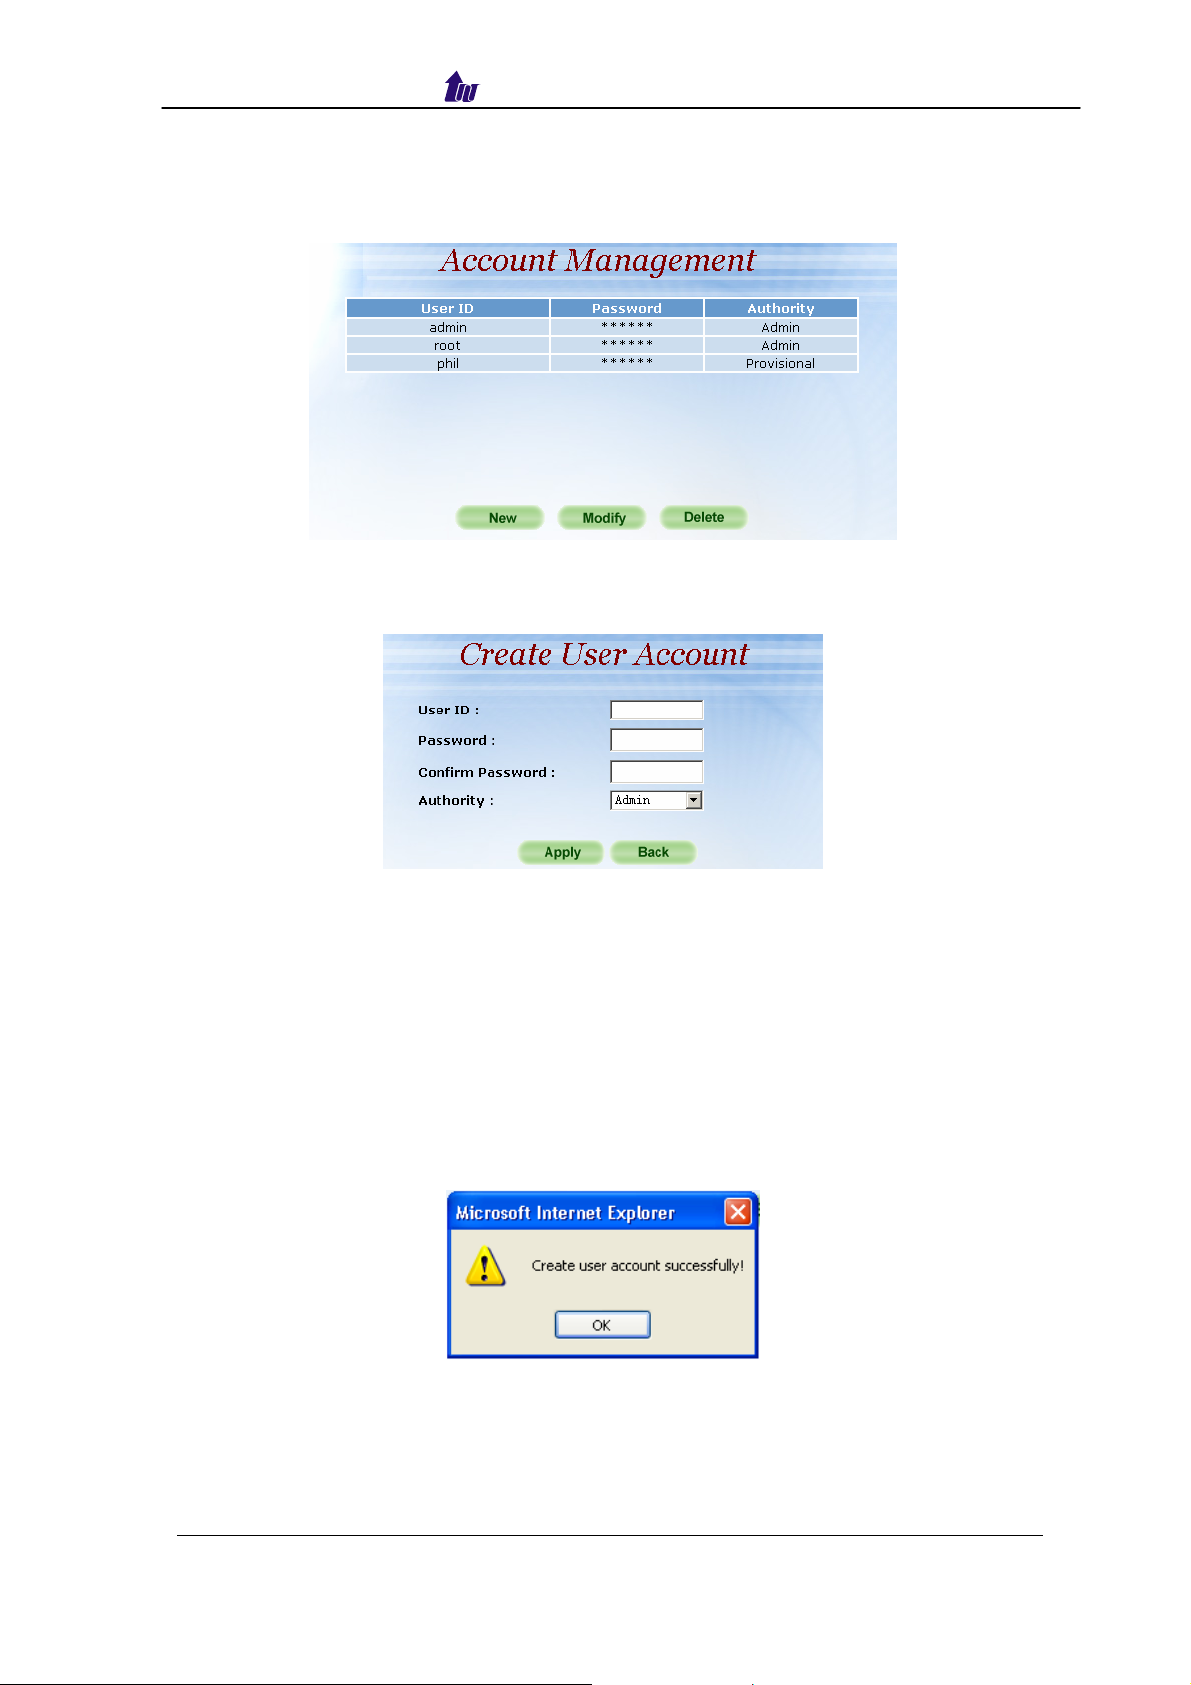
Account Manager
Step 1: You can manage your user account by click Control >Account
Manager. Add a new user account, Click New button as figure 2.4-1.
Figure 2.4-1
Step 2: Enter the new user ID, password as you need. Apply the change as
figure 2.4-2.
Figure 2.4-2
Field Description:
• User ID: Login User ID
• Password: Login Password
• Confirm Password: Confirm new password again
• Authority: The authority of the web management
- Admin: super user
- Provisional: A limited administrator for provisional purpose, it only allows
to setup those parameters regarding to IP ACL and VoIP hunting.
Step 3: When screen shows “Create user account successfully!” It means
user account setting is successfully created as figure 2.4-3.
Figure 2.4-3
☻Note: The system provides 2 USER ID by default:
User 1: “root” Password: “root”
User 2: “admin” Password: “admin”
WellGate 5260 User Guide – V6.2.0 - 16 -
Welltech Computer Co., Ltd.
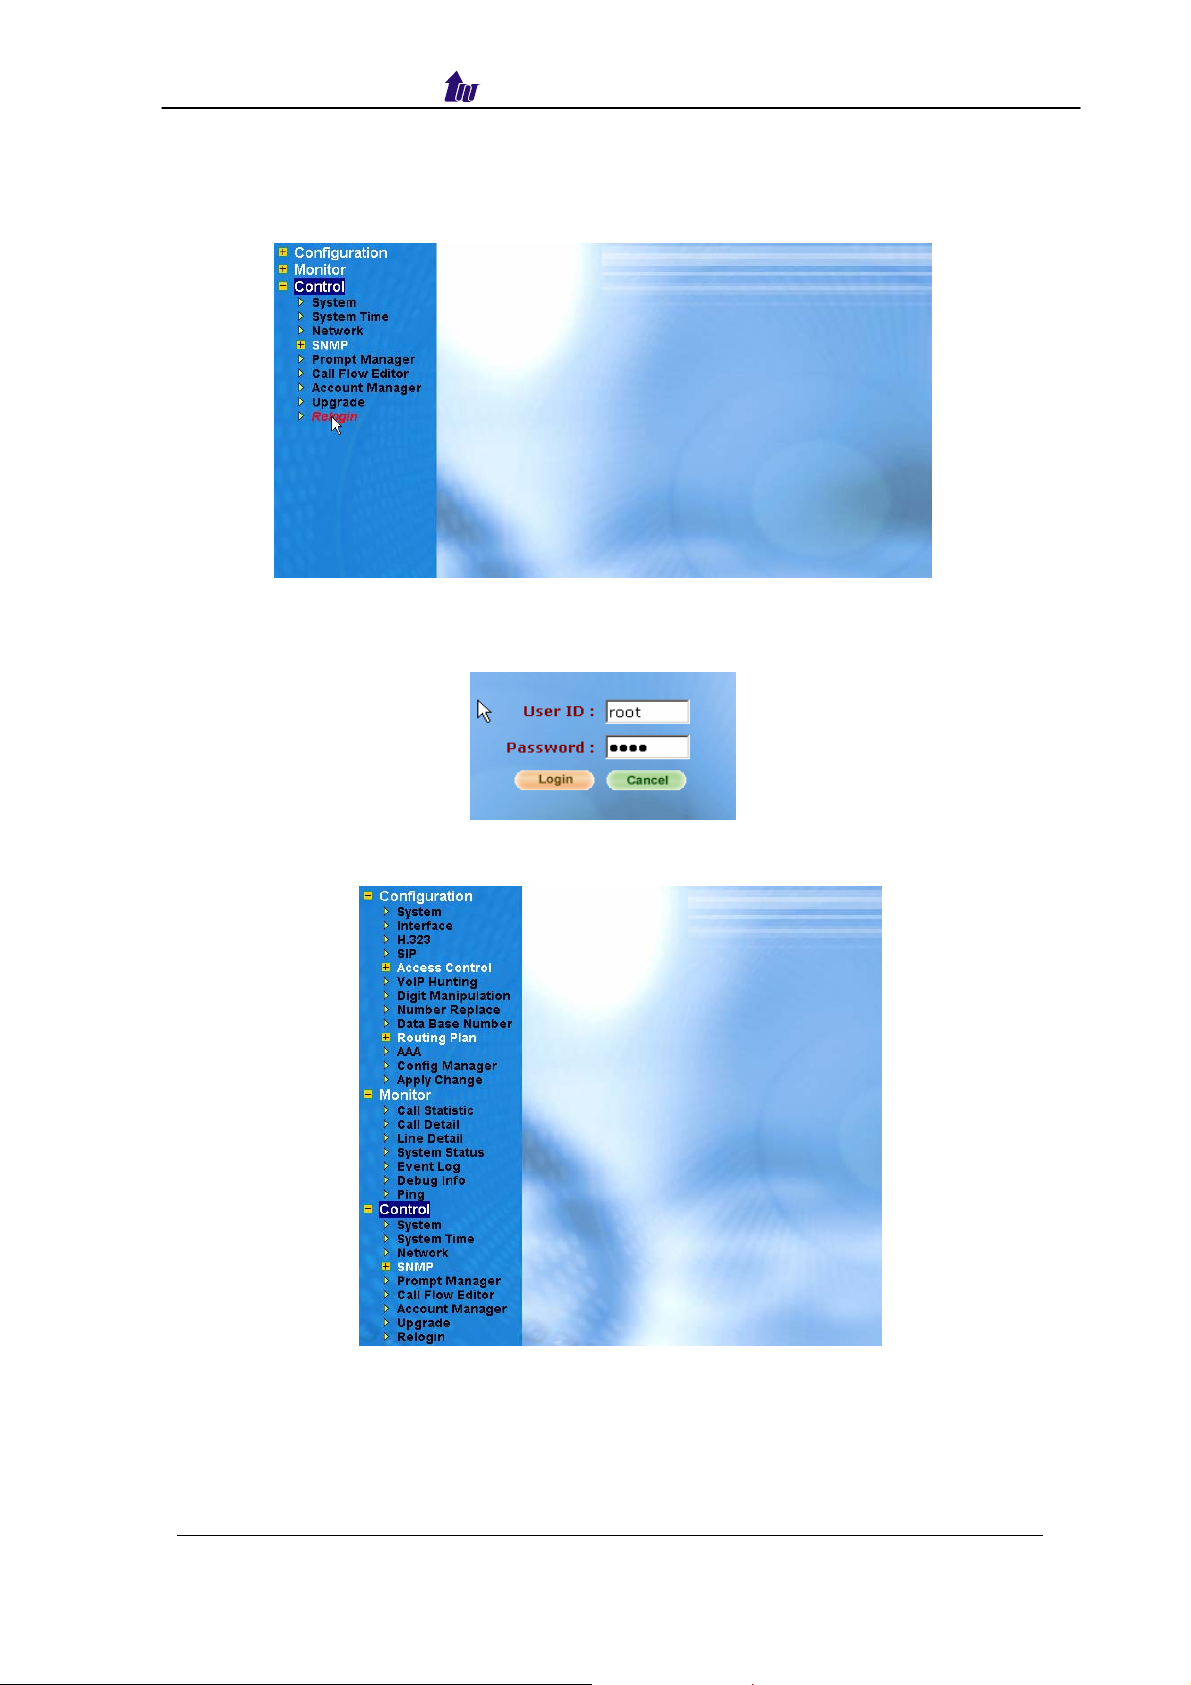
Relogin
Step 1: Click Control >Relogin to re-logon by another user account as figure
2.5-1.
Figure 2.5-1
Step 2: Enter new User ID and Password to relogon the WellGate 5260 as
figure 2.5-2.
Figure 2.5-2
Step 3: The screen shows the Home Page of WellGate 5260 as figure 2.5-3.
Figure 2.5-3
WellGate 5260 User Guide – V6.2.0 - 17 -
Welltech Computer Co., Ltd.
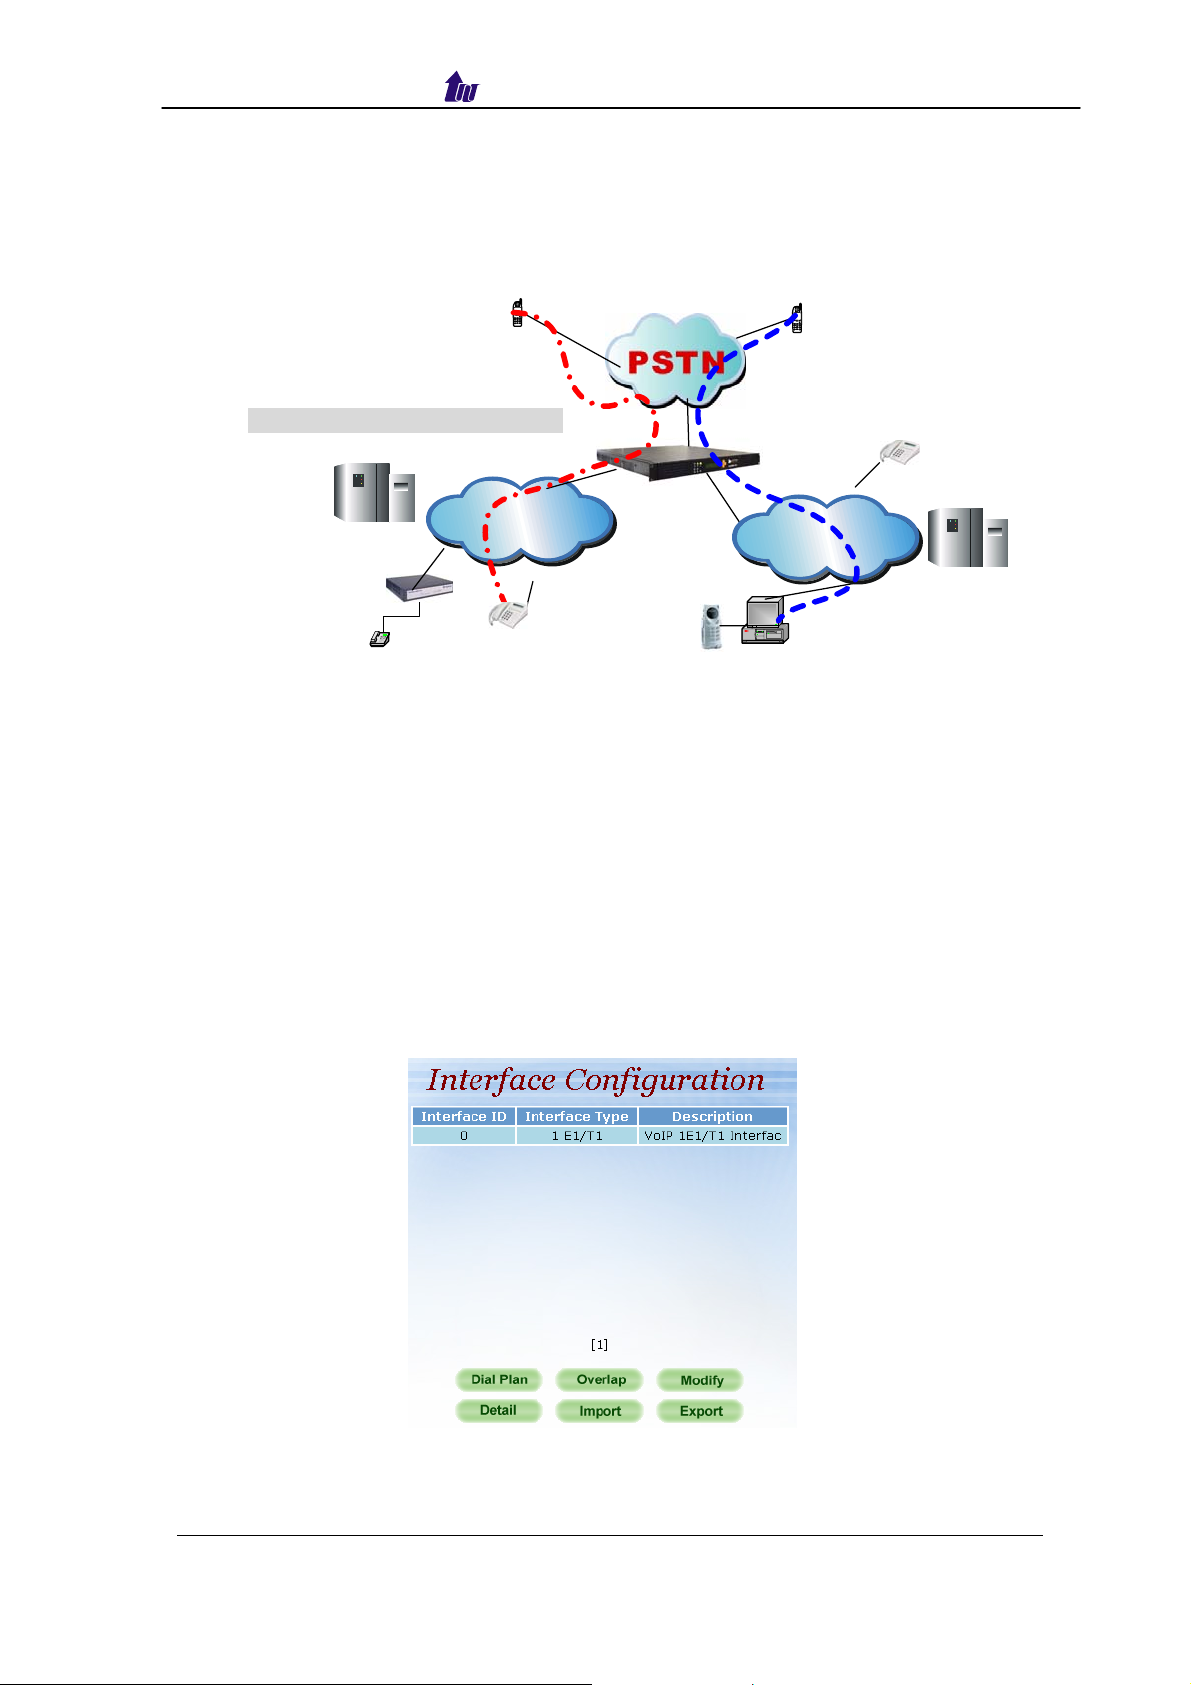
Chapter 3 H.323 Gatekeeper and SIP Proxy Mode
Configuration
Environment used in this chapter
Process:
H.323 GK and SIP Proxy Mode
Gatekeeper
H.323
Gateway
Phone 1001
H323 VoIP
Network
H323 Phone
SIP Phone
SIP VoIP
Network
SIP USB Phone
Proxy Server
PSTN → H.323 Call: DNIS (1001) → Make H.323 - Gatekeeper Call (1001)
→ SIP Call: DNIS (8888) → Make SIP – SIP Proxy Call (8888)
H.323 → DNIS (5932111222) → DM (H.323_in_drop) → Make Call
(0932111222)
SIP → DNIS (11382265699) → DM (SIP _in _drop) → Make Call
(82265699)
Interface Configuration
This section is going to setup the VoIP interface.
Step 1: Now we are going to setup the VoIP interface, click Configuration >
Interface to setup VoIP T1/E1 interface as figure 3.1-1.
Figure 3.1-1
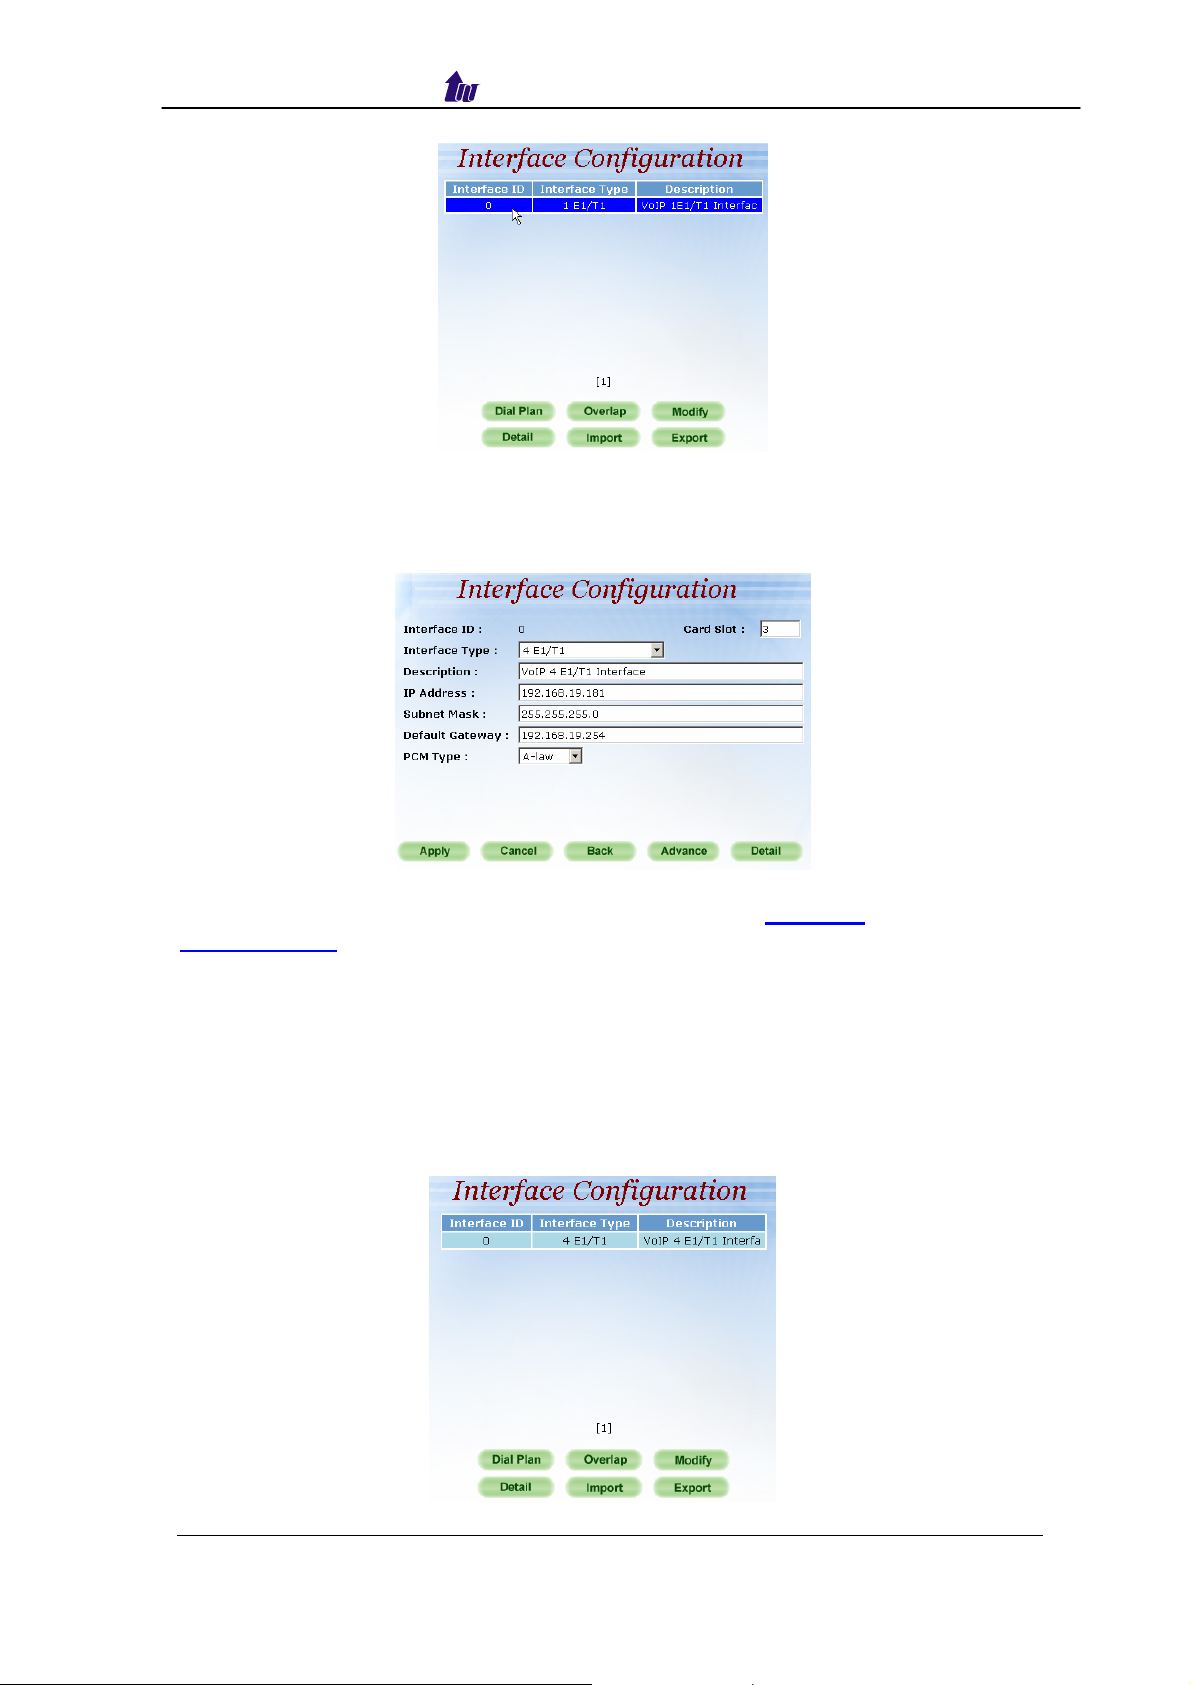
Step 2: Double-click the installed interface (i.e Interface ID: 0) to config it as
figure 3.1-2.
WellGate 5260 User Guide – V6.2.0 - 18 -
Welltech Computer Co., Ltd.
Figure 3.1-2
Step 3: Modify the VoIP Interface parameters (i.e. IP Address, Protocol Tag,
Subnet Mask and Default gateway) and apply the change by clicking
Apply as figure 3.1-3.
Figure 3.1-3
Frequency changed parameters: (Refer to section “Interface
Configuration” for more detail)
• IP Address: 192.168.19.181
• Subnet Mask: 255.255.255.0
• Default Gateway: 192.168.19.254
• PCM Type: A-law or U-law
☻Caution: Subnet Mask does not support Super net.
Step 4: After successfully change the Interface configuration, the screen come
back the page of Interface Configuration as figure 3.1-4.
Figure 3.1-4
WellGate 5260 User Guide – V6.2.0 - 19 -

Welltech Computer Co., Ltd.
T1/E1 Trunk Configuration
This section is going to setup the PSTN trunk parameters.
Step 1: Select the installed interface to modify the trunk parameter by click
Detail button as figure 3.2-1.
Figure 3.2-1
Step 2: Select the trunk to be modified and click Modify button as figure 3.2-2.
Figure 3.2-2
Step 3: Modify the trunk parameters (i.e. Trunk Type, Termin Side, Trunk Mode,
Protocol Tag, and Line Code) and apply the change by clicking Apply as
figure 3.2-3.
Figure 3.2-3
WellGate 5260 User Guide – V6.2.0 - 20 -
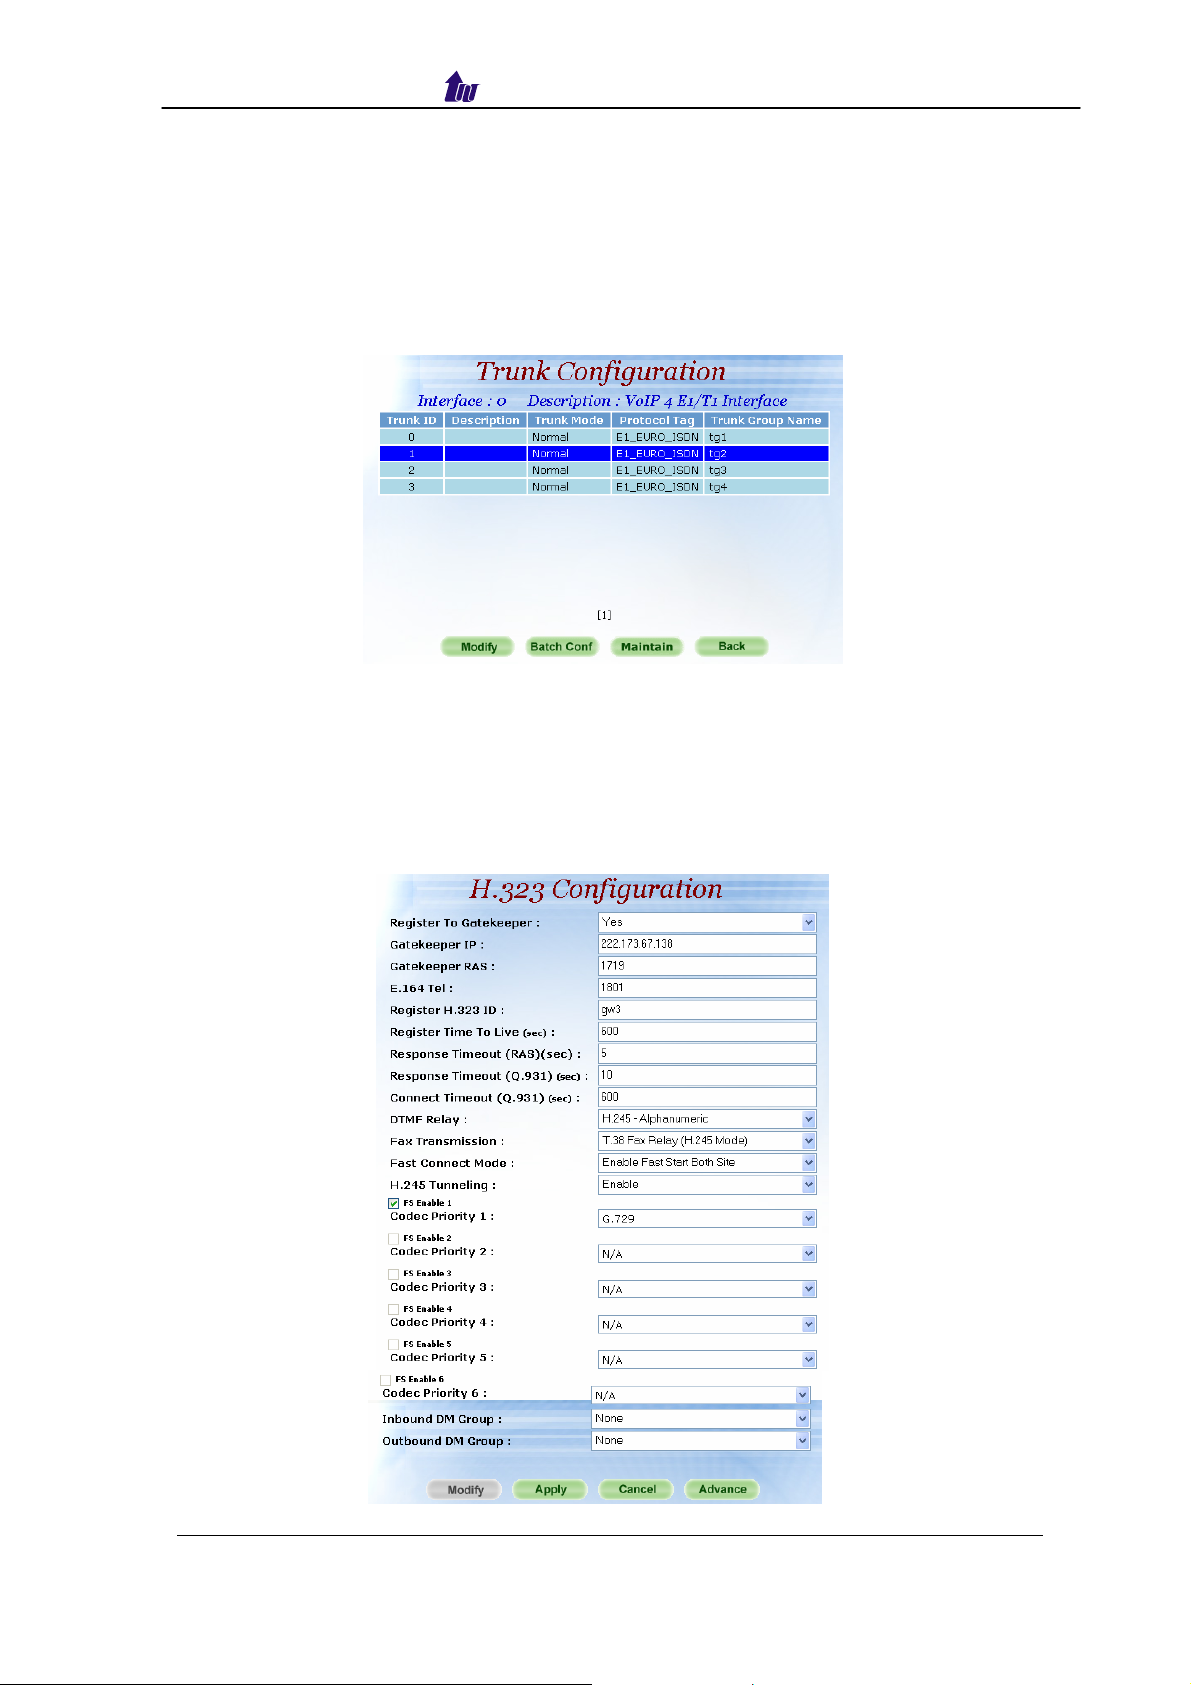
Welltech Computer Co., Ltd.
Frequency Changed Parameters:
• Trunk Type: E1 or T1
• Termin Side: User Side or Network Side
• Protocol Tag: ISDN protocol used
• Line Code: T1 or E1 line code used
Step 4: After succeeded to change the Trunk Configuration, the screen comes
back the page of Trunk Configuration as figure 3.2-4.
Figure 3.2-4
H.323 Configuration
This section is going to setup the H.323 parameter. If you only need SIP
calls, you can skip it.
Step 1: Click Configuration > H.323 to setup the H.323 parameters for
Gatekeeper related information as figure 3.3-1.
Figure 3.3-1
WellGate 5260 User Guide – V6.2.0 - 21 -
Welltech Computer Co., Ltd.
Frequency used parameters:
• Register to Gatekeeper: Yes
• Gatekeeper IP: 222.173.67.138
• E.164 Tel: 1801
• Register H.323 ID: gw3
Step 3: You can see the screen display the new configuration of the H.323
Configuration as figure 3.3-2.
Figure 3.3-2
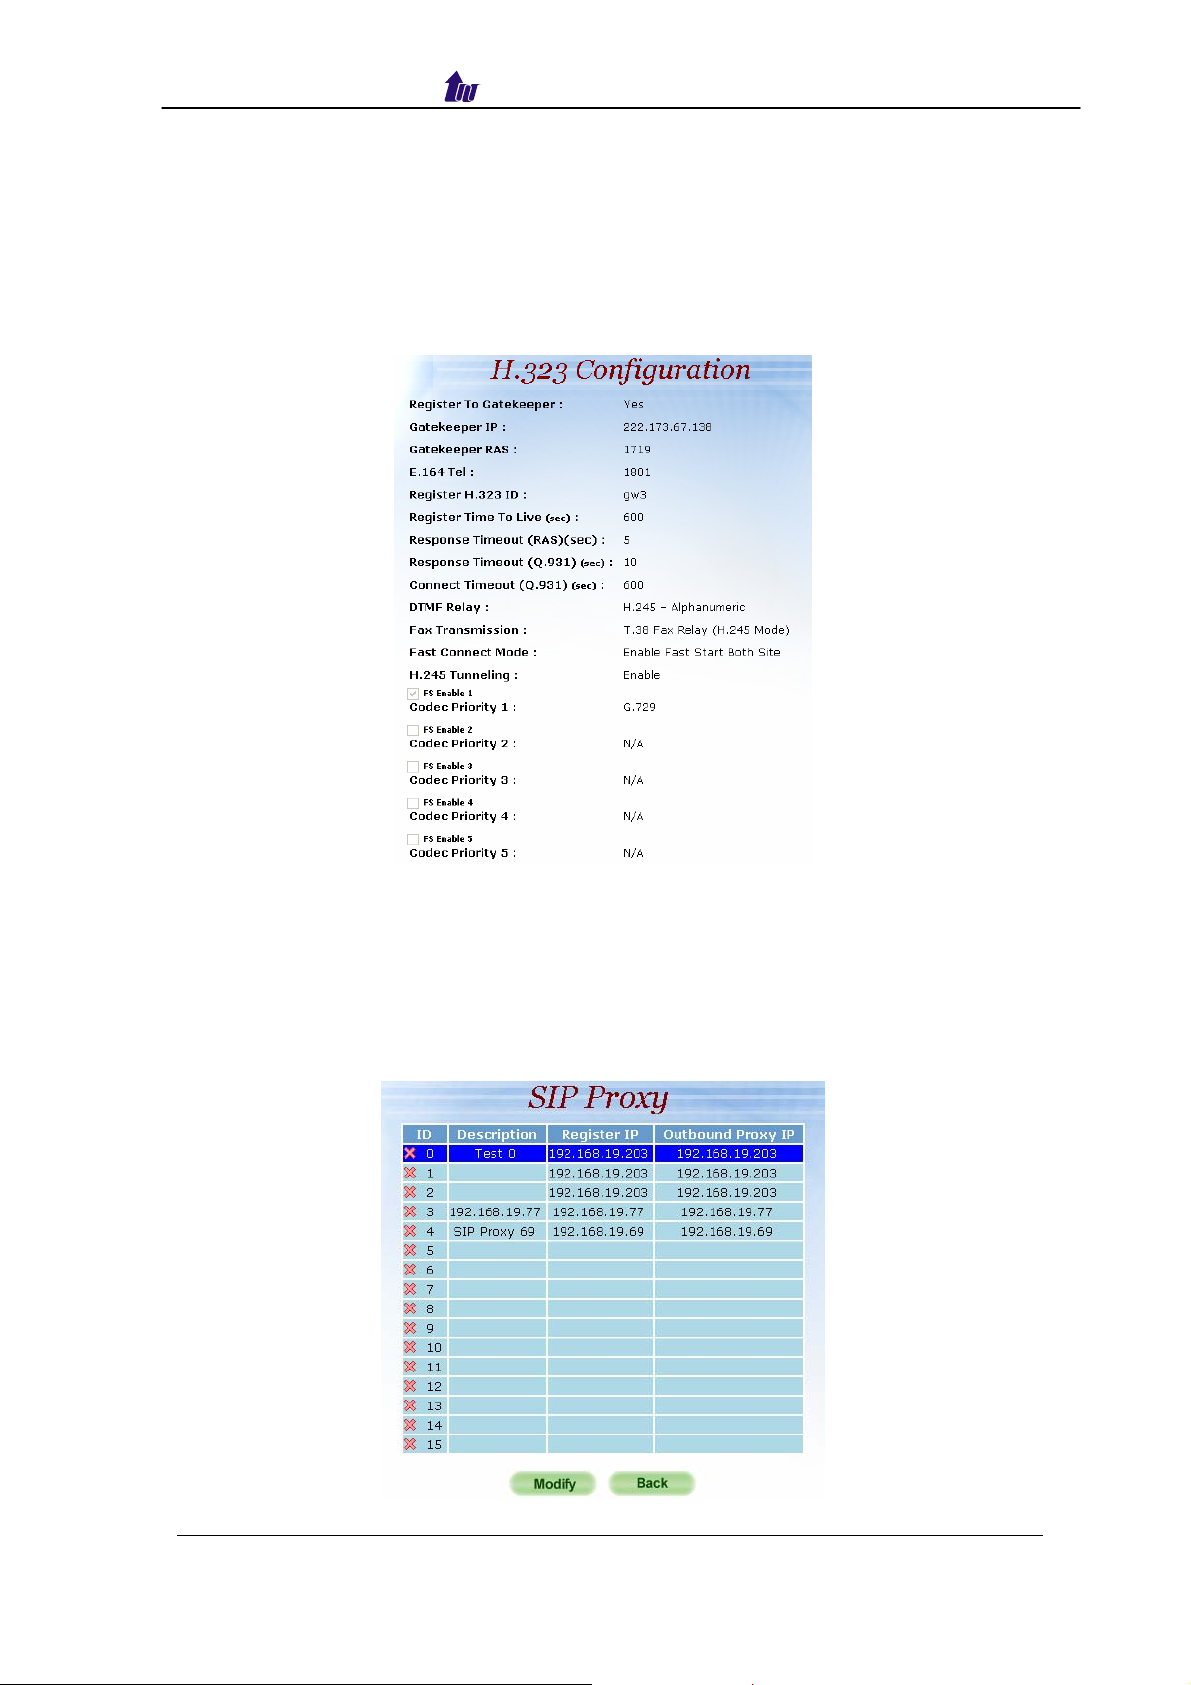
SIP Configuration
This section is going setup the SIP parameter. If you only need H.323 calls,
you can skip it.
Step 1: Click Configuration > SIP > Proxy to setup the SIP parameters for
SIP Proxy Server related information as figure3.4-1.
Figure 3.4-1
WellGate 5260 User Guide – V6.2.0 - 22 -
Welltech Computer Co., Ltd.
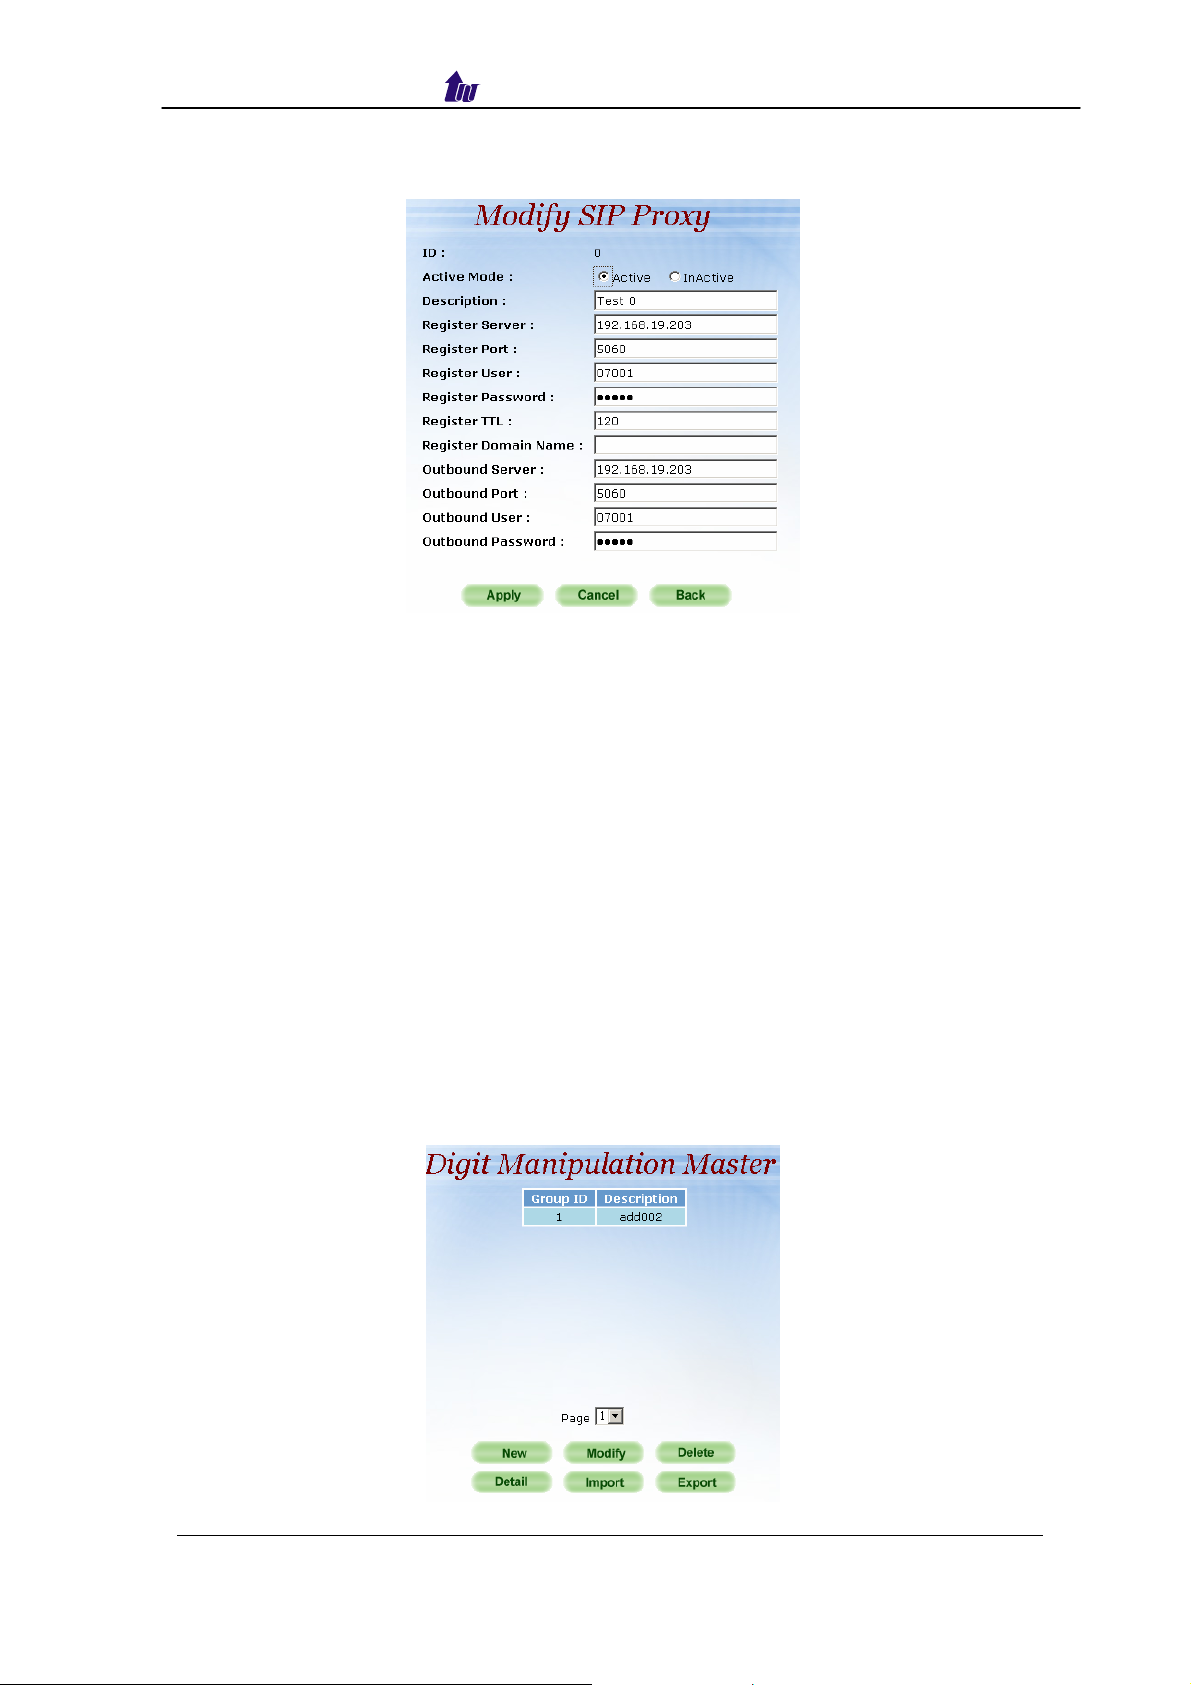
Step 2: You can see the screen display the new configuration of the SIP Proxy
as figure 3.4-2.
Figure 3.4-2
Frequency Changed Parameters:
• ID: 0
• Active Mode: Active
• Register Server: 192.168.19.203
• Register Port: 5060
• Register User: 07001
• Register Password: 07001
• Register TTL: 120
Digit Manipulation
The purpose of “Digit Manipulation” is to add or drop dialed digits for
PSTN or IP side (Interface configuration for PSTN side & H.323 Configuration
for IP side) at the selected interface in order to meet local PSTN dialing
requirement. It can also be used in Call Flow Edit for flexible usage.
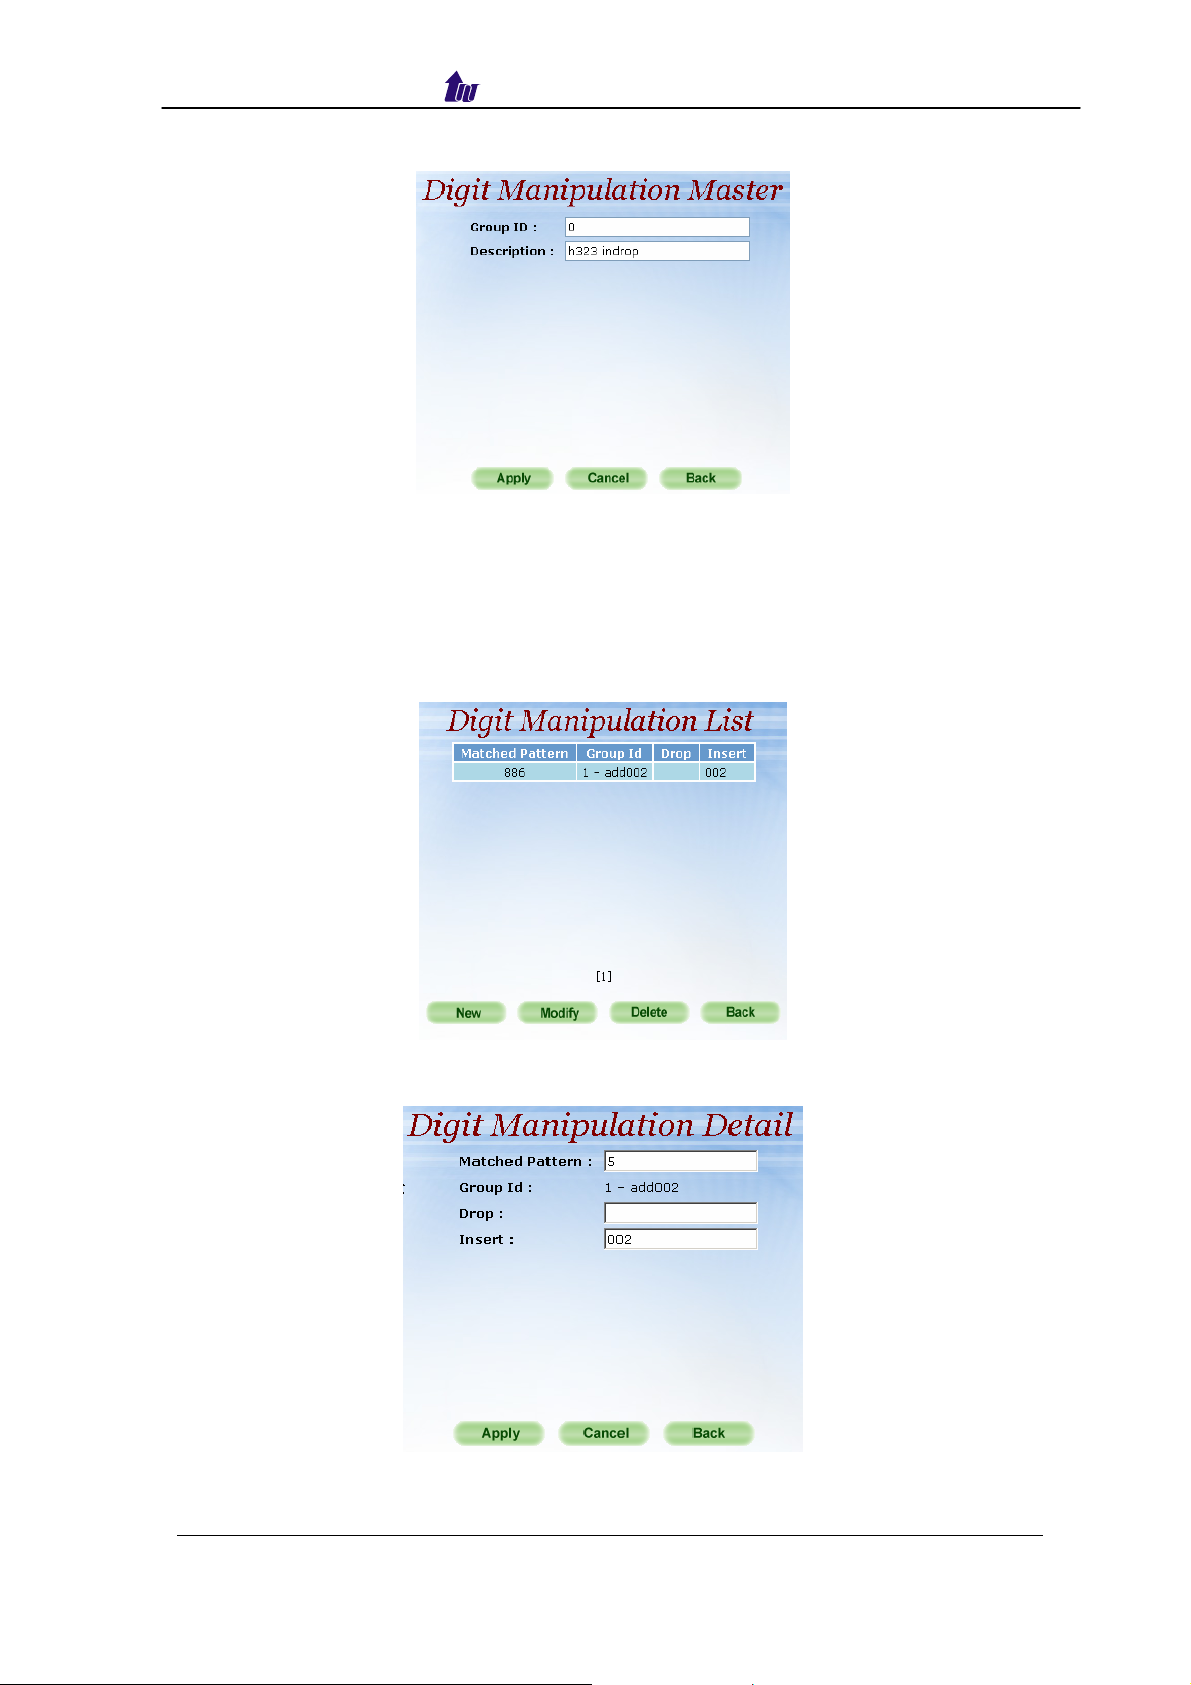
Step 1: We introduced the group and interface dependent digital manipulation
to meet the customer’s requires. Click Digit Manipulation to add a new
Digit Manipulation Group, add as figure 3.5-1.
Figure 3.5-1
WellGate 5260 User Guide – V6.2.0 - 23 -
Welltech Computer Co., Ltd.
Step 2: Enter the related parameters and click Apply button as figure 3.5-2.
Figure 3.5-2
Field Description:
• Group ID: 0 (DM Group identify)
• Description: H.323: H.323 In Drop
SIP: SIP In Drop
Step 3: Click the New created DM and Detail button to add digits setting as
figure 3.5-3.
Figure 3.5-3
Step 4: Click New button to add a new DM rule as figure 3.5-4.
Figure 3.5-4
Step 5: Create a new H.323 DM Group “1” and DM detail is shown as follows:
WellGate 5260 User Guide – V6.2.0 - 24 -
Welltech Computer Co., Ltd.
Figure 3.5-5
H.323 Incoming Call DM Setting:
• Matched Pattern: 5(pattern to be matched)
• Group ID: 1-add002 (belong to this DM group)
• Insert: The Insert digits
H.323 incoming call
↓
Dialed number: 582265699
↓
Match the pattern 5
↓
Add 002 (Insert)
↓
New dialed number becomes 002582265699
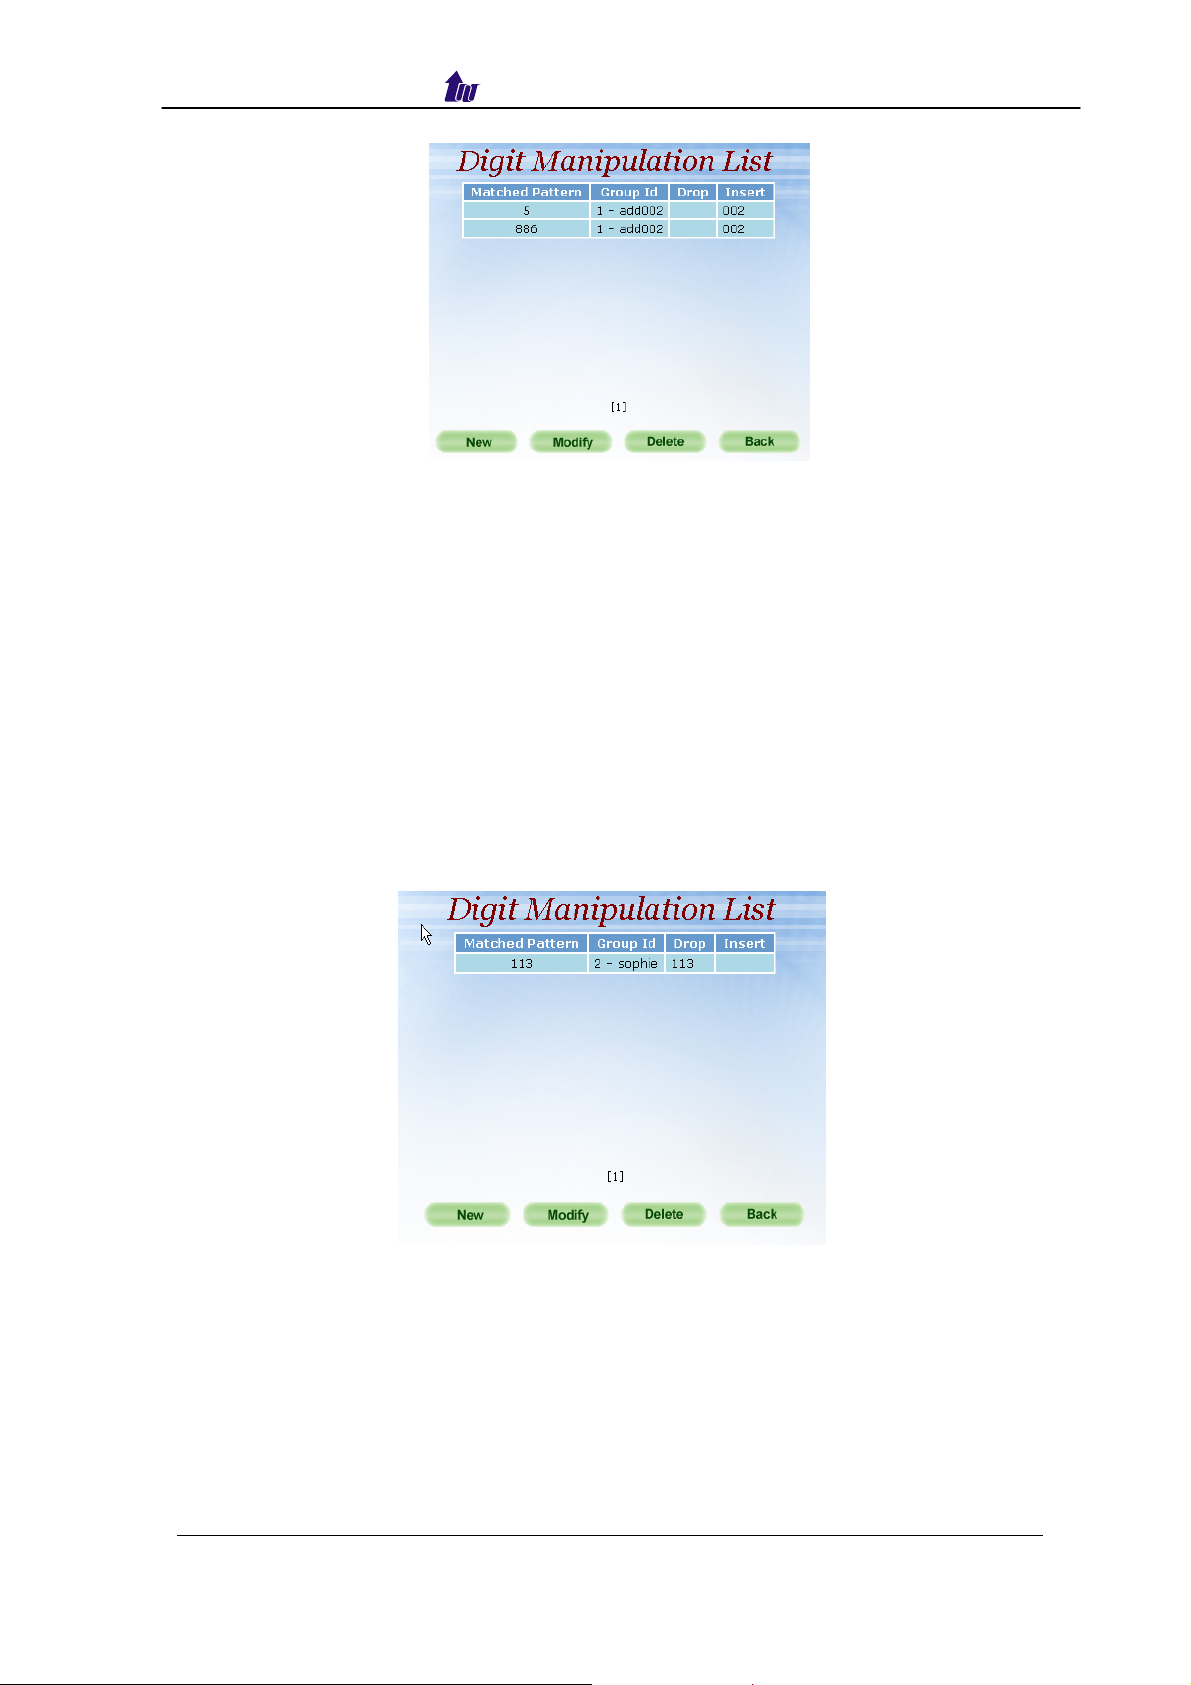
Step 6: Also create a new SIP DM Group ‘2” and DM detail shown as follows:
Figure 3.5-6
SIP Incoming Call DM Setting:
• Matched Pattern: 113 (pattern to be matched)
• Group ID: 2-sophie (belong to this DM group)
• Drop: 113 (drop digits)
SIP incoming call
↓
Dialed number: 11307688222
↓
Match the pattern 113
WellGate 5260 User Guide – V6.2.0 - 25 -
Welltech Computer Co., Ltd.
↓
Delete 113 (Drop)
↓
New dialed number becomes 07688222
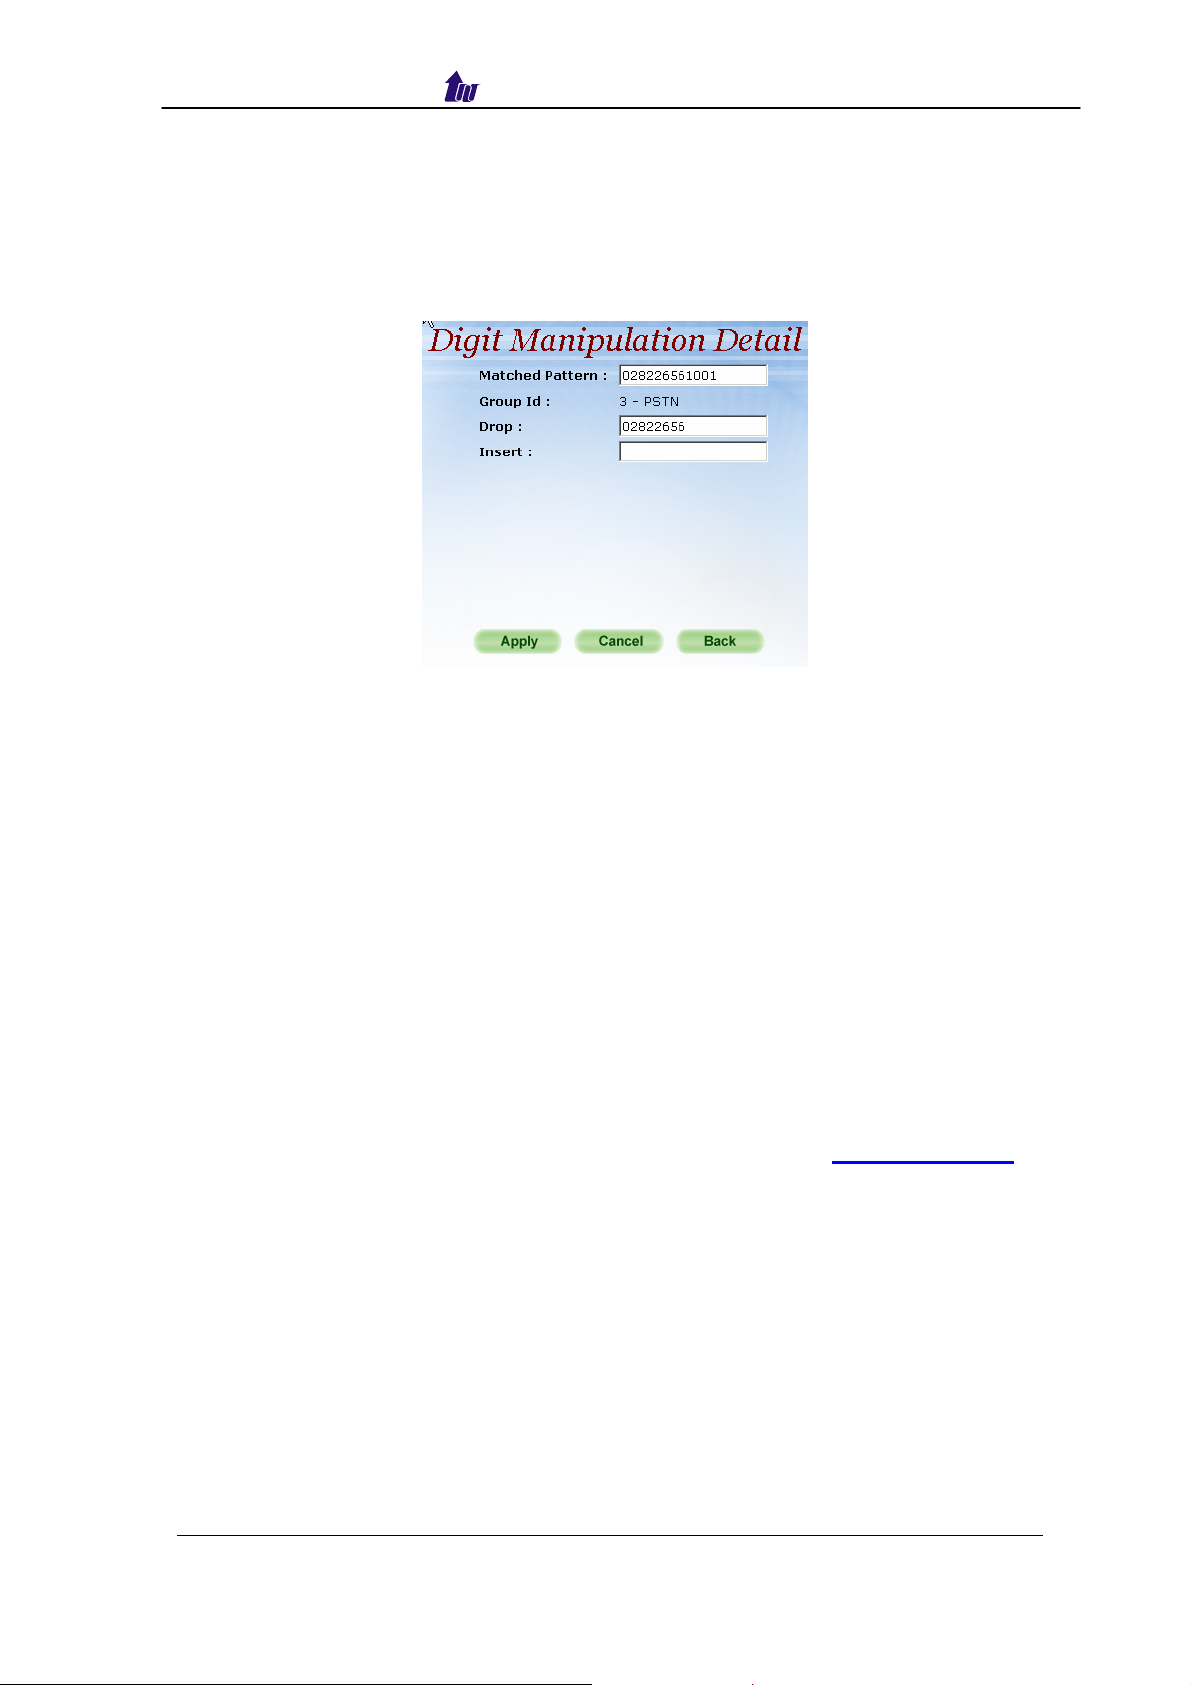
Step 6: Create a PSTN incoming call DM Group “3” and DM detail shown as
follows:
Figure 3.5-7
PSTN DM Setting:
• Matched Pattern: 02822656 (pattern to be matched)
• Group ID: 3-PSTN (belong to this group id)
• Drop: 02822656 (drop digits)
PSTN incoming call (DNIS mode)
↓
Dialed number: 028226561001
↓
Match the pattern 02822656
↓
Delete 02822656 (Drop)
↓
New dialed number becomes 1001
☻Note: Digit Manipulation have to tapped for PSTN Side (Trunk >
Outbound/Inbound DM Group), VoIP Side (VoIP > Outbound/
Inbound DM Group) or Call Flow (refer to section “Call Flow Editor”)
to take effect.
WellGate 5260 User Guide – V6.2.0 - 26 -
Welltech Computer Co., Ltd.
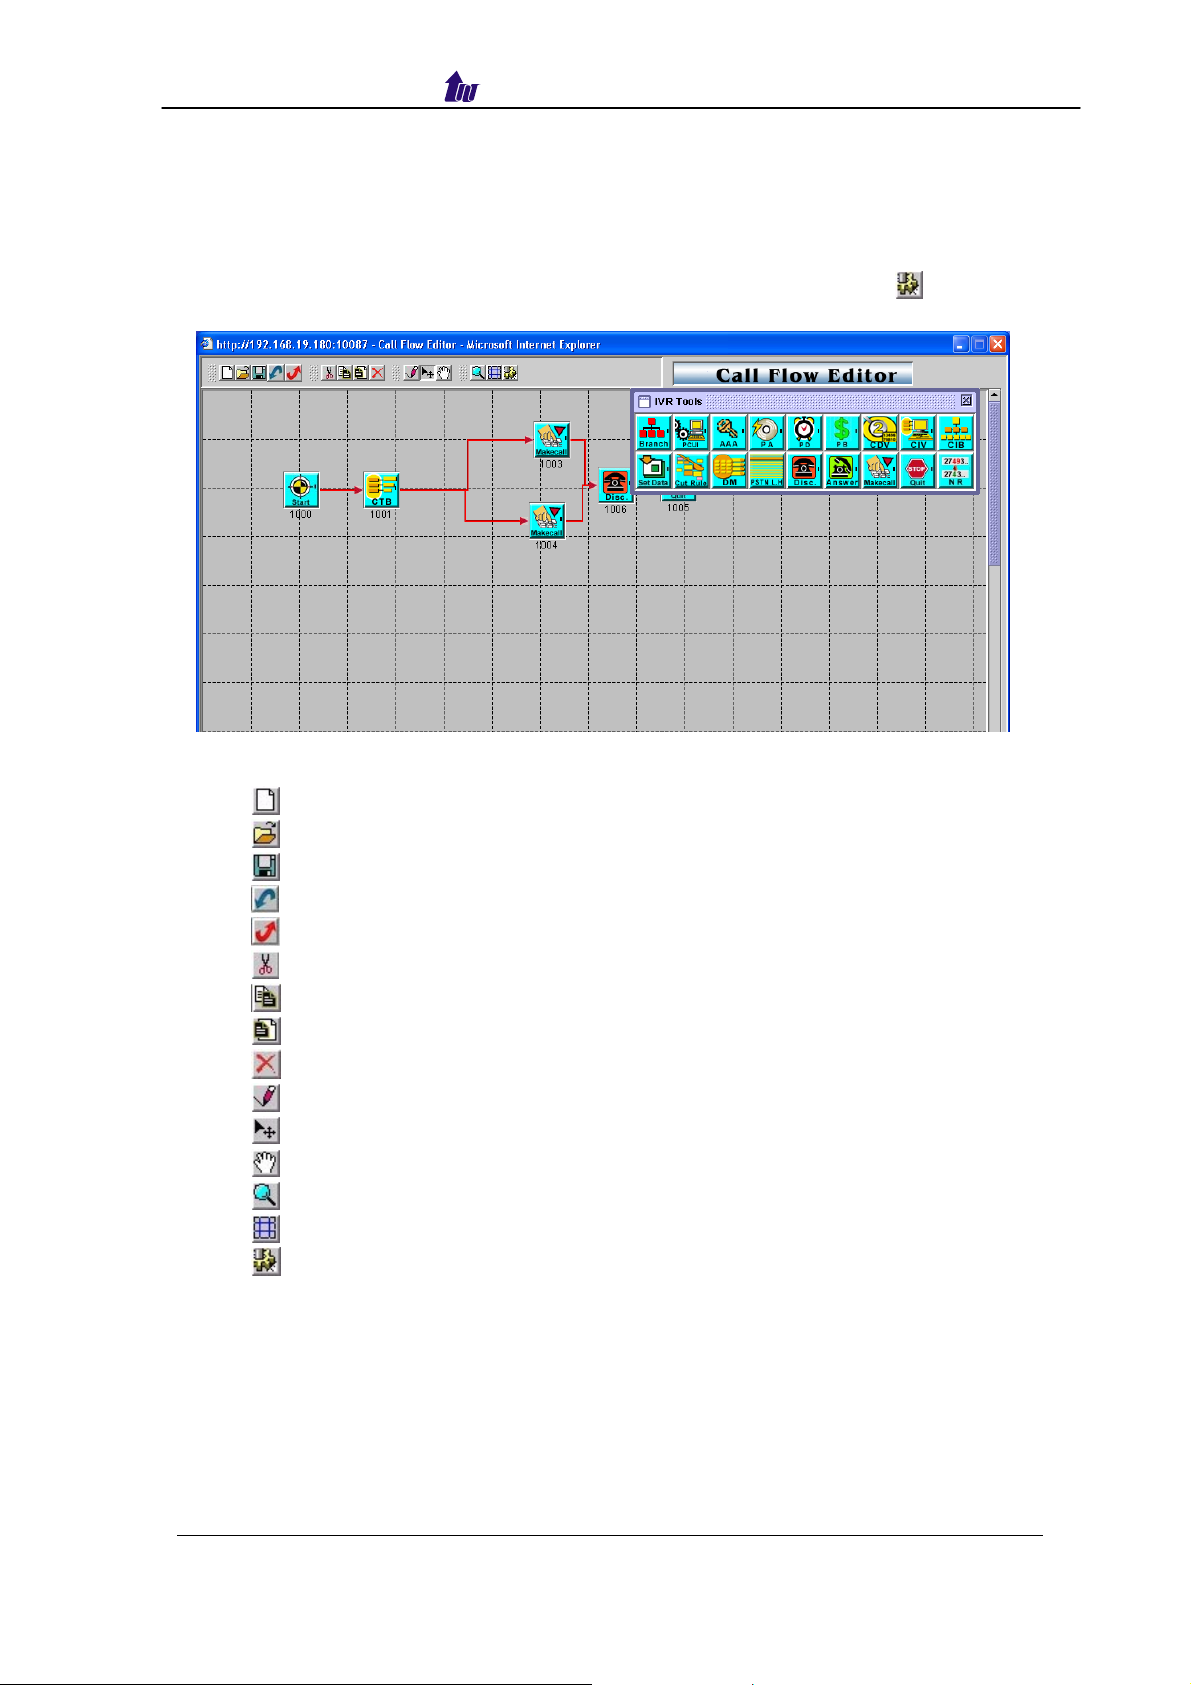
Chapter 4 Call Flow Editor
Call Flow Editor is used to control the call behavior including voice prompt,
AAA, DM…etc. It requires Java run time to run.
Step 1: Click Control>Call Flow Editor to create a Call Flow, click button to
activate IVR Tool as figure 4-1.
Figure 4-1
Component Description:
• New: Create a new call flow
• Load Call Flow: Load call flow from WellGate 5260
• Save: Save a call flow in WellGate 5260
• Import: Import a call flow to WellGate 5260
• Export: Export a call flow to WellGate 5260
• Cut: Cut a component
• Copy: Copy a component
•
•
• Line: Connecting 2 components together
• Select: Select the component at call flow workspace
• Scroll: Scroll the call flow workspace
• Zoom: Zoom in or zoom out the workspace
•
•
Paste: Paste a component
Delete: Delete a component
View Grid: View or not
Show Component Table: Show all component table
Step 2: Drag and prop the required component icon into the workspace as
figure 4-2.
WellGate 5260 User Guide – V6.2.0 - 27 -
Welltech Computer Co., Ltd.
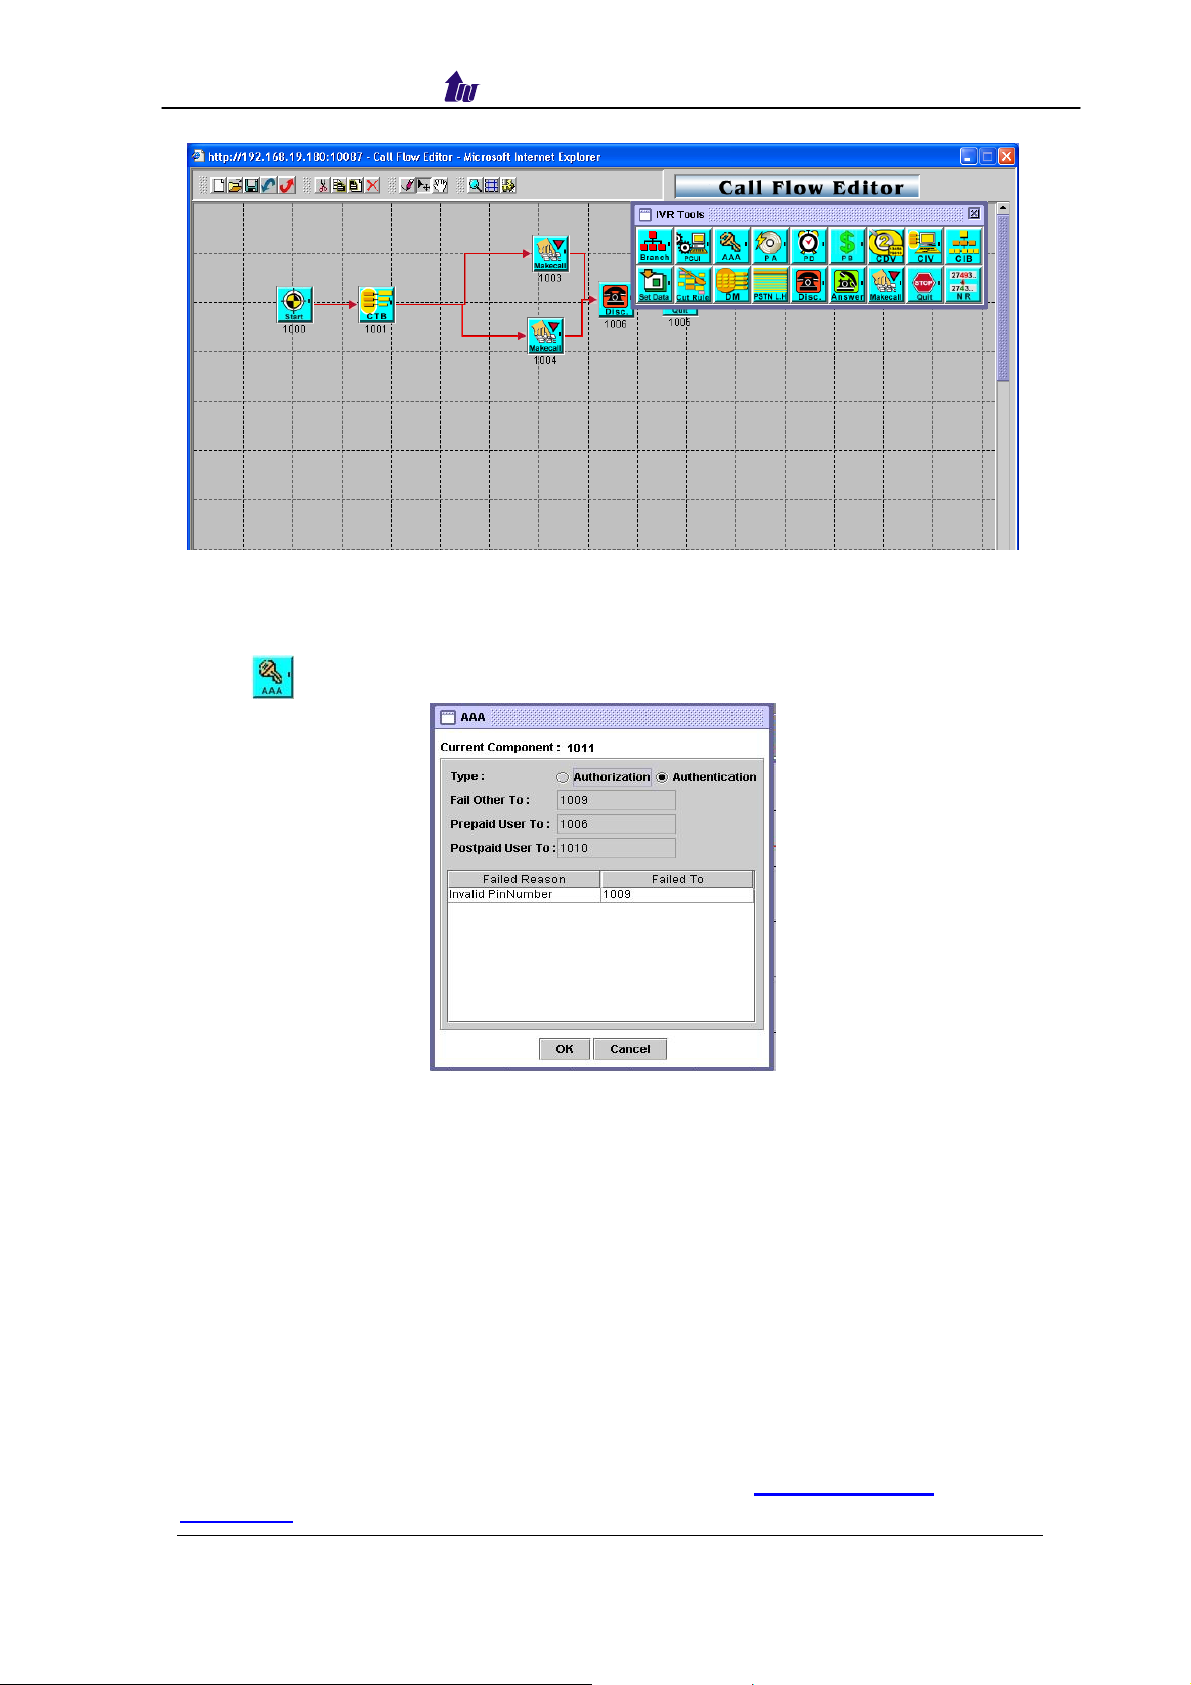
Figure 4-2
Right click the component to bring up the component propriety to setup
parameter:
• AAA: Send Authorization or Authentication for validation
o Type: AAA type selection
- Authorization: Send RADIUS Authorization packet out
- Authentication: Send RADIUS Authentication packet out
-Success To: Success to component
-Failed other to: Failed to component
o Failed Reason: Return code from RADIUS server
o Line Propriety:
- Invalid Account
- Account In Use
- Zero Balance
- Account Expired
- Over Credit Limit
- Number of Retries Exceeded
- Insufficient Balance
☺
Note: Detail response attributes, please refer to RADIUS Format
Attributes
WellGate 5260 User Guide – V6.2.0 - 28 -
Welltech Computer Co., Ltd.
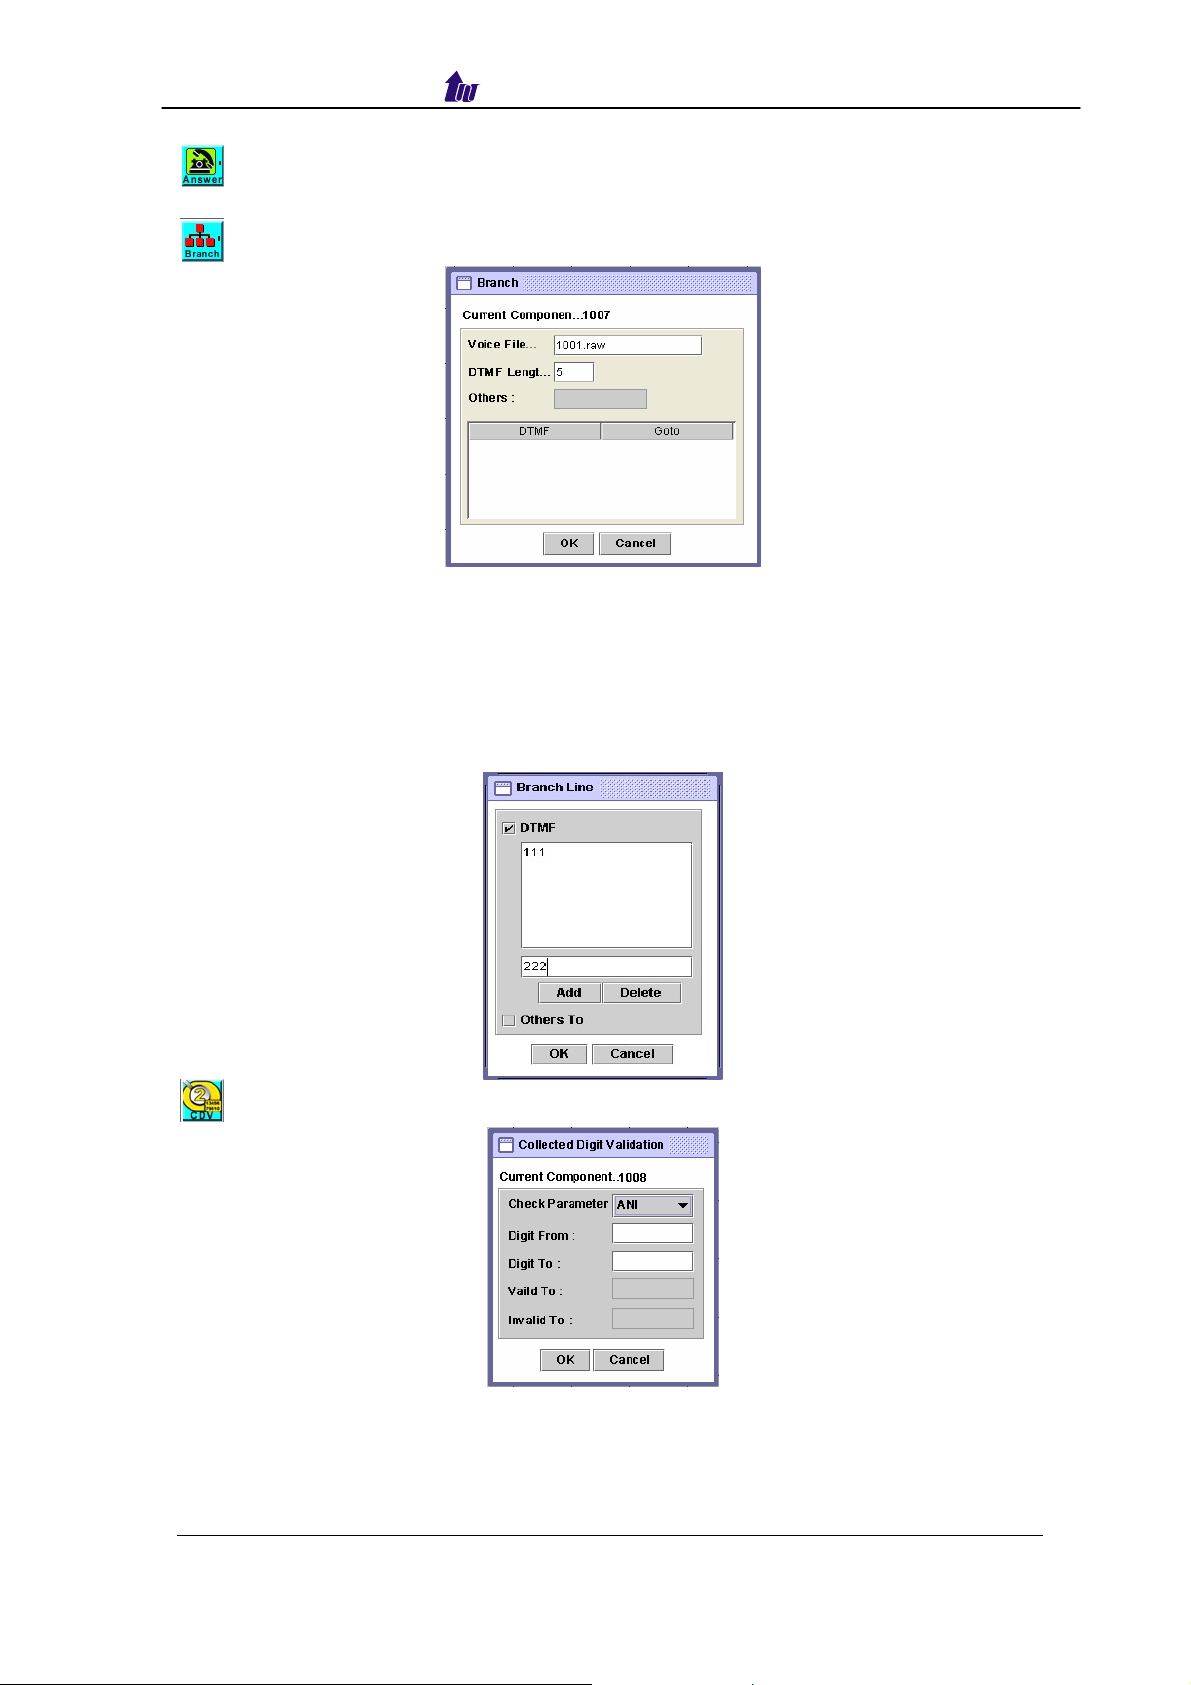
• Answer: Answer incoming call (PSTN only)
• Branch: Play an announcement and branch into different route
o Voice File: Voice prompt file (“. raw” format) to be playing
o DTMF Length: Number of DTMF to be receiving
o Others: Default flow if not match
o DTMF: DTMF match pattern
o Goto: The next component if matched
o Line Propriety:
-Branch Line: DTMF branch line setting
• CDV: Collected Digit Validation
o Check Parameter: Check parameter type (DNIS, ANI….)
o Digit From: Start digit from
o Digit To: End digit to
o Valid To: If the checked variable is success to validate
o Invalid To: If the checked variable is not success to validate
WellGate 5260 User Guide – V6.2.0 - 29 -
Welltech Computer Co., Ltd.
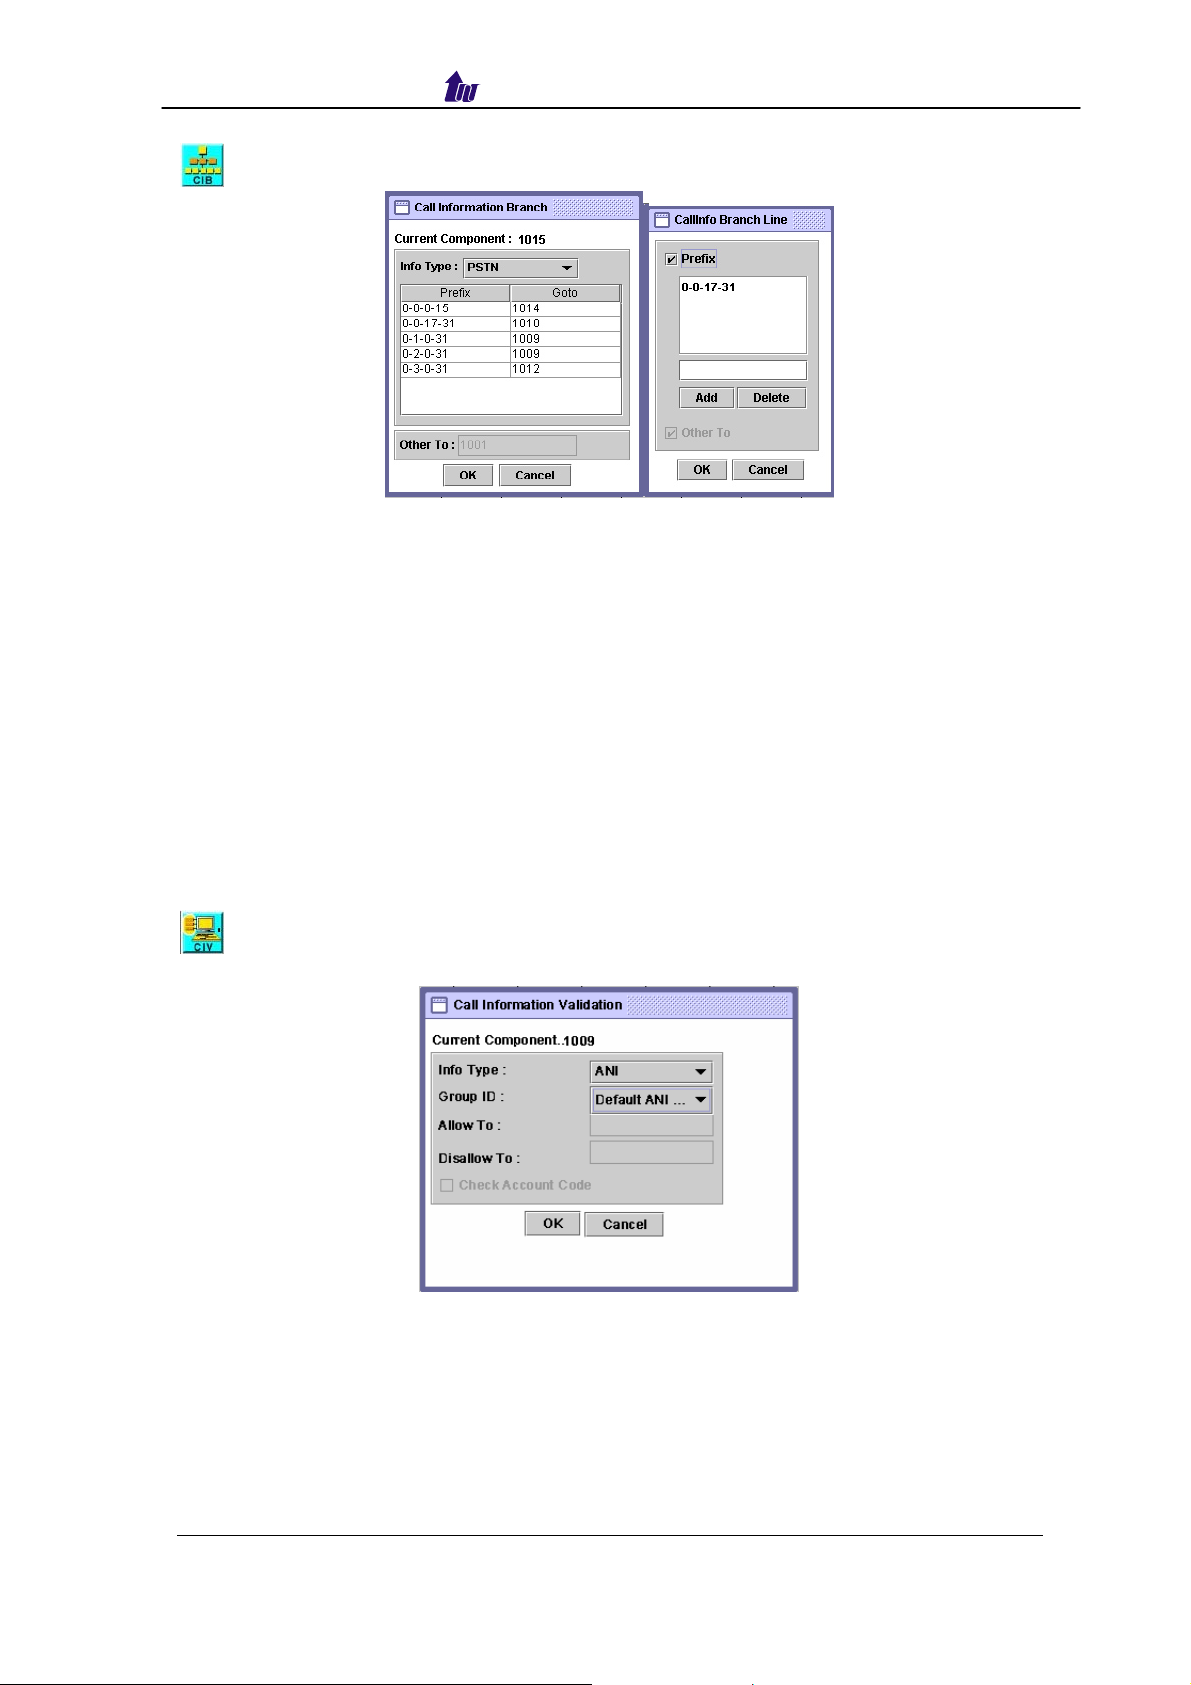
• CIB: Call Information Branch
o Info Type: Information type selection
- ANI: Calling Number
- DNIS: Called Number
- IP: IP Address or network (e.g. 192.168.0.0)
- PSTN: E1/T1 trunk and channel filter, format: interface id- trunk id-
trunk start- trunk stop
- Prefix: The prefix to be match
0-1-17-31:
0: Interface ID (Always 0)
1: Trunk ID: 1
17: Start from B Channel 17
31: Stop from B Channel 31
o Goto: The component to run next
o Call Info Branch Line: ANI, DNIS, IP or PSTN goto setting
• CIV: Call Information Validation, the user need setup the ACL for DNIS and
IP TO take effect
o Info Type: The info type to be validation
-DNIS: Called number
-ANI: Calling number
-IP: In coming IP address
-User: User ID
o Group ID: The group to be validation
o Allow To: If it is met the ACL defined
o Disallow To: If it is not met the ACL defined
WellGate 5260 User Guide – V6.2.0 - 30 -
 Loading...