


Project Sprayer
Table of contents
 Loading...
Owner’s Manual
1-800-328-8251
Wagner Technical Service
1770 Fernbrook Lane, Plymouth, MN 55447
http://www.wagnerspraytech.com
Register your product online at:
Read this manual for complete instructions
Table of Contents
Safety Information ................................................... 2
What’s in the Box ....................................................3
Before you Begin .....................................................4
Selecting the proper spray tip............................. 4
Important preparation tips ..................................4
Setup ......................................................................5-6
Material container setup ..................................... 5
Remote suction set setup ................................... 6
Flow Control Knob / Practice Spraying ................. 7
Material thinning ................................................. 7
Usage ........................................................................ 8
Priming with remote suction set .........................8
Spraying (Overspray) ......................................... 8
Spray Technique...................................................... 9
Cleanup - Latex Materials ................................ 10-11
Cleaning the material container........................ 10
Cleaning the remote suction set ....................... 11
Cleanup - Oil-based Materials .............................. 12
Cleaning the material container........................ 12
Cleaning the remote suction set ....................... 13
Cleaning the Components .................................... 14
Reassembly............................................................ 14
Maintenance ........................................................... 15
Replacement parts ................................................15
Troubleshooting .................................................... 16
Product registration .......................................... 16
Parts List ........................................................... 50-51
Warranty ................................................................. 52
Need Help? Call us rst for answers fast.
Call Wagner Spray Tech toll-free if you have any
comments or problems with this product.
Technical service hours: Monday through Friday, 8:00 am to 7:00 pm Central Time
0109 • Form No. 0525800B
English

Important Safety Information · Read all safety information before operating
Minimum gauge for extension cords
Cord length (feet)Voltage
Ampere
rating
range
2 - 3
120V
25-50
100 150 200 250 300 400 500
18
16 14 14 12 12 10 10
the equipment. SAVE THESE INSTRUCTIONS.
To reduce the risks of re or explosion, electrical shock and the injury to persons, read and understand all instructions included in
this manual. Be familiar with the controls and proper usage of the equipment.
This symbol indicates a hazardous situation, which, if not
not avoided could result in death or serious injury.
HAZARD: INJECTION INJURY
A high pressure stream of paint produced by this equipment
can pierce the skin and underlying tissues, leading to serious
injury and possible amputation.
DO NOT TREAT AN INJECTION INJURY AS A SIMPLE
CUT! Injection can lead to amputation. See a physician
immediately.
NOTE TO PHYSICIAN:
Injection into the skin is a traumatic injury. It is important to treat
the injury surgically as soon as possible. DO NOT delay treatment to
research toxicity. Toxicity is a concern with some coatings injected
directly into the blood stream. Consultation with a plastic surgeon or
reconstructive hand surgeon may be advisable.
PREVENTION:
• NEVER aim the gun at any part of the body.
• Do not aim the gun at, or spray any person or animal.
• NEVER allow any part of the body to come in contact with the uid
stream.
• NEVER put your hand in front of the gun. Wear gloves. Gloves will
not provide protection against an injection injury.
• Keep hands and other body parts away from the discharge. For
example, do not try to stop leaks with any part of the body.
• Always unplug the spray gun before servicing, cleaning tip guard,
changing tips, or leaving unattended.
• Always use the nozzle tip guard. Do not spray without nozzle tip
guard in place.The tip guard provides some protection against
injection injuries but is mainly a warning device. Only use a nozzle
tip specied by Wagner.
HAZARD: EXPLOSION OR FIRE
Solvent and paint fumes can explode or ignite, causing
property damage and/or severe injury.
PREVENTION:
• Exhaust and fresh air introduction must be provided
to keep the air within the spray area free from accumulation of
ammable vapors.
• Avoid all ignition sources such as static electricity
sparks, open ames, pilot lights, hot objects,
cigarettes, and sparks from connecting and
disconnecting power cords or working light switches.
• Fire extinguishing equipment must be present and in
good working order.
• Follow the material and solvent manufacturer’s safety precautions
and warnings.
• Do not spray ammable or combustable materials near an open
ame or sources of ignition such as cigarettes, motors, and electrical
equipment.
• Know the contents of the paints and solvents being sprayed. Read
all Material Safety Data Sheets (MSDS) and container labels
provided with the paints and solvents. Follow the paint and solvent
manufacturer’s safety instructions.
HAZARD: EXPLOSION HAZARD DUE TO
INCOMPATIBLE MATERIALS
Will cause property damage or severe injury.
PREVENTION:
• Do not use bleach.
• Do not use halogenated hydrocarbon solvents such as methylene
chloride and 1,1,1 - trichloroethane. They are not compatible with
aluminum and may cause an explosion. If you are unsure of a
material’s compatibility with aluminum, contact your coating supplier.
HAZARD: HAZARDOUS VAPORS
Paints, solvents, insecticides, and other materials can be
harmful if inhaled or come in contact with the body. Vapors
can cause severe nausea, fainting, or poisoning.
PREVENTION:
• Use a respirator or mask if vapors can be inhaled.
Read all instructions supplied with the mask to be
sure it will provide the necessary protection.
• Wear protective eyewear.
• Wear protective clothing as required by coating manufacturer.
HAZARD: GENERAL
Can cause severe injury or property damage.
PREVENTION:
• Read all instructions and safety precautions for equipment and
spray material before operating any equipment.
• Comply with all appropriate local, state, and national codes
governing ventilation, re prevention, and operation.
• Keep sprayer out of the reach of children.
• Hearing protection is recommended for extended use.
• Always wear appropriate gloves, eye protection and a respirator or
mask when painting.
• Do not operate or spray near children. Keep children away from
equipment at all times.
• Do not overreach or stand on an unstable support. Keep effective
footing and balance at all times.
• Stay alert and watch what you are doing.
• Do not operate the unit when fatigued or under the inuence of
drugs or alcohol.
HAZARD: ELECTRIC SHOCK HAZARD
May cause severe injury.
PREVENTION:
• Keep electrical cord plug and spray gun trigger free
from paint and other liquids. Never hold cord at plug connections to
support cord. Failure to observe may result in an electrical shock.
• Never immerse electrical parts in water or any other liquid. Wipe the
exterior of the sprayer with a damp cloth for cleaning. Always make
sure the sprayer is unplugged before taking it apart for cleaning.
IMPORTANT: Use only a 3-wire extension cord that has a 3-blade
grounding plug and a 3-slot receptacle that will accept the plug on the
product. Make sure your extension cord is in good condition. When
using an extension cord, be sure to use one heavy enough to carry the
current your product will draw. For lengths less than 50 feet, use a No.
18 AWG extension cord. For lengths more than 50 feet, use a No. 14 or
No. 16 AWG extension cord. An undersized cord will cause a drop in
line voltage resulting in loss of power and overheating.
Wagner Spray Tech accessory extension cords recommended:
P/N 0090241 20 foot extension cord.
P/N 0090242 35 foot extension cord.
2
English
Important Safety Information · Read all safety information before operating
Grounded Outlet
Grounding Pin
Cover for grounded outlet box
(e)
(f)
(g)
(a)
(6)
(5)
(4)
(3)
(2)(1)
(k)
(i)
(m)
(j)
(l)
(h)
the equipment. SAVE THESE INSTRUCTIONS.
Grounding Instructions
This product must be grounded. In the event of an electrical short
circuit, grounding reduces the risk of electric shock by providing an
escape wire for the electric current. This product is equipped with a
cord having a grounding wire with an appropriate grounding plug.
The plug must be plugged into an outlet that is properly installed
and grounded in accordance with all local codes and ordinances.
WARNING - Improper installation of the grounding plug
can result in a risk of electric shock.
If repair or replacement of the cord or plug is necessary,
do not connect the green grounding wire to either at blade
terminal. The wire with insulation having a green outer surface
with or without yellow stripes is the grounding wire and must be
connected to the grounding pin.
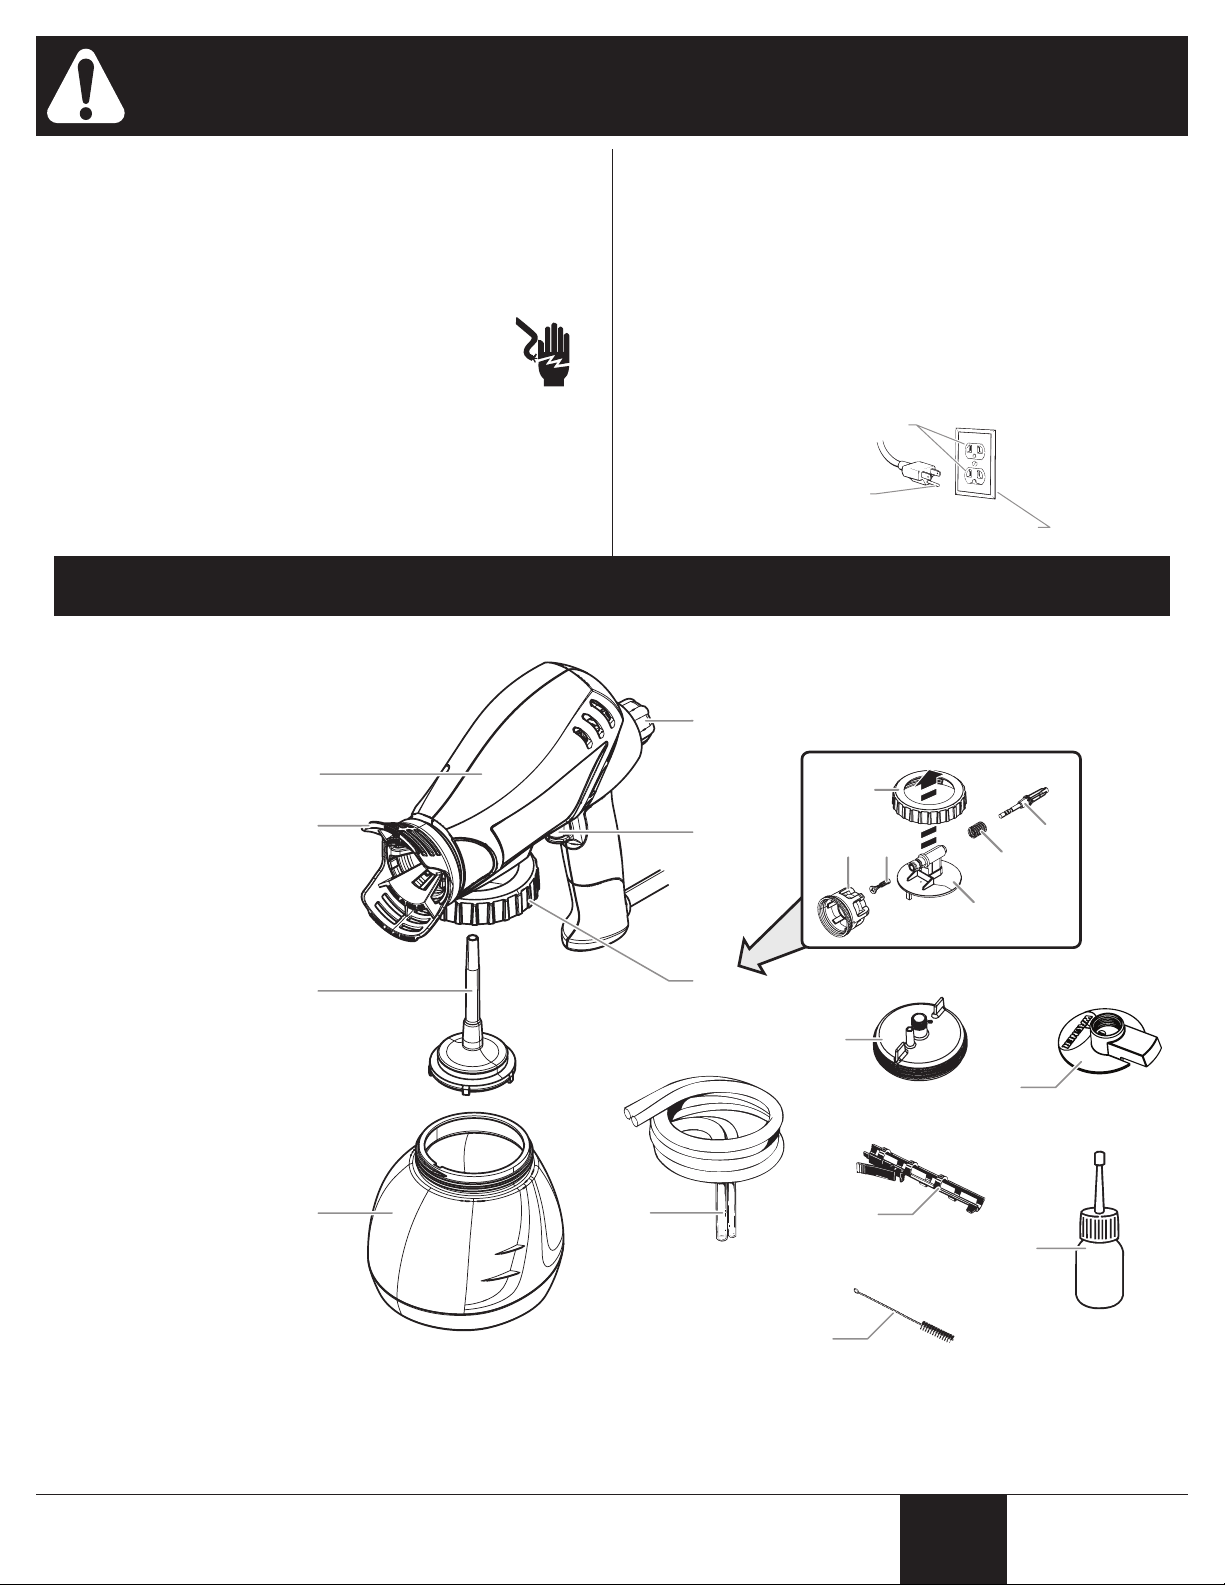
What’s in the Box
Check with a qualied electrician or serviceman if the grounding
instructions are not completely understood, or if you are in doubt
as to whether the product is properly grounded. Do not modify
the plug provided. If the plug will not t the outlet, have the proper
outlet installed by a qualied electrician.
This product is for use on a nominal 120 volt circuit and has a
grounding plug that looks like the plug illustrated below. Make
sure that the product is connected to an outlet having the same
conguration as the plug. No adapter should be used with this
product.
a) Sprayer assembly
b) Spray tip
c) Suction tube with lter
d) Material container
e) Flow control knob
f) Trigger
g) Pump assembly
1) Locking nut
2) Atomizer valve
3) Pump housing ring
4) Pump housing
5) Spring
6) Piston
h) Dual hose tting
i) Quick Flush lid
j) Remote suction hoses
k) Container clip
l) Oil lubricant*
m) Cleaning brush
* Included in some models.
3
English
Before You Begin
(a)
(b)
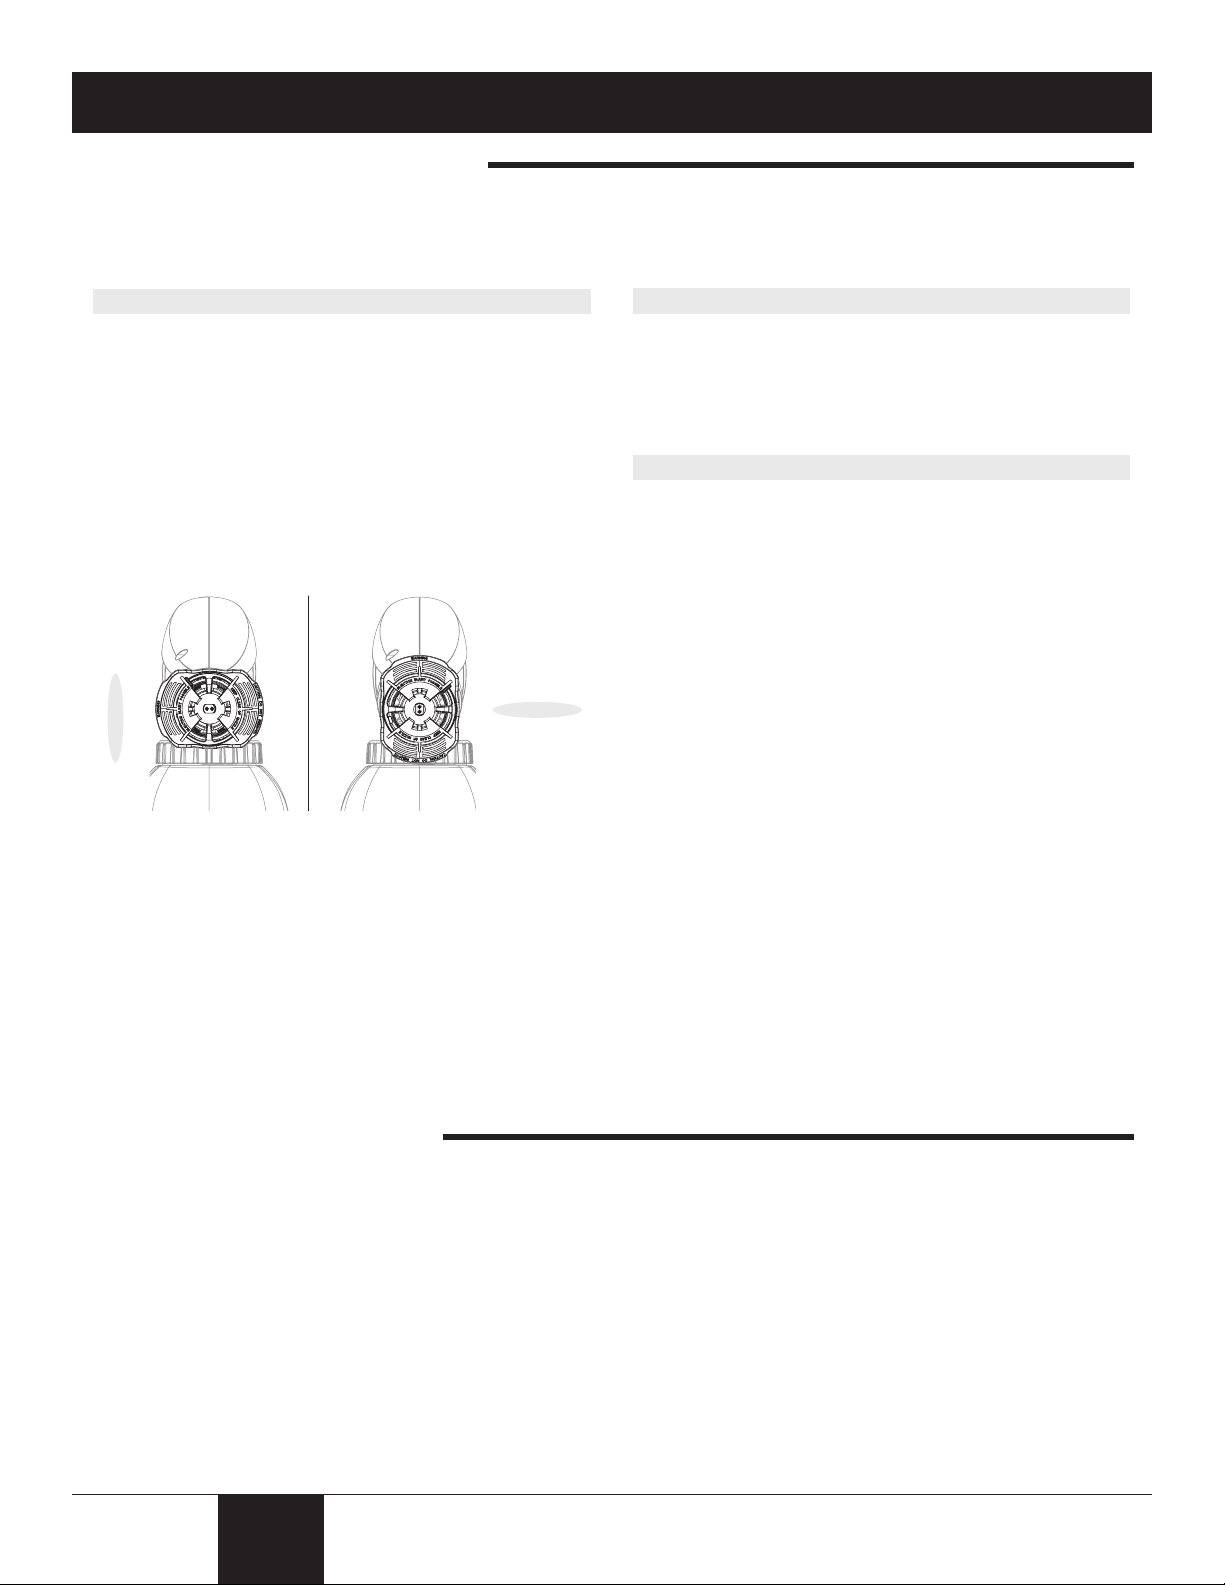
Selecting the Proper Spray Tip:
It is important that you use the proper spray tip based on your type of spraying job and the type of material you plan to spray.
Read below for details.
Optimus™ Spray Tip (included)
An Optimus™ spray tip produces a wide pattern that can be
adjusted horizontally or vertically.
To adjust:
1. Make sure the sprayer is unplugged and that spray tip is
sufciently hand-tightened.
2. Orient the spray tip to achieve your desired spray
pattern.
a. If you plan to spray horizontally (side to side), orient
the spray tip as shown in (a).
b. If you plan to spray vertically (up and down), orient
the spray tip as shown in (b).
Round Tip (sold separately)
A round tip produces a round pattern. Use a round tip if the
surface you are spraying is too small for use with the wide
angle tip.
A round tip is available at your local retailer.
Stain Tip (sold separately)
The stain tip has a specially designed opening for use with thin
materials such as thin stains, sealers and waterproofers, and
can be adjusted to reduce overspray. If you did not receive a
stain tip and will be spraying one of these materials, the tip can
be purchased at your local retailer.
The stain tip pattern is round with a ne spray. To adjust
the spray pattern size and coarseness, turn the tip slightly
counterclockwise to narrow the pattern and make the spray
more coarse. Turn the tip slightly clockwise to widen the
pattern and make the spray more ne.
IMPORTANT: Make sure to tighten all spray tips firmly by hand. If the spray tip is not tightened firmly enough, the
sprayer could leak or the tip could be damaged. Do not use a tool to tighten the spray tip. If the tip is too tight, it may be
damaged.
IMPORTANT: Use only Optimus™-labeled spray tips with this sprayer. Other tips are not compatible with this sprayer.
Important Preparation Tips:
• It is important to mix the material thoroughly before you begin. Do not shake the material to mix it. Always stir the material
gently but thoroughly before use.
• Remove any skin that has formed on the top of the material. Do not mix the skin into the material. The skin can break up
and clog the sprayer. Older paint may need to be strained.
4
English
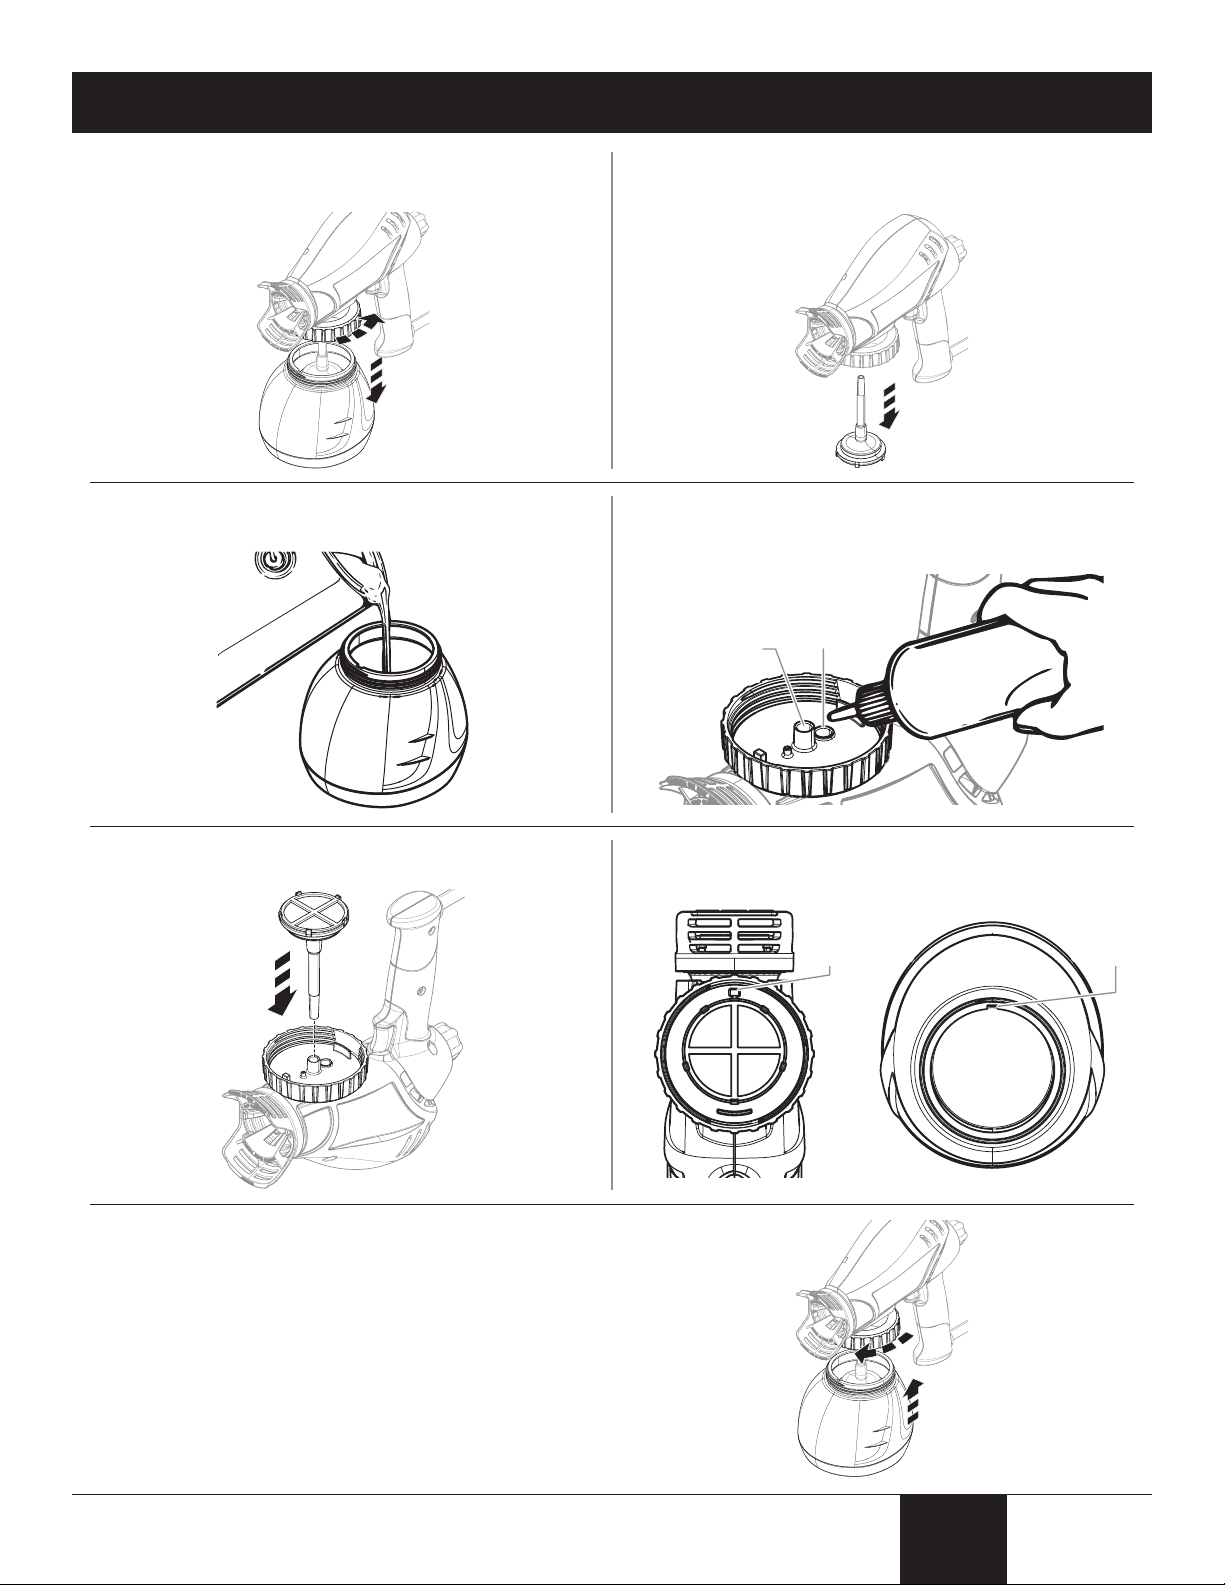
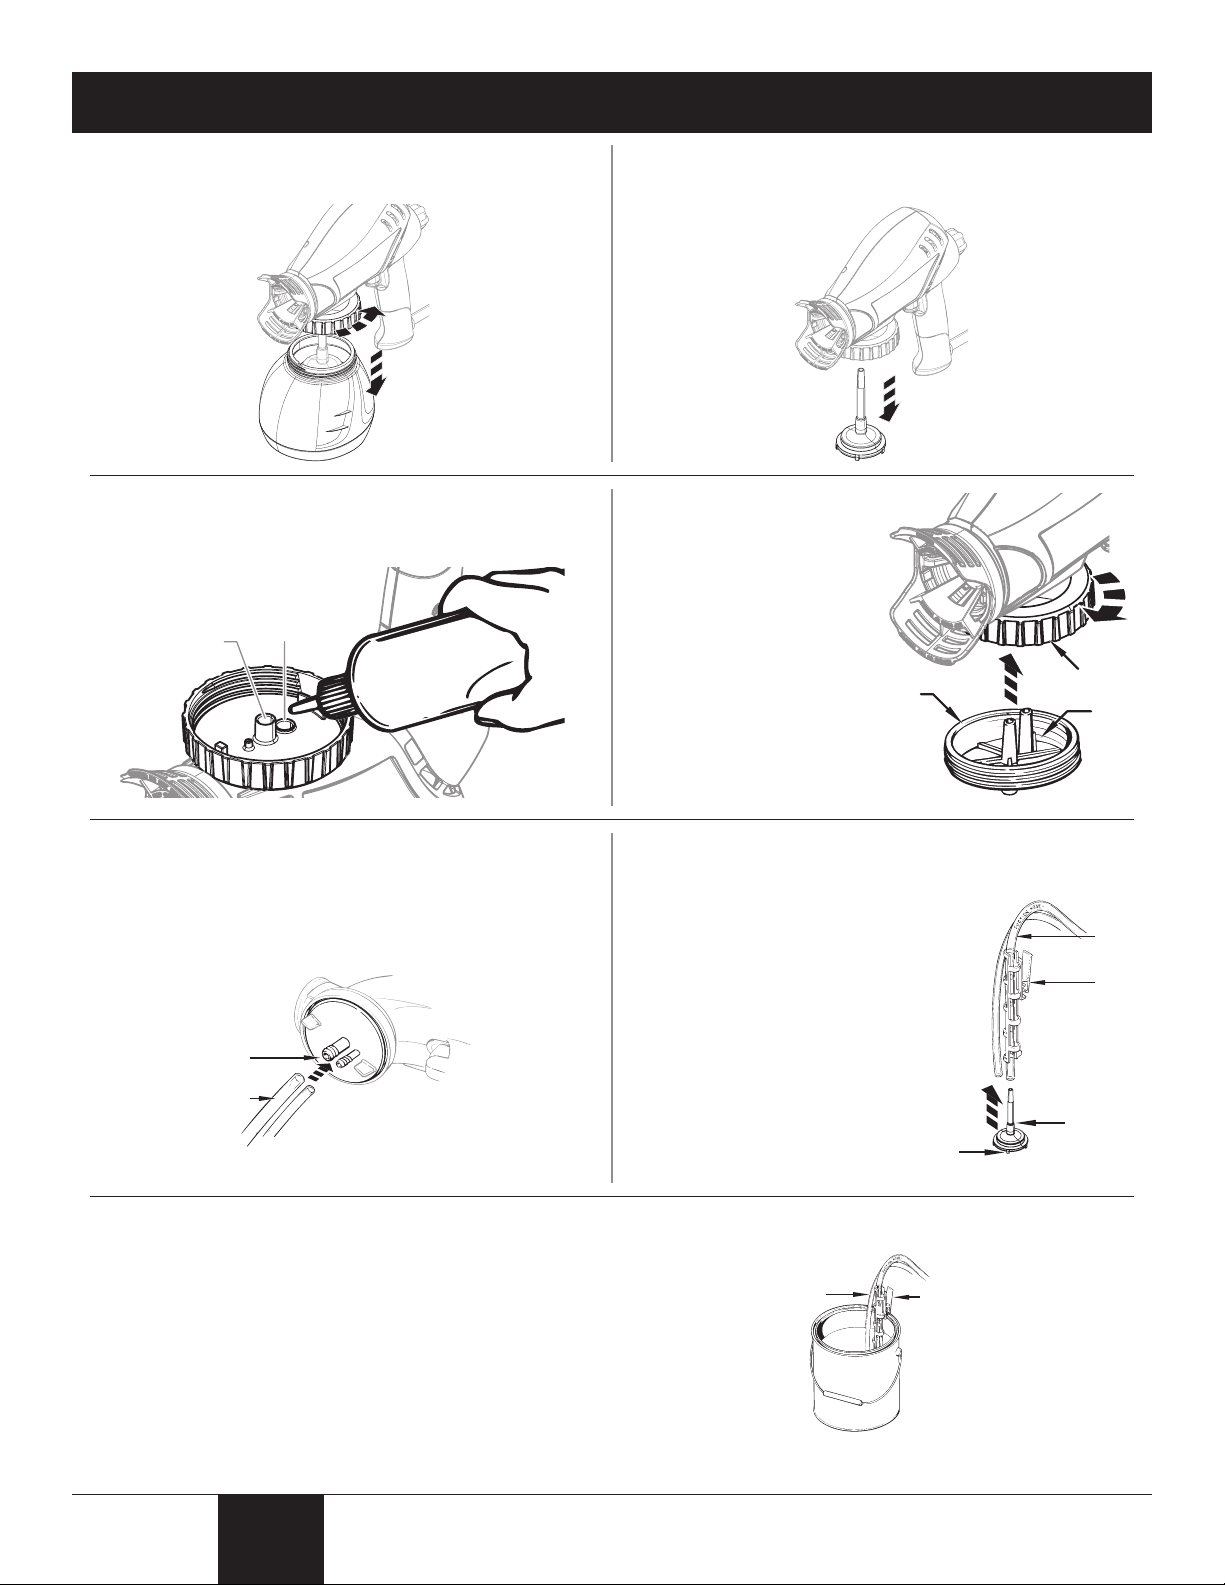
Material Container Setup
(a)
(b)
(c)(d)
1. Remove the material container from the pump housing
by turning the pump housing ring counterclockwise.
3. Fill the container with the material to be used.
2. Remove the suction tube.
4. Place a few drops of household oil down the intake (a)
and return openings (b) in the pump housing.
5. Insert the suction tube into the intake opening.
7. Twist the pump housing ring to thread the container onto
the pump housing. Plug in the unit.
6. Line up the tab (c) on the pump housing with the notch
(d) on the material container.
5
English
Remote Suction Set Setup (optional)
(m)
(l)
(g)
(f)
(d)
(c)
(e)
(a)
(b)
(i)
(h)
(j)
(k)
1. Remove the material container from the pump housing
by turning the pump housing ring counterclockwise.
3. Place a few drops of household oil down the intake (a)
and return (b) openings in the pump housing.
2. Remove the suction tube.
4. Push the dual hose
tting (c) into the intake
and return openings
on the bottom of the
housing. The tting
with the ridge (d) goes
into the return opening.
Twist the pump housing
ring (e) clockwise to
tighten the dual hose
tting into place.
5. Push the remote suction hose onto the intake and return
ports of the dual hose tting. The larger hose (f) goes
onto the intake port (g).
7. Submerge the suction tube assembly into the material
container and attach the container clip (l) to the side
to hold it securely. Make certain the return line (m) is
inside the container.
6. Slide the intake hose [(h), the larger hose] through
the container clip (i). You may need to pull the hoses
slightly apart.
Push the intake hose onto
the suction tube so that it
is ush with the ridge (j).
Make certain that the intake
lter (k) is in place on the
suction tube.
English
6
Loading...