


Paint-N-Roll™
PLUS
Owner’s Manual (page 2)
Read this manual for complete instructions
Manuel de l’utilisateur (page 8)
Lire ce manuel pour obtenir des directives complètes
Manual del usario (página 14)
Lea este manual para obtener las instrucciones completas
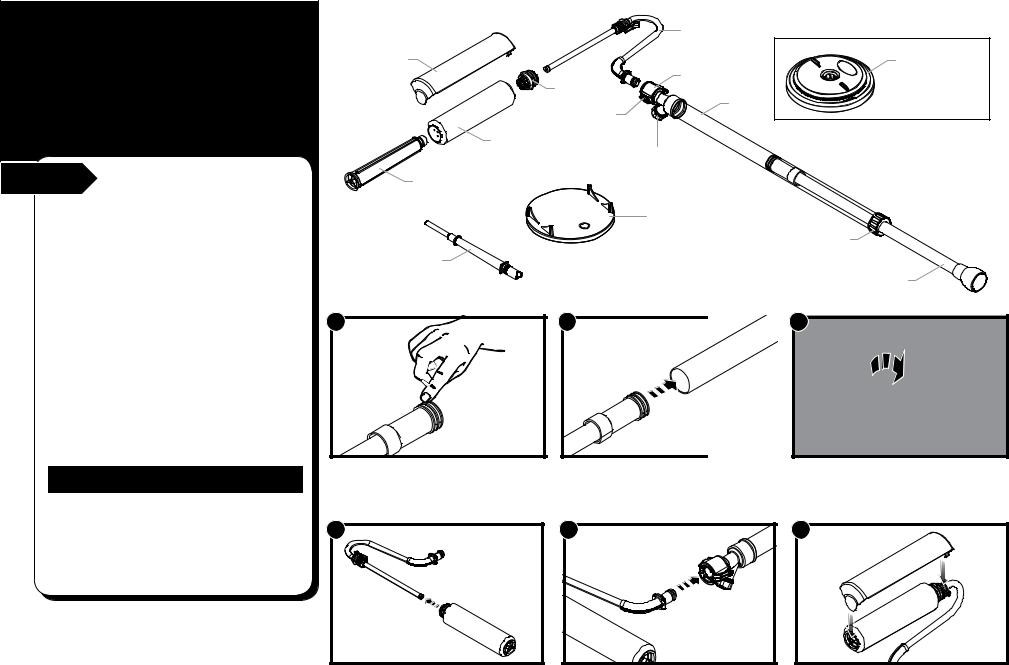
Quick Start Guide • Guide de démarrage rapide • Guía Rápida para comenzar
Plunger tube assembly • Assemblage pour le piston • Ensamblaje para el émbolo
1
Lubricate plunger O-rings
Lubrifier les joints toriques du piston Lubrique las juntas tóricas del émbolo
2 |
3 |
Insert plunger into main tube |
Tighten locking collar securely |
Insérer le piston dans le manche réservoir |
Serrer solidement la bague de blocage |
Inserte el émbolo en el tubo principal |
Ajuste firmemente el collar de sujeción |
Setup • Montage • Disposición |
|
|
1 |
2 |
3 |
|
|
or |
Attach roller cover assembly |
Attach roller arm |
Mount fill tube / lid |
|
Fixer l’ensemble du manchon du rouleau |
Fixer le bras du rouleau |
Installer le tube de remplissage et le |
|
Acople el conjunto de cubierta del rodillo |
Acople el brazo del rodillo |
couvercle |
|
Monte el tubo y la tapa de llenado |
|||
|
|
4 |
Press fill valve onto tube
Insérer la valve de remplissage dans le tube Presione la válvula de llenado en el tubo
5 |
Pull the plunger to fill the tube
Tirer le piston afin de remplir le tube Tire del émbolo para llenar el tubo
6 |
Push plunger forward and begin
Pousser le piston en avant et commencer
Empuje el tubo del émbolo hacia delante y comenzar
0911 • Form No. 0284599E |
Patent pending |
Español Français English
Getting
Started
Start |
Before you begin: |
•Make sure the type of paint you use can be cleaned with either mineral spirits (for oil-based paints) or a warm water and soap solution (for latex paints).
•It is a good idea to have drop cloths protecting your floors and anything else in the room that you do not want accidentally splattered with paint.
important: Some oil-based paints require a stronger cleaning solution than mineral spirits and should not be used with the Paint N Roll™ Plus. Using a cleaning solution stronger than mineral spirits may cause damage to the Paint N Roll™ Plus. Check with your paint supplier to be sure the oil-based paint you have can be cleaned with mineral spirits.
Questions?
Call Wagner Technical Service at:
1-800-760-3844
Register your product online at:
www.wagnerspraytech.com
Parts and Components
|
|
Roller arm |
|
|
|
assembly |
|
Spatter |
|
Head |
Non-standard |
guard |
|
container lid (not |
|
|
Roller cap |
|
included with |
|
Main |
all models) |
|
|
|
||
|
Quick-release |
|
|
|
tube |
|
|
|
tabs |
|
|
|
Roller |
Fill valve |
|
|
cover |
|
|
Roller |
|
|
|
core |
|
|
|
|
|
Standard |
|
|
|
container lid |
Locking |
|
|
|
|
Fill tube |
|
|
collar |
|
|
|
|
Assembly |
|
|
Plunger |
|
|
|
|
1 |
2 |
|
3 |
1. Remove plastic bag from plunger. |
2. Insert the plunger into the main |
3. Tighten the locking collar. |
Lubricate the plunger O-rings with |
tube. Make sure O-rings do |
|
petroleum jelly. |
not twist or cut. |
|
4 |
4. Attach the roller cover assembly to the roller arm.
5 |
5. Press the quick-release tabs on the unit and attach the roller arm.
6
6. If painting a ceiling, attach the spatter guard.
|
English |
2 |
|
|
|
|
|
|

1. Filling the main tube
Start |
Before filling: |
Your Paint N Roll™ can be used with two types of container lids that are used to allow you to pull material from the material container into the Paint N Roll™.
The lid below is desiged for use with standard, one-gallon, round material containers. This lid comes standard with your Paint N Roll™.
Attaching the container lid / fill tube
1 |
2 |
(a) 
OR
(a)
1. Slide the small end of the fill tube |
2a. Standard containers - Attach the |
2b. All other containers - Thread the |
(a) through the hole in the container |
container lid with fill tube securely |
container lid with fill tube onto the |
lid you plan to use. |
to the material container. |
material container. |
Use the lid shown below if you are using something other than a standard, one-gallon, round material container. *Not included with all models.
Filling the main tube
1
1. Apply a thin layer of petroleum jelly to the fill tube. This will help the fill valve slide easily off the fill tube.
2 |
2. Press down and firmly hold the fill valve onto the fill tube.
3
3. Pull the plunger to draw the material into the main tube. When the tube is full, you are ready to begin using the Paint N Roll™.
3 |
English |
|
 Loading...