


Owner’s Manual (page 2)
Read this manual for complete instructions
Manuel de l’utilisateur (page 8)
Lire ce manuel pour obtenir des directives complètes
Manual del usario (página 14)
Lea este manual para obtener las instrucciones completas
1211 • Form No. 0520902E |
Patent Nos. D627,940, D659,921 |
Quick Start Guide • Guide de démarrage rapide • Guía Rápida para comenzar
1
Read all warnings
Lisez tous les avertissements
Lea todas las advertencias
2 |
Fill container with water (48 oz. max)
Remplissez le réservoir avec de l’eau. (1,4 l maximum)
Llene el contenedor con agua (1,4 l máximas)
3 |
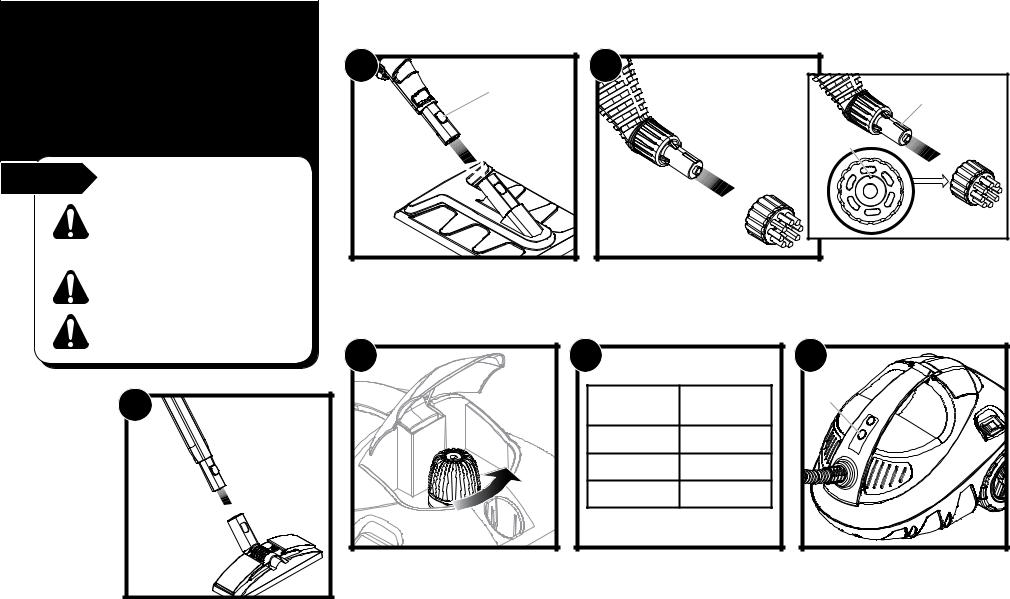
Attach handle to accessory
Assemblez la poignée et la accessoire
Coloque el mango en la accesorio
4 |
|
5 |
|
l |
O |
|
|
Plug in power cord, switch ON (l) |
Allow unit to heat (green and red lights |
|
on) |
Branchez le cordon d’alimentation et |
Laissez chauffer l’appareil (témoin |
mettez l’interrupteur en marche (l) |
lumineaux vert et rouge allumés) |
Enchufe el cable de alimentación y |
Deje que la unidad se caliente (luces |
encienda la unidad (l) |
verde y rojo encendidas) |
7 |
Score and remove wall paper, or. . .
Éraflez légèrement le papier peint, puis enlevez-le, ou . . .
Marque y retire el papel tapiz, o . . .
perform cleaning job
accomplir la tâche de nettoyage
realizar la tarea de limpieza
6 |
Green light only = you are ready to steam.
Témoin lumineux vert allumé seulement
= prêt à vaporiser
Sólo luz verde encendida = La unidad está lista para generar vapor
DO NOT fill the steamer with any liquids except clean water.
REMPLISSEZ LE VAPORISATEUR EN UTILISANT SEULEMENT DE L’EAU PROPRE.
NO LLENE EL GENERADOR DE VAPOR CON NINGÚN LÍQUIDO SALVO AGUA LIMPIA.
Español Français English
Important Safety
Information
Read all safety information before operating
the equipment. Save these instructions
To reduce the risks of fire or explosion, electrical shock and the injury to persons, read and understand all instructions included in this manual. Be familiar with the controls and proper usage of the equipment.
Indicates a hazardous situation which, if not avoided, could result in death or serious injury.
DO NOT fill the steamer with any liquids except clean water. Do not use household cleaners, bleach or any other chemicals with this steamer. This can result in a dangerous situation, resulting in an explosion.
Hazard: Hot steam and parts. May cause injury, including skin burns or property damage. Temperatures exceed 212° F (100ºC).
Prevention:
•Stay clear of steam and steam plate surface. DO NOT place hand in front of steam plate.
•Water drops are hot and may burn skin. Use extreme caution when using steam plate overhead, and routinely empty water from steam plate. Wear eye protection and gloves when using this steamer.
•Spray handle may become warm to the touch during usage.
•Allow parts to cool before changing accessories and /or opening fill cap.
•Never point steam plate or accessories at anyone.
•Hot water may eject from accessories when trigger is activated.
•DO NOT over fill water container.
•DO NOT strain or kink hose. Never repair a damaged hose.
Hazard: Fire. May cause severe injury and/or property damage.
Prevention:
•DO NOT allow water to boil dry. Boiling dry may cause overheating and fire.
•DO NOT allow water or steam to enter light switches or sockets.
Hazard: Electrical Shock. May cause severe injury.
Prevention:
•Power cord must be connected to grounded (3 prong) outlet.
•DO NOT use the unit if the power cord is worn or damaged. Never repair a power cord.
•DO NOT pull water container by power cord.
•DO NOT allow water or steam to enter light switches or sockets.
Hazard: General. May cause injury and/or property damage.
Prevention:
•DO NOT modify parts or components. Never repair damaged or worn parts.
•Water container must rest on a sturdy, level surface and in upright position.
•Keep power steamer away from children.
•NEVER leave power steamer unattended.
•Read all instructions and warnings before each use.
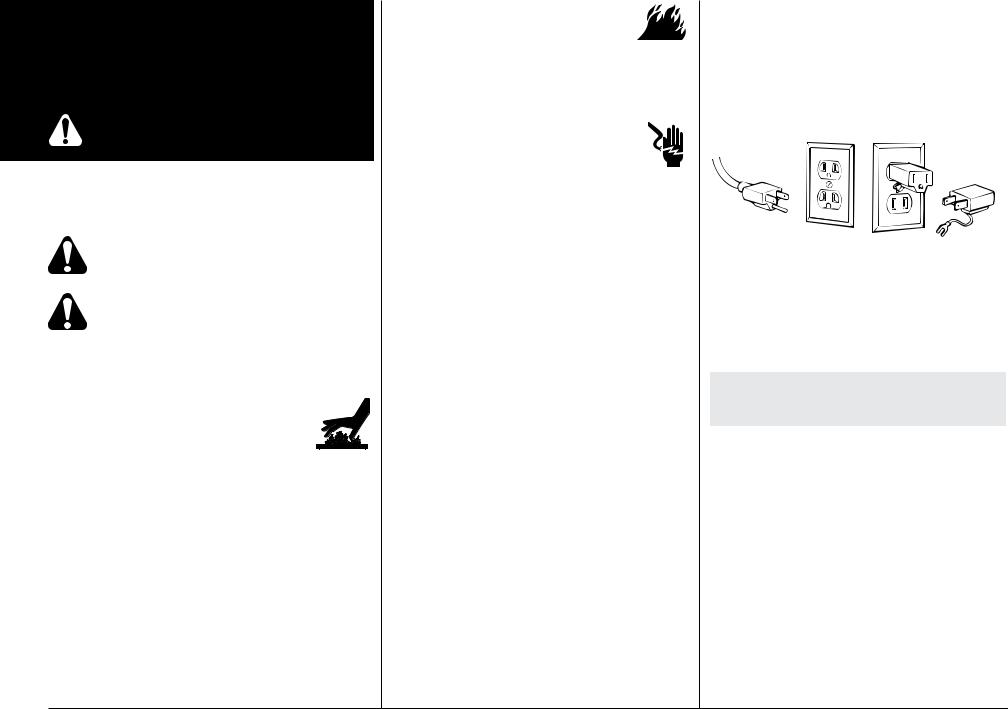
Grounding Instructions
This product should be grounded. In the event of an electrical short circuit, grounding reduces the risk of electric shock by providing an escape wire for the electric current. This product is equipped with a cord having a grounding wire with an appropriate grounding plug. The plug must be plugged into an outlet that is properly installed and grounded in accordance with all local codes and ordinances.
WARNING! — Improper installation of the grounding plug can result in a risk of electric shock.
If repair or replacement of the cord or plug is necessary, have your nearest Wagner Authorized Service Center replace it.
Check with a qualified electrician or serviceman if the grounding instructions are not completely understood, or if in doubt as to whether the product is properly grounded. Do not modify the plug provided; if it will not fit the outlet, have the proper outlet installed by a qualified electrician.
Extension Cords
Use only a 3-wire extension cord that has a 3-blade grounding plug, and a 3-slot receptacle that will accept the plug on the product. Make sure your extension cord is in good condition. When using an extension cord, be sure to use one heavy enough to carry the current your product will draw. An undersized cord will cause a drop in line voltage resulting in loss of power and overheating. For lengths up to 100 feet, use 14 AWG extension cords.
(B)
Thermal Safety Fuse Reset
Always fill the unit before plugging it in. If the steamer is plugged in before it is filled with water, or if the steamer is allowed to run dry, a thermal safety fuse will open, causing the unit to turn off. If this happens, unplug the unit and allow it to cool for at least 10 minutes. The safety fuse will reset itself.
NOTE: The water container, heating element and hose are not serviceable. Should a problem occur with the steamer, contact
Wagner Technical Service.
Product Registration
Register your product online at www.wagnerspraytech. com. Proper registration will serve as proof of purchase in the event your original receipt becomes misplaced or lost.
English |
2 |
|
|
|
|

Parts and
Components
Start |
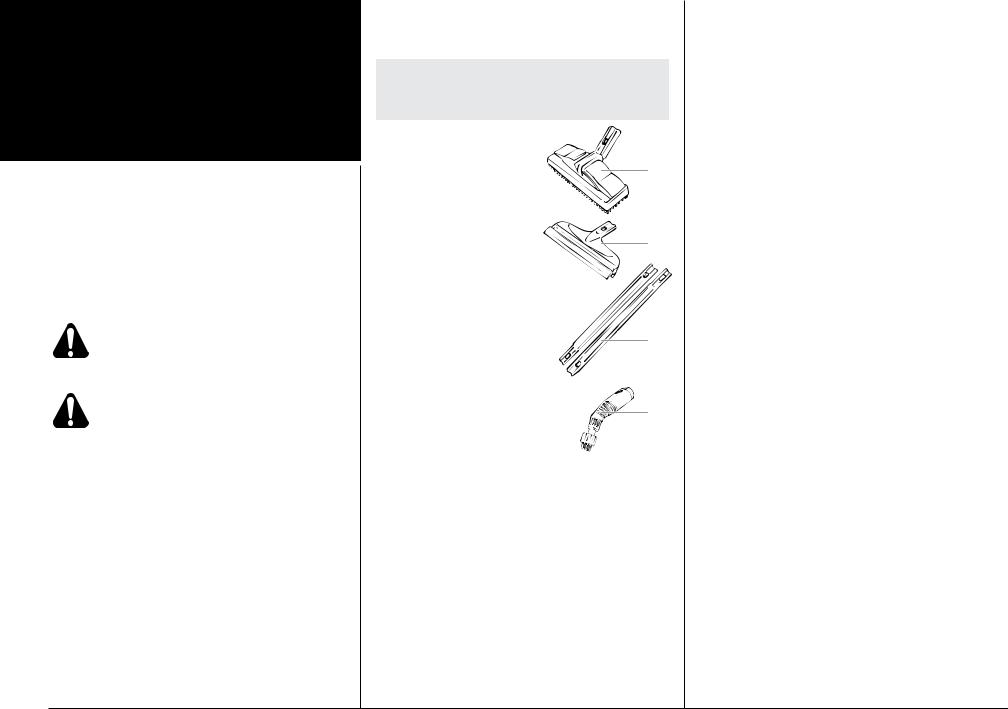
Replaceable parts: |
These parts can be ordered or replaced by calling Wagner Technical Service:
Steam plate
Jet nozzle and brushes (2)
Extension (2)
Squeegee
Cleaning brush
Cleaning brush towel
Funnel
*Indicator lights:
Green and Red light on = unit warming up Green light only on = ready to steam
Questions?
Call Wagner Technical Service at:
1-800-727-4023
Register your product online at:
www.wagnerspraytech.com
Spray handle |
|
|
|
|
Steam hose |
|
|
Trigger |
Fill cap |
l |
O |
|
(located |
||
|
under lid) |
|
|
*Green indicator |
|
|
|
light |
|
|
|
*Red indicator |
|
|
|
light |
|
Power switch |
|
|
|
||
Large cleaning brush
Nozzle brushes (2)
Jet nozzle |
Squeegee |
|
|
Extensions (2) |
Cleaning |
Steam plate |
towel |
Funnel 

3 |
English |
|
Setup |
Start |
Before you begin: |
DO NOT fill the steamer with any liquids except clean water. Do not use household cleaners, bleach or any other chemicals with this steamer.
Never use more than two extensions when using the steamer.
Never attach extensions or accessories while unit is emitting steam.
3
3. If using an extension, attach the accessory to the extension.
1 |
(a) |
1. Push the button on the handle
(a) and attach the steam plate, extensions, or cleaning accessory to the trigger mechanism.
2 |
|
|
(b) |
|
(c) |
|
Note: When attaching the |
2. If using the jet nozzle, assemble |
nozzle brush to the jet nozzle, |
line up the notch in the jet nozzle |
|
the brush onto the nozzle. |
end (b) with the guide inside the |
|
nozzle brush (c). |
4 |
4. Flip up filler cap lid and carefully unscrew filler cap.
Using the funnel, fill the steamer with clean tap water (distilled water recommended).
DO NOT OVERFILL.
5 |
|
Amount of |
Steam |
water |
time |
16 oz. |
15 min |
32 oz. |
30 min |
48 oz. |
45 min |
5. Use the chart above as a guide to determine how much water you will need based on how long you need to use the steamer.
Replace fill cap and shut filler cap lid when filled with desired amount.
6 |
(d) |
6. Plug in the power cord and turn the switch ON (I). Both the green and red indicator lights will turn on.
Once the red indicator light on the container turns off (d), you are ready to begin steaming.
Note: When the red light turns back on, you can continue steaming.
|
English |
4 |
|
|
|
|
|
|
Usage
Start |
Before you begin: |
do not leave steam plate unattended, or face down on any surfaces.
Do not operate the steamer once the water container is empty. Make sure to wear gloves and eye protection.
Before unscrewing the filler cap and filling the reservoir, make sure any remaining water has cooled for at least twenty (20) minutes. Empty any remaining water to avoid over-filling.
Do not look directly down into the fill hole when filling. Keep your free hand and others at a safe distance.
The spray handle may become warm to the touch during usage.
Note: Before using, trigger the spray handle into a sink or empty bucket to purge any remaining cold water.
Using the trigger |
|
|
1 |
|
1. You can control the flow of steam from the |
|
|
accessory by activating the trigger. |
|
|
The trigger will also relieve any built-up |
|
|
pressure remaining in the system after the |
|
|
steamer has been shut off. |
|
|
Note: Just turning the power OFF does not relieve |
|
|
steam pressure. During cool down, treat the unit as if |
|
|
it is under pressure. Always activate the trigger before |
|
|
removing the fill cap. |
Cooling / refilling |
|
|
1 |
2 |
3 |
O |
Off |
|
|
|
20 minutes |
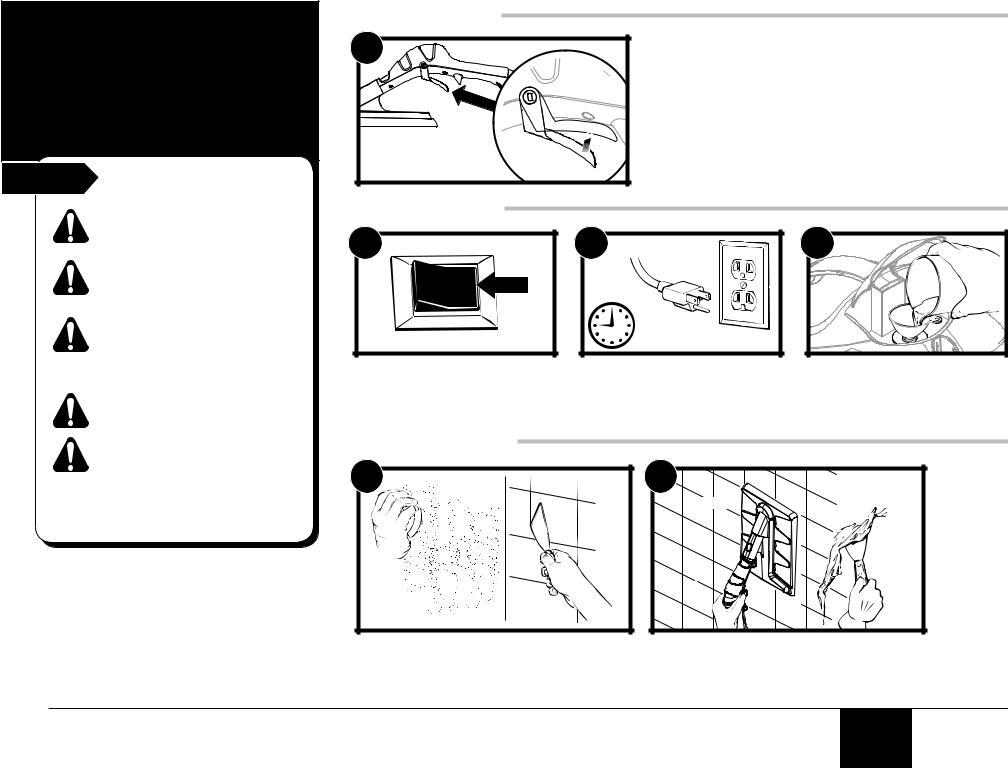
1. Shut the unit OFF. |
2. |
Unplug power cord. |
3. Once unit has sufficiently cooled, |
Activate trigger until all pressure |
|
Allow steamer to cool for at least |
repeat steps 4-6 in Setup to |
has been released. |
|
twenty (20) minutes. |
continue. |
|
* |
See NOTE, above. |
|
Wallpaper removal |
|
|
|
1 |
|
2 |
|
15-20 SEC.
1.For best results, use a scoring tool or a putty knife and gently score the wallpaper in a crisscross pattern before removal. The
perforations will allow the steam to penetrate the wallpaper.
2. To remove wallpaper, hold the steam plate flat against the scored wallpaper. Pull the trigger and hold for 15-20 seconds.
Move the steam plate to a new section and remove the steamed section with a scraper blade.
5 |
English |
|
Steamafety cleaning
General Notes:
Using Steam on Delicate Materials
Always check the suitability of materials before steam cleaning. Steam is being generated at temperatures in excess of 212ºF (100ºC). Do not use on any surfaces that cannot withstand this temperature. Always test
a small area of the material, preferably an area that is normally out of view. Do not soak materials being cleaned. Only a light application of steam is required.
See below for more information on steam cleaning.
DO NOT attempt to use the steam plate included with this unit as a cleaning device. The steam plate is designed for wallpaper removal only. This unit is not recommended to be used on self-adhesive vinyl tiles.
Pressurized steam may bounce back off cleaning surface.
•Using the cleaning accessories generally require less water than wallpaper removal. Using less water will decrease time it takes for the unit to make steam.
•Activate the trigger as needed for sufficient steam supply. Use the soft bristles to brush away dirt, grease, unwanted dried paint, etc. Do not overscrub the surface unless you are cleaning tiles or stone.
•Use only clean tap water or distilled water when using the steamer. No detergents or any other additives are needed.
•When cleaning upholstery or clothing, do not soak the material. Try cleaning an inconspicuous area that is normally not in view and wait 24 hours before checking whether the material has been affected.
If material has been adversely affected, do not continue!
Using the Cleaning Accessories:
The accessories are excellent tools for cleaning a variety of surfaces.
Note: Using the optional accessories for cleaning generally requires less water than wallpaper removal. Using less water will decrease time it takes for the unit to make steam.
The Large Cleaning Brush (a)
The large cleaning brush and |
(a) |
towel can be used to clean |
|
large, solid areas or upholstery. |
|
It can be used on surfaces such |
|
as ceramic, stone, parquet, |
|
marble, linoleum and carpet |
|
(see Steam Cleaning Tips, |
(b) |
right, before cleaning). |
Window / Tile squeegee (b) |
|
The squeegee is an excellent |
|
tool for cleaning windows and |
|
also tiles. The rubber blade |
|
can be used to scrape away dirt |
|
and other particles as steam is |
(c) |
applied. |
|
The Extensions (c) |
|
The extensions can be used for |
|
floor cleaning and to help you |
|
reach into higher or harder to |
(d) |
reach areas. |
|
The Jet Nozzle with Brush (d) |
|
The jet nozzle is recommended |
|
for steam cleaning smaller, harder to reach areas. |
|
Steam Cleaning Tips - Read before starting
Flooring and Carpeting:
•This unit is not recommended for use on surfaces that can be damaged by heat or water, such as selfadhesive vinyl tiling, or wood flooring as the steam may cause the floor boards to swell. Always check with floor manufacturer before using steamer.
•Some carpets contain stain resistant treatments which may be affected by steam cleaning. Try cleaning a small, normally unseen area of carpet, and allow 24 hours to verify any unusual effects on the carpet. If this occurs, do not conutinue to use. Check with your carpet supplier for further information.
Windows and Tiles:
•Be careful not to pick up dirt or grit particles on the rubber blade as this could scratch the glass.
•Antique and stained glass may be brittle and may crack under extreme temperatures.
•Do not use on glass when the temperature is below 32ºF (0ºC). Glass may crack in cold temperatures.
•If your window has been treated or coated in any way, check with manufacturer before using steamer.
Upholstery and Fabrics:
•Some upholstery and fabrics contain stain resistant treatments which may be affected by steam cleaning.
Try cleaning a small, normally unseen area and allow 24 hours to verify any unusual effects. If this occurs, do not continue to use. Check with material supplier for further information.
•Always check the suitability of materials before steam cleaning. Do not use on any surfaces that cannot withstand temperatures in excess of 212ºF
(100ºC).
•On clothing, always check the garmet label or check with the clothing retailer before steam cleaning.
•When cleaning upholstery or clothing, do not soak the material. Only a small amount of steam is sufficient for cleaning. Too much steam can leave water marks or other damage.
General:
•Activate the trigger as needed for sufficient steam supply. Use the soft bristles on the accessories to brush away dirt, grease, unwanted dried paint, etc. Do not over-scrub the surface unless you are cleaning tiles or stone.
•Use only clean tap water or distilled water when using the steamer. No detergents or any other additives are needed.
•Read this manual for complete instructions. Follow all warnings.
English |
6 |
|
|
|
|
 Loading...