Wagner 890 User Manual

890
Contents
2Important Safety Information
4 |
Overview |
5 |
Controls and Functions |
6Material Preparation
7Assembly
8 Air and Material Controls
9 Spray Pattern Adjustment
10 Proper Spraying Technique
12 Cleanup
14Reassembly
15Maintenance
16Troubleshooting
49Parts List
52Warranty
Owner’s Manual
Read this manual for complete instructions
Français (page 17) / Español (página 33)
Questions?
Call Wagner Technical Service at:
1-800-328-8251
Register your product online at:
www.wagnerspraytech.com
0614 • Form No. 0529862C
Español Français English
Important Safety Information
Read all safety information before operating the equipment. Save these instructions.
Indicates a hazardous situation which, if not avoided, could result in death or serious injury.
To reduce the risks of fire or explosion, electrical shock and the injury to persons, read and understand all instructions included in this manual. Be familiar with the controls and proper usage of the equipment.
Grounding Instructions
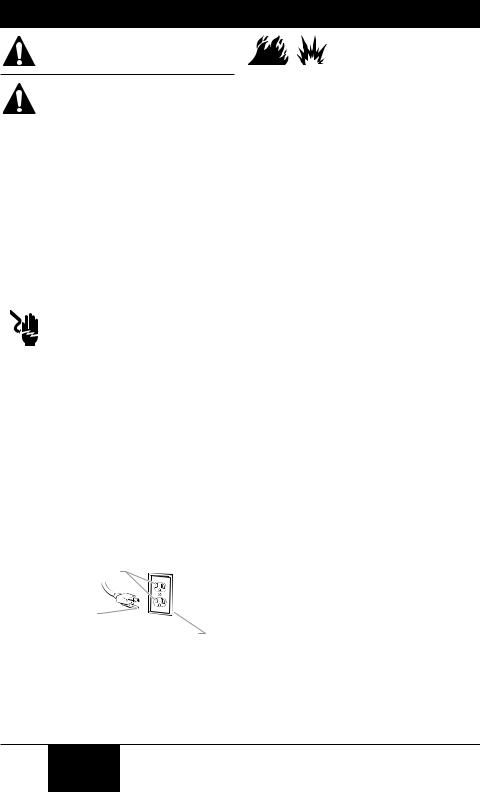
This product must be grounded. In the event of an electrical short circuit, grounding reduces the risk of electric shock by providing an escape wire for the electric current. This product is equipped with a cord having a grounding wire with an appropriate grounding plug. The plug must be plugged into an outlet that is properly installed and grounded in accordance with all local codes and ordinances.
warning - Improper installation of the grounding plug can result in a risk of electric shock.
If repair or replacement of the cord or plug is necessary, do not connect the green grounding wire to either flat blade terminal. The wire with insulation having a green outer surface with or without yellow stripes is the grounding wire and must be connected to the grounding pin.
Check with a qualified electrician or serviceman if the grounding instructions are not completely
understood, or if you are in doubt as to whether the product is properly grounded. Do not modify the plug provided. If the plug will not fit the outlet, have the proper outlet installed by a qualified electrician.
This product is for use on a nominal 120 volt circuit and has a grounding plug that looks like the plug illustrated below. Make sure that the product is connected to an outlet having the same configuration as the plug. No adapter should be used with this product.
Grounded Outlet |
Grounding Pin |
Cover for grounded outlet box |
WARNING - To reduce the risk of fire or explosion:
1.Do not spray flammable or combustible materials near an open flame, pilot lights or sources of ignition such as hot objects, cigarettes, motors, electrical equipment and electrical appliances. Avoid creating sparks from connecting and disconnecting power cords.
2.For use with only water-based or mineral spirit-type materials with a minimum flash point of 100º F (38ºC) — Do not spray or clean with liquids having a flash point of less than 100º F (38ºC). Flash point is the temperature at which a fluid can produce enough vapor to ignite.
3.Verify that all containers and collection systems are grounded to prevent static discharge.
4.Connect to a grounded outlet and use grounded extension cords (electric models only). Do not use a 3 to 2 adapter.
5.Keep spray area well ventilated. Keep a good supply of fresh air moving through the area to keep the air within the spray area free from accumulation of flammable vapors. Keep
turbine assembly in well ventilated area. Do not spray turbine assembly.
6.Do not smoke in the spray area.
7.Do not operate light switches, engines, or similar spark producing products in the spray area.
8.Keep area clean and free of paint or solvent containers, rags, and other flammable materials.
9.Know the contents of the paint and solvents being sprayed. Read all Material Safety Data Sheets (MSDS) and container labels provided with the paints and solvents. Follow the paint and solvent manufacture’s safety instructions.
10. Fire extinguisher equipment shall be present and working.
2 English
© Wagner Spray Tech - All Rights Reserved

Important Safety Information
WARNING - To reduce the risk of injury:
1.Always wear appropriate gloves, eye protection, clothing and a respirator or mask when painting. Hazardous vapors – Paints, solvents, insecticides, and other materials can be harmful if inhaled or come in contact with body. Vapors can cause severe nausea, fainting or poisoning.
2.Do not operate or spray near children. Keep children away from equipment at all times.
3.Do not overreach or stand on an unstable support. Keep effective footing and balance at all times.
4.Stay alert and watch what you are doing.
5.Do not operate the unit when fatigued or under the influence of drugs or alcohol.
6.Never aim spray gun at any part of the body.
7.Follow all appropriate local, state, and national codes governing ventilation, fire prevention, and operation.
8.The United States Government Safety Standards have been adopted under the Occupational Safety and Health Act (OSHA). These standards, particularly part 1910 of the General Standards and part 1926 of the Construction Standards should be consulted.
9.Use only manufacturer authorized parts. User assumes all risks and liabilities when using parts that do not meet the minimum specifications and safety devices of the turbine manufacturer.
10. Power cord must be connected to a grounded circuit.
11. Do not spray outdoors on windy days.
12. Use only Wagner HVLP hose.
WARNING - To reduce the risk of electric shock:
1.Do not submerge air hose into any liquids.
2.Power cord must be connected to a grounded circuit.
3.Never submerge electrical parts in liquids.
4.Never expose the equipment to rain. Store indoors.
5.Keep electrical cord plug and spray gun trigger free from paint and other liquids. Never hold the cord at plug connections to support the cord. Failure to observe may result in an electrical shock.
Important Electrical Information
Use only a 3-wire extension cord that has a 3-blade grounding plug and a 3-slot receptacle that will accept the plug on the product. Make sure your extension cord is in good condition. When using an extension cord, be sure to use one heavy enough to carry the current your product will draw. An undersized cord will cause a drop in line voltage resulting in loss of power and overheating. A 14 gauge or 12 gauge cord is recommended. If an extension cord is to be used outdoors, it must be marked with the suffix W-A after the cord type designation. For example, a designation of SJTW-A would indicate that the cord would be appropriate for outdoor use.
IMPORTANT: Household use only. Intended for indoor/outdoor use ONLY with materials having flashpoint above 100ºF (38ºC).
Thank you for your purchase!
Thank you for purchasing the Wagner FLEXiO sprayer with best-in-class features that are designed for spraying residential paint, un-thinned, indoors or out. Only the FLEXiO sprayers have the power of the X-Boost® turbine and versatility of the iSpray nozzle that will help you finish projects fast and professionally. They are easy to use right out of the box and with low overspray and less clogging you will enjoy the flexibility to tackle all the painting projects on your list. We appreciate your feedback, so please visit our website and write a review on the FLEXiO sprayer so we can continue to learn and improve our products.
Just click on www.wagnerflexio.com
© Wagner Spray Tech - All Rights Reserved |
English |
3 |
|
||
|
|
|
Overview
Note: In order to set up the system, items will need to be retrieved from inside of the X-Boost Power Box.
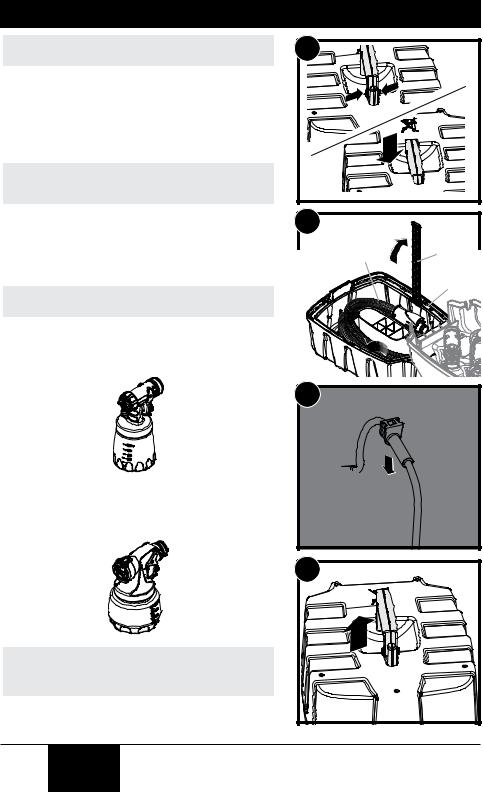
1.Lower the carry handle by pressing the locking tabs on either side of the handle.
2.Open the Power Box (a). Open the air hose retainer (b) inside the cover and retrieve the air hose and handle assembly (c). Close the air hose retainer.
3.Unwrap the power cord. Slide the power cord grommet into the provided recess.
IMPORTANT: Do not close the Power Box cover if the power cord grommet is not positioned correctly. The power cord could be damaged.
4.Remove the desired spray nozzle from inside the Power Box*. Close the cover and pull the carry handle upwards. This will make the nozzle holder accessible during usage.
*Nozzle Selection:
Note: Your unit includes two spray nozzles. See below to determine the correct nozzle for your spraying project.
•DetailFinishNozzle-usedforsmallprojectsandfine finishing. Designed for spraying thinner materials, such as waterand oil-based stains and thinned paints. The Detail Finish Nozzle leaves a smooth finish.
•iSprayNozzle-usedforbroadsurfacecoating.
Designed for spraying thicker materials, such as latex paints and stains. Spraying with this nozzle will leave a slightly coarser finish that is between a roller and finefinish sprayer.
Note: These two spray nozzles have different spray pattern / width controls. Make sure to familiarize yourself with the controls on each spray nozzle. See the “Controls” section, page 8-9.
1 |
|
2 |
|
(c) |
(b) |
|
(a) |
3 |
4 |
4 English
© Wagner Spray Tech - All Rights Reserved
Controls and Functions
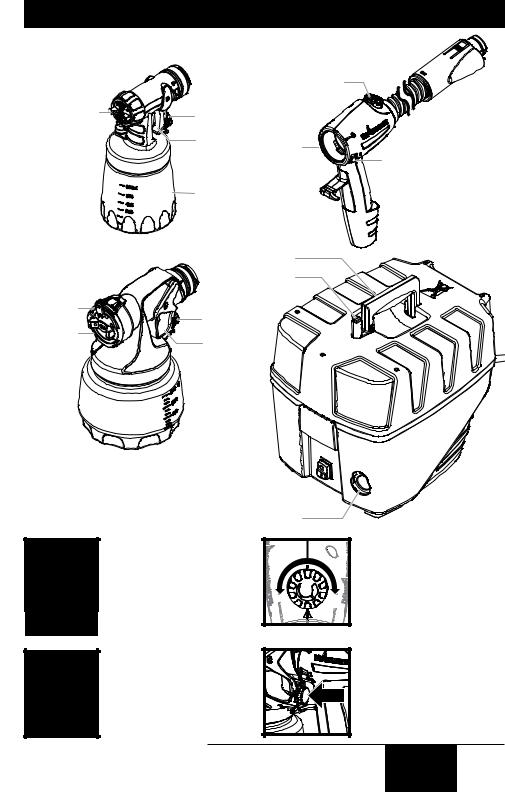
Detail Finish Nozzle |
|
X-Boost Power Dial |
|
|
|
|
|
Air cap |
Material flow |
|
Handle / air hose |
|
|
||
|
control |
|
|
|
|
assembly |
|
|
Trigger |
ON/OFF |
|
|
|
||
|
|
|
|
|
|
switch |
ON/OFF |
|
|
|
switch |
|
Material |
|
|
|
container |
|
|
|
|
Handle |
X-Boost Power Box |
iSpray Nozzle |
|
|
|
Spray gun holder |
|
||
|
|
||
Spray |
|
|
|
width lever |
|
|
|
|
Material flow |
|
|
Adjustment |
control |
|
|
ring |
Trigger |
|
|

 Material
container
ON/OFF switch
Air hose port
Turbine ON/OFF switch:
The turbine ON/OFF switch turns the system’s main power ON (I) and OFF (0).
Note: The turbine will not turn ON with this switch. The handle switch must be turned ON (I) to activate turbine.
Handle ON/OFF switch:
The handle ON/OFF switch will ready the nozzle for spraying.
|
|
X-Boost Power Dial: |
|
|
The X-Boost Power Dial |
|
|
adjusts the level of air pressure |
- |
+ |
produced by the turbine. |
|
|
Material Flow Control: |
|
|
The material flow control |
|
|
determines the amount of |
|
|
spray material that is sprayed |
|
|
from the spray gun. |
© Wagner Spray Tech. - All Rights Reserved |
English |
5 |
|
Material Preparation
Note: Material to be sprayed may need to be strained to remove any impurities in the paint which may enter and clog the system. Impurities in the paint will give poor performance and a poor finish.
Note: Only thin the material if absolutely necessary to improve spray performance (or if advised by coating manufactuer). Optimal spray performance should be acheived simply by adjusting the various controls on the unit.
Thinning the material:
For certain spraying situations or desired finishes, thinning the material may be desired. It is not necessary for most materials when used with the iSpray nozzle. For use with the Detail Finish nozzle thinning may be needed to acheive a finer finish. Make sure you adjust the X-Boost™ and Material Flow settings for your specific material needs.
If thinning is necessary, use the proper solvent as specified by the material manufacturer. Never exceed the thinning advice given by the coating manufacturer.
Do not thin with materials that have a flashpoint below 100°F (38°C). The
material flashpoint should be shown on the material container.
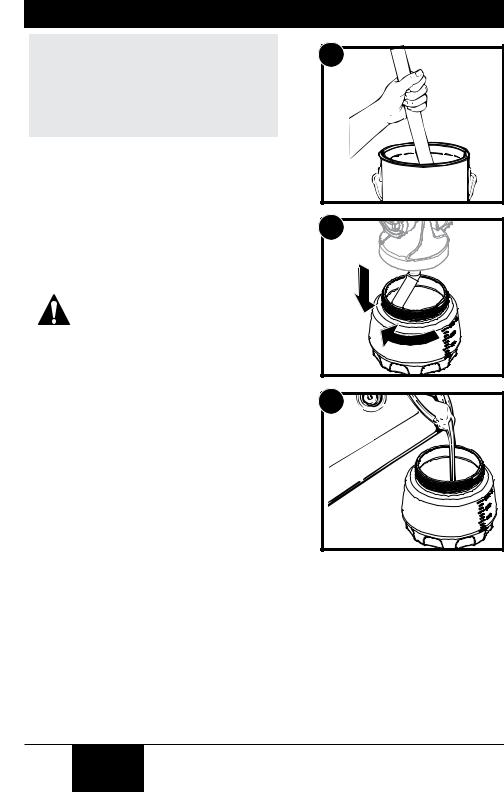
To Prepare the Material:
1.Stir the spraying material thoroughly.
2.Unscrew the cup from the nozzle.
3.After the material has been properly thinned and strained, fill the container to desired level. Do not attach the container to the nozzle yet.
1
2
3 |
6 English
© Wagner Spray Tech. - All Rights Reserved
 Loading...