


User's Guide
KEEPING THE WORLD SEWING™

This householdsewing machine is designed to comply with IEC/EN 60335-2-28 and UL 1594
IMPORTANT SAFETY INSTRUCTIONS
When using an electrical appliance, basic safety precautions should always be followed, including the following:
Read all instructions before using this household sewing machine.
DANGER - To reduce the risk of electric shock:
•A sewing machine should never be left unattended when plugged in. Always unplug this sewing machine from the electric outlet immediately after using and before cleaning.
•Always unplug before relamping. Replace bulb with same type rated 5 Watt.
WARNING - To reduce the risk of burns, fire, electric shock, or injury to persons:
•This sewing machine is not intended for use by persons (including children) with reduced physical, sensory or mental capabilities, or lack of experience and knowledge, unless they have been given supervision or instruction concerning use of the sewing machine by a person responsible for their safety.
•Children should be supervised to ensure that they do not play with the sewing machine.
•Use this sewing machine only for its intended use as described in this manual. Use only attachments recommended by the manufacturer as contained in this manual.
•Never operate this sewing machine if it has a damaged cord or plug, if it is not working properly, if it has been dropped or damaged, or dropped into water. Return the sewing machine to the nearest authorized dealer or service center for examination, repair, electrical or mechanical adjustment.
•Never operate the sewing machine with any air openings blocked. Keep ventilation openings of the sewing machine and foot controller free from the accumulation of lint, dust, and loose cloth.
•Keep fi ngers away from all moving parts. Special care is required around the sewing machine needle.
• Always use the proper needle plate. The wrong plate can cause the needle to break.
•Do not use bent needles.
•Do not pull or push fabric while stitching. It may defl ect the needle causing it to break.
•Switch the sewing machine off (“0”) when making any adjustment in the needle area, such as threading needle, changing needle, threading bobbin, or changing presser foot, etc.
•Always unplug sewing machine from the electrical outlet when removing covers, lubricating, or when making any other user servicing adjustments mentioned in the instruction manual.
•Never drop or insert any object into any opening.
•Do not use outdoors.
•Do not operate where aerosol (spray) products are being used or where oxygen is being administered.
•To disconnect, turn all controls to the off (“0”) position, then remove plug from outlet.
• |
Do not unplug by pulling on cord. To unplug, grasp the plug, not the cord. |
• |
Keep fi ngers away from moving parts, especially the area near the blades. |
SAVE THESE INSTRUCTIONS
For the USA and Canada
This sewing machine has a polarized plug (one blade wider than the other). To reduce the risk of electric shock, this plug is intended to fi t in a polarized outlet only one way. If the plug does not fi t fully in the outlet, reverse the plug. If it still does not fi t, contact a qualifi ed electrician to install the proper outlet. Do not modify the plug in any way.
Please note that on disposal, this product must be safely recycled in accordance with relevant National legislation relating to electrical/electronic products. If in doubt please contact your retailer for guidance.
|
Table of contents |
|
1. |
SUMMARY............................................................................................... |
1 |
1 |
- 1. Name of parts.......................................................................................... |
1 |
1 |
- 2. Accessories ............................................................................................. |
2 |
1 |
- 3. Preparation .............................................................................................. |
3~4 |
1 |
- 4. Sewing speed .......................................................................................... |
5 |
1 |
- 5. Telescopic thread stand ........................................................................... |
5 |
1 |
- 6. Replacing the needle............................................................................... |
6 |
1 |
- 7. Changing threads .................................................................................... |
7 |
1 |
- 8. Stitch fi nger lever ..................................................................................... |
8 |
1 |
- 9. Presser foot lift......................................................................................... |
8 |
1-10. Disengaging the upper cutter .................................................................. |
8 |
|
1-11. Free arm .................................................................................................. |
8 |
|
2. SEWING ADVISOR DISPLAY GUIDE..................................................... |
9 |
|
2 |
- 1. Selection buttons ..................................................................................... |
9 |
2 |
- 2. Sewing Advisor display function .............................................................. |
10 |
2 |
- 3. Choice of language.................................................................................. |
11 |
2 |
- 4. Auto Mode ............................................................................................... |
11~12 |
2 |
- 5. Manual Mode........................................................................................... |
12 |
2 |
- 6. Memory Mode ......................................................................................... |
13~14 |
2 |
- 7. Stitch table............................................................................................... |
15 |
2 |
- 8. Table of fabric type................................................................................... |
15 |
2 |
- 9. Error messages ....................................................................................... |
15 |
3. |
THREADING............................................................................................ |
16 |
3 |
- 1. Upper looper threading (A) ...................................................................... |
16 |
3 |
- 2. Lower looper threading (B) ...................................................................... |
17 |
3 |
- 3. Needle threading (C) (D) ......................................................................... |
18 |
3 |
- 4. Preparations and control ......................................................................... |
19 |
3 |
- 5. Presser foot pressure .............................................................................. |
19 |
3 |
- 6. Thread tension table ................................................................................ |
19 |
3 |
- 7. Thread tension......................................................................................... |
20~21 |
3 |
- 8. Adjusting the stitch width / cutting width .................................................. |
22 |
3 |
- 9. Stitch length............................................................................................. |
23 |
3-10. Differential feed........................................................................................ |
23~24 |
|
4. |
SEWING................................................................................................... |
25 |
4 |
- 1. Four thread overlock stitch with 2 needles .............................................. |
25 |
|
Before sewing.......................................................................................... |
25 |
|
Insert the fabric ....................................................................................... |
25 |
|
Start sewing and chain off....................................................................... |
25~26 |
|
Cording thread / Decorative thread ......................................................... |
27 |
|
Serging curves ........................................................................................ |
28 |
4 |
- 2. Three thread overlock.............................................................................. |
29~30 |
4 |
- 3. Two thread overlock ................................................................................. |
31 |
4 |
- 4. Stitch selection table two-thread sewing.................................................. |
32 |
4 |
- 5. Rolled edge ............................................................................................. |
33~34 |
4 |
- 6. Flatlock .................................................................................................... |
35 |
4 |
- 7. Pin tuck.................................................................................................... |
36 |
4 |
- 8. Five thread overlock stitch and Double chain stitch................................. |
37~39 |
4 |
- 9. Cover stitch.............................................................................................. |
40~48 |
5. |
|
MAINTENANCE....................................................................................... |
49 |
5 |
- 1. Changing the light bulb............................................................................ |
49 |
|
5 |
- 2. Cleaning after sewing .............................................................................. |
50 |
|
5 |
- 3. Storage .................................................................................................... |
50 |
|
5 |
- 4. Replacing the lower cutter ....................................................................... |
50 |
|
5 |
- 5. Lubrication............................................................................................... |
50 |
|
6. |
|
STITCH TABLE........................................................................................ |
51~54 |
7. |
|
TABLE OF SEWING MATERIALS, NEEDLES AND THREADS............. |
55 |
8. |
|
TROUBLE SHOOTING............................................................................ |
56 |
9. |
|
SPECIFICATIONS ................................................................................... |
57 |
10. |
OPTIONAL ACCESSORIES.................................................................... |
58 |
|
10-1. Presser feet-optional accessories ........................................................... |
58~66 |
||
10-2. Waste tray ............................................................................................... |
67 |
||
11. |
NOTE....................................................................................................... |
68~71 |
|
12. |
INDEX...................................................................................................... |
72 |
|
1 |
2 |
3 |
4 |
5 |
6 |
7 |
9
18
4 |
22 |
8 |
10 |
11 |
12 |
13 |
14 |
15 |
16 |
17 |
|
19 |
20 |
21 |
|
1. SUMMARY |
|
|
|
|
|
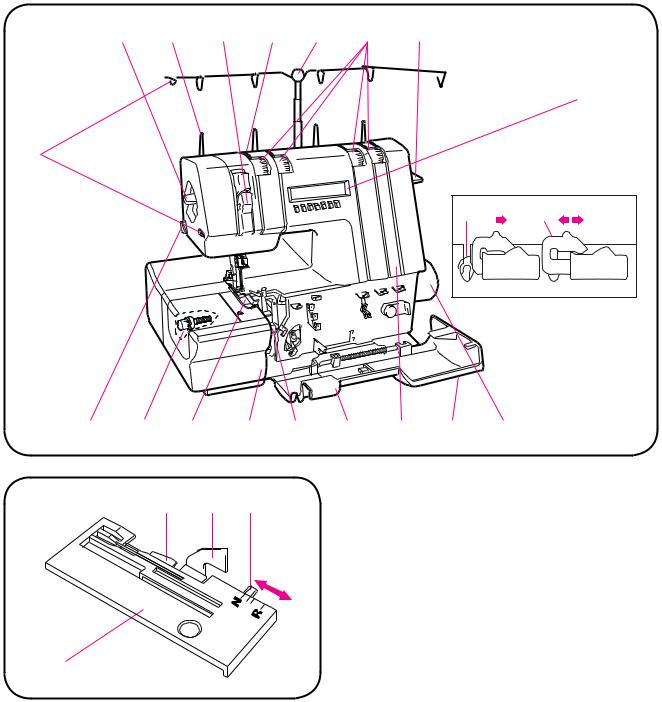
1-1. Name of parts |
|
|||||
|
|
|
|
|
1. |
Presser foot pressure adjustment dial |
||
|
|
|
|
|
2. |
Spool pin |
|
|
|
|
|
|
|
3. |
Thread take-up lever cover |
||
|
|
|
|
|
4. |
Thread guides |
|
|
|
|
|
|
|
5. |
Telescopic thread stand |
||
|
|
|
|
|
6. |
Thread tension dials |
||
|
|
|
|
|
7. |
Presser foot lift lever |
||
|
|
|
|
|
8. |
Thread cutter |
|
|
Needle plate |
|
|
|
|
9. |
Thread guides A for decorative thread / |
||
|
|
|
|
|
|
cording thread |
|
|
|
|
|
|
|
10. Upper cutter knob |
|
||
|
|
|
|
|
11. Presser foot |
|
||
|
|
|
|
|
12. Sewing surface, flat bed cover |
|||
|
|
|
|
|
13. |
Cutting width / stitch width adjusting dial |
||
|
|
|
|
|
14. Cutter cover |
|
||
|
|
|
|
|
15. Front panel |
|
||
|
|
|
|
|
16. Front cover |
|
||
|
|
|
|
|
17. Handwheel |
|
||
|
|
|
|
|
18. Sewing Advisor™ liquid crystal display |
|||
|
|
|
|
|
|
(LCD) |
|
|
|
|
|
|
|
19. |
Stitch finger |
|
|
|
|
|
|
|
20. Upper cutter |
|
||
|
|
|
|
|
21. |
Stitch finger lever |
|
|
|
|
|
|
|
22. Thread guides B for decorative thread |
|||
—1—

1-2. Accessories |
|
|
Screw driver |
|
Oiler |
Allen wrench (1.5mm) |
|
Tweezers |
Cleaning brush |
|
Spool holder |
Light bulb changer |
|
Presser foot (C) |
|
|
for Cover stitch |
Needle plate (C) |
|
Needle threader |
for Cover stitch |
|
|
and double |
|
|
chain stitch |
|
|
Multipurpose foot |
|
Vinyl cover |
Net for thread spools |
|
Cutter cover (C) |
|
|
for Cover stitch |
|
|
and double |
|
|
chain stitch |
Needles (SCHMETZ 130/705H) |
Waste tray |
By pass for thread guide E |
#80 |
|
|
#90 |
|
|
|
|
—2— |
1-3. Preparation
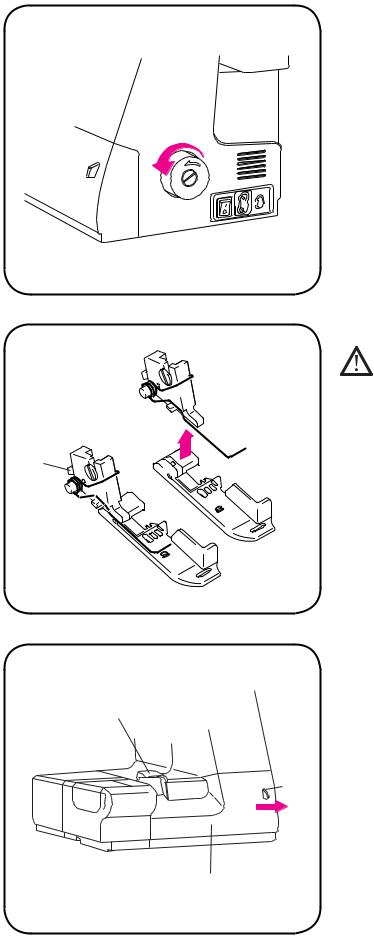
Handwheel
Always turn handwheel toward you.
|
Change the presser foot |
|
|
|
Turn the main power switch off. |
|
|
(See page 4) |
|
1. |
Raise presser foot. |
Attach |
2. Raise needle to its highest position by turning |
|
Remove |
|
the handwheel toward you. |
|
|
|
A |
3. |
Push button (A) and the foot will come off. |
|
||
|
4. |
Position the new foot with the pin beneath |
|
|
the groove of the ankle. Lower the presser |
foot lever to mark the ankle snap on to the presser foot.
Open the front cover
Push part (B) - at the arrow - to the right and
pull the cover down toward you.
Cutter cover
Close the front cover
Close the cover with caution. The front cover
B must be closed while sewing. The front cover has a safety switch. If the front cover is not closed, the machine will not sew.
Front cover
—3—

Accessory box
Lift the accessory box slightly and slide it in the direction of the arrow .
The accessory box consists of two parts. It holds the foot control and other accessories. To slide the box back on, reverse the steps from above.
Connection
Note: Turn the main power switch off. Among the accessories you will find the foot control cord and the main cord.
1.Place the foot control on its narrow side. Fit the plug into the socket inside the foot control compartment.
2.Push it firmly to make sure it is properly connected. This operation only necessary the very first time you are going to use the machine.
3.To correctly turn away the cord, place it into the slot, see picture.
Note: Before plugging in, check to ensure that the foot control is of “FR-4”.
On the back of the machine, there is information about the voltage. Before plugging in your machine, make sure that these values correspond to power supply. The specifications vary from country to country.
Connect foot control and power cord . When pressing the main switch, both machine and sewing light are turned on.
•Always turn off and unplug the machine when not in use.
•When the power switch is turned off, the machine will not start even if you press the foot control.
•Never leave anything on the foot control.
—4—
2
1


1
 2
2
ON
OFF
Indicator
Speed selector
1-4. Sewing speed
The harder you press the foot control, the faster the machine will sew. You can choose between three sewing speeds, (slow, medium, fast) with the speed selector.
When you turn on the machine, the medium speed mode is selected. Indicated symbol and maximum speed modes are as follows:
 :0-500 Slow speed mode
(max. speed 500 stitches/min)  :0-1000 Medium speed mode
(max. speed 1000 stitches/min)  :0-1300 Fast speed mode
(max. speed 1300 stitches/min)
Note : While “Chain stitch”, “Cover stitch wide”, “Cover stitch narrow” and “Triple cover stitch” are selected, the maximum speed mode is limited to slow and medium only.
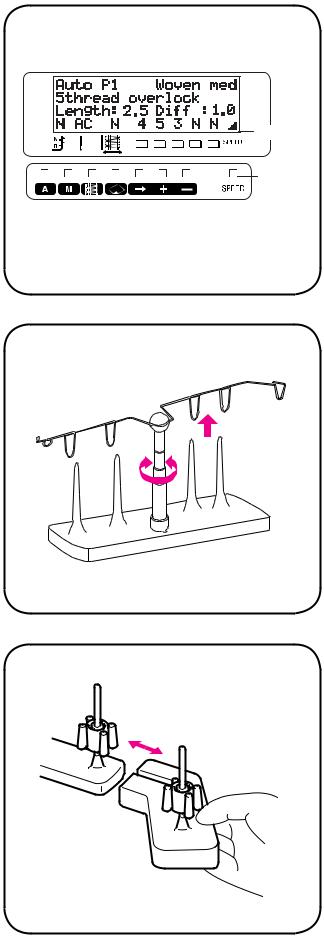
1-5. Telescopic thread stand
Extend the telescopic thread stand to its full height and turn until it locks against the stop. Make sure the round loop is to the left.
—5—
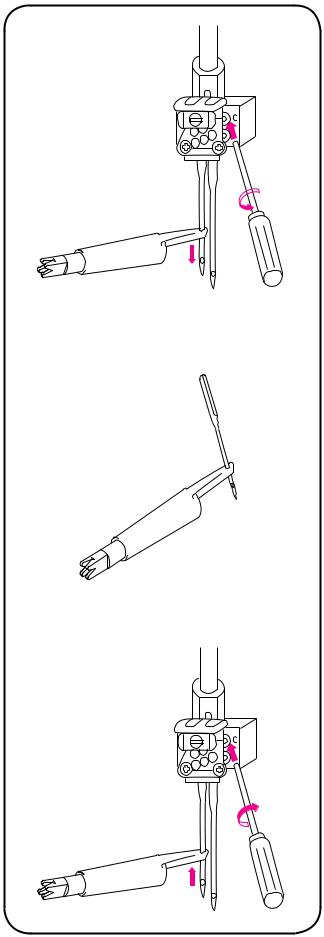
1-6. Replacing the needle
 Turn the main power switch off.
1.Turn the handwheel toward you (counterclockwise) by hand until the needle is in its highest position.
2.Insert the needle into the opposite side needle hole of Needle threader.
3.Loosen the needle set screw with allenwrench and remove the needle.
Please be sure to tighten loosen set screws
after removing the needle.
Note : Please use the allenwrench included in the standard accessories for the proper installation.
IMPORTANT
Lightly tighten the screw at the unused needle position, so it does not fall out while sewing.
To insert the needle
 Turn the main power switch off.
1.Turn the handwheel until the needle bar is in its highest position.
2.Insert the needle into the opposite side needle hole of Needle threader as far as it goes with holding the flat side of needle away from you.
3.Tighten the needle set screw with allenwrench.
4.If a needle does not go up all the way it may be necessary to loosen the adjacent needle screw slightly.
—6—
Cut the thread |
Tie the thread |
A B
 Presser
foot lift
Presser foot
Eye of the needle
1-7. Changing threads
The machine comes threaded with overlock thread. To change thread follow the easy threading as explained on page 16~18 or to tie on:
1.Cut the thread in use near the thread spool (in front of the telescopic thread stand). Place the new thread spool on the spool pin and tie the thread ends together.
2.Raise the presser foot with the presser foot lift up to release the thread tension, so the knot can easily pass through the thread tension discs.
3.Pull out the looper thread until the thread knot comes about 10 cm (3” to 4”) behind the presser foot.
4.When changing the needle thread, cut the thread knot before it reaches the eye of the needle to avoid bending the needle.
Thread net
In some cases cover the spool with the net to prevent threads from slipping off the spool. Slide on the net so that it covers the spool entirely.
Spool holder
When using standard thread spools, place the spool holders as shown to hold spool in place. And prevent thread from getting caught on edge of spool.
—7—
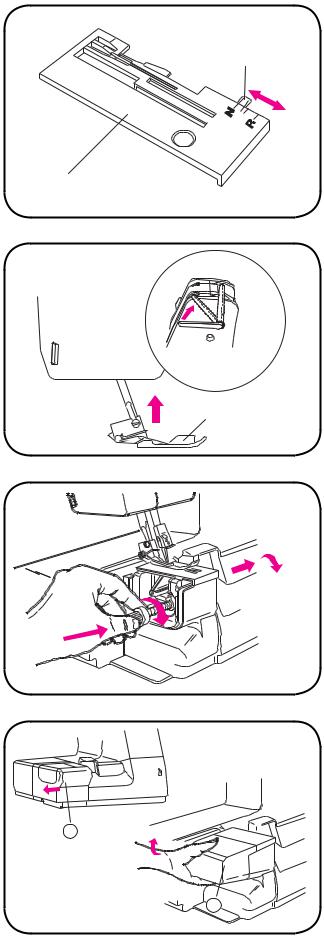
1-8. Stitch finger lever
(Convert from overlock stitch to rolled edge) Raise the needle to its highest position by turning the handwheel toward you.
Overlock
Push the stitch finger lever to align it with “N” on the needle plate.
Rolled edge
Pull the stitch finger lever toward you to align it with “R” on the needle plate.
1-9. Presser foot lift
Lift up the presser foot lift to raise the presser foot. The presser foot lift stops at position “A”. When replacing the presser foot or when inserting very thick fabrics under the presser foot, the lift height can be increased by pushing the presser foot lift to position “B” and holding it there. Make sure that the upper looper is in its lowest position.
Note : Never sew with the presser foot up.
1-10. Disengaging the upper cutter
For Cover stitch or to sew along the edge of the fabric, the upper cutter can be disengaged.
1.Remove the flat bed cover a and the free arm cover b pulling the respective cover in the direction of the arrow.
2.Open the front cover.
3.Push the knob to its maximum point and turn the knob to lower according to the arrow. Since the cutter is sharp, be careful when disengaging it.
4.Replace free arm and flat bed cover .
Note : Be sure to put the cutter fully down before sewing.
Note : You must sew along the edge of the fabric when the cutter is disengaged or set for Cover stitch.
1-11. Free arm
Pull out the flat bed cover a in the direction of the arrow. The free arm is convenient for sewing trousers legs, cuffs, and other small areas such as children’s garments.
How to remove the free arm:
Hold the free arm cover b as shown in the picture.
1.Lift it up to release the clamps.
2.Pull it to the left.
—8—
Stitch finger lever
Needle plate
B
A
Presser foot lift
Presser foot
Front cover
a
b
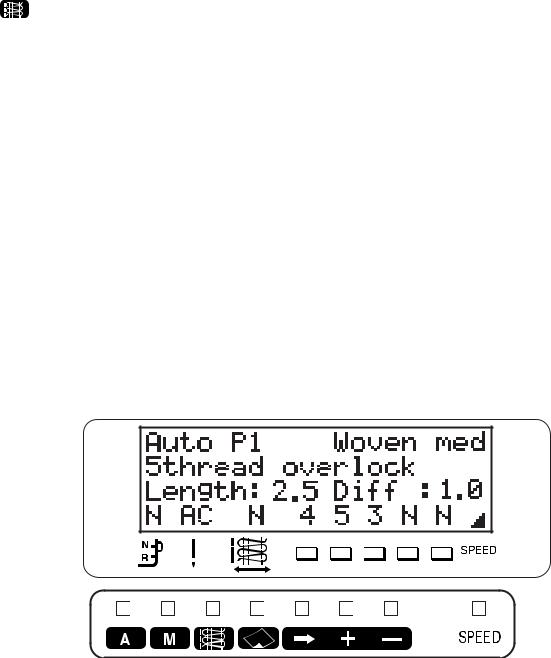
2. SEWING ADVISOR DISPLAY GUIDE
2-1. Selection buttons
The buttons below can either be pressed one step at a time or held until the desired setting is obtained.
1. : Auto button
Press for Auto Mode . Standard settings are displayed. 2. : Memory button
Press to retrieve stored settings or store new setting preference in memory.
3. |
: Stitch selection button |
Retrieve the 16 pre-set stitches in Auto Mode . 4.  : Fabric selection button
Select fabric type in Auto Mode . 5. : Cursor button
Access Manual Mode to enter and or alter settings. Cursor moves as follows:
Stitch length - Differential feed ratio - Cutting width(if applicable) - Thread tension 6.-7.  : Plus(+) and Minus(-) button
In Manual Mode , settings increase(+) or decrease(-). In Memory Mode , cursor moves to stored memories. 8. 


 : Speed selection button
Select maximum speed mode. Refer to “1-4. Sewing speed (page 5)”. 9. Sewing Advisor display
All stitch settings can be shown in the display.
—9—
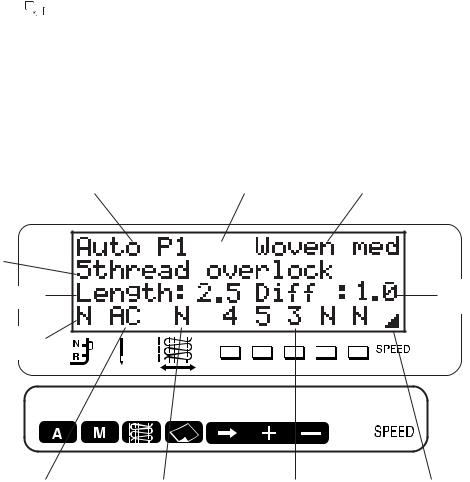
2-2. Sewing Advisor display function
Mode and stitch number :
Mode and pre-set stitch are displayed.
Memory number :
In Memory Mode , stored memory number is displayed.
Fabric :
Fabric type is displayed.
Stitch :
Stitch description is displayed.
Stitch length :
The recommended stitch length is displayed.
Differential feed ratio :
Standard ratio is displayed.
Stitch finger position :
Recommended position is displayed which corresponds to marking on the needle plate.
Needle position :
Recommended needle position is displayed which corresponds to marking on the needle clamp.
Cutting width :
The recommended cutting width is displayed.
When marking |
|
|
|
apperas on the Sewing Advisor, it means to lower the upper cutter. |
|
|
|
Thread tension :
The recommended thread tension is displayed.
Each thread tension dial corresponds to color symbols from left to right.
Speed indicator :
Selected maximum speed mode is displayed. Refer to “1-4. Sewing speed (page 5)”.
Mode and stitch number |
Memory number |
Fabric |
Stitch
Stitch length |
Differential |
|
feed ratio |
||
|
Stitch finger position
|
|
|
|
|
|
|
|
|
|
|
|
|
|
|
|
|
Needle position |
|
Cutting width |
|
Thread tension |
|
Speed indicator |
||||||||||
—10—

2-3. Choice of language
You can select the following languages :
American English, British English, French, Italian, German, Swedish, Norwegian, Danish, Finnish, Dutch, Spanish, Czech, Polish, and Russian.
Select the language as follows:
1.Turn on the machine while pressing the auto button  and cursor button
  simultaneously. The pre-set language is displayed.
2.Press the plus button  or minus button
  until the desired language is displayed.
3.Press the memory button  .
.
4.The selected language is now stored and stays in memory even if you turn off the machine.
2-4. Auto Mode
The recommended settings are displayed for perfect stitching.
Note : Fabric and thread may vary. Therefore try the setting on scraps first.
(1) Stitch selection
Turn on the machine, then “Auto A1 ” type of fabric “ Woven med ” (for woven medium)
and stitch “ 4-thread overlock ” appears. |
|
|
Change the stitch by pressing the stitch selection button |
. |
|
Each time you press the button |
, the recommended settings are displayed. |
|
Compare with “2-7. Stitch table (page 15)” and continue pressing the stitch selection button


 until the desired stitch is displayed.
When the display shows “—” for the thread tension, it means “Do not thread here ”.
Note : When it is necessary to change the accessory type, the accessory alert message is displayed. To cancel this message, press the auto button  . For accessory type, see “4. Sewing (page 25)”.
—11—
Example: If you press the stitch selection button 3 times, the following will be displayed:
|
|
|
|
|
|
|
|
|
|
|
|
|
|
|
|
|
|
|
|
|
|
|
|
|
|
|
|
|
|
|
|
|
|
|
|
|
|
|
|
|
|
|
|
|
|
|
|
|
|
|
|
|
|
|
|
|
|
|
|
|
|
|
|
|
|
|
|
|
|
|
|
|
|
|
|
|
|
|
|
|
|
|
|
|
|
|
|
|
|
|
|
|
|
|
|
|
|
|
|
|
|
(2) Selection of fabric |
|
|
|
|
|
|
|
|
|
|
|
|
|
|
|
|
|
|
|||||||||||||||
Select the fabric type with the fabric selection button |
. |
|
|
|
|
|
|
|
|
|
|
||||||||||||||||||||||
The recommended setting then appears on the |
Sewing Advisor . |
|
|||||||||||||||||||||||||||||||
The message “ Not advised ” appears when the setting is not recommended.
See “ 2-8. Table of fabric |
type (page 15)”. |
Set up your Huskylock™ |
as advised by the Sewing Advisor . |
The machine is now ready for sewing.
Note : Fabric and thread may vary. Always test sew before starting on your garments.
Note : The stitch length and the differential ratio are adjusted automatically in accordance with the displayed numbers.
2-5. Manual Mode
Manual Mode allows you to alter the auto setting. Your own setting can be stored inMemory Mode. See below.
Manual setting as follows : |
|
1. Enter Manual Mode by pressing the cursor button |
. |
2.The changeable number starts to blink.
3.Move by means of the cursor button  to the number to be changed.
4.Selected number can be altered by pressing plus or minus button  .
.
5.Continue pressing these buttons until the desired numbers appear.
6. To save this setting, store it in Memory Mode .
Note : The stitch length and the differential ratio are adjusted automatically in accordance with the displayed numbers.
The other settings may be adjusted with each dial or knob.
—12—
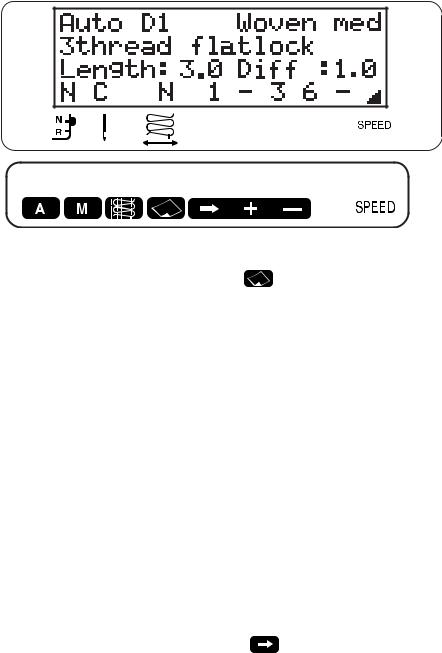
2-6. Memory Mode
After making new settings in Manual Mode , you can store your settings or retrieve them in this
mode.
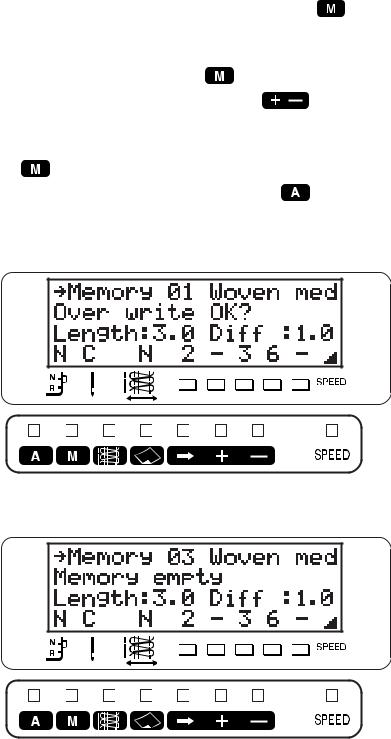
(1) Store new setting in memory |
|
After changing the settings in Manual Mode , press memory button |
and then memory number |
blinks. If the blinking memory number is used already, the message “Over write OK? ” appears and
blinks. |
|
|
|
If you want to overwrite, press the memory button |
again. |
|
|
If you do not want to overwrite, press plus or minus button |
until you reach an empty |
||
memory. |
|
|
|
When the memory is empty, the message “Memory empty ” appears and blinks. |
|||
Press memory button |
to store. |
|
|
If you do not want to overwrite or store, press the auto button |
to leave Memory Mode . |
||
Example: Memory number 01 is full.
Example: Press plus button  twice and memory number 03, which is empty, will be displayed.
Note : There are 50 memories available. On the last page of this instruction book, there is space for your notes about what you have stored.
—13—

(2) Retrieve from memory
When turning the machine on, the recommended standard settings are displayed.
Press memory button  . Now “
  Memory ” appears with the last setting you made before turning off the machine.
Select the memory you want to use by pressing plus or minus button  .
.
(3) Delete from memory |
|
|
|
|
Press the memory button |
. Now “ |
|
Memory ” appears with the last setting you made before |
|
|
||||
turning off the machine. |
|
|
|
|
Select the memory you wish to delete by pressing plus or minus button |
. |
|||
Then press the stitch selection button |
|
and the fabric selection button |
simultaneously. |
|
Now message “Memory will clear ” appears and starts to blink. |
|
|||
Note : If you want to cancel the deletion, release both buttons.
Press memory button  while pressing stitch selection button
  and fabric selection button
  at the same time to execute the deletion.
The message “ Memory empty ” appears and now the deletion is completed. Press auto button  for standard setting.
—14—

2-7. Stitch table
The following 16 stitches are programmed in the Husqvarna Viking® Huskylock 936
|
|
Stitch |
Display text |
|
|
|
|
|
|
4-thread overlock |
4thread overlock |
|
|
|
|
|
|
3-thread wide overlock |
3thread wide o/l |
|
|
|
|
|
|
3-thread narrow overlock |
3thread narrow o/l |
|
|
|
|
|
|
3-thread flatlock |
3thread flatlock |
|
|
|
|
|
|
3-thread rolled edge |
3thread rolled edge |
|
|
|
|
|
|
3-thread narrow rolled edge |
3thread narrow edge |
|
|
|
|
|
|
2-thread wide overlock |
2thread wide o/l |
|
|
|
|
|
|
2-thread narrow overlock |
2thread narrow o/l |
|
|
|
|
|
|
2-thread flatlock |
2thread flatlock |
|
|
||
|
|
|
|
|
|
2-thread rolled edge |
2thread rolled edge |
|
|
|
|
|
|
2-thread narrow rolled edge |
2thread narrow edge |
|
|
|
|
|
|
Chainstitch |
Chainstitch |
|
|
|
|
|
|
Cover stitch wide |
Cover stitch wide |
|
|
|
|
|
|
Cover stitch narrow |
Cover stitch narrow |
|
|
|
|
|
|
Triple cover stitch |
Triple cover stitch |
|
|
|
|
|
|
5-thread overlock |
5thread overlock |
|
|
|
|
2-8. Table of fabric type
Code fabric display abbreviations.
|
Fabric type |
Display text |
|
|
|
|
Medium woven |
Woven med |
|
|
|
|
Heavy woven |
Woven hvy |
|
|
|
|
Light woven |
Woven It |
|
|
|
|
Medium stretch knit |
Knit med |
|
|
|
|
Heavy stretch knit |
Knit hvy |
|
|
|
|
Light stretch knit |
Knit It |
|
|
|
2-9. Error messages
When the following messages are displayed, correct the troubles.
Message |
Meanings |
|
|
Lower presser foot |
The presser foot must be down while sewing. |
|
|
Close front cover |
The front cover must be closed while sewing. |
|
|
Overloaded |
Remover fabric, then begin sewing again. |
|
|
Use other memory |
Select another memory. |
|
|
Call service |
No access to memories. |
|
|
—15—

3. THREADING (For four thread overlock stitch)
Thread the machine in the following order: Upper looper ( A )
Lower looper ( B ) Needles ( C,D )
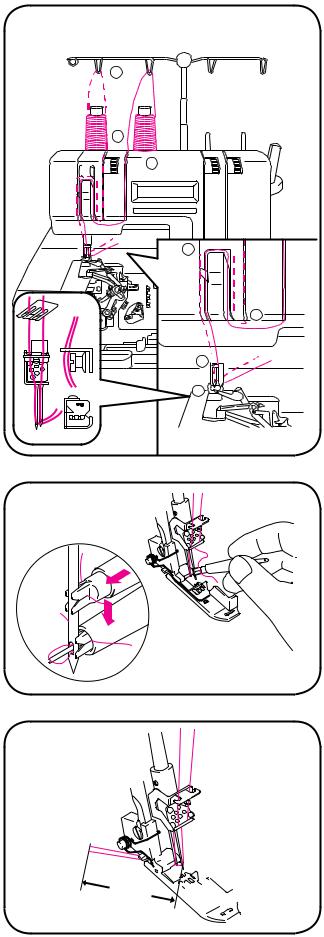
3-1. Upper looper threading ( A )
1.Set the upper looper to the highest position by turning the handwheel toward you.
2.Raise the presser foot.
3.Open front cover.
4.Pull thread from spool through guide of the thread stand and then through guides to
.
When using decorative thread, move the thread guide for decorative thread (B) to the right(D), then thread through thread guide.
When using regular thread, move the thread guide for decorative thread (B) to the left(N).
5.Thread the eye of the upper looper.
6.Pull a thread tail leaving about 10 cm (3” to 4”) long.
Spun thread |
Decorative thread |
D N |
D N |
C D A B
1
2
3
4
9
8
7 5
6
cm 10
9
Note:
For all sewing except 2-thread sewing, set the
2-thread converter as illustrated.
—16—
Spun thread |
Decorative thread |
D N |
D N |
C D A B
1
2
3
|
4 |
|
10 |
a |
|
8 |
||
|
||
9 |
|
|
7 |
5 |
|
|
||
6 |
|
(A)
10 cm
3-2. Lower looper threading ( B )
1.Raise the presser foot.
2.Open front cover.
3.Pull thread from spool through guide of the thread stand and then through guide .
Note : Make sure the thread snaps into the slot of guide , and between the thread tensions discs .
4.Turn the handwheel toward you and position the lower looper to the far right.
5.Then thread through guides to .
Note : For best result in sewing narrow edge, thread through guide a.
6.Push lever (A) in the direction of the arrow until the thread holes and are in lined up each other. Pull the thread through eye ,
of the lower looper.
7.Leave about 10 cm (4”) of the thread.
8.The lower looper threader automatically returns to its original position by turning the handwheel once toward you.
—17—
3-3. Needle threading ( C ) ( D )
1.Raise the presser foot.
2.Raise the needle to its highest position by turning the handwheel toward you.
3.Pull thread from spool through guide .
Note : Make sure the thread snaps into the slot of guide and between the thread tension discs .
4.Pull the thread through guides , , for the right needle and through guides , for the left needle.
Note : Make sure that right needle thread (D) passes to the right of the guide and left needle thread (C) to the left.
5.Slide the thread into the ditch of needle threader.
6.Hold the needle threader to the needle with the  mark on top and bottom side. Slide it along the needle to the needle eye. The
thread will loop through the eye of the needle.
7.Pull the thread through the needle eye , with tweezers leaving about 10 cm (4”) of thread tail.
C D A B
1
 2
2
 3
3
5 


 4
4
6 
7
10cm 


—18—
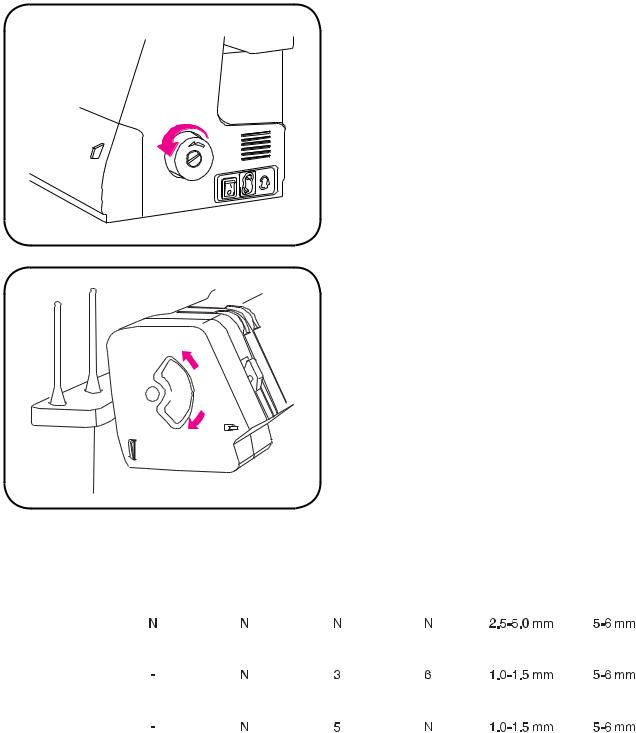
3-4. Preparations and control
Check that thread has not slipped off the guides nor has broken. Make sure the upper cutter moves correctly against the lower cutter by slowly turning the handwheel toward you. Check that there are no pieces of fabric or thread between the cutters. Turn the handwheel toward you and make sure the threads form the stitch on the stitch finger of the needle plate. If not, check threading.
When the machine has been threaded, close the front cover and lower the presser foot.
3-5. Presser foot pressure
You can change the presser foot pressure with the numbered dial on the left side of the machine.
1
Position “N” is for normal fabrics. A lower number is for thin fabrics. A higher number is for thick fabrics.

 N
N
5
3-6. Thread tension table
|
Left |
Right |
Upper |
Lower |
Stitch |
Stitch/Cutting |
|
needle |
needle |
looper |
looper |
length |
width |
|
|
|
|
|
|
|
Overlock |
|
|
|
|
|
|
|
|
|
|
|
|
|
Rolled edge |
|
|
|
|
|
|
|
|
|
|
|
|
|
Narrow edging |
|
|
|
|
|
|
|
|
|
|
|
|
|
The thread tension is only a recommendation according to the chart above. See recommendation in the Sewing Advisor display.
Since the numbers in the chart are average it may be necessary to adjust the tension somewhat according to different types of fabric and threads.
Note : Fabric and thread structure may vary between different weights and types. Therefore try the best setting for your machine.
The differential feed ratio is normally “1.0”.
—19—
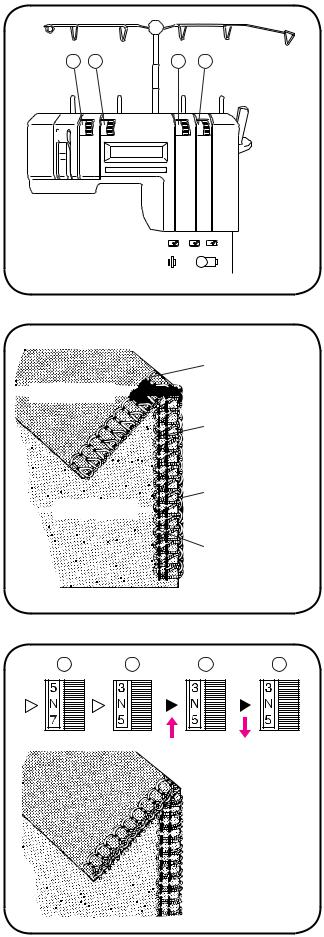
3-7. Thread tension |
|
|
|
|
Start from normal position. Change and thereaf- |
|
|
|
|
ter check one dial at a time until you obtain the |
1 |
2 |
3 |
4 |
|
||||
desired result. Turn the dial to a higher number |
|
|
|
|
to increase tension. Turn the dial to a lower |
|
|
|
|
number to decrease tension. |
|
|
|
|
Left needle thread |
|
|
|
|
Right needle thread |
|
|
|
|
Upper looper thread |
|
|
|
|
Lower looper thread |
|
|
|
|
4-thread stitch
Correct tension
Lower and upper looper threads should be well balanced with the same thread tension (both looper threads should meet at the edge of the fabric). The needle thread should not slacken or be pulled.
Unbalanced upper looper thread is wrapped
around and over the back side
Increase the thread tension of the upper looper (dial ) or reduce the thread tension of the lower looper thread (dial ).
Lower looper
thread


 Wrong side


Right needle thread
Upper looper
thread


 Right
Right side
side


Left needle thread
1 |
2 |
3 |
4 |
|
|
|
|
|
|
|
|
Lower looper |
|
|
|
|
|
|
|
|
thread |
Wrong side |
|
|
|
|
||||
|
|
|
|
|
|
|
|
Left needle |
|
|
|
|
|
|
|
|
|
|
|
|
|
|
|
|
|
thread |
|
|
|
|
|
|
|
|
Right needle |
|
|
|
|
|
|
|
|
thread |
|
|
|
|
|
|
Upper looper |
||
|
Right side |
|
|
|
|
|
||
|
|
|
|
|
|
|
|
thread |
|
|
|
|
|
|
|
|
|
—20—
 Loading...