


Use & Care
MANUAL
1 & 3 SERIES
Built-In Dishwashers
VDW302 / VDW302WS
RVDW103 / RVDW103WS
FDW103 / FDW302
FDW103WS/ FDW302WS
CFDW103 / CFDW302

Congratulations
Your dishwasher is designed to offer years of reliable service. This Use & Care Guide will provide you with the information you need to become familiar with your dishwasher’s operation and care.
Your complete satisfaction is our ultimate goal. If you have any questions or comments about this product, please contact the dealer from whom you purchased it, or contact our Consumer Support Center at 1-888-845-4641.
For more information about the complete and growing selection of products, visit us online in the US at www.vikingrange.com or in Canada at www.brigade.ca
Table of Contents
Getting Started
Warnings & Safety Instructions _________________________________________________________________________ 3 Features ___________________________________________________________________________________________ 5
Operation
Loading the Dishwasher ______________________________________________________________________________ 6 Rack Adjustments ___________________________________________________________________________________ 7 Proper and Improper Loading __________________________________________________________________________ 9 Operating Instructions ______________________________________________________________________________ 11 Program Table _____________________________________________________________________________________ 12 Function Buttons ___________________________________________________________________________________ 14 Detergent and Rinse Agent Dispenser __________________________________________________________________ 16
Product Care
Care and Maintenance ______________________________________________________________________________ 20 Cleaning the Filters _________________________________________________________________________________ 20 Cleaning the Spray Arms _____________________________________________________________________________ 21 Troubleshooting ___________________________________________________________________________________ 22 Service Information _________________________________________________________________________________ 26 Warranty __________________________________________________________________________________________ 27
2
Warnings & Safety Instructions
Please read this user manual and particularly the safety instructions completely and carefully. They will save you time and effort and help to ensure optimum dishwasher performance. Be sure to observe all listed warnings and cautions. Look particularly for the icons with exclamation marks inside. The information icon will also provide important references.
Warning and Important Safety Instructions appearing in this manual are not meant to cover all possible conditions and situations that may occur. Common sense, caution, and care must be exercised when installing, maintaining, or operating the appliance. ALWAYS contact the manufacturer about problems or conditions you do not understand.
Recognize Safety Symbols, Words, Labels
DANGER
Hazards or unsafe practices which WILL result in death or severe personal injury.
 WARNING
Hazards or unsafe practices which COULD result in death or severe personal injury.
 CAUTION
Hazards or unsafe practices which COULD result in minor personal injury.
All safety messages will identify the hazard, tell you how to reduce the chance of injury, and tell you what can happen if the instructions are not followed.
Read and follow all instructions before using this appliance to prevent the potential risk of fire, electric shock, personal injury, or damage to the appliance as a result of improper usage of the appliance. Use appliance only for its intended purpose as described in this manual.
To ensure proper and safe operation: Appliance must be properly installed and grounded by a qualified technician. DO NOT attempt to adjust, repair, service, or replace any part of your appliance unless it is specifically recommended in this manual. All other servicing should be referred to a qualified servicer.
KEEP THESE INSTRUCTIONS FOR FUTURE REFERENCE
 WARNING
State of California Proposition 65
-This product contains one or more chemicals known to the State of California to cause cancer.
-This product contains one or more chemicals known to the State of California to cause birth defects or other reproductive harm.
 WARNING
Danger of Suffocation!
Ensure that any plastic wrappings, bags, small pieces, etc., are disposed of safely and kept out of the reach of children.
 WARNING
Improper connection of the equipment-grounding conductor can result in a risk of electric shock. Check with a qualified electrician or service representative if you are in doubt whether the appliance is properly grounded. Do not modify the plug provided with the appliance; if it will not fit the outlet, have a proper outlet installed by a qualified electrician.
 WARNING
If your dishwasher is equipped with interior lighting, replacement should only be done by an authorized service agent.
3

Warnings & Safety
 WARNING
When using the dishwasher, follow basic precautions, including the following.
Read all instructions before using the dishwasher! Save these operating instructions and pass them on to any future user.
•Use the dishwasher only for its intended purpose as described in this user manual. This appliance is intended for normal household use only.
•The manufacturer disclaims responsibility for damage or injury caused by improper use of this appliance.
•The information in this user manual must be followed to minimize the risk of fire or explosion and to prevent property damage, personal injury, or loss of life.
•DO NOT operate your dishwasher unless all the enclosure panels are properly in place.
•DO NOT tamper with the controls.
•DO NOT abuse, sit on, stand in or on the door or dish rack of the dishwasher.
•The cup racks are designed to support cups, glasses, and kitchen utensils. When the cup racks are in the dishwasher, do not lean on or use the cup racks to support your body weight.
•To reduce the risk of injury, DO NOT allow children to play in, on, or near the dishwasher.
•Use only detergents or rinse agents recommended for use in a household dishwasher and keep them in a dry place out of the reach of children. Check that the detergent dispenser is empty after the completion of each wash program.
•Dishwasher detergents are alkaline. They can be dangerous if inhaled or swallowed. Avoid contact with skin and eyes and keep children and people in poor health away from the dishwasher when the door is opened. Consult a doctor immediately if detergent has been swallowed or inhaled.
•DO NOT drink water from the dishwasher! Harmful residues could be present.
•Under certain conditions, hydrogen gas may be produced in a hot water heater system that has not been used for two weeks or more. HYDROGEN GAS IS EXPLOSIVE. If the hot water system has not been used for such a period, before using the dishwasher turn on all hot water taps and let the water flow from each for several minutes. This will release any accumulated hydrogen gas. As gas is flammable, do not smoke or use an open flame during this time.
•DO NOT store or use flammable liquids or vapors in the area of the dishwasher.
•When loading items to be washed, position sharp items so that they are not likely to damage the door seal and load sharp knives with the handles up to reduce the risk of cut-type injuries.
•DO NOT wash plastic items unless they are marked “dishwasher safe” or the equivalent. For plastic items not so marked, check the manufacturer’s recommendations.
•If a malfunction occurs, switch off the appliance and turn off the water supply to the dishwasher.
•Before cleaning or carrying out maintenance, switch off the appliance, disconnect the power plug, and turn off the water supply.
•Repairs and technical modifications must be carried out exclusively by a qualified technician.
•If the dishwasher is not in use for an extended period of time (i.e. vacation home), we recommend you check that the baskets are empty, leave the inside of the dishwasher clean, leave the door cracked open to allow air to circulate, and turn off both the power and water supply to the dishwasher.
•This appliance must be grounded. In the event of a malfunction or breakdown, grounding will reduce the risk of electric shock by providing a path of least resistance for electric current. This appliance is equipped with a cord having an equipment-grounding conductor and a grounding plug. The plug must be plugged into an appropriate outlet that is installed and grounded in accordance with all local codes and ordinances.
•This appliance must be connected to a grounded metal, permanent wiring system, or an equipment-grounding conductor must be run with the circuit conductors and connected to the equipment-grounding terminal or lead on the appliance.
•The dishwasher installation must be performed in accordance with the installation guide. If you did not receive an installation guide, order it by calling 1-888-845-4641 or you may also download it from our website in the US (www.vikingrange.com) or in Canada (www.brigade.ca).
•Installation, maintenance, and repair should be performed by a qualified installer. Work by unqualified persons could be dangerous and may void the warranty.
•DO NOT operate the dishwasher if damaged, malfunctioning, partially disassembled, or if it has missing or broken parts.
•Before installation or service, disconnect the power supply to the work area by unplugging the unit, “tripping” the circuit breaker, or removing the fuse.
4
Warnings & Safety
•Only connect the dishwasher to the power supply when all installation and plumbing work is complete.
•DO NOT install or store the dishwasher where it can be exposed to below freezing temperatures or exposed to weather.
•Dishwasher must be secured to adjacent cabinetry using the brackets provided. Failure to do this may cause damage to property or bodily injury.
•Connect to a properly rated, protected and sized power supply circuit to avoid electrical overload. The dishwasher is designed for an electrical supply of 120V (volts), 60Hz (hertz), AC, connected to a dishwasher-dedicated, properly grounded electrical circuit with a fuse or breakers rated for 15 amperes. Electrical supply conductors shall be a minimum of #16 AWG copper wire rated at 167°F (75°C) or higher. These requirements must be met to prevent injury and machine damage. Consult a qualified electrician if in doubt.
•DO NOT use any extension cord or portable outlet device to connect the dishwasher to a power supply.
•Remove the dishwasher door when removing an old dishwasher from service or discarding it. Ensure that the dishwasher presents no danger to children while being stored for disposal.
•Old appliances may contain materials that can be recycled. Please contact your local recycling authority about the possibility of recycling these materials.
Features
3 Series
|
|
1. Upper rack |
|
|
2. Upper spray arm |
|
12 |
3. Salt container (select models) |
1 |
|
4. Cutlery basket |
2 |
8 |
5. Detergent dispenser |
6. Door |
||
3 |
9 |
7. Control panel |
4 |
10 |
8. Guiding track for the upper rack |
|
9. Lower spray arm |
|
|
|
|
|
11 |
10. Filters |
5 |
|
11. Lower rack |
6 |
13 |
12. Removable third rack |
13. Model and Serial Tag |
7
1 Series
|
|
|
|
|
|
|
|
|
|
|
|
|
|
|
|
|
1. Upper rack |
|
|
|
|
|
|
|
|
|
|
|
|
|
|
|
|
|
2. Upper spray arm |
1 |
|
|
|
|
|
|
|
|
|
|
|
|
|
|
|
|
3. Salt container (select models) |
|
|
|
|
|
|
|
|
|
|
|
|
|
|
|
|
||
2 |
|
|
|
|
|
|
8 |
4. Cutlery basket |
|||||||||
|
|
|
|
|
|
|
|
|
|
|
|
|
|
|
|
5. Detergent dispenser |
|
|
|
|
|
|
|
|
|
|
|
|
|
|
|
|
|
||
3 |
|
|
|
|
|
|
|
|
|
|
|
|
|
9 |
6. Door |
||
|
|
|
|
|
|
|
|
7. Control panel |
|||||||||
|
|
|
|
|
|
|
|
||||||||||
4 |
|
|
|
|
|
10 |
8. Guiding track for the upper rack |
||||||||||
|
|
|
|
||||||||||||||
|
|
|
|
|
|
|
|
|
|
|
|
|
|
11 |
9. Lower spray arm |
||
|
|
|
|
|
|
|
|
|
|
|
|
|
|
||||
|
|
|
|
||||||||||||||
|
|
|
|
|
|
|
|
|
|
|
|
|
|
|
|
|
10. Filters |
5 |
|
|
|
|
|
|
|
|
|
|
|
|
|
|
|
|
11. Lower rack |
|
|
|
|
|
|
|
|
|
|
|
|
|
|
|
|
12. Model and Serial Tag |
|
|
|
|
|
|
|
|
|
|
|
|
|
|
|
|
|
||
6 |
|
|
|
|
|
|
|
|
|
|
|
|
|
|
|
12 |
|
|
|
|
|
|
|
|
|
|
|
|
|
|
|
|
|
||
7 |
|
|
|
||||||||||||||
|
|
||||||||||||||||
|
|
|
|
|
|
|
|
|
|
|
|
|
|
|
|
|
|
|
|
|
|
|
|
|
|
|
|
|
|
|
|
|
|
|
|
5

Loading the Dishwasher
•Pull the handle to open the door. If the door is opened during operation, the dishwasher will stop running. Once the door is closed, the program will continue.
•Remove coarse food leftovers from tableware.
•Now you can load the dishwasher.
Upper Rack |
Lower Rack |
 WARNING
•Large knives and other utensils with sharp tips and edges must be placed horizontally into the upper rack due to risk of injury. Other smaller knives and sharp utensils should be placed with sharp side down in the cutlery basket.
•Use extreme caution when removing knives and other sharp utensils from the dishwasher. These items may have shifted position during the wash program, and may be wet or slippery.
•The cup racks are designed to support cups, glasses, and kitchen utensils. When the cup racks are in the dishwasher, do not lean on or use the cup racks to support your body weight.
Top rack load pattern for 12 place setting according to the AHAM DW-1 Standards
Bottom rack load pattern for 12 place setting according to the AHAM DW-1 Standards
•Your dishwasher holds a maximum of 12 place settings.
•Place all containers such as cups, glasses, and pots into the dishwasher with the opening facing downwards (so that no water can collect).
•Small and light items can go into the upper rack.
•Long and narrow items are placed in the middle of the racks.
•Place all large and very dirty items in the lower rack.
•Dishes and cutlery should not be placed above each other.
•Glasses should not touch each other.
•The movement of the spray arms must not be hindered.
•DO NOT overload your dishwasher and pay attention to manufacturer instructions regarding dishes which are appropriate for use in a dishwasher. Only with suitable dishwasher safe dishes will you obtain optimal washing results with a sensible use of energy.
Additional Loading Patterns
Top rack load pattern for 10 place setting |
Bottom rack load pattern for 10 place setting |
|||||||||||||
|
|
|
|
|
|
|
|
|
|
|
|
|
|
|
|
|
|
|
|
|
|
|
|
|
|
|
|
|
|
|
|
|
|
|
|
|
|
|
|
|
|
|
|
|
|
|
|
|
|
|
|
|
|
|
|
|
|
|
|
|
|
|
|
|
|
|
|
|
|
|
|
|
|
|
|
|
|
|
|
|
|
|
|
|
|
|
|
|
|
|
|
|
|
|
|
|
|
|
|
|
|
|
|
|
|
|
|
|
|
|
|
|
|
|
|
|
|
|
|
|
|
|
|
|
|
|
|
|
|
|
|
|
|
|
|
|
|
|
|
|
|
|
|
|
|
|
|
|
|
|
|
|
|
|
|
|
|
|
|
|
|
|
|
|
|
|
|
|
|
|
|
|
|
|
|
|
|
|
|
|
|
|
|
|
|
|
|
|
|
|
|
|
|
|
|
|
|
|
|
|
|
|
|
|
|
|
|
|
|
Top rack load pattern for 14 place international setting
Bottom rack load pattern for 14 place international setting
6
Rack Adjustments
Upper Rack
Load the upper rack with dessert plates, cups, glasses, etc.
Variable Height Setting
The upper rack is equipped with a lifting mechanism which enables you to change the height of the rack even if it is fully loaded, and without having to remove it from the dishwasher.
Lift Upper Rack
• To lift the upper rack to a higher position, hold it on one side and carefully pull it upwards A.
• To lift the opposite side of the rack, hold it and pull it upwards in the same manner.
To Lower Upper Rack
•To lower the upper rack, hold and press in the rack lever on one side and carefully lower the rack without releasing the lever B.
• Repeat the procedure with the lever on the opposite side of the rack
 NOTICE
Made sure both levers catch in the same height position
Folding Tines
There are “folding tines” in the upper rack to allow you more space to accommodate glasses or cups.
• Simply pull in the first front folding tine, move it to left A and right B to place in another position. The tines will also lay flat.
Adjustable Shelves
Depending on the size of the glasses and cups, the shelf height setting may be adjusted.
• Fold the shelf upwards A.
• Positioning at the desired height B.
• Fold the shelf again downwards C.
7
Rack Adjustments
Removable Third Rack
The removable third rack is designed for small dishes, or long dishes that cannot fit into the cutlery basket.
Thanks to the easy take-out feature, it allows removing the dishes from the
machine together with the rack after washing operation. Since it can fit into all standard size drawers, there is no need to remove the dishes from the basket and place them separately into the kitchen drawers or shelves.
If you don’t want to use the removable third rack, pull it back to yourself to 


 remove it from the machine, rotate the rail lids A towards outside and pull them


 towards yourself to take them out. After taking out the rack by lifting it up, remove the


 carrier part from the rails by pulling it towards yourself. Replace the rail lids and push them


 back to seat them into their places. Turn the rails inside the machine outwards B to seat


 them properly in their places.
In order to put the removable third basket back into its place, repeat the same process in reverse order.
Lower Rack
Use the lower rack for plates, bowls, pots, etc.
• Fold the shelf upwards A.
• Positioning at the desired height B.
• Fold the shelf again downwards C.
Adjustable Lower Rack Tines
The six piece foldable tines (A) located in the lower rack of the machine are designed for an easier placement of large pieces such as pans, bowls, etc. You can create larger spaces by folding each tine individually or all of them at once. To bring the adjustable tines into horizontal position, grab the tines from mid position and push them in the directions of arrows (B) To bring the tines back to vertical position, just lift them up. Adjustable tines will click into the latch again.
3 |
4 |
|
5 |
||
|
||
|
6 |
NOTICE |
NOTICE |
Bringing the tines to the horizontal position by holding them from the tips may cause them to bend. Therefore, adjust the tines by holding them by their stems and pushing in the direction of arrow.
When finished, test to ensure that the spray arm can still move freely.
8
Proper and Improper Loading
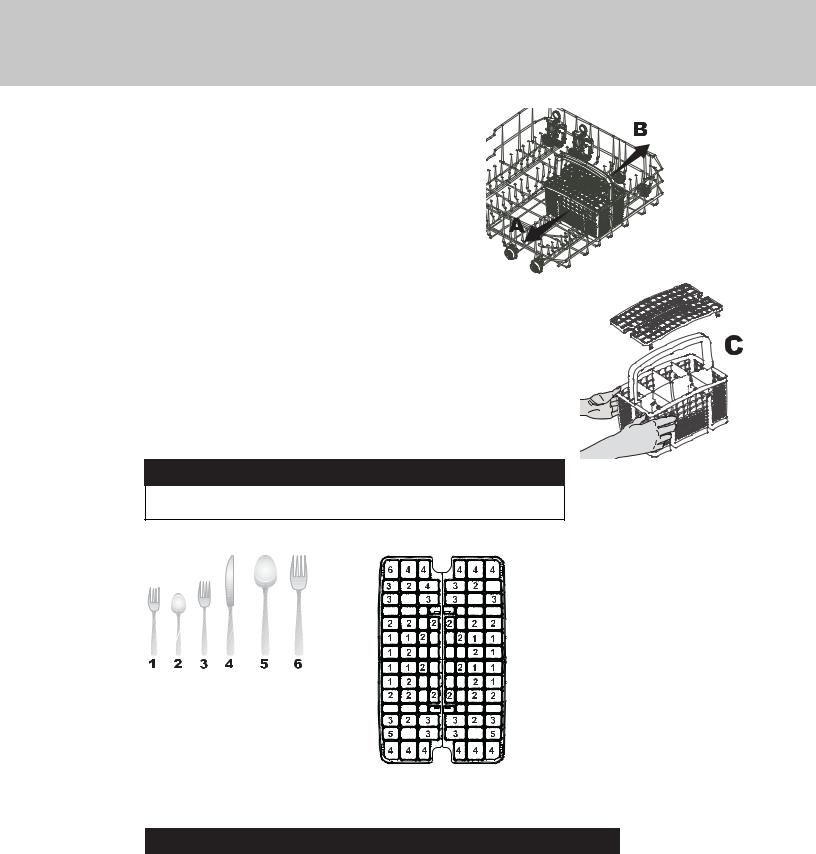
Sliding Cutlery Basket
Designed to allow free placement of the dishes according to their size; the
Sliding Cutlery Basket can slide over the tines to the left A and right B side.
Use the basket inset C for your cutlery so that all items in the basket are surrounded by a sufficient water flow.
For larger items (e.g. wire whisks) the basket inset may be removed C. Simply raise.
To make loading easier, the cutlery basket can be removed. Simply take out the basket upward.
Place long items such as ladles, cooking spoons, etc., on the shelf in the upper rack.
 NOTICE
When finished, test to ensure that the spray arm can still move freely.
1: Salad Fork |
2: Teaspoon |
3: Dinner Fork |
4: Knife – Solid Handle |
5: Serving Spoon |
6: Serving Fork |
Sliding cutlery basket load pattern for 12 place settings according to the AHAM DW-1 Standards
 NOTICE
•Place all large and very dirty items in the lower rack.
•Place all containers such as cups, glasses, and pots into the dishwasher with the opening facing downwards (so that no water can collect).
•The movement of the spray arms must not be hindered.
•Do not overload your dishwasher. Dishes and cutlery should not be placed above each other. Glasses should not touch.
•Only with suitable dishwasher safe dishes will you obtain optimal washing results with a sensible use of energy.
9
 Loading...