


AS2110
AS2115
ES INSTRUCCIONES DE USO GB OPERATING INSTRUCTIONS FR MODE D'EMPLOI
PT INSTRUÇÕES DE USO
DE GEBRAUCHSANLEITUNG HU HASZNÁLATI UTASÍTÁS
RU РУKОВОДСТВО ПО ЭКСПЛУАТАЦИИ
CZ NÁVOD K POUÎITÍ
BU УКАЗАНИЯ ЗА УПОТРЕБА
RO INSTRUCTIUNI DE FOLOSIRE
AR ﻞﻴﻐﺸﺘﻟا تادﺎﺷرإ
2110-15.indd 1 |
19/12/05 17:20:1 |

2110-15.indd 2 |
19/12/05 17:20:1 |
7 12 9 6 13 8
5
3
10 |
|
|
1 |
2 |
|
11 |
11B |
|
AS2115 |
AS2115 |
13 |
|
|
AS2110 |
|
|
|
4 |
16
15 |
20 |
17 |
15 |
18
19
21 |
14 |
|
|
|
22 |
2110-15.indd 3 |
19/12/05 17:20:1 |

Fig. 1
Fig. 3
Fig. 5
Fig. 7
Fig. 9
Fig. 2
Fig. 4
Fig. 6
Fig. 8
Fig. 10
2110-15.indd 4 |
19/12/05 17:20:2 |
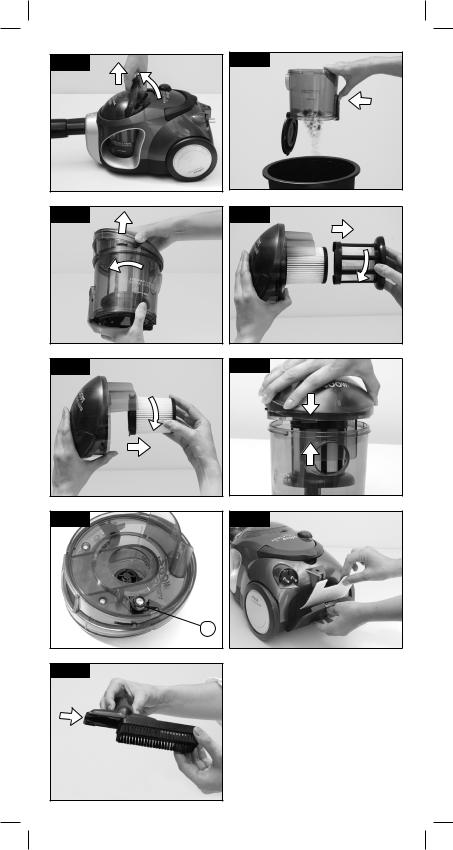
Fig. 11
Fig. 13
Fig. 15
Fig. 17
19
Fig. 19
Fig. 12
Fig. 14
Fig. 16
Fig. 18
2110-15.indd 5 |
19/12/05 17:20:2 |

ESPAÑOL
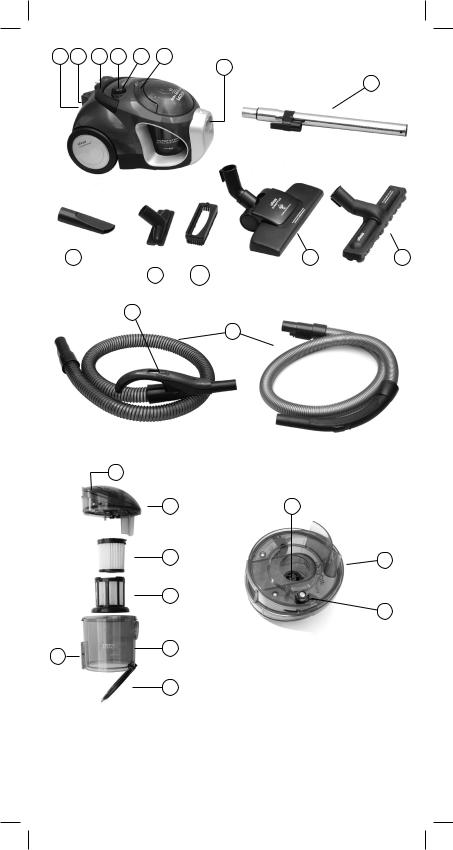
1.Cepillo para suelos
2.Cepillo para suelos de madera (AS2115)
3.Tubo telescópico
4.Manguera
5.Boca de aspiración
6.Pulsador de puesta en marcha/paro
7.Rejilla de salida del aire
8.Asa de apertura para la extracción del depósito
9.Pedal recogecables automático / Asa transporte
10.Tobera para juntas
11.Tobera para tapicerías
11B. Accesorio para muebles
12.Filtro de salida de aire
13.Mando regulador de potencia: Mod. AS2115 en la empuñadura Mod. AS2110 en el mando ON/OFF
Depósito Cycle-Tech
14.Recipiente
15.Tapa
16.Asa de la tapa del recipiente
17.Filtro Hepa permanente
18.Protector de filtro HEPA
19.Sistema de detección falta-filtro
20.Válvula de seguridad anticalentamiento
21.Pulsador para vaciado de depósito
22.Tapa inferior de depósito
ADVERTENCIAS IMPORTANTES
•Lea atentamente estas instrucciones. Consérvelas para futuras consultas.
•Antes de conectar el aparato a la red eléctrica, asegúrese de que la tensión corresponde a la indicada en la placa de características.
•Este aparato ha sido diseñado exclusivamente para uso doméstico. Solamente debe emplearse de acuerdo a estas indicaciones. El fabricante no se responsabiliza de los daños ocasionados por emplear el aparato de modo incorrecto o contrario a estas normas de uso.
•No utilice el aspirador sobre personas o animales.
•Nunca aspire sustancias calientes o incandescentes, objetos puntiagudos, sustancias mojadas o líquidos ni productos inflamables o explosivos.
•Evite que los niños manipulen el aparato.
•No se debe utilizar este aspirador sin el depósito cycle-tech y el filtro Hepa permanente. El aparato podría dañarse.
•Tanto al introducir como al sacar la clavija del enchufe, el aparato no debe estar en funcionamiento.
•No haga funcionar el aspirador con el cable enrollado.
•No desconecte la clavija tirando del cable.
•Desconecte el aspirador de la red cuando no se use y antes de proceder a su limpieza o al cambio de filtro.
•Proteja el aspirador de agentes atmosféricos externos, la humedad y el calor. No deje el aspirador al lado de hornos, estufas o radiadores calientes.
•No utilice el aspirador si tiene alguna abertura obstruida, ya que se reduciría el paso del aire, provocando sobrecalentamientos que pueden dañar el aparato.
•No coja el aspirador ni la clavija con las manos mojadas. No sumerja el aparato en agua.
•No desplazar el aspirador tirando del cable o del tubo de aspiración. Utilice el asa de transporte.
•No utilice el aparato con el cable o la clavija dañada.
•Cuando cierre una puerta, cerciórese de que ésta no pilla el cable.
•Desconecte el aspirador después de su uso y siempre que vaya a proceder a su limpieza, cambio de filtro, o vaciado del recipiente para el polvo.
•No ponga en marcha el aspirador si el cordón o el enchufe están dañados o si observa que el aparato no funciona correctamente
•Las reparaciones y cambios de cable deberán ser efectuadas exclusivamente por un Servicio Técnico Autorizado.
SISTEMA DE ASPIRACION
Este aparato funciona sin bolsa, mediante la tecnología “Cycle Tech”. Para ello basta con colocar el depósito. Este sistema le permitirá limpiar su vivienda de forma eficaz sin necesidad de adquirir bolsas de repuesto. Un eficaz sistema de filtrado, en el que se incluye un filtro antialérgico HEPA que le garantiza una perfecta limpieza.
PUESTA EN MARCHA
- Encaje la manguera a la boca de aspiración hasta escuchar un “click”.
Para ayudarse a encajar la manguera (4) o para extraerla, presione sobre el pulsador de anclaje, figura 1.
-Acople el tubo a la manguera de aspiración (4), figura 2, y ajuste su longitud a la altura del usuario
-Ajuste el cepillo o accesorio que necesite al tubo del aspirador, figura 3.
-Extraiga el cable y conecte a la red.
-Presione el interruptor de puesta en marcha/ paro (6), figura 4.
-El conjunto de ruedas, el anclaje giratorio de 360º y el asa de transporte, dotan a este aspirador de una excelente movilidad.
-Durante las pausas de aspiración puede sujetar el tubo al aspirador como muestra la figura 5 y 6.
REGULACIÓN DE POTENCIA
Mod. AS2110: Regule la potencia con el regulador de potencia electrónico (13) figura 7. La intensidad puede ser regulada desde la empuñadura. Abriendo la pestaña es menor aspiración, cerrándola es superior, figura 8.
Mod. AS2115: Regula la potencia con el regulador de potencia (13), existente en la empuñadura, figura 9.
2110-15.indd 6 |
19/12/05 17:20:2 |

AL TERMINAR
Cuando haya terminado de aspirar presione el interruptor de puesta en marcha/ paro.
Para recoger el cable, presione el pedal recogecables automático, figura 10.
MANTENIMIENTO DEL DEPOSITO CYCLE-TECH
Vaciado del recipiente
El depósito debe ser vaciado después de cada uso. Para ello, bascule el asa del depósito
(8) y extráigalo, figura 11.
Para la apertura de la tapa inferior del depósito (22), accione el pulsador (21) y vierta la suciedad en el cubo de basura, figura 12.
Para cerrarlo de nuevo, bascule la tapa (22). Para encajarlo sobre la parte inferior del depósito. Vuelva a colocar el depósito en su alojamiento sobre el aspirador.
Limpieza de los filtros
Es conveniente limpiar al menos cada seis usos el filtro Hepa permanente y sustituir anualmente el filtro de salida de aire. Esta limpieza será completamente necesaria siempre que se produzca algún bloqueo en la aspiración.
Limpieza del filtro Hepa permanente:
Extraiga la tapa del depósito, para ello, gire ligeramente la tapa (15), y sáquela de su ubicación, figura 13. Retire el protector de filtro (18), girando en sentido antihorario y sáquelo, figura 14. Gire el filtro (17) en sentido antihorario para su extracción, figura 15.
El filtro puede lavarse a mano con un detergente suave.
Una vez limpio colóquelo en su posición original bajo la tapa haciendo coincidir las pestañas de fijación y girando el filtro en sentido horario hasta notar el tope.
Vuelva a colocar en su lugar el protector de filtro (18), coloque la tapa (15) sobre el depósito y gírela hasta que quede correctamente colocado en sentido horario.
Tenga cuidado de ubicar correctamente las patillas de ubicación de la tapa, figura 16.
Importante: Déjelo secar durante 24 horas antes de volver a colocarlo.
Este aspirador cuenta con un sistema de detección de falta de filtro permanente (19), figura 17, que impide que la tapa del depósito pueda ser colocada sobre éste por error sin el filtro Hepa (17) correctamente colocado.
Sustitución del filtro de salida de aire
Retire la tapa del filtro de salida de aire accionando el pulsador de fijación y bascule ligeramente. Extraiga el filtro de carbono de su interior, figura 18.
Ufesa recomienda sustituir anualmente (en función de su uso) el filtro Hepa permanente y el filtro de carbono de salida de aire. Podrá encontrar estos repuestos en su centro de compra habitual o en el Servicio Técnico Autorizado.
Importante: El aspirador no debe ser nunca puesto en funcionamiento sin tener este filtro correctamente colocado.
Para garantizar el perfecto funcionamiento, utilice exclusivamente accesorios originales de Ufesa.
CEPILLO PARA SUELOS DE MADERA (AS2115)
Este cepillo ha sido especialmente diseñado para limpiar los suelos de madera. Las cerdas de pelo suave cepillan la superficie y recogen el polvo sin dañarla.
ACCESORIO PARA LIMPIEZA DE MUEBLES
Encaje sobre la boquilla para tapicería (11), el accesorio para muebles (11B) como muestra la figura 19. Este accesorio es idóneo para aspirar suciedad sobre muebles y otras superficies delicadas.
ACCESORIO PARA ASPIRACIÓN DE JUNTAS
Utilice este accesorio para aspirar juntas u otras superficies de difícil acceso.
RECAMBIO
Para garantizar el perfecto funcionamiento, utilice exclusivamente los filtros originales de Ufesa que encontrará en los establecimientos autorizados con la referencia: FA0610.
El pack de accesorios contiene un filtro HEPA permanente y dos filtros de carbono activo.
LIMPIEZA
Desconecte el aspirador de la red antes de su limpieza. Los accesorios y el aspirador pueden limpiarse con un paño húmedo y dejándolos secar completamente antes de volver a colocarlos. Nunca debe sumergirse el aparato en agua. No utilice disolventes, ni productos abrasivos para su limpieza.
ADVERTENCIAS DE DEPOSICIÓN/ ELIMINACIÓN
Para su transporte, nuestras mercancías cuentan con un embalaje optimizado. Este consiste - por principioen materiales no contaminantes que deberían ser entregados como materia prima secundaria al servicio local de eliminación de basuras. Su Ayuntamiento o Municipio le informará sobre posibilidades de deposición/eliminación para los aparatos en desuso.
2110-15.indd 7 |
19/12/05 17:20:2 |

ENGLISH
DESCRIPTION OF THE APPLIANCE
1.Floor brush.
2.Brush for wooden floors (AS2115)
3.Telescopic tube.
4.Hose
5.Suction hole
6.On / Off button
7.Air outlet grille
8.Release handle for extracting the dust container
9.Automatic cable rewind pedal / Carrying handle
10.Crevice nozzle
11.Upholstery nozzle.
11B. Upholstery accessory
12.Air outlet filter
13.Power regulator:
Mod. AS2115 on the handgrip Mod. AS2110 on the ON/OFF control
Cycle-Tech unit
14.Container
15.Lid
16.Handle for the container cover
17.Permanent HEPA filter.
18.HEPA filter guard
19.Missing filter detection system
20.High temperature safety valve
21.Button for emptying container
22.Container base flap
IMPORTANT ADVICE
•Read these instructions carefully. Safeguard them for future reference.
•Before plugging the appliance into the mains supply, make sure that the voltage corresponds to that stated on the characteristics plate.
•This appliance has been designed for domestic use only. It must only be used in accordance with these instructions. The manufacturer will not be held responsible for any damage caused by improper or misuse of the appliance
•Do not use the vacuum cleaner on people or animals.
•Never vacuum up hot or glowing substances, sharp objects, wet or liquid substances, or inflammable or explosive products.
•Do not let children handle the appliance.
•This vacuum cleaner must not be used without the Cycle Tech unit and the permanent HEPA filter. This could damage the appliance.
•The appliance must be switched off before plugging it in or unplugging it.
•Do not operate the appliance with the cable still coiled.
•Do not unplug the appliance by tugging on the cable.
•Unplug the vacuum cleaner from the mains supply when not in use and before proceeding to clean it or when changing the filters.
•Do not expose the vacuum cleaner to outdoor weather conditions, dampness or heat. Do not leave the vacuum beside hot ovens, heaters or radiators.
•Do not use the vacuum cleaner if any of its openings are obstructed, as this will reduce the air flow causing it to overheat, which may damage the appliance.
•Do not handle either the vacuum or the plug with wet hands. Do not immerse the appliance in water.
•Do not pull on either the cable or the suction tube to move the vacuum cleaner. Use the carry handle.
•Do not use the appliance if either the cable or plug are damaged.
•Make sure not to pinch the cable when closing doors.
•Always unplug the vacuum cleaner after use and especially when cleaning it, changing the filter or emptying out the dust container.
•Do not switch the appliance on if the cable or plug are damaged or if it can be detected that the appliance is not working correctly.
•Cable repairs and replacements must be carried out exclusively by an Authorised Technical Service Centre.
SUCTION SYSTEM
This appliance operates without a dust bag using “Cycle-Tech” technology. To do this just attach the unit.
SWITCHING ON
-Insert the hose into the suction hole so that it clicks into position. Pressing down the release button will help you to insert or remove the hose (4), figure 1.
-Attach the telescopic tube to the suction hose (4), figure 2, and adjust the length to suit the user.
-Fit the brush, or whichever accessory is required, to the vacuum tube, figure 3.
-Pull the cable out and plug it into the mains supply.
-Press the On/Off button (6), figure 4.
-The wheels, the 360º swivel joint and the carrying handle, along with its compactness, make this vacuum cleaner extremely mobile.
-During pauses in vacuuming you can clip the tube onto the vacuum as shown in figure 5 and 6.
POWER REGULATION
Mod AS2110: Regulate the power using the electronic power regulator (13), figure 7. Suction intensity can be regulated from the handgrip. Opening the flap reduces suction, whereas closing it increases suction, figure 8.
Mod AS2110: Regulate the power using the power regulator (13) on the handgrip, figure 9.
WHEN FINISHED
When you have finished using the appliance press the On/Off switch.
Press the automatic cable rewind pedal to wind the cable back in, figure 10.
2110-15.indd 8 |
19/12/05 17:20:2 |

MAINTAINING THE CYCLE-TECH UNIT
Emptying the container
The container must be emptied after each use. To do this, lift the release handle (8) and extract the container, figure 11.
Empty the contents into a dustbin by pressing button (21) to open the base flap (22), figure 12.
Bring the flap (22) back up to close it again. Locking it back on to the base of the container Place the container back into its housing on the vacuum cleaner.
Cleaning the filters
It is advisable to clean the permanent HEPA filter at least every six uses and to replace the air outlet filter each year. The filters must always be cleaned whenever any type of blockage occurs with the suction.
Cleaning the permanent HEPA filter:
Take the lid (15) off the container by turning it slightly and removing it, figure 13. Take off the filter guard (18) by turning it anticlockwise, figure 14. Turn the filter (17) anticlockwise to remove it, figure 15.
The filter can be hand washed in a mild detergent.
Once clean, fit it back under the lid making sure that the holding clips line up, and turn the filter clockwise until it locks into position.
Put the filter guard (18) back on, fit the lid (15) on the container and turn it clockwise until it locks on correctly.
Make sure that the lid location lugs fit correctly, figure 16.
Important: Leave it to dry for 24 hours before refitting it.
This vacuum cleaner has a missing filter detection system (19), figure 17, which prevents the lid from being put back on the container if the HEPA filter (17) is not fitted correctly.
Replacing the air outlet filter
Press the release button to open the cover for the air outlet filter. Remove the carbon filter, figure 18.
Ufesa recommends that the permanent HEPA filter and the carbon outlet filter be replaced yearly (depending on use). You can get these replacements at your local shopping centre or from an Authorised Dealer.
Important: The vacuum cleaner must never be switched on unless this filter is fitted correctly.
To guarantee trouble-free operation, use only original Ufesa parts.
BRUSH FOR WOODEN FLOORS (AS2115)
This brush has been specially designed to clean wooden floor surfaces. The soft hair bristles brush over the surface picking up the dust but without damaging the floor.
ACCESSORY FOR CLEANING UPHOLSTERY
Fit the upholstery accessory (11B) onto the upholstery nozzle, as shown in figure 19. This accessory is ideal for cleaning upholstery and other delicate surfaces.
ACCESSORY FOR CLEANING CREVICES
Use this accessory to vacuum crevices and other awkward surfaces.
REPLACEMENTS
To guarantee trouble-free operation only use original Ufesa filters which can be found at authorised establishments, reference nº: FA0610.
The accessory pack contains a permanent HEPA filter and two active carbon filters.
CLEANING
Unplug the vacuum from the mains supply before cleaning it. The accessories and the vacuum can be wiped clean with a damp cloth and then left to dry before reusing them.
Never immerse the appliance in water. Do not use solvents nor abrasive products to clean it.
ADVICE ON DISPOSAL
Our goods come in optimised packaging. This basically consists in using non-contaminating materials which should be handed over to the local waste disposal service as secondary raw materials. Your local town council can provide you with information on how to dispose of obsolete appliances.
2110-15.indd 9 |
19/12/05 17:20:2 |
 Loading...