


 Loading...
TOSHIBA
Telecommunication Systems Division
IP Telephone, Messaging and
Call Manager User Guide
Title Page
February 2014
Publication Information
Toshiba America Information Systems, Inc.
Telecommunication Systems Division
Publication Information
Toshiba America Information Systems, Inc., Telecommunication Systems Division, reserves the right, without prior notice, to revise this information publication for any reason, including, but not limited to, utilization of new advances in the state of technical arts or to simply change the design of this document.
Further, Toshiba America Information Systems, Inc., Telecommunication Systems Division, also reserves the right, without prior notice, to make such changes in equipment design or components as engineering or manufacturing methods may warrant.
IPedge-UG-VF
Version F, February 2014
Our mission to publish accurate, complete and user accessible documentation. At the time of printing the information in this document was as accurate and current as was reasonably possible. However, in the time required to print and distribute this manual additions, corrections or other changes may have been made. To view the latest version of this or other documents refer to the Toshiba FYI web site.
Toshiba America Information Systems shall not be liable for any commercial losses, loss of revenues or profits, loss of goodwill, inconvenience, or exemplary, special, incidental, indirect or consequential damages whatsoever, or claims of third parties, regardless of the form of any claim that may result from the use of this document.
THE SPECIFICATIONS AND INFORMATION PROVIDED HEREIN ARE FOR INFORMATIONAL PURPOSES ONLY AND ARE NOT A WARRANTY OF ACTUAL PERFORMANCE, WHETHER EXPRESSED OR IMPLIED. THE SPECIFICATIONS AND INFORMATION ARE SUBJECT TO CHANGE WITHOUT NOTICE. ACTUAL PERFORMANCE MAY VARY BASED ON INDIVIDUAL CONFIGURATIONS, USE OF COLLATERAL EQUIPMENT, OR OTHER FACTORS.
© Copyright 2011~2013
This document is copyrighted by Toshiba America Information Systems, Inc. with all rights reserved. Under the copyright laws, this document cannot be reproduced in any form or by any means—graphic, electronic, or mechanical, including recording, taping, photocopying, without prior written permission of Toshiba. No patent liability is assumed, however, with respect to the use of the information contained herein.
Trademarks
Toshiba, IPedge, CIX, SoftIPT and Strata are trademarks of Toshiba Corporation or Toshiba America Information Systems, Inc.
Appcritical is a registered trademark of Apparent Networks, Inc. Android is a trademark of Google Inc.
AudioCodes is Registered trademark of AudioCodes Ltd. Cisco is a registered trademark of Cisco Technology, Inc. iPhone and iTunes are registered trademarks of Apple Inc Linux is a registered trademark of Linus Torvalds
Mozilla and Firefox are registered trademarks of Mozilla Foundation Corp. SonicWALL is a registered trademark of SonicWALL, Inc.
Windows, Outlook, and Microsoft are registered trademarks of Microsoft.
Trademarks, registered trademarks, and service marks are the property of their respective owners.

IPedge General End User Information
FCC Requirements
Means of Connection: The IPedge does not connect directly to the telephone network. All direct connections are made to a gateway. Please refer to the gateway manufacturer's documentation.
Radio Frequency Interference
Warning: This equipment generates, uses, and can radiate radio frequency energy and if not installed and used in accordance with the manufacturer’s instruction manual, may cause interference to radio communications. It has been tested and found to comply with the limits for a Class A computing device pursuant to Subpart J of Part 15 of FCC Rules, which are designed to provide reasonable protection against such interference when operated in a commercial environment. Operation of this equipment in a residential area is likely to cause interference, in which case, the user, at his/her own expense, will be required to take whatever measures may be required to correct the interference.
Underwriters Laboratory
This system is listed with Underwriters Laboratory (UL). Secondary protection is required, on any wiring from any telephone that exits the building or is subject to lightning or other electrical surges, and on DID, OPS, and Tie lines. (Additional information is provided in the IPedge Install Manual.)
301756 I.T.E
CP01, Issue 8, Part I Section 14.1
Notice: The Industry Canada label identifies certified equipment. This certification means that the equipment meets certain telecommunications network protective, operational and safety requirements as prescribed in the appropriate Terminal Equipment Technical Requirements document(s). The Department does not guarantee the Equipment will operate to the user’s satisfaction.
Repairs to Certified Equipment should be coordinated by a representative designated by the supplier. Any repairs or alterations made by the user to this equipment, or equipment malfunctions, may give the telecommunications company cause to request the user to disconnect the equipment.
Users should ensure for their own protection that the electrical ground connections of the power utility, telephone lines and internal metallic water pipe system, if present, are connected together. This precaution may be particularly important in rural areas.
Before installing this equipment, users should ensure that it is permissible to be connected to the facilities of the local telecommunications company. The equipment must also be installed using an acceptable method of connection. The customer should be aware that compliance with the above conditions may not prevent degradation of service in some situations.
CAUTION! Users should not attempt to make such connections themselves, but should contact the appropriate electric inspection authority, or electrician, as appropriate.
Important Notice — Music-On-Hold
In accordance with U.S. Copyright Law, a license may be required from the American Society of Composers, Authors and Publishers (ASCAP), or other similar organization, if radio or TV broadcasts are transmitted through the music-on-hold feature of this telecommunication system. Toshiba America Information Systems, Inc., strongly recommends not using radio or television broadcasts and hereby disclaims any liability arising out of the failure to obtain such a license.
Hearing Aid Compatibility Notice: The FCC has established rules that require all installed business telephones be hearing aid compatible. This rule applies to all telephones regardless of the date of manufacture or installation. There are severe financial penalties which may be levied on the end-user for non-compliance.
Toshiba Telecommunication Systems Warranty and License Agreements
For information relating to the End User Limited Warranty and License Agreements, please refer to http:// www.telecom.toshiba.com/Telephone_Systems_Support/warranty.cfm
WARRANTIES FOR NON-TOSHIBA BRANDED THIRD PARTY PRODUCTS
A valuable element of Toshiba’s product strategy is to offer our customers a complete product portfolio. To provide this value to our customers at the most optimal prices, we offer both Toshiba-branded and thirdparty manufactured products that support our Toshiba IPedge product portfolio. Similar to other resellers of software, hardware and peripherals, these third-party manufactured products carry warranties independent of our Toshiba limited warranty provided with our Toshiba-branded products. Customers should note that third-party manufacturer warranties vary from product to product and are covered by the warranties provided through the original manufacturer and passed on intact to the purchaser by Toshiba. Customers should consult their product documentation for third-party warranty information specific to third-party products. More information may also be available in some cases from the manufacturer’s public website.
While Toshiba offers a wide selection of software, hardware and peripheral products, we do not specifically test or guarantee that the third-party products we offer work under every configuration with any or all of the various models of the Toshiba IPedge. Toshiba does not endorse, warrant nor assume any liability in connection with such third party products or services. If you have questions about compatibility, we recommend and encourage you to contact the third-party software, hardware and peripheral product manufacturer directly.

Contents
Organization.......................................................................................................................................... |
9 |
Conventions ........................................................................................................................................ |
10 |
Related Documents/Media.................................................................................................................. |
10 |
Chapter 1 – The Grand Tour |
|
IP5000-series Telephone Overview .................................................................................................... |
13 |
Fixed Buttons.................................................................................................................................... |
13 |
Programmable Feature Buttons........................................................................................................ |
16 |
Key Strip ........................................................................................................................................... |
16 |
LCD..................................................................................................................................................... |
16 |
9-Line LCD Display........................................................................................................................... |
16 |
4-Line LCD Display........................................................................................................................... |
17 |
Soft Keys............................................................................................................................................. |
18 |
Chapter 2 – The Basics |
|
Customizing Your Telephone.............................................................................................................. |
19 |
Volume Control ................................................................................................................................. |
19 |
LCD Contrast ...................................................................................................................................... |
20 |
Brightness Control ............................................................................................................................ |
20 |
Backlight On/Off................................................................................................................................ |
21 |
Dial Pad and Button Beeps............................................................................................................... |
21 |
Speakerphone/Microphone Sensitivity Adjustment .......................................................................... |
21 |
Telephone Terminology ...................................................................................................................... |
22 |
Making a Call ...................................................................................................................................... |
23 |
Handset ............................................................................................................................................ |
23 |
Spkr Button ....................................................................................................................................... |
23 |
Hot Dialing ........................................................................................................................................ |
23 |
Dial Directory....................................................................................................................................... |
23 |
Answering a Call ................................................................................................................................. |
25 |
Handset ............................................................................................................................................ |
25 |
Speaker ............................................................................................................................................ |
25 |
Shift Button ....................................................................................................................................... |
25 |
Handsfree Answerback..................................................................................................................... |
25 |
On a Call ............................................................................................................................................. |
26 |
Switching Between Handset and Speakerphone.............................................................................. |
26 |
Microphone (Mic/Mute) Button.......................................................................................................... |
26 |
Hold .................................................................................................................................................. |
26 |
Message Waiting................................................................................................................................. |
27 |
Responding to a Lit Msg LED ........................................................................................................... |
27 |
Turning On/Off MW LED on Another Extension ............................................................................... |
27 |
LED Indicator Details .......................................................................................................................... |
28 |
IPedge UG 02/14 |
TOSHIBA |
1 |

Contents |
|
Chapter 3 – SoftIPT |
|
Chapter 3 – SoftIPT |
|
SoftIPT Icons .................................................................................................................................... |
29 |
Fixed Buttons.................................................................................................................................... |
30 |
Flexible Buttons ................................................................................................................................ |
30 |
Liquid Crystal Display ....................................................................................................................... |
30 |
Configuring SoftIPT............................................................................................................................. |
31 |
Configure the SoftIPT ....................................................................................................................... |
31 |
Basic SoftIPT Functions...................................................................................................................... |
34 |
Start the SoftIPT ............................................................................................................................... |
34 |
Answering a Call............................................................................................................................... |
35 |
Switching a Call to Your Headset ..................................................................................................... |
35 |
Labeling Feature Buttons.................................................................................................................. |
35 |
Using the Directory ........................................................................................................................... |
35 |
Using Echo Canceller.......................................................................................................................... |
36 |
Chapter 4 – Feature Operations |
|
Account Codes.................................................................................................................................... |
37 |
Voluntary Account Codes ................................................................................................................. |
38 |
Advisory Message............................................................................................................................... |
38 |
Alarm Notification ................................................................................................................................ |
39 |
Automatic Callback ............................................................................................................................. |
40 |
Background Music (BGM) ................................................................................................................... |
40 |
Call Forward........................................................................................................................................ |
41 |
Call Forward Types........................................................................................................................... |
41 |
Call Forward Settings ....................................................................................................................... |
43 |
Station Call Forward Procedures...................................................................................................... |
43 |
Program Call Forward via Enterprise Manager................................................................................. |
43 |
Example: Call Forward to extension ................................................................................................. |
44 |
Example: Call Forward to outside line .............................................................................................. |
44 |
Program System Call Forward via Enterprise Manager.................................................................... |
44 |
Default Call Forward Codes.............................................................................................................. |
45 |
Call History.......................................................................................................................................... |
47 |
Call Park.............................................................................................................................................. |
48 |
Call Pickup .......................................................................................................................................... |
49 |
Call Transfer........................................................................................................................................ |
50 |
Call Waiting ......................................................................................................................................... |
51 |
Caller Identification.............................................................................................................................. |
51 |
Conference Call .................................................................................................................................. |
52 |
Direct Station Selection (DSS) ............................................................................................................ |
54 |
Do Not Disturb..................................................................................................................................... |
55 |
Emergency Call................................................................................................................................... |
56 |
Emergency Monitoring Station.......................................................................................................... |
56 |
Emergency Ringdown ......................................................................................................................... |
56 |
Message Waiting................................................................................................................................. |
56 |
Microphone Cut-Off............................................................................................................................. |
57 |
Off-Hook Call Announce (OCA) .......................................................................................................... |
58 |
Override .............................................................................................................................................. |
58 |
Paging................................................................................................................................................. |
60 |
Privacy ................................................................................................................................................ |
61 |
Redial.................................................................................................................................................. |
62 |
Speed Dial........................................................................................................................................... |
62 |
Time and Date Setting (Local) ............................................................................................................ |
64 |
Tone First / Voice First Signalling ....................................................................................................... |
64 |
2 |
TOSHIBA |
IPedge UG 02/14 |

|
Contents |
|
Chapter 5 – Messaging Features |
Tone First Signalling ......................................................................................................................... |
64 |
Voice First Signalling ........................................................................................................................ |
65 |
Uniform Call Distribution ..................................................................................................................... |
66 |
Login/Logout ....................................................................................................................................... |
66 |
Chapter 5 – Messaging Features |
|
Access your Mailbox by Phone ........................................................................................................... |
67 |
Set up Your Mailbox for the First Time................................................................................................ |
67 |
Check New Messages ........................................................................................................................ |
68 |
Review saved messages .................................................................................................................... |
68 |
Envelope Information .......................................................................................................................... |
68 |
Volume /Speed Control....................................................................................................................... |
69 |
Reply to a Message ............................................................................................................................ |
69 |
Call Back Directly ................................................................................................................................ |
69 |
Redirect a Message ............................................................................................................................ |
70 |
Erase / Delete and Retrieve a Deleted Message ................................................................................ |
71 |
Delete a Message............................................................................................................................. |
71 |
Retrieve a Deleted Message ............................................................................................................ |
71 |
Number of Messages .......................................................................................................................... |
71 |
Send A Message Directly To A Subscriber’s Mailbox ......................................................................... |
71 |
To Mark a Message as Confidential.................................................................................................... |
72 |
To Mark a Message as Priority ........................................................................................................... |
72 |
To Mark a Message as Priority and Confidential ................................................................................ |
73 |
To Request a Return Receipt for a Message...................................................................................... |
73 |
To Request Notification of Non-receipt ............................................................................................... |
73 |
To Schedule a Message for Future Delivery....................................................................................... |
73 |
To Send a Message Using Directory Assistance ................................................................................ |
74 |
To Send a Message to a Group Distribution ....................................................................................... |
74 |
Delete a Message after Sending......................................................................................................... |
74 |
Chapter 6 – Greetings |
|
Manage your Default Greeting ............................................................................................................ |
75 |
Activate your Extended Absence Greeting ......................................................................................... |
76 |
Deactivate your Extended Absence Greeting ..................................................................................... |
76 |
Manage your Busy Greeting ............................................................................................................... |
76 |
Manage your Out of Office Greeting ................................................................................................... |
76 |
Manage your Custom Greetings ......................................................................................................... |
76 |
Change your Recorded Name ............................................................................................................ |
77 |
Msync.................................................................................................................................................. |
77 |
Chapter 7 – Other Messaging Applications |
|
Group Distributions ............................................................................................................................. |
79 |
Set up a Private Group Distribution List .............................................................................................. |
79 |
Add Members to a Private Group Distribution List .............................................................................. |
79 |
Delete Members from a Private Group Distribution List...................................................................... |
80 |
Delete a Private Group Distribution List .............................................................................................. |
80 |
Listen to Members in a Private Group Distribution List ....................................................................... |
80 |
Using a Private Group Distribution List ............................................................................................... |
80 |
Using a Global Group Distribution List ................................................................................................ |
80 |
Personal Options................................................................................................................................. |
81 |
Message Notification........................................................................................................................... |
81 |
To Activate or Deactivate Message Notification.................................................................................. |
81 |
Set a Wake up Call ............................................................................................................................. |
82 |
IPedge UG 02/14 |
TOSHIBA |
3 |

Contents |
|
Chapter 8 – IPMobility Application |
|
Change your Mailbox Password ......................................................................................................... |
82 |
Personal Assistant .............................................................................................................................. |
83 |
Follow Me............................................................................................................................................ |
83 |
Setting up Call Screening.................................................................................................................... |
86 |
Setting up “Do not Disturb”.................................................................................................................. |
86 |
Setting up a Personal Schedule.......................................................................................................... |
86 |
Recording a Scheduled Greeting ........................................................................................................ |
86 |
Unified Messaging............................................................................................................................... |
86 |
Access your Voicemails through Email ............................................................................................... |
87 |
Enhanced Presence............................................................................................................................ |
88 |
Msync.................................................................................................................................................. |
89 |
Chapter 8 – IPMobility Application |
|
IPMobility............................................................................................................................................. |
91 |
Before You Begin.............................................................................................................................. |
92 |
Download IPMobility Application....................................................................................................... |
92 |
First-Time Setup ............................................................................................................................... |
93 |
Mailbox Setup Wizard....................................................................................................................... |
95 |
Mailbox Setup Wizard....................................................................................................................... |
97 |
Using IPMobility .................................................................................................................................. |
99 |
Messages Tab..................................................................................................................................... |
99 |
Message Menu ............................................................................................................................... |
101 |
Call Tab............................................................................................................................................. |
105 |
My Info Tab ....................................................................................................................................... |
106 |
Greeting Management .................................................................................................................... |
106 |
Record Greetings............................................................................................................................ |
106 |
Call Settings...................................................................................................................................... |
111 |
Call Control ..................................................................................................................................... |
112 |
Incoming Calls ................................................................................................................................ |
113 |
Chapter 9 – Fax Capabilities |
|
Sending a Fax from your desktop ..................................................................................................... |
117 |
Recipient......................................................................................................................................... |
118 |
My Info ............................................................................................................................................ |
118 |
Options ........................................................................................................................................... |
119 |
Server Info ...................................................................................................................................... |
119 |
Setting up the Internal address book .............................................................................................. |
119 |
Fax options........................................................................................................................................ |
120 |
Fax Settings.................................................................................................................................... |
120 |
Incoming Faxes .............................................................................................................................. |
120 |
Fax Confirmation ............................................................................................................................ |
121 |
Auto Print ........................................................................................................................................ |
121 |
Fax Contacts................................................................................................................................... |
121 |
Fax Log........................................................................................................................................... |
121 |
Fax Queue ...................................................................................................................................... |
121 |
Cover Information ........................................................................................................................... |
121 |
Redirect fax messages...................................................................................................................... |
121 |
Chapter 10 –Call Manager Basics |
|
The Main Screen............................................................................................................................... |
124 |
The Compact View ......................................................................................................................... |
124 |
Expanded View............................................................................................................................... |
127 |
Screen Docked Views..................................................................................................................... |
128 |
4 |
TOSHIBA |
IPedge UG 02/14 |

|
Contents |
|
Chapter 11 – Using Call Manager Features |
Call Manager Main Menu................................................................................................................ |
128 |
Shortcuts ........................................................................................................................................... |
129 |
KeyTips........................................................................................................................................... |
129 |
Hot Keys ......................................................................................................................................... |
129 |
The Side Window Screen.................................................................................................................. |
130 |
Call Handler Mode .......................................................................................................................... |
130 |
Buttons Mode.................................................................................................................................. |
130 |
Companion Application Windows...................................................................................................... |
131 |
Screen Colors ................................................................................................................................... |
131 |
Chapter 11 –Using Call Manager Features |
|
Call Handling Features...................................................................................................................... |
133 |
Making Outgoing Calls.................................................................................................................... |
133 |
Answering Calls .............................................................................................................................. |
134 |
Hang Up.......................................................................................................................................... |
135 |
Holding Calls................................................................................................................................... |
135 |
Transferring Calls ........................................................................................................................... |
135 |
Call Forwarding............................................................................................................................... |
136 |
Status Messages and DND ............................................................................................................ |
137 |
Viewing Extra Call Information........................................................................................................ |
138 |
Call Center Features ......................................................................................................................... |
139 |
Logging In or Out ............................................................................................................................ |
139 |
Changing Agent Status................................................................................................................... |
140 |
Chapter 12 –Preferences |
|
PREFERENCES ............................................................................................................................... |
141 |
Config Settings.................................................................................................................................. |
141 |
General ........................................................................................................................................... |
142 |
Dialing Tab...................................................................................................................................... |
146 |
Docking Tab.................................................................................................................................... |
151 |
Advanced Tab................................................................................................................................. |
152 |
Setting Up Hot Key Dialing & Popup................................................................................................. |
155 |
Setting Shortcut Keys ..................................................................................................................... |
155 |
Skin Editor......................................................................................................................................... |
157 |
Skins Files ...................................................................................................................................... |
158 |
Saving/Creating New/Deleting Skins .............................................................................................. |
158 |
The Skin Editor ............................................................................................................................... |
159 |
LCD Background and Text Colors .................................................................................................. |
159 |
Insert your Logo into the Skin ......................................................................................................... |
160 |
Changing Call Windows Appearance ............................................................................................. |
160 |
Changing the Button/ACD Button Appearance............................................................................... |
160 |
Email skins...................................................................................................................................... |
161 |
Tab Settings...................................................................................................................................... |
162 |
Add Tab .......................................................................................................................................... |
162 |
Update Tab ..................................................................................................................................... |
162 |
Delete Tab ...................................................................................................................................... |
164 |
Revert ............................................................................................................................................. |
164 |
Chapter 13 –Buttons |
|
Programmable Buttons ..................................................................................................................... |
165 |
User Programmable Keys ................................................................................................................. |
166 |
To Initialize Key .............................................................................................................................. |
166 |
To Swap Keys................................................................................................................................. |
166 |
IPedge UG 02/14 |
TOSHIBA |
5 |

Contents |
|
Chapter 14 – Actions |
|
To Copy This Key ........................................................................................................................... |
167 |
Change Key .................................................................................................................................... |
167 |
Chapter 14 –Actions |
|
Creating Actions................................................................................................................................ |
175 |
Attach Account Code ...................................................................................................................... |
176 |
Export Call Info ............................................................................................................................... |
176 |
Log Info to File ................................................................................................................................ |
177 |
Lookup in Outlook........................................................................................................................... |
177 |
Minimize Phone Screen.................................................................................................................. |
178 |
Modify Call Information ................................................................................................................... |
178 |
Play WAV File................................................................................................................................. |
179 |
Pop External Web Browser............................................................................................................. |
180 |
Pop Internal Web Browser.............................................................................................................. |
180 |
Popup Call Info Screen................................................................................................................... |
181 |
Popup Phone Screen...................................................................................................................... |
182 |
Run another Program ..................................................................................................................... |
182 |
Send DDE Msg ............................................................................................................................... |
183 |
Send Keystrokes to a Program....................................................................................................... |
184 |
Set Phone Status Message ............................................................................................................ |
186 |
Set Phone Forwarding .................................................................................................................... |
187 |
System/PBX Command .................................................................................................................. |
188 |
Transfer Call ................................................................................................................................... |
189 |
Action Variables ................................................................................................................................ |
190 |
Call Variables.................................................................................................................................. |
190 |
System Variables............................................................................................................................ |
192 |
Exporting Actions............................................................................................................................ |
193 |
Importing Actions ............................................................................................................................ |
193 |
Testing Actions ............................................................................................................................... |
194 |
Chapter 15 –Personal Call Handler |
|
Personal Call Handler ....................................................................................................................... |
195 |
Creating Personal Call Handling Rules............................................................................................. |
196 |
Like Matches ..................................................................................................................................... |
204 |
Unlike Matches.................................................................................................................................. |
205 |
Export Rules...................................................................................................................................... |
206 |
Importing Rules ................................................................................................................................. |
206 |
Chapter 16 –Using Microsoft Outlook |
|
Dialing from within Outlook ............................................................................................................... |
207 |
Incoming Calls................................................................................................................................... |
207 |
Integrating with Outlook Calendar..................................................................................................... |
208 |
Create Actions to set and clear the DSS Message......................................................................... |
208 |
Create Personal Call Handler Rules............................................................................................... |
210 |
The Final PCH Rules ...................................................................................................................... |
210 |
Chapter 17 –Using Companion Applications |
|
Contacts............................................................................................................................................ |
211 |
Sorting Entries ................................................................................................................................ |
211 |
Searching Entries ........................................................................................................................... |
211 |
Directory ......................................................................................................................................... |
212 |
Personal / Speed Dial Directory...................................................................................................... |
213 |
6 |
TOSHIBA |
IPedge UG 02/14 |
|
Contents |
|
Chapter 17 – Using Companion Applications |
Presence Viewer............................................................................................................................. |
213 |
History............................................................................................................................................... |
215 |
ACD Viewer....................................................................................................................................... |
219 |
Logging In or Out ............................................................................................................................ |
221 |
ACD Group Status .......................................................................................................................... |
223 |
Notifications .................................................................................................................................... |
224 |
CM LCD .......................................................................................................................................... |
225 |
Miscellaneous ................................................................................................................................. |
226 |
Using ACD Viewer .......................................................................................................................... |
226 |
Requesting Supervisor Help ........................................................................................................... |
229 |
Chat................................................................................................................................................... |
229 |
Chat Operation ............................................................................................................................... |
230 |
Using Chat Messaging.................................................................................................................... |
230 |
To Send a Broadcast Message ...................................................................................................... |
233 |
Chat Feature Operation .................................................................................................................. |
235 |
Response Buttons .......................................................................................................................... |
236 |
Personal Groups............................................................................................................................. |
237 |
Whiteboard Operation..................................................................................................................... |
238 |
Whiteboards Setup ......................................................................................................................... |
239 |
Configuring Chat............................................................................................................................. |
240 |
Interfacing with Other Programs ..................................................................................................... |
244 |
Format of the DDE Command Interface ......................................................................................... |
245 |
Dialer................................................................................................................................................. |
249 |
Main Screen.................................................................................................................................... |
250 |
Calls Display Area .......................................................................................................................... |
250 |
Functions ........................................................................................................................................ |
251 |
Sorting Entries ................................................................................................................................ |
251 |
Dialer Operation.............................................................................................................................. |
251 |
Adding Calls to the Dialer ............................................................................................................... |
253 |
Configuration Settings .................................................................................................................... |
256 |
Adding Action Buttons to Ready to Dial and Results Screens........................................................ |
257 |
Advanced Topics ............................................................................................................................ |
258 |
Buttons .............................................................................................................................................. |
259 |
Web Browser..................................................................................................................................... |
259 |
Soft phone......................................................................................................................................... |
261 |
History............................................................................................................................................... |
262 |
ACD Viewer....................................................................................................................................... |
266 |
Logging In or Out ............................................................................................................................ |
267 |
ACD Group Status .......................................................................................................................... |
269 |
Notifications .................................................................................................................................... |
270 |
CM LCD .......................................................................................................................................... |
271 |
Miscellaneous ................................................................................................................................. |
272 |
Using ACD Viewer .......................................................................................................................... |
272 |
Requesting Supervisor Help ........................................................................................................... |
275 |
Chat................................................................................................................................................... |
276 |
Chat Operation ............................................................................................................................... |
276 |
Using Chat Messaging.................................................................................................................... |
276 |
To Send a Broadcast Message ...................................................................................................... |
279 |
Chat Feature Operation .................................................................................................................. |
281 |
Response Buttons .......................................................................................................................... |
282 |
Personal Groups............................................................................................................................. |
283 |
Whiteboard Operation..................................................................................................................... |
284 |
Whiteboards Setup ......................................................................................................................... |
285 |
Configuring Chat............................................................................................................................. |
286 |
IPedge UG 02/14 |
TOSHIBA |
7 |

Contents |
|
Chapter 18 – IPedge Enterprise Manager |
|
Interfacing with Other Programs ..................................................................................................... |
290 |
Format of the DDE Command Interface ......................................................................................... |
291 |
Dialer................................................................................................................................................. |
296 |
Main Screen.................................................................................................................................... |
296 |
Calls Display Area .......................................................................................................................... |
296 |
Functions ........................................................................................................................................ |
297 |
Sorting Entries ................................................................................................................................ |
298 |
Dialer Operation.............................................................................................................................. |
298 |
Adding Calls to the Dialer ............................................................................................................... |
299 |
Configuration Settings .................................................................................................................... |
302 |
Adding Action Buttons to Ready to Dial and Results Screens........................................................ |
303 |
Advanced Topics ............................................................................................................................ |
304 |
Buttons .............................................................................................................................................. |
305 |
Web Browser..................................................................................................................................... |
306 |
Soft phone......................................................................................................................................... |
307 |
Chapter 18 –IPedge Enterprise Manager |
|
Prerequisites ..................................................................................................................................... |
309 |
Log In ................................................................................................................................................ |
310 |
To change your Security Code/Password ...................................................................................... |
310 |
Log Out ............................................................................................................................................. |
310 |
Home................................................................................................................................................. |
311 |
Keystrip Labels.................................................................................................................................. |
312 |
DND Activating.................................................................................................................................. |
313 |
One Touch Buttons ........................................................................................................................... |
313 |
Changing a One Touch Button ....................................................................................................... |
313 |
To Use a One Touch Button ........................................................................................................... |
314 |
Ring Tones........................................................................................................................................ |
315 |
Settings ............................................................................................................................................. |
316 |
Call Forward...................................................................................................................................... |
317 |
CF Internal and Line Calls .............................................................................................................. |
317 |
CF Direct Line Calls........................................................................................................................ |
317 |
To set up Station Call Forward ....................................................................................................... |
317 |
Speed Dial......................................................................................................................................... |
320 |
System Speed Dial ......................................................................................................................... |
320 |
System Info ....................................................................................................................................... |
320 |
Display Advisory Messages............................................................................................................ |
320 |
Voice Mail.......................................................................................................................................... |
321 |
Account Code.................................................................................................................................... |
321 |
Preferences....................................................................................................................................... |
322 |
Meeting ............................................................................................................................................. |
322 |
EMPA Super User............................................................................................................................. |
323 |
Index .......................................................................................................................................................... |
325 |
8 |
TOSHIBA |
IPedge UG 02/14 |

Introduction
|
This guide describes the Toshiba IP5000-series telephones and various other |
|
user operations for applications that are integrated with the IPedge system. |
Organization |
This guide is divided as follows: |
|
• Chapter 1 – The Grand Tour is an overview of the telephones supported |
|
by the IPedge system. |
|
• Chapter 2 – The Basics covers the basic operations of the IP5000-series |
|
telephones |
|
• Chapter 3 – SoftIPT describes the SoftIPT software client functions. |
|
• Chapter 4 – Feature Operations covers the details about the IP5000- |
|
series telephone’s advanced features. |
|
• Chapter 5 – Messaging Features contains user instructions for the basic |
|
Messaging features. |
|
• Chapter 6 – Greetings has procedures for the Message Greeting |
|
functions. |
|
• Chapter 7 – Other Messaging Applications has instructions for |
|
advanced messaging functions, such as Group Distributions, Adding and |
|
deleting members of groups lists, Setting up personal options and |
|
message notifications, Changing mailbox passwords, Personal Assistant, |
|
Follow me, etc. |
|
• Chapter 8 – IPMobility Application describes how a mobile device may |
|
act as an extension of an office desk phone by providing outgoing and |
|
incoming call functions. |
|
• Chapter 9 – Fax Capabilities describes how to send faxes from your |
|
desktop, redirect fax messages and automatically send faxes to a printer. |
|
• Chapter 10 – Call Manager Basics covers the basics of using Call |
|
Manager. |
|
• Chapter 11 – Using Call Manager Features contains user instructions |
|
for call handling features for personal as well as ACD calls in Call |
|
Manager. |
|
• Chapter 12 – Preferences covers the Preferences options in Call |
|
Manager. |
|
• Chapter 13 – Buttons discusses the various buttons and options |
|
available in Call Manager and how to change, edit, etc. |
|
• Chapter 14 – Actions defines the powerful actions that can used with |
|
Call Manager. |
|
• Chapter 15 – Personal Call Handler covers the setting up of call |
|
handling rules and other personal call handling options. |
IPedge UG 02/14 |
TOSHIBA |
9 |

IPedge
•Chapter 16 – Using Microsoft Outlook provides user instructions for Microsoft Outlook integration using Call Manager.
•Chapter 17 – Using Companion Applications contains procedures for Companion applications available with Call Manager, such as, Contacts, History, ACD Viewer, Chat, Dialer, Buttons, and Web Browser.
•Chapter 18 – IPedge Enterprise Manager familiarizes you with the webbased Enterprise Manager personal administration tool.
Conventions
Conventions |
Description |
|
|
|
Elaborates specific items or references other information. Within |
|
Note |
some tables, general notes apply to the entire table and |
|
|
numbered notes apply to specific items |
|
|
|
|
Important! |
Calls attention to important instructions or information |
|
|
|
|
Extension Number |
Press to answer a call to the Extension Number. Each station can have multiple |
|
|
extension buttons. Incoming calls ring the extension button(s) from the top down. |
|
|
For example, station 10's extensions ring 10-1 first, then 10-2, 10-3, and 10-4. A |
|
|
station is considered busy when all extensions are being used |
|
|
|
|
Arial bold |
Represents telephone buttons |
|
|
|
|
Courier |
Shows a computer keyboard entry or screen display |
|
|
|
|
“Type” |
Indicates entry of a string of text |
|
|
|
|
“Press” |
Indicates entry of a single key. For example: Type prog then |
|
press Enter |
||
|
||
|
|
|
|
Shows a multiple PC keyboard or phone button entry. Entries without |
|
Plus (+) |
spaces between them show a simultaneous entry. Example: Esc + |
|
Enter. Entries with spaces between them show a sequential entry. |
||
|
||
|
Example: # + 5 |
|
|
|
|
Tilde (~) |
Means “through.” Example: 350~640 Hz frequency range |
|
|
|
|
1. |
Denotes a procedure |
|
|
|
|
• |
Denotes the step in a one-step procedure |
|
|
|
|
|
Grey words within the printed text denote cross-references. In the |
|
See Figure 10 |
electronic version of this document (Library CD-ROM), cross- |
|
|
references appear in blue hypertext |
|
|
|
|
Related |
Some documents listed below may appear in different versions on the Toshiba |
|
Documents/Media |
FYI site or in print. To find the most current version, check the version/date in the |
|
|
Publication Information on the back of the document’s title page. The following are |
|
|
related documents for IPedge systems. |
|
|
• IPedge General Description |
|
|
• IPedge Installation Manual |
|
|
• IPedge Feature Description and Implementation |
|
|
• IPedge IP5000-Series Telephone Quick Reference Card |
|
|
Important! This document may contain references to features |
|
|
intended for future implementation. |
10 |
TOSHIBA |
IPedge UG 02/14 |

The Grand Tour |
1 |
The IP5000-series telephones connected to a Strata CIX telephone system, running Release 5.2 or higher software, include a selection of IP telephone models and matching IP add-on modules, as well as a 60 button DSS Console. See Table 1 for more details.
Some IP5000 telephones offer a built-in gigabit ethernet switch allowing the telephone to auto-sense the network speed, 10/100/1000Mbps. The IP5522SD, IP5622-SD, IP5531-SDL, and IP5631-SDL telephone models do not support 1000Mbps.
Through dynamic soft key assignments, the LCD telephones provide easy access to frequently-used features by prompting specific tasks, providing Outside Line Identification, User Name/Number, Call Duration, Date/Time of Day displays, and Name and number displays of incoming callers.
The full-duplex speakerphone on these telephones enables you to place and receive calls without lifting the handset.
The LCD telephones with 10 and 20 buttons are available with LCD backlight. However, the IP5022-SD, IP5522-SD and IP5531-SDL telephones do not have the backlight. To change the backlight settings, refer to Chapter 4 – Feature Operations.
|
Table 1 IP5000 Series Telephones |
|
|
|
|
|
|
|
|
|
|
Description |
Image |
|
|
10 Button IP Telephone: |
|
|
|
|
• 4 line LCD with back light option |
|
|
|
|
• |
Full duplex Speakerphone |
|
|
|
• |
Headset I/F |
|
|
|
• |
Ringing LED |
|
|
|
|
|
|
|
|
20 Button IP Telephone: |
|
|
|
|
• 4 line LCD with back light option |
|
|
|
|
• |
Full duplex Speakerphone |
|
|
|
• |
Headset I/F |
|
|
|
• |
Ringing LED |
|
|
|
|
|
|
|
|
|
|
|
|
IPedge UG 02/14 |
TOSHIBA |
11 |

IPedge
The Grand Tour
Table 1 IP5000 Series Telephones |
(continued) |
||
|
|
|
|
|
Description |
|
Image |
20 Button with Electronic LCD Labels: |
|
||
• 9 line LCD with back light |
|
|
|
• |
Full duplex Speakerphone |
|
|
• |
Headset I/F |
|
|
• |
Ringing LED |
|
|
|
|
|
|
The IP5000-series telephone upgrade options include:
Table 2 |
IP5000 Series Add-on Modules |
|
|
|
|
|
|
|
|
|
Description |
|
Image |
|
10 Button ADM for IP5000-series |
|
|
|
|
• LCD programmable key strip with |
|
|
|
|
back light |
|
|
|
|
|
|
|
|
|
20 Button ADM for IP5000-series |
|
|
|
|
• Paper Key Strip |
|
|
|
|
|
|
|
|
|
60 Button DSS for IP5000-series |
|
|
|
|
• Paper Key Strip |
|
|
|
|
|
|
|
|
|
Note: |
IP5522-SD, IP5531-SDL and IP5622-SD can not connect ADM/DSS. |
|||
12 |
TOSHIBA |
IPedge UG 02/14 |
IP5000-series
Telephone
Overview
IPedge
The Grand Tour
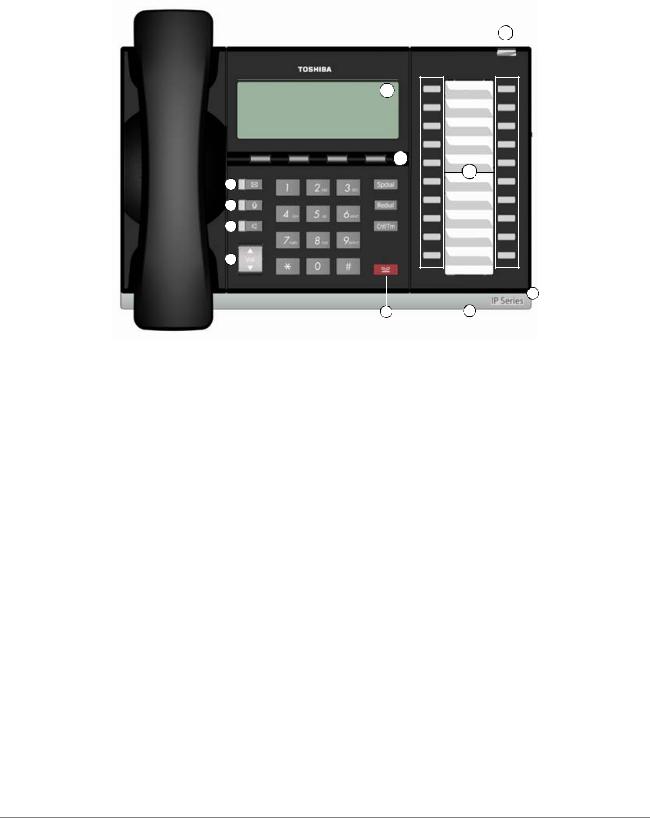
The illustration of the IP5000-series telephone shown below gives a general idea of the basic attributes found on most of these telephones. The positioning of the buttons varies per telephone model.
A 
B 
C 
D 
E
F
G
H
J 
I K
20 Programmable Feature Button 4-Line LCD Telephone
Legend
A Status LED (message and ringing)
B.LCD Display
C.Softkeys
D.Programmable Feature Buttons
E.Message Waiting LED Button
F.Microphone LED Button
G.Speaker LED Button
H.Volume Button
I.Hold Button
J.Microphone
K.Tilt stand
Fixed Buttons The fixed buttons on the dial pad help perform standard functions quickly and easily.
IPedge UG 02/14 |
TOSHIBA |
13 |

IPedge
The Grand Tour
Layouts Fixed buttons are laid out differently on the IP5000-series telephones.
9-line LCD Telephone
10 and 20 Button 4-line LCD Telephones
Fixed buttons are located on either side of the dial pad.
The Fixed buttons are described below.
Table 3 |
Fixed Button Definitions |
|
|
|
|
Button |
Definitions |
|
|
Message (Msg): When Msg LED flashes, press Msg to call back the |
|
|
station or voice mail device that activated the LED. This is the tele- |
|
|
phone’s [PDN] message waiting button. |
|
|
Important! |
Red LED must be on in order for button to |
|
|
function. |
Microphone (Mic/Mute) button toggles between Mic and Mute. When Mic key is lit, Mute is disabled. When Mic is pressed again and light is off, Mute is enabled on the microphone in the telephone and the microphone in the handset.
14 |
TOSHIBA |
IPedge UG 02/14 |

IPedge
The Grand Tour
Table 3 |
Fixed Button Definitions |
(continued) |
|
|
|
Button |
Definitions |
|
|
|
|
Speaker: Press to toggle the speaker ON/OFF. When red Speaker LED is lit handsfree communications is supported.
To start a handsfree conversation; press the Speaker button, this turns the red Speaker LED on. To terminate this call press the Speaker button again (Speaker LED off).
During a handset conversation, press the Speaker button to start hands-free communications (red Speaker LED on). Press the Speaker button again to transfer the conversation back to the handset (Speaker LED off).
Press and release the volume control bar to adjust volume levels.
|
|
|
Shift Key: Purple button on the IP5131 telephone. Press Shift at any |
|
|
|
time to alternate between display of feature keys 1~10 and feature keys |
|
|
|
11~20. |
|
|
|
|
|
|
|
|
|
|
|
Web Browser Key: Blue button on the IP5131 telephone. Press this key |
|
|
|
to access the web. |
|
|
|
|
|
|
|
|
|
|
|
Navigation Key: Round button on the IP5131 telephone is a navigation |
|
|
|
key used for moving the cursor on html pages and in the programming |
|
|
|
screens. Center of the button is the “select” function. The arrows are |
|
|
|
used to scroll up, down, left or right. |
|
|
|
|
Spdial |
Press Spdial and enter 3-digit Speed dial access code. Speed dial |
||
|
|
|
access codes must be setup before they can be accessed. |
|
|
|
|
Redial |
Press Redial to dial the last telephone number called (internal or exter- |
||
|
|
|
nal). |
|
|
|
If you have Automatic Line Selection, lift the handset first. |
|
|
|
|
Cnf/Trn (Con- |
Press Cnf/Trn to add internal or external parties to a conference call |
||
ference/Trans- |
(up to 8 parties). |
||
fer) |
Press Cnf/Trn and enter a number to transfer a call to another party (on |
||
|
|
|
the CIX system). |
Hold |
Press Hold to place an internal or external call on hold. |
||
|
|
|
Press Hold + Hold (twice) to place an internal or external call on Exclu- |
|
|
|
sive hold. If your telephone is programmed for Automatic Hold, existing |
|
|
|
calls are automatically placed on hold when you answer a call or make |
|
|
|
another call. |
IPedge UG 02/14 |
TOSHIBA |
15 |

IPedge
The Grand Tour
Programmable
Feature Buttons
Programmable Feature Buttons are programmed by the System Administrator and can be customized on a per user basis.
Note: Programmable Feature Buttons are numbered bottom to top, left to right (shown right).
10 |
20 |
09 |
19 |
08 |
18 |
07 |
17 |
06 |
16 |
05 |
15 |
04 |
14 |
03 |
13 |
02 |
12 |
01 |
11 |
Programmable Feature Button
Layout
Key Strip The key strips on the IP5000-series telephones and add-on modules are either electronic (programmable) or paper (refer to Table 1 and Table 2).
LCD
9-Line LCD Display |
The LCD on the 9-Line LCD telephone (shown below) in idle state shows: |
|
• Top to Bottom |
|
• Line 1 or the top line of the LCD will display your user name (if |
|
programmed) and your extension number. |
|
• Line 2 will show the Date and time. |
|
• Line 3 will show information related to your telephone set: VM New/Saved |
|
messages, Call Forward, or if a certain feature is enabled on your |
|
telephone set. |
|
A plus sign + on the LCD indicates there is more data to display. Press |
|
NEXT to advance through the information. |
|
• Lines 4~8 will indicate Programmable Feature Button labels. “Browser”on |
|
Page -16 |
|
• Line 9 will display the Soft Keys (See “Soft Keys” on page 1-18). |
Browser |
Note: This feature applies to the IP5131-SDL telephone. |
|
Toshiba’s IP5131-SDL with it’s large display screen also supports an HTML |
|
browser to allow navigation on the World Wide Web or a company’s intranet. |
|
The phone can have a home page setup that allows navigation to begin just |
|
like a home page in your internet browser. |
|
Web pages display basic HTML but do not support ASP or Flash. The 18 |
|
buttons that surround the screen can be used to highlight selections in the |
16 |
TOSHIBA |
IPedge UG 02/14 |
IPedge
The Grand Tour
Shift Button toggles between Programmable Feature Buttons 1~10 and 11~20.
Navigation Button - See “Browser” on Page 10
Blue Button – toggles inbetween call processing screen and HTML browser or programming.
browser. The Navigation Button can be used to move the viewing window across the website; the center of the navigation button can be pressed to select a field that is highlighted.
The browser allows navigation through various pages of content and is not static to just one site. Navigation is as easy as highlighting a link and selecting it to move to the next web page. All IP5131-SDL telephones come with the browser enabled. In order to access the browser, press the blue button on the bottom righthand side of the phone; this allows you to switch between your call processing screen and the browser window.
4-Line LCD The LCD in it's idle state (shown Display right) displays:
Line 1 or the top line of the LCD will display your user name (if programmed) and your extension number.
Line 2 will show the Date and time.
Line 3 will show information related to your telephone set: VM New/Saved messages, Call Forward, or if a certain feature is enabled on your
telephone set. A plus sign + on the LCD indicates there is more data to display. Press NEXT to advance through the information.
Line 4 will display the soft keys available in idle state. Press DSPLY to switch from the Call Forward display to the User Name display.
IPedge UG 02/14 |
TOSHIBA |
17 |

IPedge
The Grand Tour
Soft Keys |
Softkeys (SK1 - SK4) refer to |
|
|
|
|
|
|
|
|
|
the four buttons directly below |
|
|
|
|
|
|
|
|
|
the LCD screen (shown right). |
|
|
|
|
|
|
|
|
|
Soft Keys dynamically change |
|
|
|
|
|
|
|
|
|
their functions and label |
|
|
|
|
|
|
|
|
|
depending on the state of the |
|
|
|
|
|
|
|
|
|
telephone. The dynamic |
|
|
|
|
|
|
|
|
|
feature associated with the Soft |
|
|
|
|
|
|
|
|
|
Key is displayed on the bottom |
|
|
|
|
|
|
|
|
|
line of the LCD display directly |
|
|
|
|
|
|
|
|
|
above each Soft Key button. |
|
|
|
|
|
|
|
|
|
SK1 |
SK2 |
SK3 |
SK4 |
|||||
|
|
||||||||
18 |
TOSHIBA |
IPedge UG 02/14 |

The Basics |
2 |
This chapter reviews the basic operations of the IP5000-series telephones.
The instructions apply to all telephone models, except when noted otherwise.
Customizing Your
Telephone
Volume Control
To adjust the Handset Volume
Press the Vol up to increase volume and Vol dn to decrease volume during the call. When you hang up, the volume returns to the default setting.
To adjust the speaker volume for internal/external calls and background music
1.Press Spkr
2.Press an extension button - you hear dial tone
3.Press Vol up to increase volume and Vol dn to decrease volume. This volume setting applies to all calls until changed
To adjust Ring Tone, Hands free Answerback and Speaker Off-hook Call
Announce
Make sure the telephone is idle and the handset is on-hook. Press the Vol up to increase volume and Vol dn to decrease volume. This adjusts volume for your telephone’s ring tone, Hands free Answerback and Speaker Off-hook Call Announce simultaneously.
To adjust handset Beep Tone
1.With the handset off-hook, dial the Beep Tone Adjustment Code #6101 (default code). A beep will be heard
2.Press Vol up or Vol dn to reach the desired level
IPedge UG 02/14 |
TOSHIBA |
19 |

IPedge
The Basics
LCD Contrast Available on backlit telephones and backlit add-on module.
To adjust the LCD contrast on the backlit telephones
1.Press and hold down the Mic button
2.Press and release Vol s or Vol t repeatedly
Note: Holding the Vol button does not continue to change the setting. The button must be pressed for each step of contrast change
To adjust the LCD contrast on the Add-on Module
1.Press 3+6+9+Hold (simultaneously)
2.Press Contrast + button to increase contrast
3.Press Contrast - button to decrease contrast
4.Lift the handset off-hook / on-hook to save settings
Note: Holding the soft key does not continue to change the setting. The soft key must be pressed for each step of contrast change
Brightness Control Available on backlit telephones with 4-line LCD’s and backlit add-on module.
To change the LCD back light brightness
1.Press 3+6+9+Hold (simultaneously)
2.Press Bright soft key to increase brightness
3.Press Dim soft key to decrease brightness
4.Lift the handset off-hook / on-hook to save the settings
Note: Use the BL BRIGHT and BL DIM buttons in steps 2 and 3 on the 10 button LCD Add-on Module
To change the LCD backlight brightness for IP5131-SDL or IP5631-SDL
1.Press 3+6+9+Hold (simultaneously)
2.Press the Others soft key
3.Press the BL Bright soft key
4.Enter a value of 0~3 using the keypad. (0 = dim; 3 = brightest)
5.Press the Set soft key twice
20 |
TOSHIBA |
IPedge UG 02/14 |

IPedge
The Basics
Backlight On/Off Available on backlit telephones and backlit add-on module.
To change Backlight Settings
1.Press 3+6+9+Hold (simultaneously)
2.Press the Mic button
3.Press Hold
4.Use table below to choose preferred settings
5.Press Hold + Hold (twice) to save settings
Table 4 Backlight Settings
Button |
Input |
Meaning |
|
1 |
Always Off |
FB1 |
2 |
Always On |
|
3 |
On-demand |
|
|
Backlight |
FB2 |
1~30 |
Timer [x10 seconds] |
|
|
Example: 1 = 10 seconds; 30 = 300 seconds. |
Note: FB1 is the lower left key, FB2 in the next up, FB3 is above FB2, and FB4 is above FB3.
Dial Pad and |
IP telephones can emit a “beep” whenever a dial pad or feature button is pressed. |
|
Button Beeps |
The “beeps” are On by default. Follow these steps to turn the “beeps” On or Off. |
|
|
1. |
Press 3+6+9+Hold (simultaneously) |
|
2. |
Press 0 |
|
3. |
Press Hold |
|
4. |
Press Programmable Feature Button 1 (FB1) to toggle On/Off |
|
5. |
FB1, LED On: buttons beep |
|
6. |
FB1, LED Off: buttons do not beep |
|
7. |
Press Hold to set the option |
|
8. |
You must also go off-hook, then on-hook to exit the program mode |
Speakerphone/ |
When you are using the speakerphone, high ambient noise levels may cause the |
|
Microphone |
party you are talking with to be to cut off frequently. If this happens, follow these |
|
Sensitivity |
steps to lower the sensitivity of the microphone on a IP5000-series telephone. The |
|
Adjustment |
default is normal sensitivity. |
|
|
1. |
Press 3+6+9+Hold (simultaneously) |
|
2. |
Press 0 |
|
3. |
Press Hold |
|
4. |
Press Programmable Feature Button 3 (FB3) to toggle On/Off |
|
5. |
FB3, LED On: Lower sensitivity |
IPedge UG 02/14 |
TOSHIBA |
21 |

IPedge
The Basics
|
6. |
FB3, LED Off: Normal sensitivity |
|
7. |
Press Hold to set the option |
|
8. |
Go off-hook, then on-hook to exit the program mode |
Telephone |
When making or receiving calls on your IP5000-series telephone you may |
|
Terminology |
experience one or more of the following call features depending on how your |
|
|
telephone is configured. |
|
|
• |
Line – is synonymous with trunk which is the line that connects you to the |
|
|
PSTN (Public Switched Telephone Network). Line can be: |
|
|
• a button on your telephone set designated for outgoing calls |
|
|
• your DN button followed by dialing 9. |
|
• |
Automatic Line Selection (ALS) – ALS is engaged on outgoing calls. |
|
|
Lift the handset or press Spkr to hear dial tone, the steady green Line |
|
|
LED indicates ALS in enabled. The second line of the LCD will display the |
|
|
method of dialing available, followed by the digits dialed. |
|
• |
Ringing Line Preference – Answer any incoming call by lifting the |
|
|
handset or pressing Spkr. There is no need to press the ringing line |
|
|
button to answer the call when ringing line preference is enabled. |
|
• |
Tone First Signaling – Internal incoming calls only: telephone rings in |
|
|
standard ring tone, lift handset or press Spkr to answer call. |
|
• |
Voice First Signaling – Internal incoming calls only: a long tone is heard, |
|
|
followed by the caller's voice, this will automatically engage the Spkr to |
|
|
allow for hands free communications. Lift the handset if desired (for |
|
|
privacy). When Voice First Signaling is enabled the telephone does not |
|
|
ring on internal incoming calls. |
|
• |
Hot Dialing – Dial a telephone number from the keypad, the telephone |
|
|
automatically selects a line, shown with a green LED, and turns on the |
Spkr and Mic LED's. When Hot Dialing is not turned on the handset should be lifted or Spkr should be pressed in order to make a call.
22 |
TOSHIBA |
IPedge UG 02/14 |

IPedge
The Basics
Making a Call |
There are three ways to originate a call from the telephone: |
Handset 1. To make a call, lift the handset, then dial the number.
A line may be automatically selected or choose a line manually. Dial tone is heard through the handset. The Speaker and Microphone LEDs do not light.
Digits display as they are dialed. Call progress tones (Ringback Tone, Busy Tone, etc.) are heard through the handset.
2.When connected, continue using the handset or switch to speakerphone by holding down Spkr and placing the handset in the cradle.
Spkr Button 1. To make a call, press Spkr.
A line may be selected automatically or choose a line manually. The extension or Line button lights (depending on system programming). Dial tone is heard through the speaker. The Speaker and Microphone LEDs light.
2. Dial the number.
Digits display as they are dialed. Call progress tones (Ringback Tone, Busy Tone, etc.) are heard through the speaker.
When connected, continue using the speakerphone or lift the handset to continue the conversation.
Hot Dialing 1. To make a call using Hot Dialing, start dialing the number.
The extension button, Spkr and Mic LEDs light. Digits display as they are dialed. Call progress tones (Ringback Tone, Busy Tone, etc.) are heard through the speaker.
2.When connected, continue using the speakerphone or lift the handset to continue the conversation.
Dial Directory |
Calls can be made by selecting a name from the alphabetical telephone directory. |
To access the Directory
1.Press DIR soft key (shown right).
Select Directory menu appears.
The soft keys on the Select Directory are:
My = Personal Speed Dial Names EXTR = System Speed Dial Names
INTR = Directory Number Names Dial = Cancel directory, get dial tone.
TOM EDISON |
NO.2004 |
APR 05 WEDNESDAY |
1:01PM |
DIR
4 Line LCD Display
2.Choose the directory you wish to access and use the dial pad to enter the name.
IPedge UG 02/14 |
TOSHIBA |
23 |

IPedge
The Basics
Notes:
•If a directory is not selected and a name is entered, all directories will be searched.
•To enter names from the dial pad, press the dial pad button associated with the letter to be entered. Press the button once for the first letter, twice for the second letter, etc. Left and Right Soft Keys are available to move the cursor.
1.Press FIND to start the directory search.
2.Press NEXT to move forward through the directory.
3.Press BACK to move backwards through the directory.
4.Press Call to connect to the directory entry selected.
5.On the 9-line LCD Display, press the button next to the displayed name. See figure on following page.
6.Press CNCL to quit the directory search.
Press the key next to the displayed
 name to call that person.
|
|
|
|
|
|
|
|
|
|
|
|
|
|
|
|
|
|
|
BOB L (PRI) |
|
|
BRAD FERRIS |
|
|
|
||||||
|
|
|
|
|
|
|
|
||||||||
|
|
|
BOB LAWVER |
|
|
BRAD FISHER |
|
|
|
||||||
|
|
|
|
|
|
|
|
||||||||
|
|
|
BILL THOMAS |
|
|
BRIAN SMITH |
|
|
|
||||||
|
|
|
|
|
|
|
|
||||||||
|
|
|
|
|
|
|
|
|
|
|
|
|
|
|
|
|
|
|
ONE TOUCH |
|
|
ONE TOUCH |
|
|
|
||||||
|
|
|
|
|
|
|
|
||||||||
|
|
|
PICKUP |
|
|
ONE TOUCH |
|
|
|
||||||
|
|
|
|
|
|
|
|
||||||||
|
|
|
CFAC |
|
|
ONE TOUCH |
|
|
|
||||||
|
|
|
|
|
|
|
|
||||||||
|
|
|
DND |
|
|
ONE TOUCH |
|
|
|
||||||
|
|
|
|
|
|
|
|
||||||||
|
|
|
Ext. 4227 |
|
|
ONE TOUCH |
|
|
|
||||||
|
|
|
|
|
|
|
|
||||||||
|
|
|
|
|
|
|
|
|
|
|
|
|
|
|
|
|
|
|
|
NEXT |
|
|
BACK CNCL |
|
|
|
|||||
|
|
|
|
|
|
|
|
|
|||||||
|
|
|
|
|
|
|
|
|
|
|
|
|
|
|
|
|
|
|
|
|
|
|
|
|
|
|
|
|
|
|
|
|
|
|
|
|
|
|
|
|
|
|
|
|
|
|
|
|
|
|
|
|
|
|
|
|
|
|
|
|
|
|
|
9 Line LCD Display - Dial by Name Screen
24 |
TOSHIBA |
IPedge UG 02/14 |

Answering a Call
IPedge
The Basics
There are several ways to answer a call:
Handset When the telephone is programmed for Ringing Line Preference, pick up the handset and the telephone automatically answers the ringing line.
... or press the button associated with the ringing line (flashing green LED).
Speaker When the telephone is programmed for Ringing Line Preference, press Spkr and the ringing line is answered.
... or press the button associated with the ringing line (flashing green LED). Once connected, continue using the speakerphone or lift the handset.
Shift Button Available on a 9-line display telephone only.
If the LCD screen is set to view Buttons 11~20 and a call comes in on Button 1 the phone will ring and Caller ID information will display on the top of the screen, press the “Shift” Button to view Buttons 1~10 and answer the call.
Handsfree With speakerphone enabled, the telephone may be programmed for Handsfree Answerback Answerback. The called party hears a single long tone, followed by the caller’s
voice. Begin hands free conversation. If Handsfree Answerback were not programmed, the called party could hear the calling party speak but would not be able to answer them without answering the call manually.
Notes:
•The extension LED flashes green, the Microphone LED lights steady red and the Speaker LED flashes Red.
•In order to perform any additional functions with this call (like a transfer or hold) the call must be properly answered to gain full call control. Perform the same steps you normally would to answer a call: press the Spkr button, the flashing DN button or lift the handset.
•Handsfree MIC setting needs to be enabled by your System Administrator.
IPedge UG 02/14 |
TOSHIBA |
25 |

IPedge
The Basics
On a Call
Switching Between
Handset and
Speakerphone
Microphone (Mic/
Mute) Button
Hold
While on a call you can perform the following:
Press Spkr and place the handset on-hook to switch from handset to speakerphone mode.
Take the handset off-hook to switch from speakerphone to handset mode.
This button toggles between Mic and Mute. When Mic button is lit, handsfree communication is supported, when Mic is pressed again and light is off, Mute is enabled and mutes both the microphone and the handset.
To place a call on hold, press Hold. Your LCD shows the line on hold. The held Line’s LED flashes green while appearances of the line at other stations flash red.
•To return to the held call, press the flashing held Line button.
•If you do not return to the held call within a specified time, it rings back to your telephone. The call remains camped-on to your station.
•If the held party hangs up, the call is released.
•See the Call Pickup section to pick up a call on hold from another extension.
Exclusive Hold This feature enables you to place a call on hold so that only you can retrieve it.
While on a call, press Hold twice. That line’s LED flashes green while appearances of the line at other stations are steady red (in use).
Automatic Hold This features enables you to move from one Line button to another Line button without pressing Hold.
Check with your System Administrator to make sure this setting is turned on. If Automatic Hold is not enabled, calls will drop when moving from one line to another without pressing Hold.
While on a call, press another extension button to receive/originate a new call. The accessed line’s LED flashes (in-use). The first call is put on hold and your extension’s LED flashes.
Consultation Hold 1. While on a call, press Cnf/Trn. The call goes on hold.
2.Dial another line.
3.Transfer the call or return to the held call by pressing its Line button.
26 |
TOSHIBA |
IPedge UG 02/14 |
Loading...