


UM_EEMEA_Scan_1108.book Page 1 Monday, December 15, 2008 2:26 PM
User’s Manual
CZ RS
FR RU
GR SK
HR SL
HU TR
PL AR

UM_EEMEA_Scan_1108.book Page 2 Monday, December 15, 2008 2:26 PM
EN
Table of Contents
Important Safety Instructions . . . . . . . . . . . . . . . . . . . . . . . . . . . . . . . . . . . . . .3 Introduction . . . . . . . . . . . . . . . . . . . . . . . . . . . . . . . . . . . . . . . . . . . . . . . . . . . . .6
Checking the Components . . . . . . . . . . . . . . . . . . . . . . . . . . . . . . . . . . . . . . .6 Parts of the Scanner and Their Functions . . . . . . . . . . . . . . . . . . . . . . . . . . .6
Using the Scanner . . . . . . . . . . . . . . . . . . . . . . . . . . . . . . . . . . . . . . . . . . . . . . .8
Preparation . . . . . . . . . . . . . . . . . . . . . . . . . . . . . . . . . . . . . . . . . . . . . . . . . . .8 Making a Scan . . . . . . . . . . . . . . . . . . . . . . . . . . . . . . . . . . . . . . . . . . . . . . . .9 Scanning to a Digital Photo Frame . . . . . . . . . . . . . . . . . . . . . . . . . . . . . . . .10 Connecting the Scanner to a Computer . . . . . . . . . . . . . . . . . . . . . . . . . . . .10 More Information . . . . . . . . . . . . . . . . . . . . . . . . . . . . . . . . . . . . . . . . . . . . . .11
Care and Maintenance . . . . . . . . . . . . . . . . . . . . . . . . . . . . . . . . . . . . . . . . . . .13
Cleaning the Scanner . . . . . . . . . . . . . . . . . . . . . . . . . . . . . . . . . . . . . . . . . .13 Calibrating the Scanner . . . . . . . . . . . . . . . . . . . . . . . . . . . . . . . . . . . . . . . .14
Troubleshooting . . . . . . . . . . . . . . . . . . . . . . . . . . . . . . . . . . . . . . . . . . . . . . . .15 Specifications . . . . . . . . . . . . . . . . . . . . . . . . . . . . . . . . . . . . . . . . . . . . . . . . . .16 TOSHIBA Support . . . . . . . . . . . . . . . . . . . . . . . . . . . . . . . . . . . . . . . . . . . . . . .17 Copyright Statement . . . . . . . . . . . . . . . . . . . . . . . . . . . . . . . . . . . . . . . . . . . .17 Disclaimer . . . . . . . . . . . . . . . . . . . . . . . . . . . . . . . . . . . . . . . . . . . . . . . . . . . . .17 Trademarks . . . . . . . . . . . . . . . . . . . . . . . . . . . . . . . . . . . . . . . . . . . . . . . . . . . .17 Regulatory Statements . . . . . . . . . . . . . . . . . . . . . . . . . . . . . . . . . . . . . . . . . . .18
CE Compliance . . . . . . . . . . . . . . . . . . . . . . . . . . . . . . . . . . . . . . . . . . . . . . .18 Working Environment . . . . . . . . . . . . . . . . . . . . . . . . . . . . . . . . . . . . . . . . . .18 Additional Environments not Related to EMC . . . . . . . . . . . . . . . . . . . . . . . .19 Following Information is Only for EU-member States . . . . . . . . . . . . . . . . . .19
2 |
User’s Manual |

UM_EEMEA_Scan_1108.book Page 3 Monday, December 15, 2008 2:26 PM
Important Safety Instructions
EN
Please read the following important safety instructions carefully before using this scanner. Failure to observe these instructions may result in personal injuries or damages to this scanner.
Do not place this scanner under direct sunlight or near heat sources, such as in a closed car under sunlight or near a stove. The outer casing of this scanner may become deformed and the sophisticated sensors inside may become damaged due to excessive heat.
Do not use this scanner near water, in the rain or allow any liquid to get inside this product. Water and moisture may cause shortcircuit to the electronic components and lead to malfunctions.
Do not use this scanner in dusty environments. Dust grains may cover this scanner and scratch the original to be scanned. Do not scan originals that are contaminated by dusts or other particles.
Do not use this scanner near strong electromagnetic sources, such as a microwave oven or television. The electromagnetic interference may cause this scanner to malfunction.
Do not drop or apply shock/vibration to this scanner. Strong impacts may damage the components inside.
Do not insert objects other than compatible memory cards into the memory card slots of this scanner. The metal contacts inside the slots can easily become damaged by foreign objects.
User’s Manual |
3 |

UM_EEMEA_Scan_1108.book Page 4 Monday, December 15, 2008 2:26 PM
EN
The power socket and USB port on this scanner are designed solely for connecting to the supplied power adapter and optional USB cable. Do not insert any other objects into these sockets.
If there are strange odors or heat emitting from this scanner or any signs of malfunction, disconnect this scanner from the power immediately and contact your dealer for inspection or service.
Do not attempt to disassemble, modify, tamper with or repair product (including AC adaptor). Disassembly, modification, tampering or repairing the product could cause fire or electric shock, possibly resulting in serious injury. Please contact an authorized Toshiba service provider for any repair service.
Please pay specail attention to the following when using AC adaptor and handling the power cable/cord:
nWhen handling the power cable/cord, follow these precautions: n Never tamper with the power cable/cord or plug.
n Never splice or alter a power cable/cord. n Never bend or twist a power cable/cord.
n Never pull on a power cable/cord to remove a plug from a socket. Always grasp the plug directly.
n Never place heavy objects on a power cable/cord.
n Never run a power cable/cord through a pinch point such as a door or window.
n Never place a power cable/cord near a heat source.
n Never use nails, staples or similar objects to fasten or attach cord in place. n Never attempt to disassemble or repair an AC adaptor.
n Doing any of the above may damage the cables, and/or result in a fire or electric shock, possibly resulting in serious injury.
4 |
User’s Manual |

UM_EEMEA_Scan_1108.book Page 5 Monday, December 15, 2008 2:26 PM
|
|
EN |
n Attaching the power cable/cord |
||
n Always confirm that the power plug (and extension cable plug if used) has |
|
|
|
|
|
been fully inserted into the socket, to ensure a secure electrical connection. |
|
|
Failure to do so may result in a fire or electric shock, possibly resulting in |
|
|
serious injury. |
|
|
n Be careful if you use a multiple connector. An overload on one socket could |
|
|
cause a fire or electric shock, possibly resulting in serious injury. |
|
|
n If dust gets on the power plug connectors or connector base, turn the power off |
|
|
and disconnect the power plug. Then clean the connector and/or connector |
|
|
base with a dry cloth. Continuing to use the product without cleaning the power |
|
|
plug may result in a fire or an electric shock, possibly resulting in serious injury. |
|
|
n Always use the TOSHIBA AC adaptor that was provided with your product (that |
|
|
may have been provided with your product), or use AC adaptors specified by |
|
|
TOSHIBA to avoid any risk of fire or other damage to the product. Use of an |
|
|
incompatible AC adaptor could cause fire or damage to the product possibly |
|
|
resulting in serious injury. TOSHIBA assumes no liability for any damage |
|
|
caused by use of an incompatible adaptor or charger. |
|
|
n Never plug the AC adaptor into a power source that does not correspond to |
|
|
both the voltage and the frequency specified on the regulatory label of the unit. |
|
|
Failure to do so could result in a fire or electric shock, possibly resulting in |
|
|
serious injury. |
|
|
n Always use or purchase power cables/cords that comply with the legal voltage |
|
|
and frequency specifications and requirements in thecountry of use. Failure to |
|
|
do so could result in a fire or electric shock, possibly resulting in serious injury. |
|
|
n Never attempt to connect or disconnect a power plug with wet hands. Failure to |
|
|
follow this instruction could result in an electric shock, possibly resulting in |
|
|
serious injury. |
|
|
n Never allow any liquids to spill into any part of your product, and never expose |
|
|
the product to rain, water, seawater or moisture. Exposure to liquid or moisture |
|
|
can cause electric shock or fire, resulting in damage or serious injury. If any of |
|
|
these eventualities should accidentally occur, immediately: |
|
|
n Turn off the product. |
|
|
n Disconnect the AC adaptor from the power plug socket and product. |
|
|
Do not turn on the power again, until you have taken the product to an |
|
|
authorized service center. Failure to follow these instructions could result in |
|
|
serious injury or permanent damage to the product. |
|
|
User’s Manual |
5 |

UM_EEMEA_Scan_1108.book Page 6 Monday, December 15, 2008 2:26 PM
EN
Introduction
Checking the Components
Journe Scan
Calibrate |
/ / / Calibrer / Kalibrieren / Calibra / Calibrar |
Calibration Card
AC Adapter |
USB Cable |
||
|
|
|
|
Roller cleaning sheet |
Sensor cleaning swab |
Protective Sheath |
User’s Manual |
Warranty leaflet |
Parts of the Scanner and Their Functions
Front view
6 |
User’s Manual |

UM_EEMEA_Scan_1108.book Page 7 Monday, December 15, 2008 2:26 PM
No. |
Name |
Function/description |
|
1 |
Status/card |
Indicates the operating status of the scanner and |
|
indicator |
memory card. |
||
|
|||
|
|
Press this button to turn the power on or off. |
|
2 |
Power button |
Press and hold this button for 5 seconds to enter |
|
cleaning mode. See “Cleaning the Scanner” on |
|||
|
|
||
|
|
page 13. |
|
3 |
Power indicator |
Indicates the power status of the scanner. |
|
|
|
|
|
4 |
Paper guide |
Used to guide the material to be scanned to ensure |
|
the alignment. |
|||
|
|
||
5 |
4" x 6" mark |
Slide the paper guide to this position when scanning |
|
4" x 6" photos. |
|||
|
|
||
6 |
Feeding slot |
Insert an original into this slot to begin scanning. |
|
|
|
|
|
7 |
Orientation mark |
Indicates the correct original orientation. |
EN
Rear view
No. |
Name |
Function/description |
|
1 |
SD/xD/MMC/MS |
Accepts the following types of memory cards: SD, xD, |
|
card slot |
MMC and MS. |
||
|
|||
2 |
Output slot |
The scanned original comes out from this slot. |
|
|
|
|
|
3 |
CF card slot |
Accepts a Type I CF card. |
|
|
|
|
|
4 |
Mini USB socket |
For connecting to a computer (or digital photo frame) |
|
via a USB cable. |
|||
|
|
||
5 |
Power socket |
For connecting to the supplied power adapter. |
|
|
|
|
User’s Manual |
7 |

UM_EEMEA_Scan_1108.book Page 8 Monday, December 15, 2008 2:26 PM
EN
Using the Scanner
Preparation
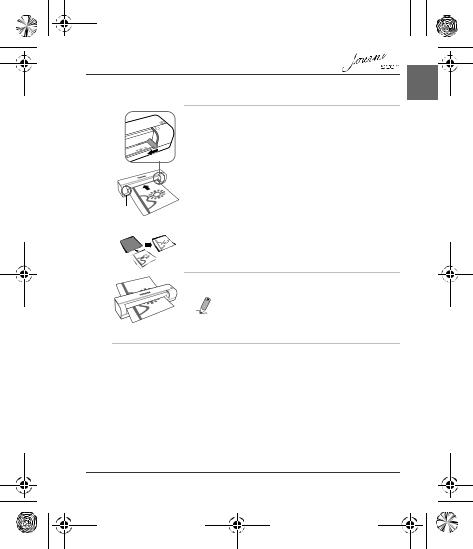
1. Peel off the tape that secures the guide lever.
NOTE: This step is only required when you use the scanner for the first time.
2.Connect the plug on the power adapter cable to the power socket on the scanner. Plug the power adapter into a power outlet.
3.Insert an unlocked (writable) memory card into a suitable memory card slot.
•If both slots are occupied, the scanner will take the following priority when storing the scanned images: SD (MMC) > CF > xD > MS
4.Press the Power button. The Power indicator blinks. Wait until the Power indicator stops blinking and then goes off. The Status/card indicator will light up instead, indicating that the scanner is ready.
8 |
User’s Manual |
UM_EEMEA_Scan_1108.book Page 9 Monday, December 15, 2008 2:26 PM
Making a Scan
EN
1.With the side to be scanned facing upward and in correct orientation as indicated by the orientation mark, place one edge of the original on the scanner and adjust the guide lever so that the original aligns against the left side of the feeding slot. Insert the original into the feeding slot.
 CAUTION: Do not scan glossy photos in humid environments (humidity higher than 70% RH). Otherwise the surface of the photo will become sticky and cause the scanner to jam.
Align left
 NOTE: For your older, fragile photographs, we suggest to use the supplied protective sheath before scanning.
2.The original will be fed into the slot and scanned automatically.
NOTE: If the protective sheath is used, insert it with the folded side first into the feeding slot of the scanner. See “More Information” on page 11 for how to insert photos and other types of originals.
3.When scanning is completed, the Power and Status/card indicators will keep blinking for a while, indicating that the scanner is processing the image and storing the file. Wait until the indicators stop blinking before inserting and scanning the next original.
 CAUTION:
Insert only one sheet at a time. Insert the next original only when the previous one is done. Otherwise the scanner will fail to function normally.
 NOTE:
NOTE:
nDo not remove the memory card or disconnect the power supply while the indicators are blinking.
User’s Manual |
9 |
|
|
|
|
|
|
|
|
|
|
|
|
|
|
UM |
_EEMEA_Scan_1108.book Page 10 Monday, December 15, 2008 2:26 PM |
|
|
||
|
|
|
|
|
|
|
|
|
|
|
|
EN |
|
|
|
|
|
|
|
|
n This scanner only supports output images in JPEG (.jpg) format, and the |
|
|
||||||
|
|
|
|
|
date/time mark will not be added. |
|
|
||
|
|
|
|
|
|
||||
|
|
|
|
|
n For more information on how this scanner stores the scanned image files on |
|
|
||
|
|
|
|
|
the memory card, see “Orientation of the original and scanned image” on |
|
|
||
|
|
|
|
|
page 12. |
|
|
||
|
|
|
|
|
n If the memory card is near full (lower than 1MB), the Status/card indicator |
|
|
||
|
|
|
|
|
blinks. Use another card or delete some files on it if necessary. |
|
|
||
|
|
|
|
|
|
|
|
|
|
|
|
|
|
|
|
4. To turn off the scanner after all originals are scanned, press |
|
|
|
|
|
|
|
|
|
and hold the Power button for 1 second. The power indicator |
|
|
|
|
|
|
|
|
|
will blink and then go off. |
|
|
|
|
|
|
|
Scanning to a Digital Photo Frame |
|
|
|||
|
|
|
|
|
By connecting this photo scanner to a compatible digital photo frame, the |
|
|
||
|
|
|
|
|
scanned images will be transferred to and displayed on the digital photo frame |
|
|
||
|
|
|
|
|
automatically. |
|
|
||
|
|
|
|
|
NOTE: This function requires a compatible digital photo frame (visit |
|
|
||
|
|
|
|
|
www.computers.toshiba-europe.com for information about purchasing the digital |
|
|
||
|
|
|
|
|
frame and using this function). |
|
|
||
|
|
|
|
Connecting the Scanner to a Computer |
|
|
|||
|
|
|
|
|
By connecting the scanner to a computer, you can access the scanned images on |
|
|
||
|
|
|
|
|
the memory card directly, or use the scanner as a memory card reader. |
|
|
||
|
|
|
|
System requirements (for computer) |
|
|
|||
|
|
|
|
|
n Operating system: Windows: Windows 2000, XP or Vista. |
|
|
||
|
|
|
|
|
n An available USB 1.1 or 2.0 port |
|
|
||
10 |
User’s Manual |
UM_EEMEA_Scan_1108.book Page 11 Monday, December 15, 2008 2:26 PM
Making connection
1.Connect one end of the USB cable (with a Mini USB connector) to the Mini USB socket on the scanner.
2.Turn on the computer, and connect the other end of the USB cable to the USB port of the computer.
3.Insert an unlocked (writable) memory card into a suitable memory card slot.
4.Connect the power supply to the scanner.
5.Press the Power button. The Power indicator blinks.
6.The scanner will be recognized by the computer as a removable disk (Windows system). Now you are ready to manipulate the files on the memory card.
More Information
Suitable and unsuitable types of originals
This scanner is designed to obtain the best scanning results for the following types of originals:
n3.5"x5" and 4"x6" photos
nName cards
EN
User’s Manual |
11 |
UM_EEMEA_Scan_1108.book Page 12 Monday, December 15, 2008 2:26 PM
EN
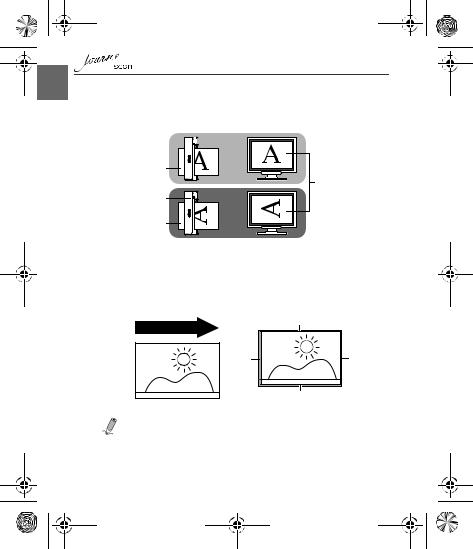
Orientation of the original and scanned image
Please refer to the illustrations below for the relationship between the orientation of the original when scanning and that of the scanned image when displayed on the computer screen.
Scanner 


Original |
Scanned image |
|
when displayed |
|
on-screen |
Scanner |
|
Original |
|
Cropping on scanned images
In order for the scanner to determine the correctness of the scanned image data, some cropping on the scanned image may occur. Please refer to the illustration below.
Cropping size (as measured on the original)
Scanning direction |
Max. 1.5mm |
|
|
Max. |
|
2.5mm |
Max. |
|
1.5mm |
|
Max. 1.5mm |
Original |
Scanned image |
|
NOTE: When scanning darker originals (for example, a photo of the night |
|
sky), over-cropping may occur. Please insert the original in a different |
|
direction (orientation) and try again. |
|
|
12 |
User’s Manual |
UM_EEMEA_Scan_1108.book Page 13 Monday, December 15, 2008 2:26 PM
EN
|
|
|
|
|
Scanned image (over- |
||
Original |
|
cropped) |
|
Care and Maintenance
Cleaning the Scanner
In order to maintain the scanned image quality and prevent dust accumulation, it is recommended that you clean the scanner (outer casing, image sensor and roller inside the scanner) regularly (about every 150-200 scans) using only the recommended and supplied tools.
 CAUTION: Do not use any tools other than the supplied ones to clean the image sensor and roller inside the scanner. Otherwise they will be permanently damaged. Make sure that there is no visible dust on the cleaning tool before using.
Cleaning the roller
1.Connect the power supply to the scanner.
2.With scanner power off, press and hold the Power button for 5 seconds. The scanner will enter cleaning mode.
3.Insert the supplied roller cleaning sheet as shown. Note the direction of the black sponge on the sheet when inserting.
4.The cleaning sheet will be brought into the feeding slot automatically, and the cleaning process will begin.
User’s Manual |
13 |

UM_EEMEA_Scan_1108.book Page 14 Monday, December 15, 2008 2:26 PM
EN |
|
|
|
|
|
||
|
|
5. When the cleaning process is completed, the cleaning sheet will be ejected |
|
|
|
|
|
|
|
|
from the feeding slot, and the Power indicator will go off. Remove the cleaning |
|
|
|
sheet, and keep it away from dust. |
|
|
Cleaning the image sensor |
|
1.With the scanner power off and disconnected from the power supply, insert the sensor cleaning swab into one end of the output slot.
2.Gently slide the sensor cleaning swab to the other end of the output slot. Repeat two or three times consecutively.
3.Remove the sensor cleaning swab, store it in a safe place and keep it away from dust.
Calibrating the Scanner
If the scanned image looks fuzzy or there are strange stripes on it, then the scanner needs to be calibrated in order for the sensor to resume its original precision. To calibrate the scanner:
1.Follow the instructions on how to clean the roller and image sensor, and then follow the instructions in “Preparation” on page 8 to prepare the scanner for scanning.
2.Insert the calibration card as shown. The scanner will scan the pattern on the calibration card and perform calibration to the sensor inside automatically. Make sure that the calibration card is inserted in the correct direction.
14 |
User’s Manual |

UM_EEMEA_Scan_1108.book Page 15 Monday, December 15, 2008 2:26 PM
Troubleshooting
Problem: |
There are strange lines on the scanned image, or the image is |
|
not clear. |
Solution: |
Please ensure the following: |
|
n Are there scratches on the original, or is the original clean? |
|
Remove any stains or dust from the original before scanning. |
|
n Has the scanner been used for a long period of time without |
|
cleaning and calibration? Refer to “Cleaning the Scanner” on |
|
page 13 and “Calibrating the Scanner” on page 14 to clean and |
|
calibrate the scanner and then try again. |
Problem: |
The original gets stuck halfway in the feeding slot. |
Solution: |
Press the Power button. The scanner will advance the original so |
|
you can remove the jammed original from the output slot. |
Problem: |
The status indicator blinks rapidly and no scan is possible. |
Solution: |
Check the following: |
|
n Is the memory card inserted properly into the memory card slot? |
|
Re-insert the card and try again. |
|
n Is the SD card locked? Unlock the card. |
|
n Is the memory card full? The indicator blinks when the free space |
|
on the memory card is below 3MB. Use another card if |
|
necessary. |
|
n Did you insert the next original before the scanning process of |
|
the previous one is completed? Power off and then on the |
|
scanner and try again. Make sure that you scan the next original |
|
only after the scanning process of the previous one is completed |
|
n Does the length of the original exceed the maximum acceptable |
|
size? |
EN
User’s Manual |
15 |
UM_EEMEA_Scan_1108.book Page 16 Monday, December 15, 2008 2:26 PM
EN
Specifications
Dimensions (scanner only) |
156 x 46 x 38mm |
|
Weight (scanner only) |
170g |
|
Supported memory card types |
• CF (CompactFlash) Type I |
|
|
• MS (MemoryStick) |
|
|
• MS Pro |
|
|
• MS Pro Duo (adapter needed) |
|
|
• MS Duo (adapter needed) |
|
|
• MMC (MultiMediaCard) |
|
|
• RS-MMC (adapter needed) |
|
|
• |
xD (H-type and M-type) |
|
• |
SD (SecureDigital) |
|
• |
Mini SD (adapter needed) |
|
• |
micro SD/T-Flash (adapter needed) |
Supported output image format |
JPEG (.jpg) |
|
USB port |
USB or compatible with the USB 2.0 |
|
|
specification |
|
Power input |
100 - 240V AC, 50/60 Hz |
|
Power output |
6V DC, 1.5A |
|
Operating temperature |
15°C ~ 35°C |
|
Operating humidity |
20% ~70% RH |
|
Storage temperature |
-20°C ~ 60°C |
|
Storage humidity |
10% ~ 90% RH |
|
|
|
|
16 |
User’s Manual |
UM_EEMEA_Scan_1108.book Page 17 Monday, December 15, 2008 2:26 PM
TOSHIBA Support
Need help?
For the latest driver updates, user manuals & FAQs please have a look at the TOSHIBA options & services support page:
computers.toshiba.eu/options-support
Please see computers.toshiba.eu/options-warranty for the TOSHIBA hotline numbers.
Copyright Statement
No part of this publication may be reproduced in any form by any means without prior written permission. Other trademarks or brand names mentioned herein are trademarks or registered trademarks of their respective companies.
Disclaimer
Information in this document is subject to change without notice. The manufacturer does not make any representations or warranties (impliedor otherwise) regarding the accuracy and completeness of this document and shall in no event be liable for any loss of profit or any commercial damage, including but not limited to special, incidental, consequential, or other damage.
December 2008, Rev1.0
Trademarks
Microsoft, Windows and Windows Vista are either registered trademarks or trademarks of Microsoft Corporation in the United States and/or other countries.
Other brands and product names are trademarks or registered trademarks of their respective companies.
EN
User’s Manual |
17 |

UM_EEMEA_Scan_1108.book Page 18 Monday, December 15, 2008 2:26 PM
EN
Regulatory Statements
CE Compliance
This product is CE marked in accordance with the requirements of the applicable EU Directives. Responsible for CE-marking is Toshiba Europe GmbH, Hammfelddamm 8, 41460 Neuss, Germany. A copy of the official Declaration of Conformity can be obtained from following website:
http://epps.toshiba-teg.com/
Working Environment
The Electromagnetic Compliance (EMC) of this product has been verified typically for this product category for a so called Residential, Commercial & Light Industry Environment. Any other working environment has not been verified by Toshiba and the use of this product in these working environments is maybe restricted or cannot be recommended. Possible consequences of the use of this product in non verified working environments can be: Disturbances of other products or of this product in the nearby surrounding area with temporarily malfunction or data loss/corruption as result. Example of non verified working environments and related advices:
nIndustrial environment (e.g. where 3-phase 380V mains is being used mainly): Danger of disturbances of this product due to possible strong electromagnetic fields especially near to big machinery or power units.
nMedical environment: The compliance to the Medical Product Directive has not been verified by Toshiba, therefore this product cannot be used as a medical product without further verification. The use in usual office environments e.g. in hospitals should be no problem if there is no restriction by the responsible administration.
nAutomotive environment: Please search the owner instructions of the related vehicle for advices regarding the use of this product (category).
nAviation environment: Please follow the instructions of the flight personnel regarding restrictions of use.
18 |
User’s Manual |

UM_EEMEA_Scan_1108.book Page 19 Monday, December 15, 2008 2:26 PM
Additional Environments not Related to EMC
nOutdoor use: As a typical home/office equipment this product has no special resistance against ingress of moisture and is not strong shock proofed.
nExplosive atmosphere: The use of this product in such special working environment (Ex) is not allowed.
Following Information is Only for EU-member States
Disposal of products
The crossed out wheeled dust bin symbol indicates that products must be collected and disposed of separately from household waste.
The black bar indicates that the product was placed on the market after August 13, 2005.
By participating in separate collection of products, you will help to assure the proper disposal of products and thus help to prevent potential negative consequences for the environment and human health.
For more detailed information about the collection and recycling programmes available in your country, please visit our website (http://eu.computers.toshiba-europe.com) or contact your local city office or the shop where you purchased the product.
© 2008 TOSHIBA Europe GmbH. All rights reserved.
TOSHIBA reserves the right to make technical changes. TOSHIBA assumes no liability for damages incurred directly or indirectly from errors, omissions or discrepancies between this product and the documentation.
User’s Manual |
19 |
EN

UM_EEMEA_Scan_1108.book Page 1 Monday, December 15, 2008 2:26 PM
CZ
Obsah
Důležité bezpečnostní pokyny . . . . . . . . . . . . . . . . . . . . . . . . . . . . . . . . . . . . .2 Úvod . . . . . . . . . . . . . . . . . . . . . . . . . . . . . . . . . . . . . . . . . . . . . . . . . . . . . . . . . . .5
Kontrola součástí . . . . . . . . . . . . . . . . . . . . . . . . . . . . . . . . . . . . . . . . . . . . . . |
5 |
Součásti skeneru a jejich funkce . . . . . . . . . . . . . . . . . . . . . . . . . . . . . . . . . . |
5 |
Používání skeneru . . . . . . . . . . . . . . . . . . . . . . . . . . . . . . . . . . . . . . . . . . . . . . .7
Příprava . . . . . . . . . . . . . . . . . . . . . . . . . . . . . . . . . . . . . . . . . . . . . . . . . . . . .7 Skenování . . . . . . . . . . . . . . . . . . . . . . . . . . . . . . . . . . . . . . . . . . . . . . . . . . . .8 Skenování do digitálního fotorámečku . . . . . . . . . . . . . . . . . . . . . . . . . . . . . .9 Připojení skeneru k počítači . . . . . . . . . . . . . . . . . . . . . . . . . . . . . . . . . . . . . .9 Další informace . . . . . . . . . . . . . . . . . . . . . . . . . . . . . . . . . . . . . . . . . . . . . . .10
Péče a údržba . . . . . . . . . . . . . . . . . . . . . . . . . . . . . . . . . . . . . . . . . . . . . . . . . .12
Čištění skeneru . . . . . . . . . . . . . . . . . . . . . . . . . . . . . . . . . . . . . . . . . . . . . . .12 Kalibrace skeneru . . . . . . . . . . . . . . . . . . . . . . . . . . . . . . . . . . . . . . . . . . . . .13
Odstraňování závad . . . . . . . . . . . . . . . . . . . . . . . . . . . . . . . . . . . . . . . . . . . . .14 Specifikace . . . . . . . . . . . . . . . . . . . . . . . . . . . . . . . . . . . . . . . . . . . . . . . . . . . .15 Podpora TOSHIBA . . . . . . . . . . . . . . . . . . . . . . . . . . . . . . . . . . . . . . . . . . . . . .16 Prohlášení o autorských právech . . . . . . . . . . . . . . . . . . . . . . . . . . . . . . . . . .16 Poznámka . . . . . . . . . . . . . . . . . . . . . . . . . . . . . . . . . . . . . . . . . . . . . . . . . . . . .16 Obchodní známky . . . . . . . . . . . . . . . . . . . . . . . . . . . . . . . . . . . . . . . . . . . . . . .16 Regulační opatření . . . . . . . . . . . . . . . . . . . . . . . . . . . . . . . . . . . . . . . . . . . . . .17
Splnění CE . . . . . . . . . . . . . . . . . . . . . . . . . . . . . . . . . . . . . . . . . . . . . . . . . .17 Pracovní prostředí . . . . . . . . . . . . . . . . . . . . . . . . . . . . . . . . . . . . . . . . . . . .17 Další prostředí bez souvislosti s EMC . . . . . . . . . . . . . . . . . . . . . . . . . . . . .18 Následující informace platí pouze pro členské státy EU . . . . . . . . . . . . . . . .18
1 |
Uživatelská příručka |
UM_EEMEA_Scan_1108.book Page 2 Monday, December 15, 2008 2:26 PM
Důležité bezpečnostní pokyny
Než začnete používat tento skener, pečlivě si přečtěte následující důležité bezpečnostní pokyny. Nedodržení těchto pokynů může vést k poranění osob nebo poškození skeneru.
Nepokládejte tento skener na přímé sluneční světlo nebo v blízkosti tepelných zdrojů, například uvnitř zavřeného auta nebo poblíž kamen. Vnější pouzdro skeneru se může zdeformovat a snímače uvnitř se mohou poškodit nadměrným teplem.
Nepoužívejte tento skener v blízkosti vody, v dešti a zamezte vniknutí vody dovnitř tohoto produktu. Voda a vlhkost mohou způsobit zkrat v elektronických součástkách a mohou vést k nefunkčnosti.
Nepoužívejte tento skener v prašném prostředí. Na skener se mohou usadit částečky prachu, které mohou poškrábat snímaný originál. Neskenujte originály, které jsou znečištěny prachem nebo jinými částicemi.
Nepoužívejte tento skener v blízkosti elektromagnetických zdrojů, jakými jsou například mikrovlnná trouba nebo televize. Elektromagnetické rušení může vést k nefunkčnosti tohoto skeneru.
Neupusťte skener na zem a nevystavujte jej nárazům/vibracím.
Silné nárazy mohou poškodit součástky uvnitř.
Nevkládejte do slotů paměťové karty tohoto skeneru jiné předměty než jsou kompatibilní paměťové karty. Kovové kontakty uvnitř slotů se mohou cizími předměty snadno poškodit.
CZ
Uživatelská příručka |
2 |

CZ
UM_EEMEA_Scan_1108.book Page 3 Monday, December 15, 2008 2:26 PM
Napájecí zásuvka a USB port na tomto skeneru jsou navrženy výhradně pro připojení přiloženého napájecího adaptéru a volitelného kabelu USB. Nevkládejte do těchto zásuvek jiné předměty.
V případě výskytu zvláštního pachu, při vyzařování tepla z tohoto skeneru nebo při známkách poruchy odpojte skener ihned od napájení a obraťte se na prodejce za účelem přezkoušení nebo opravy.
Výrobek nerozebírejte, neupravujte, neopravujte ani do něj jinak nezasahujte (včetně AC adaptéru). Demontáž, úpravy, opravy a podobné zásahy do produktu by mohly způsobit požár nebo úraz elektrickým proudem s rizikem vážného zranění. Veškeré opravy přenechejte pracovníkům autorizovaného servisu Toshiba.
Při práci s AC adaptérem a napájecím kabelem věnujte obzvláštní pozornost následujícím bodům:
nPři manipulaci s napájecím kabelem dodržujte následující bezpečnostní opatření:
n Nezasahujte do napájecího kabelu ani do zástrčky.
n Napájecí kabel nenastavujte ani jej žádným způsobem neupravujte. n Napájecí kabel neohýbejte ani nedeformujte.
n Při odpojování zástrčky ze zásuvky netahejte za napájecí kabel. Uchopte přímo zástrčku.
n Na napájecí kabel nepokládejte těžké předměty.
n Nevoďte napájecí kabel místy, kde by mohlo dojít k jeho přiskřípnutí (například ve dveřích nebo v okně).
n Nepokládejte napájecí kabel v blízkosti tepelných zdrojů.
n K připevnění nebo zavěšení napájecího kabelu nepoužívejte hřebíky, svorky ani jiné předměty podobného typu.
n Nerozebírejte a neopravujte AC adaptér.
n Nedodržíte-li některé z výše uvedených pokynů, může dojít k poškození kabelů, požáru či k úrazu elektrickým proudem s rizikem vážného zranění.
3 |
Uživatelská příručka |

UM_EEMEA_Scan_1108.book Page 4 Monday, December 15, 2008 2:26 PM
n Připojení napájecího kabelu |
|
n Zkontrolujte, zda je zástrčka napájecího kabelu a případně i zástrčka |
|
prodlužovacího kabelu řádně zapojená do zásuvky a že je tudíž elektrické |
CZ |
připojení v pořádku. Pokud tak neučiníte, může dojít k požáru nebo úrazu |
|
elektrickým proudem s rizikem vážného zranění. |
|
n Používáte-li rozbočovací zásuvku, postupujte opatrně. Přetížení jedné |
|
|
|
zdířky může způsobit požár nebo úraz elektrickým proudem s rizikem |
|
vážného zranění. |
|
n Pokud se na zástrčkách nebo patce konektoru napájecího kabelu usadí prach, |
|
vypněte napájení a odpojte napájecí kabel. Potom otřete zástrčky nebo patku |
|
konektoru suchou látkou. Pokud byste počítač nadále používali, aniž očistíte |
|
napájecí kabel, mohlo by dojít k požáru nebo úrazu elektrickým proudem s |
|
rizikem vážného zranění. |
|
n Používejte pouze AC adaptér TOSHIBA dodaný spolu s výrobkem (pokud byl s |
|
počítačem dodán), případně jiné typy AC adaptérů určených společností |
|
Toshiba. Zabráníte tak riziku požáru nebo jiného poškození výrobku. Použití |
|
nekompatibilního adaptéru střídavého napětí může poškodit výrobek nebo |
|
způsobit požár s rizikem vážného zranění. TOSHIBA nepřebírá žádnou |
|
odpovědnost za poškození způsobená nekompatibilním adaptérem nebo |
|
nabíječkou. |
|
n Adaptér střídavého napětí nezapojujte do elektrické sítě, jejíž napětí nebo |
|
frekvence neodpovídá hodnotám uvedeným na štítku jednotky. Pokud tak |
|
neučiníte, může dojít k požáru nebo úrazu elektrickým proudem s rizikem |
|
vážného zranění. |
|
n Kupujte a používejte pouze napájecí kabely, jejichž parametry odpovídají |
|
napětí, frekvenci a dalším požadavkům dané země. Pokud tak neučiníte, může |
|
dojít k požáru nebo úrazu elektrickým proudem s rizikem vážného zranění. |
|
n Nikdy se nepokoušejte zapojit nebo odpojit zástrčku napájecího kabelu |
|
mokrýma rukama. Pokud tento pokyn nedodržíte, může dojít k úrazu |
|
elektrickým proudem s rizikem vážného zranění. |
|
n Do výrobku nebo do jakékoliv jeho části se nesmí dostat žádná kapalina. |
|
Chraňte jej proto před deštěm, vodou, mořskou vodou a vlhkostí. Kontakt s |
|
kapalinou či vlhkostí může způsobit úraz elektrickým proudem nebo požár s |
|
následným poškozením počítače či vážným ohrožením zdraví osob. Pokud |
|
některá z uvedených situací přece jen nastane, postupujte neprodleně |
|
následujícím způsobem: |
|
n Vypněte výrobek. |
|
n Odpojte adaptér střídavého napětí ze zásuvky a z výrobku. |
|
Nezapínejte napájení, dokud výrobek nezkontrolují pracovníci |
|
autorizovaného servisu. Nebudete-li postupovat podle výše uvedených |
|
pokynů, může dojít k vážnému zranění nebo k trvalému poškození výrobku. |
|
Uživatelská příručka |
4 |

UM_EEMEA_Scan_1108.book Page 5 Monday, December 15, 2008 2:26 PM
CZ
Úvod
Kontrola součástí
Journe Scan
Calibrate |
/ / / Calibrer / Kalibrieren / Calibra / Calibrar |
Kalibrační karta
Napájecí adaptér |
USB kabel |
||
|
|
|
|
Čisticí list válečku |
Čisticí tampon |
|
snímače |
Ochranný obal |
Uživatelská příručka |
Záruční leták |
Součásti skeneru a jejich funkce
Pohled zepředu
5 |
Uživatelská příručka |

UM_EEMEA_Scan_1108.book Page 6 Monday, December 15, 2008 2:26 PM
č. |
Název |
Funkce/popis |
|
1 |
Stavový/kartový |
Indikuje provozní stav skeneru a paměťové karty. |
|
indikátor |
|||
|
|
Stisknutím tohoto tlačítka se zapne nebo vypne napájení.
2 Tlačítko napájení Stiskněte a podržte toto tlačítko po dobu 5 sekund za účelem vstupu do režimu čištění. Viz „Čištění skeneru“ na straně 12.
3 Indikátor napájení Indikuje stav napájení skeneru.
4 |
Vodítko papíru |
Slouží k vedení skenovaného materiálu a zajištění |
|
jeho zarovnání. |
|||
|
|
||
|
|
|
|
5 |
Značka 4" x 6" |
Posuňte vodítko papíru do této pozice při skenování |
|
fotografií o rozměru 4" x 6". |
|||
|
|
||
6 |
Podávací drážka Vložte originál do této drážky a začněte skenovat. |
||
|
|
|
|
7 |
Orientační |
Označuje správnou orientaci originálu. |
|
značka |
|||
|
|
||
CZ
Pohled zezadu
č. |
Název |
Funkce/popis |
|
1 |
Slot pro karty SD/ |
Je určen pro následující typy paměťových karet: SD, |
|
xD/MMC/MS |
xD, MMC a MS. |
||
|
|||
2 |
Výstupní drážka |
Z této drážky vychází naskenovaný originál. |
|
|
|
|
|
3 |
Slot karty CF |
Je určen pro karty CF typu I. |
|
|
|
|
|
4 |
Zásuvka Mini |
Slouží pro připojení k počítači (nebo digitálního |
|
USB |
fotorámečku) pomocí kabelu USB. |
||
|
|||
5 |
Zásuvka napájení |
Slouží k připojení dodaného napájecího adaptéru. |
|
|
|
|
Uživatelská příručka |
6 |

UM_EEMEA_Scan_1108.book Page 7 Monday, December 15, 2008 2:26 PM
CZ
Používání skeneru
Příprava
1. Odstraňte pásku, která zajišťuje páčku vodítka.
POZNÁMKA: tento krok se provede pouze před prvním použitím skeneru.
2.Připojte zástrčku kabelu napájecího adaptéru do napájecí zásuvky na skeneru. Napájecí adaptér zastrčte do elektrické zásuvky.
3.Vložte odemknutou paměťovou kartu (s povoleným zápisem) do vhodného slotu paměťové karty.
•Jsou-li obsazeny oba sloty, skener bude ukládat naskenované obrázky s následující prioritou: SD (MMC) > CF > xD > MS
4.Stiskněte tlačítko napájení. Indikátor napájení bude blikat. Počkejte, až indikátor napájení přestane blikat a zhasne. Místo toho se rozsvítí stavový/kartový indikátor na znamení toho, že skener je připraven.
7 |
Uživatelská příručka |

UM_EEMEA_Scan_1108.book Page 8 Monday, December 15, 2008 2:26 PM
Skenování
1.Položte jeden okraj originálu na skener tak, aby skenovaná strana směřovala nahoru a byla ve správné orientaci tak, jak indikuje orientační značka, a nastavte páčku vodítka tak, aby byl originál zarovnaný k levé straně podávací drážky. Vložte originál do podávací drážky.
|
|
|
|
POZOR: neprovádějte skenování lesklých |
|
|
|
|
|
|
|
|
|
fotografií ve vlhkém prostředí (vlhkost vyšší než 70% r.v.). |
|
|
|
|
Jinak začne povrch fotografie lepit a může dojít k |
Zarovnat |
zablokování skeneru. |
|||
doleva |
|
|||
|
|
|
|
POZNÁMKA: pro vaše starší a křehké fotografie |
|
|
|
|
|
|
|
|
|
doporučujeme před skenováním použít přiložený |
|
|
|
|
ochranný obal. |
2.Originál bude automaticky podáván do drážky a skenován.
POZNÁMKA: pokud se použije ochranný obal, vložte jej do podávací drážky složenou stranou napřed. Viz „Další informace“ na straně 10, kde zjistíte, jak vkládat fotografie a jiné typy předloh.
3.Po dokončení skenování budou napájecí a stavový kartový indikátor ještě chvíli blikat, což znamená, že skener zpracovává obrázek a soubor se ukládá. Před vložením a skenováním dalšího originálu počkejte, až indikátory přestanou blikat.
 UPOZORNĚNÍ:
CZ
Vkládejte pouze jeden list najednou. Vložte další originál, až když je předchozí hotový. Jinak může skener přestat normálně fungovat.
 POZNÁMKA:
nNevytahujte paměťovou kartu nebo neodpojujte napájení v době, kdy blikají indikátory.
Uživatelská příručka |
8 |
CZ
UM_EEMEA_Scan_1108.book Page 9 Monday, December 15, 2008 2:26 PM
nTento skener podporuje pouze obrázky ve formátu JPEG (.jpg) a datum a čas se nevkládají.
nDalší informace o tom, jak tento skener ukládá nasnímané obrazové soubory na paměťovou kartu, najdete v části „Orientace originálu a nasnímaného obrázku“ na straně 11.
nJestliže je paměťová karta již téměř plná (zbývá méně než 1 MB), stavový/ kartový indikátor bliká. Použijte jinou kartu nebo odstraňte některé soubory, je-li to nutné.
4.Chcete-li vypnout skener po nasnímání všech originálů, stiskněte tlačítko napájení a podržte je po dobu 1 sekundy. Indikátor napájení zabliká a zhasne.
Skenování do digitálního fotorámečku
Pokud připojíte tento skener ke kompatibilnímu digitálnímu fotorámečku, nasnímané obrázky se automaticky přenesou do digitálního fotorámečku a zobrazí se na něm.
 POZNÁMKA: tato funkce vyžaduje kompatibilní digitální fotorámeček
(navštivte stránky www.computers.toshiba-europe.com, kde najdete informace ohledně zakoupení digitálního rámečku a používání jeho funkcí).
Připojení skeneru k počítači
Po připojení skeneru k počítači získáte přístup k naskenovaným obrázkům přímo na paměťové kartě nebo můžete používat skener jako čtečku paměťových karet.
Požadavky na systém (pro počítač)
nOperační systém:Windows: Windows 2000, XP nebo Vista.
nK dispozici port USB 1.1 nebo 2.0
9 |
Uživatelská příručka |

UM_EEMEA_Scan_1108.book Page 10 Monday, December 15, 2008 2:26 PM
Propojení
|
|
|
|
CZ |
|
|
1. Připojte jeden konec kabelu USB (s konektorem Mini USB) |
||
|
|
do zásuvky Mini USB na skeneru. |
||
|
|
|
|
|
|
|
|
|
|
2. |
Zapněte počítač a připojte druhý konec kabelu USB do portu USB v počítači. |
|
||
|
|
|
|
|
3. |
Vložte odemknutou paměťovou kartu (s povoleným zápisem) do vhodného |
|
||
|
slotu paměťové karty. |
|
||
|
|
|
|
|
4. |
Připojte ke skeneru napájení. |
|
||
|
|
|
|
|
5. |
Stiskněte tlačítko napájení. Indikátor napájení bude blikat. |
|
||
|
|
|
|
|
6. |
Skener bude počítačem rozpoznán jako vyměnitelný disk (systém Windows). |
|
||
|
Nyní jste připraveni k práci se soubory na paměťové kartě. |
|
||
Další informace
Vhodné a nevhodné typy předloh (originálů)
Tento skener je navržen tak, aby poskytoval co nejlepší výsledky skenování pro následující typy originálů:
nFotografie 3.5"x5" a 4"x6"
nVizitky
Uživatelská příručka |
10 |

UM_EEMEA_Scan_1108.book Page 11 Monday, December 15, 2008 2:26 PM
CZ
Orientace originálu a nasnímaného obrázku
Viz ilustrace níže, kde je popsán vztah mezi orientací originálu při skenování a orientací nasnímaného obrázku při zobrazení na obrazovce.
Skener 


Originál |
Nasnímaný obraz |
|
zobrazený na |
|
obrazovce |
Skener |
|
Originál |
|
Oříznutí nasnímaných obrázků
Aby mohl skener určit správnost dat nasnímaného obrázku, může nastat určité oříznutí nasnímaného obrázku. Prohlédněte se ilustraci dole.
Velikost oříznutí (změřeno na originálu)
Pokyny pro skenování |
Max. 1.5 mm |
|
|
Max. |
|
2.5 mm |
Max. |
|
1.5 mm |
|
Max. 1.5 mm |
Originál |
Nasnímaný obraz |
POZNÁMKA: při skenování tmavších originálů (například fotografie noční oblohy) může dojít k nadměrnému ořezu. Vložte originál v jiném směru (orientaci) a zkuste do znovu.
11 |
Uživatelská příručka |
 Loading...