


NETWORK CAMERA
Model: IK-WD01A
User's Manual
For information on our latest products and peripheral devices, refer to the following web page:
■ http://www.toshibasecurity.com
The above URL is subject to change without prior notice.
If the URL changes, refer to the Toshiba website (http://www.toshiba.com).

Installation Introduction
Use to How
in nitionsDefi
gurationConfi
Appendix
Introduction
FCC (USA)-INFORMATION
NOTE: This equipment has been tested and found to comply with the limits for a Class B digital device, pursuant to Part 15 of the FCC Rules. These limits are designed to provide reasonable protection against harmful interference in a residential installation. This equipment generates, uses and can radiate radio frequency energy and, if not installed and used in accordance with the instructions, may cause harmful interference to radio communications. However, there is no guarantee that interference will not occur in a particular installation.
If this equipment does cause harmful interference to radio or television reception, which can be determined by turning the equipment off and on, the user is encouraged to try to correct the interference by one or more of the following measures:
Reorient or relocate the receiving antenna.
Increase the separation between the equipment and receiver.
Connect the equipment into an outlet on a circuit di erent from that to which the receiver is connected.
Consult the dealer or an experienced radio/TV technician for help.
USER-INSTALLER CAUTION: Your authority to operate this FCC verified equipment could be voided if you make changes or modifications not expressly approved by the party.
2

Thank you for purchasing the IK-WD01A Network Camera. Before you start using the camera, read this User's Manual carefully to ensure correct usage. Once you have finished reading this User's Manual, keep it in a convenient place for future reference. The design, specifications, software, and User's Manual contents are subject to change without prior notice.
Terms and Trademarks
●The term "OS" is used in this User's Manual to indicate operating systems compatible with this product.
Windows XP: Microsoft® Windows® XP operating system
Windows Vista: Microsoft® Windows® Vista Business operating system
●The formal name of Windows® is Microsoft® Windows® Operating System.
●Microsoft® and Windows® are trademarks or registered trademarks of Microsoft® Corporation in the United States and other countries.
●Other product names appearing in this User's Manual may be trademarks or registered trademarks of their respective holders.
 NOTE
NOTE
• This network camera might not operate correctly depending on the network environment.
Installation Introduction
Use to How
in nitionsDefi
gurationConfi
Appendix
3

Installation Introduction
Use to How
in nitionsDefi
gurationConfi
Appendix
IMPORTANT SAFEGUARDS
1.Read Instructions
All the safety and operating instructions should be read before the product is operated.
2.Retain Instructions
The safety instructions and user's manual should be retained for future reference.
3.Warnings
Comply with all warnings on the product and in the user's manual.
4.Follow Instructions
Follow all operating and use instructions.
5.Cleaning
Disconnect this video product from the power supply before cleaning.
6.Attachments
Do not use attachments not recommended by the video product manufacturer as they may cause hazards.
7.Water and Moisture
Do not use this video product near water. Some examples are: near a bath tub, wash bowl, kitchen sink, or laundry tub, in a wet basement, or near a swimming pool.
8.Accessories
Do not place this video product on an unstable cart, stand, tripod, bracket or table. The video product may fall, causing serious injury to a person, or serious damage to the product. Use only with stand, tripod, bracket, or table recommended by the manufacturer,
or sold with the video product. Any mounting of the product should follow the manufacturer's instructions, and should use a mounting accessory recommended by the manufacturer.
9.Ventilation
This video product should never be placed near or over a radiator or heat register. If this product is placed in a built in installation verify that there is proper ventilation so that the camera temperature operates within the recommended temperature range.
10.Power Sources
This video product should be operated only from the type of power source indicated on the information label. If you are not sure of the type of power supply at your location, consult your product dealer.
11. Power-Cord Protection
Power cords should be routed so that they are not likely to be walked on or pinched by items placed upon or against them. Pay particular attention to cords at plugs, screws and the point where they exit the product.
12. Installation
Install this video product on a secure part of the ceiling or wall. If installed on an unsecured location the camera could fall causing injury and damage.
13. Lightning
For additional protection on this video product during a lightning storm, or when it is left unattended and unused for long periods of time, unplug it from the wall outlet and disconnect the power supply and cable system. This will prevent damage to the video product due to lightning and power-line surges. If lightning occurs, do not touch the unit or any connected cables in order to avoid electric shock.
14. Overloading
Do not overload the power supply or extension cords as this can result in a risk of fire or electric shock.
15. Object and Liquid Entry
Never push objects of any kind into this video product through openings as they may touch dangerous electrical points or short-out parts that could result in a fire or electrical shock. Never spill liquid of any kind on the video product.
16. Servicing
Do not attempt to service this video product yourself as opening or removing covers may expose you to dangerous electrical or other hazards. Refer all servicing to qualified service personnel.
17.Damage Requiring service
Disconnect this video product from the power supply and refer servicing to qualified service personnel under the following conditions.
a.When the power-supply cord or plug is damaged.
b.If liquid has been spilled, or objects have fallen into the video product.
c.If the video product has been exposed to rain or water.
d.If the video product does not operate normally by following the operating instructions in the user's manual. Adjust only those controls that are covered by the user's manual as an improper adjustment of other controls may result in damage and will often require extensive work by a qualified technician to restore the video product to its normal operation.
e.If the video product has been dropped or the cover has been damaged.
f.When the video product exhibits a distinct change in performance which indicates a need for service.
18.Replacement Parts
When replacing parts be sure the service technician uses parts specified by the manufacturer or have the same characteristics as the original part. Unauthorized substitutions may result in fire, electric shock or other hazards.
19. Safety Check
Upon completion of any service or repairs to this video product, ask the service technician to perform safety checks to determine that the video product is in proper operating condition.
4
CAUTION TO REDUCE THE RISK OF ELECTRIC SHOCK. DO NOT REMOVE COVER (OR BACK).
NO USER SERVICEABLE PARTS INSIDE.
REFER SERVICING TO QUALIFIED SERVICE PERSONNEL.
The lightning flash with arrow head symbol, within an equilateral triangle, is intended to alert the user to the presence of uninsulated "dangerous voltage" within the product's enclosure that may be of sufficient magnitude to constitute a risk of electric shock to persons.
The exclamation point within an equilateral triangle is intended to alert the user to the presence of important operating and maintenance (servicing) instructions in the literature accompanying the appliance.
WARNING:
TO REDUCE THE RISK OF FIRE OR ELECTRIC SHOCK, DO NOT EXPOSE THIS APPLIANCE TO RAIN OR MOISTURE.
CAUTION:
CONNECT 24 VAC UL LISTED CLASS 2 POWER SUPPLY.
FIELD INSTALLATION
MARKING:
WORDED: "THIS INSTALLATION SHOULD BE MADE BY A QUALIFIED SERVICE PERSON AND SHOULD CONFORM TO ALL LOCAL CODES."
Installation Introduction
Use to How
in nitionsDefi
gurationConfi
Appendix
5

Installation Introduction
Use to How
in nitionsDefi
gurationConfi
Appendix
NOTES ON USE AND INSTALLATION
•This camera is for indoor use.
•Do not aim the camera at the sun
Never aim the camera at the sun even with the camera power o .
•Do not shoot intense light
Intense light such as a spotlight may cause a bloom or smear. A vertical stripe may appear on the screen. However, this is not a malfunction.
•Treat the camera with care
Do not drop the camera or subject it to intense vibration.
•Never touch internal parts
Do not touch the internal parts of the camera other than the parts specified.
•Do not splash water on the camera
Install the camera where the camera can be kept dry. If the camera gets wet, turn o the power and contact your dealer.
•Keep the camera installation away from video noise
If cables are wired near electric lighting wires or a TV set, noise may appear in images. In this event, relocate cables or reinstall equipment.
•Check the ambient temperature and humidity
Avoid using the camera where the temperature is hotter or colder than the specified operating range. Doing so could a ect the internal parts or cause the image quality to deteriorate. Special care is required to use the camera at high temperature and humidity.
•Cleaning the camera
Turn the power o and use a dry cloth to clean the camera. When the dirt is hard to remove, use a cloth with a mild detergent and wipe gently.
Do not use volatile substances (e.g. paint thinner, petroleum benzin, or household pesticide) on the camera. Otherwise, it may cause discoloration or malfunctions. Use a lens cleaning paper (used to clean camera lenses or lenses of spectacles) to clean the camera lens.
•Should you notice any trouble
If any trouble occurs while you are using the camera, turn off the power and contact your dealer. If you continue to use the camera when there is something wrong with it, the trouble may get much worse and an unpredictable problem may occur.
6

Precautions for Use
Disclaimer
We disclaim any responsibility and shall be held harmless for any damages or losses incurred by the user in any of the following cases:
1.Fire, earthquake or any other act of God; acts by third parties; misuse by the user, whether intentional or accidental; use under extreme operating conditions.
2.Malfunction or non-function resulting in indirect, additional or consequential damages, including but not limited to loss of expected income and suspension of business activities.
3.Incorrect use not in compliance with instructions in this user's manual.
4.Malfunctions resulting from misconnection to other equipment.
5.Repairs or modifications made by the user or caused to be made by the user and carried out by an unauthorized third party.
6.Notwithstanding the foregoing, Toshiba's liabilities shall not, in any circumstances, exceed the purchase price of the product.
Installation Introduction
Copyright and Right of Portrait
There may be a conflict with the Copyright Law and other laws when a customer uses, displays, distributes, or exhibits an image picked up by the camera without permission from the copyright holder. Please also note that transfer of an image or file covered by copyright is restricted to use within the scope permitted by the Copyright Law.
Protection of Personal Information
Images taken by the camera that reveal the likeness of an individual person may be considered personal information. To disclose, exhibit or transmit those images over the internet or otherwise, consent of the person may be required.
Usage Limitation
The product is not designed for any "critical applications." "Critical applications" means life support systems, exhaust or smoke extraction applications, medical applications, commercial aviation, mass transit applications, military applications, homeland security applications, nuclear facilities or systems or any other applications where product failure could lead to injury to persons or loss of life or catastrophic property damage.
Accordingly, [Toshiba/TAIS] disclaims any and all liability arising out of the use of the product in any critical applications.
Use to How
in nitionsDefi
gurationConfi
Appendix
7

Installation Introduction
Use to How
in nitionsDefi
gurationConfi
Appendix
AC adapter
Be sure to use only the supplied AC adapter. Using a different AC adapter may cause the camera to malfunction, heat up, or catch fire. Before using the AC adapter, carefully read and observe the Important Safety Instructions ( → page 4) and the notes below.
•Plug the AC adapter into the 120 VAC outlet.
If inserting it into other than 120 VAC outlet, it may result in electric shock or fire hazard.
•Do not repair, modify or disassemble the AC adapter. It may result in electric shock or fire hazard.
•Keep the blades of plug from any dust or dirt. Neglecting to do so may cause a fire due to deterioration of the insulation. Pull out the power plug from the outlet before cleaning the blades.
•Do not cover or wrap the AC adapter with a cloth or place it near heating devices. It may cause fire or malfunction of the unit.
•Protect the power cord from being:
•damaged, modified for extension, or applied heat.
•pulled, put heavy objects, or pinched.
•bent, twisted extremely, or bundle.
Neglecting to do so may cause electric shock or fire hazard.
•Do not expose this AC adapter to water.
•Install the AC adapter properly on a wall or ceiling after plugging in the AC adapter. Avoid dropping the AC adapter, failing to do so may cause serious personal injury or death.
•Do not allow the connectors on the AC adapter to come into contact with any other metal object as this may result in short circuit.
•To connect the AC adapter, firmly insert the plug end of the cable into the AC adapter jack. Do not insert the plug into other jacks as this may cause a malfunction.
•When removing the connection cable, disconnect the cable by holding its plug. Do not disconnect the cable by pulling on the cable.
•Do not drop the AC adapter or subject it to strong impact.
•Do not use the AC adapter in hot and humid places.
•Do not use the supplied AC adapter with devices other than this camera.
•Temperature increasing on the surface of the adapter is normal. Before moving the adapter to another location, unplug it from the wall outlet, and wait until its temperature decreases.
•Buzzing noises may come from inside. This does not indicate malfunction.
•Using the AC adapter near a radio, TV, or cellphone may cause interference. Use the adapter at su cient distances from these devices.
•Be sure to use the supplied AC adapter. Using di erent AC adapter may cause fire hazard or the camera to malfunction.
8

Specifications
AC adapter (AH1812-B)
Power source |
: 100-240 VAC 50/60 Hz 18 W |
Rated output |
: 12 VDC, 1.5 A |
Ambient temperature guaranteed for performance |
|
|
: 0° C to 40° C (32° F to 104° F) |
Storage temperature |
: -25° C to 85° C (-13° F to 185° F) |
Maximum external dimensions |
: 34.5 x 75 x 46.5 mm (1.358 x 2.953 x 1.831 inches) |
|
(width x height x depth) |
Cord length |
: 1800 mm (70.866 inches) |
Installation Introduction
Use to How
in nitionsDefi
gurationConfi
Appendix
9

Installation Introduction
Use to How
in nitionsDefi
gurationConfi
Appendix
Table of Contents |
|
|
|
Introduction |
|
● Introduction....................................................................................................................................... |
2 |
|
● IMPORTANT SAFEGUARDS....................................................................................................... |
4 |
|
● NOTES ON USE AND INSTALLATION.................................................................................... |
6 |
|
● Precautions for Use....................................................................................................................... |
7 |
|
● AC adapter........................................................................................................................................ |
8 |
|
● Table of Contents........................................................................................................................ |
10 |
|
● Contents......................................................................................................................................... |
12 |
|
|
Installation |
|
● Installation...................................................................................................................................... |
13 |
|
• |
Hardware installation ............................................................................................................................ |
13 |
• |
Software installation............................................................................................................................. |
14 |
● Initial Access to the Network Camera................................................................................. |
15 |
|
• |
Check Network Settings...................................................................................................................... |
15 |
• Add Password to prevent Unauthorized Access........................................................................ |
15 |
|
|
How to Use |
|
● How to Use.................................................................................................................................... |
16 |
|
● Authentication.............................................................................................................................. |
16 |
|
● Installing plug-in........................................................................................................................... |
17 |
|
● User's features............................................................................................................................. |
18 |
|
• Main Screen with Camera View......................................................................................................... |
18 |
|
• |
Digital Zoom............................................................................................................................................. |
19 |
• |
MP4 Recording........................................................................................................................................ |
20 |
• |
Snapshot................................................................................................................................................... |
20 |
• |
Client settings......................................................................................................................................... |
21 |
• |
Digital output........................................................................................................................................... |
23 |
• |
Audio communication............................................................................................................................ |
24 |
● Administrator's features........................................................................................................... |
25 |
|
• Fine-tuning for Best Performance.................................................................................................... |
25 |
|
• Opening accounts for new users...................................................................................................... |
27 |
|
• Build a security application................................................................................................................. |
28 |
|
• |
Software revision upgrade................................................................................................................... |
29 |
10
|
Definitions in Configuration |
|
● Definitions in Configuration..................................................................................................... |
30 |
|
● System parameters.................................................................................................................... |
31 |
|
● Security settings......................................................................................................................... |
32 |
|
● Network settings......................................................................................................................... |
33 |
|
• |
Network type............................................................................................................................................ |
34 |
• |
HTTP........................................................................................................................................................... |
35 |
• |
Two way audio......................................................................................................................................... |
35 |
• |
FTP............................................................................................................................................................... |
35 |
• |
RTSP Streaming..................................................................................................................................... |
36 |
● DDNS............................................................................................................................................... |
37 |
|
● Access List.................................................................................................................................... |
38 |
|
● Audio and Video........................................................................................................................... |
39 |
|
• |
Video Settings......................................................................................................................................... |
40 |
• |
Audio Settings......................................................................................................................................... |
41 |
• |
Image Settings........................................................................................................................................ |
42 |
• |
Privacy Mask............................................................................................................................................ |
43 |
● Motion detection.......................................................................................................................... |
45 |
|
● Application..................................................................................................................................... |
46 |
|
• |
Event........................................................................................................................................................... |
47 |
• |
Server.......................................................................................................................................................... |
48 |
• |
Media........................................................................................................................................................... |
50 |
● Recording....................................................................................................................................... |
51 |
|
● System log..................................................................................................................................... |
53 |
|
● Maintenance.................................................................................................................................. |
54 |
|
|
Appendix |
|
● A. Troubleshooting...................................................................................................................... |
55 |
|
• |
Status LED ............................................................................................................................................... |
55 |
• |
Reset and restore ................................................................................................................................. |
55 |
● B. Glossary (Index)...................................................................................................................... |
56 |
|
● C. Specifications.......................................................................................................................... |
58 |
|
● D. Appearance Diagram .............................................................................................................. |
59 |
|
Installation Introduction
Use to How
in nitionsDefi
gurationConfi
Appendix
11
Contents
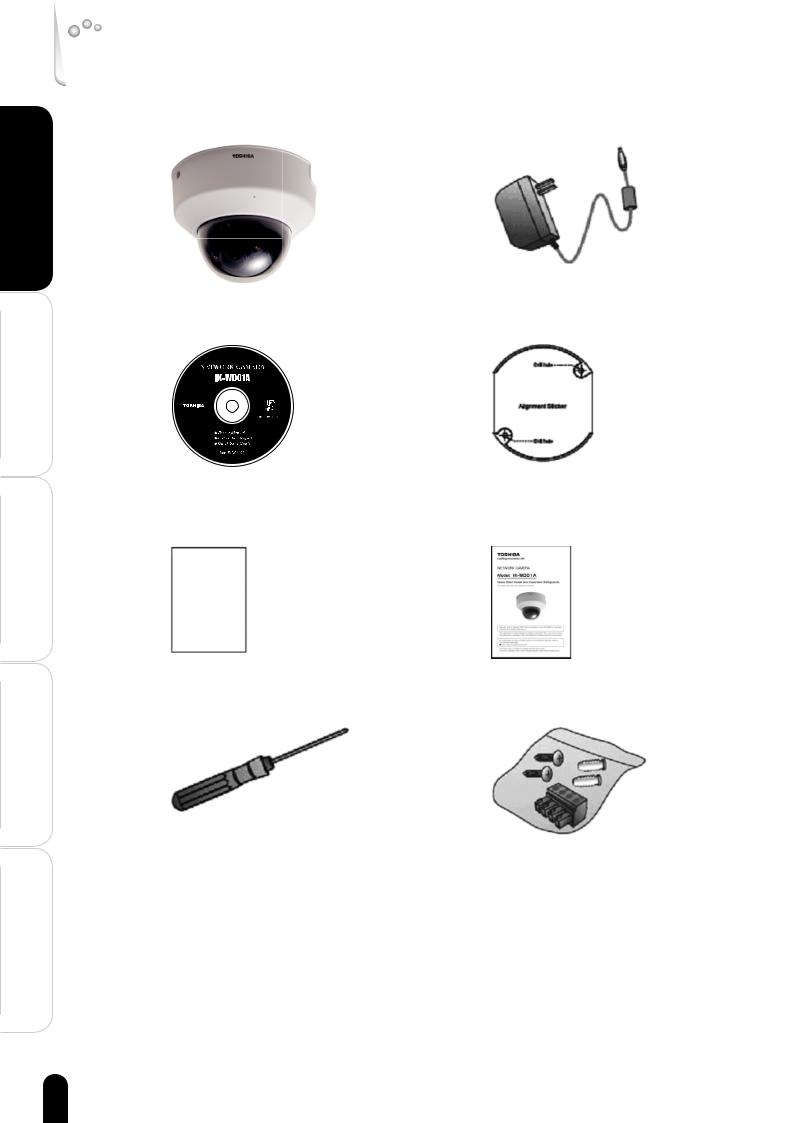
● IK-WD01A |
● AC Adapter |
Introduction
● CD-ROM |
● Alignment Sticker |
Installation
Use to How
● Warranty |
● Quick Start Guide and Important |
|
Safeguards |
in nitionsDefi
gurationConfi
Appendix
● Torx driver |
● Screws and I/O Connector |
12
Installation
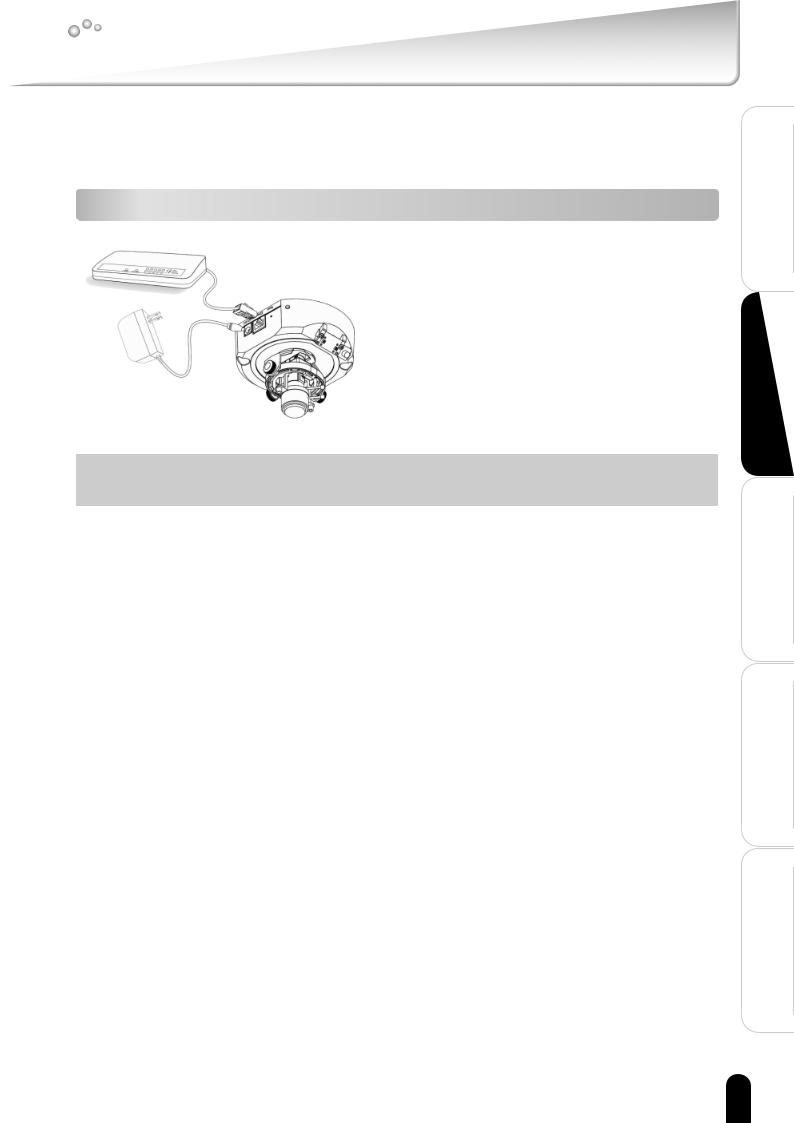
In this user's manual, "User" refers to whoever has access to the Network Camera, and "Administrator" refers to the person who can configure the Network Camera and grant user access to the camera.
Hardware installation
Please verify that your product package contains all the accessories listed in the foregoing Package Contents. Depending on the user's application, an Ethernet cable may be needed. The Ethernet cable should meet the specs of UTP Category 5.
 Connect the power adapter jack to the Network Camera before plugging in to the power socket. This will reduce the risk of accidental electric shock.
Upon powering up, the status LED will light up and then the device will go through a booting process. The status LED will be steady orange when obtaining an IP address. After obtaining an IP address, the LED will blink orange and red indicating the camera is ready.
Please refer to the Quick Start Guide for details to the hardware installation.
To install in Ethernet
Make sure the Ethernet is firmly connected to a switch hub. After attaching the Ethernet cable plug in the power adapter. If the LED turns out to blink orange-color, go to next paragraph "Software installation".
Power over Ethernet (PoE) installation
Connect the Ethernet cable to a PoE switch or hub and to the camera. The camera will go through the "power up" sequence. Proceed to "Software installation" after the camera goes into the ready state.
Installation Introduction
Use to How
in nitionsDefi
gurationConfi
Appendix
13
Installation Introduction
Use to How
Installation (Cont.)
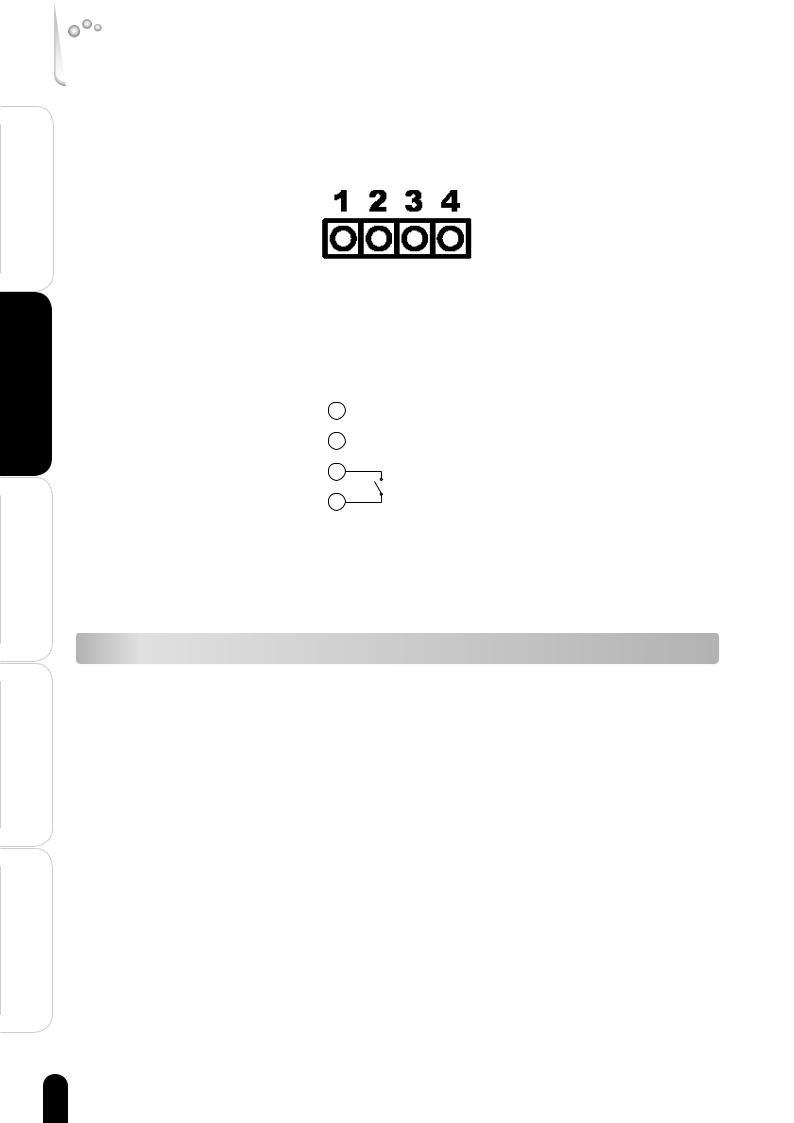
General I/O terminal block
This Network Camera provides a general I/O terminal block with one digital input and one digital output device control. The pin definition is as below.
1:Power
2:Digital output
3:Digital input
4:Ground
The connection definition is as below when "Digital input" is used for alarm input.
1
2
3
Alarm switch
4
External/Internal MIC switch
Switch“Internal”or“Microphone”to set up the source of microphone input.
in nitionsDefi
gurationConfi
Appendix
Software installation
At the end of the hardware installation, users can use Installation Wizard program included in the product CD-ROM to find the location of the Network Camera. There may be many Network Cameras in the local network. Users can differentiate the Network Cameras with the serial number. The serial number is printed on the labels on the carton and the bottom of the Network Camera body. Please refer to the Quick Start Guide for details to the Installation Wizard.
Once installation is complete, the Administrator should proceed to the next section "Initial Access to the Network Camera" for necessary checks and configurations.
14

Initial Access to the Network Camera
Check Network Settings
The Network Camera can be connected either before or immediately after software installation onto the Local Area Network. The Administrator should complete the network settings on the configuration page, including the correct subnet mask and IP address of gateway and DNS. Ask your network administrator or Internet service provider for the detail information. By default the Network Camera requires the Administrator to run installation every time it reboots. If the network settings are to remain unchanged, disable the Install option. Refer to“Network settings”on the System Configuration page for details. If any setting is entered incorrectly and cannot proceed to setting up the Network Camera, restore the factory settings following the steps in the“Troubleshooting”chapter of the Appendix.
Add Password to prevent Unauthorized Access
The default Administrator's password is blank and the Network Camera initially will not ask for any password. The Administrator should immediately implement a new password as a matter of prudent security practice. Once the Administrator's password is saved, the Network Camera will ask for the user's name and password before each access. The Administrator can set up a maximum of twenty (20) user accounts. Each user can access the Network Camera except to perform system configuration. Some critical functions are exclusive for the Administrator, such as system configuration, user administration, and software upgrades. The user name for the Administrator is permanently assigned as "root".
Once the password is changed, the browser will display an authentication window to ask for the new password. Once the password is set, there is no provision to recover the Administrator's password. The only option is to restore to the original factory default settings.
Installation Introduction
Use to How
in nitionsDefi
gurationConfi
Appendix
15
Installation Introduction
Use to How
in nitionsDefi
gurationConfi
Appendix
How to Use
A PC with the Windows operating system can use Internet Explorer (IE) to connect to the Network Camera. A plug-in will be installed into IE when it is connected for the first time.
Authentication
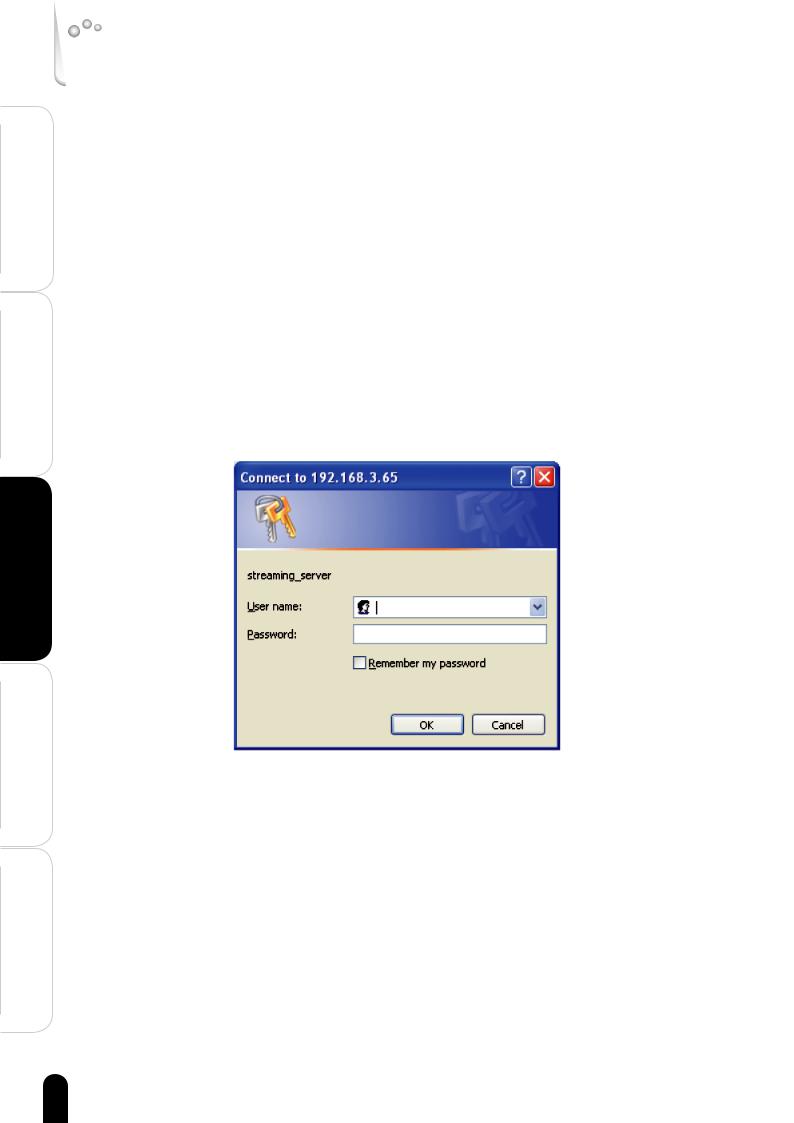
After opening the Web browser and typing in the URL of the Network Camera, a dialogue window pops up to request a username and password. Upon successful authentication, the following figure is displayed.
Note: Because this network camera is shipped without any password by factory default, this dialogue window does not pop up.
The foreground is the login window and the background shows the message if authentication fails. The user may check the option box to save the password for future convenience. This option is not available to the Administrator.
16

Installing plug-in
During initial access to the Network Camera in Windows, the web browser may prompt for permission to install a new plug-in for the Network Camera. Permission request depends on the Internet security settings of the user's PC or notebook. If the highest security level is set, the computer may prohibit any installation and execution attempt. This plug-in has been registered for certificate and is used to display the video in the browser. Users may click on  to proceed. If the web browser does not allow the user to continue to install, check the Internet security option and lower the security levels or contact your IT or networking supervisor for help.
Installation Introduction
Use to How
in nitionsDefi
gurationConfi
Appendix
17

Installation Introduction
Use to How
in nitionsDefi
gurationConfi
Appendix
User's features
Main Screen with Camera View
The main page layout has two sections:
Configuration functions: The camera can be configured using these user interfaces.
Camera View: What the camera sees.
Click on the configuration link to the left of the image window to enter the configuration page.
Internet Explorer layout when streaming MPEG-4.
Internet Explorer layout when streaming JPEG.
18
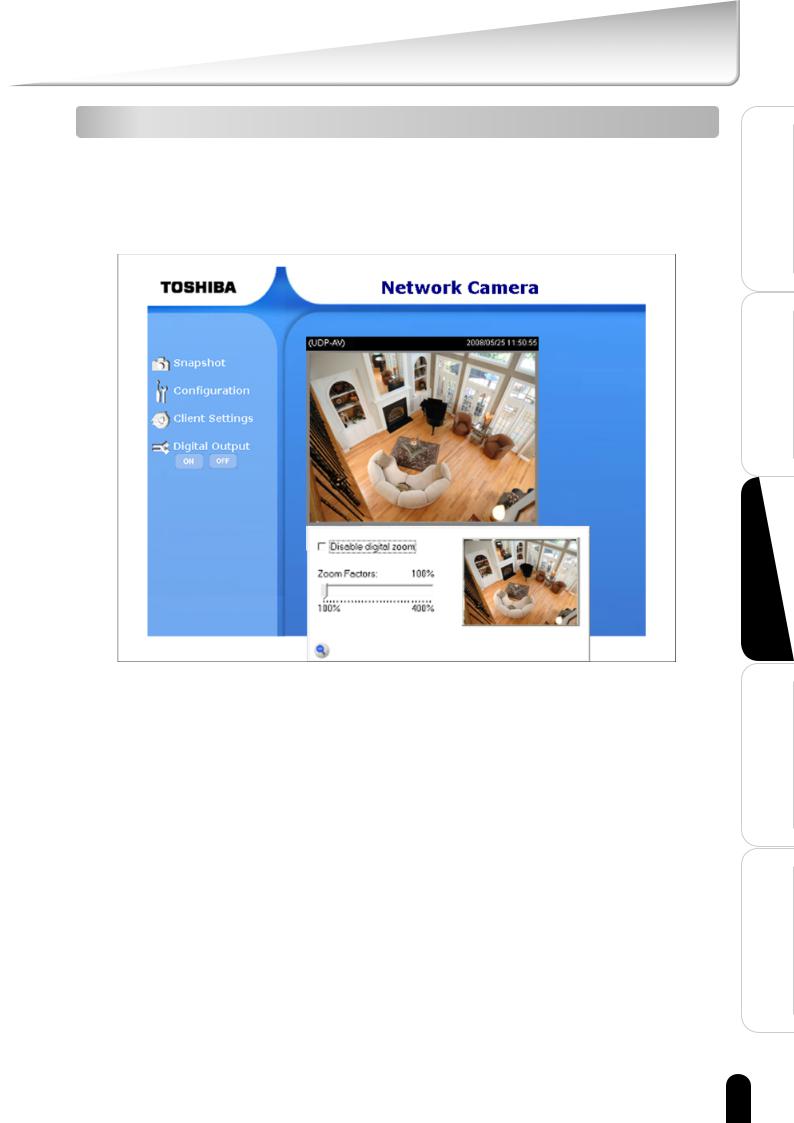
Digital Zoom
Clicking on the magnifier icon, under the camera view, the digital zoom control panel will appear. Uncheck "Disable digital zoom" and use the slider control to change the zoom factors.
Use the Area Of Interest windows to zoom in on a specific area.
Installation Introduction
Use to How
in nitionsDefi
gurationConfi
Appendix
19
Installation Introduction
Use to How
in nitionsDefi
gurationConfi
Appendix
User's features (Cont.)
MP4 Recording
Click on the red circle button  on the plugin to start MP4 recording. You can set the related options in the client setting page.
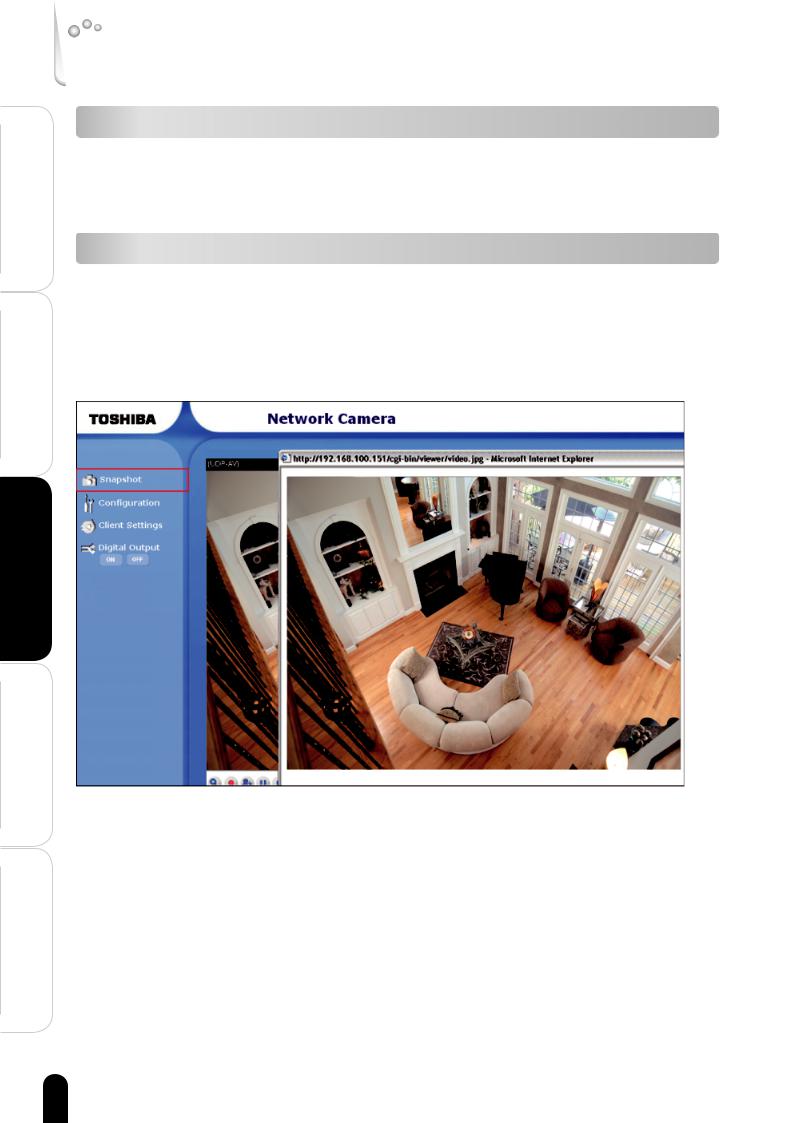
Snapshot
There are di erent frame sizes for stream 1 and stream 2. The snapshot image will be of the larger frame size of the two.
Click on "Snapshot", web browser will pop up a new window to show the snapshot. Users can place the mouse pointer on the snapshot and click the right button of mouse to save it.
20
 Loading...