


 Loading...
Sierra M6-1
SAS/SATA Protocol Analyzer
User Manual
For Software Version 5.50
Document Version 5.50
February 2014
Teledyne LeCroy Protocol Solutions Group
Trademarks and Servicemarks:
Teledyne LeCroy, Teledyne LeCroy Protocol Solutions Group, CATC, SAS/SATA Protocol Suite, SASTracer, SATracer, SAS Trainer, SATrainer, SASTracker and Avalanche are trademarks of Teledyne LeCroy. Microsoft, Windows, Windows 2000, and Windows XP, Windows Vista and Windows 7 are registered trademarks of Microsoft Inc.
Intel and Pentium are registered trademarks of Intel Corporation.
All other trademarks and registered trademarks are property of their respective owners.
THE SPECIFICATIONS AND INFORMATION REGARDING THE PRODUCTS IN THIS MANUAL ARE SUBJECT TO CHANGE WITHOUT NOTICE. ALL INFORMATION, EXAMPLES AND RECOMMENDATIONS IN THIS MANUAL ARE BELIEVED TO BE ACCURATE BUT ARE REPRESENTED WITHOUT WARRANTY OF ANY KIND, EXPRESS OR IMPLIED. USERS ARE FULLY RESPONSIBLE FOR THEIR APPLICATION OF ANY PRODUCTS.
THE SOFTWARE LICENSE AND LIMITED WARRANTY FOR THE ACCOMPANYING PRODUCT ARE SET FORTH IN INFORMATION THAT SHIPPED WITH THE PRODUCT AND ARE INCORPORATED HEREIN BY THIS REFERENCE. IF YOU ARE UNABLE TO LOCATE THE SOFTWARE LICENSE OR LIMITED WARRANTY, CONTACT TELEDYNE LECROY FOR A COPY.
© 2012 Teledyne LeCroy, Inc. All rights reserved.
This document may be printed and reproduced without additional permission, but all copies should contain this copyright notice.
WEEE Program
Teledyne LeCroy
3385 Scott Blvd.
Santa Clara, CA 95054
TEL: 800 909 7112 (USA and Canada)
TEL: 408 653 1260 (worldwide)
Sierra M6 1 SAS/SATA Protocol Analyzer User Manual |
ii |

Contents
Chapter 1: Introduction......................................................................................... |
13 |
|
1.1 |
Analyzer Overview................................................................................................................ |
13 |
1.2 |
Features................................................................................................................................. |
14 |
1.3 |
Receiving Your Analyzer...................................................................................................... |
15 |
1.4 |
Unpacking the Analyzer ....................................................................................................... |
15 |
1.5 |
Analyzer Features................................................................................................................. |
15 |
|
1.5.1 Front Panel .................................................................................................................................................. |
15 |
|
1.5.2 Rear Panel.................................................................................................................................................... |
16 |
|
1.5.3 Temperature and Humidity......................................................................................................................... |
16 |
1.6 |
Installing Your Analyzer....................................................................................................... |
17 |
|
1.6.1 Software Installation ................................................................................................................................... |
17 |
|
System restart ..................................................................................................................................... |
17 |
|
Error Message ..................................................................................................................................... |
17 |
|
1.6.2 Hardware Setup........................................................................................................................................... |
17 |
|
Separate Systems ............................................................................................................................... |
17 |
|
Connecting in General........................................................................................................................ |
17 |
1.7 |
Cascading Sierra Analyzers ................................................................................................ |
18 |
1.8 |
Connecting via Ethernet ...................................................................................................... |
20 |
|
1.8.1 Connecting to a Network............................................................................................................................ |
20 |
|
1.8.2 Select Device............................................................................................................................................... |
20 |
|
1.8.3 Connecting over Different Subnets........................................................................................................... |
25 |
|
1.8.4 TCP and UDP Ports Must Be Open to Connect over Ethernet................................................................ |
25 |
1.9 |
Launching Your Analyzer .................................................................................................... |
25 |
1.10 Operating in Simulation Mode........................................................................................... |
25 |
|
|
1.10.1 Using the Software.................................................................................................................................... |
26 |
|
1.10.2 Getting Started with the Protocol Analyzer ............................................................................................ |
27 |
1.11 Teledyne LeCroy SAS/SATA Protocol Suite Menu Options and Toolbars.................... |
27 |
|
|
1.11.1 File.............................................................................................................................................................. |
27 |
|
1.11.2 Setup .......................................................................................................................................................... |
28 |
Sierra M6 1 SAS/SATA Protocol Analyzer User Manual |
1 |

Teledyne LeCroy |
|
Contents |
1.11.3 Session ...................................................................................................................................................... |
|
29 |
1.11.4 Analysis ..................................................................................................................................................... |
|
29 |
Viewing Captured Data ....................................................................................................................... |
|
30 |
1.11.5 Navigation.................................................................................................................................................. |
|
31 |
1.11.6 View............................................................................................................................................................ |
|
31 |
1.11.7 Window ...................................................................................................................................................... |
|
33 |
1.11.8 Help ............................................................................................................................................................ |
|
33 |
1.11.9 Toolbars..................................................................................................................................................... |
|
33 |
1.11.10 Port Status............................................................................................................................................... |
|
34 |
1.11.11 InFusion ................................................................................................................................................... |
|
34 |
1.11.12 Analyzer and InFusion............................................................................................................................ |
|
34 |
Chapter 2: Protocol Analysis ............................................................................... |
|
37 |
2.1 Easy Mode (Pre-Defined Setups) ........................................................................................ |
|
37 |
2.2 Main Window......................................................................................................................... |
|
37 |
2.3 Project Tree........................................................................................................................... |
|
39 |
2.4 Capture Tab Fields ............................................................................................................... |
|
39 |
Exclude SATA_CONT (SAS) or Exclude CONT (SATA)................................................................... |
39 |
|
Exclude SATA_SYNC (SAS) or Exclude SYNC (SATA) ................................................................... |
39 |
|
Exclude OOB Signals ......................................................................................................................... |
|
39 |
Exclude XXXX...................................................................................................................................... |
|
39 |
Exclude ALIGN .................................................................................................................................... |
|
39 |
Exclude RRDY (SAS only) .................................................................................................................. |
|
40 |
Exclude NOTIFY (SAS only) ............................................................................................................... |
|
40 |
Exclude Idle ......................................................................................................................................... |
|
40 |
Define different patterns for pre-trigger and post-trigger data captures....................................... |
40 |
|
2.5 SAS/SATA Software Menus and Toolbars ......................................................................... |
|
40 |
2.5.1 SAS/SATA Main Toolbar ............................................................................................................................ |
|
40 |
2.5.2 SATA Main Toolbar..................................................................................................................................... |
|
40 |
2.6 Start Recording..................................................................................................................... |
|
41 |
2.6.1 Launch Jammer .......................................................................................................................................... |
|
43 |
2.7 CrossSync Control Panel..................................................................................................... |
|
43 |
2.7.1 Launching the CrossSync Control Panel ................................................................................................. |
|
43 |
2.8 Save Workspace ................................................................................................................... |
|
44 |
2.9 Saving a Trace Capture........................................................................................................ |
|
44 |
2.9.1 Exporting ..................................................................................................................................................... |
|
45 |
Export to Text/Excel............................................................................................................................ |
|
46 |
2.9.2 Export Read/Write Command Report........................................................................................................ |
|
47 |
2.9.3 Export Paired SAS Address Report .......................................................................................................... |
|
47 |
2.9.4 Trace Properties.......................................................................................................................................... |
|
48 |
2.9.5 Edit Comment.............................................................................................................................................. |
|
48 |
2 |
Sierra M6 1 SAS/SATA Protocol Analyzer User Manual |
|

Contents |
Teledyne LeCroy |
2.10 Projects................................................................................................................................ |
48 |
2.10.1 Project File Types ..................................................................................................................................... |
48 |
2.10.2 Example Projects ...................................................................................................................................... |
49 |
2.10.3 Run an Example Analysis Project ........................................................................................................... |
49 |
2.11 Patterns and Data Capture Setup...................................................................................... |
51 |
2.11.1 Choose a Parameter ................................................................................................................................. |
52 |
2.11.2 Exclude Patterns....................................................................................................................................... |
52 |
2.11.3 Pre and Post Trigger Data Capture ......................................................................................................... |
53 |
2.11.4 Defining Patterns ...................................................................................................................................... |
54 |
2.11.5 Data Pattern............................................................................................................................................... |
55 |
2.12 Protocol Errors ................................................................................................................... |
55 |
Protocol Errors Descriptions ............................................................................................................. |
56 |
STP Frame (SATA only)...................................................................................................................... |
57 |
Address Frame (SAS only)................................................................................................................ |
58 |
SMP Frame (SAS only) ....................................................................................................................... |
59 |
SSP Frame (SAS only) ........................................................................................................................ |
60 |
FIS (Frame Information Structure) (SATA only) ............................................................................... |
60 |
STP Frame Pattern .............................................................................................................................. |
61 |
FIS Types (SAS and SATA) ................................................................................................................ |
61 |
Register Device to Host...................................................................................................................... |
62 |
Set Device Bits .................................................................................................................................... |
63 |
DMA Activate....................................................................................................................................... |
63 |
DMA Setup ........................................................................................................................................... |
64 |
BIST...................................................................................................................................................... |
64 |
PIO Setup............................................................................................................................................. |
65 |
Data ...................................................................................................................................................... |
65 |
Vendor.................................................................................................................................................. |
66 |
2.13 Trigger Setup ...................................................................................................................... |
66 |
2.13.1 Snapshot Mode ......................................................................................................................................... |
67 |
2.13.2 Manual Trigger Mode................................................................................................................................ |
67 |
2.13.3 Any Trigger in Pattern Mode.................................................................................................................... |
67 |
2.13.4 Choosing a Parameter.............................................................................................................................. |
70 |
2.13.5 Triggering on a Timer ............................................................................................................................... |
70 |
2.13.6 Timeout ...................................................................................................................................................... |
70 |
External/Manual Trigger ..................................................................................................................... |
72 |
Bus Condition...................................................................................................................................... |
72 |
Symbol ................................................................................................................................................. |
73 |
Primitive............................................................................................................................................... |
73 |
ATA Command .................................................................................................................................... |
75 |
ATAPI ................................................................................................................................................... |
76 |
Data Pattern......................................................................................................................................... |
77 |
Sierra M6 1 SAS/SATA Protocol Analyzer User Manual |
3 |
Teledyne LeCroy |
Contents |
|
|
Training Sequence.............................................................................................................................. |
78 |
Protocol Errors.................................................................................................................................... |
79 |
STP Frame (SAS only) ........................................................................................................................ |
80 |
Address Frame (SAS only)................................................................................................................. |
81 |
SMP Frame (SAS only) ....................................................................................................................... |
82 |
SSP Frame (SAS only) ........................................................................................................................ |
83 |
SCSI Command (SAS only) ................................................................................................................ |
84 |
FIS (Frame Information Structure) (SATA only) ............................................................................... |
85 |
2.13.7 STP Frame Pattern.................................................................................................................................... |
86 |
ATA Command Pattern (SATA only) ................................................................................................. |
86 |
Soft Reset (SATA only)....................................................................................................................... |
87 |
2.13.8 Sequential Trigger Mode .......................................................................................................................... |
87 |
Timer .................................................................................................................................................... |
88 |
Defining Patterns ................................................................................................................................ |
88 |
Triggering Order.................................................................................................................................. |
89 |
Pre-Trigger........................................................................................................................................... |
90 |
2.14 Project Settings .................................................................................................................. |
91 |
2.14.1 Memory Settings ....................................................................................................................................... |
91 |
Trigger Position................................................................................................................................... |
91 |
Sample File Name ............................................................................................................................... |
92 |
Auto Run.............................................................................................................................................. |
92 |
Memory Size ........................................................................................................................................ |
92 |
Partial Memory .................................................................................................................................... |
92 |
Segmented Memory............................................................................................................................ |
92 |
Upload Manager .................................................................................................................................. |
92 |
2.15 Analyzer Settings................................................................................................................ |
93 |
2.15.1 Primitive Response Timeout.................................................................................................................... |
93 |
2.15.2 Disable Descrambling .............................................................................................................................. |
93 |
2.15.3 Show XXXX value...................................................................................................................................... |
94 |
Pack training sequence...................................................................................................................... |
94 |
2.15.4 Protocol Error Mask.................................................................................................................................. |
94 |
2.15.5 External Trig Out Setting.......................................................................................................................... |
95 |
2.15.6 External Trig In Setting............................................................................................................................. |
95 |
2.15.7 Choose Port Speed................................................................................................................................... |
95 |
2.15.8 Ports Configuration .................................................................................................................................. |
95 |
2.15.9 Port Configuration and Projects.............................................................................................................. |
97 |
2.15.10 Add a Project Note.................................................................................................................................. |
97 |
2.16 Advanced Mode (User-Defined) ........................................................................................ |
98 |
2.16.1 Working in Advanced Mode..................................................................................................................... |
98 |
2.16.2 State Number for Complex Trigger Sequences ................................................................................... |
100 |
Setting Trigger Conditions............................................................................................................... |
100 |
Set Timers.......................................................................................................................................... |
102 |
4 |
Sierra M6 1 SAS/SATA Protocol Analyzer User Manual |
Contents |
Teledyne LeCroy |
|
|
|
|
Timeout .............................................................................................................................................. |
103 |
Useful Key Sequences...................................................................................................................... |
105 |
2.17 Project Settings ................................................................................................................ |
106 |
2.17.1 Notes ........................................................................................................................................................ |
106 |
2.18 Creating a Data Block....................................................................................................... |
106 |
2.18.1 Naming a Data Block .............................................................................................................................. |
107 |
2.18.2 Editing a Data Block ............................................................................................................................... |
108 |
2.18.3 Define Your Own Pattern........................................................................................................................ |
108 |
2.19 Counter.............................................................................................................................. |
109 |
2.19.1 Random Data Pattern ............................................................................................................................. |
110 |
2.19.2 Walking Bit Pattern ................................................................................................................................. |
110 |
2.19.3 Creating and Editing Data Blocks as Text............................................................................................ |
111 |
2.19.4 Load Data................................................................................................................................................. |
111 |
2.19.5 Save As .................................................................................................................................................... |
111 |
Chapter 3: Display Manipulation ....................................................................... |
113 |
3.1 Viewer Display .................................................................................................................... |
113 |
3.1.1 Quick View................................................................................................................................................. |
114 |
3.1.2 Using the Viewer Display ......................................................................................................................... |
115 |
3.2 Trace Properties ................................................................................................................. |
115 |
3.3 Analysis............................................................................................................................... |
116 |
3.3.1 Analysis Toolbar ....................................................................................................................................... |
116 |
3.3.2 Decoding Assignments ............................................................................................................................ |
117 |
3.3.3 Packet View ............................................................................................................................................... |
118 |
Packet View Metrics.......................................................................................................................... |
118 |
Copying Packets from a Trace to a Host Emulator Script ............................................................ |
119 |
3.3.4 Changing the Default View....................................................................................................................... |
120 |
3.3.5 Spreadsheet View ..................................................................................................................................... |
120 |
Export As Text/Excel ........................................................................................................................ |
121 |
Change Format of Logical Block Address (LBA)........................................................................... |
121 |
3.3.6 Column View ............................................................................................................................................. |
121 |
Resize Columns ................................................................................................................................ |
122 |
Rearrange Columns.......................................................................................................................... |
122 |
3.3.7 Text View ................................................................................................................................................... |
122 |
3.3.8 Frame Inspector View............................................................................................................................... |
123 |
3.3.9 Waveform Display..................................................................................................................................... |
124 |
Making a timing Measurement......................................................................................................... |
124 |
Expanded Waveform View ............................................................................................................... |
125 |
3.3.10 Statistical Report .................................................................................................................................... |
125 |
Generating Statistical Read/Write Report....................................................................................... |
125 |
Report between Cursors .................................................................................................................. |
126 |
Sierra M6 1 SAS/SATA Protocol Analyzer User Manual |
5 |
Teledyne LeCroy |
Contents |
|
|
Report between Events .................................................................................................................... |
127 |
Statistical Report Content ................................................................................................................ |
127 |
Report Options.................................................................................................................................. |
128 |
General Report .................................................................................................................................. |
128 |
Primitive Report ................................................................................................................................ |
128 |
Bus Condition Report....................................................................................................................... |
129 |
ATA Command Report...................................................................................................................... |
130 |
Time out of ATA Command Report ................................................................................................. |
130 |
ATAPI Report..................................................................................................................................... |
130 |
Protocol Error Report ....................................................................................................................... |
131 |
Others Report.................................................................................................................................... |
131 |
SSP Transport Report (SAS)............................................................................................................ |
132 |
SMP Transport Report (SAS) ........................................................................................................... |
132 |
STP Transport Report (SAS) ............................................................................................................ |
133 |
SCSI Command Report (SAS).......................................................................................................... |
133 |
SMP Command Report (SAS) .......................................................................................................... |
133 |
Task Command Report (SAS) .......................................................................................................... |
134 |
SAS Address Report (SAS) .............................................................................................................. |
134 |
Lanes Report (SAS) .......................................................................................................................... |
135 |
Read/Write Command Report (SAS) ............................................................................................... |
135 |
Performance Report (SAS)............................................................................................................... |
136 |
Performance Report (SATA) ............................................................................................................ |
136 |
FIS Report (SATA)............................................................................................................................. |
137 |
Queue Command Report (SATA)..................................................................................................... |
138 |
PM Statistic Report (SATA) .............................................................................................................. |
138 |
PM Performance Report (SATA) ...................................................................................................... |
139 |
Read Write Command Report (SATA) ............................................................................................. |
139 |
3.3.11 Statistical Report Toolbar ...................................................................................................................... |
140 |
Export as Microsoft® Excel file ....................................................................................................... |
140 |
Save as Text file ................................................................................................................................ |
140 |
Print Statistical Report ..................................................................................................................... |
140 |
Print Preview ..................................................................................................................................... |
141 |
Report Display Settings.................................................................................................................... |
141 |
Link With Sample View..................................................................................................................... |
142 |
3.3.12 Formatting the Statistical Report View ................................................................................................. |
143 |
Filtering Column Content ................................................................................................................. |
143 |
Sorting Column Content......................................................................................................... |
.......... 145 |
Hiding Columns................................................................................................................................. |
145 |
3.3.13 Histogram View ....................................................................................................................................... |
146 |
Hide Frames....................................................................................................................................... |
146 |
Hide Error Frames............................................................................................................................. |
146 |
Pending IO Graph.............................................................................................................................. |
147 |
6 |
Sierra M6 1 SAS/SATA Protocol Analyzer User Manual |
Contents |
Teledyne LeCroy |
|
|
|
|
User Defined...................................................................................................................................... |
147 |
3.3.14 Bus Utilization View................................................................................................................................ |
148 |
3.3.15 Bus Utilization Buttons .......................................................................................................................... |
149 |
3.3.16 Data Report.............................................................................................................................................. |
149 |
3.3.17 Compare Two Data Payloads................................................................................................................. |
152 |
3.4 Running Verification Script Engine (VSE)........................................................................ |
153 |
3.5 Navigation + View Toolbar................................................................................................. |
156 |
3.5.1 Go To Menu ............................................................................................................................................... |
157 |
3.5.2 Filtering...................................................................................................................................................... |
161 |
3.5.3 Filter Setup ................................................................................................................................................ |
162 |
Filter Type.......................................................................................................................................... |
162 |
Filtering Direction ............................................................................................................................. |
163 |
Filter Idle ............................................................................................................................................ |
163 |
Save Filter Setup............................................................................................................................... |
163 |
Filter Logic......................................................................................................................................... |
163 |
Multilevel Filtering in SAS ................................................................................................................ |
163 |
Filter descending packets from trace highlight bar....................................................................... |
166 |
3.5.4 Selectable Filter Options for SAS............................................................................................................ |
166 |
Command Data Pattern .................................................................................................................... |
167 |
Bus Condition.................................................................................................................................... |
167 |
Incomplete Frames ........................................................................................................................... |
167 |
ATA Command .................................................................................................................................. |
167 |
Protocol Error.................................................................................................................................... |
167 |
ATAPI SCSI Command ..................................................................................................................... |
167 |
Filter Check Condition...................................................................................................................... |
168 |
Filter by Tag Number ........................................................................................................................ |
169 |
Filter Miscellaneous.......................................................................................................................... |
170 |
Use Pair SAS Addresses.................................................................................................................. |
171 |
Training Sequence............................................................................................................................ |
171 |
3.5.5 Selectable Filter Options for SATA ......................................................................................................... |
171 |
3.5.6 Enable Filter .............................................................................................................................................. |
172 |
3.5.7 Filter Idle .................................................................................................................................................... |
172 |
3.5.8 Search ........................................................................................................................................................ |
173 |
Save Search Setup............................................................................................................................ |
174 |
Search By........................................................................................................................................... |
174 |
Search Direction................................................................................................................................ |
174 |
Search From ...................................................................................................................................... |
174 |
Search Logic...................................................................................................................................... |
175 |
Search For ......................................................................................................................................... |
175 |
Data Pattern....................................................................................................................................... |
175 |
Advanced options ............................................................................................................................. |
175 |
Search Domain.................................................................................................................................. |
175 |
Sierra M6 1 SAS/SATA Protocol Analyzer User Manual |
7 |
Teledyne LeCroy |
Contents |
|
|
Search Sub Items.............................................................................................................................. |
176 |
Search by Tag Number ..................................................................................................................... |
177 |
3.5.9 Show/Hide Ports ....................................................................................................................................... |
179 |
Single Port ......................................................................................................................................... |
179 |
Multiple Ports .................................................................................................................................... |
179 |
3.6 Packet View Toolbar........................................................................................................... |
179 |
3.6.1 CATC Navigation View ............................................................................................................................. |
181 |
3.6.2 Spec View .................................................................................................................................................. |
182 |
3.6.3 Decode Icons............................................................................................................................................. |
182 |
3.6.4 Customize Display .................................................................................................................................... |
183 |
Rename Port...................................................................................................................................... |
183 |
Select and Apply Show/Hide Port Mode ......................................................................................... |
183 |
Show/Hide Field ................................................................................................................................ |
184 |
Related Frames ................................................................................................................................. |
185 |
Byte Order.......................................................................................................................................... |
186 |
Choose Data Format ......................................................................................................................... |
186 |
Show All Data .................................................................................................................................... |
187 |
3.7 Port Status........................................................................................................................... |
188 |
3.8 Toolbars............................................................................................................................... |
190 |
3.8.1 Enabling Tool Bars ................................................................................................................................... |
190 |
3.8.2 Cursor Position Status Bar ...................................................................................................................... |
190 |
3.9 Status Bar............................................................................................................................ |
191 |
3.9.1 Search Status ............................................................................................................................................ |
191 |
3.10 Using the Cursors and Bookmarks................................................................................. |
191 |
3.10.1 Cursors .................................................................................................................................................... |
191 |
Positioning the X Cursor .................................................................................................................. |
191 |
Time.................................................................................................................................................... |
191 |
3.11 Display Configuration ...................................................................................................... |
192 |
3.11.1 Trace Viewer Configuration ................................................................................................................... |
192 |
Field Setting....................................................................................................................................... |
194 |
Field Header Setting ......................................................................................................................... |
195 |
Viewer Setting ................................................................................................................................... |
195 |
Data Payload...................................................................................................................................... |
195 |
Time Stamp Origin ............................................................................................................................ |
195 |
Start Time and Port........................................................................................................................... |
195 |
Packet View Condense Mode........................................................................................................... |
195 |
Time Stamp Format........................................................................................................................... |
196 |
Font .................................................................................................................................................... |
196 |
Save/Load Settings........................................................................................................................... |
196 |
3.12 Set Port Alias .................................................................................................................... |
196 |
Restore Factory Presets................................................................................................................... |
197 |
8 |
Sierra M6 1 SAS/SATA Protocol Analyzer User Manual |
Contents |
Teledyne LeCroy |
Set As Default.................................................................................................................................... |
197 |
3.13 SAS Address Alias (SAS only) ........................................................................................ |
197 |
Set As Default.................................................................................................................................... |
198 |
3.14 TxRx Vout & Preemphasis............................................................................................... |
198 |
3.15 Preferences ....................................................................................................................... |
200 |
3.15.1 General Tab ............................................................................................................................................. |
200 |
Paths .................................................................................................................................................. |
200 |
Template Files ................................................................................................................................... |
200 |
Other................................................................................................................................................... |
201 |
Found Device List Mode................................................................................................................... |
201 |
Browse Default Path ......................................................................................................................... |
201 |
Port Configuration Setting ............................................................................................................... |
201 |
3.15.2 Trace Viewer Tab .................................................................................................................................... |
202 |
Open Trace file In.............................................................................................................................. |
202 |
Optimization ...................................................................................................................................... |
202 |
3.15.3 Other ........................................................................................................................................................ |
203 |
3.15.4 Spread Sheet View Tab .......................................................................................................................... |
205 |
Color Setting...................................................................................................................................... |
205 |
Anchor the Selection bar.................................................................................................................. |
205 |
Other................................................................................................................................................... |
206 |
3.15.5 Column View Tab .................................................................................................................................... |
206 |
Other................................................................................................................................................... |
206 |
3.15.6 Sampling Memory Usage Optimization................................................................................................. |
207 |
If the Sampling Memory Usage Optimization Option is Checked ................................................ |
207 |
If the Sampling Memory Usage Optimization Option is Not Checked ......................................... |
208 |
3.16 Floating License ............................................................................................................... |
209 |
3.17 External Trig Setting......................................................................................................... |
209 |
External Trig Out Setting.................................................................................................................. |
210 |
External Trig In Setting..................................................................................................................... |
210 |
3.18 Update Device................................................................................................................... |
210 |
3.19 User-Defined Decoding.................................................................................................... |
212 |
3.20 Help Menu.......................................................................................................................... |
213 |
3.20.1 Tell Teledyne LeCroy.............................................................................................................................. |
213 |
3.20.2 Help Topics.............................................................................................................................................. |
213 |
3.20.3 VSE Help Topics ..................................................................................................................................... |
213 |
3.20.4 Update License ....................................................................................................................................... |
213 |
3.20.5 Display License Information .................................................................................................................. |
213 |
3.20.6 Check for Updates .................................................................................................................................. |
214 |
3.20.7 About........................................................................................................................................................ |
215 |
3.21 Setup Menu ....................................................................................................................... |
215 |
Sierra M6 1 SAS/SATA Protocol Analyzer User Manual |
9 |
Teledyne LeCroy |
Contents |
|
|
3.21.1 Self Test ................................................................................................................................................... |
215 |
3.21.2 Clock Check ............................................................................................................................................ |
216 |
Test Result: OK or Error................................................................................................................... |
216 |
Saving ................................................................................................................................................ |
216 |
Number of Runs Each Test .............................................................................................................. |
217 |
Run All Tests Sequentially ............................................................................................................... |
217 |
3.21.3 Memory Check ........................................................................................................................................ |
217 |
3.21.4 Serdes Check .......................................................................................................................................... |
218 |
3.21.5 Crosspoint Check ................................................................................................................................... |
219 |
3.21.6 Main FPGA Check (SATA only).............................................................................................................. |
220 |
3.21.7 Expansion Check .................................................................................................................................... |
221 |
3.21.8 LED/Buzzer Check .................................................................................................................................. |
222 |
3.22 Find DUT............................................................................................................................ |
223 |
Aliasing .............................................................................................................................................. |
225 |
Exporting ........................................................................................................................................... |
225 |
3.23 Power Source Control...................................................................................................... |
226 |
Chapter 4: InFusion Overview ........................................................................... |
227 |
4.1 Key Features ....................................................................................................................... |
228 |
4.2 Interface............................................................................................................................... |
229 |
4.2.1 Buttons ...................................................................................................................................................... |
229 |
4.2.2 Menus......................................................................................................................................................... |
230 |
Setup .................................................................................................................................................. |
230 |
View.................................................................................................................................................... |
230 |
Configuration..................................................................................................................................... |
230 |
Tools................................................................................................................................................... |
230 |
Help .................................................................................................................................................... |
230 |
4.2.3 Main Library............................................................................................................................................... |
231 |
4.2.4 File Library................................................................................................................................................. |
231 |
4.2.5 Device Ports .............................................................................................................................................. |
232 |
4.2.6 Using the Device Ports Dialog................................................................................................................. |
232 |
4.3 Port Configuration for InFusion ........................................................................................ |
233 |
4.4 InFusion Scenarios............................................................................................................. |
234 |
4.4.1 Scenarios Overview.................................................................................................................................. |
234 |
InFusion Scenario Parameters ........................................................................................................ |
235 |
Global Rules ...................................................................................................................................... |
237 |
Sequences ......................................................................................................................................... |
237 |
4.4.2 Scenario Libraries..................................................................................................................................... |
238 |
Main Library....................................................................................................................................... |
238 |
File Libraries...................................................................................................................................... |
238 |
Device Libraries ................................................................................................................................ |
239 |
4.4.3 Scenario Properties .................................................................................................................................. |
239 |
10 |
Sierra M6 1 SAS/SATA Protocol Analyzer User Manual |

Contents |
Teledyne LeCroy |
|
|
SATA Smart Hold Option.................................................................................................................. |
241 |
4.5 Scenario Events.................................................................................................................. |
242 |
|
4.5.1 DWORD Matcher ....................................................................................................................................... |
245 |
|
4.5.2 SAS Data Pattern ...................................................................................................................................... |
245 |
|
4.5.3 SATA Data Pattern .................................................................................................................................... |
245 |
|
4.6 Scenario Actions ................................................................................................................ |
246 |
|
4.6.1 Available Resources................................................................................................................................. |
248 |
|
4.6.2 Using Counters in Events and Actions................................................................................................... |
249 |
|
4.6.3 Capturing a Data DWORD ........................................................................................................................ |
250 |
|
4.6.4 Using Captured Data DWORDs................................................................................................................ |
250 |
|
4.7 Summary of Scenario Creation ......................................................................................... |
252 |
|
4.8 Creating Global Rules ........................................................................................................ |
252 |
|
4.9 Example 1: Creating a Single Event and Action that Removes a Primitive .................. |
253 |
|
4.10 |
Example 2: Wait for a Primitive and Replace It with an Error....................................... |
256 |
4.11 |
Example 3: Creating OR Conditions............................................................................... |
257 |
4.12 |
Example 4: Multiple Triggers and Actions ..................................................................... |
258 |
4.13 |
Example 5: Multiple Actions on a Single Event............................................................. |
260 |
4.14 |
Example 6: Using Timers................................................................................................. |
261 |
4.15 |
Creating a Sequence ........................................................................................................ |
263 |
4.16 |
Example 7: Creating Two Sequences and Global Rules............................................... |
264 |
4.17 |
Example 8: Creating a Sequence With Many States #1 ................................................ |
269 |
4.18 |
Example 9: Creating a Sequence With Many States #2 ................................................ |
273 |
4.19 |
Downloading Scenarios................................................................................................... |
275 |
4.20 |
Running Scenarios........................................................................................................... |
276 |
4.21 |
Scenario Batch Files ........................................................................................................ |
276 |
4.21.1 Script Workspace.................................................................................................................................... |
277 |
|
4.21.2 Error Checking ........................................................................................................................................ |
279 |
|
4.21.3 Log ........................................................................................................................................................... |
279 |
|
4.21.4 Statements............................................................................................................................................... |
279 |
|
|
IfIsStopped......................................................................................................................................... |
279 |
4.21.5 Goto Label ............................................................................................................................................... |
280 |
|
4.21.6 Run ........................................................................................................................................................... |
281 |
|
4.21.7 Stop .......................................................................................................................................................... |
282 |
|
4.21.8 WaitForStop............................................................................................................................................. |
282 |
|
4.21.9 Beep ......................................................................................................................................................... |
284 |
|
Appendix A: Creating a Pattern Generator File................................................ |
285 |
|
5.1 Key words............................................................................................................................ |
285 |
|
Sierra M6 1 SAS/SATA Protocol Analyzer User Manual |
11 |

Teledyne LeCroy |
Contents |
|
5.2 Comment format................................................................................................................. |
286 |
|
5.3 |
Primitive definition format ................................................................................................. |
286 |
5.4 |
Loop definition format........................................................................................................ |
286 |
5.5 |
Scramble definition format ................................................................................................ |
286 |
5.6 |
Role definition format......................................................................................................... |
286 |
5.7 |
END_OF_FILE definition .................................................................................................... |
286 |
5.8 |
Example Pattern Generator File ........................................................................................ |
286 |
Appendix B: China Restriction of Hazardous Substances Table................... |
289 |
|
6.1 WAN Operation ................................................................................................................... |
290 |
|
Appendix C: How to Contact Teledyne LeCroy................................................ |
291 |
|
Index:.................................................................................................................. |
293 |
|
12 |
Sierra M6 1 SAS/SATA Protocol Analyzer User Manual |
Chapter 1
Introduction
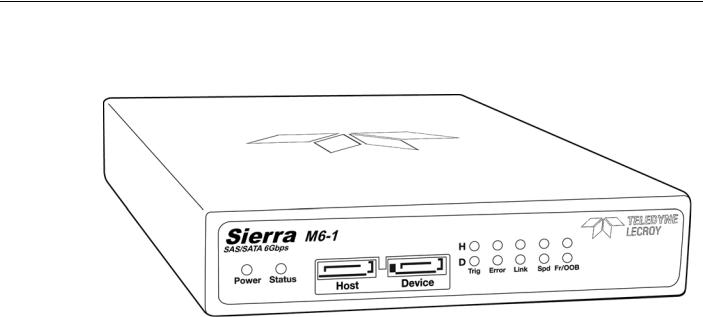
This manual describes installation and operation of the Teledyne LeCroy Sierra M6 1™ Protocol Analyzer and includes examples of typical applications.
Figure 1.1: Teledyne LeCroy Sierra M6-1 Protocol Analyzer
1.1Analyzer Overview
The Sierra M6 1 SAS/SATA Protocol Analyzer is a portable single port system that can function as a protocol analyzer or as an error injector. The SAS analyzer software performs serial bus analysis for Serial Attached SCSI (SAS) data transfers, as well as Serial ATA (SATA) data transfers through STP data transfers. The SATA analyzer software performs serial bus analysis for Serial ATA (SATA) data transfers.
The Analyzer can operate at 1.5, 3, or 6 Gb/s data rates and has 2 GB or 4 GB of recording memory.
The Analyzer supports capture, triggering, and filtering of Serial Attached SCSI packets or Serial ATA packets. The Analyzer provides for bi directional trigger and capture of commands, primitives, patterns and all bus conditions. The analyzer allows you to select frames to include and exclude for capture. Capturing can be triggered based on a specific event or manually.
The Analyzer has a USB port and a GbE (Gigabit Ethernet) port to connect to a host machine, which serves as the host for analysis or error injection software. The versatile GbE port can be used for either local or remote network connectivity.
Sierra M6 1 SAS/SATA Protocol Analyzer User Manual |
13 |
Teledyne LeCroy |
Features |
|
|
Sierra M6 1 Analyzers can be linked together in cascaded configurations to provide additional recording channel capacity, or used in tandem to combine simultaneous error injection and trace capture/analysis capabilities (requires two Sierra M6 1 units, one protocol analyzer model and one error injector model). Separate licences are required for the protocol analyzer and the error injector.
The Sierra M6 1 Analyzer provides a full range of views and statistical reports. Statistical reports provide event and error counters, as well as performance metrics, that give users a snapshot into capture.
The InFusion™ Error Injector and Traffic Modifier is an error injector and traffic modification tool that allows you to verify real world fault handling. The Sierra M6 1 InFusion models perform as a stand alone 1.5, 3 or 6 Gb/s version, allowing engineers to verify error recovery characteristics of their designs. An easy pop up menu interface allows the creation of customized test scenarios in just minutes. You can program on the fly modifications to any field within any intercepted and changed to a different user frame, as the data moves across the link. Any primitive or data pattern can be intercepted and changed to a different user specified pattern. Examples include support for changing DWORD values, disconnecting links, and forcing various error conditions, such as an intermittent CRC error or running disparity errors. This enables unprecedented corner case testing for SAS and SATA traffic, which is especially useful during final test and integration cycles.
The Sierra M6 1 Analyzer software has an intuitive GUI, combining easy setup with flexible data analysis displays. The application layer view logically assembles frames and primitives that are part of a specific SAS or SATA command. You can quickly view the completion status of any command, which is especially useful in addressing system level debug challenges.
1.2Features
6 Gb/s SAS/SATA protocol analysis or error injection
Native PHY for fast lock time
Easy mode triggering
Cascade up to 8 ports
Sync with Teledyne LeCroy Sierra and STX family products
CrossSync Control Panel
Hardware filtering
Automatic error detection
Comprehensive decoding of SAS and SATA data traffic
Logical and chronological traffic displays
Statistical reporting
Trace memory of 2 GB or 4 GB
GbE & USB 2.0 host interfaces
Capture, triggering, and filtering of Serial Attached SCSI packets or Serial ATA packets
TX Vout on transmitters for test and characterization
Automation API
Error Injection Functionality (Jammer)
14 |
Sierra M6 1 SAS/SATA Protocol Analyzer User Manual |
Receiving Your Analyzer |
Teledyne LeCroy |
|
|
|
|
1.3Receiving Your Analyzer
The analyzer package includes the following components:
1 Sierra M6 1 Analyzer identified in the packing list
1 USB A B 2.0 cable, 1.8 meter
1 Ethernet cable, 10 feet
2 SATA cables, 0.5 meter
2 SATA cables, 0.15 meter
1 Sync cable, 10 pin, 6 inch
1 DC power pack and cord
1 Installation CD ROM with software and documentation
1 Sierra M6 1 Quick Start manual
1.4Unpacking the Analyzer
Inspect the shipping container for any damage. Unpack the container and account for each of the system components listed on the accompanying packing list. Visually inspect each component for any damage. In the event of damage, notify the shipper and Teledyne LeCroy Corporation. Retain all shipping materials for shipper’s inspection.
1.5Analyzer Features
1.5.1Front Panel
The Analyzer has the following features on the front:
Power Indicator LED (green)
Status LED (blue)
Host SATA Connector
Device SATA Connector
LED Indicators for Host and Device
|
Trig |
trigger (blue) |
|
Error |
error (red) |
|
Link |
link (orange) |
|
Spd |
speed level (yellow) |
Speed |
Host |
Device |
1.5G |
Off |
Off |
3.0G |
On |
Off |
6.0G |
On |
On |
Sierra M6 1 SAS/SATA Protocol Analyzer User Manual |
15 |
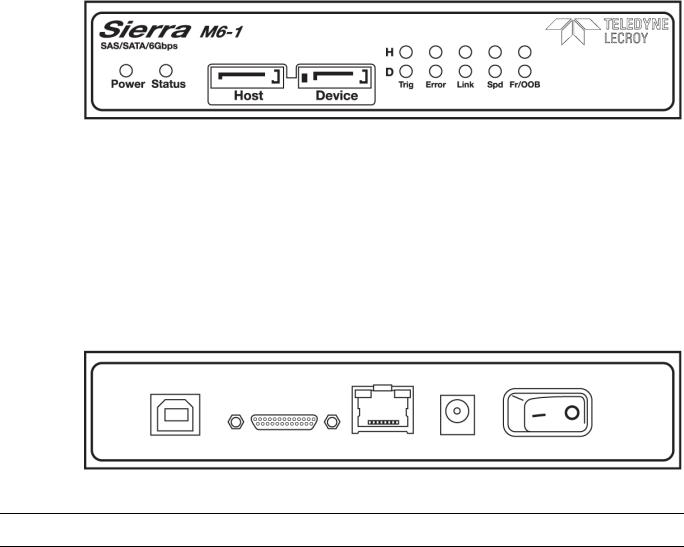
Teledyne LeCroy |
Analyzer Features |
|
|
Fr/OOB |
OOB (Out of Bound) or Frames (traffic) (green) |
|
Before the link, illuminates during |
|
the OOB sequence. |
|
After the link, indicates traffic on |
|
the bus. |
Figure 1.2: Front Panel
1.5.2Rear Panel
From left to right, the Analyzer has the following on the back:
USB Port for host connectivity
External Trigger IN/OUT and Sync Expansion Port
Gigabit Ethernet Port for network connectivity
DC Power
Power Switch (0/1)
Figure 1.3: Rear Panel
WARNING: Do not open the enclosure. No operator serviceable parts are inside.
1.5.3Temperature and Humidity
The hardware should operate flawlessly in the following temperatures range:
Operating 0 °C to 55 °C (32 °F to 131 °F)
Non Operating 20 °C to 80 °C ( 4 °F to 176 °F)
The hardware should operate in the following humidity range: 10% to 90% RH (non condensing)
16 |
Sierra M6 1 SAS/SATA Protocol Analyzer User Manual |

Installing Your Analyzer |
Teledyne LeCroy |
|
|
|
|
1.6Installing Your Analyzer
1.6.1Software Installation
The SAS/SATA software works on systems using the Windows® XP, Windows 7 (x86, x64) Windows 8 (x86, x64), Windows Server 2003, Windows Server 2008 and Windows Server 2012 R2 operating systems. 64 bit Windows OS is recommended because it allows using more RAM memory. Other Operating Systems limit the RAM to 3GB.
Insert the Installation CD ROM into the CD/DVD drive on the host machine.
1.The installation automatically starts setup, unless Auto Run is off. In that case, select the CD ROM from “My Computer” and click Setup.
2.After the warning to close all other programs and before starting the installation, the Install component selection opens.
3.Select components for installation.
4.Click Next to complete the installation.
System restart
You must restart your computer before you can use your Analyzer software.
Error Message
If you get an error message during installation of the drivers for Window, consult your system administrator. Your system may allow only administrator level users to copy such driver files.
1.6.2Hardware Setup
Separate Systems
When using the analyzer, it is recommended to use a system to generate bus traffic and a second system to run the software, to avoid characterization of traffic generated by the analyzer.
Connecting in General
Note:You must install the software before connecting the analyzer to the host machine for the first time.
To set up the analyzer:
1.Plug the power adapter into the unit, and then plug the power adapter into a 100V– 240V, 50Hz–60Hz, power outlet. Turn on the Power switch.
2.Connect the USB cable between the Sierra M6 1 USB port and a USB port on the host machine. The host machine’s operating system detects the analyzer and driver files.
(See “Connecting via Ethernet” on page 20 for Ethernet connectivity.)
3.Connect the analyzer to Host and Device as follows.
Sierra M6 1 SAS/SATA Protocol Analyzer User Manual |
17 |
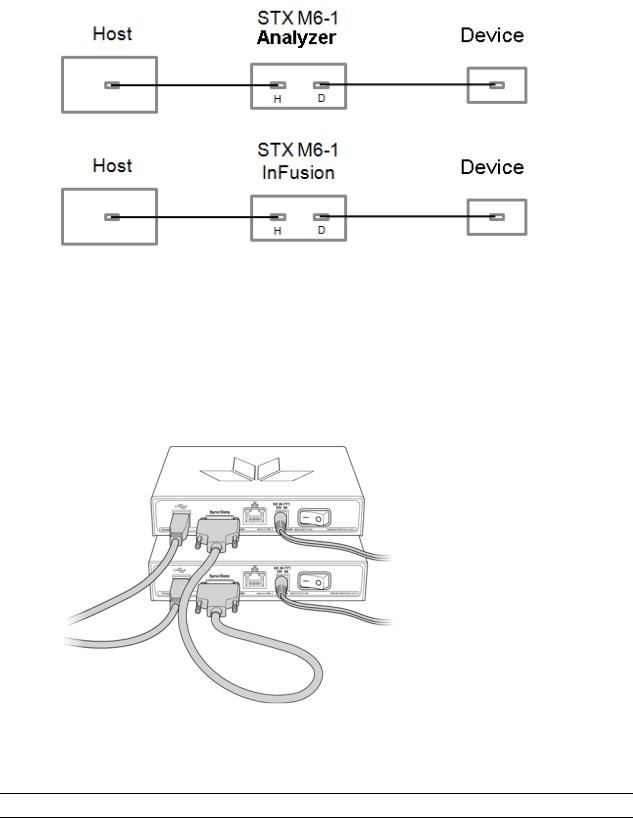
Teledyne LeCroy |
|
Cascading Sierra Analyzers |
|
|
|
|
|
|
|
|
|
|
|
|
|
|
|
|
|
|
|
|
|
Figure 1.4: Hardware Setup
1.7Cascading Sierra Analyzers
A Sierra M6 1 analyzer includes a built in Sync port on the back panel (between the USB and Ethernet ports). See Figure 1.3.
To connect two Sierra M6 1 analyzers, plug the ends of a Micro D Sync cable [AC031XXA X] into the Sync ports.
Figure 1.5: Cascading Two M6-1 Analyzers with a Micro-D Sync Cable
You must connect each of the analyzers to the host machine using the USB port or Ethernet port.
Note:Before connecting, stop all recording. However, you do not have to turn power off.
For Sierra M6 1 analyzers connected by Sync cables, the SAS/SATA Protocol Suite application automatically synchronizes their recording timestamps, starts, and stops.
18 |
Sierra M6 1 SAS/SATA Protocol Analyzer User Manual |
Cascading Sierra Analyzers |
Teledyne LeCroy |
|
|
|
|
To connect three Sierra M6 1 analyzers, connect the Micro D end of a Micro D to
DB 9 Sync cable [AC030XXA X] to the Sync port of the first analyzer. Connect the male DB 9 end of the Micro D to DB 9 cable to the female DB 9 end of a second Micro D to DB 9 cable. Connect the Micro D end of the second Micro D to DB 9 Sync cable to the Sync port of the second analyzer. Connect the male DB 9 end of the second Micro D to DB 9 cable to the female DB 9 end of a third Micro D to DB 9 Sync cable. Connect the Micro D end of the third Micro D to DB 9 Sync cable to the Sync port of the third analyzer.
Figure 1.6: Example Cascading Three Analyzers with Micro-D to DB-9 Cables
To connect a Sierra M6 1 analyzer to a Sierra M6 2 or M6 4 analyzer with a CATC SYNC Expansion Card, connect the Micro D end of a Micro D to DB 9 Sync cable [AC030XXA X] to the Sync port of the Sierra M6 1 analyzer. Connect the female DB 9 end of the Micro D to DB 9 cable to the CATC SYNC OUT port of the Sierra M6 2 or M6 4 analyzer.
Figure 1.7: Cascading M6-1 and M6-2 or M6-4 Analyzers with a Micro-D to DB-9 Cable
Note:You cannot connect a Sierra M6 1 analyzer to a Sierra M6 2 or M6 4 analyzer with a STX SYNC Expansion Card.
Sierra M6 1 SAS/SATA Protocol Analyzer User Manual |
19 |

Teledyne LeCroy |
Connecting via Ethernet |
|
|
Note:The Self Test, SAS Verification Test, SATA Compliance Test and Update License functions only work on unit 1 when the analyzers are set up in cascading mode.
For Sierra M6 1, M6 2, and M6 4 analyzers connected by Sync cables, the SAS/SATA Protocol Suite application automatically synchronizes their recording timestamps, starts, and stops.
For how to daisy chain two or more Sierra M6 2 analyzers, see the Sierra M6 2
User Manual. For how to daisy chain two or more Sierra M6 4 analyzers, see the Sierra M6 4 User Manual.
Note:You can use the Sync port to synchronize a Sierra M6 1 analyzer to analyzers with different protocols. You use a Micro D Sync cable (AC031XXA X) to connect to a Teledyne LeCroy Advisor T3 analyzer. You use a Micro D to DB 9 Sync cable (AC030XXA X) to connect to other Teledyne LeCroy analyzers. For more information, see the CrossSync User Manual and/or see “CrossSync Control Panel” on page 43.
1.8Connecting via Ethernet
The Ethernet connection can have any of these configurations:
1.Analyzer connected to a network using a hub or switch, Gigabit Ethernet interface, or similar device.
2.Analyzer connected to the host computer (machine running the application software), using a hub or switch, Gigabit Ethernet interface, or similar device.
1.8.1Connecting to a Network
When connected to a network, the analyzer can communicate with the DHCP server to obtain IP address configuration information in order to establish a connection.
1.8.2Select Device
After starting the software, click on Setup and select All Connected Devices (see the following screen capture).
20 |
Sierra M6 1 SAS/SATA Protocol Analyzer User Manual |
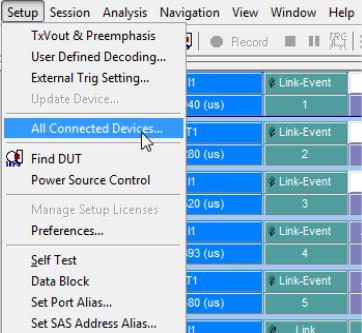
Connecting via Ethernet |
Teledyne LeCroy |
|
|
|
|
Figure 1.8: Connecting to All SAS/SATA Device(s)
The Select Device dialog allows connecting and disconnecting analyzers on the fly, without restarting the application.
The new Device List (introduced in version 4.10) mandates using updated firmware in order to detect the analyzer over Ethernet. Thus, the analyzer must be updated over USB before it can be used remotely over Ethernet. This is applicable for any update from version 4.00 or earlier to any version from 4.10 or later.
The following Select Device dialog displays (see Figure 1.9 on page 22). The colors in the ‘Location’ column mean the following:
Red: Firmware and/or BusEngine components need to be updated to the latest version
Light Blue: The device is ready to be connected.
Yellow: The device is locked.
Green: The software is connected and ready to run.
Sierra M6 1 SAS/SATA Protocol Analyzer User Manual |
21 |
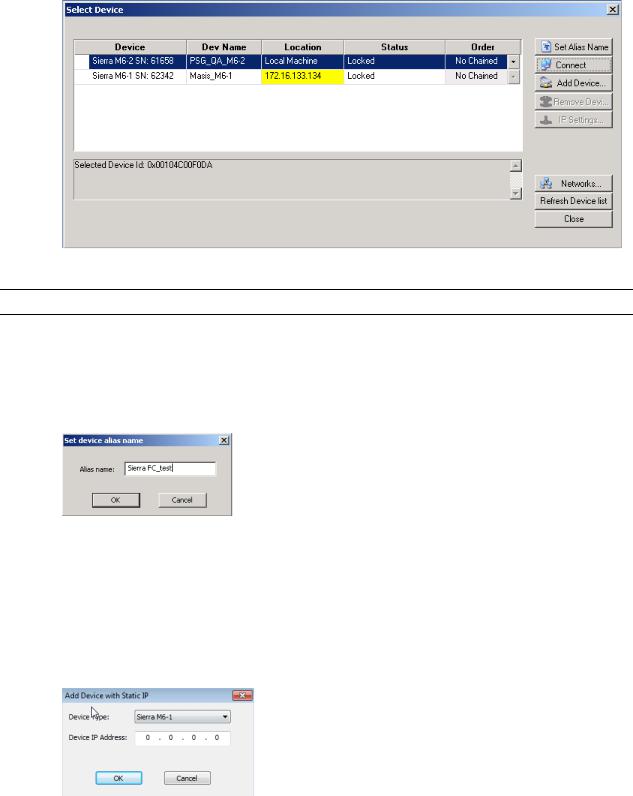
Teledyne LeCroy |
Connecting via Ethernet |
|
|
Figure 1.9: Select Device Dialog
Note:Click Refresh Device List to display all the devices on the network.
The Select Device dialog displays the following buttons:
Set Alias Name
Click Set Alias Name to display the Set device alias name dialog as shown below.
Figure 1.10: Set Device Alias Name Dialog
Disconnect
Click Disconnect to disconnect a device.
Add Device...
Click Add Device to add a device with a static IP address.
Figure 1.11: Add Device with Static IP Dialog
Remove Device
Click Remove Device to remove a previously added device.
22 |
Sierra M6 1 SAS/SATA Protocol Analyzer User Manual |
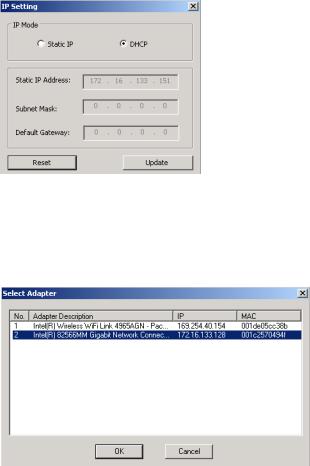
Connecting via Ethernet |
Teledyne LeCroy |
|
|
|
|
IP Settings...
Click IP Setting to reset IP settings of a device. The following IP Setting dialog displays.
Figure 1.12: IP Setting Dialog
Networks...
Click Networks to select a network adapter. The following dialog displays.
Figure 1.13: Select Adapter Dialog
Refresh Device List
Click Refresh Device List to refresh the device list.
To connect to a device, select a device which is Ready to Connect and click the Connect button on the right. The Connection Properties dialog is displayed (see Figure 1.14 on page 24).
Sierra M6 1 SAS/SATA Protocol Analyzer User Manual |
23 |

Teledyne LeCroy |
Connecting via Ethernet |
|
|
Figure 1.14: Connection Properties Dialog
Specify one of the actions from the following:
Automatically connect to the device
Ask if I want to connect to the device
Take no action
If ‘Automatically connect to the device’ is selected, the next time the application opens the device will be automatically connected.
In the Select Device dialog chained or cascaded units are displayed in the Device column with a [ (square bracket) icon. The sequence of the units is displayed in the Order column. See the following screen capture.
Figure 1.15: Select Device Dialog Displaying Unit 1 and Unit 2 Chained
Note:When using STX Sync cards, you need to manually specify the order of the chained units. To match your unit sequence to the address for each unit in the Select Device dialog, click the pull down tab under the Order heading (on the right side) and select unit numbers: 1 for
24 |
Sierra M6 1 SAS/SATA Protocol Analyzer User Manual |

Launching Your Analyzer |
Teledyne LeCroy |
|
|
|
|
Unit 1, 2 for Unit 2, and so on. This determines the order in which the cascaded ports appear in the trace. When using the CATC Sync cards the order is automatically detected.
IMPORTANT! Power up all units before starting the software.
1.8.3Connecting over Different Subnets
If the host machine (with the software) and Sierra M6 1 are on the same subnet, they will see each other’s broadcasts, and the Sierra M6 1 application will automatically appear in the Select Device dialog, from which you can select a device (as described in the previous section).
If the host machine and Sierra M6 1 do not reside on the same subnet, they will not see each other automatically. You must add the Sierra M6 1 IP address manually. To add the IP Address, use the Add Device button (see Figure 1.11 on page 22).
1.8.4TCP and UDP Ports Must Be Open to Connect over Ethernet
WARNING: Check your firewall settings before making Ethernet connections. Incorrect firewall settings can prevent Teledyne LeCroy applications from detecting analyzers on the network, though Ping works correctly. Consult your Firewall documentation to allow Teledyne LeCroy applications access to the network.
The following TCP and UDP ports must be open to connect over the Ethernet:
TCP Port: 4000 to 4003
UDP Ports: 4015 to 4017
1.9Launching Your Analyzer
To launch the software, double click the SAS or SATA icon.
1.10Operating in Simulation Mode
The SAS/SATA applications operate in Simulation Mode by default if the software detects no hardware.
The Analyzer software launches and displays the appropriate tool bar, but with the limitation that the Analyzer operates only on static, previously captured, bus data.
Limitations: Simulation Mode lets you try all of the available functions, but the system is not capturing any real data and is displaying only
pre captured results.
Sierra M6 1 SAS/SATA Protocol Analyzer User Manual |
25 |
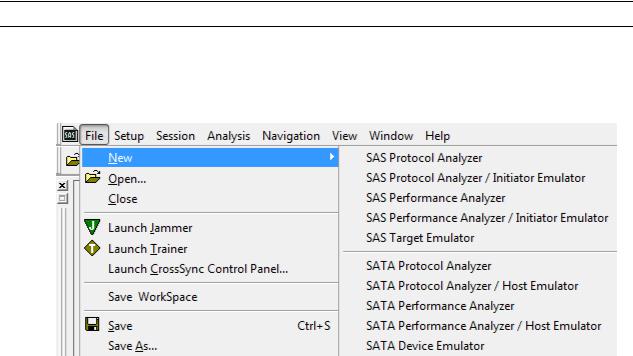
Teledyne LeCroy |
Operating in Simulation Mode |
|
|
1.10.1Using the Software
Depending on the software license(s) purchased with the unit, the Sierra M6 1 has SAS and SATA protocol capability or has SATA only. Use the SAS/SATA Protocol Suite applications, respectively.
The Teledyne LeCroy SAS/SATA Protocol Suite can be a:
Protocol Analyzer: Captures data, triggers on events, and saves. Easy Mode allows standard Trigger and Data capture. Advanced Mode (requires license) allows you to program custom triggering in and out, capturing, state jumps, and timers (see “Protocol Analysis” on page 37).
Jammer: The InFusion™ Error Injector and Traffic Modifier is an error injector and traffic modification tool that allows you to verify real world fault handling (see “InFusion Overview” on page 227).
Note:The Advanced Mode option has to be purchased separately.
The SAS/SATA application now provides functionality for both protocols. Either protocol can now be accessed via the File menu and choosing the protocol to work with. Click File> New and select the desired protocol and application.
Figure 1.16: File Menu
To switch between protocols click Window and the select the trace or application to use.
Depending on the protocol in use, the relevant functions and menu options are available and the others are greyed out (see Figure 1.17 on page 27).
26 |
Sierra M6 1 SAS/SATA Protocol Analyzer User Manual |
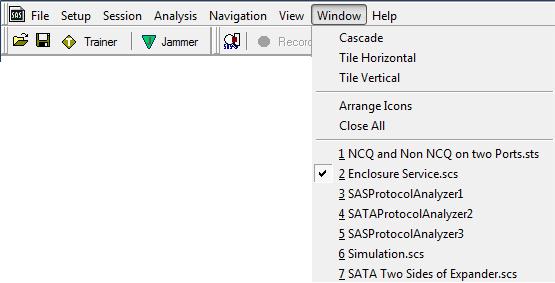
Teledyne LeCroy SAS/SATA Protocol Suite Menu Options and Toolbars |
Teledyne LeCroy |
|
|
|
|
Figure 1.17: Window Dialog
1.10.2Getting Started with the Protocol Analyzer
To use the software for protocol analysis, first select File > New > SAS Protocol Analyzer,
File > New > SATA Protocol Analyzer for a new SATA project for a new project or File > Open an existing protocol analysis file: .sac for a SAS file or .stc for a SATA file (see “Protocol Analysis” on page 37). You can also open a .scs SAS Sample file or
.sts SATA Sample file. Example files are in the Examples folder.
On the Capture tab, select to capture Everything or Pattern. For Pattern, select a Pattern. You can exclude patterns and frames. You can use different patterns for pre trigger and post trigger.
On the Trigger tab, select the trigger type. For Pattern, select the pattern. On the Settings tab, select trigger position and memory use.
Change the Analyzer settings if necessary. Change the port Speed if necessary.
Use Advanced Mode only after you become familiar with the hardware and software and have special needs.
1.11Teledyne LeCroy SAS/SATA Protocol Suite Menu Options and Toolbars
This section lists all the SAS/SATA Protocol Suite application menu options and the toolbars.
1.11.1File
The File menu options allows you to perform common tasks such as open, close, save, export, print, send files and exit the application (see Figure 1.18 on page 28).
Sierra M6 1 SAS/SATA Protocol Analyzer User Manual |
27 |

Teledyne LeCroy |
Teledyne LeCroy SAS/SATA Protocol Suite Menu Options and Toolbars |
|
|
Figure 1.18: File Menu Option
1.11.2Setup
For special work, you can use the Setup menu (see Figure 1.19 on page 29) to perform the following actions:
Configure TxRxVout & Pre emphasis (see “TxRx Vout & Preemphasis” on page 198)
User Defined Decoding (see “User Defined Decoding” on page 212)
External Trig Setting (see “External Trig Setting” on page 209)
Update Device (see “Update Device” on page 210)
All Connected Devices (see “Select Device” on page 20)
Find DUT (see “Find DUT” on page 223)
Power Source Control (see “Power Source Control” on page 226)
Manage Setup Licences (see “Floating License” on page 209)
Set Preferences (see “Preferences” on page 200)
Perform a Self Test (see “Self Test” on page 215)
Create a Data Block (see “Creating a Data Block” on page 106)
Set Port Alias (see “Set Port Alias” on page 196)
Set SAS Address Alias (see “SAS Address Alias (SAS only)” on page 197)
28 |
Sierra M6 1 SAS/SATA Protocol Analyzer User Manual |
Loading...