


 Loading...
VERSION 17 |
VEGAS |
VEGAS PRO
English language manual

Lastchanges: Wednesday, July17, 2019
This documentation is protected bycopyrightlaw.
Allrights,especiallytherightofduplication,circulation,and translation arereserved.
No partofthis publication maybereproduced in formofcopies,microfilms or other processes,or transmitted into alanguageused for machines,especiallydataprocessingmachines,withouttheexpress written consentofthepublisher.
Allrights ofreproduction arereserved.Errors in and changes to thecontents as wellas programmodifications reserved. Copyright© MAGIXSoftwareGmbH,1994–2019.Allrights reserved.
MAGIX,Vegas and allmentioned MAGIXproductnames areregistered trademarks ofMAGIXSoftwareGmbH HDVand HDVlogo aretrademarks ofSonyCorporation and Victor CompanyofJapan,Limited (JVC).
"ATRAC,""ATRAC3,""ATRAC3plus,""ATRACAdvanced Lossless,"and theATRAClogo aretrademarks ofSonyCorporation. http://www.sony.net/Products/ATRAC3/
Morelicenseinformation can befound onlineattheVegas web sites.
MAGIXlicensingconditions areincluded in theinstallation and also atwww.magix.comunder EULA.
www.vegascreativesoftware.com

Table of Contents |
3 |
Table of Contents
Tableof Contents |
3 |
Introduction |
11 |
Technical Support |
12 |
AboutVEGAS Pro |
12 |
InteractiveTutorials |
12 |
TheVEGAS Pro Window |
13 |
Main toolbar |
13 |
Editing Tool |
15 |
TimeDisplay |
18 |
Track List |
18 |
Scrubbing |
19 |
MarkerBar |
21 |
Timeline |
22 |
TheTransportand Editing Toolbar |
23 |
Viewing thestatus bar |
25 |
Window Docking Areaand Floating Window Docks |
27 |
TheExplorerWindow |
27 |
TheTrimmerWindow |
30 |
TheMasterBus Window |
30 |
TheVideo Preview Window |
30 |
TheProjectMediaWindow |
31 |
TheEditDetails Window |
32 |
TheTransitions Window |
32 |
TheVideo FXWindow |
33 |
TheMediaGenerators Window |
34 |
TheProjectNotes window |
35 |
TheCompositors Window |
36 |
ThePlug-In ManagerWindow |
37 |
TheVideo Scopes Window |
38 |
TheSurround PannerWindow |
39 |
TheXDCAMExplorerWindow |
39 |
TheMixing ConsoleWindow |
39 |
TheDashboard |
40 |
Loudness meters |
41 |
Working with projects |
43 |
Creating anew project |
43 |
Setting projectproperties |
43 |
Opening aprojectormediafile |
50 |
Creating rotated projects |
52 |
Nesting projects |
54 |
Nested Timelines |
55 |
Opening arecentproject |
56 |

4
Saving aproject |
56 |
Automaticprojectsaving |
56 |
Advanced SaveLiveSave& AutomaticBackups |
56 |
Saving and renaming aproject(SaveAs) |
58 |
Projectreferences in rendered files |
59 |
Sharing aprojectonline |
60 |
Uploading yourmovieto YouTube |
61 |
Uploading yourmovieto Facebook |
61 |
Uploading yourmovieto Vimeo |
63 |
Importing and exporting projects |
63 |
Importing and exporting AAFfiles |
64 |
Archiving projects |
66 |
Working with P2Video |
67 |
Working with HDR video |
68 |
EditDecision Lists |
68 |
Closing aProject |
69 |
Exiting theVEGAS Pro Application |
69 |
Adding, managing, and arranging media |
70 |
Using theProjectMediawindow |
70 |
Previewing mediafiles |
76 |
Adding mediafiles to yourproject |
77 |
Using Storyboards |
81 |
Working with high-frame-rate(HFR)clips |
83 |
Adding layered PSDfiles to thetimeline |
84 |
TheSlideshow Creator |
85 |
Importing mediafrom aprojectfile |
86 |
Importing BroadcastWaveFormatfiles |
86 |
Importing video from aDVDcamcorder |
88 |
Editing video from an XDCAMStation with StreamChase |
88 |
Creating proxyfiles forhigh-definition editing |
90 |
Using HitFilm effects |
90 |
Inserting Subtitles |
91 |
Sorting yourmediawith bins |
92 |
Viewing orchanging mediafileproperties |
94 |
Inserting audio tracks |
97 |
Inserting video tracks |
98 |
Recording audio |
98 |
Metronome |
103 |
Capturing video |
103 |
Capturing from an SDI card |
104 |
Capturepreferences |
106 |
Screen Capturing |
110 |
Converting video to 24p |
110 |
www.vegascreativesoftware.com

|
Table of Contents |
5 |
Extracting audio from CDs |
111 |
|
Editing events on thetimeline |
113 |
|
Adding mediafiles to yourproject |
113 |
|
Inserting an emptyevent |
118 |
|
Inserting time |
118 |
|
Creating selections and positioning thecursor |
118 |
|
Moving events |
121 |
|
Automaticcrossfades |
122 |
|
Enablesnapping |
123 |
|
Quantizeto frames |
125 |
|
Cutting, copying, and pasting events |
125 |
|
Deleting events |
128 |
|
Trimming events |
129 |
|
Post-editripple |
129 |
|
Splitting events |
130 |
|
SmartSplitting Events |
131 |
|
Healing Events |
131 |
|
Closing gaps |
131 |
|
Shuffling events |
132 |
|
Using theTrimmer |
133 |
|
Adjusting an event's length |
139 |
|
EventLength Display |
142 |
|
Expanded editmode |
142 |
|
Slipping and sliding events |
144 |
|
Repairing audio/video synchronization offsets |
145 |
|
Add missing streams |
146 |
|
Eventenvelopes |
146 |
|
Adding aFreezeFrameatCursorPosition |
149 |
|
Panning and cropping video events |
149 |
|
Stabilizing Video Clips |
159 |
|
Reversing an event |
161 |
|
Using takes as alternateversions of events |
161 |
|
Grouping events |
163 |
|
Using synclinks |
164 |
|
Applying switches to events |
165 |
|
Audio streams |
168 |
|
Audio channels |
168 |
|
Opening events in an audio editor |
169 |
|
Opening acopyof an eventin an audio editor |
169 |
|
Editing eventproperties |
170 |
|
Copying and pasting orselectivelypasting eventattributes |
175 |
|
Using theEditDetails Window |
175 |
|
Removing red eyefrom still images |
176 |
|
Undoing and redoing editoperations |
177 |
|

6
Rebuild audio peaks |
178 |
Zooming and magnification |
178 |
Multicameraediting |
180 |
Shooting multicameravideo |
180 |
Capturing multicameravideo |
180 |
Synchronizing video in multicameraprojects |
180 |
Creating multicameraevents |
182 |
Editing multicameravideo |
182 |
Stereoscopic3Dediting |
188 |
Setting up yourstereoscopic3Dproject |
188 |
Setting up stereoscopic3Dpreviews |
192 |
Synchronizing stereoscopic3Devents |
192 |
Aligning leftand right-eyeviews and adjusting depth |
195 |
Rendering astereoscopic3Dproject |
197 |
Using markers, regions, and commands |
200 |
Inserting markers |
200 |
Inserting regions |
201 |
Using mediamarkers and regions |
202 |
Inserting command markers |
203 |
Inserting CDtrack regions |
206 |
Inserting CDindexmarkers |
206 |
TheMarkerTool |
207 |
Track editing |
208 |
Inserting audio tracks |
208 |
Inserting video tracks |
208 |
Selecting tracks |
208 |
Arranging tracks |
209 |
Grouping tracks |
209 |
Duplicating tracks |
211 |
Audio track controls |
211 |
Video track controls |
218 |
Audio bus tracks |
223 |
Video bus track |
225 |
Setting defaulttrack properties |
228 |
Renderto New Track |
229 |
Using automation |
230 |
Audio track automation |
230 |
Video track automation |
233 |
Automating audio effectparameters |
236 |
Adjusting envelopes |
238 |
Recording track envelopeand keyframeautomation |
242 |
Animating video events and tracks |
246 |
Panning and cropping video events |
246 |
www.vegascreativesoftware.com

|
Table of Contents |
7 |
Editing track motion |
255 |
|
Keyframeanimation |
261 |
|
Motion tracking |
265 |
|
Applying effects |
268 |
|
Adding audio track effects |
268 |
|
Adding audio eventeffects |
269 |
|
Using bus effects |
270 |
|
Applying non-real-timeeventeffects |
272 |
|
Using assignableeffects |
272 |
|
Adding an assignableeffects chain |
272 |
|
Routing tracks to an assignableeffects chain |
274 |
|
Using assignableeffects envelopes |
275 |
|
Removing an assignableeffects chain |
275 |
|
Creating and using effects packages |
275 |
|
Bypassing all audio effects |
275 |
|
Editing audio effects |
276 |
|
Adding video effects |
279 |
|
LUTExport |
283 |
|
Using theColorGrading panel |
283 |
|
Adding transitions |
285 |
|
Adding generated mediato yourproject |
288 |
|
Creating textand titles |
290 |
|
Using theTitles & TextPlug-In |
291 |
|
Mixing audio |
294 |
|
Using theMasterBus Window |
294 |
|
Busses - overview |
296 |
|
Adding audio busses |
296 |
|
Assigning tracks to busses |
297 |
|
Using bus envelopes |
298 |
|
Routing busses |
298 |
|
Signal flow diagram |
300 |
|
Using inputbusses |
301 |
|
Adding ordeleting inputbusses |
301 |
|
Recording using an inputbus |
302 |
|
Using inputbusses with hardware-based effects |
304 |
|
Real-timerendering |
305 |
|
TheMixing Console |
308 |
|
TheMixing ConsoleToolbar |
308 |
|
TheChannel ListPane |
310 |
|
TheView Controls Pane |
310 |
|
Channel Strips |
312 |
|
Using theMixing Console |
314 |
|
Adding Track, AssignableFX, and Bus Channels |
314 |
|
Audio Track Channel Strips |
314 |
|

8
Bus Channel Strips |
321 |
Inputbus channel strips |
326 |
FXsend (assignableeffects)channel strips |
332 |
Creating acue(headphone)mixwith theMixing Console |
337 |
Compositing video |
340 |
Compositing and masks |
340 |
3Dcompositing |
345 |
Video signal flow diagram |
353 |
Proxy-firstworkflow |
356 |
Working with HDV |
358 |
Capturing HDV clips |
358 |
Editing HDV video on thetimeline |
358 |
Working with REDcameraclips |
360 |
Working with AVCHDvideo |
362 |
S-Log and ACES workflow in VEGAS Pro 17 |
364 |
Enabling colormanagementin yourVEGAS Pro project |
369 |
Specifying thecolorspaceforindividual shots |
371 |
Specifying thecolorspacein acustom rendering template |
372 |
VEGAS Pro 15ACES 1.1 updates |
374 |
360° video |
376 |
Preparing aprojectfor360° movies |
376 |
TheVideo Preview window in 360° mode |
376 |
Stitching |
377 |
Exporting 360° videos |
379 |
360° Video Stabilization |
379 |
5.1 surround projects |
380 |
Setting up your5.1 surround project |
380 |
5.1 surround panning and mixing |
382 |
Audio panning modes |
389 |
Rendering your5.1 surround project |
391 |
Exporting aVEGAS Pro projectto DVDArchitect |
392 |
Closed Captioning |
393 |
Adding closed captioning to video files |
393 |
Captioning Windows Mediafiles |
402 |
Previewing yourproject |
405 |
Loop Playback |
405 |
MuteAll Audio |
405 |
MuteAll Video |
405 |
Using theVideo Preview window |
405 |
Split-screen previews |
411 |
Using dynamicRAMpreviews |
413 |
Using an External Video Monitor |
414 |
External monitorviaDVI (Windows Graphics Card) |
414 |
www.vegascreativesoftware.com

|
Table of Contents |
9 |
External monitorviaIEEE-1394 (FireWire) |
415 |
|
External monitorviaSDI |
416 |
|
Selectivelyprerendervideo |
417 |
|
Cleaning up prerendered video files |
418 |
|
Loudness metering and logging |
418 |
|
Loudness meters |
418 |
|
Generating aloudness log |
420 |
|
Monitoring video with scopes |
423 |
|
TheVectorscopeMonitor |
423 |
|
TheVideo Waveform Monitor |
424 |
|
TheHistogram Monitor |
425 |
|
TheRGBParadeMonitor |
427 |
|
Video ScopeSettings |
428 |
|
Timecodesynchronization |
431 |
|
GenerateMIDI Timecode |
431 |
|
GenerateMIDI Clock |
431 |
|
Triggerfrom MIDI Timecode |
432 |
|
Burning discs |
435 |
|
Track-at-once(TAO)CDburning |
435 |
|
Disc-at-once(DAO orRed Book)CDBurning |
436 |
|
Burning aBlu-rayDiscfrom thetimeline |
441 |
|
Burning aDVDfrom thetimeline |
442 |
|
Printing video to tape |
443 |
|
Printing video to tapefrom thetimeline |
443 |
|
Printing video to HDV tape |
448 |
|
Rendering projects (RenderAs) |
451 |
|
Rendering Multichannel Audio Files |
453 |
|
Rendering MPEGFiles |
456 |
|
Rendering Projects forUsein DVDArchitect |
456 |
|
MediaFileSettings forBlu-rayDiscProjects |
458 |
|
Custom rendering templates |
460 |
|
Using Vegas Pro Connect |
463 |
|
Setting up Vegas Pro Connect |
463 |
|
Using Vegas Pro Connectto control playback |
464 |
|
Using Vegas Pro Connectto review projects on yourmobiledevice |
468 |
|
Adjusting Vegas Pro Connectsettings |
471 |
|
Troubleshooting Vegas Pro ConnectConnections |
471 |
|
Using hardwarecontrollers |
473 |
|
Using acontrol surface |
473 |
|
Using aMackieControl |
474 |
|
Using aFrontierTranzPort |
486 |
|
Using aPreSonus FaderPort |
488 |
|
Using aGenericControl Surface |
490 |
|
Configuring aGenericControl Surface |
491 |
|

10
Using ajoystick forpanning, adjusting controls, and colorcorrection |
493 |
Using amultimediacontroller |
495 |
Using Scripting |
497 |
Customizing theVEGAS Pro interface |
501 |
Customizing thetoolbar |
501 |
Customizing keyboard shortcuts |
501 |
Timeruler |
502 |
Grid spacing |
504 |
Saving and recalling window layouts |
504 |
VEGAS Pro preferences |
507 |
Preferences - General Tab |
507 |
Preferences - Video Tab |
511 |
Preferences - Preview DeviceTab |
514 |
Preferences - Audio Tab |
520 |
Preferences - Audio DeviceTab |
523 |
Advanced Audio Configuration |
524 |
Customizing ASIO portnaming |
526 |
Preferences - MIDI DeviceTab |
527 |
Preferences - VSTEffects |
527 |
Preferences - Editing Tab |
528 |
Preferences - DisplayTab |
530 |
Preferences - CDSettings Tab |
532 |
Preferences - SyncTab |
533 |
Preferences - External Control & Automation Tab |
535 |
Depracted Features tab |
537 |
FileI/O tab |
537 |
Keyboard shortcuts |
539 |
Glossary |
553 |
Index |
571 |
www.vegascreativesoftware.com
11
Introduction
MAGIXproudlyintroduces VEGAS Pro 17 , afull-featured nonlineareditor(NLE)forvideo and multitrack digital audio designed forvideo postproduction and multichannel audio recording and mixing.
What's new in this version
•Nested Timelines This is afurtherdevelopmentof theexisting nested projects functionality. Whereanested projecthas to beopened in asecond instanceof VEGAS Pro forediting, with thenested timelines itis now possibleto createand edita"project-inside-aproject" directlyfrom thetimeline.
•Color Grading window: Several color-related Video EventFX(including InputLUT, ColorWheels, Color Curves,HSL, WhiteBalanceand manymore)arecombined in adedicated screen areathatis easilyshown or hidden with atoolbarbutton. To saveyou alotof clicks itcan stayopen to applythedesired colorgrading to the differentevents, instead of opening each event's FXchain and loading thecolorFXseparately.
•LUT Export: Saveall coloreffects from an effectchain as aCUBE filewith theSaveLUTbutton in thePlug-in chooserwindow.
•Improved Storyboard functionality: You can add thesamepieceof mediato asinglestoryboard, and thumbnails reflectthein pointof themediathatis used in thetimeline.
•Warp Flow transition/SmartSplit: TheWarp Flow transition automaticallyfixes jump cuts bysynthesizing movement. TheSmartSplitcommand cuts outparts of an eventand applies theWarp Flow transition to conceal thecut.
•Mesh Warp plug-in forcreativedeformation of yourfootage, or, when you setthegrid sizeto 1x1 itgives you fourcornerpoints to quicklyconform yourvideo to anon-rectangularfour-sided surface.
•Lens Correction plug-in to compensatedistortions from wide-anglelens systems as used in action cams.
•HDR Color supportenhancements
o |
GPU-based processing |
o |
Windowed HDR Preview (preview in theVideo Preview window) |
o |
HDR Specificcolorgrading |
o |
HLGsupport |
•Stabilization improvements: Using theVideo stabilization is now also possibleateventlevel, when used on eventlevel itis possibleto visualizethemotion tracks of thestabilization.
•ProjectNotes window: Attach notes to yourprojectif you wantto hand itto someoneelse. Thenotes can be tagged as "resolved", resolved notes can behidden.
•AutomaticSlideshow Creator: CreateaSlideshow of adesired length from afolderorselection of pictures.
•AdjustableColor temperature enhancementto White Balance plug-in.
•Audio synchronization for multicam: SynchronizeMulticam footagebyanalyzing and matching theaudio track of therecordings.
•8ksupport: You can add 8k to yourprojectnow when using proxyfiles.
•New Formats:
o |
Experimental MKV support. |
o |
10bitintermediateformat |
o |
ProRes 4444 files with embedded alphachannels |
o |
NVENC 10-bitHEVC rendering |
o |
Hardwaredecoding forAVC and HEVC |
• User Interface improvements:
www.vegascreativesoftware.com
Introduction 12
o |
You'll getawarning when you deleteatrack thathas events on it. |
o |
Hi-DPI interface improvements: TheHigh DPI modeis now defaulted to on forVEGAS Pro17 |
oYou can displaytheEventlength on theheaderof timelineevents. Find itin thehamburgermenu foreach eventorundertheView menu.
oTemporarilyignore eventgrouping when moving an event: Hold both theleftand rightmousebuttons as you drag an eventto moveitindependentlyfrom othergroup members.
oThere's anew indicatoron an eventto show if Media FXhavebeen applied to themediatheeventholds (find itin theeventhamburgermenu)
o You will beasked to confirm if you click cancel in arenderprocess.
•New, taskspecific, defaultlayouts / Dashboard:Easyediting modes forbeginners work with asimplified version of theuserinterfacethatshow onlythemostimportantcontrols forastep-by-step walk-through from adding mediato thefinal movie, everything puttogetherin theDashboard window. TheGuided Video Creator from theTool Menu takes you through thesesteps.
•VEGAS Screen Captureutility: Record video streams from yourbrowserorvideo game.
•Motion tracking: Track motion in asceneand letotherevents ortextfollow themovement.
•Super-smooth slow motion (optical flow and motion estimation)with theVEGAS Slow Motion plug-in
•VEGAS POST integration
TechnicalSupport
If you experienceproblems orhavequestions whileusing VEGAS Pro, ourtechnical supportdepartmentis always readyto help you. Additional supportand information can befound athttp://www.vegascreativesoftware.com.
Foradetailed listof Technical Supportoptions, pleasevisitourweb site.
AboutVEGAS Pro
From theHelp menu, chooseAboutVEGAS Pro to displayinformation abouttheapplication, such as thesoftware licenseowner, copyrightand system information, program version and serial number, and theVEGAS Pro logo.
 Beforecontacting Technical Support, click theComputertab to displayinformation aboutyourcomputer.
Interactive Tutorials
 UsetheInteractive Tutorials Button from theMain Toolbaror, chooseInteractive Tutorials from theHelp
menu to startan interactiveguidethatwill show you each partof theVEGAS Pro interfaceand teach you how to createprojects.
Chooseatopicfrom theInteractiveTutorials overview to startatutorial—you'll beup and running in no time!
13
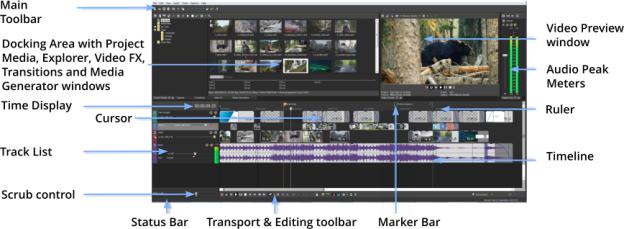
The VEGAS Pro Window
TheVEGAS® Pro window is whereyou edityourproject, and thescreen is divided into several areas.
Tips:
•If you preferto work with thetimelineatthebottom of thewindow and thedocking areaatthetop of the window, selecttheDisplaytimeline atbottom of main window check boxon theDisplaytab of thePreferences dialog. Formoreinformation, see"Preferences - DisplayTab" on page530
•Thetrack list, timeline, and window docking areasections can besized to yourpreferences bydragging the dividers between them orbyusing F11:
o |
F11 minimizes and restores thewindow docking area. |
o |
Shift+F11 minimizes and restores thetrack list. |
oCtrl+F11 maximizes and restores thetimelineverticallyand horizontally(window docking areaand track list will behidden).
Therearetimes when you don’tneed quick access to theall various buttons in theUI. Somebuttons you will useall thetimewhileothers onlyoccasionally. Several areas of theUI havebeen designed so thatyou can customizewhich buttons aredisplayed bydefault. Examples of this arethetool bars found in theVideo Preview window, theTrimmer window, and theaudio and video Track Headers.
Access to thebuttons thatarenotcurrentlydisplayed can beachieved viatheHamburgerbutton  . The
. The
Hamburgerbutton also gives you access to theEditVisible Button Setcommand which enables you to control which buttons aredisplayed bydefault.
 Hint: Throughoutthemanual and help system, featuredescriptions arebased on visiblebuttons. To access a button notcurrentlydisplayed:
•Click theHamburgerbutton 
•Click thecommand in thepop-up menu to perform theaction of thatbutton.
To choosewhich buttons aredisplayed bydefault:
•Click on theHamburgerbutton  and chooseEditVisible Button Set
•Click thecheck boxforanybutton you wantto bedisplayed bydefault.
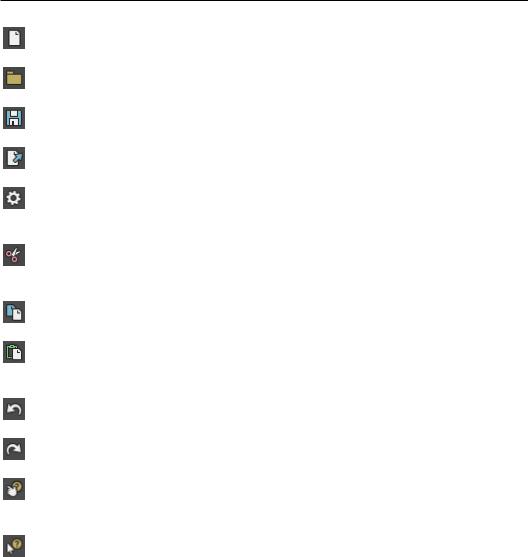
Main toolbar
From theView menu, chooseToolbar to togglethedisplayof themain toolbar.
www.vegascreativesoftware.com
The VEGAS Pro Window |
14 |
Thetoolbarcontains buttons thatenableyou to selectfrequentlyused commands quickly. You can customizeitby adding, removing, orreordering buttons.Formoreinformation, see"Customizing thetoolbar" on page501
Button Name |
Description |
New Empty |
Creates anew blank projectusing thedefaultsettings. Formore |
Project |
information, see"Creating anew project" on page43 |
|
|
Open |
Opens an existing projectormediafile. Formoreinformation, see |
|
"Opening aprojectormediafile" on page50 |
|
|
Save |
Saves thecurrentproject. Formoreinformation, see"Saving a |
|
project" on page56 |
|
|
Render As |
Saves yourprojectin anew formatas asinglefile. Formore |
|
information, see"Rendering projects (RenderAs)" on page451 |
|
|
Properties |
Opens theProjectProperties dialog boxallowing you to make |
|
changes to thecurrentproject. Formoreinformation, see"Setting |
|
projectproperties" on page43 |
|
|
Cut |
Deletes and copies thecurrenteventselection to theclipboard. For |
|
moreinformation, see"Cutting, copying, and pasting events" on |
|
page125 |
|
|
Copy |
Copies thecurrenteventselection to theclipboard. Formore |
|
information, see"Cutting, copying, and pasting events" on page125 |
|
|
Paste |
Pastes thecontents of theclipboard atthecurrentcursorposition. |
|
Formoreinformation, see"Cutting, copying, and pasting events" on |
|
page125 |
|
|
Undo |
Reverses thelastaction performed. Formoreinformation, see |
|
"Undoing and redoing editoperations" on page177 |
|
|
Redo |
Reverses theaction of theUndo command. Formoreinformation, |
|
see"Undoing and redoing editoperations" on page177 |
|
|
Interactive |
Starts an interactiveguidethatwill show you each partof theVEGAS |
Tutorials |
Pro interfaceand teach you how to createprojects. Formore |
|
information, see"InteractiveTutorials" on page12 |
|
|
What's This |
Displays context-sensitivehelp. |
Help |
|
|
|
15
EditingTool
ChooseEdit> Editing Tooland selectatool from thesubmenu to changetheactivetool.
Normal
To usetheNormal tool  , chooseEditing Toolfrom theEditmenu, and chooseNormalfrom thesubmenu.
This tool gives you themostflexibilitywhileediting; selection, projectnavigation, mostenvelopeediting, etc. The onlyfunctions you cannotperform whilein normal editing modeareboxselection, boxmagnification, and multiple envelopepointselection.Formoreinformation, see"Adjusting envelopes" on page238
Selecting events
Click an eventto selectit. Hold Ctrl whileclicking to selectmultipleevents, orhold Shiftto selectall events between thefirstand lasteventyou click.
Moving events
Selectevents and drag them along thetimeline.
Changing an event's length
Drag eitheredgeof an eventto changeits length. Theeventedgewill snap to grid lines if snapping is on. Hold the Shiftkeywhiledragging to temporarilysuspend snapping.Formoreinformation, see"Enablesnapping" on page123
Click thedown arrow  nextto theNormal tool and chooseatool from themenu to selectthemodethatwill be used forediting events. Formoreinformation, see"TheTransportand Editing Toolbar" on page23
Tool |
Description |
Normal EditTool |
Useto select, move, and trim theends of events. |
|
Click an eventto selectit. Hold Ctrl whileclicking to selectmultiple |
|
events, orhold Shiftto selectall events between thefirstand last |
|
eventyou click. |
|
Selectevents and drag them along thetimelineto movethem. |
|
Drag eitheredgeof an eventto changeits length. Theeventedgewill |
|
snap to grid lines if snapping is on. Hold theShiftkeywhiledragging |
|
to temporarilysuspend snapping.Formoreinformation, see"Enable |
|
snapping" on page123 |
|
Formoreinformation, see"Creating selections and positioning the |
|
cursor" on page118"Moving events" on page121"Moving events" on |
|
page121 or"Adjusting an event's length" on page139 |
|
|
ShuffleTool |
Useto rearrangeevents on thetimeline. Formoreinformation, see |
|
"Shuffling events" on page132 |
|
Right-click and drag an eventto anew location on thetimeline |
|
and chooseShuffle Events from theshortcutmenu to shuffle |
|
events when theShuffleTool is notactive. |
|
|
Slip Tool |
Useto slip an event's mediawithoutmoving theeventon the |
|
timeline. Formoreinformation, see"Slipping and sliding events" on |
|
page144 |
|
|
www.vegascreativesoftware.com
16
Tool |
Description |
|
Hold Altwhiledragging an eventto slip events when theSlip |
|
Tool is notactive. |
|
|
SlideTool |
Useto movean eventon thetimelinewithoutmoving theunderlying |
|
media. Formoreinformation, see"Slipping and sliding events" on |
|
page144 |
|
Hold Ctrl+Altwhiledragging an eventto slideevents when the |
|
SlideTool is notactive. |
|
|
Time |
Useto makeevents longerorshorterwhilechanging thevelocityof |
Stretch/Compress Tool |
themediato createfast- orslow-motion effects. Formore |
|
information, see"Adjusting an event's length" on page139 |
|
Hold Ctrl whiledragging theedgeof an eventto time |
|
stretch/compress events when theTimeStretch/Compress |
|
Tool is notactive. |
|
|
SplitTrim Tool |
Useto splitan eventatthepointyou click and trim theeventin the |
|
direction you drag (erasermode). Formoreinformation, see"Slipping |
|
and sliding events" on page144 |
|
Hold Ctrl+Alt+ Shiftand drag to splittrim events when theSplit |
|
Trim Tool is notactive. |
|
|
Envelope
To usetheEnvelopetool  , chooseEdit> Editing Tool> Envelope.
TheEnvelopetool is designed to manipulateenvelopes in events. With theEnvelopetool selected, you can add, delete, select, and moveenvelopepoints, butevents cannotbemoved oredited.Formoreinformation, see "Adjusting envelopes" on page238
Selection
To usetheSelection tool  , chooseEdit> Editing Tool> Selection.
TheSelection tool is designed to selectmultipleevents across tracks bydrawing selection boxes around theevents you wantto include. TheSelection tool can draw threetypes of selection boxes:
Type |
Description |
Free Selection |
Thedefaultbehaviorof thetool: |
|
• Click to selectindividual events (hold ShiftorCtrl to select |
|
multipleevents). |
|
• Drag to draw arectangularregion thatbegins whereyou start |
|
drawing and ends whereyou releasethemousebutton. All of |
|
theevents thatareinsidetheregion will beselected. This |
|
method is good forselecting agroup of events thatareclose |
|
together. |
|
|
Vertical |
Can beused to easilyselectall events thatoccurwithin atimerange. |
|
Thevertical selection boxautomaticallyselects all of thetracks |
|
between yourfirstmouseclick and whereyou draw theselection |
|
box; even tracks thatarenotvisibleatthecurrentmagnification are |
|
selected. |
|
|
Horizontal |
Can beused to easilyselectall events on asingleormultipleadjacent |
|
|
17
Type Description
tracks. Thehorizontal selection boxautomaticallyselects all events on atrack thatis touched bytheselection box; even events thatare notvisibleatthecurrentmagnification areselected.
To changethetypeof selection boxyou areusing, right-click themousewhileholding down theleftmousebutton. Clicking therightmousebutton will togglethrough thethreetypes of selection boxes.
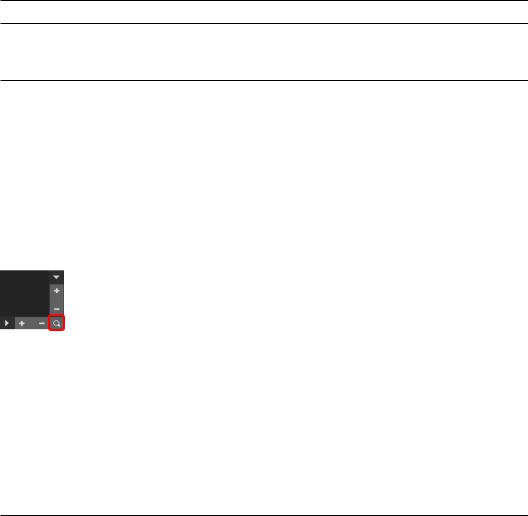
Zoom
To usetheZoom tool  , chooseEdit> Editing Tool> Zoom. You can usethezoom tool to changethe magnification of theVEGAS Pro project.
 Click theZoom button in thecornerof thetimelineto temporarilychangethecursorinto theZoom tool. Select
an areaof thetimelinethatyou wantto magnify, and thecursorwill revertto thepreviouslyactivetool.
 Beforezooming, you can maximizethetimelinebyusing thefollowing shortcuts:
•Press F11 to maximizethetimelinevertically(Window Docking areawill behidden).
•Press Ctrl+F11 to maximizethetimelineverticallyand horizontally(Window Docking areaand Track Listwill be hidden).
•Press Shift+F11 to maximizethetimelinehorizontally(Track Listwill behidden).
Drag themouseovertheareayou wantto magnify. Adotted rectangleis drawn around thearea, and theareais magnified when themousebutton is released.
Whileholding theleftmousebutton, click therightmousebutton to togglethrough thethreemagnification modes:
Item |
Description |
Free Zoom |
Thedefaultbehaviorof theZoom tool. Usethis modeto zoom into a |
|
section of yourVEGAS Pro projecthorizontallyand verticallyatthe |
|
sametime. |
|
|
Time Zoom |
Usethis modeto zoom horizontallywithoutchanging thevertical |
|
magnification. |
|
|
TrackHeightZoom |
Usethis modeto zoom verticallywithoutchanging thehorizontal |
|
magnification. |
|
|
 Clicking anywherein theprojectwith theZoom tool will zoom outso thattheentireprojectfits in thetimeline, and as manytracks as possiblewill bedisplayed.
Next Tool
ChooseNextTool(orpress D)to switch to thenexttool in thelist. Forexample, if you'reusing theNormal tool,
NextToolselects theEnvelopetool.
Previous Tool
ChoosePrevious Tool(orpress Shift+D)to switch to thenexttool in thelist. Forexample, if you'reusing the
Envelopetool, Previous Toolselects theNormal tool.
www.vegascreativesoftware.com
18
Time Display
TheTimeDisplaywindow shows thecurrentcursorposition, MTC input, MTC output, orMIDI clock outputtime.
Right-click thewindow and chooseacommand from thesubmenu to changethedisplayformat.
Item |
Description |
Time atCursor |
Displays thecurrentcursorposition using thecurrenttimeformat. |
|
|
MIDI Timecode In |
Displays incoming MIDI timecode. Formoreinformation, see |
|
"Triggerfrom MIDI Timecode" on page432 |
|
|
MIDI Timecode Out |
Displays outgoing MIDI timecode. Formoreinformation, see |
|
"GenerateMIDI Timecode" on page431 |
|
|
MIDI ClockOut |
Displays outgoing MIDI clock. Formoreinformation, see"Generate |
|
MIDI Clock" on page431 |
|
|
Time Format |
ChooseTime Formatand chooseasetting from thesubmenu to set |
|
thetimeunits used in theTimeDisplayand TimeRuler. Formore |
|
information, see"Timeruler" on page502 |
|
|
TextColor |
ChooseCustom to specifythecolorthatwill beused to displaythe |
|
textin thewindow. |
|
|
Background Color |
ChooseCustom to specifythecolorthatwill beused to displaythe |
|
background of thewindow. |
|
Changing theTimeDisplaywindow colors affects onlythe |
|
currentcolorscheme. You can changethecolorschemeon the |
|
Displaytab of thePreferences dialog. |
|
|
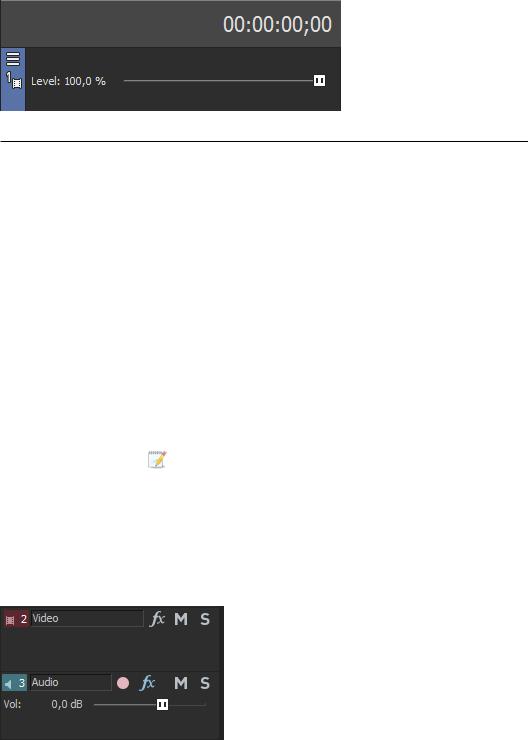
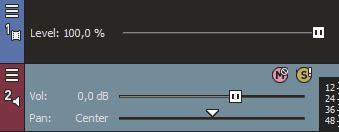
TrackList
Thetrack listdisplays all of theaudio and video tracks in yourprojectand contains themastercontrols foreach track. Ascrub control and playback rateslideris also availablebelow thetrack list.
19
Formoreinformation, seeAudio track controls Video track controls and Scrubbing
Track Headers
TheTrack Headers havebeen designed to beless cluttered and takeup less screen realestate. You can usethe Hamburgerbutton  , located justabovethetrack numberin thetrack header, to quicklyassess buttons thatare
notdisplayed orto selectwhich buttons aredisplayed bydefaulteach timeyou open theprogram.
To access abutton notcurrentlyshown in thetrack header, click theHamburgerbutton  to open themenu. Select thecommand according to thebutton from thedrop down list.
To add abutton to thetrack header, click theHamburger button to open thebutton selection menu. ChooseEdit
Visible Button Setfrom thedrop down list. Click thecheck boxof thebutton(s)you wantto beshown in thetrack headerand click OK.
If you wantall of thebuttons to show on theTrack Header, click theHamburger button to open thebutton selection menu, chooseEditVisible Button Setfrom thedrop down list, click theShow Allbutton, and click OK. Tip:
You can quicklyresetthebuttons displayed on theTrack Headerto thefactorydefaultbychoosing View | Window Layouts | DefaultLayout(Alt+D, D).
Note:
This resets theapplication back to all of thefactorydefaultsettings, notjusttheTrack Headerdefaults.
Therearetimes when you need to freeup as much screen/track real-estateas possible. Thevideo and audio Track Headers havebeen designed to accommodatethat. You can go from full to minimal to veryminimal and back again quicklyand easily.
1.Click theHamburgerbutton  and chooseEditVisible Button Set
2.Click theHide Allbutton and click OK
3.Do thesameforboth audio and video tracks. You now seeonlythefaders and pan controls
4.Placethecursoron thevertical borderbetween thetrack headers and thetracks. Themousewill changeits shapeto alinewith adouble-headed arrow . Click and drag to theleftuntil all you seearethetrack numbers and Hamburgerbutton. To return to thedefaultTrack Headersizedrag theborderback to theright, ordoubleclick theborder.
 Note:
Note:
You don’tneed to hideall thebuttons forthis to work. As you drag theTrack Headerborderto theleftitwill automaticallyhidethebuttons. You can always getto hidden buttons viatheHamburgermenu. Double-clicking the borderwill takeyou to and from full Track Headerwidth and justthetrack colorbars.
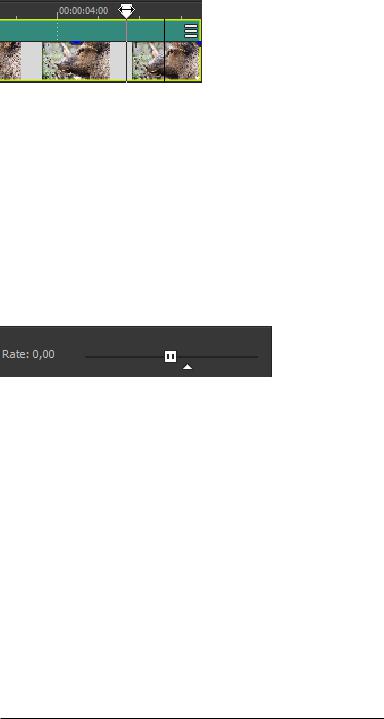
Scrubbing
You can usescrubbing to scroll playback of yourprojectatvarying speeds.
www.vegascreativesoftware.com
20
Chooseasetting from theJKL/ shuttle speed drop-down liston theEditing tab of thePreferences dialog to control thescrub speed and rangewhen you scrub with theJKLkeys orwith amultimediacontroller. Formoreinformation, see"Using amultimediacontroller" on page495
Scrubbing with the playhead
Drag theplayhead  abovethetimelineto shuttleforward orbackward from thecursorposition to find an edit point.
Tips:
•Hold Alt, click theruler, and drag to movethecursorto theposition you clicked and scrub in thedirection you drag.
•Hold Ctrl whiledragging (ordrag whileholding therightmousebutton)to find audio when you'rezoomed out. Thecursormoves in largersteps than with aregulardrag.
•Hold Ctrl+Altwhiledragging to scrub video only.
•Zoom in oroutto adjustthescrub sensitivity.Formoreinformation, see"Zooming and magnification" on page178
Using the scrub control in the track list
Drag thescrub control to shuttleforward orbackward from thecursorposition to find an editpoint.
You can drag theNormalRate indicatorbelow thescrub control (ordouble-click thelabel to typeaplayback rate)to adjustplayback speed when you click thePlay orPlayfrom Start
 button.
Scrubbing with the cursor
1.Hoveroverthecursorin an areaof thetimelinethatdoes notcontain an eventand press Ctrl. Themousepointer is displayed as a .
.
 When theAllow Ctrl+drag cursor style scrub over events check boxon theGeneral tab of thePreferences dialog is selected, you can scrub with themouseeven when thecursoris overan event.
2.Drag leftorrightto scrub playback.
Scrubbing with the keyboard
Press theJ, K, orLkeys to usethekeyboard as ascrub control.
 Press and hold K whilepressing J orLto emulateashuttleknob mode. Press K+J to turn theknob to theleftor K+Lto turn theknob to theright.
Item |
Description |
J |
Scrub reversemode. Press again to acceleratethe |
|
|
21
Item Description
playback rate.
KPause.
LScrub forward mode. Press again to acceleratethe playback rate.
Marker Bar
Themarkerbardisplays markers thatyou add to yourproject. Markers areahandywayto easenavigation in the timeline. Theycan beused to indicatesections of projects, oryou can usemarkers as snap points forediting.
Forinformation aboutinserting markers, see"Inserting markers" on page200
Ashortcutmenu is displayed when you right-click themarkerbar:
Item |
Description |
Loop Playback |
Sets thetimeselection rangeto repeatthemusicwhen played. |
|
|
SetSelection to View |
Sets theloop region to thevisibleedges of thetimeline. If theentire |
|
projectis displayed, theloop region is setto theends of theproject. |
|
|
SetSelection to Project |
Sets theloop region to theends of theproject. |
|
|
SelectLoop Region |
Creates atimeselection based on thecurrentloop region. |
|
|
Markers/Regions |
Chooseacommand from thesubmenu to add ordeletemarkers or |
|
regions. Formoreinformation, see"Inserting markers" on page200 |
|
and "Inserting regions" on page201 |
|
|
Quantize to Frames |
Forces edits to occuron frameboundaries. Formoreinformation, see |
|
"Quantizeto frames" on page125 |
|
|
Enable Snapping |
When snapping is enabled, theSnap to Gridand Snap to Markers |
|
commands becomeavailable. Formoreinformation, see"Enable |
|
snapping" on page123 |
|
|
Snap to Grid |
Selectthis command to forceelements in thetimelineto snap to the |
|
grid. Thegrid is defined in units of time. Formoreinformation, see |
|
"Enablesnapping" on page123 |
|
|
Snap to Markers |
Selectthis command to forceelements in thetimelineto snap to |
|
markers. Formoreinformation, see"Enablesnapping" on page123 |
|
|
Snap to AllEvents |
Selectthis command to forceelements in thetimelineto snap to the |
|
ends of events on othertracks. Formoreinformation, see"Enable |
|
snapping" on page123 |
|
|
GridSpacing |
Chooseacommand from thesubmenu to setthespacing of vertical |
|
grid lines along thetimeline. |
|
|
SelectivelyPrerender |
Opens thePrerenderVideo dialog, whereyou can createafull-quality |
Video |
preview of yourprojectas itwill appearin its final form. Formore |
|
information, see"Selectivelyprerendervideo" on page417 |
|
|
Clean UpPrerendered |
Removes thetemporaryfiles created as aresultof using the |
Video |
SelectivelyPrerender Video command. Formoreinformation, see |
|
"Cleaning up prerendered video files" on page418 |
|
|
www.vegascreativesoftware.com
22
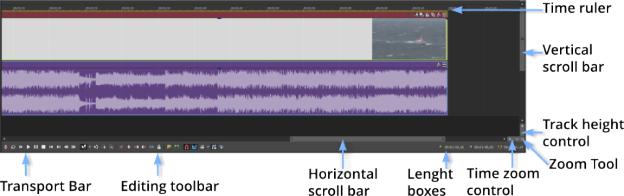
Timeline
Thetimelineis themain partof theVEGAS Pro window whereyou will bedoing mostof yourwork. Themajorityof thewindow consists of actual track space. This areacontains thedrawn events on each track.
 You can chooseEdit> Navigate and chooseacommand from thesubmenu to navigatethetimelinequickly.
Time ruler
Displays thetimein theformatyou select. Formoreinformation, see"Timeruler" on page502
Vertical scroll bar
Drag thescroll boxto pan theview of theprojectup ordown.
 Double-clicking thevertical scroll barwill zoom theprojectoutso thatas manytracks as possiblewill be displayed.
Track height control
Click + to increasetheheightof thetracks, orclick - to decreasetrack height.
 You can also click in thespacebetween the+ and - buttons and drag verticallyforadjusting track height.
Time zoom control
Click + to zoom in horizontally, orclick - to zoom out.
 You can also click in thespacebetween the+ and - buttons and drag horizontallyforadjusting zoom.
Horizontal scroll bar
Drag thescroll boxto pan theview of theprojectleftorright. Theends of thescroll baralso function as zoom controls. You can zoom theprojectin and outbydragging theedges of thescroll box.
 Double-clicking thehorizontal scroll barwill zoom theprojectoutso thattheentirelength of theprojectwill be
displayed.
Zoom tool
Click theZoom Toolbutton  in thecornerof thetimelineto temporarilychangethecursorinto theZoom tool.
Selectan areaof thetimelinethatyou wantto magnify, and thecursorwill revertto thepreviouslyactivetool.
23
Editing toolbar
Theediting toolbaris displayed below thetimelineand provides access to tools you'll usewhileediting events on the timeline. Formoreinformation, see"TheTransportand Editing Toolbar" below
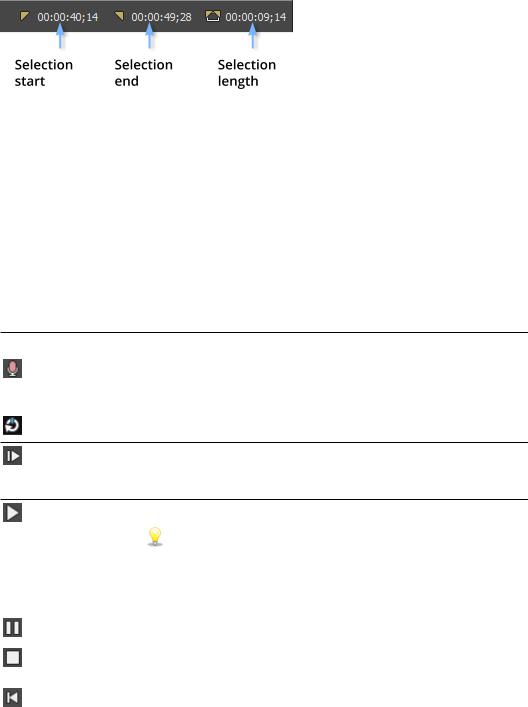
Length boxes
Thelength boxes displaythestarttime, end timeand length of aselected timerange. If there’s no timeselection, the firstboxshows thecurrentcursorposition.
You can double-click theboxes and typeavalueto changethestart, end orlength of thecurrentselection. Formore information, see"Creating selections and positioning thecursor" on page118
The Transportand EditingToolbar
TheTransportand Editing toolbarprovides controls forplayback, recording, and cursor-positioning buttons and timelineediting.
During projectplayback, audio tracks will bemixed to theMasterbus unless you areusing acustom bus assignment. Video tracks will bemixed to theVideo Preview window.
Formoreinformation, see"Assigning tracks to busses" on page297 and "Using theVideo Preview window" on page405
 You can chooseEdit> Navigate and chooseacommand from thesubmenu to navigatethetimelinequickly.
Button Name |
Description |
Record |
Starts recording on all armed tracks. If no tracks arearmed, anew |
|
track will becreated automatically. Formoreinformation, see |
|
"Recording audio" on page98 |
|
|
Loop Playback |
Plays onlytheevents in theloop region in acontinuous mode. |
Playfrom Start Starts playback from thebeginning of theprojectregardless of the currentcursorposition. When you stop playback, thecursorreturns to its original position.
Play |
Starts playback from thecursorposition. |
|
SelecttheMake spacebar andF12 Play/Pause instead of |
|
Play/Stop check boxin theGeneral Preferences tab if you want |
|
theF12and spacebarkeyboard shortcuts to togglebetween Play |
|
and Pausemode. In this mode, thecursorwill maintain its |
|
position. |
|
|
Pause |
Pauses playback and leaves thecursoratits currentposition. |
|
|
Stop |
Stops playback orrecording and returns thecursorto its starting |
|
position. |
|
|
Go to Start |
Moves thecursorto thebeginning of theproject. |
|
|
www.vegascreativesoftware.com
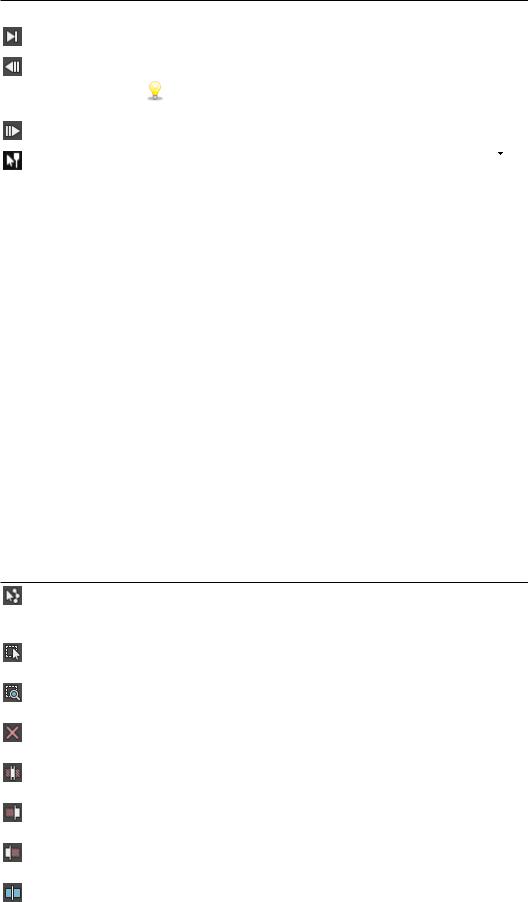
24
Button Name |
Description |
Go to End |
Moves thecursorto theend of theproject. |
|
|
Previous |
Moves thecursorto theprevious frame. |
Frame |
Click and hold thePrevious Frame and NextFrame buttons to |
|
|
|
movethecursormultipleframes. |
|
|
NextFrame |
Moves thecursorto thenextframe. |
|
|
NormalEdit |
Selectthis button to perform eventediting. Click thedown arrow |
Tool |
and chooseatool from themenu to selectthemodethatwill beused |
|
forediting events. Formoreinformation, see"Editing Tool" on |
|
page15 |
•
•
•
•
•
 NormalEditTool: Useto trim theends of events. Formore information, see"Adjusting an event's length" on page139
  Shuffle Tool: Useto rearrangeevents on thetimeline. For moreinformation, see"Shuffling events" on page132
 SlipTool: Useto slip an event's mediawithoutmoving the
eventon thetimeline. Formoreinformation, see"Slipping and sliding events" on page144
 Slide Tool: Useto movean eventon thetimelinewithout
moving theunderlying media. Formoreinformation, see "Slipping and sliding events" on page144
 Time Stretch/Compress Tool: Useto makeevents longer
orshorterwhilechanging thevelocityof themediato create fast- orslow-motion effects. Formoreinformation, see "Adjusting an event's length" on page139
• SplitTrim Tool: Useto splitan eventatthepointyou click
and trim theeventin thedirection you drag (erasermode). For moreinformation, see"Slipping and sliding events" on page144
Envelope Edit |
Selectthis button when you wantto editmultipleenvelopes without |
Tool |
moving theevents. Formoreinformation, see"Editing Tool" on |
|
page15 |
|
|
Selection Edit |
Selectthis button when you wantto selectmultipleevents. Formore |
Tool |
information, see"Editing Tool" on page15 |
|
|
Zoom Edit |
Magnifies thecurrentproject. Formoreinformation, see"Editing |
Tool |
Tool" on page15 |
|
|
Delete |
Deletes theselected events ortracks. Formoreinformation, see |
|
"Deleting events" on page128 |
|
|
Trim |
Trims atimeselection. Formoreinformation, see"Trimming events" |
|
on page129 |
|
|
Trim Start |
Trims thestartof theselected eventto thecursor. Formore |
|
information, see"Trimming events" on page129 |
|
|
Trim End |
Trims theend of theselected eventto thecursor. Formore |
|
information, see"Trimming events" on page129 |
|
|
Split |
Click to splitan event. Formoreinformation, see"Splitting events" on |
|
page130 |
|
|
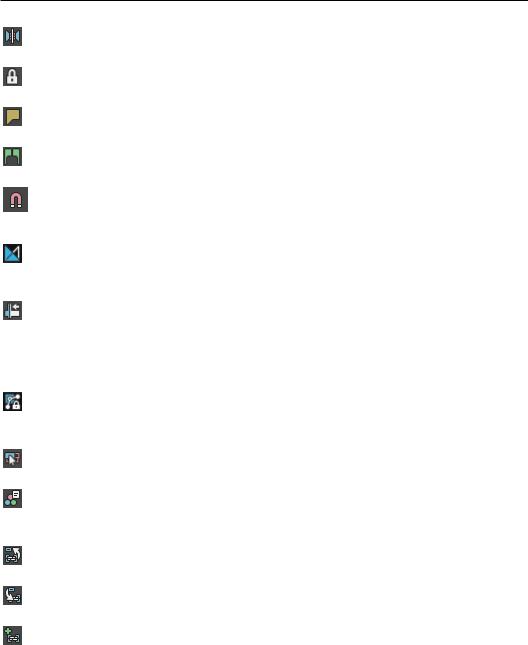
25
Button Name |
Description |
SmartSplit |
Click to SmartSplitan eventFormoreinformation, seeSmart |
|
Splitting Events |
|
|
Lock |
Locks an eventso thatitcannotbemoved oredited. Formore |
|
information, see"Applying switches to events" on page165 |
|
|
InsertMarker |
Adds amarkeratthecursorposition. Formoreinformation, see |
|
"Inserting markers" on page200 |
|
|
InsertRegion |
Adds region tags ateach end of theselection. Formoreinformation, |
|
see"Inserting regions" on page201 |
|
|
Enable |
Turns on snapping and enables theSnap to Gridand Snap to |
Snapping |
Markers commands. Formoreinformation, see"Enablesnapping" |
|
on page123 |
|
|
Automatic |
Selectthis button to automaticallycreateacrossfadewhen two or |
Crossfades |
moreevents overlap. Formoreinformation, see"Automatic |
|
crossfades" on page122 |
|
|
Auto Ripple |
Selectthis button and chooseamodefrom thedrop-down listto |
|
automaticallyripplethecontents of thetimelinefollowing an edit |
|
afteradjusting an event's length, cutting, copying, pasting, or |
|
deleting events. Formoreinformation, see"Post-editripple" on |
|
page129 |
|
|
Lock |
Selectthis button if you wantenvelopepoints to follow an event |
Envelopes to |
when itis moved along thetimeline. Formoreinformation, see |
Events |
"Video track automation" on page233 |
|
|
Ignore Event |
Selectthis button to overrideeventgroups withoutremoving the |
Grouping |
groups. Formoreinformation, see"Grouping events" on page163 |
|
|
|
Selectthis button to show orhidetheHDR-compatibleColor |
|
Grading tools.Formoreinformation, seeUsing theColorGrading |
|
panel |
|
|
|
Selectthis button to closethecurrentnested timelineand open its |
|
parenttimeline.Formoreinformation, seeNested Timelines |
|
|
|
Selectthis button to open thecurrentlyselected eventas anested |
|
timeline. |
|
|
|
Selectthis button to createand open anested timelinefrom the |
|
currentlyselected timelineevents. |
|
|
Viewingthe status bar
From theView menu, chooseStatus Bar to togglethedisplayof thestatus baratthebottom of theVEGAS Pro window.
Thestatus bardisplays help textwhen yourmouseis overmenu items, shows theavailablerecord timein the selected folder, and will also show progress meters foranyactions thattaketimeto complete.
www.vegascreativesoftware.com
26
 To changetherecorded files folder, chooseProperties from theFilemenu and click theAudio tab.Formore information, see"Setting projectproperties" on page43

27
Window Docking Area and Floating Window Docks
You can usethewindow docking areato keep frequentlyused windows available, butoutof theway, whileyou are working with aproject.
Tips:
•If you wantto displaythewindow docking areaatthetop of theVEGAS® Pro window, selecttheDisplay timeline atbottom of main window check boxon theDisplaytab of thePreferences dialog. Clearthecheck box to displaythedocking areaatthebottom of theVEGAS Pro window.
•If you wantto displaytabs atthetop of docking windows, selectthePosition tabs attopof docked windows check boxon theDisplaytab of thePreferences dialog.
You can also createmultiplefloating docks to organizeyourVEGAS Pro windows. Thesedocks can floatoverthe VEGAS Pro window or—if you haveadual-monitorvideo card —on asecondarymonitor.
•To dock awindow, ctrl + drag itbythetitlebarto thedocking areaorafloating dock. Drop nearthetop of the window to createatabbed window oranew docking area. Drop atthetop of thewindow to dock thewindow at thetop. Drop atthebottom of thewindow to dock thewindow atthebottom.
•To undock awindow, click theand drag thewindow tab outof thedocking areaorfloating dock.
•To preventawindow from docking when you drag it, do nothold theCtrl key.
 When theAllow floating windows to dockcheck boxon theDisplaytab of thePreferences dialog is cleared, windows will notdock unless you hold theCtrl key. When thecheck boxis selected, you can preventawindow from docking byholding theCtrl key.
•To expand adocked window so itfills thedocking area, click theMaximize button  . Click therestorebutton
  to restorethewindow to its previous size.
•To removeawindow from thedocking areaorafloating dock, click theClose button  .
.
You can dock several windows in thesameareaof thescreen, and thewindows will belayered. Click awindow’s tab to bring itto thetop.
The Explorer Window
ChooseView > Window > Explorer to togglethedisplayof theExplorerwindow.
LiketheProjectMediawindow, you can usetheExplorerwindow to view, preview, and add mediafiles to your project.
www.vegascreativesoftware.com
Window Docking Area and Floating Window Docks |
28 |
Learning more about the Explorer window
Item Name |
Description |
Back/Forward |
UsetheBackand Forward buttons to navigatethefolderhistory. |
|
|
Address Bar |
Displays thepath to thecurrentfolder. |
|
|
Tree View |
Displays all of theavailablefiles and folders whereyou can find |
|
mediafiles. |
|
|
Contents Pane |
Displays thefolders and mediafiles contained in theactivefolder. |
|
|
Up |
Opens thefolderonelevel abovetheactivefolder. |
|
|
Refresh |
Refreshes thecontents of theactivefolder. |
|
If you insertanew CD(orotherremovablemedia), click to refresh |
|
theExplorer. |
|
|
Delete |
Deletes theselected folderorfile. |
|
|
Addto Favorites |
Adds theselected folderto theFavorites folderin thetreeview. The |
|
Favorites foldercontains links to folders thatyou usemostoften. |
|
|
StartPreview |
Plays theselected mediafile. |
|
|
StopPreview |
Stops theplayback of theselected mediafile. |
|
|
Auto Preview |
Automaticallypreview mediafiles when you click them in the |
|
Explorerwindow. Formoreinformation, see"Previewing mediafiles" |
|
on page76 |
|
|
GetMedia from |
Opens theGetMediafrom theWeb dialog, whereyou can download |
the Web |
files to usein yourproject. |
|
|
Views |
Allows you to changethewaythefiles areviewed in thelistview. |
|
• Details – Displays thefilesize, dateand when thefilewas last |
|
created orlastmodified. |
|
• List– Displays asimplelistof thefilenameof each filein the |
|
|

29
Item Name |
Description |
Explorerwindow.
•Thumbnail– Displays thefirstframeof avideo file.
•Regions – Displays anyregions thathavebeen defined in the selected mediafile.
•Summary– Displays ashortdescription of theselected media fileatthebottom of theExplorerwindow.
•Tree – Displays all of theavailabledrives and folders thatyou maychoosefrom to find files.
•AllFiles – Displays all filetypes in theactivefolder.
Adding regions from a file to the timeline
When Regions is selected in theExplorerwindow, anyregions saved in theselected filearedisplayed in thebottom of theExplorerwindow.
You can drag aregion to thetimelineto createan eventusing aportion of afile.
 You can saveregions and markers in amediafileusing theTrimmerwindow. Formoreinformation, see"Using theTrimmer" on page133
Click thedown arrow  nextto theViews button
  and chooseRegions to togglethedisplayof regions in the Explorerwindow.
Using the Favorites folder
SelecttheFavorites folder in thetreeview to view thecontents of theFavorites folder. This foldercontains
shortcuts to folders thatyou useoften.
Favorites aresaved in thefollowing file:C:\Users\username\AppData\Local\Vegas\VEGAS Pro\17\NewExplorerFavorites.txt.
Thefileis saved wheneveryou closetheExplorerwindow orexittheapplication. You can copythefileto different computers oruseraccounts to migrateFavorites settings.
To seethis file, you musthavetheShow hidden files andfolders radio button selected on theView tab of theFolder Options Control Panel.
Adding afolder to theFavorites folder
1.Browseto thefolderyou wantto add.
2.Right-click thefolderand chooseAddFolder to Favorites from theshortcutmenu. Ashortcutto thefolderis added to theFavorites folder.
Removing afolder from theFavorites folder
1.SelecttheFavorites folder.
2.Right-click thefolderyou wantto deleteand chooseDelete from theshortcutmenu.
 Deleting afolderfrom Favorites deletes onlytheshortcutto thefolder; thetargetfolderis unaffected.
www.vegascreativesoftware.com

Window Docking Area and Floating Window Docks |
30 |
The Trimmer Window
TheTrimmerwindow is agood placeto editanymediafile. When amediafileis placed in theTrimmerwindow, you can placeportions of thefileon separatetracks bydragging and dropping.
Formoreinformation, see"Using theTrimmer" on page133
The Master Bus Window
TheMasterBus window provides you with astreamlined view of yourproject's masteroutput. Formoreinformation, see"Using theMasterBus Window" on page294
The Video Preview Window
ChooseView > Window > Video Preview to togglethedisplayof theVideo Preview window.
TheVideo Preview window displays aproject's video outputatthecurrentcursorposition during editing and play back. Theplayback includes anyeffects thatyou haveapplied to it. This window is also useful when editing frameby frameforsynchronizing audio. Right-click anywherein thewindow to displayashortcutmenu with Video Preview window options.
Loading...