


VAIO VGN-TXN27N
Table of contents
 Loading...
Sony VAIO VGN-TXN27N, VAIO VGN-TXN25N, VAIO VGN-TXN25N/W, VAIO VGN-TXN27N/T, VAIO VGN-TXN27N/W User Manual
...
User Guide
Personal Computer
VGN-TXN20 Series
N

Contents
Before Use .........................................................................................................................................................................6
Documentation .............................................................................................................................................................7
Ergonomic Considerations.........................................................................................................................................10
Getting Started .................................................................................................................................................................12
Locating Controls and Ports.......................................................................................................................................13
About the Indicator Lights ..........................................................................................................................................20
Connecting a Power Source ......................................................................................................................................22
Using the Battery Pack ..............................................................................................................................................23
Shutting Down Your Computer Safely .......................................................................................................................27
Using Your VAIO Computer.............................................................................................................................................28
Using the Keyboard ...................................................................................................................................................29
Using the Touch Pad .................................................................................................................................................31
Using Special-function Buttons ..................................................................................................................................32
Using the Optical Disc Drive ......................................................................................................................................34
Using PC Cards .........................................................................................................................................................44
Using the Memory Stick Media ..................................................................................................................................47
Using Other Memory Cards .......................................................................................................................................52
Using the Internet.......................................................................................................................................................55
Using Wireless LAN (WLAN) .....................................................................................................................................56
Using the Bluetooth Functionality ..............................................................................................................................63
2
nN

3
nN
Using Peripheral Devices .................................................................................................................................................70
Connecting a Port Replicator .....................................................................................................................................71
Connecting External Speakers ..................................................................................................................................75
Connecting an External Display.................................................................................................................................76
Selecting Display Modes............................................................................................................................................79
Using the Multiple Monitors Function.........................................................................................................................80
Connecting an External Microphone..........................................................................................................................82
Connecting a Universal Serial Bus (USB) Device......................................................................................................83
Connecting a Printer ..................................................................................................................................................86
Connecting an i.LINK Device .....................................................................................................................................87
Connecting to a Network (LAN) .................................................................................................................................89
Customizing Your VAIO Computer ..................................................................................................................................90
Setting the Password .................................................................................................................................................91
Using Fingerprint Authentication..............................................................................................................................102
Using Trusted Platform Module (TPM).....................................................................................................................127
Setting Up Your Computer with VAIO Central .........................................................................................................134
Using the Power Saving Modes...............................................................................................................................135
Managing Power with VAIO Power Management ....................................................................................................140
Changing the Performance Setting..........................................................................................................................143
Protecting the Hard Disk ..........................................................................................................................................144
Upgrading Your VAIO Computer....................................................................................................................................145
Adding and Removing Memory................................................................................................................................146

4
nN
Precautions ....................................................................................................................................................................152
On Handling the LCD Screen ..................................................................................................................................153
On Using the Power Source ....................................................................................................................................154
On Handling Your Computer....................................................................................................................................155
On Handling Floppy Disks .......................................................................................................................................157
On Handling Discs ...................................................................................................................................................158
On Using the Battery Pack.......................................................................................................................................159
On Using Headphones.............................................................................................................................................160
On Handling Memory Stick Media............................................................................................................................161
On Handling the Hard Disk ......................................................................................................................................162
Troubleshooting .............................................................................................................................................................163
Computer .................................................................................................................................................................165
System Security .......................................................................................................................................................172
Battery......................................................................................................................................................................173
Internet.....................................................................................................................................................................175
Networking ...............................................................................................................................................................177
Bluetooth Technology ..............................................................................................................................................180
Optical Discs ............................................................................................................................................................184
Display .....................................................................................................................................................................188
Printing.....................................................................................................................................................................191
Microphone ..............................................................................................................................................................192
Mouse ......................................................................................................................................................................193
Speakers..................................................................................................................................................................194
Touch Pad................................................................................................................................................................195

5
nN
Keyboard..................................................................................................................................................................196
Floppy Disks ............................................................................................................................................................197
PC Cards .................................................................................................................................................................198
Audio/Video..............................................................................................................................................................200
Memory Stick Media ................................................................................................................................................201
Peripherals ...............................................................................................................................................................202
Support Options .............................................................................................................................................................203
Sony Support Information ........................................................................................................................................203
Program Support Information...................................................................................................................................206

nN
Before Use
Before Use
Congratulations on your purchase of this Sony VAIO® computer, and welcome to the on-screen User Guide. Sony has
combined leading-edge technology in audio, video, computing, and communications to provide state-of-the-art personal
computing.
!
External views illustrated in this manual may look slightly different from those of your computer.
6

7
nN
Before Use
Documentation
Your documentation includes printed information and user guides to read on your VAIO computer.
Printed Documentation
❑ Welcome mat — Contains an overview of connections, setting up information, etc.
❑ Safety Information — Contains safety guidelines and owner information.
❑ Instant Mode — Provides a guide to use Instant Mode.
Non-printed Documentation
❑ User Guide (this manual) — Contains features of your computer. It also includes information about the software programs
included with your computer, as well as information on solving common problems.
❑ Specifications — The online Specifications describe the hardware and software configuration of your VAIO computer.
To view the online Specifications:
1 Connect to the Internet.
2 Go to the Sony online support Web site at:
http://esupport.sony.com/EN/VAIO/
http://www.sony.ca/support
http://esupport.sony.com/ES/VAIO/
http://esupport.sony.com/ES/VAIO/BR/
for customers in Canada,
for customers in USA,
for customers in Spanish speaking Latin American countries or areas, or
for customers in Brazil.

8
nN
Before Use
❑ VAIO Recovery Guide — Provides information about restoring individual software programs, software drivers, and drive
partition(s) or your entire hard disk drive to the original factory installed settings.
To access this on-screen guide:
1 Click Start and Help and Support.
2 Click Manuals & Specifications.
3 Click VAI O Recovery Guide.
™
❑ SmartWi
Connection Utility Guide (Selected models only) — Provides information about setting up Bluetooth,
wireless LAN, and wireless WAN functionalities.
To access this on-screen guide:
1 Click Start and Help and Support.
2 Click Manuals & Specifications.
3 Click SmartWi Connection Utility Guide.

9
nN
Before Use
Help and Support
Help and Support is easy to access and provides a single location for information and technical assistance for your VAIO
computer. Choose from the following categories to find the answers you need.
To access Help and Support, click Start and Help and Support.
❑ Manuals & Specifications
Here you will find the on-screen User Guide, warranty information, other VAIO documents, and system and software
information for your computer.
❑ VAIO Support
Access interactive help in the form of VAIO tutorials, an escalation page containing support and contact information, and
various links to VAIO online support Web sites.
❑ Backup & Recovery
Find information on how to back up and restore your operating system, system software, and your personal data.
❑ Wireless & Network
Learn about wireless connections including Bluetooth Wireless technology and Wireless LAN. Run utilities that include
VAIO Media Setup and Windows Network and Sharing, and access to wireless tutorials.
❑ Security
Keep your data safe and your computer running efficiently with updates and maintenance programs from Microsoft and
Sony.
❑ VAIO Sites
Contains links to other Internet sites you might find interesting and useful.
10
nN
Before Use
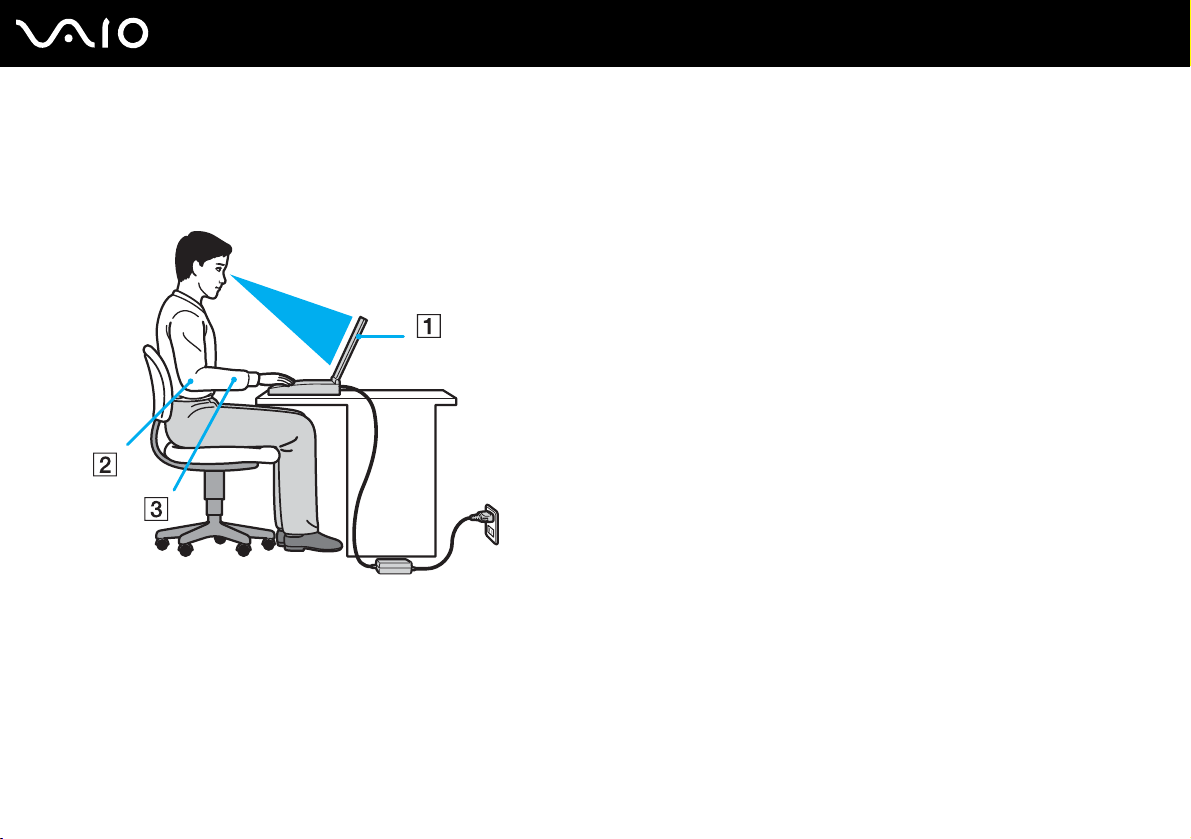
Ergonomic Considerations
You will be using your computer as a portable device in a variety of environments. Whenever possible, you should attempt
to take account of the following ergonomic considerations to both stationary and portable environments:
❑ Position of your computer – Place the computer directly in front of you (1). Keep your forearms horizontal (2), with your
wrists in a neutral, comfortable position (3) while using the keyboard, touch pad, or external mouse. Let your upper arms
hang naturally at your sides. Have breaks during sessions with your computer. Excessive use of the computer may strain
muscles or tendons.
❑ Furniture and posture – Sit in a chair with good back support. Adjust the level of the chair so your feet are flat on the
floor. A footrest may make you more comfortable. Sit in a relaxed, upright posture and avoid slouching forward or leaning
far backwards.

11
nN
Before Use
❑ Viewing angle of the computer's display – Use the display's tilting feature to find the best position. You can reduce eye
strain and muscle fatigue by adjusting the tilt of the display to the proper position. Adjust the brightness setting of the
display as well.
❑ Lighting – Choose a location where windows and lights do not create glare and reflection on the display. Use indirect
lighting to avoid bright spots on the display. Proper lighting adds to your comfort and work effectiveness.
❑ Positioning an external display – When using an external display, set the display at a comfortable viewing distance.
Make sure the display screen is at eye level or slightly lower when you are sitting in front of the monitor.

Getting Started
Getting Started
This section describes how to get started using your VAIO computer.
!
Before starting your computer for the first time, do not connect any new hardware that did not originally come with your computer. Make sure to start
up your computer with only the supplied accessories connected and set up your system. Upon completion, connect one device (for example, a printer,
an external hard disk drive, a scanner, and so on) at a time, following the manufacturer's instructions.
❑ Locating Controls and Ports (page 13)
❑ About the Indicator Lights (page 20)
❑ Connecting a Power Source (page 22)
❑ Using the Battery Pack (page 23)
❑ Shutting Down Your Computer Safely (page 27)
12
nN

Locating Controls and Ports
Take a moment to identify the controls and ports shown on the following pages.
13
nN
Getting Started

Front
14
nN
Getting Started
A Media Access indicator (page 20)
B Memory Stick PRO/Duo media slot
C SD memory card/MultiMediaCard (MMC) slot (page 52)
D LCD screen (page 153)
E Keyboard (page 29)
F Touch pad (page 31)
G Fingerprint sensor (page 102)
H WIRELESS switch (page 56)
I Muting button (page 32)
J Volume buttons (page 32)
K Headphones jack (page 75)
L Microphone jack (page 82)
* Your computer supports Memory Stick PRO media and Memory Stick Duo
media with high speed and high capacity capabilities.
*
(page 48)
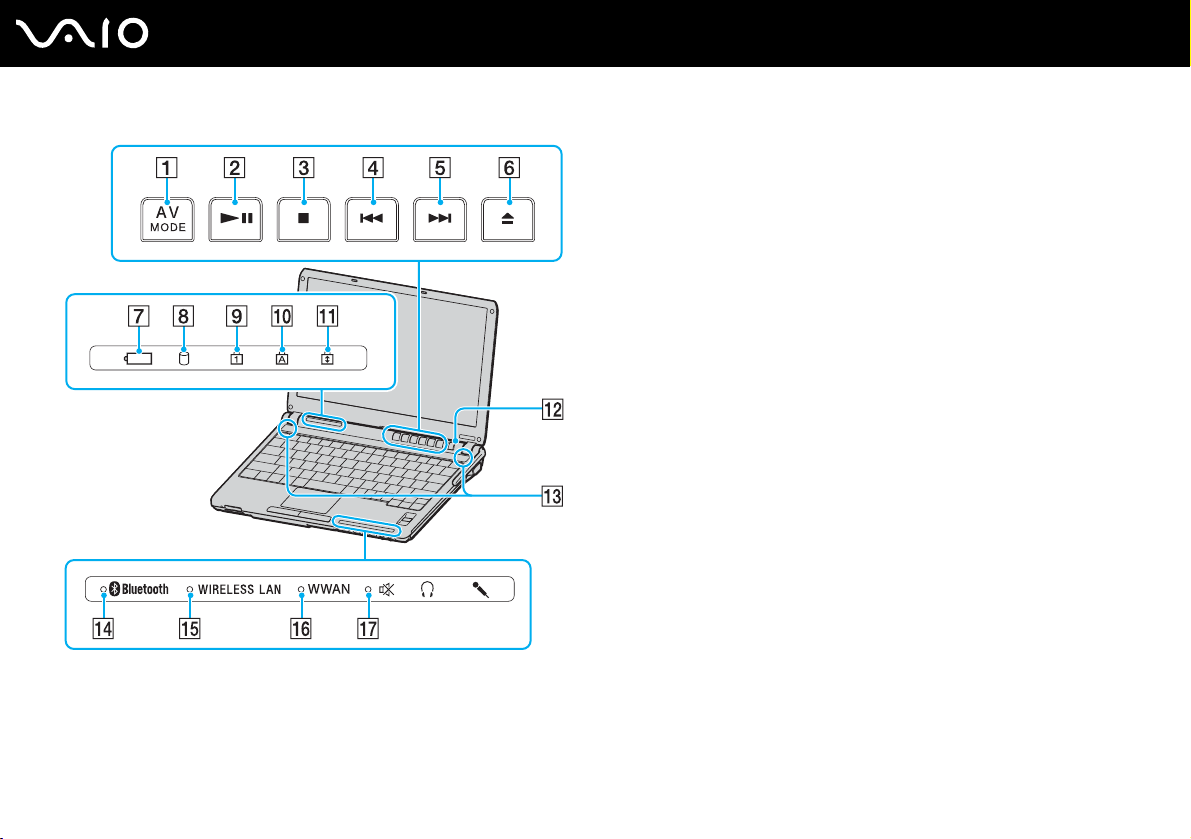
Getting Started
AV MODE button (page 32)
A
B Play/Pause button (page 32)
C Stop button (page 32)
D Previous track button (page 32)
E Next track button (page 32)
F Disc drive eject button (page 32)
G Battery indicator (page 20)
H Hard disk drive indicator (page 20)
I Num lock indicator (page 20)
J Caps lock indicator (page 20)
K Scroll lock indicator (page 20)
L Power button
M Built-in speakers (stereo)
N Bluetooth indicator (page 20)
O WIRELESS LAN (Wireless LAN) indicator (page 20)
P WWAN (Wireless WAN) indicator
*
(page 20)
Q Muting indicator (page 20)
* On selected models only.
15
nN
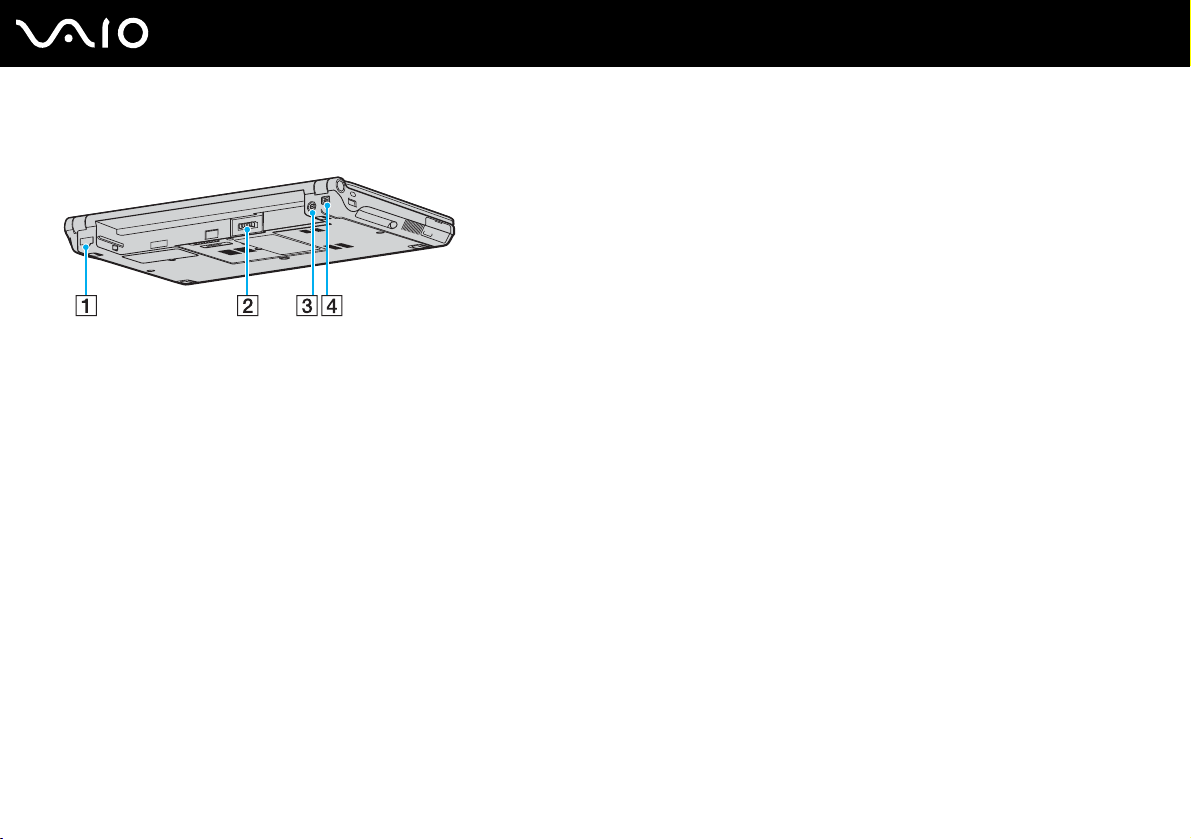
Back
A Network (Ethernet) port (page 89)
B Battery connector (page 23)
C DC IN port (page 22)
D i.LINK (IEEE 1394) S400 port (page 87)
16
nN
Getting Started
Right
Getting Started
A Optical disc drive (page 34)
B Optical disc drive indicator (page 20)
C Manual eject hole (page 184)
D Substitute drive eject button (page 34)
E Monitor (VGA) port (page 76)
F WWAN antenna
If you do not intend to use the Wireless WAN functionality at all,
you can detach the WWAN antenna. Once you have detached
the WWAN antenna, be sure to put the supplied WWAN
connector cap in place.
Place the cap with a small groove upright, and push it until it
clicks into place as shown below.
*
(page 56)
17
nN
* On selected models only.

Left
A Security slot
B Hi-Speed USB (USB 2.0) ports
C PC Card slot (page 44)
D PC Card release button (page 46)
E Air vent
F Modem port (page 55)
* Supports high-/full-/low- speeds.
*
(page 83)
18
nN
Getting Started
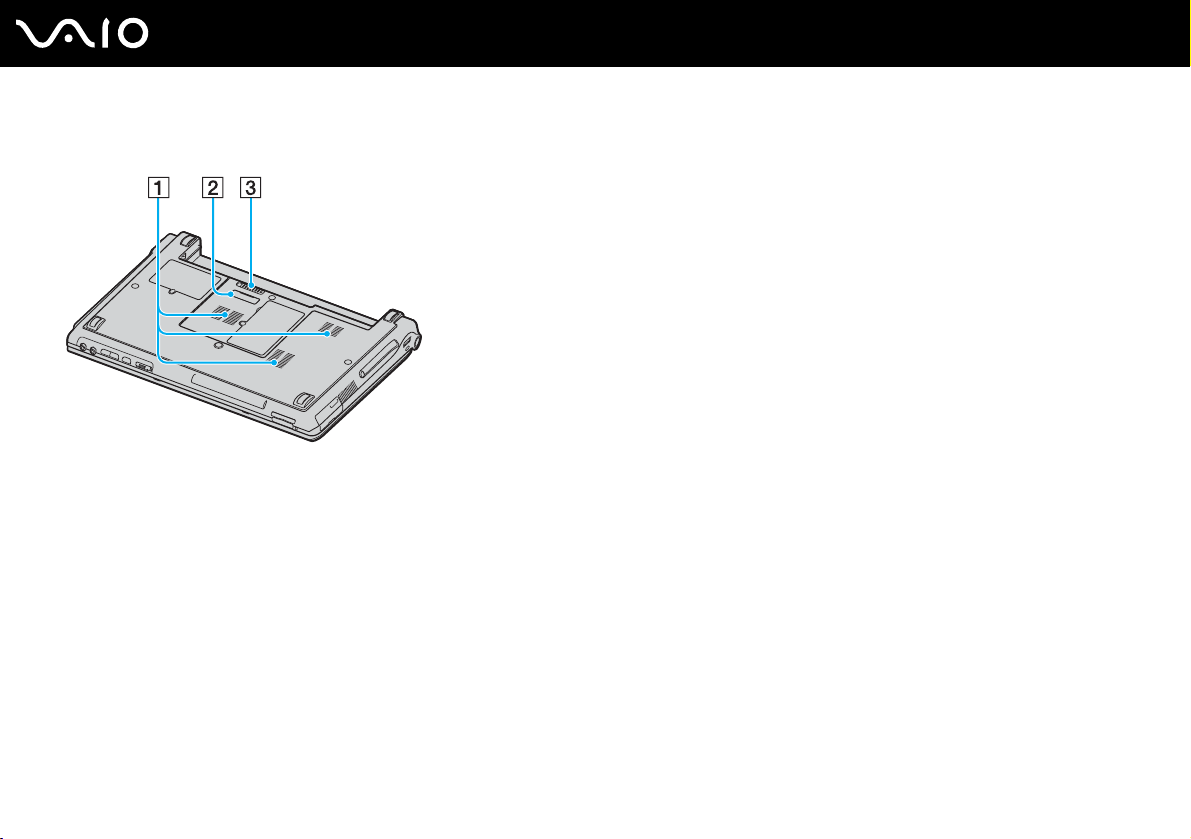
Bottom
A Air vents
B Port replicator connector (page 72)
C Battery release latch (page 26)
19
nN
Getting Started
Getting Started
About the Indicator Lights
Your computer is equipped with the following indicator lights.
Indicator Functions
Power 1 Illuminates when the power of the computer is on, blinks when the computer is in Sleep mode, and turns off
when the computer is in Hibernate mode or off.
Battery e Illuminates when the computer is using battery power, blinks when the battery pack is running out of power, and
Media Access Illuminates when data is read from or written to a memory card. (Do not enter Sleep mode or turn off the
Optical disc drive Illuminates when data is read from or written to the optical disc. When the indicator is off, the optical disc is not
Muting % Illuminates when the volume is turned off.
Hard disk drive
Num lock
Caps lock
Scroll lock
Bluetooth technology
double-blinks when the battery pack is charging.
computer when this indicator is on.) When the indicator is off, the memory card is not being used.
being used.
Illuminates when data is read from or written to the hard disk. Do not enter Sleep mode or turn off the computer
when this indicator is on.
Press the Num Lk key to activate the numeric keypad. Press it a second time to deactivate the numeric keypad.
The numeric keypad is not active when the indicator is off.
Press the Caps Lock key to type letters in uppercase. Letters appear in lowercase if you press the Shift key
while the indicator is on. Press the key a second time to turn off the indicator. Normal typing resumes when the
Caps lock indicator is off.
Press the Scr Lk key to change how you scroll the display. Normal scrolling resumes when the Scroll lock
indicator is off. The Scr Lk key functions differently depending on the program you are using and does not work
with all programs.
Illuminates when the WIRELESS switch is set to ON and Bluetooth technology is enabled.
20
nN
Indicator Functions
Wireless LAN Illuminates when the wireless LAN function is running.
Wireless WAN
* On selected models only.
*
Illuminates when the wireless WAN function is enabled.
21
nN
Getting Started

22
nN
Getting Started
Connecting a Power Source
You can use either an AC adapter or a rechargeable battery pack as a power source for your computer.
Using the AC Adapter
✍
Use your computer only with the supplied AC adapter.
To use the AC adapter
1 Plug one end of the power cord (1) into the AC adapter (3).
2 Plug the other end of the power cord into an AC outlet (2).
3 Plug the cable attached to the AC adapter (3) into the DC IN port (4) on the computer or on the (optional) port replicator.
!
The shape of the DC In plug varies depending on the AC adapter.
✍
To disconnect your computer completely from AC power, unplug the AC adapter.
Make sure that the AC outlet is easily accessible.
If you do not use your computer for a long period of time, place the computer into Hibernate mode. See Using Hibernate Mode (page 138). This power
saving mode saves the time of shutting down or resuming.

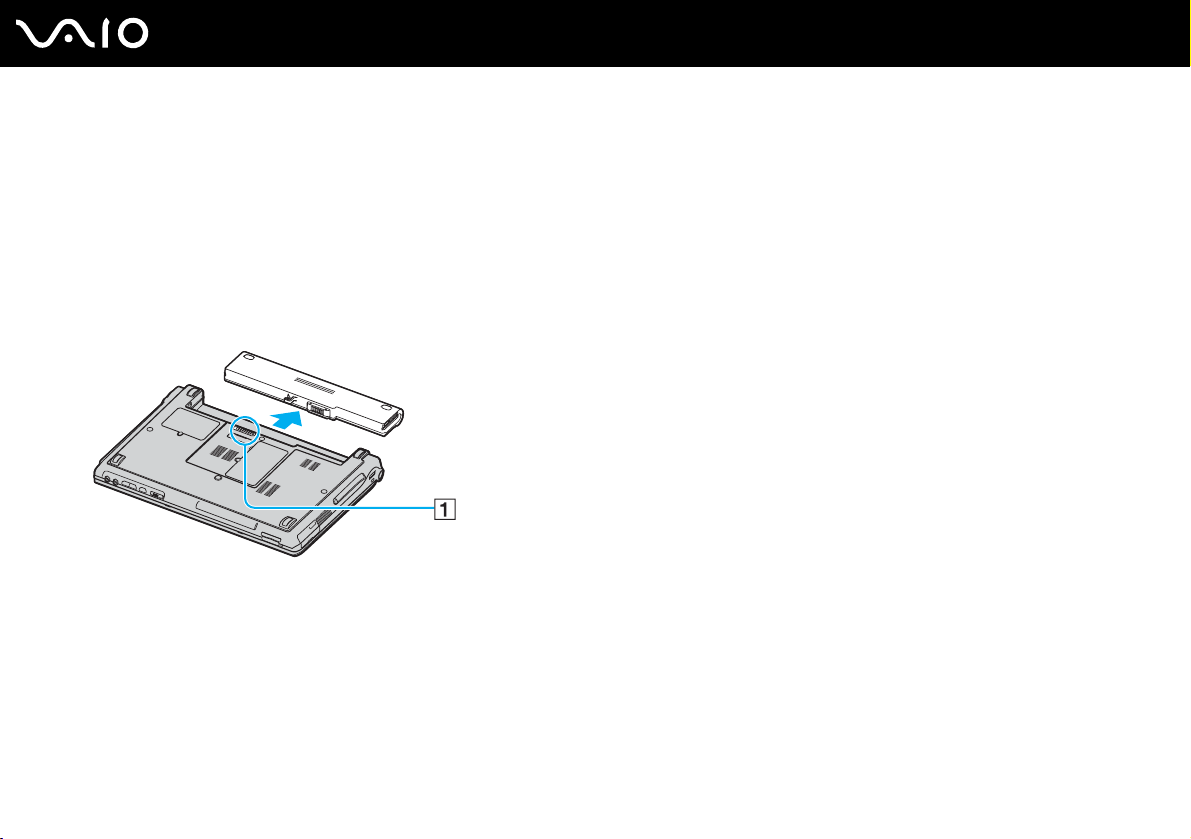
Using the Battery Pack
The battery pack supplied with your computer is not fully charged at the time of purchase.
Installing the Battery Pack
To install the battery pack
1 Turn off the computer and close the LCD screen lid.
2 Slide the battery pack into the battery compartment until it clicks into place.
✍
When your computer is directly connected to AC power and has a battery pack installed, it uses power from the AC outlet.
23
nN
Getting Started
!
This computer is designed to operate only with genuine Sony batteries.
Getting Started
Charging the Battery Pack
The battery pack supplied with your computer is not fully charged at the time of purchase.
To charge the battery pack
1 Install the battery pack.
2 Connect the AC adapter to the computer.
The computer automatically charges the battery pack (the battery indicator light flashes in a double blink pattern as the
battery pack charges). When the battery pack is about 85% charged, the battery indicator turns off.
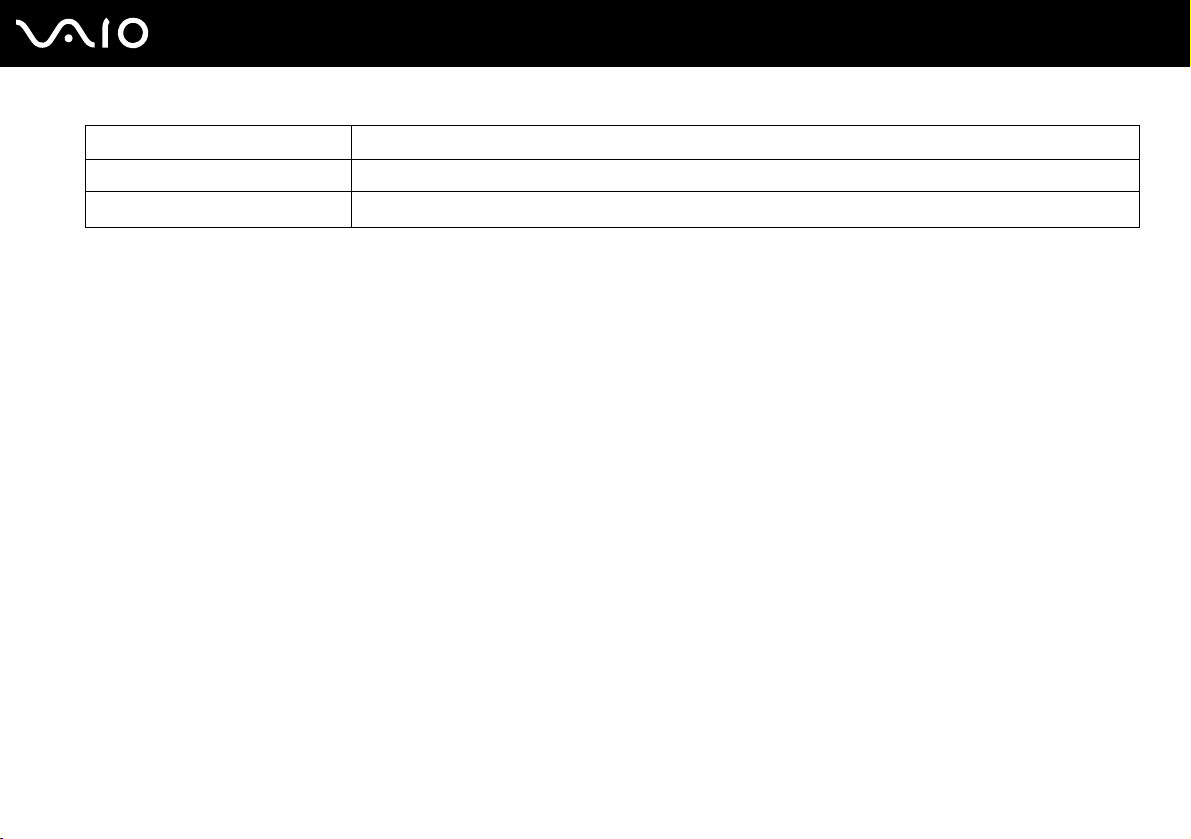
Battery indicator light status Meaning
On The computer is using battery power.
Blinks The battery pack is running out of power.
Double blinks The battery pack is charging.
Off The computer is using AC power.
24
nN

Getting Started
✍
When the battery pack is running out of power, both the battery and power indicator lights blink.
Keep the battery pack in your computer while it is directly connected to AC power. The battery pack continues to charge while you are using the
computer.
If the battery level falls below 10%, you should either attach the AC adapter to recharge the battery pack or shut down your computer and install a fully
charged battery pack.
The battery pack supplied with your computer is a lithium ion battery pack and can be recharged any time. Charging a partially discharged battery pack
does not affect battery life.
The battery indicator light is on while you use the battery pack as a power source. When battery life is nearly depleted, both the battery and power
indicator lights start flashing.
For some software applications and some peripheral devices, your computer may not enter Hibernate mode even when battery life is low. To avoid loss
of data when using battery power, you should save your data frequently and manually activate a power management mode, such as Sleep or Hibernate.
If the battery pack wears out when the computer enters Sleep mode, you will lose any unsaved data. Going back to the previous work state is impossible.
To avoid loss of data, you should save your data frequently.
When your computer is directly connected to AC power and has a battery pack installed, it uses power from the AC outlet.
25
nN
Getting Started
Removing the Battery Pack
!
You may lose data if you remove the battery pack while your computer is on and not connected to the AC adapter or if you remove the battery pack
while the computer is in Sleep mode.
To remove the battery pack
1 Turn off the computer and close the LCD screen lid.
2 Slide and hold the battery release latch (1) and slide the battery pack away from the computer.
✍
If the battery pack is stuck by the side spring locks, release one lock and then the other to remove the battery pack.
26
nN

27
nN
Getting Started
Shutting Down Your Computer Safely
To avoid losing unsaved data, be sure to shut down your computer properly, as described below.
To shut down your computer
1 Turn off any peripherals connected to the computer.
2 Click Start, the arrow next to the Lock button, and Shut Down.
3 Respond to any prompts warning you to save documents or to consider other users and wait for the computer to turn off
automatically.
The power indicator light turns off.

Using Your VAIO Computer
This section describes how to get the most out of using your VAIO computer.
❑ Using the Keyboard (page 29)
❑ Using the Touch Pad (page 31)
❑ Using Special-function Buttons (page 32)
❑ Using the Optical Disc Drive (page 34)
❑ Using PC Cards (page 44)
❑ Using the Memory Stick Media (page 47)
❑ Using Other Memory Cards (page 52)
❑ Using the Internet (page 55)
❑ Using Wireless LAN (WLAN) (page 56)
❑ Using the Bluetooth Functionality (page 63)
28
nN
Using Your VAIO Computer
nN
Using Your VAIO Computer
Using the Keyboard
Your keyboard is very similar to a desktop computer keyboard, but has additional keys that perform model-specific tasks.
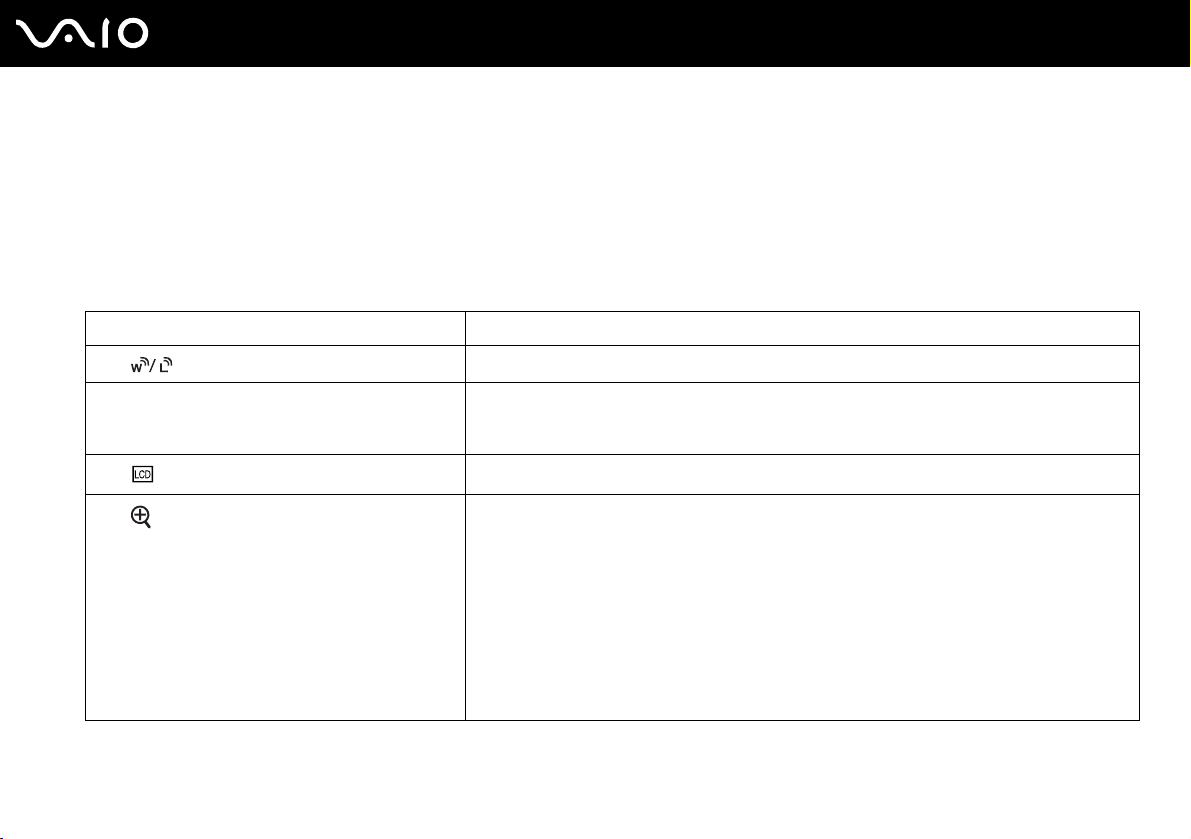
Combinations and Functions with the Fn Key
✍
Some functions are not available before Windows launches.
Combinations/Feature Functions
Fn + (F1): wireless switching
Fn + 8 (F5/F6): brightness control Adjusts the LCD brightness of your computer screen.
Fn + /T (F7): display output
Fn + (F10): zoom
*
Toggles among Bluetooth, wireless LAN, and wireless WAN functionalities.
To increase lightness intensity, press Fn+F6 and then M or ,, or keep pressing Fn+F6.
To decrease lightness intensity, press Fn+F5 and then m or <, or keep pressing Fn+F5.
Toggles among your computer screen, an external display, and simultaneous output to both.
Changes the screen resolution to magnify/restore your computer's screen view.
✍
The magnified view is not as clear as the standard view, as it is implemented by applying a lower resolution
to the computer screen with a higher resolution.
This key combination may not work with graphic images as it magnifies the screen view by changing the
resolution.
The location and size of software windows may change when the screen view is magnified or the standard
view is restored because pressing this key combination changes the resolution.
When your computer's screen view is magnified, switching the view to the external display disables the
function and restores the standard view.
29
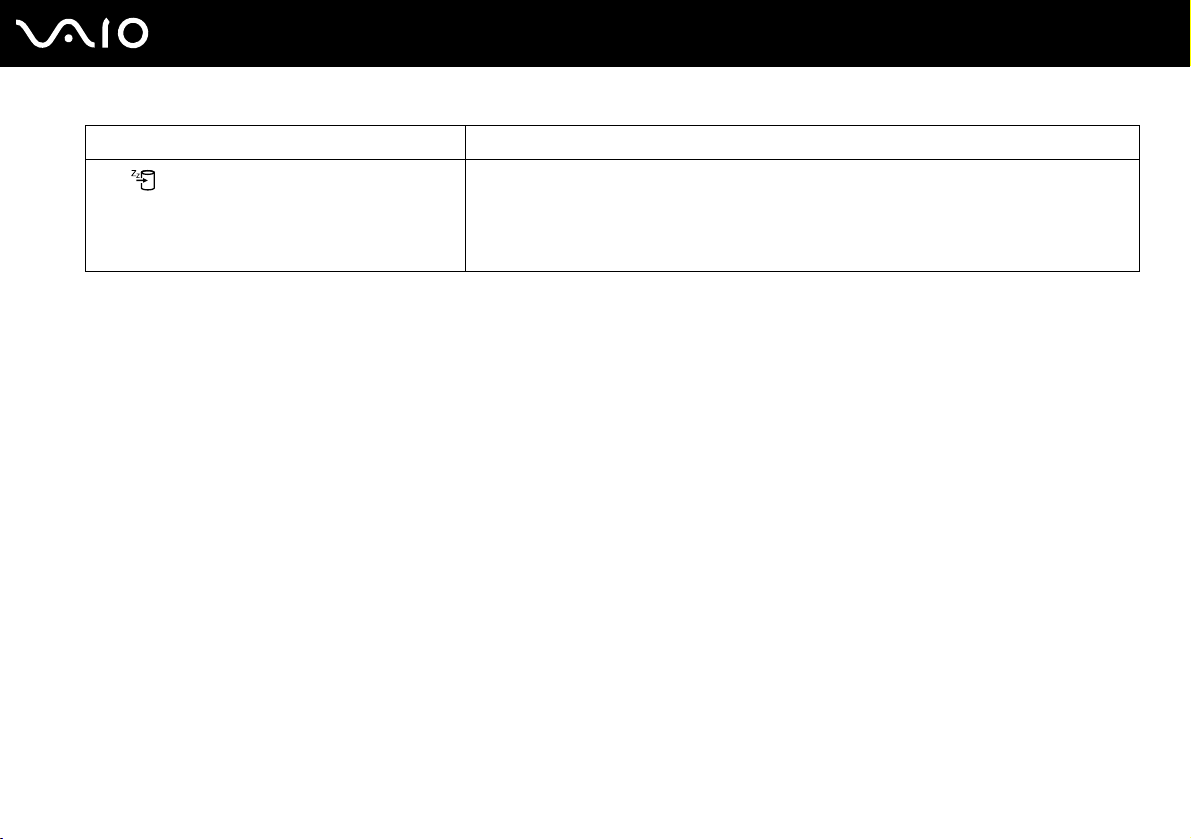
Combinations/Feature Functions
Fn + (F12): Hibernate
* On selected models only.
30
nN
Using Your VAIO Computer
Provides for the lowest level of power consumption. When you execute this command, the
states of the system and the peripheral devices are written to the hard disk and the system
power is turned off. To return the system to its original state, use the power button to turn on the
power.
For details on power management, see Using the Power Saving Modes (page 135).
Loading...