


Sony VAIO VGX-TP3SR/B, VAIO VGX-TP3S, VAIO VGX-TP3Z/B, VAIO VGX-TP3S/B, VAIO VGX-TP3E/B User Manual
...N
User Guide
Personal Computer
V G X - T P s e r i e s

n 2 N
Contents |
|
Before Use ......................................................................................................................................................................... |
5 |
Notice........................................................................................................................................................................... |
6 |
Documentation............................................................................................................................................................. |
7 |
Getting Started ................................................................................................................................................................. |
10 |
Locating Controls and Ports....................................................................................................................................... |
11 |
About the Indicator Lights .......................................................................................................................................... |
16 |
Setting Up Your Computer......................................................................................................................................... |
17 |
Shutting Down Your Computer Safely ....................................................................................................................... |
29 |
Using Your VAIO Computer ............................................................................................................................................. |
30 |
Using the Keyboard ................................................................................................................................................... |
31 |
Using the Touch Pad ................................................................................................................................................. |
35 |
Using the Optical Disc Drive ...................................................................................................................................... |
36 |
Using the TV Function ............................................................................................................................................... |
45 |
Using the Memory Stick ............................................................................................................................................. |
56 |
Using the SD Memory Card ....................................................................................................................................... |
62 |
Using the Internet....................................................................................................................................................... |
66 |
Using Wireless LAN (WLAN) ..................................................................................................................................... |
67 |

n 3 N
Using Peripheral Devices................................................................................................................................................. |
76 |
Selecting Display Modes............................................................................................................................................ |
77 |
Using the Multiple Monitors Function......................................................................................................................... |
78 |
Connecting a Universal Serial Bus (USB) Device...................................................................................................... |
80 |
Connecting a Printer .................................................................................................................................................. |
83 |
Connecting an i.LINK Device ..................................................................................................................................... |
84 |
Connecting to a Network (LAN) ................................................................................................................................. |
86 |
Customizing Your VAIO Computer .................................................................................................................................. |
88 |
Setting the Password ................................................................................................................................................. |
89 |
Setting Up Your Computer with VAIO Control Center................................................................................................ |
94 |
Using the Power Saving Mode................................................................................................................................... |
95 |
Upgrading Your VAIO Computer...................................................................................................................................... |
98 |
Adding and Removing Memory.................................................................................................................................. |
99 |
Precautions .................................................................................................................................................................... |
106 |
Using the Power Source .......................................................................................................................................... |
107 |
Handling Your Computer ......................................................................................................................................... |
108 |
Handling Floppy Disks ............................................................................................................................................. |
111 |
Handling Discs ......................................................................................................................................................... |
112 |
Using Headphones .................................................................................................................................................. |
113 |
Handling the Memory Stick ...................................................................................................................................... |
114 |
Handling the Hard Disk ............................................................................................................................................ |
115 |
Updating Your Computer ......................................................................................................................................... |
116 |

n 4 N
Troubleshooting ............................................................................................................................................................. |
117 |
Computer ................................................................................................................................................................. |
118 |
System Security ....................................................................................................................................................... |
124 |
Networking ............................................................................................................................................................... |
125 |
Optical Discs ............................................................................................................................................................ |
128 |
Display ..................................................................................................................................................................... |
132 |
Printing..................................................................................................................................................................... |
134 |
Microphone .............................................................................................................................................................. |
135 |
Speakers.................................................................................................................................................................. |
136 |
Keyboard.................................................................................................................................................................. |
137 |
Touch Pad................................................................................................................................................................ |
138 |
Floppy Disks ............................................................................................................................................................ |
139 |
Audio/Video.............................................................................................................................................................. |
140 |
Memory Stick ........................................................................................................................................................... |
143 |
Peripherals............................................................................................................................................................... |
144 |
Support Options ............................................................................................................................................................. |
145 |
Sony Support Information ........................................................................................................................................ |
146 |
e-Support ................................................................................................................................................................. |
147 |
Trademarks .................................................................................................................................................................... |
149 |

n 5 N
Before Use
Before Use
Congratulations on your purchase of this Sony VAIO® computer, and welcome to the on-screen User Guide. Sony has combined leading-edge technology in audio, video, computing, and communications to provide state-of-the-art personal computing experience.
!
External views illustrated in this manual may look slightly different from those of your computer.

n 6 N
Before Use
Notice
© 2008 Sony Corporation. All rights reserved.
This manual and the software described herein, in whole or in part, may not be reproduced, translated, or reduced to any machine-readable form without prior written approval.
Sony Corporation provides no warranty with regard to this manual, the software, or other information contained herein and hereby expressly disclaims any implied warranties or merchantability or fitness for any particular purpose with regard to this manual, the software, or such other information. In no event shall Sony Corporation be liable for any incidental, consequential, or special damages, whether based on tort, contract, or otherwise, arising out of or in connection with this manual, the software, or other information contained herein or the use thereof.
In the manual, the ™ or ® marks are not specified.
Sony Corporation reserves the right to make any modification to this manual or the information contained herein at any time without notice. The software described herein is governed by the terms of a separate user license agreement.

n 7 N
Before Use
Documentation
Your documentation includes printed information and user guides to read on your VAIO computer.
Printed Documentation
Quick Start Guide — Describes the process from unpacking to starting up your VAIO.
Troubleshooting and Recovery Guide — Contains solutions to problems other than those you encounter during normal operation.
Regulations, Guarantee, EULA and Service Support — Contains Sony guarantee conditions, safety / regulations, modem regulations, wireless LAN regulations, wireless WAN regulations, Bluetooth regulations, end user software license agreement, and Sony support services information.

n 8 N
Before Use
Non-printed Documentation
User Guide (this manual) — Explains features of your computer. It also includes information about the software programs included with your computer, as well as information on solving common problems. The User Guide is provided in PDF format for easy browsing and printing.
To view this on-screen guide:
1 Double-click the VAIO User Guide icon on the desktop.
2 Open the folder for your language.
3 Select the guide you want to read.
You can manually browse to the user guides by going to Computer > VAIO (C:) (your C drive) > Documentation > Documentation and opening the folder for your language.
To go to web sites described in this manual by clicking their respective URLs beginning with http://, your computer must be connected to the Internet.
Specifications — The online specifications describe the hardware and software configurations of your VAIO computer. To view the online specifications:
1 Connect to the Internet.
2 Go to the Sony online support web site at http://www.vaio-link.com.
You may have a separate disc that includes documentation for the bundled accessories.

n 9 N
Before Use
Windows Help and Support
Windows Help and Support is a comprehensive resource for practical advice, tutorials, and demonstrations to help you learn to use your computer.
Use the search feature, index, or table of contents to view all Windows Help resources, including those on the Internet.
To access Windows Help and Support, click Start  and Help and Support. Or go to Windows Help and Support by pressing and holding the Microsoft Windows key and pressing the F1 key.
Further Sources
Consult the help files included with the software you are using for detailed information on features and troubleshooting.
Go to http://www.club-vaio.com to find online tutorials about your favorite VAIO software.

n 10 N
Getting Started
Getting Started
This section describes how to get started using your VAIO computer.
Locating Controls and Ports (page 11)
About the Indicator Lights (page 16)
Setting Up Your Computer (page 17)
Shutting Down Your Computer Safely (page 29)
n 11 N
Getting Started
Locating Controls and Ports
Take a moment to identify the controls and ports shown on the following pages.
!
The appearance of your computer may be different from those illustrated in this manual due to variations in specifications. It may also vary in some countries or areas.

n 12 N
Getting Started
Top
A Hard disk drive/Optical disc drive indicator (page 16)
B Power button/Power indicator (page 16)
C WLAN (Wireless LAN) indicator (page 16)
n 13 N
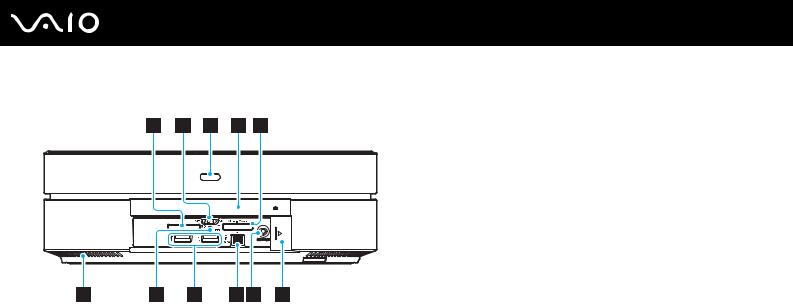
Getting Started
Front
A SD memory card slot (page 62)
B WLAN (Wireless LAN) switch (page 67)
C Remote sensor
Point the supplied remote commander to this sensor for operations.
D Optical disc drive (page 36)
E Memory Stick slot*1 (page 56)
F Air vent
G Media Access indicator (page 16)
H Hi-Speed USB (USB 2.0) ports*2 (page 80)
I i.LINK 4-pin (S400) port (page 84)
J CONNECT button (page 26)
K Front panel door
To open the front panel door, put your fingertip on the left end of the door and slide it half way to the right. The door will automatically be retracted under the panel. To close the door, slide it half way to the left. The door will keep sliding on its own and shut.
*1 Your computer supports both standardand Duo-size Memory Stick.
*2 Support high-/full-/low- speeds.

n 14 N
Getting Started
Back
!
The area around the air vent (1) becomes hot while your computer is on. Be sure to wait until the computer cools down before you touch it.
A Air vents
B VHF/UHF input port (page 45)
C WLAN ANT port (page 69)
D Hi-Speed USB (USB 2.0) ports* (page 80)
EHeadphones jack
Connect external headphones.
FMicrophone jack
Connect an external microphone.
GOPTICAL OUT port
(Output Sampling Rate: 44.1 KHz/48.0 KHz/96.0 KHz) Connect an S/PDIF device such as digital headphones or an AV amplifier.
H Network (Ethernet) port (page 86)
IA/V IN port
Connect an external device such as a VCR.
J HDMI OUT port (page 18)
K Monitor port (page 21)
L DC IN port (page 22)
*Support high-/full-/low- speeds.

n 15 N
Getting Started
Bottom
A Air vents
B Memory module compartment cover (page 99)
C Security slot

n 16 N
Getting Started
About the Indicator Lights
Your computer is equipped with the following indicator lights:
Indicator |
Functions |
|
|
|
|
Power 1 |
The indication behavior varies depending on the state of your computer: |
|
|
Green lit: the computer is on. |
|
|
Orange lit: the computer is in Sleep mode. |
|
|
Off: the computer is off. |
|
|
|
|
Media Access |
Illuminates when data is read from or written to a memory card. (Do not place the computer into Sleep mode or |
|
|
turn it off when this indicator is lit.) When the indicator is unlit, the memory card is not in use. |
|
|
|
|
Hard disk drive/Optical disc drive |
Illuminates when the drive is reading or writing data. Do not place the computer into Sleep mode or turn it off |
|
when this indicator is lit. |
||
|
||
|
|
|
Wireless LAN |
Illuminates when the wireless LAN function is enabled. |
|
|
|

n 17 N
Getting Started
Setting Up Your Computer
Connecting a Display
Connect a display (not supplied) to your computer. When connecting it, see the manual that came with your display as well.
Connect the power cord of your display after connecting all other cables.
n 18 N
Getting Started
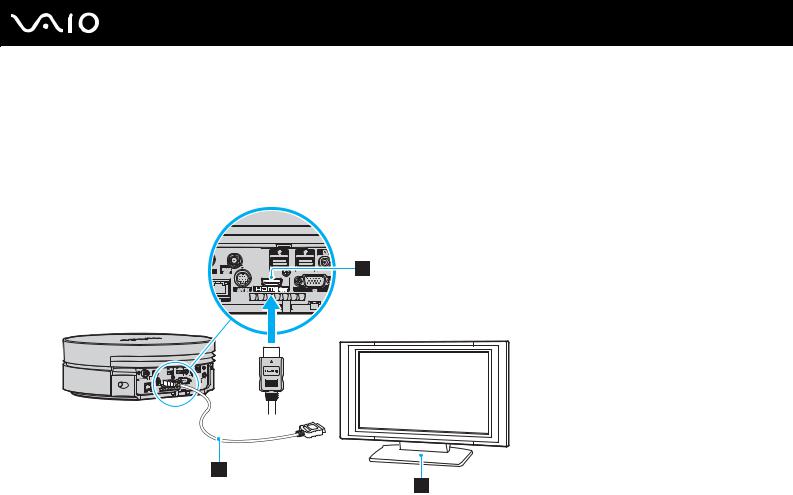
To connect a display (HDMI-compatible TV)
!
To hear sound from the device connected to the HDMI OUT port, you need to change the device for sound output. For the detailed instructions, see
How do I change the sound output device? (page 141).
1Plug one end of the HDMI cable (supplied) (1) to the HDMI OUT port (2) on the computer.
2Plug the other end to the display (TV) (3).

n 19 N
Getting Started
See the manual that came with your TV for more information on installation and use.
If your TV is equipped with a DVI-D port, you can use the HDMI cable and the HDMI to DVI-D adapter (both supplied) for connection. To use them for connection, however, you also need an audio cable (not supplied) since no audio signals are carried through the DVI-D port.
If your TV is equipped with an HDMI port and a DVI-D port, we recommend that you use the HDMI port.
The HDMI cable carries both video and audio signals.
!
If a device driver other than the one provided by Sony is used, the image will not be displayed and the audio will not be heard. Always use the device driver provided by Sony for updates.
Your computer is compliant with the HDCP standard and capable of encrypting the transmission channel of digital video signals for the purpose of copyright protection, which enables you to play and view a wide variety of copyright protected, high-quality contents. Note that you need to connect an HDCP-compliant external display to your computer to view the copyright protected contents. If your computer has a non-compliant display connected, you will not be able to play or view any copyright protected contents.

n 20 N
Getting Started
Additionally, you can connect a high-quality home theater receiver or other surround sound decoder devices between your computer and TV using an HDMI connection.
To connect a high-quality digital sound output device between your computer and a TV
!
Before connecting the device to the computer, make sure the HDMI connection has been set up between the TV and the home theater receiver or surround sound decoder device first.
To hear sound from the device connected to the HDMI OUT port, you need to change the device for sound output. For the detailed instructions, see
How do I change the sound output device? (page 141).
1Turn on the TV and set its input to the HDMI input.
2Turn on the home theater receiver or surround sound decoder device and set its input to the HDMI input.
3Plug one end of the HDMI cable (supplied) to the HDMI input port on the home theater receiver or surround sound decoder device and the other end to the HDMI OUT port on the computer.
With the HDMI connection, the volume can be adjusted by the connected audio device only. Your computer has no control over the output volume of any connected devices.
n 21 N
Getting Started
To connect a display (monitor)
1If you want to connect a computer display, connect the display cable (1) (not supplied) into the monitor port (2) on the back of the computer.
2If necessary, plug the display cable into the display.

n 22 N
Getting Started
Connecting a Power Source
You need an AC adapter to connect your computer to an AC power source and it must be plugged into the power source before you can establish communication with your wireless keyboard.
Use only the supplied AC adapter for your computer.
To connect the AC adapter
1Plug one end of the power cord (1) into the AC adapter (3).
2Plug the other end of the power cord and the power cord from your display (TV) into AC outlets (2).
3Route the cable connected to the AC adapter (3) through the hooks (4) on the back of your computer and plug it into the DC IN port (5).

n 23 N
Getting Started

n 24 N
Getting Started
To disconnect your computer completely from AC power, unplug the power cord when the computer is off. Make sure that the AC outlets are easily accessible.
!
If you unplug the AC adapter from your computer while the computer is on or in Sleep mode, you may lose all unsaved data.
n 25 N
Getting Started
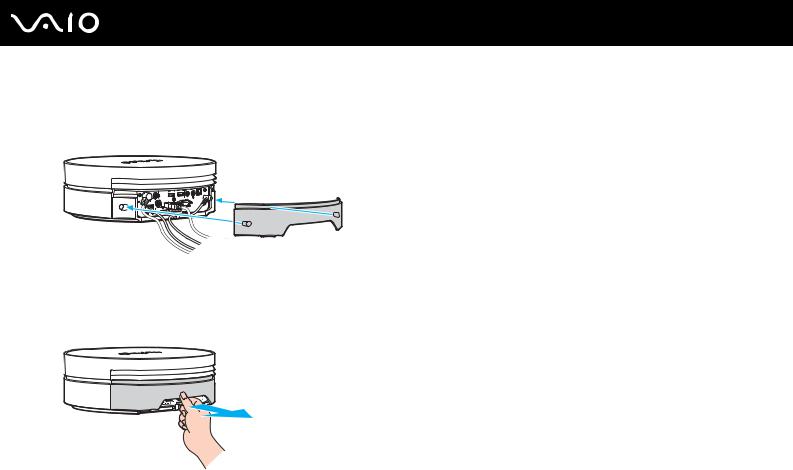
Attaching the Rear Cover
An exclusively designed rear cover is supplied with your computer for port protection and tidy cabling. Once you have set up your computer, attach the rear cover. Be sure to hold the cover with your both hands when attaching it.
!
You may not be able to attach the rear cover depending on the shape or size of connected cable plugs. In such a case, leave the back of your computer uncovered and keep the rear cover at hand.
To remove the rear cover, grasp the cover as illustrated below and pull it away from the computer.
!
Do not leave the removed rear cover on the floor. Stepping on it may hurt your foot.
n 26 N
Getting Started
Connecting the Wireless Keyboard
A wireless keyboard and four AA alkaline batteries for use in the keyboard are supplied with your computer. Before attempting to use the wireless keyboard, you must install the batteries and establish communication between the computer and the keyboard.
If you find your keyboard not working, for example after replacement of the keyboard batteries, try the following steps for reconnection.
To connect the wireless keyboard
!
To connect the wireless keyboard, it must be located within a range of 30 cm to 1 m from the computer.
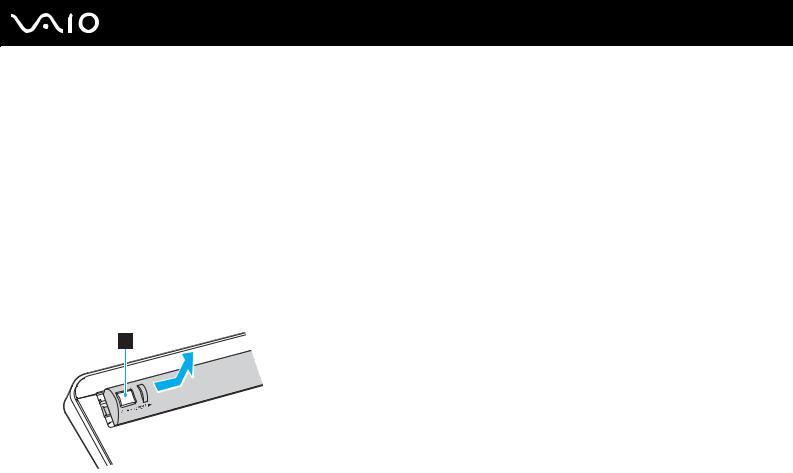
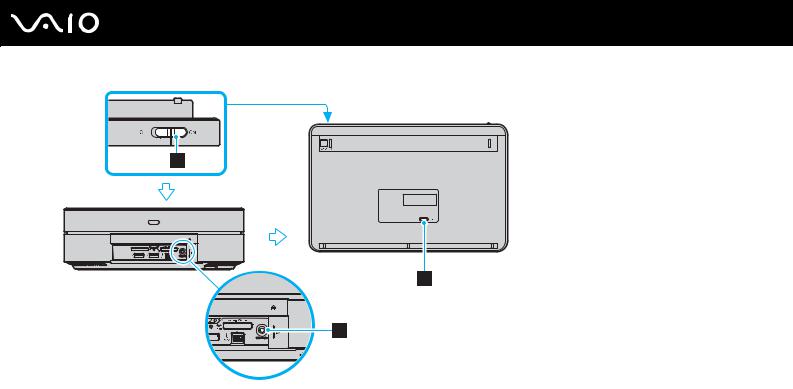
1Turn over the wireless keyboard.
2Press the button (1) on the battery compartment cover and slide and lift the cover in the direction of the arrow to remove the cover.
n 27 N
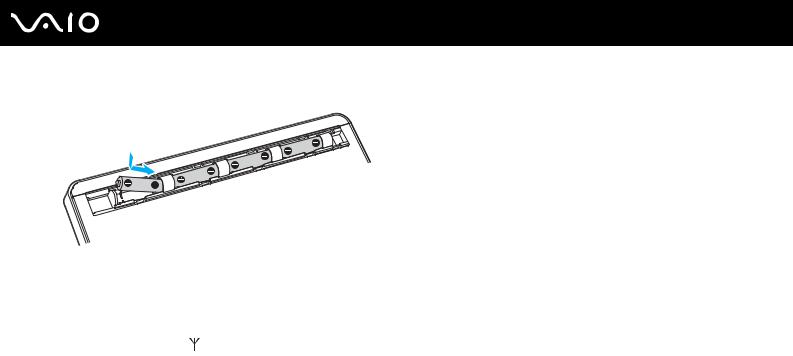
Getting Started
3 Insert the supplied four AA batteries into the battery compartment as illustrated below:
4Turn on the computer.
5Slide the power switch (2) on the keyboard to the ON position.
6Press the CONNECT button (3) on the front of the computer.
7Press the CONNECT button (4) on the bottom of the keyboard.
The connect indicator turns on in the LCD window on the keyboard when connection is established between the computer and the keyboard. If not, repeat the procedure.
!
Steps 6 and 7 must be completed within 10 seconds of each other.
If the wireless keyboard is left unused for 20 minutes or longer, the connect indicator will turn off. This could indicate that the connection between your computer and the keyboard is lost. Press the Fn key to check that the connect indicator turns on before using the keyboard.
n 28 N
Getting Started
You can check the battery indicator (
 or
or 
 ) in the LCD window on the wireless keyboard for its battery power level.
If the wireless keyboard does not operate properly, the batteries may need to be replaced. If you do not intend to use the wireless keyboard for an extended period of time, remove the batteries to avoid possible damage from battery leakage.

n 29 N
Getting Started
Shutting Down Your Computer Safely
To avoid losing unsaved data, be sure to shut down your computer properly, as described below.
To shut down your computer
1Turn off any peripherals connected to the computer.
2Click Start, the arrow  next to the Lock button, and then Shut Down.
3Respond to any prompts warning you to save documents or to consider other users and wait for the computer to turn off automatically.
The power indicator light turns off.

n 30 N
Using Your VAIO Computer
Using Your VAIO Computer
This section describes how to get the most out of using your VAIO computer.
Using the Keyboard (page 31)
Using the Touch Pad (page 35)
Using the Optical Disc Drive (page 36)
Using the TV Function (page 45)
Using the Memory Stick (page 56)
Using the SD Memory Card (page 62)
Using the Internet (page 66)
Using Wireless LAN (WLAN) (page 67)
 Loading...