


 Loading...
Revised January 8, 2014
ACID, ACIDized, ACIDplanet.com, ACIDplanet, the ACIDplanet logo, ACID XMC, Artist Integrated, the Artist Integrated logo, Beatmapper, Cinescore, CD Architect, DVD Architect, DoStudio, Jam Trax, Perfect Clarity Audio, Photo Go, Sound Forge, Super Duper Music Looper, Transparent Technology, Vegas, Vision Series, and Visual Creation Studio are the trademarks or registered trademarks of Sony Creative Software Inc. in the United States and other countries.
PlayStation is a registered trademark and PSP is a trademark of Sony Corporation Entertainment Inc.
HDV and HDV logo are trademarks of Sony Corporation and Victor Company of Japan, Limited (JVC).
"ATRAC," "ATRAC3," "ATRAC3plus," "ATRAC Advanced Lossless," and the ATRAC logo are trademarks of Sony Corporation. http://www.sony.net/Products/ATRAC3/
All other trademarks or registered trademarks are the property of their respective owners in the United States and other countries. For more information, see http://www.sonycreativesoftware.com/licensenotices.
Sony Creative Software Inc. may have patents, patent applications, trademarks, copyrights, or other intellectual property rights covering subject matter in this document. Except as expressly provided in any written license agreement from Sony Creative Software Inc., the furnishing of this document does not give you any license to these patents, trademarks, copyrights, or other intellectual property.
Music recognition technology and related data are provided by Gracenote®. Gracenote is the industry standard in music recognition technology and related content delivery. For more information visit www.gracenote.com.
Sony Creative Software Inc.
8215 Greenway Blvd.
Suite 400
Middleton, WI 53562
USA
The information contained in this manual is subject to change without notice and does not represent a guarantee or commitment on behalf of Sony Creative Software Inc. in any way. All updates or additional information relating to the contents of this manual will be posted on the Sony Creative Software Inc. Web site, located at http://www.sonycreativesoftware.com. The software is provided to you under the terms of the End User License Agreement and Software Privacy Policy, and must be used and/or copied in accordance therewith. Copying or distributing the software except as expressly described in the End User License Agreement is strictly prohibited. No part of this manual may be reproduced or transmitted in any form or for any purpose without the express written consent of Sony Creative Software Inc.
Copyright © 2014. Sony Creative Software Inc.
Program Copyright © 2014 Sony Creative Software Inc. All rights reserved.

|
Table of Contents |
Table of Contents |
3 |
Introduction |
7 |
Technical Support |
7 |
About Movie Studio Platinum |
7 |
Show Me How |
7 |
The Movie Studio Platinum window |
9 |
Main toolbar |
9 |
Editing tools |
10 |
Time Display window |
11 |
Track list |
11 |
Scrubbing |
11 |
Timeline |
12 |
Editing toolbar |
12 |
Status bar |
13 |
Touchscreen editing |
13 |
Window docking area |
17 |
Video Preview window |
17 |
Project Media window |
18 |
Transitions window |
18 |
Video FX window |
19 |
Media Generators window |
19 |
Working with projects |
21 |
Creating a new project |
21 |
5.1 surround projects |
22 |
Opening a project or media file |
22 |
Saving a project |
24 |
Adding, managing, and arranging media |
25 |
Using the Project Media window |
25 |
Previewing media files |
26 |
TABLE OFCONTENTS |
3 |

Adding media files to your project |
26 |
The Slideshow Creator |
27 |
Importing video from a DVD camcorder |
29 |
Recording audio |
30 |
Capturing video |
31 |
Capturing HDV clips |
31 |
Extracting audio from CDs |
32 |
Editing events on the timeline |
35 |
Creating selections and positioning the cursor |
35 |
Moving events |
37 |
Automatic crossfades |
38 |
Cutting, copying, and pasting events |
38 |
Deleting events |
41 |
Trimming events |
42 |
Automatic post-edit ripple editing |
42 |
Splitting events |
43 |
Undoing and redoing edit operations |
43 |
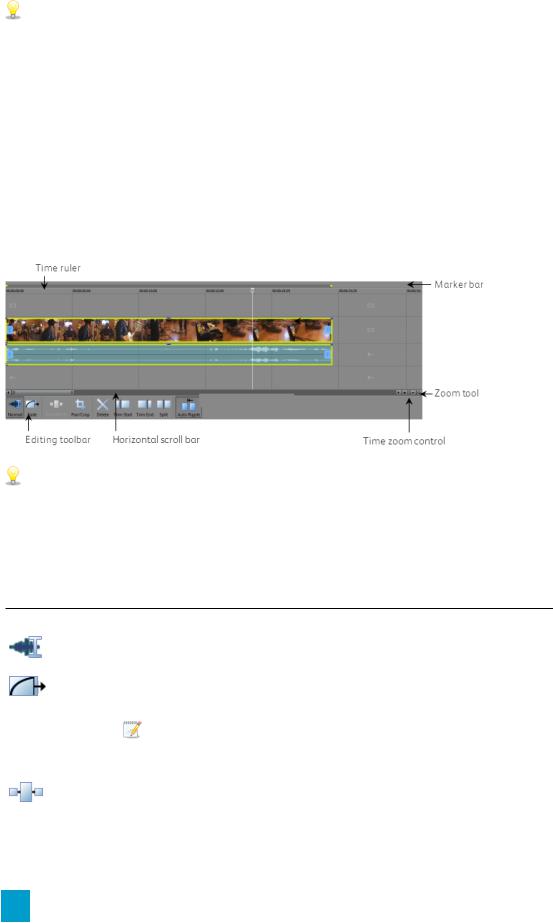
Zooming and magnification |
45 |
Using markers and regions |
47 |
Inserting markers |
47 |
Inserting regions |
48 |
Applying effects |
51 |
Adding audio track effects |
51 |
Adding audio event effects |
52 |
Adding video effects |
53 |
Adding transitions |
55 |
Creating text and titles |
57 |
Rendering projects (Render As) |
59 |
Make Movie Wizard |
61 |
Uploading your movie to YouTube |
61 |
Uploading your movie to Facebook |
62 |
Burning a DVD from the timeline |
64 |
4 TABLE OFCONTENTS

Burning a DVD with DVD Architect Studio |
64 |
Burning a Blu-ray Disc from the timeline |
65 |
Burning a Blu-ray Disc with DVD Architect Studio |
67 |
Saving your movie to a DV camera |
68 |
Saving your movie to an HDV camera |
69 |
Exporting a movie to a PSP™ |
69 |
Saving your movie to your hard drive |
70 |
Index |
73 |
TABLE OFCONTENTS |
5 |

6 TABLE OFCONTENTS

Chapter 1
Introduction
Edit 4K and stereoscopic 3D files natively on the timeline, apply color correction and video effects, select from dual edit modes, and upload the finished masterpiece directly to Facebook™ or YouTube™. With Movie Studio Platinum, the possibilities are endless.
Technical Support
If you experience problems or have questions while using Movie Studio Platinum, our technical support department is always ready to help you. Additional support and information can be found at http://www.sonycreativesoftware.com.
nFor a detailed list of Technical Support options, please visit http://www.sonycreativesoftware.com/support/default.asp.
nTo listen to your support options, please call 608-256-5555.
About Movie Studio Platinum
From the Help menu, choose About Movie Studio Platinum to display information about the application, such as the software license owner, copyright and system information, program version and serial number, and the Movie Studio Platinum logo.
 Before contacting Technical Support, click the Computer tab to display information about your computer.
Show Me How
From the Help menu, choose Show Me How to start an interactive guide that will show you each part of the Movie Studio Platinum interface and teach you how to create projects.
Choose a topic from the Show Me How overview to start a tutorial—you'll be up and running in no time!
INTRODUCTION 7

8 CHAPTER 1
Chapter 2
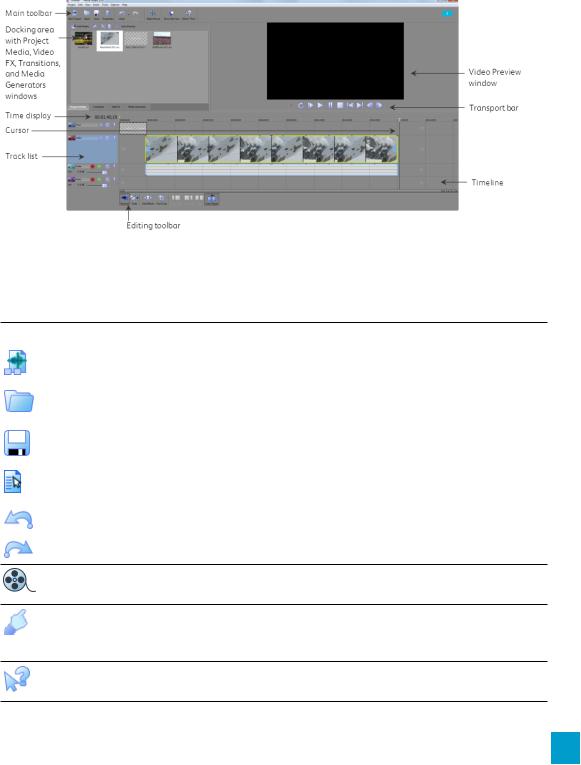
The Movie Studio Platinum window
The Movie Studio Platinum window is where you edit your project, and the screen is divided into several areas.
Main toolbar
The main toolbar contains buttons that enable you to select frequently used commands quickly.
Button |
Name |
Description |
|
New Project |
Opens the New Project dialog. For more information, see "Creating a |
|
|
new project" on page 21. |
|
|
|
|
Open |
Opens an existing project or media file. For more information, see |
|
|
"Opening a project or media file" on page 22. |
|
|
|
|
Save |
Saves the current project. For more information, see "Saving a |
|
|
project" on page 24. |
|
|
|
|
Properties |
Opens the Project Properties dialog box allowing you to make |
|
|
changes to the current project. |
|
|
|
|
Undo |
Reverses the last action performed. |
|
|
|
|
Redo |
Reverses the action of the Undo command. |
Make Movie Starts the Make Movie Wizard. For more information, see "Make Movie Wizard" on page 61.
Show Me How Starts an interactive guide that will show you each part of the Movie Studio Platinum interface and teach you how to create projects. For more information, see "Show Me How" on page 7.
What's This Displays context-sensitive help.
Help
THE MOVIE STUDIO PLATINUM WINDOW 9

Editing tools
Use the Normal and Fade tools to edit events on the timeline.
Normal
To use the Normal tool, select the Normal button  .
.
This tool gives you the most flexibility while editing; selection, project navigation, most envelope editing, etc. The only functions you cannot perform while in normal editing mode are box selection, box magnification, and multiple envelope point selection.
Selecting events
Click an event to select it. Hold Ctrl while clicking to select multiple events, or hold Shift to select all events between the first and last event you click.
Moving events
Select events and drag them along the timeline.
Changing an event's length
Drag either edge of an event to change its length. The event edge will snap to grid lines if snapping is on. Hold the Shift key while dragging to temporarily suspend snapping.
Fade
To use the Fade tool, select the Fade button  .
.
When you select an event with the Fade tool, fade handles are displayed at the top of the event. You can drag the fade handles to fade an event in or out. You do not need to select an event to fade the edges, but you might find the fade handles useful in your editing workflow.
You can also adjust an event's opacity or gain with the Fade tool.
10 CHAPTER 2
Time Display window
The Time Display window shows the current cursor position.
Track list
The track list displays all of the audio and video tracks in your project and contains the master controls for each track. A scrub control and playback rate slider is also available below the track list.
Scrubbing
You can use scrubbing to scroll playback of your project at varying speeds.
Press Ctrl and drag the playhead  above the timeline to shuttle forward or backward from the cursor position to find an edit point.
THE MOVIE STUDIO PLATINUM WINDOW 11
Tips:
nHold Alt, click the ruler, and drag to move the cursor to the position you clicked and scrub in the direction you drag.
nHold Ctrl+Alt while dragging to scrub video only.
nZoom in or out to adjust the scrub sensitivity. For more information, see "Zooming and magnification" on page 45.
Timeline
The timeline is the main part of the Movie Studio Platinum window where you will be doing most of your work. The majority of the window consists of actual track space. This area contains the drawn events on each track.
You can choose Edit > Navigate and choose a command from the submenu to navigate the timeline quickly.
Editing toolbar
The editing toolbar is displayed below the timeline and provides access to tools you'll use while editing events on the timeline.
Button |
Description |
Normal |
Click to select the Normal tool. For more information, see "Editing tools" on |
|
page 10. |
|
|
Fade |
Click to select the Fade tool. For more information, see "Editing tools" on page |
|
10. |
|
Fades between overlapping events cannot be adjusted when automatic |
|
crossfades are enabled. For more information, see "Automatic |
|
crossfades." |
|
|
Add |
Click to add effects to an event. For more information, see "Adding audio |
Effects |
event effects" on page 52 or "Adding video effects" on page 53. |
|
|
12 CHAPTER 2
Button Description
Pan/Crop Click to pan or crop a video event. For more information, see "Panning and cropping video events in Simple Edit Mode."
Delete |
Deletes the selected event from the timeline. For more information, see |
|
"Deleting events" on page 41. |
|
|
Trim |
Trims the start of the selected event to the cursor. For more information, see |
Start |
"Trimming events" on page 42. |
Trim End Trims the end of the selected event to the cursor. For more information, see "Trimming events" on page 42.
Split |
Click to split an event. For more information, see "Splitting events" on page 43. |
Auto Select this button to automatically ripple the contents of the timeline following Ripple an edit after adjusting an event's length, cutting, copying, pasting, or deleting events. For more information, see "Automatic post-edit ripple editing" on page
42.
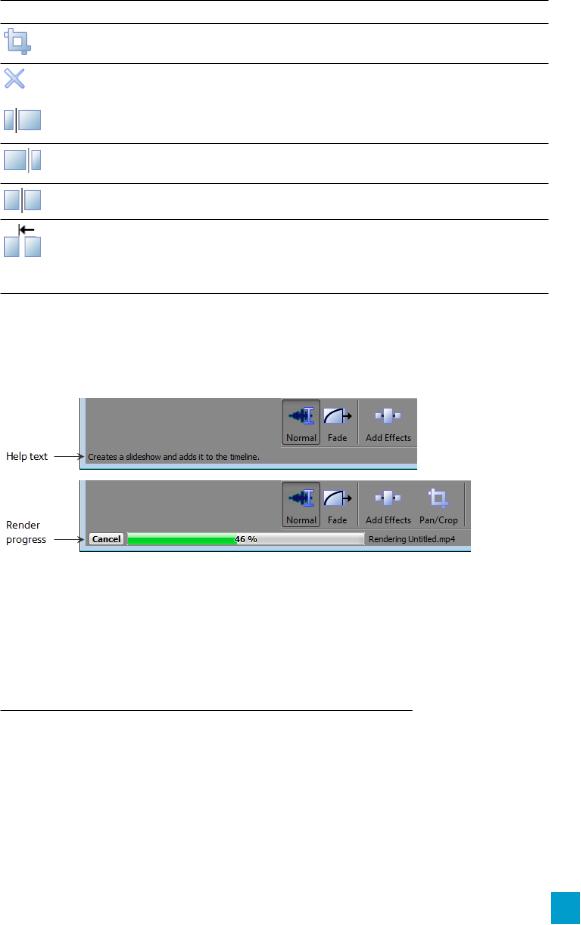
Status bar
The status bar displays help text when your mouse is over menu items and will also show progress meters for any actions that take time to complete.
Touchscreen editing
If you have a Windows 8 or later computer or tablet with a touchscreen, you can perform some timeline edits in your Movie Studio Platinum project using the touchscreen instead of your mouse or keyboard.
Gestures
Gesture |
Result |
Horizontal one-finger flick |
Creates a loop region |
|
|
Horizontal two-finger flick |
Scrolls the timeline |
|
|
Vertical two-finger flick |
Scrolls the track list |
|
|
Two-finger pinch |
Zooms the timeline horizontally and vertically. |
|
|
THE MOVIE STUDIO PLATINUM WINDOW 13

Gesture |
Result |
Drag an event |
Moves the event |
|
|
Tap an event |
Selects the event |
|
|
14 CHAPTER 2

Trim and fade handles
When you select an event with the Normal tool  , trim handles are displayed at each end of the event. You can drag the trim handles to adjust an event's length.
When you select an event with the Fade tool  , fade handles are displayed at the top of the event. You can drag the fade handles to fade an event in or out.
Adding video effects, transitions, and generated media
To add a video effect, transition, or generated media item to your project, first select the item you want to add and then drag it to the timeline.
THE MOVIE STUDIO PLATINUM WINDOW 15

16 CHAPTER 2
Chapter 3
Window docking area
The window docking area keeps frequently used windows available, but out of the way, while you are working with a project.
Tips:
nIf you want to display the window docking area at the top of the Movie Studio Platinum window, select the Display timeline at bottom of main window check box on the Display tab of the Preferences dialog. Clear the check box to display the docking area at the bottom of the Movie Studio Platinum window.
nIf you want to display tabs at the top of docking windows, select the Position tabs at top of docked windows check box on the Display tab of the Preferences dialog.
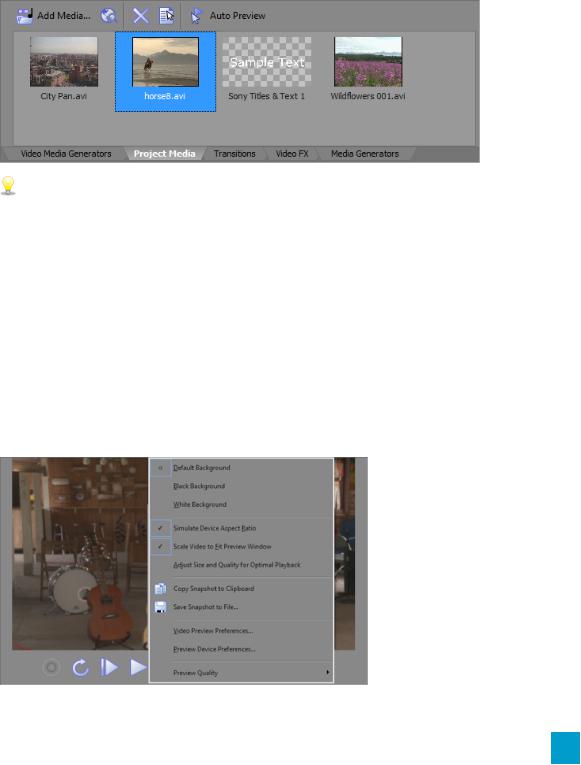
Video Preview window
The Video Preview window displays a project's video output at the current cursor position during editing and playback. The playback includes any effects that you have applied to it. This window is also useful when editing frame by frame for synchronizing audio. Right-click anywhere in the window to display a shortcut menu with Video Preview window options.
WINDOW DOCKING AREA 17
Project Media window
You can use the Project Media window to collect and arrange all the media you will use in your project. You can add media, preview it, view and change file properties, and add effects to a file.
For more information, see "Using the Project Media window" on page 25.
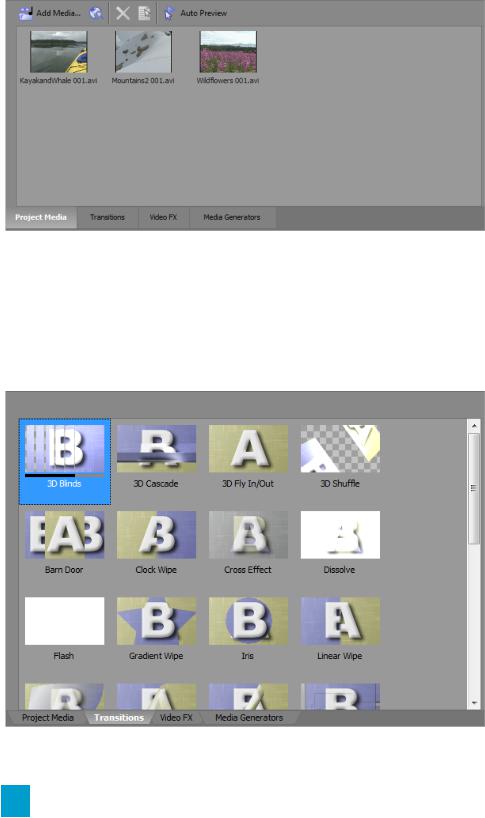
Transitions window
Use the Transitions window to choose and preview transition effects that you can use to control how a video begins or ends, or to change the way one event flows into another.
Drag a transition preset to overlapping video events in the timeline to add a transition.
For more information, see "Adding transitions" on page 55.
18 CHAPTER 3

Video FX window
Drag a video effect preset to a track or event to apply the effect.
For more information, see "Adding video effects" on page 53.
Media Generators window
Use the Media Generators window to add text, titles, backgrounds, and other generated media. You can drag a preset thumbnail to a track to add media.
WINDOW DOCKING AREA 19

20 CHAPTER 3
Chapter 4
Working with projects
A project (.vf) file saves the relevant information about your source media: file locations, edits, insertion points, transitions, and effects.
A project file is not a multimedia file. It contains pointers to the original source files, so you can edit your project nondestructively — you can be creative without worrying about corrupting your source files.
Creating a new project
The first step in creating your masterpiece is to create a Movie Studio Platinum project file.
You can quickly create a project by pressing Ctrl+Shift+N. The project will use the default settings, but you can use the Project Properties dialog to edit the settings later.
1.From the Project menu, choose New. The New Project dialog is displayed.
2.From the Region drop-down list, choose a video output standard.
3.In the Video box, click the type of video that you're using to create your project or the format you want to use to deliver your completed project.
The Project box will display a list of options for the selected video type.
If you want your project to match the properties of an existing media file, choose Match media settings and click the Browse button next to the Choose media box to select the file you want to use.
WORKING WITH PROJECTS 21
4.Set your project name and the location where you want to save it:
a.In the Name box, type a name to identify your project. If you don't specify a project name when creating a project, the file name you use to save your project will be used.
b.The Folder box displays the path to the folder where your project file (.vf) will be saved. Click the Browse button if you want to choose a different folder.
c.Select the Manage project files check box if you want your project media to be saved in the project folder.
When this check box is selected, the following files will be stored in subfolders below the project folder:
o |
Audio recordings. |
o |
Files that you capture or import from a video camera or audio CD. |
o |
Snapshots that you copy from the Video Preview window. |
o |
Files that you create using Render to New Track. |
Existing media files on you computer will not be moved.
5.Click OK to create the project.
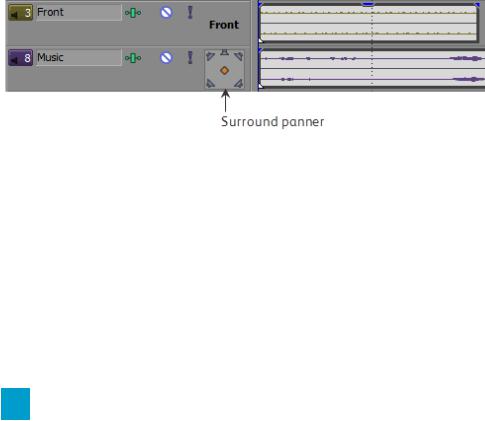
5.1surround projects
When you add media with 5.1 surround audio in Simple Edit Mode, the front-channel audio is displayed on the Front track.
If you want to add voiceovers or soundtracks, you can add audio to the Music track and use the surround panner in the track list to pan the track within the surround soundfield.
If you want to adjust the panning of your audio, switch to Advanced Edit Mode for full 5.1 surround support.
Opening a project or media file
From the Project menu, choose Open to open a media file or Movie Studio Platinum project.
22 CHAPTER 4

You can open multiple Movie Studio Platinum projects by launching another instance of the application (if your computer has enough resources).
nOpening a project closes the current project and displays the opened project in the Movie Studio Platinum window.
nOpening a media file will place the event that contains the media onto a new track in the current project.
Opening a Movie Studio Platinum project
1.From the Project menu, choose Open. The Open dialog box is displayed.
2.Choose the folder where the project you want to open is stored:
nChoose a drive and folder from the Look in drop-down list.
nChoose a folder from the Recent drop-down list to quickly select a folder from which you have previously opened files.
3.Select a file in the browse window or type a name in the File name box. Detailed information about the selected file appears at the bottom of the dialog box.
 Tips:
Tips:
nTo limit the files displayed in the dialog, choose a file type from the Files of Type dropdown list or enter *. and an extension in the File name box. For example, enter *.wav to display all wave files in the current folder, or enter *guitar*.wav to display all wave files that have the word guitar in the file name.
nTo open a project quickly, double-click a .veg file in the Explorer window.
4.Click Open. If you have not saved the current project, you will be prompted to save your changes.
Opening a media file
1.From the Project menu, choose Open. The Open dialog box is displayed.
2.Choose the folder where the file you want to open is stored:
nChoose a drive and folder from the Look in drop-down list.
nChoose a folder from the Recent drop-down list to quickly select a folder from which you have previously opened files.
WORKING WITH PROJECTS 23
Loading...