


PCG-Z600LEK
Table of contents
 Loading...
N
Sony Notebook
User Guide
PCG-Z600LEK/HEK

Sony Notebook User Guide
Read this first
2
nN
Read this first
Notice
© 2001 Sony Corporation. All rights reserved.
This manual and the software described herein, in whole or in part, may not be reproduced, translated, or reduced to any machine-
readable form without prior written approval.
Sony Corporation provides no warranty with regard to this manual, the software, or other information contained herein and hereby
expressly disclaims any implied warranties or merchantability or fitness for any particular purpose with regard to this manual, the
software or such other information. In no event shall Sony Corporation be liable for any incidental, consequential, or special damages,
whether based on tort, contract, or otherwise, arising out of or in connection with this manual, the software, or other information
contained herein or the use thereof.
Sony Corporation reserves the right to make any modification to this manual or the information contained herein at any time without
notice. The software described herein is governed by the terms of a separate user license agreement.
Sony, DVgate, i.LINK
TM
and the i.LINK logo, JogDial
TM
, PictureGear, Memory Stick and the Memory Stick logo, VAIO and the VAIO logo
are trademarks of Sony Corporation. i.LINK™ is the name for the IEEE 1394-1995 standards and their revisions.
Microsoft, Windows and the Windows logo, Windows Media and Outlook are trademarks or registered trademarks of U.S. Microsoft
Corporation in the U.S. and other countries.
Adobe
®
, Adobe
®
Acrobat
®
Reader, Adobe
®
Premiere
®
are trademarks of Adobe Systems Incorporated.
QuickTime and the QuickTime logo are trademarks used under license. QuickTime is registered in the U.S. and other countries.
RealPlayer is a trademark or registered trademark of RealNetworks, inc. in the U.S. and other countries.
PowerPanel is a trademark of U.S. Phoenix Technologies Corporation.
VirusScan is a trademark of Network Associates Corporation.
All other names of systems, products and services are trademarks of their respective owners. In the manual, the ™ or
®
marks are not
specified.
Specifications are subject to change without notice.

Sony Notebook User Guide
Read this first
3
nN
As an ENERGY STAR Partner, Sony has determined that this product meets the ENERGY STAR guidelines for energy efficiency.
The International E
NERGY STAR Office Equipment Program is an international program that promotes energy saving through the use of
computers and their office equipment. The program backs the development and dissemination of products with functions that
effectively reduce energy consumption. It is an open system in which business proprietors can participate voluntarily. The targeted
products are office equipment such as computers, displays, printers, facsimiles and copiers. Their standards and logos are uniform
among participating nations.
E
NERGY STAR is a U.S. registered mark.
Safety information
Owner's record
The model number and serial number are located on the bottom of your Sony notebook. Record the serial number in the space provided
here. Refer to the model and serial number when you call VAIO-Link.
Serial number:________________________
Model number:
PCG-5416 / PCG-5426
Sony Notebook User Guide
Read this first
4
nN
Warnings
General
Opening the unit, for whatever reason, could lead to damages that are not covered by the guarantee.
To avoid electrical shock, do not open the cabinet. Refer servicing to qualified personnel only.
To prevent fire or shock hazard, do not expose your VAIO notebook to rain or moisture.
Avoid using the modem during an electrical storm.
Do not use the modem or a telephone to report a gas leak in the vicinity of the leak.
Audio/video
Audio and picture distortion may occur if this equipment is positioned in close proximity to any
equipment emitting electromagnetic radiation.
Connectivity
Never install modem or telephone wiring during a lightning storm.
Never install telephone jacks in wet locations unless the jack is specifically designed for wet locations.
Use caution when installing or modifying telephone lines.
Use your notebook only with the supplied AC adapter. To disconnect your notebook completely from
mains voltage, unplug the AC adapter.
Please make sure that the socket outlet is easily accessible.
Never touch uninsulated telephone wire or terminals unless the telephone line has been disconnected
at the network interface.
CD-ROM
The use of the optical instruments supplied with your notebook will cause eye hazard. As the laser beam
used in this product is harmful to eyes, do not attempt any disassembling process. For servicing, refer to
qualified personnel only.
Sony Notebook User Guide
Read this first
5
nN
Regulatory information
This product conforms to the following European Directives:
73/23/EEC (Low Voltage Directive)
89/336/EEC, 92/31/EEC (EMC Directives)
93/68/EEC (CE Marking Directive)
1999/5/EC (radio equipment and telecommunications terminal equipment Directive)
This product complies with EN 55022 Class B and EN 50082-1 for use in following areas: residential, commercial and light-industrial.
This product has been tested and found compliant with the limits set out in the EMC Directive for using connection cables shorter than
3 metres (9.8 feet).
The CD-ROM/DVD-ROM (depending on your model) is classified as a CLASS 1 LASER PRODUCT and complies with the Laser Product
Safety Standard EN 60825-1. Repair and maintenance only by authorized Sony technicians. Improper repairs and use can create safety
hazards.
CLASS 1
LASER PRODUCT
TO EN 60825-1

Sony Notebook User Guide
Read this first
6
nN
Disposing of lithium ion batteries
Do not handle damaged or leaking Lithium ion batteries. Dispose of promptly and properly at end-of-life.
Danger of explosion if battery is incorrectly replaced. Replace only with the same or equivalent type
recommended by the manufacturer. Discard used batteries according to the manufacturer’s instructions.
The battery pack used in this device may present a fire or chemical burn hazard if mistreated. Do not
disassemble, heat above 100°C (212°F) or incinerate.
Keep away from children.
Your notebook is equipped with an internal backup memory battery. For changing this battery, please
contact VAIO-Link:
http://www.vaio-link.com
In some areas the disposal of lithium ion batteries in household or business waste may be prohibited.
Use the public collection system.
Sony Notebook User Guide
Welcome
7
nN
Welcome
Congratulations on purchasing a Sony VAIO notebook. Sony has combined leading-edge technology in
audio, video, computing and communications to provide you with state-of-the-art personal computing.
Here are just some of the features your VAIO notebook has to offer.
Exceptional performance - Your PC includes a fast processor, a fast CD-ROM/DVD-ROM drive* and an
internal modem.
Portability - The rechargeable battery pack provides hours of use without AC power.
Sony audio and video quality - A high-resolution LCD screen enables you to take advantage of today’s
advanced multimedia applications, games, and entertainment software.
Multimedia features – Enjoy the speakers to listen to audio and video CDs.
Interconnectivity – Your computer has Ethernet, Memory Stick
TM
* and i.LINK
TM
functionalities.
Memory Stick is Sony’s new universal storage medium. i.LINK is a bidirectional digital interface for
exchanging data.
Windows
®
- Your system includes the latest operating system from Microsoft.
Communications - Access popular online services, send and receive e-mails, browse the Internet...
Excellent customer support - If you are experiencing any problems with your computer, please check
the VAIO-Link web site for a possible solution:
http://www.vaio-link.com
Before contacting VAIO-Link, you may try to solve the problem by reading the User Guide or the manuals
and help files for the peripherals or software.
* Depending on your model
Sony Notebook User Guide
Welcome
8
nN
Documentation pack
Your Documentation Pack contains paper and online user guides on a Documentation CD-ROM.
Printed documentation
A Setting Up poster in colour and a Getting Started brochure;
A Customer Guide, where you will find all the basic information to start using your notebook;
A complete Regulatory and Safety Information poster;
A Modem Regulations Flyer applying to the modem;
Yo ur Sony Guarantee conditions.
Online documentation
1 The Sony Notebook User Guide:
Using Your Sony Notebook shows you how to use the standard components of your system.
Connecting Peripheral Devices explains how you can add functionality by connecting various
peripherals.
Getting Help explains the support options available to you, and offers basic troubleshooting tips.
Precautions provides facts and advice about using your notebook computer.
Specifications provides details on your computer, drivers and accessories.
2 Refer to your Software Guide for information on the bundled software and the Sony applications.
About the Software is a short description of the features of the software pre-installed on your
system.
Customizing your notebook explains how to set your system and power management.
Using the Product Recovery CD-ROMs explains how to perform a system and application recovery.

Sony Notebook User Guide
Welcome
9
nN
3 Consult the Online Help files of the software you are using for detailed information on features and
troubleshooting.
4 Refer to the Microsoft Quick Start manual for more information on Windows.
Sony Notebook User Guide
Welcome
10
nN
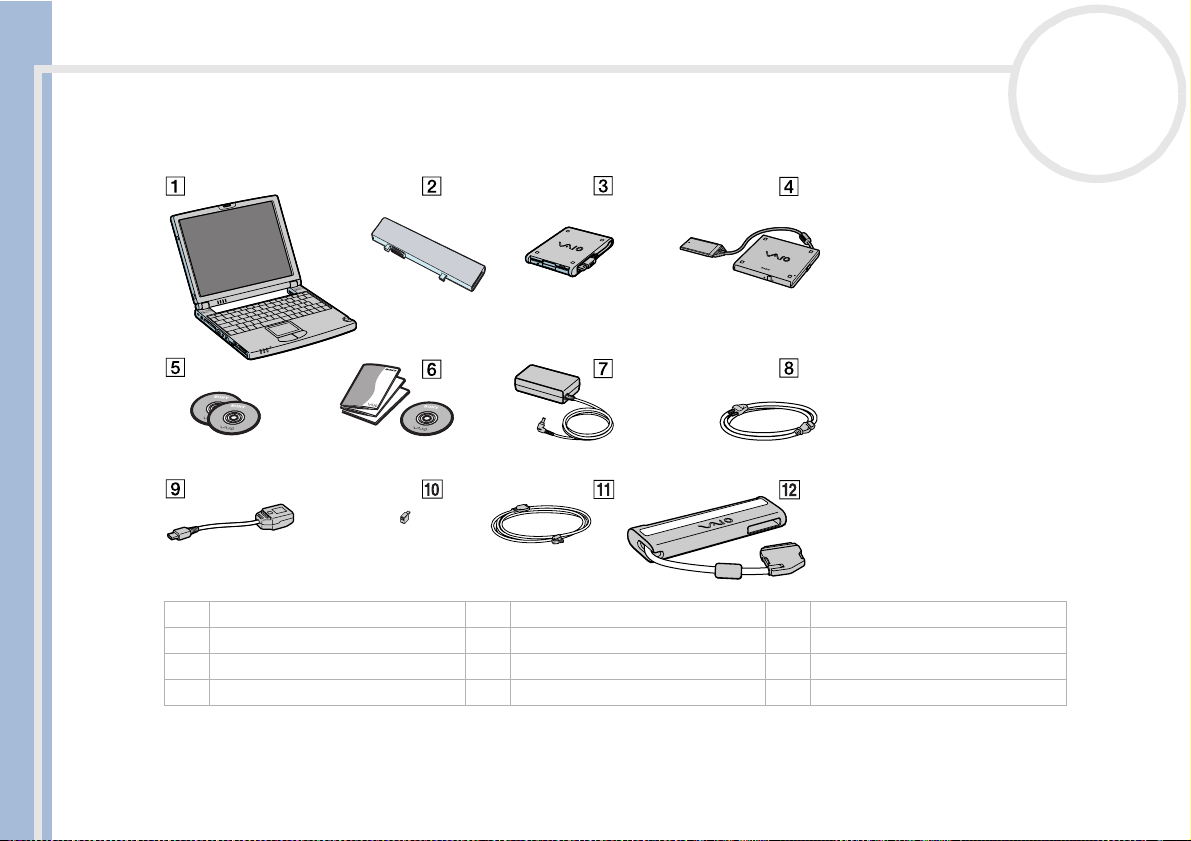
Your notebook and its accessories
Remove the following hardware items from the box:
1 main unit 5 product recovery CD-ROMs 9 USB conversion adapter
2 rechargeable battery pack 6 documentation pack 10 phone plug (country specific)
3 USB floppy disk drive 7 AC adapter 11 phone cable
4 CD-ROM drive 8 power cord 12 i.LINK
TM
port replicator

Sony Notebook User Guide
Welcome
11
nN
Ergonomic considerations
You will be using your notebook as a portable device in a variety of environments. Whenever possible, you
should attempt to take account of the following ergonomic considerations to both stationary and portable
environments:
Position of your computer – Place the computer directly in front of you (1). Keep your forearms
horizontal (2), with your wrists in a neutral, comfortable position (3) while using the keyboard,
touchpad, or external mouse. Let your upper arms hang naturally at your sides. Have breaks during
sessions with your computer. Excessive use of the computer may strain muscles or tendons.
Furniture and posture – Sit in a chair with good back support. Adjust the level of the chair so your feet
are flat on the floor. A footrest may make you more comfortable. Sit in a relaxed, upright posture and
avoid slouching forward or leaning far backwards.
Sony Notebook User Guide
Welcome
12
nN
Viewing angle of the computer’s display – Use the display’s tilting feature to find the best position.
You can reduce eye strain and muscle fatigue by adjusting the tilt of the display to the proper position.
Adjust the brightness setting of the display as well.
Lighting – Choose a location where windows and lights do not create glare and reflection on the
display. Use indirect lighting to avoid bright spots on the display. You can also purchase accessories for
your display that help reduce glare. Proper lighting adds to your comfort and work effectiveness.
Placement of an external display – When using an external display, set the display at a comfortable
viewing distance. Make sure the display screen is at eye level or slightly lower when you are sitting in
front of the monitor.

Sony Notebook User Guide
Using your notebook
13
nN
Using your notebook
This section describes how to start using your computer and how to use your computer’s internal and
external devices.
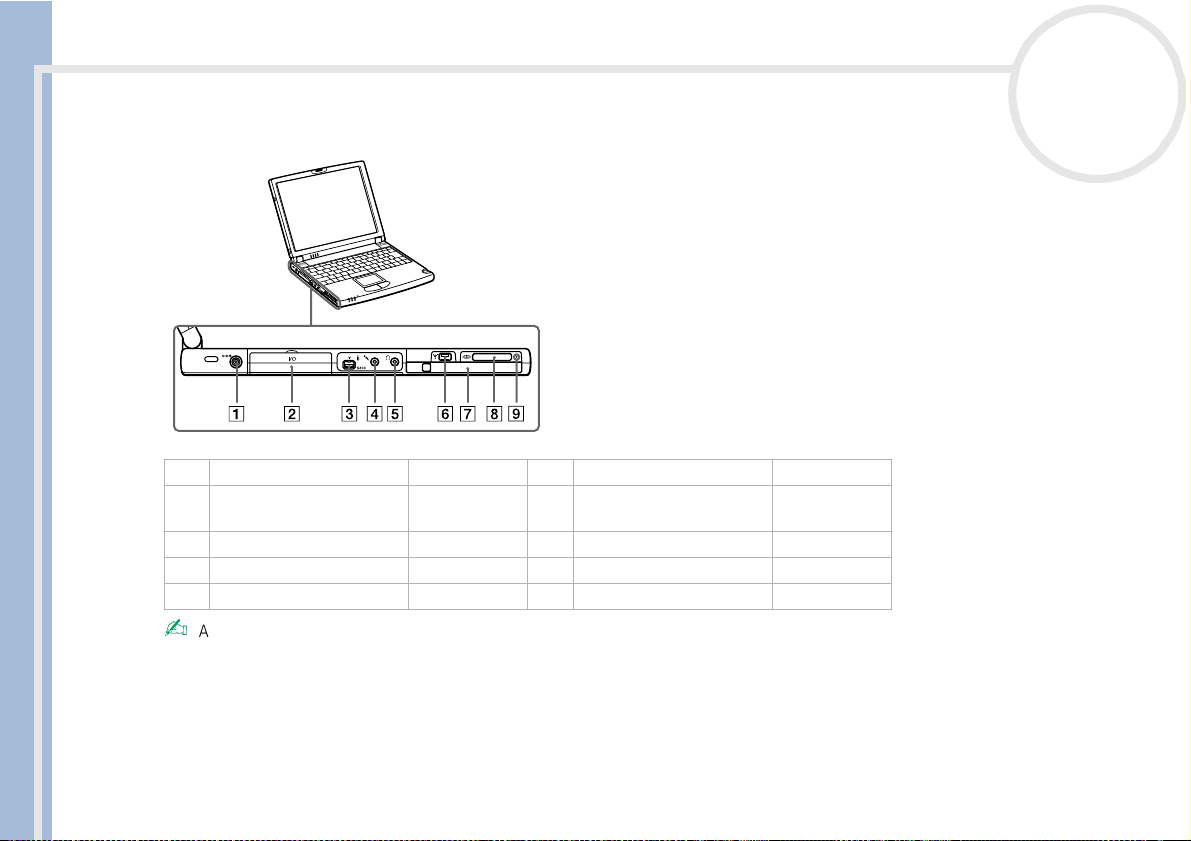
Locating controls and connectors
Right
Phone cable and connectors are TNV (Telecommunications Network Voltage), according to EN60950.
1Jog Dial (page 29) 4 ventilation slot
2 USB connector (page 50) 5 power switch (page 21)
3 ethernet network
connector
(page 60) 6 phone line jack (page 38)
Sony Notebook User Guide
Using your notebook
14
nN
Left
AC adapter mains connector and power cord: hazardous voltage, according to EN 60950.
All other connectors for this notebook are SELV (Safety Extra Low Voltage), according to EN 60950.
1DC In (page 17) 6 mini USB connector (page 50)
2 i.LINK
TM
port replicator
connector
(page 42) 7 PC Card slot (page 33)
3 S400 i.LINK
TM
connector (page 57) 8 Memory Stick™ slot (page 36)
4 microphone connector (page 49) 9Memory Stick™ indicator (page 36)
5 headphone connector (page 48)
Sony Notebook User Guide
Using your notebook
15
nN
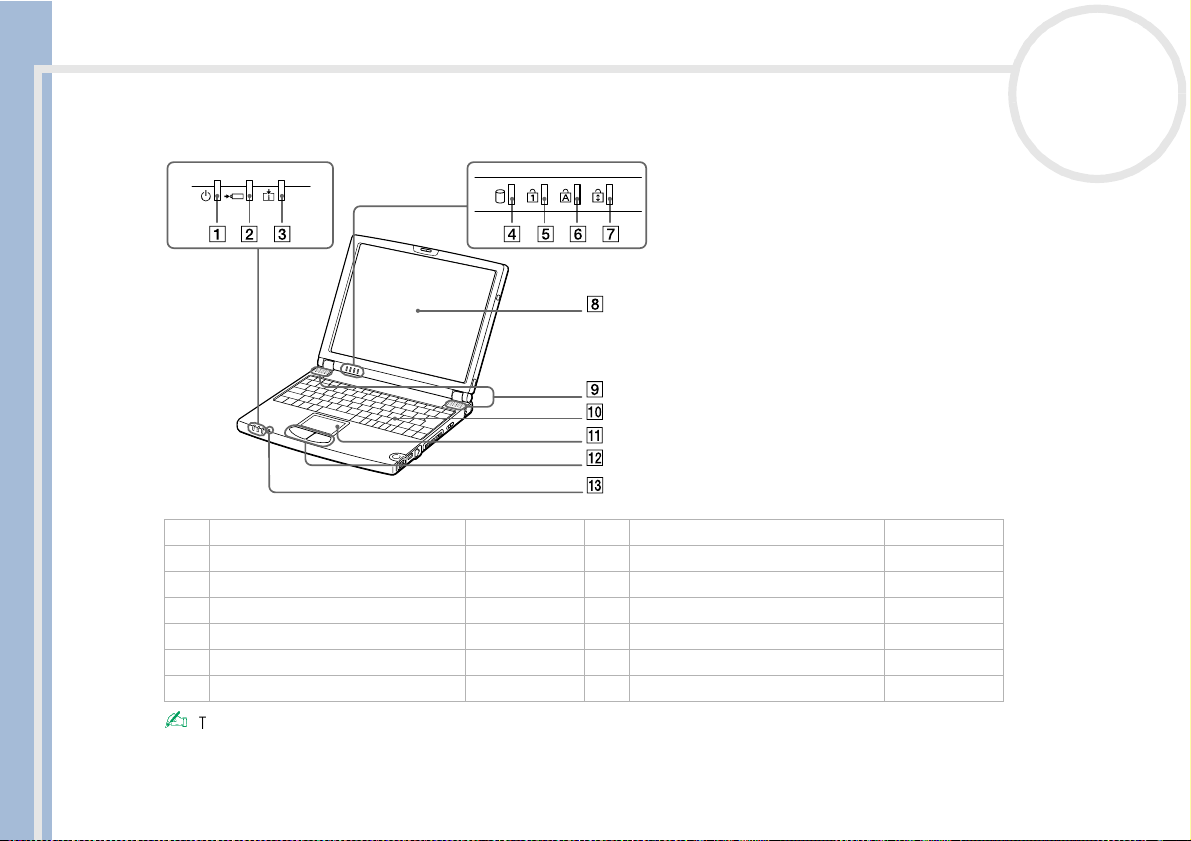
Front
There is a ventilation slot located near the power switch. Do not cover the ventilation slot when your computer is on.
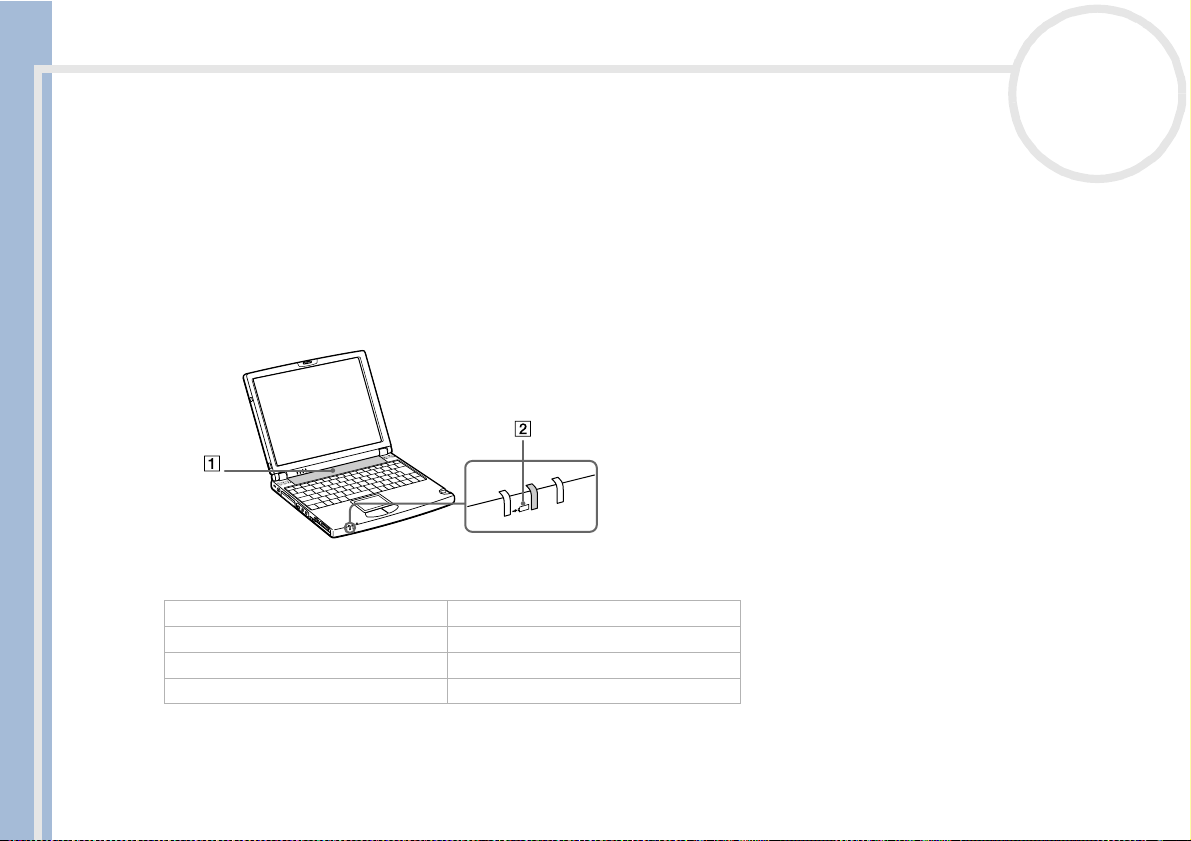
1 power indicator (page 26) 8 LCD screen (page 27)
2 battery indicator (page 26) 9 speaker (page 27)
3 information indicator (page 26) 10 keyboard (page 24)
4 hard disk drive indicator (page 26) 11 touchpad (page 28)
5 Num Lock indicator (page 26) 12 left/right buttons (page 28)
6 Caps Lock indicator (page 26) 13 internal microphone (page 49)
7 Scroll Lock indicator (page 26)
Sony Notebook User Guide
Using your notebook
16
nN
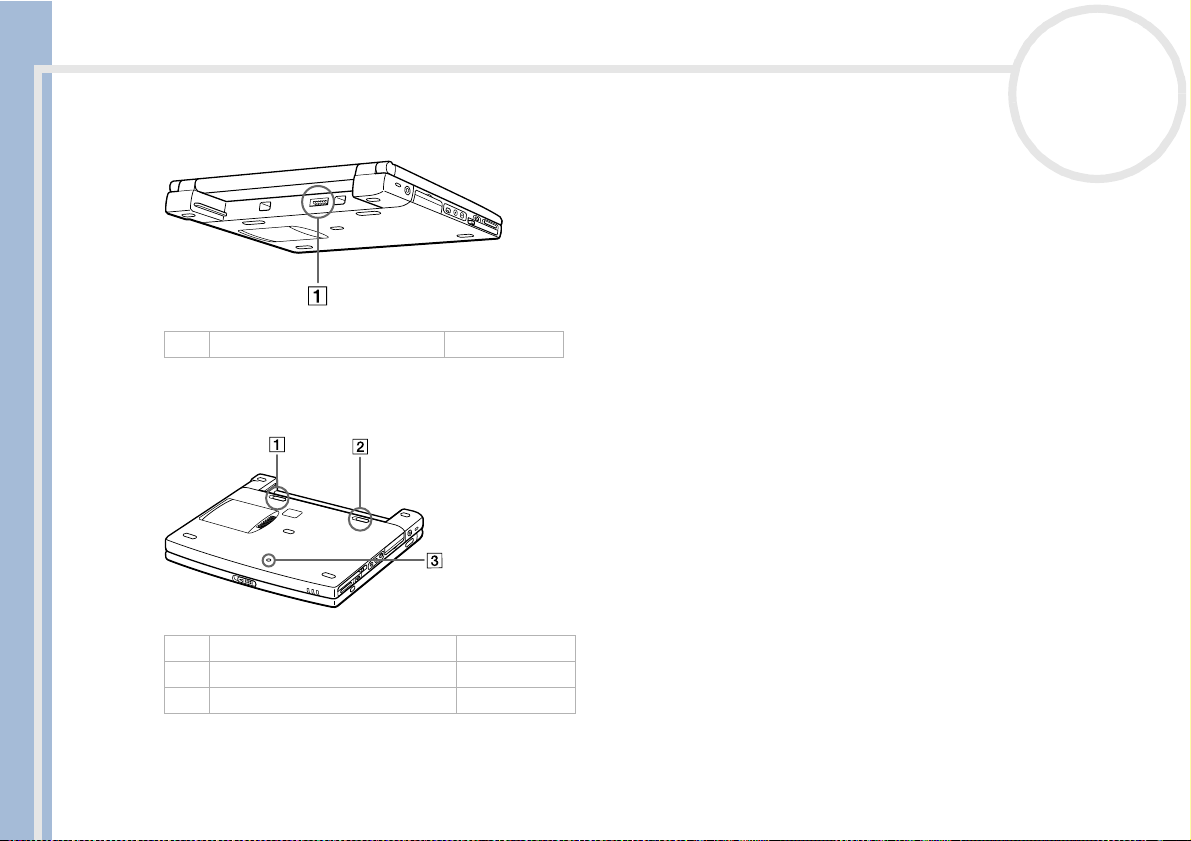
Back
Bottom
1 battery connector (page 18)
1 battery release lever (page 18)
2 battery lock lever (page 18)
3 reset switch
Sony Notebook User Guide
Using your notebook
17
nN
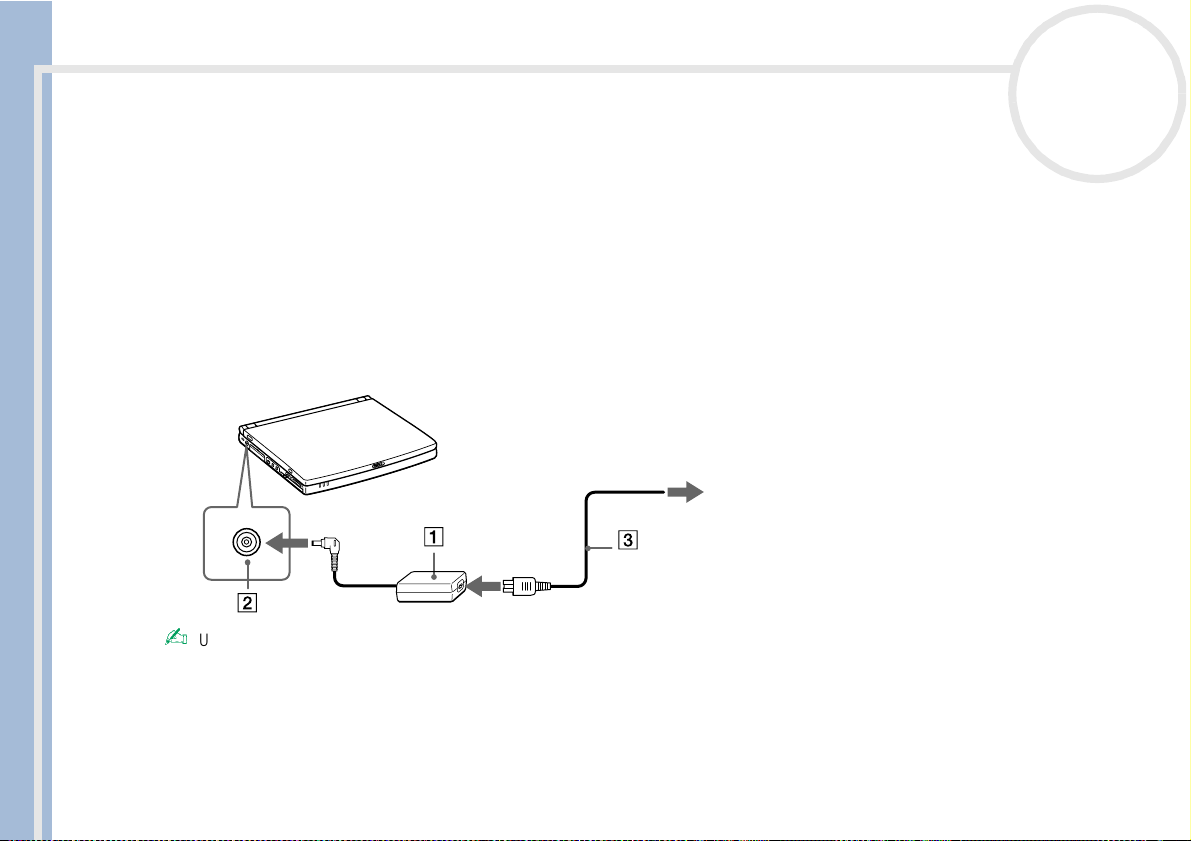
Connecting a power source
You can use either an AC adapter or a rechargeable battery pack as a power source.
Using the AC adapter
To use the AC adapter, proceed as follows:
1 Plug the cable attached to the AC adapter (1) into the DC In connector (2) on the computer.
2 Plug one end of the power cord (3) into the AC adapter.
3 Plug the other end of the power cord into an AC outlet.
Use your notebook only with the supplied AC adapter.
To disconnect your notebook completely from mains voltage, unplug the AC adapter.
Make sure that the socket outlet is easily accessible.
Sony Notebook User Guide
Using your notebook
18
nN
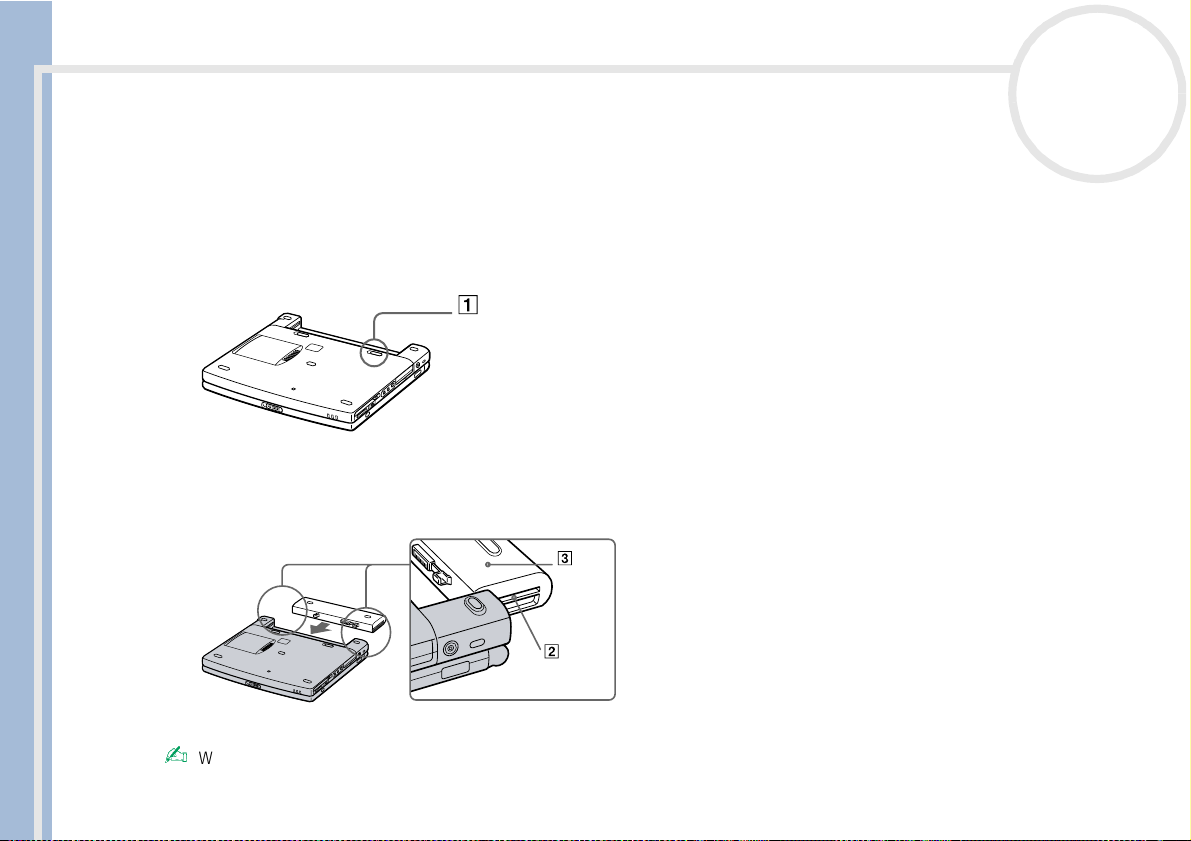
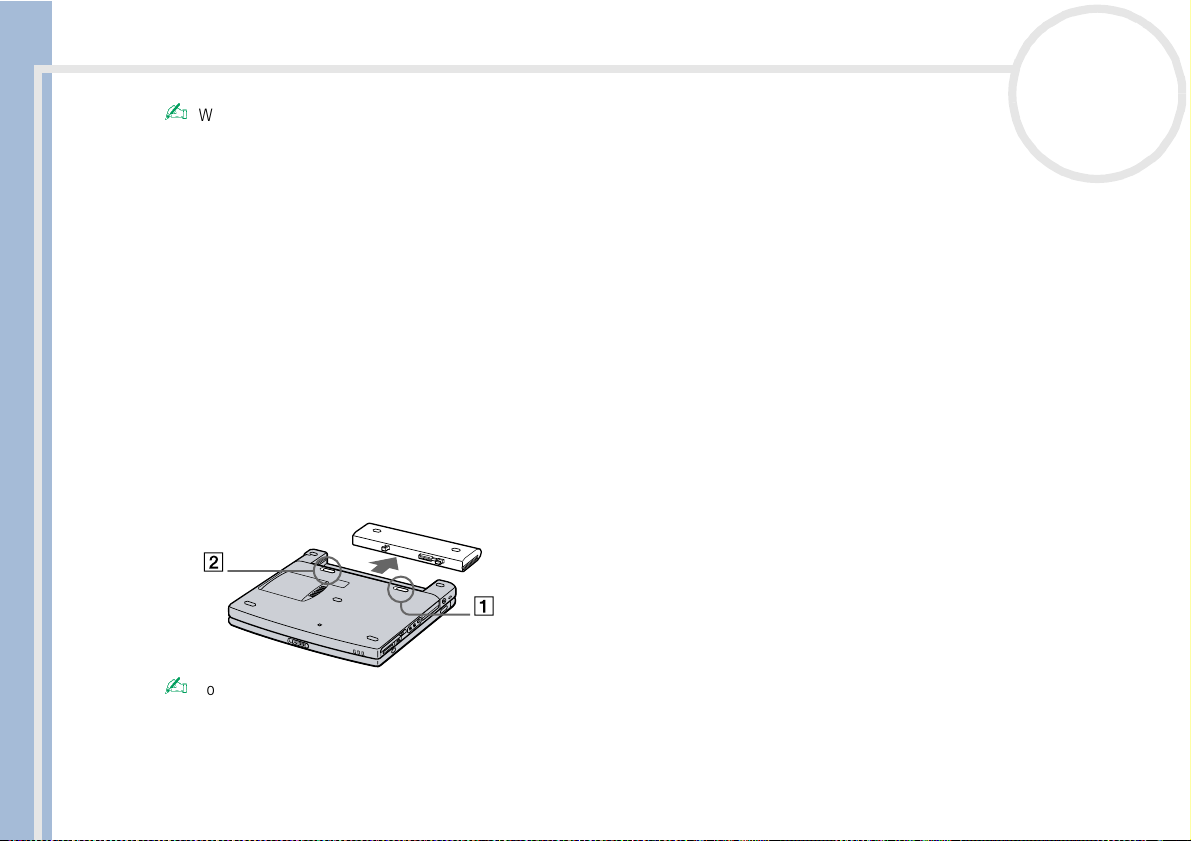
Using the battery pack
You can use a battery pack as a source of power.
The battery pack supplied with your computer is not fully charged at the time of purchase.
Inserting the battery pack
To insert the battery, proceed as follows:
1 Move the lock lever (1) on the bottom of the computer to the Unlock position.
2 Align the grooves (2) and tabs on the battery (3) with the tabs and notches on the back of the computer,
and then slide the battery towards the computer until it clicks into place.
3 Slide the lock lever into the Lock position to secure the battery on the computer.
When the computer is directly connected to AC power and has a battery pack inserted in the battery bay, it uses power from the AC outlet.
! Make sure the cover is closed before inserting the battery pack.
Sony Notebook User Guide
Using your notebook
19
nN
Charging the battery pack
To charge the battery pack, proceed as follows:
1 Connect the AC adapter to the computer.
2 Insert the battery pack.
The computer automatically charges the battery (1) (the battery indicator (2) light flashes in a double
blink pattern as the battery charges). When the battery is 85% full, the battery indicator light turns off.
This process takes approximately two and a half hours. To charge the battery completely, continue
charging for an additional hour.
battery indicator light status meaning
on The computer is using battery power.
single blink The battery is running out of power.
double blink The battery is charging.
off The computer is using AC power.
Sony Notebook User Guide
Using your notebook
20
nN
When the battery is running out of power, both the battery and power indicators blink.
Keep the battery pack in the computer while it is directly connected to AC power. The battery pack continues to charge while you are using the
computer.
If the battery level falls to below 10%, you should either attach the AC adapter to recharge the battery or shut down your computer and insert a fully
charged battery.
You can extend battery life by changing the power management modes in the PowerPanel utility.
The battery pack supplied with your computer is a lithium ion battery and can be recharged any time. Charging a partially discharged battery does
not affect battery life.
The battery indicator light is on while you use the battery pack as a power source. When the battery life is nearly depleted, the battery indicator starts
flashing.
Removing the battery pack
To remove the battery pack, proceed as follows:
1 Turn off the computer and close the cover.
2 Slide the lock lever (1) to the Unlock position.
3 Slide the release lever (2) to the Unlock position and slide the battery away from the computer.
You can remove the battery pack without turning off the computer when it is connected to the mains voltage (AC adapter).
Close the cover before you remove the battery pack.
You may lose data if you remove the battery pack while the computer is on and not connected to the AC adapter or if you remove the battery while
the computer is in system suspend mode.
Sony Notebook User Guide
Using your notebook
21
nN
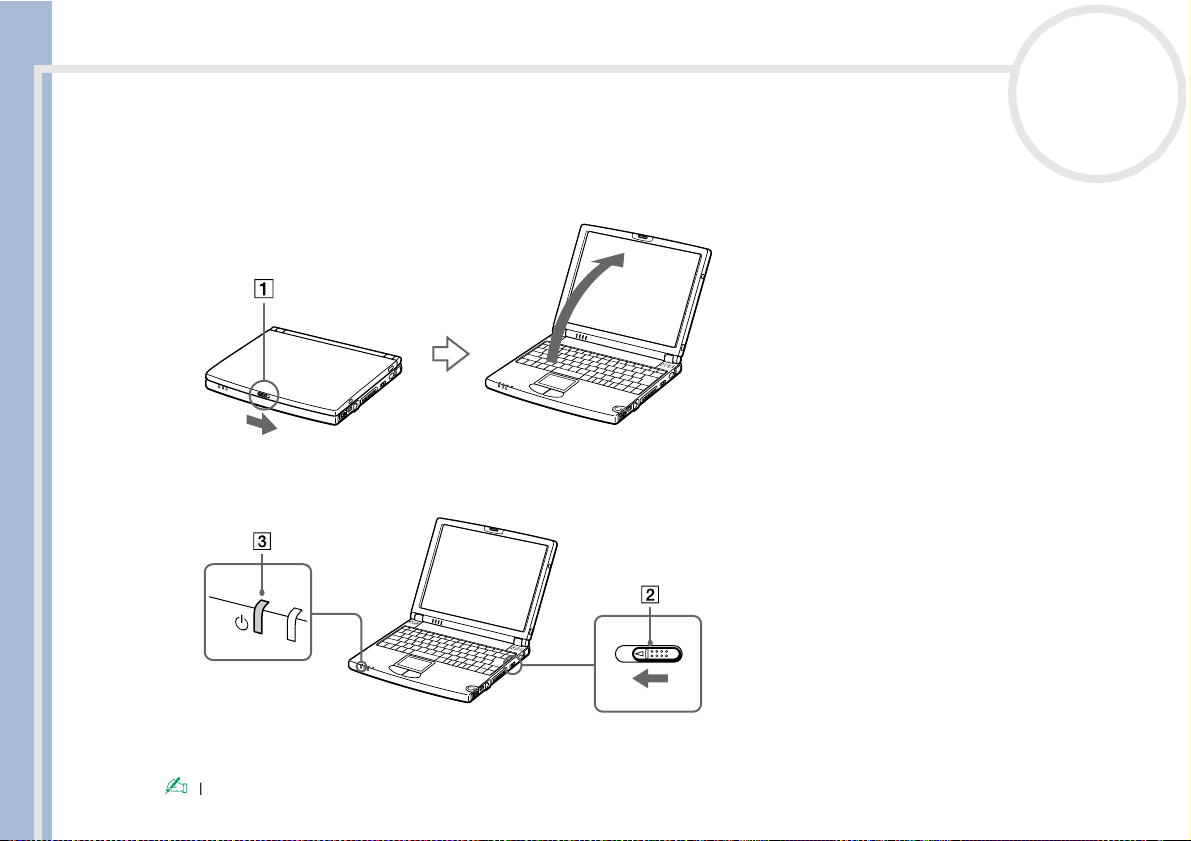
Starting your notebook
To start your computer, proceed as follows:
1 Slide the LCD lock lever (1) in the direction of the arrow, and lift the cover.
2 Slide the power switch (2) on the right side toward the front of the computer until the green power
indicator (3) light turns on.
3 If necessary, press <Fn>+<F5> to adjust the brightness controls for the LCD display. To increase the
brightness, use the up or right arrow keys. To decrease, use the down or left arrow keys.
If you hold the power switch in the on position for more than four seconds, the computer will turn off.

Sony Notebook User Guide
Using your notebook
22
nN
Shutting down your notebook
It is important that you shut down your computer properly in order not to lose unsaved data.
To shut down your computer, proceed as follows:
1 Click the Start button on the Windows
®
taskbar.
2 Click Shut Down.
The Shut Down dialog box appears.
3 Select Shut down.
4 Click OK.
5 Wait for your computer to turn off automatically.
The power indicator turns off.
6 Turn off any peripheral connected to your computer.
Respond to any prompts warning you to save documents.
If you are unable to shut down your computer:
close all software in use,
remove the PC Cards if inserted,
disconnect any USB devices,
Then press the <Ctrl>+<Alt>+<Delete> keys at the same time and click Shut Down. If this does not work, you can slide the power switch
forward and hold for four seconds. This will shut down the computer. This operation may result in data loss.
During a period of inactivity, you can conserve battery life by using System Suspend mode.
Sony Notebook User Guide
Using your notebook
23
nN
Registering your notebook
You can take advantage of Sony’s commitment to quality customer support and receive the following
benefits by registering your computer:
VAIO-Link – If you are experiencing any problems with your computer, you can check the VAIO-Link web
site for a possible solution:
http://www.vaio-link.com
Guarantee – Protect your investment. See the Guarantee sheet for the terms and conditions and refer
to your Customer Service Guide for more information.
To register your Sony Notebook, proceed as follows:
1 Click on the Welcome button on your desktop,
2 Click Next,
3 Click Internet,
4 Fill in your Registration card fields,
5 Scroll down to the bottom of the form and click Send,
6 Click OK.
You must connect your phone line before using any online services, including the online registration service.
To access the online Registration web page, you must have a connection to the Internet.
Sony Notebook User Guide
Using your notebook
24
nN
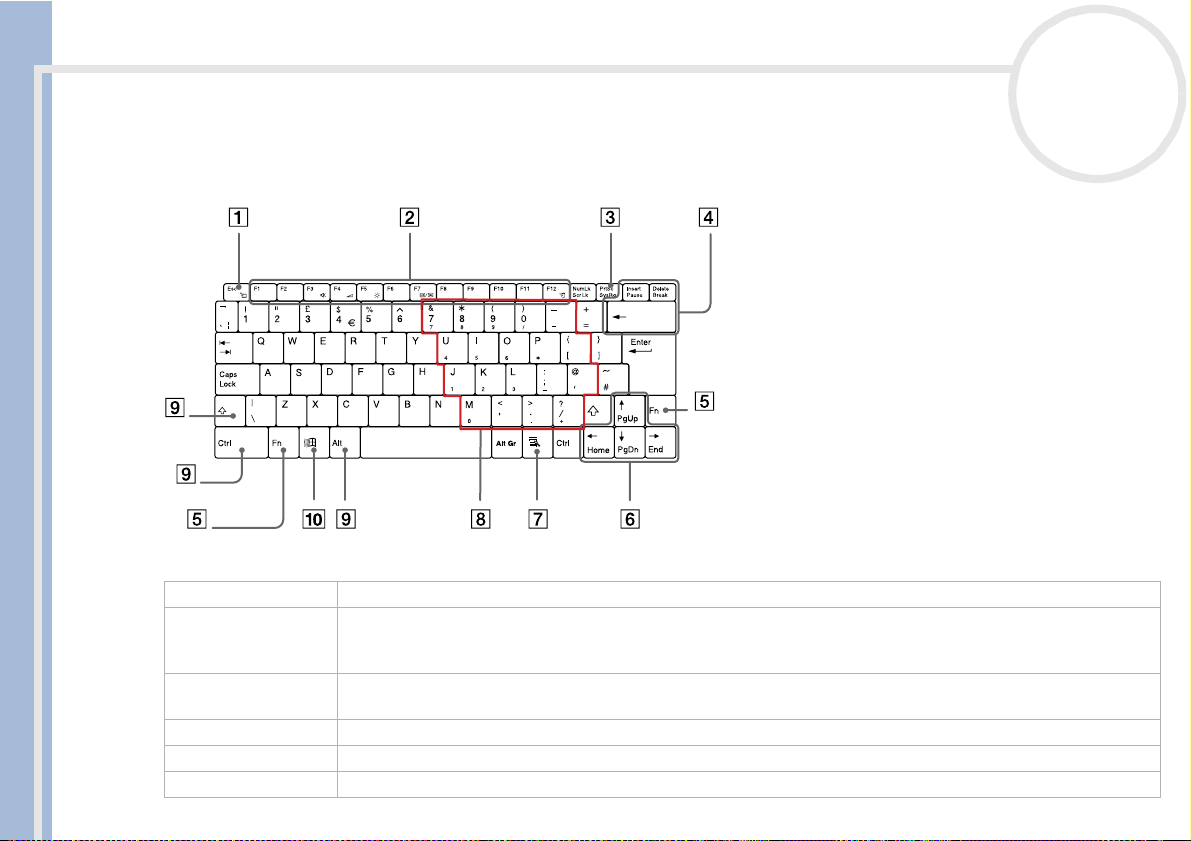
Using the keyboard
Your keyboard is very similar to a desktop computer’s, but the keyboard has additional keys that perform
specific notebook-related tasks.
Keys Descriptions
Escape key (1) The <Esc> (Escape) key is used to cancel commands.
Function keys (2) The twelve function keys along the top of the keyboard are used to perform designated tasks. For example,
in many applications, <F1> is the Help key. The task associated with each function key may vary from one
application to the next.
Print Screen key (3) The <Print Screen> key takes an electronic snapshot of the screen and moves it to the Windows Clipboard.
You can then paste the screenshot into a document and print it.
Correction keys (4) The <Insert>, Back Space and <Delete> keys enable you to make corrections.
Fn key (5) The <Fn> key is used in combination with other keys to execute commands.
Navigation keys (6) These keys enable you to move the cursor on the screen.
Sony Notebook User Guide
Using your notebook
25
nN
Combinations and functions with the Windows key
Application key (7) The Application key displays a shortcut menu; pressing this key is equivalent to clicking the right mouse
button.
Numeric keypad area
(8)
Contains the keys found on a typical calculator. Use the numeric keypad area to type numbers or to perform
mathematical calculations such as addition and subtraction. Note that you must press the <Num Lock> key to
activate the numeric keypad. When you do so, the Num Lock light illuminates.
Operator keys (9) Several keys are always used with at least one other key: <Ctrl>, <Alt>, and <Shift>. When held down with
another key, the <Ctrl> (Control) and <Alt> (Alternate) keys offer another way to execute commands. For
example, in many applications, instead of choosing the Save command from a menu, you can hold down
<Ctrl> and press S (referred to as Ctrl+S). The <Shift> key is used to produce capital letters or special symbols
such as @ and $.
Windows
®
key (10) The key with the Windows
®
logo displays the Windows
®
Start menu; it is equivalent to clicking the Start
button on the taskbar.
Combinations Functions
+ F1 Displays Windows Help.
+ Tab Switches the selected button on the taskbar.
+ E Displays Windows Explorer.
+ F Displays the Search Results window to find a file or folder.
This is equivalent to selecting Search and then For files or Folders from the Start menu.
+ Ctrl + F Displays the Search Results - Computer window where you can locate other computers.
+ M Minimizes all displayed windows.
Shift + + M Returns all minimized windows to their previous size.
+ R Displays the Run window. This is equivalent to selecting Run from the Start menu.
+ Insert Displays the System Properties window. This is equivalent to dou ble-clicking the System icon in the Control
Panel.
Keys Descriptions

Sony Notebook User Guide
Using your notebook
26
nN
Indicators
Indicator Functions
power Power on: lights green. System Idle mode: lights amber.
System Suspend mode: flashes amber.
battery Indicates the status of the battery inserted in the computer.
information Turns on when the Timer function of Jog Dial Setup is set. Turns off when the Timer is not set or the Timer
is inactive (for example, when the power is off or when the computer is in System Hibernation mode).
Light On Off
hard disk Data is read from or written to the hard drive. Do not
enter System Suspend mode or turn off the
computer when this indicator light is on.
The hard drive is not being accessed.
Num Lock Turns on when the number keys in the numeric
keypad are active.
Turns off when the alphanumeric character keys in the
keypad area are active.
Caps Lock Turns on when the letters appear in uppercase as you
type. The <Shift> key lowers the case of typed letters
when Caps Lock is on.
Turns off when the letters appear in lowercase as you
type (unless you hold down the <Shift> key).
Scroll Lock Turns on when the screen scrolls differently (depends
on the application, no effect in many applications.)
Turns off when the information moves across the
display normally.
Loading...