


 Loading...
Sony PCG-R505JEK, PCG-R505JE, PCG-R505JL-C, PCG-R505JL, PCG-R505JSP User Manual
...VAIO® R505
SuperSlim Pro™
Notebook Quick Start
PCG-R505JS/PCG-R505JSK/PCG-R505JSP PCG-R505JE/PCG-R505JEK/PCG-R505JEP PCG-R505JL/PCG-R505JLK/PCG-R505JLP PCG-R505JL/C

Contents
Welcome....................................................... |
5 |
Features ....................................................................... |
5 |
Unpacking Your Notebook ......................................... |
6 |
Registering Your Notebook ........................................ |
8 |
Setting Up Your Dial-Up Connection......................... |
9 |
Setting Up Your VAIO Notebook.............. |
13 |
Locating Controls and Connectors............................ |
14 |
Connecting the Docking Station ............................... |
20 |
Disconnecting the Docking Station........................... |
22 |
Connecting a Power Source ...................................... |
26 |
Starting Your Notebook ............................................ |
32 |
Shutting Down Your Notebook................................. |
33 |
Using Power Saving Modes ...................................... |
34 |
Adding Memory ......................................... |
37 |
Precautions and Procedures....................................... |
37 |
Removing a Memory Module ................................... |
39 |
Installing a Memory Module..................................... |
40 |
Viewing the Amount of Memory .............................. |
43 |
3

VAIO® R505 SuperSlim Pro™ Notebook Quick Start
About the Software on Your Notebook ...45
Overview of the Software on Your Notebook .......... |
45 |
Application, Driver, and System Recovery CDs ...... |
53 |
Using Your Recovery CDs ....................................... |
54 |
Troubleshooting........................................ |
61 |
Getting Help............................................... |
77 |
Support Options ........................................................ |
77 |
Software Support Information .................................. |
79 |
Index........................................................... |
83 |
4

Welcome
Congratulations on your purchase of the Sony VAIO® notebook. Sony has combined leading-edge technology in audio, video, computing, and communications to provide you with state-of-the-art personal computing.
Features
For complete specifications of your VAIO® notebook, refer to the Specifications flyer supplied with your notebook.
Exceptional performance — Your notebook includes a mobile Intel® Pentium® III processor* and a V.90/K56flex-compatible modem.†
Portability — Rechargeable battery pack provides hours of use without AC power, even while you use the optional docking station.
Sony audio and video quality — High-quality MPEG2 video, which supports full-screen display (12.1-inch Active Matrix LCD screen) and enables you to take advantage of today’s advanced multimedia applications, games, and entertainment software.
Multimedia features — Enjoy the stereo speakers or use headphones (not supplied) to listen to audio and video CDs.
Microsoft Windows® operating system — Your system includes the latest Microsoft® Windows® operating system.
Communications — Access popular online services, send e-mail, browse the Internet, and use fax features.
* CPU speed will be reduced under certain operating conditions.
†Actual upload and download speeds may vary due to line conditions, ISP support, and government regulations.
5
VAIO® R505 SuperSlim Pro™ Notebook Quick Start
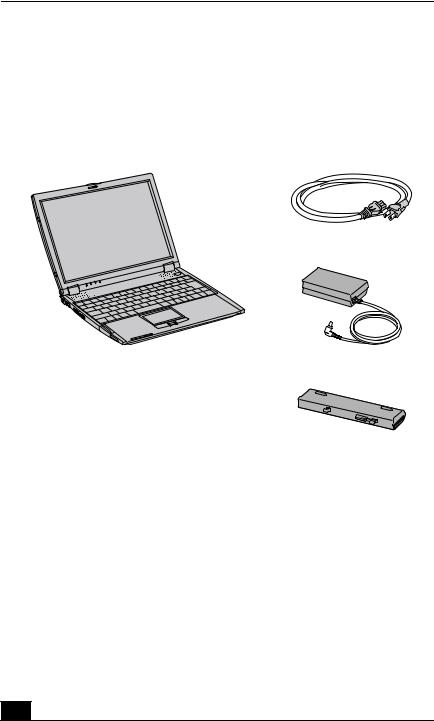
Unpacking Your Notebook
Remove the following hardware, documents, and CDs from the box:
Hardware
Main Unit |
Power Cord |
AC Adapter
Rechargeable Battery Pack
Documents
VAIO® R505 SuperSlim Pro™ Notebook Quick Start — Contains details on unpacking and setting up your notebook, supplementary updates, and software information.
Microsoft® Windows® manual — Explains how to use the basic features of the latest Windows operating system.
VAIO® Notebook Specifications flyer — Details the hardware specifications for your notebook and the docking station, which is supplied with selected models.
VAIO® Notebook Notes on Use — Explains notes on use and offers safety tips.
6

Unpacking Your Notebook
Software CDs
Microsoft® Word — Enables you to reinstall Microsoft Word to the VAIO® computer you purchased, if the application becomes corrupted or is erased.
Recovery CDs
Application Recovery CD(s) — Enables you to reinstall individual applications if they become corrupted or are erased.
Driver Recovery CD(s) — Enables you to reinstall individual device drivers if they become corrupted or are erased.
System Recovery CD(s) — Enables you to format the C:\ partition of the hard disk drive, then reinstall the operating system and software titles that shipped with your notebook if they become corrupted or are erased.
To use these recovery CDs, connect the docking station (supplied with selected models) or an optional optical drive, such as a fully atapi compliant PC Card CD-ROM drive, to the notebook.
Other
Packet containing special product offers
Limited Warranty Card
7

VAIO® R505 SuperSlim Pro™ Notebook Quick Start
Registering Your Notebook
Take advantage of Sony’s commitment to quality customer support and receive these benefits by registering your notebook:
Sony Customer Support — Talk to a Support Representative to troubleshoot problems you may be having with your notebook.
Limited Warranty — Protect your investment. See the Limited Warranty Card for more details.
You are prompted to register your computer the first time you turn on the unit. Follow the on-screen instructions to complete the registration process. If you are not able to register your computer during the first session, you are provided with additional registration opportunities later.
8
Setting Up Your Dial-Up Connection
Setting Up Your Dial-Up Connection
This section describes the basic steps for setting up your dial-up connection. The Connection Wizard guides you through the process of connecting to the Internet and then choosing an Internet Service Provider (ISP) or setting up an existing account.
Setting up your Internet connection (Microsoft® Windows XP)
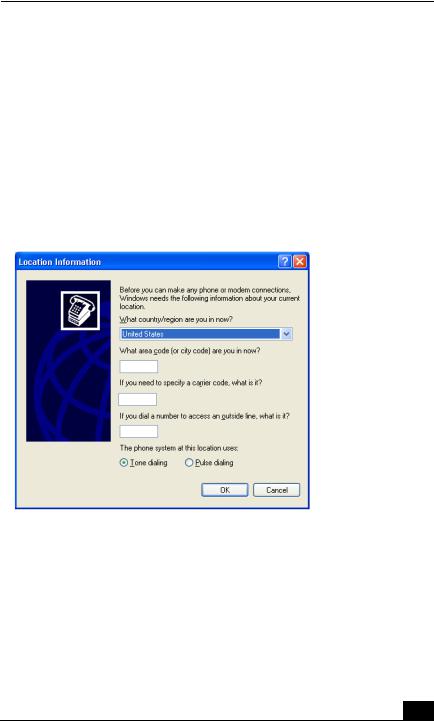
1Click Start, point to All Programs, Accessories, Communications, and then click New Connection Wizard. The Location Information screen appears.
Location Information screen
2Follow the instructions onscreen and then click OK to continue. The Phone and Modem Options screen appears.
9
VAIO® R505 SuperSlim Pro™ Notebook Quick Start
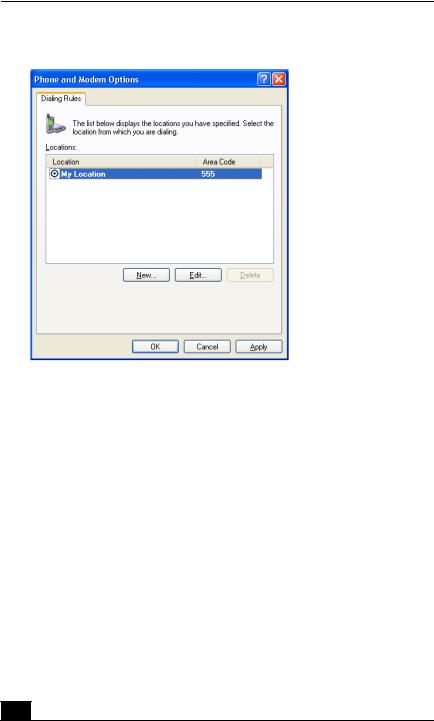
Phone and Modem Options screen
3Select the location from where you are dialing and then click OK. The New Connection Wizard appears.
10
Setting Up Your Dial-Up Connection
New Connection Wizard
4Follow the onscreen instructions to finish setting up your Internet connection.
11

VAIO® R505 SuperSlim Pro™ Notebook Quick Start
Setting up your dial-up connection (Windows 2000)
1Click Start, point to Programs, Accessories, Communications, and then click Internet Connection Wizard. The Internet Connection Wizard appears.
Internet Connection Wizard.
2Follow the onscreen instructions to finish setting up your Internet connection.
12

Setting Up Your VAIO Notebook
This section describes the following:
Locating Controls and Connectors
Connecting the Docking Station
Disconnecting the Docking Station
Connecting a Power Source
Starting Your Notebook
Shutting Down Your Notebook
Using Power Saving Modes
13

VAIO® R505 SuperSlim Pro™ Notebook Quick Start
Locating Controls and Connectors
On the Notebook
Front
|
|
|
4 |
1 |
Power indicator |
8 |
Scroll lock indicator |
2 |
Battery indicator |
9 |
LCD screen |
3 |
Memory Stick® indicator |
10 |
Speakers |
4 |
Docking Station indicator |
11 |
Power button |
5 |
Hard disk drive indicator |
12 |
Keyboard |
6 |
Num lock indicator |
13 |
Touchpad |
7 |
Caps lock indicator |
14 |
Left and right buttons |
14
Locating Controls and Connectors
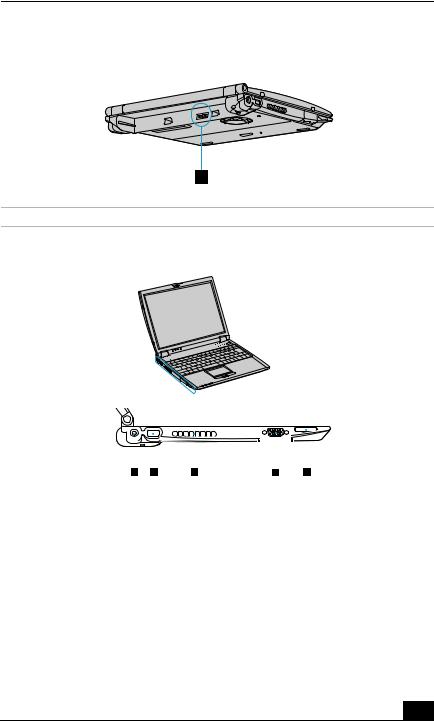
Back
1 Battery port
Left
|
|
|
|
|
|
|
|
|
|
|
|
|
|
|
|
|
|
|
|
|
|
|
|
|
|
|
|
|
|
|
|
|
|
|
|
|
|
|
|
|
|
|
|
|
|
|
|
|
|
|
|
|
|
|
|
|
|
|
|
|
|
|
|
|
|
|
|
|
|
|
|
|
|
|
|
|
|
|
|
|
|
|
|
|
|
|
|
|
|
|
|
|
|
|
|
|
|
|
|
|
|
|
|
1 |
DC In port |
4 |
Monitor port |
|||||||||
|
|
|
|
|
|
|
|
|
|
|
|
|
2 |
USB port |
5 |
Memory Stick® slot |
|||||||||
|
|
|
|
|
|
|
|
|
|
|
|
|
3 |
Air vent |
|
|
|
|
|
|
|
|
|
|
|
|
|
|
|
|
|
|
|
|
|
|
|
|
15

VAIO® R505 SuperSlim Pro™ Notebook Quick Start
Right
|
|
|
|
|
|
|
|
|
|
|
|
|
|
|
|
|
|
|
|
|
|
|
|
|
|
|
|
|
|
|
|
|
|
|
|
|
|
|
|
|
|
|
|
|
|
|
|
|
|
|
|
|
|
|
|
|
|
|
|
|
|
|
|
|
|
|
|
|
|
|
|
|
|
|
|
|
|
|
|
|
|
|
|
|
|
|
|
|
|
|
|
|
|
|
|
|
|
|
|
|
|
|
|
|
|
|
|
|
|
|
|
|
|
|
|
|
|
|
|
|
|
|
|
|
|
|
|
|
|
|
|
|
|
|
|
|
|
|
|
1 |
USB port |
5 |
|
PC Card slot |
|||||||||||||||
|
|
|
|
|
|
|
|
|
|
|
|
|
|
|
|
|
|
|
|
2 |
Headphone jack |
6 |
|
Ethernet port |
|||||||||||||||
|
|
|
|
|
|
|
|
|
|
|
|
|
|
|
|
|
|
|
|
3 |
Microphone jack |
7 |
|
Phone line jack |
|||||||||||||||
4 i.LINK® (IEEE1394) S400 port
Only connect 10Base-T and 100Base-TX cables to the  Ethernet port. Do not connect any other type of network cable or any telephone line. Connecting cables other than those listed above may result in an electric current overload and could cause a malfunction, excessive heat, or fire in the port. To connect the unit to the network, contact your network administrator.
16
Locating Controls and Connectors
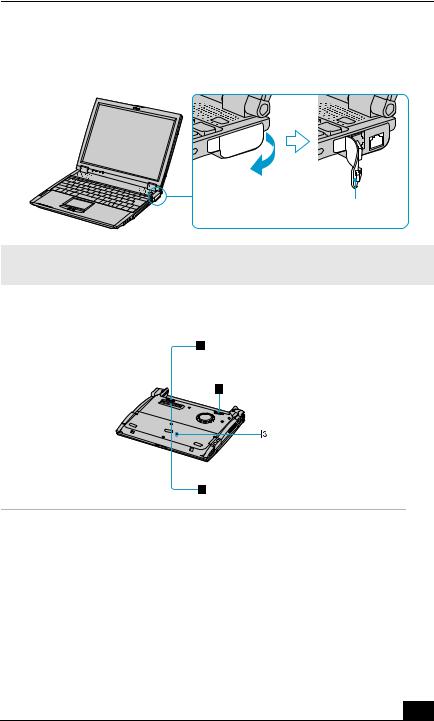
Removing Rubber Tab
Rubber tab
Gently pull the rubber tab away from the notebook to find the Ethernet port and phone line jack.
Bottom
1 |
Battery unlock/lock lever |
3 |
Reset switch |
2 |
Battery unlock lever |
4 |
Docking station connector |
|
|
|
|
17
VAIO® R505 SuperSlim Pro™ Notebook Quick Start
On the Docking Station
Your notebook may come with a PCGA-DSD5 or PCGA-DSM5 docking station, depending on the model you purchased. Both Sony docking stations provide you with the following features:
A floppy disk drive.
An optical drive.
A back panel that enables you to connect additional peripherals to your notebook, as shown below.
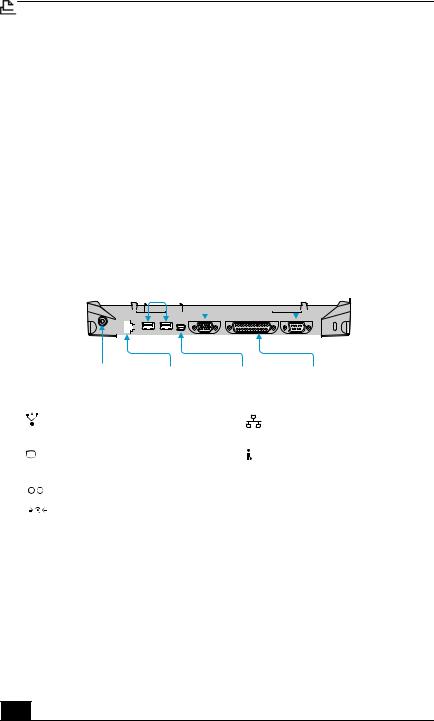
Back Panel
|
1 |
|
|
|
|
|
2 |
|
3 |
|
|
|
|
|||||||||||||
|
|
|
|
|
|
|
|
|
|
|
|
|
|
|
|
|
|
|
|
|
|
|
|
|
|
|
|
|
|
|
|
|
|
|
|
|
|
|
|
|
|
|
|
|
|
|
|
|
|
|
|
|
|
|
|
|
|
|
|
|
|
|
|
|
|
|
|
|
|
|
|
|
|
|
|
|
|
|
|
|
|
|
|
|
|
|
|
|
|
|
|
|
|
|
|
|
|
|
|
|
|
|
|
|
|
|
|
|
|
|
|
|
|
|
|
|
|
|
|
|
|
|
|
|
|
|
|
|
|
|
|
|
|
|
|
4 |
|
5 |
|
6 |
|
7 |
|
|
|
|
|
|
|
|
|
|
|
|
|
|
|
|
|
|
|
1 |
|
|
|
|
|
USB ports |
5 |
Ethernet port |
|
|
|
|
|
|
|
|
(10BaseT/100Base-TX) |
|
|
|
|
|
|
|
|
|
2 |
|
|
|
|
|
Monitor port |
6 |
i.LINK®* (IEEE 1394) |
|
|
|
|
|
|
|
|
S400 port |
|
|
|
|
|
|
|
|
|
3 |
|
|
|
|
|
Serial port |
7 |
Printer port |
|
|
|
||||||
|
|
|
||||||
|
|
|
|
|
|
|
|
|
4 |
|
|
|
|
|
DC In port |
|
|
|
|
|
|
|
|
|
|
|
18

Locating Controls and Connectors
Left
1 Left lever |
3 |
Floppy disk drive |
2 Air vent
Right
1 |
Optical drive |
3 |
DC In indicator |
2 |
UNDOCK switch |
4 |
Right lever |
|
|
|
|
19
VAIO® R505 SuperSlim Pro™ Notebook Quick Start
Connecting the Docking Station
You may connect your notebook to the docking station as long as it is not in power saving mode, i.e., Standby or Hibernate. Connecting the notebook while it is in power saving mode may result in data loss or a computer malfunction. Note the following before connecting your notebook to the docking station:
Disconnect the VGA, USB, AC, and Ethernet devices from your notebook. Leaving these devices connected while you connect the docking station could damage them.
Ensure that the battery is installed. If you install a charged battery, you can connect the docking station while the notebook is on.
Follow the procedure below to connect your notebook to the docking station:
1Plug one end of the AC adapter cable into the DC In port of the docking station and the other end into an AC outlet. The LED of the DC In port switches on.
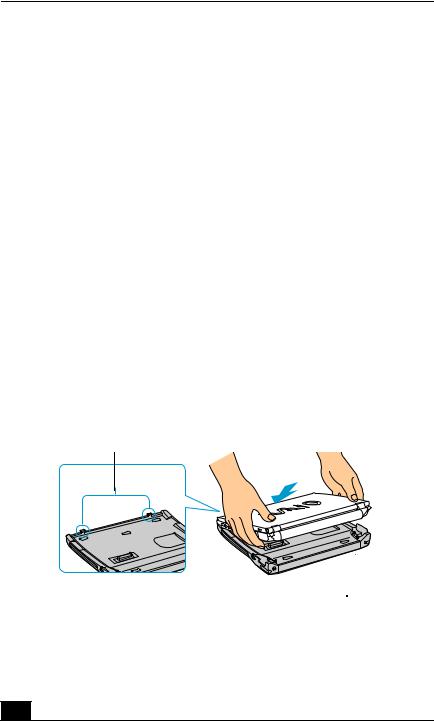
2Holding the notebook with the front side facing you, insert the two holes on the front of the notebook into the two corresponding latches protruding from the front side of the docking station.
Latching the Notebook to the Docking Station
Latches Protruding from Docking Station
Docking Station
20
Connecting the Docking Station
3Firmly press down the two rear corners of the notebook until it clicks into place and is securely fastened to the docking station.
Be careful not to press the top of the notebook too strongly. The LCD display may be damaged.
Securing the Notebook to the Docking Station
Firmly press down the two rear corners of the notebook until it clicks into place.
21
VAIO® R505 SuperSlim Pro™ Notebook Quick Start
Disconnecting the Docking Station
You may disconnect the notebook from the docking station when the notebook is off or on. However, do not disconnect the notebook from the docking station while the docking indicator is on, while the notebook is in Standby or Hibernate mode, or while battery power is low. If you do attempt to disconnect the docking station in any of these three states, you may lose data or the notebook may malfunction.
When the battery is low, turn off the notebook before you disconnect the docking station.
Follow one of the two procedures below to disconnect the docking station when the notebook is off or on.
Disconnecting the docking station when the notebook is off
Before you begin, disconnect all peripheral devices (i.e., i.LINK devices) from the notebook and the docking station. Also, remove all objects placed on top of the notebook.
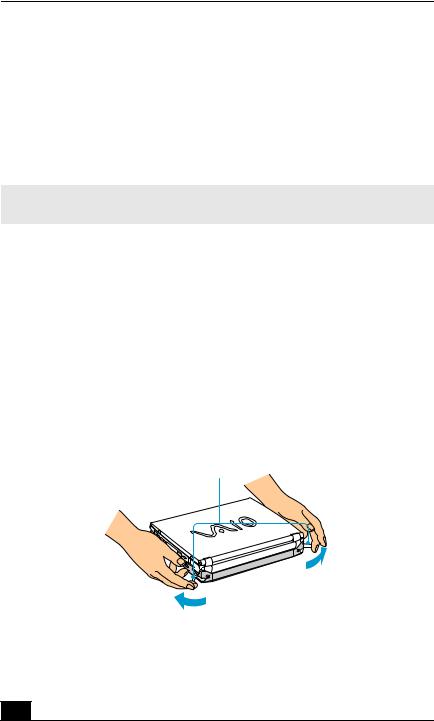
1Pull out the two release levers on either side of the rear corners of the docking station, to release the notebook from the docking station.
Releasing the Notebook from the Docking Station
Pull release levers on either side of rear corners of docking station
22
Disconnecting the Docking Station
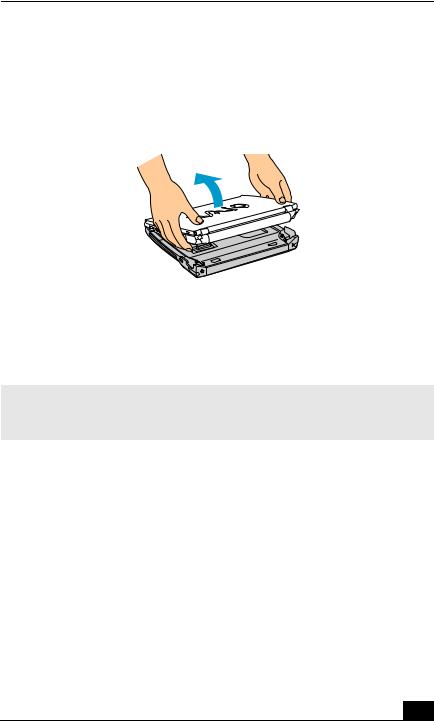
2Remove the notebook from the docking station, while moving the notebook slightly back to disengage it from the two front latches of the docking station.
Removing the Notebook from the Docking Station
Disconnecting the docking station when the notebook is on
You can use the Start Menu in the Windows® task tray or the UNDOCK switch on the docking station to disconnect your notebook from the docking station while the notebook is on.
(Microsoft® Windows XP) If you switch user accounts using Fast User Switching, the UNDOCK switch function on the docking station will be interrupted. Instead, follow the instructions to disconnect the docking station from the Start menu.
23
VAIO® R505 SuperSlim Pro™ Notebook Quick Start
From the Start menu
1Click Start in the Windows® taskbar.
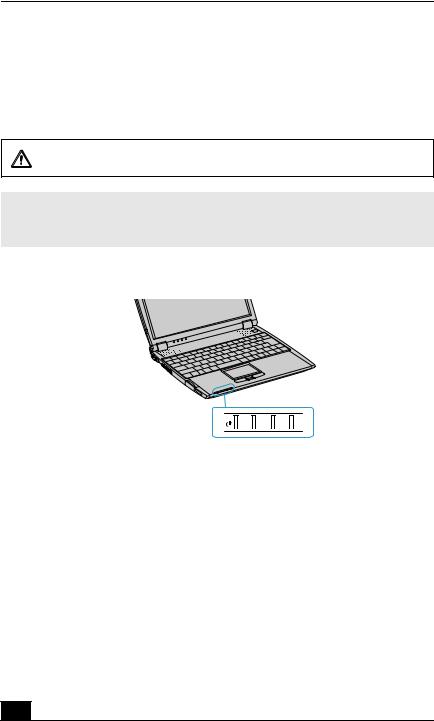
2Select Unlock Computer to access the Undock Complete dialog box.
Wait for the docking indicator to switch off before undocking the notebook.
Once the Undock Complete dialog box appears, continue on to step 3 to finish undocking the notebook. This prevents you from leaving the notebook on the docking station in this released state for too long.
Docking Indicator
Docking


 Indicator
3Release and remove your notebook. See “Disconnecting the docking station when the notebook is off” on page 22 for instructions.
24

Disconnecting the Docking Station
Using the UNDOCK switch
1Pull the UNDOCK switch on the right side of your notebook. The “Undock Complete” dialog box appears.
Once the “Undock Complete” dialog box appears, continue on to step 2 to finish undocking the notebook. This prevents you from leaving the notebook on the docking station in this released state for too long.
UNDOCK switch
UNDOCK
Switch
2Release and remove your notebook as described in “Disconnecting the docking station when the notebook is off” on page 22.
25
VAIO® R505 SuperSlim Pro™ Notebook Quick Start
Connecting a Power Source
You can use either AC power or a rechargeable battery pack as a power source.
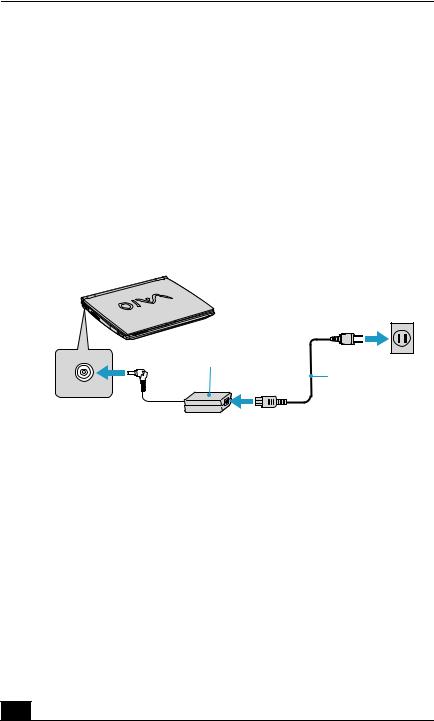
Using the AC adapter
1Plug the cable attached to the AC adapter into the DC In port on the notebook.
2Plug one end of the power cord into the AC adapter.
3Plug the other end of the power cord into an AC outlet.
Connecting AC Adapter
|
Notebook |
DC In |
AC Adapter |
(supplied) |
Power Cord (supplied)
Notes on the AC adapter
Your notebook operates on 100-240V AC 50/60 Hz.
Do not share the AC outlet with other power-consuming equipment, such as a copy machine or shredder.
You can purchase a power strip with a surge protector. This device prevents damage to your computer caused by sudden power surges such as those that may occur during an electrical storm.
Do not place heavy objects on the power cord.
To disconnect the cord, pull it out by the plug. Never pull the cord itself.
Unplug your notebook from the wall outlet if you will not be using the notebook for a long time.
26
Loading...