


Sony KDL-40NX5xx, KDL-32EX6xx, KDL-32BX4xx, KDL-32EX3xx, KDL-26EX3xx User Manual
...LCD
Digital Colour TV
Operating Instructions
4-168-148-15(1)
Start-up Guide
i-MANUAL
Additional Information
For useful information about Sony products
KDL-46EX4xx / KDL-40BX4xx / KDL-40EX4xx / KDL-40EX6xx / KDL-40NX5xx /
KDL-37EX4xx / KDL-32BX3xx / KDL-32BX4xx / KDL-32EX3xx / KDL-32EX4xx /
KDL-32EX6xx / KDL-32NX5xx / KDL-26EX3xx / KDL-22EX3xx
© 2010 Sony Corporation |
416814815 |
4-168-148-15(1) |
NOTICE FOR CUSTOMERS IN THE UNITED KINGDOM
A moulded plug complying with BS1363 is fitted to this equipment for your safety and convenience.
Shouldthefuseintheplugsuppliedneedtobereplacedwith the same rating of fuse approved by ASTA or BSI to BS 1362 (i.e., marked with or
or  ) must be used.
When an alternative type of plug is used it should be fitted with the same rating of fuse, otherwise the circuit should be protected by a 10 AMP FUSE at the distribution board.
Iftheplugsuppliedwiththisequipmenthasadetachablefuse cover, be sure to attach the fuse cover after you change the fuse.Neverusetheplugwithout thefusecover.Ifyoushould lose the fuse cover, please contact your nearest Sony service station.
 FUSE
FUSE
FUSE 


How to replace the fuse
Open the fuse compartment with a blade screwdriver, and replace the fuse.
Pleaserefertotheillustrationthatactuallyequippedwiththe product.
Introduction
Thank you for choosing this Sony product.
BeforeoperatingtheTV,pleasereadthismanualthoroughly and retain it for future reference.
Notice for Digital TV function
•Any functionsrelated to Digital TV ( ) willonly work in countriesor areas where DVB-T (MPEG-2 and H.264/ MPEG-4 AVC)digital terrestrialsignals arebroadcastor whereyouhaveaccesstoacompatibleDVB-C(MPEG-2and H.264/MPEG-4 AVC) cableservice. Please confirm with yourlocaldealerifyoucanreceiveaDVB-Tsignalwhereyou liveoraskyourcableprovideriftheirDVB-Ccableserviceis suitable for integrated operation with this TV.
•Your cable provider may chargea fee for their services, or requireyoutoagreetoitstermsandconditionsofbusiness.
•This TV set complies with DVB-T and DVB-C specifications, but compatibility with future DVB-T digital terrestrial and DVB-C digital cable broadcasts are not guaranteed.
•Some Digital TV functions may not be available in some countries/areas and DVB-C cable may not operate correctly with some providers.
For a list of compatible cable providers, refer to the support web site:
http://support.sony-europe.com/TV/DVBC/
ThemanufacturerofthisproductisSonyCorporation, 1-7-1 Konan Minato-ku Tokyo, 108-0075 Japan. The Authorized Representative for EMC and product safety is Sony Deutschland GmbH, Hedelfinger Strasse 61, 70327 Stuttgart, Germany. For any service orguaranteematterspleaserefertotheaddressesgiven in separate service or guarantee documents.
Trademark information
• is a registered trademark of the DVB Project
•HDMI, the HDMI logo and High-Definition Multimedia Interface are trademarks or registered trademarks of HDMI Licensing LLC.
•Manufactured under license from Dolby Laboratories. Dolby and the double-D symbol are trademarks of Dolby Laboratories.
•ABOUT DIVX VIDEO: DivX® is a digital video format created by DivX,Inc. This is an official DivX Certified device that plays DivX video. Visit www.divx.com for more information and software tools to convert your files into DivX video.
ABOUT DIVX VIDEO-ON-DEMAND: This DivX Certified® device must be registered in order to play DivX Video-on-Demand (VOD) content. To generate the registrationcode,locatetheDivXVODsectioninthedevice setup menu.Gotovod.divx.comwiththiscode tocomplete the registration process and learn more about DivX VOD.
•“BRAVIA” and 


 are trademarks of Sony Corporation.
•“XMB™” and “XrossMediaBar” are trademarks of Sony Corporation and Sony Computer Entertainment Inc.
About the model name in this manual
The “xx” that appears on the model name, corresponds to two numeric digits related to design or colour variation.
~
•The illustrations used in this manual are of the KDL32EX402 unless otherwise stated.
Location of the identification label
Labels for Model No. and Power Supply rating (in accordance with applicable safety regulation) are located on the rear of the TV.
2GB

Table of Contents |
|
Start-up Guide |
4 |
Safety information............................................................................................................. |
9 |
Precautions...................................................................................................................... |
10 |
i-MANUAL |
|
Navigating through the Instruction Manual.................................................................. |
11 |
Additional Information |
|
Installing the Accessories (Wall-Mount Bracket)......................................................... |
12 |
Specifications.................................................................................................................. |
15 |
Troubleshooting.............................................................................................................. |
18 |
 : for digital channels only
•Before operating the TV, please read “Safety Information” 9. Retain this manual for future reference.
•Full operating instructions can be found on the screen.
•Instructions about “Installing Wall Mount Bracket” are included within this TV’s instructions manual.
3 GB
Start-up Guide
1: Checking the accessories
Mains lead (1) (only for KDL-46EX4xx) Cable holder (1) (only for KDL-40/32NX5xx) Stand (1)*
Screws for stand (4) (only for KDL-46EX4xx) Screws for stand (4 + 3) (only for KDL-40BX4/EX4xx, KDL-37EX4xx, KDL-32BX3/BX4/EX3/EX4xx, KDL26EX3xx, KDL-22EX3xx)
Screws for stand (4 + 4) (only for KDL-40/32EX6xx, KDL-40/32NX5xx)
Remote RM-ED022 (1)
Remote RM-ED036 (1) (only for KDL-40/32EX6xx) Size AAA batteries (2)
* Disassembled except for KDL-46EX4xx.
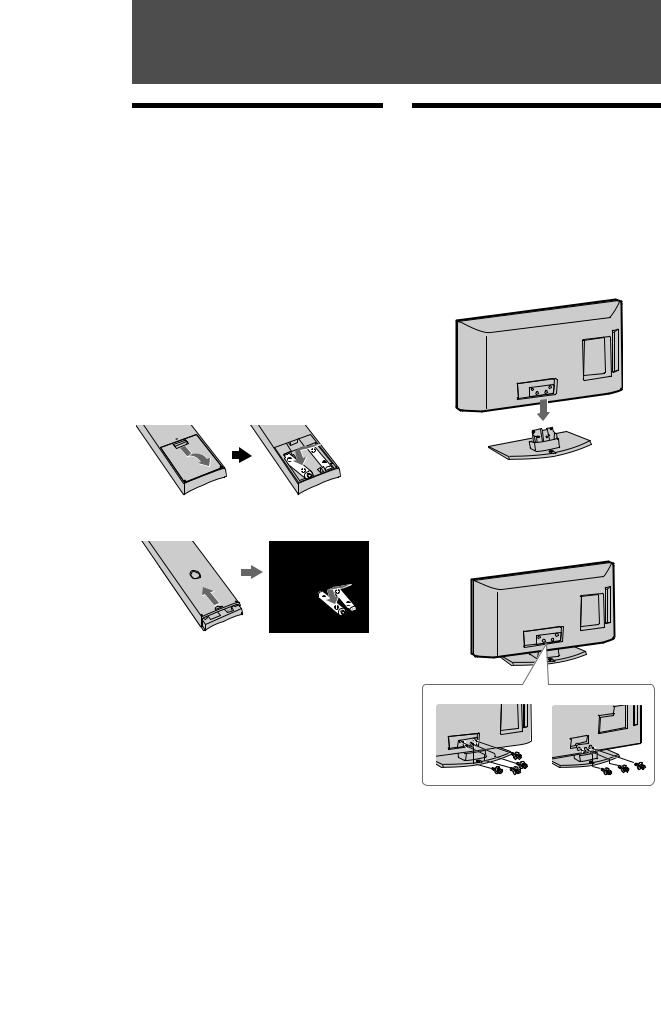
To insert batteries into the remote
(only for KDL-40/32EX6xx)
~
•Observe the correct polarity when inserting batteries.
•Do not use different types of batteries together or mix old and new batteries.
•Dispose of batteries in an environmentally friendly way. Certain regions may regulate disposal of batteries. Please consult your local authority.
•Handle the remote with care. Do not drop or step on it, or spill liquid of any kind onto it.
•Do not place the remote in a location near a heat source, a place subject to direct sunlight, or a damp room.
2: Attaching the stand
Follow the assembling steps required to place on a TV stand.
1 Refer to the supplied Table-Top Stand leaflet for proper attachment for some TV models.
2 Place the TV set on the stand. Take care not to interfere with cables.
3 Fix the TV to the stand according to the arrow marks  that guide the screw holes using the supplied screws.
Only for KDL-22EX3xx
~
•If using an electric screwdriver, set the tightening torque at approximately 1.5 N·m (15 kgf·cm).
4 GB

3: Connecting an aerial/cable/VCR/DVD recorder
Connecting an aerial/cable only
Terrestrial signal
 or cable
Coaxial cable 

Connecting an aerial/cable/VCR/DVD recorder with SCART
Coaxial cable 
Terrestrial signal or cable
Scart lead 
Coaxial cable 
VCR/DVD recorder
~
•AV1 outputs available only for analogue TV.
•AV2 outputs to the current screen (except PC, HDMI, Component, USB).
Connecting an aerial/cable/VCR/DVD recorder with HDMI
|
Coaxial |
up-Start |
|
cable |
|
|
|
|
HDMI cable |
Terrestrial signal |
Guide |
|
or cable  Coaxial cable
VCR/DVD recorder
4: Preventing the TV from toppling over
 2
2
3


 1
1
1 Install a wood screw (4 mm in diameter, not supplied) in the TV stand.
Continued
5 GB
2 Install a machine screw (M4 × 16, not supplied) into the screw hole of the TV.
3 Tie the wood screw and the machine screw with a strong cord.
z
•An optional Sony support belt kit is used to secure the TV. Contact your nearest Sony Service Centre to purchase a kit. Have your TV model name ready for reference.
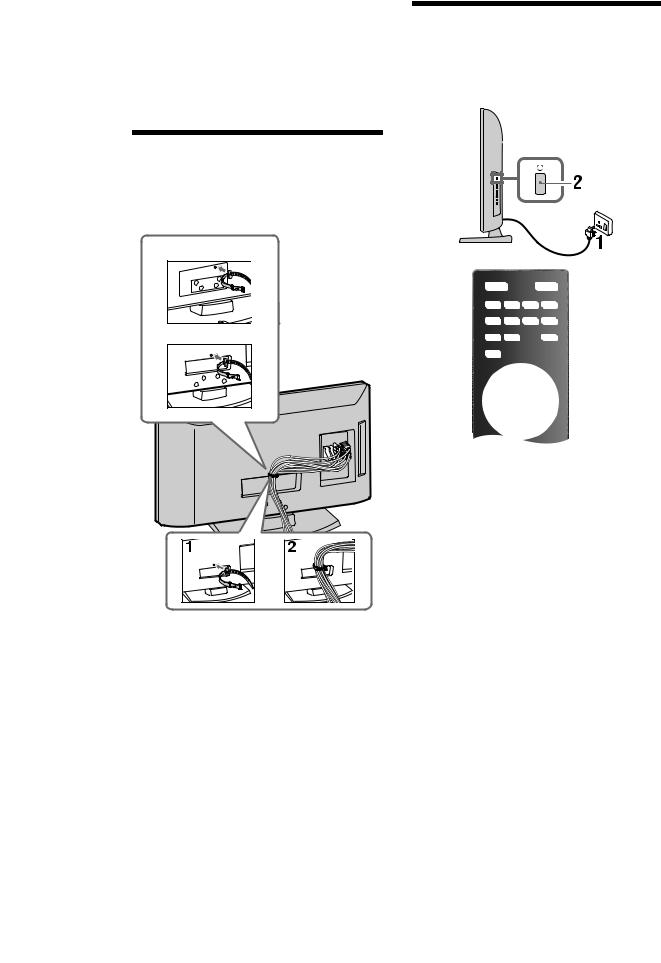
5: Bundling the cables
(only for KDL-40/32NX5xx)
You can bundle the connecting cables as illustrated below.
KDL-32NX5xx |
KDL-40NX5xx |
6: Selecting the language, country/region and location
3,4,5
~
•Do not bundle the mains lead with other connecting cables.
1 Connect the TV to your mains socket
(220-240V AC, 50Hz).
2 Press 1 on the side of the TV.
When you turn on the TV for the first time, the Language menu appears on the screen.
~
•When you turn on the TV, the power indicator light up in green.
3 Press F/f to select the language displayed on the menu screens, then press  .
.
6 GB
 Loading...