

Page 1

MSKOMNM
áåbçë=_äìÉ
kÉï=~ë=çÑW==
bеЦдблЬ
lйЙк~нбеЦ=fелнкмЕнбзел
Page 2

62 99 205 D3446
2 D3446.201.02.02.02 06.2010
Sirona Dental Systems GmbH
Table of contents Operating Instructions inEos Blue
Table of contents
1 Dear Customer, ........................................................................................................ 5
2 General information.................................................................................................. 6
2.1 Structure of the documents ........................................................................... 6
2.1.1 Identification of danger levels............................................................. 6
2.1.2 Formats and symbols used................................................................ 7
2.2 Legend .......................................................................................................... 7
2.3 Warranty........................................................................................................ 7
3 Safety ....................................................................................................................... 8
3.1 Basic safety information ................................................................................ 8
3.1.1 Prerequisites ...................................................................................... 8
3.1.2 Connecting the unit ............................................................................ 8
3.1.2.1Connection to the CEREC 3 acquisition unit...................................... 8
3.1.2.2Connection to the CEREC AC acquisition unit................................... 9
3.1.3 Connection of external equipment ..................................................... 10
3.1.4 Maintenance and repair ..................................................................... 10
3.1.5 Accessories........................................................................................ 10
3.1.6 In case of damage.............................................................................. 10
3.2 Intended use ................................................................................................. 10
3.3 Certification ................................................................................................... 11
4 Technical description................................................................................................ 12
4.1 Design and function ...................................................................................... 12
4.2 System components...................................................................................... 12
4.2.1 Components of the inEos Blue........................................................... 13
4.2.2 Accessories (included in the scope of supply) ................................... 14
4.2.3 Calibration parts (included in scope of supply) .................................. 15
4.2.3.13D acquisition system ........................................................................ 15
4.2.3.2XYZ axis alignment ............................................................................ 15
4.3 Technical data............................................................................................... 16
4.4 System requirements .................................................................................... 16
5 Transport to the installation site ............................................................................... 17
5.1 Transport and unpacking .............................................................................. 17
Page 3

62 99 205 D3446
D3446.201.02.02.02 06.2010
3
Sirona Dental Systems GmbH
Operating Instructions inEos Blue Table of contents
bеЦдблЬ
5.2 Installation site.............................................................................................. 17
6 Initial installation of the software.............................................................................. 18
6.1 Installation of the user software and initial start-up ...................................... 18
6.2 Connecting the unit to the PC ...................................................................... 18
6.3 Switching the unit on and starting the software............................................ 19
6.4 Selecting the 3D acquisition system............................................................. 19
6.5 Adding inEos Blue to the device configuration............................................. 20
7 Connecting the unit.................................................................................................. 21
7.1 Connecting the inEos Blue to the PC........................................................... 21
7.2 Connecting the inEos Blue to the power supply........................................... 22
7.3 Connecting the rotation mouse .................................................................... 23
7.4 Connecting the foot switch ........................................................................... 23
8 Controls and displays .............................................................................................. 24
8.1 Controls on the inEos Blue........................................................................... 24
8.2 Ready LED ................................................................................................... 25
9 Switching the system on.......................................................................................... 26
10 Calibration ............................................................................................................... 27
10.1 General information on calibration ............................................................... 27
10.2 Calibrating the 3D camera system ............................................................... 27
10.3 Calibrating the XYZ axis alignment .............................................................. 28
11 Performing 3D acquisition ....................................................................................... 32
11.1 General......................................................................................................... 32
11.1.1 Scan models ..................................................................................... 32
11.1.2 Focusing the image ........................................................................... 33
11.1.3 Overlap area during acquisition ........................................................ 33
11.1.4 Deleting images ................................................................................ 33
11.1.5 Operating the foot switch .................................................................. 34
11.2 Raster scans ................................................................................................ 34
11.2.1 Preparing the model .......................................................................... 34
11.2.2 Taking a scan .................................................................................... 34
11.3 Free scans.................................................................................................... 35
11.3.1 Preparing the model .......................................................................... 36
11.3.2 Taking a scan .................................................................................... 36
Page 4

62 99 205 D3446
4 D3446.201.02.02.02 06.2010
Sirona Dental Systems GmbH
Table of contents Operating Instructions inEos Blue
11.3.3 Performing detail scans...................................................................... 37
11.4 Rotational scans............................................................................................ 38
11.4.1 Preparing the model........................................................................... 38
11.4.2 Taking a scan..................................................................................... 38
11.5 Acquiring impressions ................................................................................... 38
11.6 Examples ...................................................................................................... 40
11.6.1 Scan of a 3-unit bridge ....................................................................... 40
11.6.1.1Acquiring a preparation .................................................................... 40
11.6.1.2Rotational scans............................................................................... 42
11.6.1.3Acquiring an antagonist.................................................................... 43
11.6.1.4Bite registration ................................................................................ 44
11.6.1.5Buccal scan...................................................................................... 44
11.6.1.6Terminating acquisition .................................................................... 45
11.6.2 Acquisition of a veneer....................................................................... 46
11.6.3 Acquisition of a crown cap ................................................................. 47
11.6.4 Exposure of an inlay........................................................................... 48
11.6.4.1Acquiring a preparation .................................................................... 48
11.6.4.2Considering the antagonist .............................................................. 50
11.6.4.3Terminating acquisition .................................................................... 50
12 Cleaning and care .................................................................................................... 51
12.1 Care of the 3D camera system ..................................................................... 51
12.2 Cleaning the outer surface ............................................................................ 51
12.3 Protection against medicaments ................................................................... 51
Page 5

62 99 205 D3446
D3446.201.02.02.02 06.2010
5
Sirona Dental Systems GmbH Dear Customer,
Operating Instructions inEos Blue
bеЦдблЬ
1 Dear Customer,
Thank you for purchasing your inEos Blue® from Sirona.
Improper use and handling can create hazards and cause damage. Please read and follow these operating instructions carefully and always
keep them within easy reach.
To prevent personal injury or material damage, it is important to observe
all safety information.
To safeguard your warranty claims, please complete the attached Installation Report / Warranty Passport when the system is handed over and
send it to the indicated fax number.
Your
inEos Blue Team
Page 6

62 99 205 D3446
6 D3446.201.02.02.02 06.2010
General information Sirona Dental Systems GmbH
Structure of the documents Operating Instructions inEos Blue
2 General information
Please read this document completely and follow the instructions exactly.
You should always keep it within reach.
Original language of the present document: German.
2.1 Structure of the documents
2.1.1 Identification of danger levels
To prevent personal injury and material damage, please observe the warning and safety information provided in this document. Such information
is highlighted as follows:
NOTE: Application information and other useful information
Tip: Work simplification information
CAUTION
Be sure to observe all warnings!
Please observe the warning and safety information provided to prevent
personal injury and material damage. Any such information is highlighted by a signal word, i.e. DANGER, WARNING, CAUTION or NOTICE.
DANGER
In the event of imminent danger, which results in severe injuries or even
death.
WARNING
In the event of a potentially dangerous situation, which could result in severe injuries or even death.
CAUTION
In the event of a potentially dangerous situation, which could result in minor personal injuries.
NOTICE
In the event of a potentially harmful situation, which could lead to damage of the product or an object in its environment.
Page 7

62 99 205 D3446
D3446.201.02.02.02 06.2010
7
Sirona Dental Systems GmbH General information
Operating Instructions inEos Blue Legend
bеЦдблЬ
2.1.2 Formats and symbols used
The symbols and character formats used in the present manual have the
following meaning:
2.2 Legend
Year of manufacture
Year of manufacture
2.3 Warranty
To safeguard your warranty claims, please complete the attached Installation Report / Warranty Passport when the unit is handed over. Then fax
it to the specified fax no.
✔ Prerequisite
1. First action step
CAUTION! Action step warning
2. Second action step
or
➢ Alternative action
Result
Requests you to do something.
see "Formats and symbols used" Identifies a reference to another
te x t passage and speci f ies its p age
number.
●List Identifies a list.
"Command/menu item" Identifies commands, menu items
or quotations.
20XX
Page 8

62 99 205 D3446
8 D3446.201.02.02.02 06.2010
Safety Sirona Dental Systems GmbH
Basic safety information Operating Instructions inEos Blue
3 Safety
3.1
Basic safety information
3.1.1 Prerequisites
3.1.2 Connecting the unit
Description
Perform connection by following the directions given in the present operating instructions.
3.1.2.1 Connection to the CEREC 3 acquisition unit
Warning: inEos connected to CEREC 3 acquisition unit
NOTICE
Important information on the building installation
The building installation must be performed by a qualified expert in compliance with the national regulations. DIN VDE 0100-710 applies in Germany.
NOTICE
Restrictions regarding installation site
The system is not intended for operation in areas subject to explosion
hazards.
NOTICE
Do not damage the unit!
The unit can be damaged if opened improperly.
It is expressly prohibited to open the unit with tools!
WARNING
No acquisitions in the patient's mouth
As long as an inEos Blue is connected to a CEREC 3 acquisition unit,
no acquisitions may be made in the patient's mouth using the connected
CEREC 3D camera.
Page 9

62 99 205 D3446
D3446.201.02.02.02 06.2010
9
Sirona Dental Systems GmbH Safety
Operating Instructions inEos Blue Basic safety information
bеЦдблЬ
3.1.2.2 Connection to the CEREC AC acquisition unit
Patient environment
Patient environment
Within the patient environment (A), direct contact is only permissible with
devices or system parts that are approved for use in the patient environment (A).
This applies to all possible patient positions (B) during the examination or
treatment.
inEos outside of patient environment
WARNING
No acquisitions in the patient's mouth within the patient environment
As long as an inEos Blue is connected to a CEREC AC acquisition unit,
no acquisitions may be made in the patient's mouth using the connected
CEREC Bluecam if the inEos Blue is located outside of the patient environment.
1500mm
59”
1500mm
59”
1500mm
59”
1500mm
59”
1500mm
59”
1500mm
59”
1500mm
59”
1500mm
59”
1500mm
59”
1500mm
59”
1500mm
59”
Page 10

62 99 205 D3446
10 D3446.201.02.02.02 06.2010
Safety Sirona Dental Systems GmbH
Intended use Operating Instructions inEos Blue
3.1.3 Connection of external equipment
If any equipment not approved by Sirona is connected, it must comply
with the applicable standards:
● EN 60 950 for information technology equipment, and
● EN 61 010-1 for laboratory equipment.
3.1.4 Maintenance and repair
As manufacturers of dental instruments and laboratory equipment, we
can assume responsibility for the safety properties of the unit only if the
following points are observed:
● The Maintenance and repair of this unit may be performed only by Sirona or by agencies authorized by Sirona.
● Components which have failed and influence the safety of the unit
must be replaced with original (OEM) spare parts.
Please request a certificate whenever you have such work performed. It
should include:
● The type and scope of work.
● Any changes made in the rated parameters or working range.
● Date, name of company and signature.
Changes to the product
Modifications to this unit which may affect the safety of the operator, patients or third parties are prohibited by law!
3.1.5 Accessories
In order to ensure product safety, this product may be operated only with
original Sirona accessories or third-party accessories expressly approved
by Sirona. The user assumes the risk of using non-approved accessories.
3.1.6 In case of damage
In case of noticeable malfunctions or damage, stop using the instrument
immediately and notify your dental depot or the manufacturer.
3.2 Intended use
This system is used for 3D digitization of single tooth or complete jaw
saw-cut models and impressions.
Follow the operating ins tructions
If the unit is used for any purpose other than the one mentioned above, it
may be damaged.
Proper use also includes observing the present operating instructions and
the relevant maintenance instructions.
NOTICE
Follow the instructions
If the instructions for operating the unit described in this document are
not observed, the intended protection of the user may be impaired.
Page 11

62 99 205 D3446
D3446.201.02.02.02 06.2010
11
Sirona Dental Systems GmbH Safety
Operating Instructions inEos Blue Certification
bеЦдблЬ
3.3 Certification
CE mark SU + inEos
empty
CE mark
This product bears the CE mark in accordance with the provisions of Directives 2006/95/EC (Low-voltage Directive) and 2004/108/EC (EMC Directive).
Examples EN60950 + CAN/ CSA
Examples of CE mark for connected products:
● EN 60950:1992 + A1:1993 + A2:1993 + A3:1995 + A4:1997 based on
IEC 60950
● CAN/CSA-C22.2 No.61010-1-04.
inLab+Eos GOST mark
empty
GOST mark
CSA mark
empty
CSA mark
VDE mark
empty
VDE mark
CAUTION
CE mark for connected products
Further products which are connected to this unit must also bear the CE
mark. These products must be tested according to the applicable standards.
CUS
Page 12

62 99 205 D3446
12 D3446.201.02.02.02 06.2010
Technical description Sirona Dental Systems GmbH
Design and function Operating Instructions inEos Blue
4 Technical description
4.1
Design and function
The inEos Blue is designed as a desktop unit and consists of several
components (see Chapter "System components" [ ➙ 12]). It is powered
from the standard local power network via an external power supply unit.
The unit is connected to a PC via a USB port. The PC must fulfill the minimum requirements (see Chapter on "System requirements" [ ➙ 16]).
The PC serves both for controlling inEos Blue and for displaying the captured images by means of the user software.
4.2 System components
"inEos Blue"
consists of a base plate and a vertical unit. In addition, different accessories as well as the required calibration kits are included in the
scope of supply of the system.
A
B
C
D
A External power supply unit
B Supply board
C Rotation mouse
D 3D acquisition system
Page 13

62 99 205 D3446
D3446.201.02.02.02 06.2010
13
Sirona Dental Systems GmbH Technical description
Operating Instructions inEos Blue System components
bеЦдблЬ
4.2.1 Components of the inEos Blue
empty
Vertical unit and front side of base plate
A Vertical unit E Base plate
B Rotary knobs for height
adjustment
F Ready LED (blue)
C Height adjustment unit
with 3D camera system
G Shifting plate
D Cone with glass protec-
tion cover
H Start button
I Rotation mouse
Page 14
62 99 205 D3446
14 D3446.201.02.02.02 06.2010
Technical description Sirona Dental Systems GmbH
System components Operating Instructions inEos Blue
empty
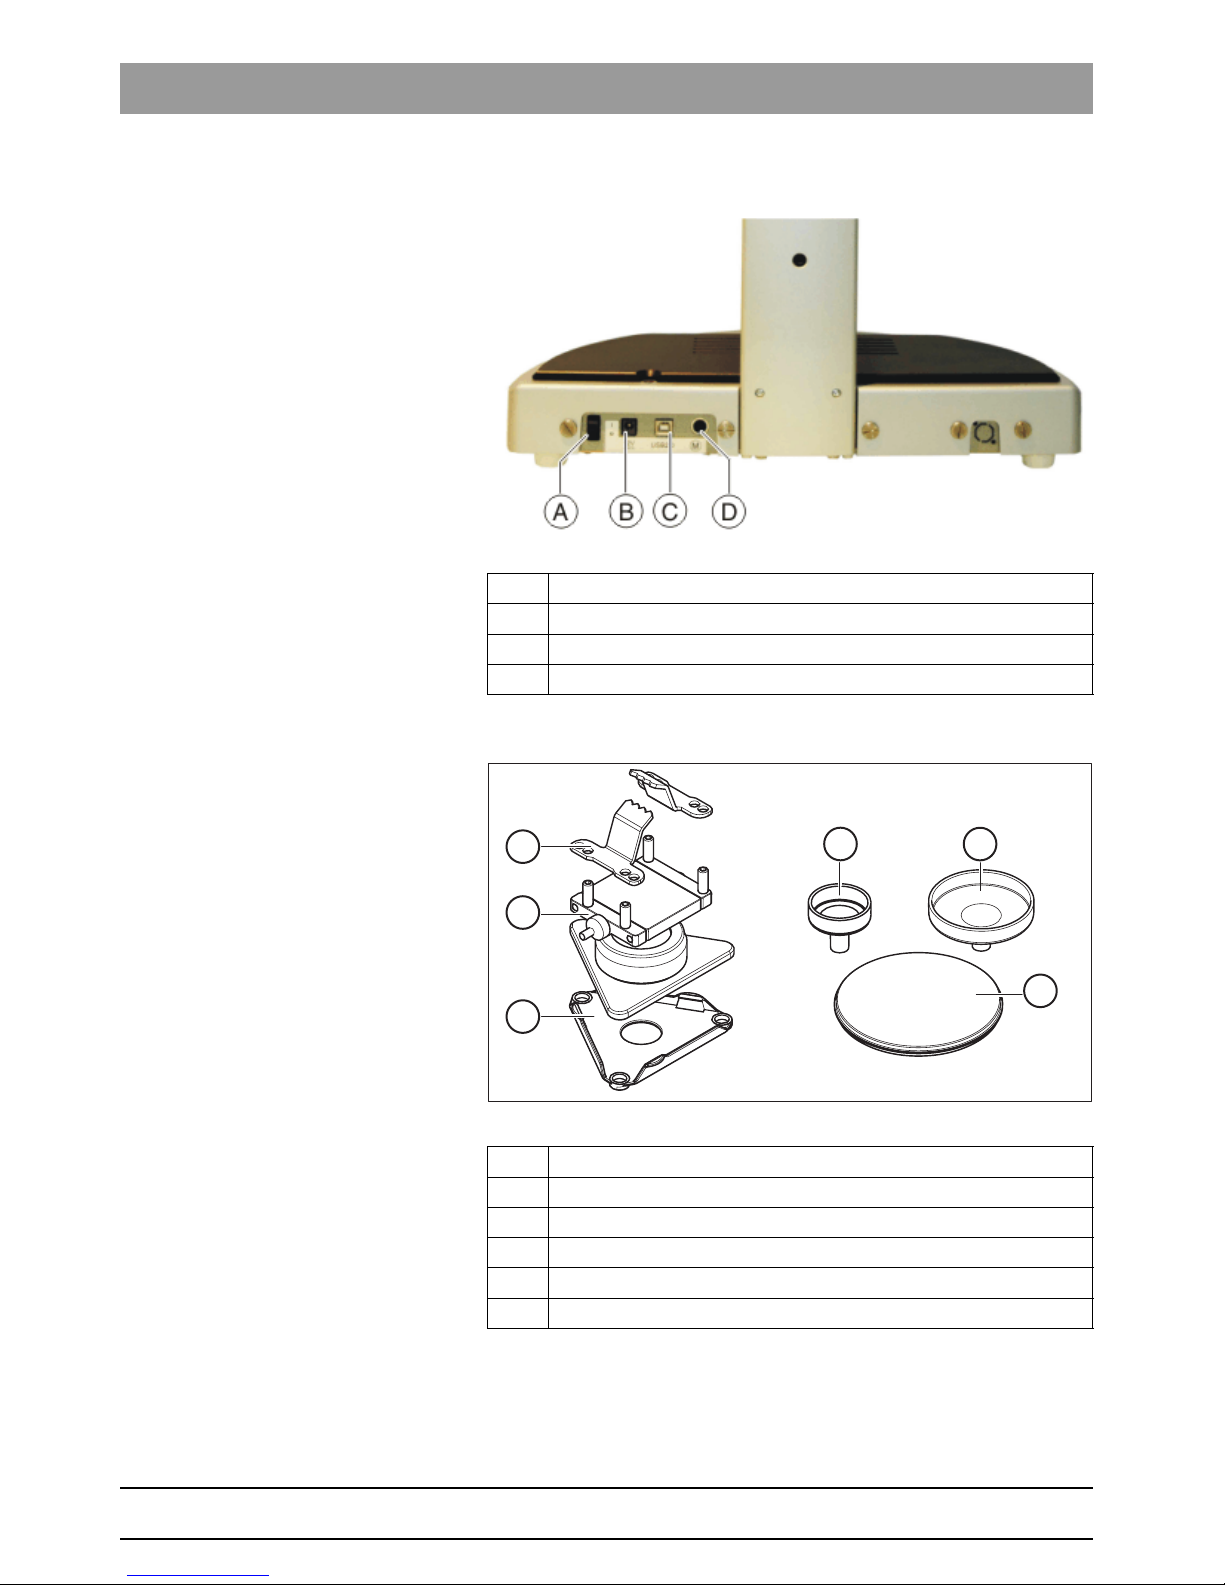
Rear side of base plate
4.2.2 Accessories (included in the scope of supply)
A Main switch
B Supply voltage input
C USB port
D Rotation mouse
A Model holder (with ball-and-socket joint)
B Sliding block
C Clamps
D Model pot 31 (3x)
E Model pot 52 (2x)
F Plate
E
D
F
A
B
C
Page 15

62 99 205 D3446
D3446.201.02.02.02 06.2010
15
Sirona Dental Systems GmbH Technical description
Operating Instructions inEos Blue System components
bеЦдблЬ
4.2.3 Calibration parts (included in scope of supply)
4.2.3.1 3D acquisition system
Calibration part for calibrating the 3D acquisition system.
4.2.3.2 XYZ axis alignment
Calibration parts for calibrating the XYZ axis alignment
Foot control
A Calibration part
A
A Calibration plate
B Spacer
A B
Page 16

62 99 205 D3446
16 D3446.201.02.02.02 06.2010
Technical description Sirona Dental Systems GmbH
Technical data Operating Instructions inEos Blue
4.3 Technical data
4.4 System requirements
An inLab PC 64bit is required to run this software. The hardware version
must be PC Hardware L or higher.
Model designation inEos Blue
Power connection via power supply unit:
INPUT: 100-240VAC / 47- 63Hz / 1.0 A max.
permissible line voltage fluctuations:
± 10% of nominal voltage
Overvoltage category II
OUTPUT: +12VDC / 2.08A / 25W max.
Power consumption 15 W
Ambient conditions For indoor use
Pollution degree 2
Temperature: 10°C – 35°C (50°F ~ 95°F)
Relative humidity: 30% – 75%
Barometric pressure: 700hPa – 1060hPa
Transport and
storage conditions
Temperature: -40°C – +70°C (-40°F ~ 158°F)
Relative humidity: 10% – 95%
Barometric pressure: 500hPa – 1060hPa
Protection class Class I device
Degree of protection against
ingress of water
Ordinary equipment (not protected)
Mode of operation Continuous operation with intermittent loading corresponding to the la-
boratory mode of working.
Tabletop unit
Tests/approvals This device complies with the requirements of
EN 61 010-1: 2001
Page 17

62 99 205 D3446
D3446.201.02.02.02 06.2010
17
Sirona Dental Systems GmbH Transport to the installation site
Operating Instructions inEos Blue Transport and unpacking
bеЦдблЬ
5 Transport to the installation site
5.1
Transport and unpacking
Transport and unpacking
All Sirona products are carefully checked prior to shipment. Please perform an incoming inspection immediately after delivery.
1. Check the delivery note to ensure that the consignment is complete.
2. Check whether the product shows any visible signs of damage.
If return shipment is required, please use the original packaging for shipment.
5.2 Installation site
The unit is designed for desktop use and requires a level footprint of approx. 35 x 45 cm for installation.
Make sure that suitable operating conditions are given (see section on
“Technical data“ [ ➙ 16]).
NOTICE
Damage during transport
If the product was damaged during transport, please contact your carrying agent.
NOTICE
Install inEos Blue in a protected area
3D image acquisition may be adversely affected by bright light.
Set the inEos Blue up so that it is not located directly in the beam path
of an extreme light source and not exposed to direct sunlight.
Page 18

62 99 205 D3446
18 D3446.201.02.02.02 06.2010
Initial installation of the software Sirona Dental Systems GmbH
Installation of the user software and initial start-up Operating Instructions inEos Blue
6 Initial installation of the software
6.1
Installation of the user software and initial start-up
1. Start your PC.
2. Insert the DVD into the DVD drive of your PC.
ª The installation wizard opens.
3. Click the
"next"
button.
4. Read the license agreement.
5. Confirm your acceptance by clicking the
"Yes"
button.
6. Click
"Standard Installation"
.
ª The standard installation is then executed.
7. Follow the instructions of the installation wizard to complete the in-
stallation.
8. Restart the system.
ª The software and drivers are installed.
6.2 Connecting the unit to the PC
➢ Connect the inEos Blue to the PC (see also section “Connecting the
unit“ [ ➙ 21]).
NOTICE
Initial installation without inEos Blue
Perform the initial installation of the software without connecting inEos
Blue.
NOTICE
Installation does not start
The installation will start automatically. If it does not start, the CD autorun feature is disabled on your PC. In this case start the setup.exe
file on the CD-ROM by double-clicking it.
NOTICE
User-defined installation
The user-defined installation option is recommended only for experienced users.
Page 19

62 99 205 D3446
D3446.201.02.02.02 06.2010
19
Sirona Dental Systems GmbH Initial installation of the software
Operating Instructions inEos Blue Switching the unit on and starting the software
bеЦдблЬ
6.3 Switching the unit on and starting the software
Let unit dry off after storage
1. Switch the unit on at the main switch.
2. Start the software at the PC via the Windows start menu.
6.4 Selecting the 3D acquisition system
1. Click
"Settings"/"Configuration"/"Acquisition system"
in the user soft-
ware.
ª The menu for selection of the 3D acquisition system opens.
2. Select
"inEos"
.
3. Click the
"OK"
button.
NOTICE
Do not put the unit into operation at low temperatures!
If you move the unit to the operating site from a cold environment, condensation may form and result in a short circuit.
✔ Install the unit at room temperature.
➢ Wait until the unit has reached room temperature and is absolutely
dry.
ª The unit is dry and can be put into operation.
Page 20

62 99 205 D3446
20 D3446.201.02.02.02 06.2010
Initial installation of the software Sirona Dental Systems GmbH
Adding inEos Blue to the device configuration Operating Instructions inEos Blue
6.5 Adding inEos Blue to the device configuration
Calibrating the system
1. Click
"Settings"/"Configuration"/"Devices..."
in the user software.
ª The
"Configure Devices"
dialog box opens.
2. Click the
"Add automatically"
button and enter a name for this device
(
"inEos Blue"
is suggested).
3. Click the
"Add Device"
button.
ª The installation is now completed.
Calibrating the system
NOTICE
inEos Blue is not displayed
If inEos Blue does not appear in the
"Configure Devices"
dialog, check
the configuration of the interface (see the section entitled “Checking and
configuring the serial interface“).
NOTICE
Calibrating the system
After installing the inEos Blue, you must calibrate the system (see the
chapter entitled "Calibration" [ ➙ 27]).
Page 21

62 99 205 D3446
D3446.201.02.02.02 06.2010
21
Sirona Dental Systems GmbH Connecting the unit
Operating Instructions inEos Blue Connecting the inEos Blue to the PC
bеЦдблЬ
7 Connecting the unit
7.1
Connecting the inEos Blue to the PC
➢ Connect the socket (USB port) of the inEos Blue (A) to the socket
(USB port) of your PC (C) via the interface cable included in the scope of supply (B).
CAUTION
Switching the PC off
Switch the PC off before connecting the inEos Blue.
A Socket (USB port) of inEos Blue
B Interface cable
C Socket (USB port) on the rear of the PC (labeled
"inEos Blue"
)
Page 22

62 99 205 D3446
22 D3446.201.02.02.02 06.2010
Connecting the unit Sirona Dental Systems GmbH
Connecting the inEos Blue to the power supply Operating Instructions inEos Blue
7.2 Connecting the inEos Blue to the power supply
➢ Connect the socket (A) of the inEos Blue to the power supply via the
power supply unit included in the scope of supply.
A Socket for power supply
NOTICE
Use a grounded power outlet
The power supply unit must be connected to a grounded power outlet.
Page 23

62 99 205 D3446
D3446.201.02.02.02 06.2010
23
Sirona Dental Systems GmbH Connecting the unit
Operating Instructions inEos Blue Connecting the rotation mouse
bеЦдблЬ
7.3 Connecting the rotation mouse
➢ Plug the connector of the rotation mouse (B) into the matching socket
(A) on the inEos Blue.
7.4 Connecting the foot switch
➢ Plug the connector of the foot switch into the matching socket (USB
port) of your PC.
A Socket of the inEos Blue
B Rotation mouse
Page 24

62 99 205 D3446
24 D3446.201.02.02.02 06.2010
Controls and displays Sirona Dental Systems GmbH
Controls on the inEos Blue Operating Instructions inEos Blue
8 Controls and displays
8.1
Controls on the inEos Blue
The following controls are available on the inEos Blue:
A Rotary knobs for height adjustment (focusing) of the lens on the
vertical unit
B Start button
C Main switch
D Rotation mouse
Page 25

62 99 205 D3446
D3446.201.02.02.02 06.2010
25
Sirona Dental Systems GmbH Controls and displays
Operating Instructions inEos Blue Ready LED
bеЦдблЬ
8.2 Ready LED
The blue Ready LED indicates the operating status of the unit:
A LED not lit:
Unit is switched off
B LED flashes:
Unit is switched on and ready for operation
Page 26

62 99 205 D3446
26 D3446.201.02.02.02 06.2010
Switching the system on Sirona Dental Systems GmbH
Operating Instructions inEos Blue
9 Switching the system on
Let unit dry off after storage
Switching the system on
empty
Switching the inEos Blue on
1. Switch on the PC.
2. Switch the inEos Blue on at the main switch.
empty
Starting the software
➢ Start the software at the PC via the Windows start menu.
NOTICE
Do not put the unit into operation at low temperatures!
If you move the unit to the operating site from a cold environment, condensation may form and result in a short circuit.
✔ Install the unit at room temperature.
➢ Wait until the unit has reached room temperature and is absolutely
dry.
ª The unit is dry and can be put into operation.
Page 27

62 99 205 D3446
D3446.201.02.02.02 06.2010
27
Sirona Dental Systems GmbH Calibration
Operating Instructions inEos Blue General information on calibration
bеЦдблЬ
10 Calibration
10.1
General information on calibration
The inEos Blue has two components that must be calibrated:
● 3D camera system
● XYZ axis alignment
Various calibration standards and parts are required for calibration (see
Chapter on "Calibration parts" [ ➙ 15]). They are included in the scope of
supply of the inEos Blue.
Recalibrate your inEos Blue
● following transport (shaking stress),
● after storage in unheated or un-air-conditioned rooms (temperature
differences exceeding 30°C),
● with temperature differences of over 15°C between the last calibration and operation.
10.2 Calibrating the 3D camera system
empty
Preparing the inEos Blue
✔ The PC and the inEos Blue are switched on.
✔ The inLab software is started
NOTICE
Calibrate prior to initial startup
Prior to initial startup of the inEos Blue, you must perform a full calibration. No further calibrations are usually required afterwards.
If you remove the shifting plate, the X-Y-Z alignment must be recalibrated after reassembling the unit.
NOTICE
Do not damage the calibration parts
Proceed carefully when attaching or removing the calibration part in order to ensure that it is not damaged or contaminated.
Page 28

62 99 205 D3446
28 D3446.201.02.02.02 06.2010
Calibration Sirona Dental Systems GmbH
Calibrating the XYZ axis alignment Operating Instructions inEos Blue
1. Click
"Settings"/"Calibration"/"inEos"/"Camera system"
.
ª The window for calibrating the 3D camera system opens.
ª You will be prompted to attach the calibration part.
2. Fasten the calibration part to the left side of the cone with the clip.
3. Tilt the calibration part via the cone.
4. Slide the calibration part upward up to the stop.
5. Confirm the message box with the
"OK"
button.
ª The calibration is performed.
ª A message appears stating that the unit has been successfully
calibrated.
6. Confirm the message box with the
"OK"
button.
7. Remove the calibration part.
Note: After each additional calibration of the camera system, you also
must calibrate the X-Y-Z axis alignment.
10.3 Calibrating the XYZ axis alignment
1. Click
"Settings"/"Calibration"/"inEos"/"XYZ alignment"
.
Tip: The following dialog boxes will guide you through the calibration
procedure and provide all relevant information.
ª The calibration window and a message box open.
2. Check to make sure that the calibration parts are not damaged and
click the
"OK"
button .
Step 1
empty
Step 1
Page 29

62 99 205 D3446
D3446.201.02.02.02 06.2010
29
Sirona Dental Systems GmbH Calibration
Operating Instructions inEos Blue Calibrating the XYZ axis alignment
bеЦдблЬ
1. Place the calibration plate in position 1.
Note the position of the beveled corner. The grid balls must be seated
as shown in the illustration.
The right half of the cylinder is located in the image field.
2. Adjust the spacer as shown in the illustration between the calibration
plate and the cone and move the vertical unit into the bottom position.
Remove the spacer.
3. Click the
"Acquire"
button.
ª The scan starts.
Step 2
empty
Step 2
1. Position the calibration plate in position 2.
Note the position of the beveled corner. The grid balls must be seated
as shown in the illustration.
The left half of the cylinder is located in the image field.
2. Click the
"Acquire"
button.
ª The scan starts.
Step 3
empty
Step 3
1. Rotate the calibration plate counterclockwise 90° and position it in position 3.
Align the calibration plate so that the grid balls are seated as shown
in the illustration.
The upper half of the cylinder is located in the image field.
2. Click the
"Acquire"
button.
NOTICE
Do not change this position
This position must not be further changed until step 5.
Page 30

62 99 205 D3446
30 D3446.201.02.02.02 06.2010
Calibration Sirona Dental Systems GmbH
Calibrating the XYZ axis alignment Operating Instructions inEos Blue
ª The scan starts.
Step 4
empty
Step 4
1. Position the calibration plate in position 4.
Note the position of the beveled corner. The grid balls must be seated
as shown in the illustration.
The bottom half of the cylinder is located in the image field.
2. Click the
"Acquire"
button.
ª The scan starts.
Step 5
empty
Step 5
1. Screw in the calibration plate 90° clockwise and place it in position 1.
Align the calibration plate in such a way that the grid balls are seated
as shown in the illustration.
The cylinder is positioned horizontal. The right half of the cylinder is
located in the image field.
2. Move the vertical unit upward (approx. 7mm) until the spacer fits between the calibration plate and the cone as shown in the illustration.
Remove the spacer.
3. Click the
"Acquire"
button.
ª The scan starts.
Page 31

62 99 205 D3446
D3446.201.02.02.02 06.2010
31
Sirona Dental Systems GmbH Calibration
Operating Instructions inEos Blue Calibrating the XYZ axis alignment
bеЦдблЬ
Step 6
empty
Step 6
1. Turn the calibration plate counterclockwise 90° and place it in position 3.
Note the position of the beveled corner. The grid balls must be seated
as shown in the illustration.
The bottom half of the cylinder is located in the image field.
2. Click the
"Acquire"
button.
ª The scan starts.
ª The automatic calibration of the XYZ axis alignment is now com-
pleted.
3. Confirm the successful calibration in the inLab software with the
"OK"
button.
4. Remove the calibration plate from the shifting plate.
Page 32

62 99 205 D3446
32 D3446.201.02.02.02 06.2010
Performing 3D acquisition Sirona Dental Systems GmbH
General Operating Instructions inEos Blue
11 Performing 3D acquisition
11.1
General
Acquisition methods
You have three modes for executing scans with inEos Blue:
● Grid acquisition
– For large scans with 9 or more units
– Long, untoothed areas
● Free scan
– For scans with up to and including 8 units
– For additional scans at different angles
● Rotational scan
– For the surveying of single tooth stumps
– For single restorations without consideration of the proximal con-
tacts or the antagonist
You can execute several scan modes in sequence.
You can omit a scan mode if, for example, it is not suitable for your model.
11.1.1 Scan models
Materials
You can scan all materials that correspond to the following criteria:
● Non-reflecting
● Nontransparent
● No transparent parts
● Not highly absorbent
(e.g. heavily colored plasters)
Unscannable materials generate artifacts in the image.
Tip: When using plasters that do not meet the above criteria, you must
powder the affected areas. Otherwise the measuring accuracy will be impaired considerably.
The following are suitable for this purpose: CEREC Optispray (REF
61 44 179)
For scanning with inEos Blue, we recommend using CEREC Stone BC
plaster (REF 62 37 502).
Saw-cut etc.
● When preparing saw-cut models, be careful not to mill off the individual stump segments. Place the model next to the stumps so that the
scanner can properly capture these areas.
● Create only a slight fluting below the preparation margin.
Page 33

62 99 205 D3446
D3446.201.02.02.02 06.2010
33
Sirona Dental Systems GmbH Performing 3D acquisition
Operating Instructions inEos Blue General
bеЦдблЬ
11.1.2 Focusing the image
➢ Turn the rotary buttons for height adjustment.
ª The sharpness adjustment changes.
The image is then sharpened if the relevant areas are not red.
Left: Scan clear; Right: Scan unclear
empty
Object unclear
If the object is unclear while the image is being acquired, the error message
"Object out of focus! Move camera down!"
or
"Object out of focus!
Move camera up!"
appears.
Sharpen the image and take a new scan.
11.1.3 Overlap area during acquisition
If images are acquired via free scans, each image must overlap with the
previous image. This overlap area must comprise roughly half of the
image.
empty
Overlapping insufficient
If the overlap with the previous scans is not sufficient, the software cannot
assign the image. The error message
"No matching data found"
appears.
Select a section that has a larger overlap with previously acquired images
or reduce the tilt.
11.1.4 Deleting images
empty
Deleting images
You can delete completed scans by right-clicking on the active scan icon
(e.g.
"Preparation"
). Each further click deletes the last scan.
Page 34

62 99 205 D3446
34 D3446.201.02.02.02 06.2010
Performing 3D acquisition Sirona Dental Systems GmbH
Raster scans Operating Instructions inEos Blue
11.1.5 Operating the foot switch
You can use the foot switch instead of the start button of the inEos Blue.
To do this, connect the foot switch as described in the chapter entitled
"Connecting the foot switch" [ ➙ 23].
11.2 Raster scans
11.2.1 Preparing the model
1. Secure the model to the model holder included. The labial side faces
the fixing screw.
2. Release the ball and socket joint.
3. Align the model:
The model is horizontal and the front teeth stand parallel to a triangle
side.
4. Remove the sliding block from the model holder.
11.2.2 Taking a scan
Tip: Do not change the position of the ball-and-socket joint during acquisition.
NOTICE
Do not damage the shifting plate
Do not apply any pressure to the model when it is located on the shifting
plate. Doing so could damage the shifting plate.
Page 35

62 99 205 D3446
D3446.201.02.02.02 06.2010
35
Sirona Dental Systems GmbH Performing 3D acquisition
Operating Instructions inEos Blue Free scans
bеЦдблЬ
1. Place the model holder on the shifting plate. The small balls must
lodge in the longitudinal and transverse grooves. The tip of the model
holder plate and the oral side of the model face the column of the inEos Blue.
2. Click the icon for grid scans.
ª A section of the model appears in the the live image.
3. Slide the model until you can begin scan acquisition on a distal side.
4. Focus the image with the rotary knobs for height adjustment; see Focusing the image [ ➙ 33].
Do not touch the rotary knobs during the image acquisition process.
5. Single-click the Start button of the inEos Blue.
ª The image is acquired.
6. Add additional scans from adjacent areas: Move the model in the
desired direction by one stop position and repeat steps 4 to 5.
If you do not require any further grid scans, you can change to the next
acquisition mode; see Free scans [ ➙ 35] or Rotational scans [ ➙ 38].
Tip: If a bite registration is to be acquired, additional mesial and distal
areas also must be scanned. These areas must not be concealed by the
bite registration.
11.3 Free scans
You can also take detail scans from different angles in this mode.
You can use detail scans for example to detect undercuts which were not
detected by the overview scans.
Page 36

62 99 205 D3446
36 D3446.201.02.02.02 06.2010
Performing 3D acquisition Sirona Dental Systems GmbH
Free scans Operating Instructions inEos Blue
11.3.1 Preparing the model
1. Press the triangular glide foot on to the bottom of the model holder
until the glide foot clicks into place.
ª The model holder can be moved into any position across the shif-
ting plate.
2. Secure the model to the model holder included. The labial side faces
the fixing screw.
3. Release the ball and socket joint.
4. Align the model:
The model is horizontal and the front teeth stand parallel to a triangle
side.
11.3.2 Taking a scan
The Free Scan mode offers a variety of options for image acquisition.
empty
Acquisition with the Start button
Double-click the Start
button
A single exposure will be acquired.
Single-click the Start
button.
The crosshairs turn blue. The system will automatically acquire new images after you move
the model or reset the image focus.
If you want to interrupt the automatic scan, single-click the Start button of the inEos Blue. The
crosshairs turn green.
Use the Start button to acquire additional exposures.
Tip: When taking detail scans, interrupt the automatic scan to continue at a different model
location. This location must overlap roughly
one half of the image previously scanned.
Page 37

62 99 205 D3446
D3446.201.02.02.02 06.2010
37
Sirona Dental Systems GmbH Performing 3D acquisition
Operating Instructions inEos Blue Free scans
bеЦдблЬ
empty
Acquisition with the foot switch
empty
Taking the scan
1. Click the Free Scan icon.
ª A section of the model appears in the the live image.
2. Slide the model until you can begin scan acquisition on a distal side.
3. Focus the image with the rotary knobs for height adjustment; see Focusing the image [ ➙ 33].
4. Single-click the Start button of the inEos Blue.
ª The first scan is taken and the crosshairs are displayed blue.
5. Add additional scans from adjacent areas: Move the model freely on
the table until you have reached the next acquisition position. As soon
as the model stops moving, the camera is automatically released.
You can turn the model on the shifting plate by up to 30°.
Tip:The new image must overlap approximately one half of the previous image. If necessary, you can turn the model by 180°.
6. Repeat step 5 until all of the required scans have been taken.
If you do not require any further free scans (including detail scans), you
can change to the next acquisition mode; see Rotational scans [ ➙ 38].
11.3.3 Performing detail scans
You can acquire detail scans at any time during the free scan.
1. Tilt the model no more than 30° in the desired direction.
Tip: You can turn the entire model on the shifting plate by 180° if necessary.
2. Double-click the Start button of the inEos Blue.
ª An image is acquired.
3. Repeat steps 1 and 2 until all of the required scans have been taken.
Tip: Align the scanned area as for the overview scan. Tilt the model holder
to an angle of up to 30°.
Multiple scans are required for angles larger than 30°. Start with a small
Actuate the foot switch
once
A single exposure will be acquired. The model
must be motionless and set in focus.
Press and hold down
the foot switch
The crosshairs turn blue. The system will automatically acquire new images after you move
the model or reset the image focus.
To interrupt the automatic scan, simply let go
of the foot switch. The crosshairs turn green.
You can acquire additional exposures by reactivating the foot switch.
Tip: When taking detail scans, interrupt the automatic scan to continue at a different model
location. This location must overlap roughly
one half of the image previously scanned.
Page 38

62 99 205 D3446
38 D3446.201.02.02.02 06.2010
Performing 3D acquisition Sirona Dental Systems GmbH
Rotational scans Operating Instructions inEos Blue
angle and take additional exposures right afterwards with a larger angle.
Do not turn the model. The lateral alignment must remain the same as for
the overview scans.
11.4 Rotational scans
Use the rotational scans to acquire single tooth stumps from all sides.
11.4.1 Preparing the model
1. Move the model holder on the rotation mouse to the 0° position.
2. Secure the object (e.g. a tooth stump) with the fill material in the center of the model holder. The longitudinal alignment of the object must
correspond to the model holder's axis of rotation.
3. Tilt the model holder at an angle which enables the undercuts to be
recorded (standard: 60°).
11.4.2 Taking a scan
1. Click the icon for rotational scans.
2. Slide the rotation mouse on the shifting plate until the entire object is
displayed in the image field.
The cable of the rotation mouse should point to the right or left, and
not to the front or rear.
3. Rotate the rotation pot until the object remains in the image field in
every position.
4. Focus the image with the rotary knobs for height adjustment; see Focusing the image [ ➙ 33].
5. Click the Start button of the inEos Blue.
ª 8 single scans are taken in rapid succession.
Tip: You can accelerate the computing process.
Align the object so that the distal side points upward.
11.5 Acquiring impressions
You have selected the bite registration technique
"Buccal scan"
.
Page 39

62 99 205 D3446
D3446.201.02.02.02 06.2010
39
Sirona Dental Systems GmbH Performing 3D acquisition
Operating Instructions inEos Blue Acquiring impressions
bеЦдблЬ
empty
Preparing an impression
1. Apply a matte finishing to the areas to be acquired to prevent reflections. An example of a matting agent is CEREC Optispray.
2. Attach the impression tray with the filler material on the rough side of
the round plate.
3. Set the plate into the model holder with the oral side facing the column of the inEos Blue.
empty
Taking scans
It is best to take scans in Free Scan mode. The steps are the same as for
exposures of a model.
Tip: Be careful not to touch the impression tray when shifting the model.
Only touch the model holder.
1. Place a checkmark in front of
"Impression Scan"
in the selection dia-
log.
ª Both sides of the model are displayed in the 3D preview. If you
click the
"Next"
icon, the model will be reconstructed from the im-
pression.
2. Check the scan 3D preview. The preparation surface must be completely scanned.
Impressions of the upper and lower jaw can only be registered via an exposure of a corresponding buccal impression. The impression should be
matted, e.g. using CEREC Optispray, and must be positioned under the
camera so that the occlusal plane appears vertically in the live image, and
50% of each half of the jaw is visible.
Page 40

62 99 205 D3446
40 D3446.201.02.02.02 06.2010
Performing 3D acquisition Sirona Dental Systems GmbH
Examples Operating Instructions inEos Blue
11.6 Examples
11.6.1 Scan of a 3-unit bridge
11.6.1.1 Acquiring a preparation
empty
Preparing the model
✔ The sliding block is mounted on the model holder.
1. Place the model on the model holder.
2. Tighten the fastening screw until the model is fixed in place.
3. Align the platform in such a way that the model is horizontal.
4. Place the model holder on the shifting plate of the inEos Blue. The
oral side points to the column of the inEos Blue.
empty
Preparing scans
✔ The inLab software is started.
1. Click the
"New"
button to create a new restoration.
ª The
"Select patient for new restoration"
window opens.
2. Select a patient you would like to assign the restoration to.
ª A dialog box opens.
Page 41

62 99 205 D3446
D3446.201.02.02.02 06.2010
41
Sirona Dental Systems GmbH Performing 3D acquisition
Operating Instructions inEos Blue Examples
bеЦдблЬ
3. Select the type of restoration
"Bridge"
, the allocation
"Bite material
scan"
or
"Buccal scan"
, the Design technique and the teeth concer-
ned and confirm with the
"OK"
button.
ª A new restoration opens.
empty
Acquiring an overview
1. Click the
"Preparation"
button.
ª The
"Acquisition technique"
window opens.
2. Select the button for free scans in the
"Acquisition technique"
win-
dow.
ª A section of the model appears in the the live image.
3. Place the model so that the desired section appears in the live image.
Start at the distal end. Be careful to include the adjacent teeth in the
scan.
4. Focus the image with the rotary knobs for height adjustment; see Focusing the image [ ➙ 33].
5. Single-click the Start button of the inEos Blue to start the automatic
scan.
ª The first scan is taken and the crosshairs are displayed blue. If
you shift the model or re-focus it, additional scans will automatically be generated.
6. Shift the model and take further exposures until you have a complete
overview of the required teeth. Refocus the image if necessary.
Tip: The image must overlap approximately one half of the previous
image.
Interrupt the automatic scan to continue at another location of the model. This location must overlap roughly one half of the image previously scanned.
Page 42

62 99 205 D3446
42 D3446.201.02.02.02 06.2010
Performing 3D acquisition Sirona Dental Systems GmbH
Examples Operating Instructions inEos Blue
7. To stop acquisition, single-click the Start button of the inEos Blue.
empty
Acquiring detail scans
1. Set the angle of the model holder so that the areas required for the
design can be completely acquired.
Tip: You can rotate the model in the
"3D Preview"
window. In this
way, you can determine whether the information is complete.
2. Click the Start button of the inEos Blue twice to create single scans.
ª The overview image is supplemented.
3. Repeat steps 1 and 2 until all required areas have been covered.
Tip: If you have selected
"Buccal scan"
as the bite registration sy-
stem, make sure that buccal parts are included in the scan as well.
11.6.1.2 Rotational scans
Perform the following steps for both abutment teeth.
Page 43

62 99 205 D3446
D3446.201.02.02.02 06.2010
43
Sirona Dental Systems GmbH Performing 3D acquisition
Operating Instructions inEos Blue Examples
bеЦдблЬ
empty
Preparing the model for rotational scans
1. Fixate the model of the respective tooth in the center of the model pot
with filler material.
2. Set the rotation mouse to 60° and place it on the shifting plate of the
inEos Blue.
empty
Acquisition of rotational scans
1. Select the button for rotational scans in the
"Acquisition technique"
window.
2. Focus the image with the rotary knobs for height adjustment; see Focusing the image [ ➙ 33].
3. Single-click the Start button of the inEos Blue to start the scan.
ª Eight scans are acquired and included in the preparation.
4. Check whether the preparation surface and the preparation margin
were fully acquired. The other scans are displayed transparently.
5. If necessary, acquire further rotational scans at a different angle.
11.6.1.3 Acquiring an antagonist
1. Replace the model in the model holder with the model of the antagonist as described in the section "Preparing the model."
2. Click the
"Antagonist"
button.
3. Select the button for free scans in the
"Acquisition technique"
win-
dow.
ª A section of the model appears in the the live image.
4. Position the model. Acquire an image of the antagonist section that
matches the exposures in the
"Preparation"
image field.
5. Focus the image with the rotary knobs for height adjustment; see Focusing the image [ ➙ 33].
6. Single-click the Start button of the inEos Blue to start the automatic
scan.
ª The first scan is taken and the crosshairs are displayed blue. If
you shift the model or re-focus it, additional scans will automatically be generated.
7. Shift the model and take further exposures until you have a complete
overview of the required teeth. Refocus the image if necessary.
Tip: The image must overlap approximately one half of the previous
image.
Page 44

62 99 205 D3446
44 D3446.201.02.02.02 06.2010
Performing 3D acquisition Sirona Dental Systems GmbH
Examples Operating Instructions inEos Blue
8. To stop acquisition, single-click the Start button of the inEos Blue.
Tip: If you selected
"Buccal scan"
as the bite registration system, you also
have to acquire the buccal parts of the antagonist.
11.6.1.4 Bite registration
If you selected
"Bite material scan"
as the bite registration system in the
"New" dialog, you have to acquire an image of the bite registration.
1. Replace the model in the model holder with the model of the preparation as described in the section "Preparing the model."
2. Place the bite registration on the model.
3. Click the
"Occlusion"
button in the inLab software.
4. Select the button for free scans in the
"Acquisition technique"
win-
dow.
ª A section of the model appears in the the live image.
5. Fasten the models in the holder and place it on the shifting plate of
the inEos Blue.
The view is located on the preparation.
6. Focus the image with the rotary knobs for height adjustment; see Focusing the image [ ➙ 33].
7. Double-click the Start button of the inEos Blue.
ª An image is acquired.
8. Scan additional images until the required area has been fully acquired.
11.6.1.5 Buccal scan
If you selected
"Buccal scan"
as the bite registration system in the "New"
dialog, you have to acquire an image of the buccal side.
1. Bring the models of the upper and lower jaws into terminal occlusion.
Page 45

62 99 205 D3446
D3446.201.02.02.02 06.2010
45
Sirona Dental Systems GmbH Performing 3D acquisition
Operating Instructions inEos Blue Examples
bеЦдблЬ
2. Fasten the models in the model holder and place it on the shifting plate of the inEos Blue. The occlusal plane is vertical and points toward
the column.
Scan a location near the preparation.
Tip: If you cannot fix the model on the holder, hold the models freely
underneath the camera. At the same time, support the model to prevent blurring.
3. Click the
"Buccal"
button.
4. Double-click the Start button of the inEos Blue.
ª An image is acquired.
The preparation and the antagonist can only be combined if sufficient
buccal portions were acquired in the image fields
"Preparation"
and
"Ant
-
agonist"
.
11.6.1.6 Terminating acquisition
✔ The respective teeth, proximal contacts and antagonists have been fully
acquired.
➢ Click the
"Next"
button.
ª The program calculates the data.
Page 46

62 99 205 D3446
46 D3446.201.02.02.02 06.2010
Performing 3D acquisition Sirona Dental Systems GmbH
Examples Operating Instructions inEos Blue
11.6.2 Acquisition of a veneer
empty
Preparing the model
✔ The sliding block is mounted on the model holder.
1. Place the model on the model holder.
2. Tighten the fastening screw until the model is fixed in place.
3. Align the platform in such a way that the model is vertical.
4. Place the model holder on the shifting plate of the inEos Blue. The incisal edge points left or right, but not toward the column or the user.
empty
Preparing scans
✔ The inLab software is started.
1. Click the
"New"
button to create a new restoration.
ª The
"Select patient for new restoration"
window opens.
2. Select a patient you would like to assign the restoration to.
ª A dialog box opens.
3. Select the type of restoration
"Veneer"
, the allocation
"Bite material
scan"
the Design technique, and the teeth concerned and confirm
with the
"OK"
button.
ª A new restoration opens.
empty
Acquiring an overview
1. Click the
"Preparation"
button.
ª The
"Acquisition technique"
window opens.
2. Select the button for free scans in the
"Acquisition technique"
win-
dow.
ª A section of the model appears in the the live image.
3. Place the model so that the desired section appears in the live image.
4. Focus the image with the rotary knobs for height adjustment.
5. Double-click the Start button of the inEos Blue to create a single scan.
ª An image is acquired.
Page 47

62 99 205 D3446
D3446.201.02.02.02 06.2010
47
Sirona Dental Systems GmbH Performing 3D acquisition
Operating Instructions inEos Blue Examples
bеЦдблЬ
6. Tilt the model and take additional scans until all of the information required for a restoration is available.
empty
Terminating acquisition
✔ The respective tooth has been completely acquired.
➢ Click the
"Next"
button.
ª The program calculates the data.
11.6.3 Acquisition of a crown cap
empty
Preparing scans
✔ The inLab software is started.
1. Click the
"New"
button to create a new restoration.
ª The
"Select patient for new restoration"
window opens.
2. Select a patient you would like to assign the restoration to.
ª A dialog box opens.
3. Select the type of restoration
"Crown"
, the Design technique
"Frame
-
Work"
, and the teeth concerned and confirm with the
"OK"
button.
ª A new restoration opens.
empty
Preparing the model for rotational scans
1. Fixate the model of the respective tooth in the center of the model pot
with plasticine.
2. Set the rotation mouse to 60° and place it on the shifting plate of the
inEos Blue. The tooth must remain completely visible during the rotational movement.
empty
Acquisition of rotational scans
1. Select the button for rotational scans in the
"Acquisition technique"
window.
2. Focus the image with the rotary knobs for height adjustment.
3. Single-click the Start button of the inEos Blue to start the scan.
ª Eight scans are acquired and included in the preparation.
Page 48

62 99 205 D3446
48 D3446.201.02.02.02 06.2010
Performing 3D acquisition Sirona Dental Systems GmbH
Examples Operating Instructions inEos Blue
11.6.4 Exposure of an inlay
11.6.4.1 Acquiring a preparation
empty
Preparing the model
✔ The sliding block is mounted on the model holder.
1. Place the model on the model holder.
2. Tighten the fastening screw until the model is fixed in place.
3. Align the platform so that the model is positioned horizontally to the
model holder plate.
4. Place the model holder on the shifting plate of the inEos Blue. The
oral side points to the column of the inEos Blue.
empty
Preparing scans
✔ The inLab software is started.
1. Click the
"New"
button to create a new restoration.
ª The
"Select patient for new restoration"
window opens.
2. Select a patient you would like to assign the restoration to.
ª A dialog box opens.
3. Select the type of restoration
"Inlay"
, the allocation
"Bite material
scan"
or
"Buccal scan"
, the Design technique and the tooth concer-
ned and confirm with the
"OK"
button.
ª A new restoration opens.
empty
Acquiring an overview
1. Click the
"Preparation"
button.
ª The
"Acquisition technique"
window opens.
Page 49

62 99 205 D3446
D3446.201.02.02.02 06.2010
49
Sirona Dental Systems GmbH Performing 3D acquisition
Operating Instructions inEos Blue Examples
bеЦдблЬ
2. Select the button for free scans in the
"Acquisition technique"
win-
dow.
ª A section of the model appears in the the live image.
3. Place the model so that the desired section appears in the live image.
Start with the acquisition of the adjacent tooth.
Start at the distal end. Be careful to include the adjacent teeth in the
scan.
4. Focus the image with the rotary knobs for height adjustment.
5. Single-click the Start button of the inEos Blue to start the automatic
scan.
ª The first scan is taken and the crosshairs are displayed blue. If
you shift the model or re-focus it, additional scans will automatically be generated.
Tip: If you want to interrupt the automatic scan, single-click the
Start button of the inEos Blue. The crosshairs turn green. You
can resume scanning by clicking the Start button again.
6. Shift the model and take further exposures until you have a complete
overview of the required teeth. Refocus the image if necessary.
Tip: The image must overlap approximately one half of the previous
image.
Interrupt the automatic scan to continue at another location of the model. This location must overlap roughly one half of the image previously scanned.
7. To stop acquisition, single-click the Start button of the inEos Blue.
Page 50

62 99 205 D3446
50 D3446.201.02.02.02 06.2010
Performing 3D acquisition Sirona Dental Systems GmbH
Examples Operating Instructions inEos Blue
empty
Acquiring detail scans
1. Tilt the model slightly to acquire the areas of the preparations that
have not yet been exposed.
2. Set the angle of the model holder so that the areas required for the
design can be completely acquired.
Tip: You can rotate the model in the
"3D Preview"
window. In this
way, you can determine whether the information is complete.
3. Click the Start button of the inEos Blue twice to create single scans.
ª The overview image is supplemented.
4. Repeat steps 1 and 2 until all required areas have been covered.
Tip: If you have selected
"Buccal scan"
as the bite registration sy-
stem, make sure that buccal parts are included in the scan as well.
11.6.4.2 Considering the antagonist
Take a scan of the antagonist as described in the Sections Scanning the
antagonist [ ➙ 43] and Bite registration [ ➙ 44] and Buccal scans [ ➙ 44].
11.6.4.3 Terminating acquisition
✔ The respective teeth, proximal contacts and antagonists have been fully
acquired.
➢ Click the
"Next"
button.
ª The program calculates the data.
Page 51

62 99 205 D3446
D3446.201.02.02.02 06.2010
51
Sirona Dental Systems GmbH Cleaning and care
Operating Instructions inEos Blue Care of the 3D camera system
bеЦдблЬ
12 Cleaning and care
12.1
Care of the 3D camera system
The 3D camera system is a very sensitive optical device and must therefore be handled with the utmost care.
Avoid scratches on the lens cover, as they may impair the quality of the
3D images.
Use a lint-free cloth and ethanol (commercially available cleaning alcohol)
to clean the lens cover glass.
12.2 Cleaning the outer surface
Clean the outer surfaces at regular intervals with a mild, commercially
available cleaning agent.
12.3 Protection against medicaments
Due to their high concentrations and the substances they contain, many
medicaments can dissolve, etch, bleach or discolor surfaces.
NOTICE
Damage to the surface
Clean the surface immediately with a moist cloth and a cleaning agent.
Page 52

tЙ=кЙлЙкоЙ=нЬЙ=кбЦЬн=нз=г~вЙ=~еу=~днЙк~нбзел=пЬбЕЬ=г~у=ДЙ=кЙимбкЙЗ=ЗмЙ=нз=нЙЕЬебЕ~д=бгйкзоЙгЙенлK
«=pбкзе~=aЙен~д=pулнЙгл=dгДe=OMNM pйк~ЕЬЙW==ЙеЦдблЕЬ= mкбенЙЗ=бе=dЙкг~еу
aPQQSKOMNKMOKMOKMO MSKOMNM ûKJkêKW= NNO=UOU
pбкзе~=aЙен~д=pулнЙгл=dгДe
áå=íÜÉ=rp^W
c~Дкбвлнк~≈Й=PN
SQSOR=_ЙелЬЙбг
dЙкг~еу
пппKлбкзе~KЕзг
pбкзе~=aЙен~д=pулнЙгл=ii`
QUPR=pбкзе~=aкбоЙI=pмбнЙ=NMM
`Ь~кдзннЙI=k`=OUOTP
rp^
lêÇÉê=kç
SO=VV=OMR=aPQQS
 Loading...