

Page 1
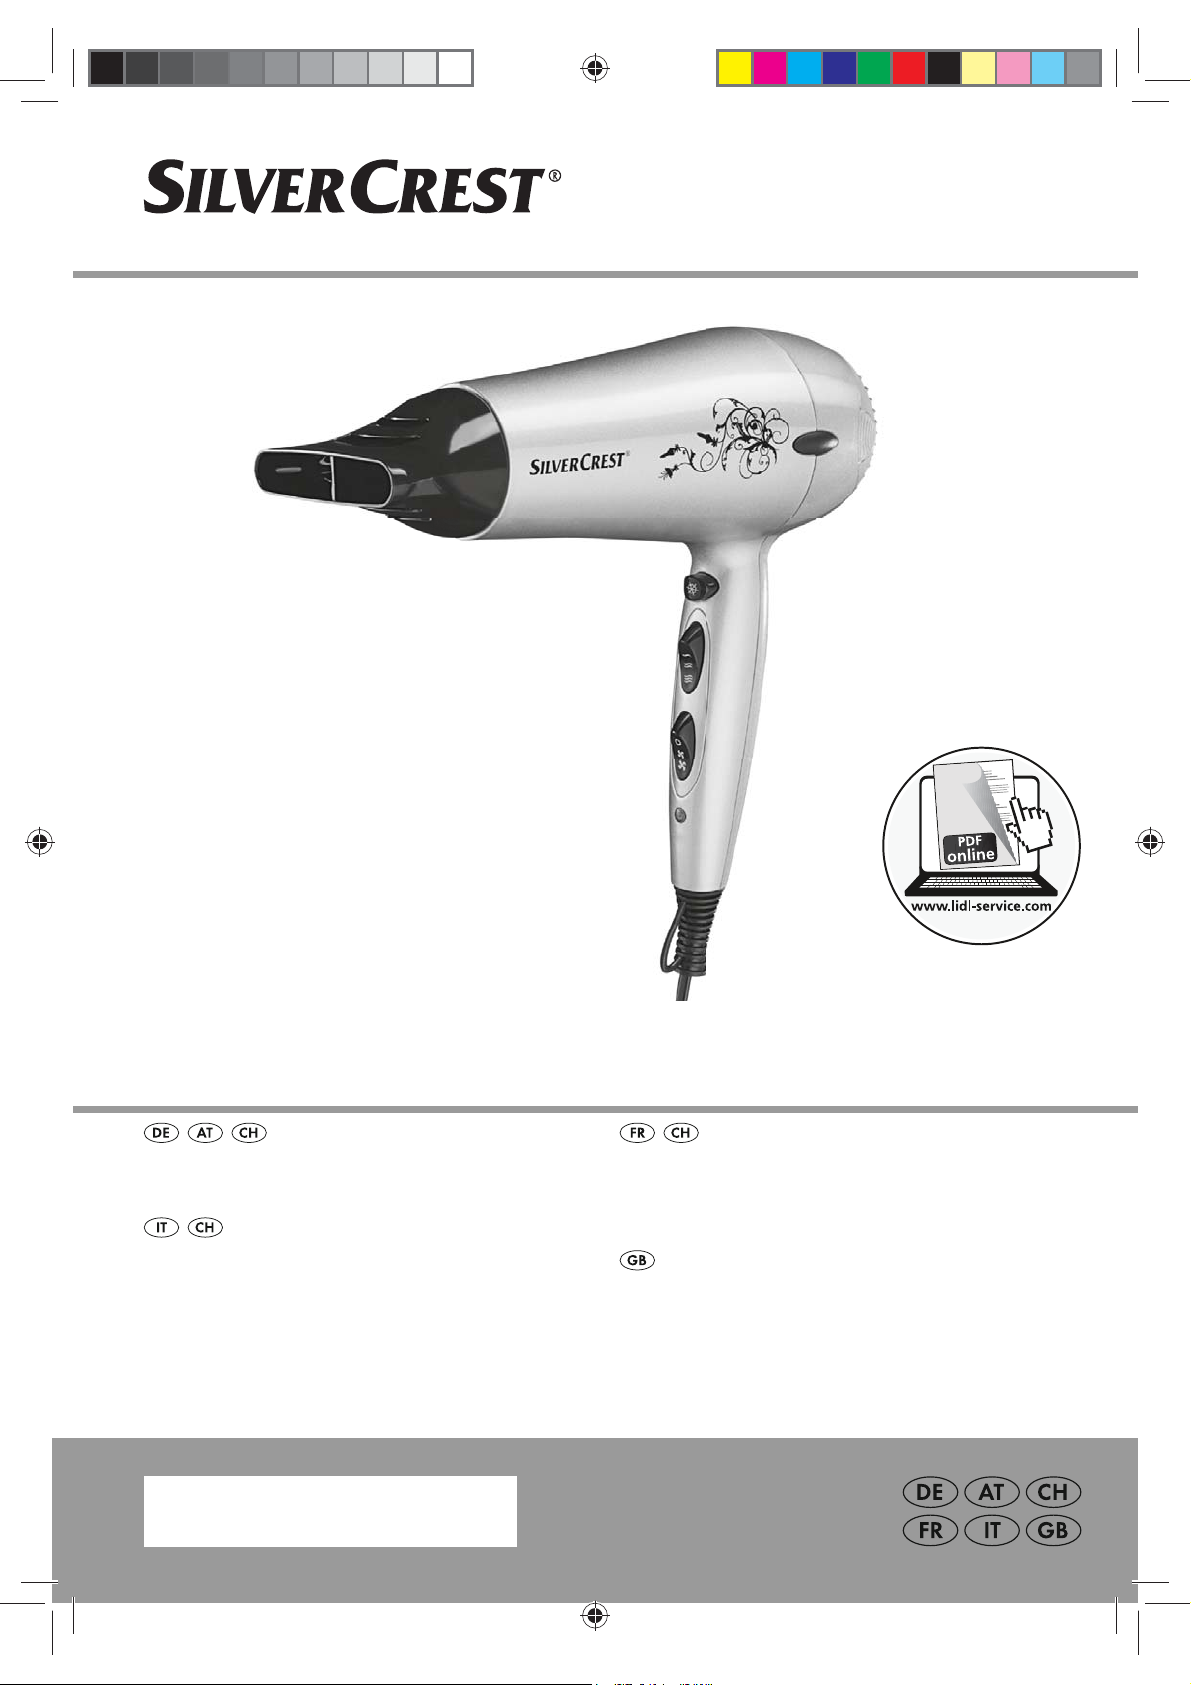
IONEN-HAARTROCKNER SHTR 2200 D2
IONEN-HAARTROCKNER
Bedienungsanleitung
ASCIUGACAPELLI AGLI IONI
Istruzioni per l’uso
IAN 102826
KRA102826_Haartrockner_Cover_LB1.indd 2 17.09.14 11:41
SÈCHE-CHEVEUX
À TECHNOLOGIE IONIQUE
Mode d’emploi
IONIC HAIRDRYER
Operating instructions
Page 2
_KRA102826_Haartrockner_B1.book Seite 1 Freitag, 12. September 2014 10:31 10
Deutsch.................................................................................... 2
Français ................................................................................. 12
Italiano .................................................................................. 22
English................................................................................... 32
ID: SHTR 2200 D2_A1_14_V1.3
Page 3
1
2
4
5
9
6
10
1112
8
_KRA102826_Haartrockner_B1.book Seite 2 Freitag, 12. September 2014 10:31 10
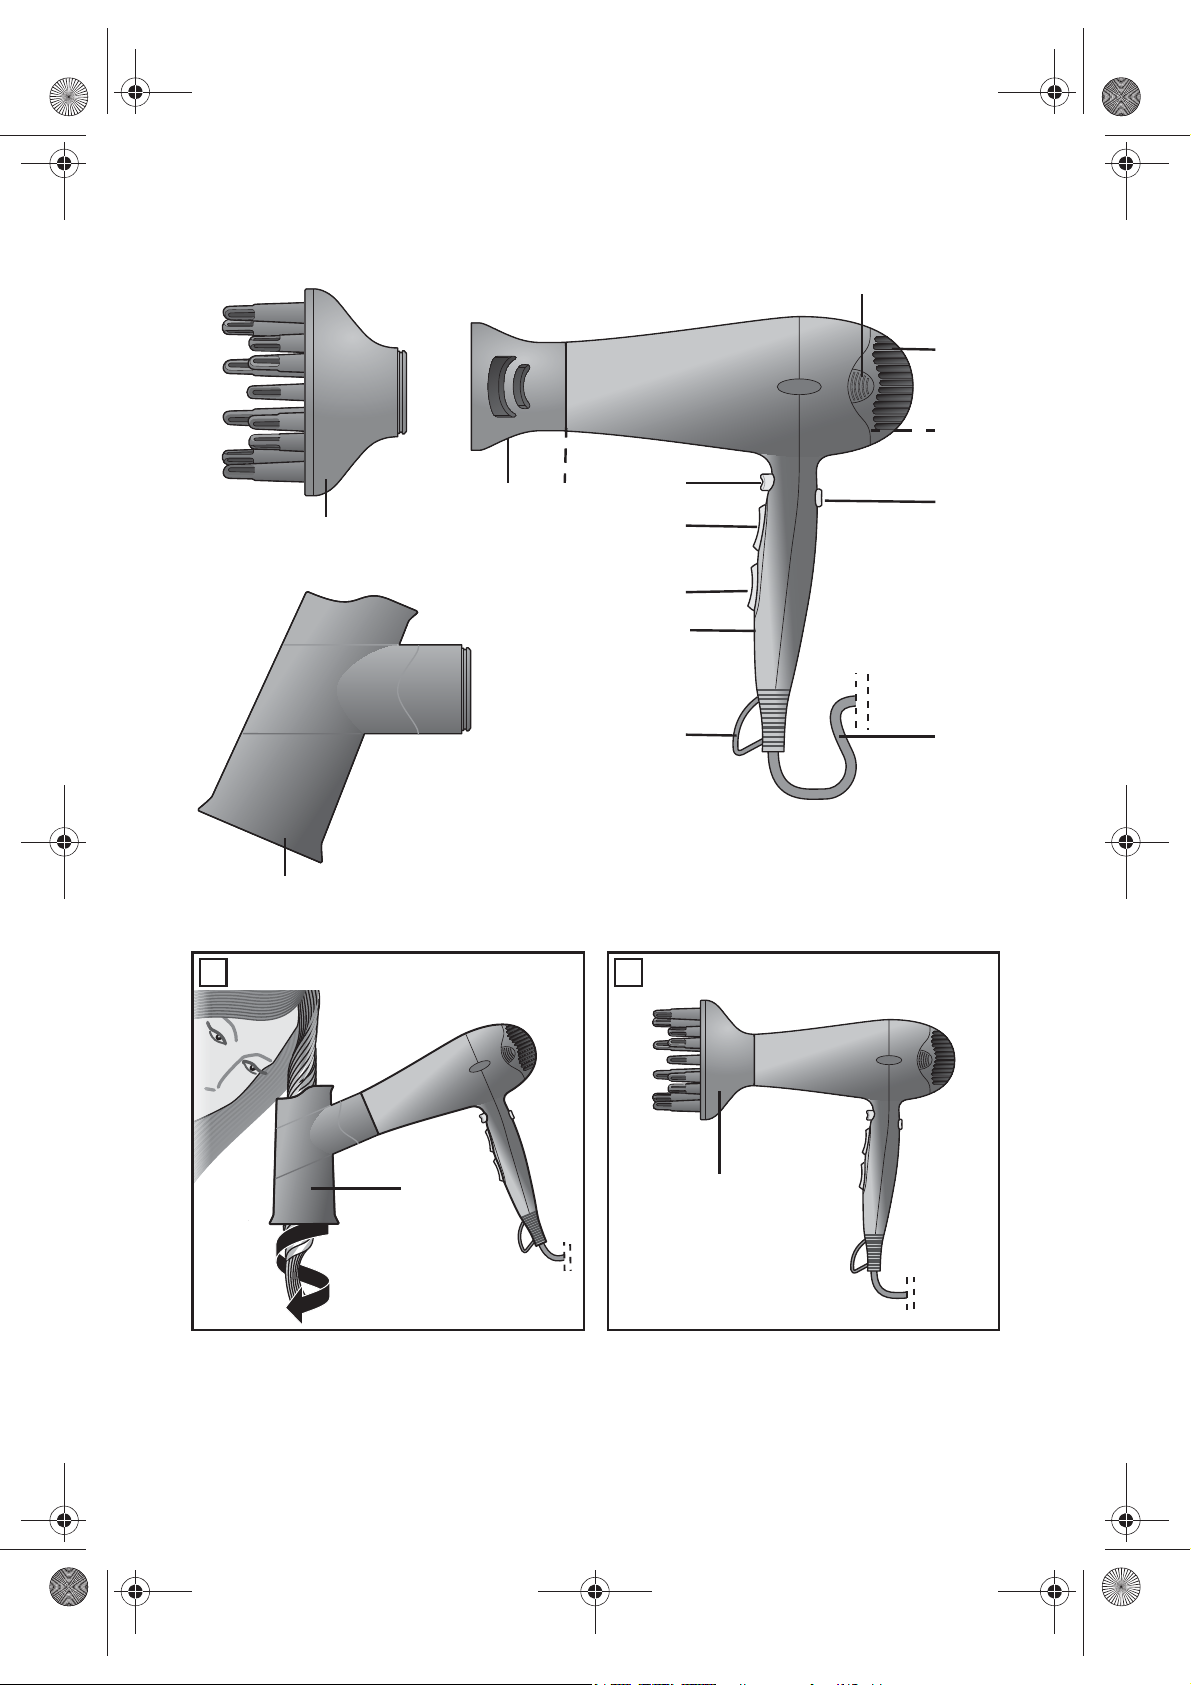
Übersicht / Aperçu de l'appareil / Panoramica / Overview
13
7
3
A
14
B
14
13
Page 4
_KRA102826_Haartrockner_B1.book Seite 2 Freitag, 12. September 2014 10:31 10
Inhalt
1. Übersicht ......................................................................................... 2
2. Bestimmungsgemäßer Gebrauch ...................................................... 3
3. Sicherheitshinweise ......................................................................... 4
4. Lieferumfang ................................................................................... 6
5. Bedienung ....................................................................................... 6
6. Reinigen .......................................................................................... 8
7. Aufbewahrung ................................................................................ 9
8. Entsorgen ........................................................................................ 9
9. Problemlösung ................................................................................ 9
10. Technische Daten ............................................................................. 9
11. Garantie der HOYER|Handel GmbH ................................................ 10
1. Übersicht
1 Schutzgitter
2 Luftansaugöffnung (mit abnehmbarem Schutzgitter)
3 Feiner Filter (unter dem Schutzgitter)
4 Schiebeschalter für Ionen-Funktion
5 Kabel mit Netzstecker
6 Aufhängeöse
7 LED, leuchtet, wenn die Ionen-Funktion aktiviert ist.
8 Ein-/Ausschalter und Schalter für die Geschwindigkeitsstufen:
0 (aus) / (langsam) / (schnell)
9 Schalter für die Heißluftstufen:
(gering) / (mittel) / (hoch)
10 Taste für Abkühlfunktion
11 Luftaustrittsöffnung (mit Schutzlamellen)
12 Stylingdüse (drehbar und abnehmbar)
13 Diffuser (drehbar und abnehmbar)
14 Lockenaufsatz (drehbar und abnehmbar)
Die Zubehörteile Stylingdüse 12, der Diffuser 13 und der Lockenaufsatz 14 sind nicht
bei allen Modellen Teil des Lieferumfangs
(siehe “Lieferumfang” auf Seite 6). In dieser
Anleitung werden alle 3 Varianten beschrieben.
2
DE
Page 5
_KRA102826_Haartrockner_B1.book Seite 3 Freitag, 12. September 2014 10:31 10
Herzlichen Dank für Ihr
Vertrauen!
Wir gratulieren Ihnen zu Ihrem neuen
trockner mit Ionen-Funktion
Für einen sicheren Umgang mit dem Produkt
und um den ganzen Leistungsumfang kennenzulernen:
• Lesen Sie vor der ersten Inbetriebnahme diese Bedienungsanleitung gründlich durch.
• Befolgen Sie vor allen Dingen die
Sicherheitshinweise!
• Das Gerät darf nur so bedient
werden, wie in dieser Bedienungsanleitung beschrieben.
• Bewahren Sie diese Bedienungsanleitung auf.
• Falls Sie das Gerät einmal weitergeben, legen Sie bitte diese
Bedienungsanleitung dazu.
.
Haar-
2. Bestimmungsgemäßer
Gebrauch
Der Haartrockner ist ausschließlich zum
Trocknen und Stylen von echten, eigenen,
menschlichen Kopfhaaren vorgesehen.
Das Gerät ist für den privaten Haushalt konzipiert und darf nicht für gewerbliche Zwecke
eingesetzt werden.
Das Gerät darf nur in Innenräumen benutzt
werden.
Vorhersehbarer Missbrauch
WARNUNG vor Verletzungen!
Trocknen Sie mit dem Haartrockner keine anderen Körperteile, Tiere oder Gegenstände.
Verwenden Sie das Gerät nicht für Kunsthaar
oder Haarverlängerungen (Extensions).
Wir wünschen Ihnen viel Freude mit Ihrem
neuen Haartrockner mit Ionen-Funktion!
DE
3
Page 6
_KRA102826_Haartrockner_B1.book Seite 4 Freitag, 12. September 2014 10:31 10
3. Sicherheitshinweise
Warnhinweise
Falls erforderlich, werden folgende Warnhinweise in dieser Bedienungsanleitung verwendet:
GEFAHR! Hohes Risiko: Missachtung der Warnung kann Schaden für Leib und Leben verursachen.
WARNUNG! Mittleres Risiko: Missachtung der Warnung kann Verletzungen oder schwere
Sachschäden verursachen.
VORSICHT: Geringes Risiko: Missachtung der Warnung kann leichte Verletzungen oder
Sachschäden verursachen.
HINWEIS: Sachverhalte und Besonderheiten, die im Umgang mit dem Gerät beachtet werden sollten.
Anweisungen für den sicheren Betrieb
~
Dieses Gerät kann von Kindern ab 8|Jahren und von Personen mit
reduzierten physischen, sensorischen oder mentalen Fähigkeiten
oder Mangel an Erfahrung und/oder Wissen benutzt werden,
wenn sie beaufsichtigt oder bezüglich des sicheren Gebrauches
des Gerätes unterwiesen wurden und die daraus resultierenden
Gefahren verstanden haben. Kinder dürfen nicht mit dem Gerät
spielen. Reinigung und Benutzer-Wartung dürfen nicht durch Kinder durchgeführt werden, es sei denn, sie sind älter als 8 Jahre und
beaufsichtigt.
~
Kinder jünger als 8 Jahre sind vom Gerät und der Anschlussleitung
fernzuhalten.
~
Wenn der Haartrockner in einem Badezimmer verwendet wird, ist
nach Gebrauch der Stecker zu ziehen. Die Nähe von Wasser stellt
eine Gefahr dar, auch wenn das Gerät ausgeschaltet ist.
~
Wenn die Netzanschlussleitung dieses Gerätes beschädigt wird,
muss sie durch den Hersteller oder seinen Kundendienst oder eine
ähnlich qualifizierte Person ersetzt werden, um Gefährdungen zu
vermeiden.
~
Als zusätzlicher Schutz wird die Installation einer Fehlerstromschutzeinrichtung (FI/RCD) mit einem Bemessungsauslösestrom von
nicht mehr als 30 mA im Stromkreis empfohlen. Fragen Sie Ihren
Elektroinstallateur um Rat. Lassen Sie den Einbau ausschließlich von
einer Elektro-Fachkraft durchführen.
4
DE
Page 7
_KRA102826_Haartrockner_B1.book Seite 5 Freitag, 12. September 2014 10:31 10
~ Schließen Sie den Netzstecker nur an
GEFAHR für Kinder
~ Verpackungsmaterial ist kein Kinder-
spielzeug. Kinder dürfen nicht mit den
Kunststoffbeuteln spielen. Es besteht Erstickungsgefahr.
GEFAHR von Stromschlag
durch Feuchtigkeit
~ Benutzen Sie dieses Gerät nicht
in der Nähe von Badewannen,
Duschen, Waschbecken oder
anderen Gefäßen, die Wasser
enthalten.
~ Legen Sie das Gerät niemals so ab,
dass es im angeschlossenen Zustand ins
Wasser fallen kann.
~ Schützen Sie das Gerät vor Feuchtig-
keit, Tropf- oder Spritzwasser.
~ Das Gerät, das Kabel und der Netzste-
cker dürfen nicht in Wasser oder andere Flüssigkeiten getaucht werden.
~ Sollte Flüssigkeit in das Gerät gelangen,
sofort den Netzstecker ziehen. Vor einer
erneuten Inbetriebnahme das Gerät prüfen lassen.
~ Sollte das Gerät doch einmal ins Was-
ser gefallen sein, ziehen Sie sofort den
Netzstecker und nehmen Sie erst danach das Gerät heraus. Benutzen Sie
das Gerät in diesem Fall nicht mehr,
sondern lassen Sie es von einer Fachwerkstatt überprüfen.
~ Bedienen Sie das Gerät nicht mit nas-
sen Händen.
eine ordnungsgemäß installierte, gut zugängliche Steckdose an, deren Spannung der Angabe auf dem Typenschild
entspricht. Die Steckdose muss auch
nach dem Anschließen weiterhin gut zugänglich sein.
~ Achten Sie darauf, dass die Anschlusslei-
tung nicht durch scharfe Kanten oder heiße Stellen beschädigt werden kann.
Wickeln Sie die Anschlussleitung nicht
um das Gerät (Gefahr von Kabelbruch!).
~ Achten Sie darauf, dass die Anschluss-
leitung nicht eingeklemmt oder gequetscht wird.
~ Um den Netzstecker aus der Steckdose
zu ziehen, immer am Netzstecker, nie
an der Anschlussleitung ziehen.
~ Ziehen Sie den Netzstecker aus der
Steckdose, …
… nach jedem Gebrauch,
… wenn eine Störung auftritt,
… wenn Sie das Gerät nicht benutzen,
… bevor Sie das Gerät reinigen und
… bei Gewitter.
~ Um Gefährdungen zu vermeiden, neh-
men Sie keine Veränderungen am Artikel vor. Auch die Anschlussleitung darf
nicht selbst ausgetauscht werden. Lassen Sie Reparaturen nur von einer Fachwerkstatt bzw. im Service-Center
durchführen.
~ Versuchen Sie niemals, mit spitzen Ge-
genständen (z. B. mit einem Stielkamm)
Staub oder Fremdkörper aus dem Geräteinneren zu entfernen.
GEFAHR durch Stromschlag
~ Nehmen Sie das Gerät nicht in Betrieb,
wenn das Gerät oder die Anschlussleitung sichtbare Schäden aufweist oder
wenn das Gerät zuvor fallen gelassen
wurde.
~ Verlegen Sie die Anschlussleitung so,
dass niemand auf diese treten, daran
~ Lassen Sie das angeschlossene Gerät
~ Gerät niemals abdecken oder auf wei-
GEFAHR - Brandgefahr
niemals unbeaufsichtigt.
chen Gegenständen (wie z. B. Handtüchern) ablegen.
hängen bleiben oder darüber stolpern
kann.
DE
5
Page 8
_KRA102826_Haartrockner_B1.book Seite 6 Freitag, 12. September 2014 10:31 10
~ Achten Sie darauf, dass Luftansaug- und
Luftaustrittsöffnung stets frei sind. Halten
Sie die Luftansaugöffnung fern von langen Haaren oder Gegenständen, die
angesaugt werden könnten.
~ Dieses Gerät hat einen Überhitzungs-
schutz. Bei Überhitzung, z. B. durch Abdecken der Luftansaug- oder Luftaustrittsöffnung, schaltet sich das Gerät
automatisch aus. Stellen Sie in diesem
Fall den Ein-/Ausschalter auf 0 (aus),
ziehen Sie den Netzstecker aus der
Steckdose und lassen Sie das Gerät
ausreichend abkühlen. Vergewissern
Sie sich vor dem erneuten Einschalten,
dass keine Haare oder Fremdkörper die
Luftansaugöffnung blockieren.
~ Schalten Sie das Gerät nicht gleichzei-
tig mit einem anderen Gerät mit hoher
Leistungsaufnahme ein, das an dieselbe
Mehrfachsteckdose angeschlossen ist.
Verwenden Sie kein Verlängerungskabel.
~
GEFAHR von Verletzungen
durch Verbrennen
~ Richten Sie den heißen Luftstrom nicht
auf Augen, Hände oder andere wärmeempfindliche Körperbereiche.
~ Berühren Sie nicht die heißen Oberflä-
chen des Gerätes.
~ Lassen Sie das Gerät vollständig abküh-
len, bevor Sie es reinigen oder wegräumen.
~ Lassen Sie alle Zubehörteile abkühlen,
bevor Sie sie vom Gerät abnehmen.
WARNUNG vor Sachschäden
~ Verwenden Sie nur das Original-Zube-
hör.
~ Legen Sie das Gerät niemals auf heiße
Oberflächen (z.|B. Herdplatten) oder in
die Nähe von Wärmequellen oder offenem Feuer.
~ Verwenden Sie keine scharfen oder
kratzenden Reinigungsmittel.
~ Setzen Sie das Gerät nicht Temperatu-
ren unter -10|°C oder über +40|°C aus.
4. Lieferumfang
1 Haartrockner
1 Stylingdüse 12
1 Diffuser 13
1 Lockenaufsatz 14
1 Bedienungsanleitung
Zubehör bei den einzelnen Varianten:
- schwarzer Haartrockner
Diffusor 13, Stylingdüse 12
- silberner Haartrockner
Lockenaufsatz 14, Stylingdüse 12
- pinker Haartrockner
Diffusor 13, Stylingdüse 12
5. Bedienung
HINWEIS: Vor dem ersten Gebrauch schalten Sie das Gerät einige Minuten ein und
lassen es auf höchster Geschwindigkeit und
bei höchster Temperatur laufen. Dabei kann
fabrikationsbedingt eine leichte Geruchsbildung entstehen. Diese ist unbedenklich und
tritt nur bei Erstgebrauch auf. Sorgen Sie für
eine gute Durchlüftung des Raumes.
Ein-/Ausschalten und Geschwindigkeit regeln
1. Stecken Sie den Netzstecker 5 in eine
gut zugängliche Steckdose.
2. Mit dem Ein-/Ausschalter 8 und Schal-
ter für die Geschwindigkeitsstufen
schalten Sie das Gerät ein und wählen
die gewünschte Geschwindigkeit für
den Luftstrom:
0 =aus
= langsam; geringer Luftstrom
= schnell; starker Luftstrom
3. Nach dem Trocknen schalten Sie den
Ein-/Ausschalter 8 auf 0 (aus) und ziehen Sie den Netzstecker.
6
DE
Page 9
_KRA102826_Haartrockner_B1.book Seite 7 Freitag, 12. September 2014 10:31 10
Temperatur wählen
Mit dem Schalter für die Heißluftstufen 9
wählen Sie die gewünschte Temperatur des
Luftstroms:
=geringe Temperatur
= mittlere Temperatur
=hohe Temperatur
Abkühlfunktion
Um die Haltbarkeit der Frisur zu verbessern,
können Sie die mit Warmluft geformte Haarpartie mit Hilfe der Taste 10 abkühlen.
Halten Sie während des Trocknens die Taste
10 gedrückt, um unabhängig von der
Ausgangstemperatur einen kühlen Luftstrom
zu erhalten.
Wenn Sie den kühlen Luftstrom nicht mehr
benötigen, lassen Sie die Taste 10 los.
Ionisierungs-Funktion
Mit dem Ionen-Schalter 4 können Sie bei jeder Betriebsart zusätzlich die IonisierungsFunktion hinzuschalten. Es werden dann permanent Ionen auf das Haar aufgebracht.
So wird die statische Aufladung des Haares
reduziert und die Frisierbarkeit verbessert.
Das Haar wird weich, geschmeidig, glänzend und leichter zu frisieren.
• Ionen-Funktion ein, LED 7 leuchtet
• Ionen-Funktion aus, LED 7 aus
Stylingdüse
Die Stylingdüse 12 ermöglicht es, den Luftstrom gezielt auf bestimmte Haarpartien zu
richten.
1. Stecken Sie die Stylingdüse 12 vorne
auf den Haartrockner, sodass sie einrastet.
2. Die Stylingdüse 12 lässt sich in jede
gewünschte Position drehen.
3. Ziehen Sie die Stylingdüse 12 erst vom
Haartrockner ab, wenn sie abgekühlt
ist.
Lockenaufsatz
Der Lockenaufsatz 14 ermöglicht es Ihnen,
schnell Locken und Wellen zu kreieren. Da
deutlich weniger Hitze auf das Haar einwirkt als bei einem Lockenstab, wird Ihr
Haar auch weniger beansprucht.
HINWEIS: Das Ergebnis hängt von folgenden Faktoren ab:
- Ihrem Haartyp;
- der Feuchtigkeit der Haare;
- Ihrer Haarlänge;
- der Dicke der Haarsträhnen die Sie
pro Vorgang trocknen;
- der Vorbehandlung des Haares.
1. Waschen Sie Ihr Haar mit normalem
Schampoo.
HINWEIS: Verwenden Sie keinen Conditioner. Er würde die Lockenbildung verringern.
2. Reiben Sie das Haar handtuchtrocken.
3. Bürsten Sie das Haar durch und achten
Sie darauf, dass keine Knoten im Haar
sind.
4. Stecken Sie die Stylingdüse 12 vorne
auf den Haartrockner, sodass sie einrastet.
5. Trocknen Sie die Haare nur am Haaransatz.
6. Nehmen Sie die Stylingdüse 12 ab.
7. Stecken Sie den Lockenaufsatz 14 vorne auf den Haartrockner, sodass er einrastet.
8. Teilen Sie Ihr Haar nun in einzelne
Strähnen und bearbeiten Sie Strähne
für Strähne.
9. Bild A: Drehen Sie eine Strähne leicht
ein und stecken Sie sie von oben in den
Lockenaufsatz 14.
DE
7
Page 10
_KRA102826_Haartrockner_B1.book Seite 8 Freitag, 12. September 2014 10:31 10
10. Schalten Sie den Haartrockner auf die
höchste Temperaturstufe und die
höchste Geschwindigkeitsstufe . Die
Haarsträhne wird im Luftstrom gedreht.
11. Bewegen Sie den Haartrockner langsam auf und ab. Die Haarsträhne soll
von der Spitze bis fast zum Haaransatz
durch den Lockenaufsatz geführt werden bis sie trocken ist.
12. Um die Formgebung durch einen kühlen Luftstrom zu stabilisieren, halten Sie
in der letzten Phase des Trocknens die
Taste 10 gedrückt.
13. Gehen Sie mit den restliche Haarsträhnen ebenso vor.
14. Schalten Sie den Haartrockner aus und
lassen Sie die Haare auskühlen.
15. Drehen Sie nun die einzelnen Lockensträhnen auf.
16. Sie können die Haare nun nach Ihren
Wünschen weiter stylen. Lockern Sie
z.|B. die Haare mit den Fingern auf
oder bürsten Sie sie durch.
17. Wenn Sie mögen, können Sie die Locken nun mit einem Haarspray fixieren.
18. Ziehen Sie den Lockenaufsatz 14 erst
vom Haartrockner ab, wenn er abgekühlt ist.
Diffuser
Nutzen Sie den Diffuser-Aufsatz 13 zum
Kreieren von Locken und leichten Wellen in
den Längen und Spitzen sowie für Stand
und Fülle am Haaransatz.
1. Bild B: Den Diffuser 13 auf den Haartrockner aufstecken.
2. Haartrockner einschalten.
3. Einsatz:
- Bei langem Haar: Diffuser 13 zu den
Haarspitzen führen und das Haar in
Richtung Ansatz in sanfte Wellen formen.
- Bei kurzem Haar: Mittels Diffuser 13
kurzes Haar im Ansatzbereich aufarbeiten, sodass Stand und Fülle entsteht.
4. Ziehen Sie den Diffuser 13 erst vom
Haartrockner ab, wenn er abgekühlt ist.
6. Reinigen
GEFAHR!
~ Ziehen Sie den Netzstecker 5 aus der
Steckdose, bevor Sie den Haartrockner
reinigen.
WARNUNG vor Sachschäden!
~ Verwenden Sie keine scharfen oder
kratzenden Reinigungsmittel.
Reinigen Sie das Gerät regelmäßig. Achten
Sie besonders darauf, dass die Luftansaugund die Luftaustrittsöffnung frei von Staub,
Haaren und Fusseln sind.
• Wischen Sie das Gehäuse, das Schutz-
gitter 1 über der Luftansaugöffnung und
die Stylingdüse 12 mit einem leicht angefeuchteten Tuch ab.
• Ziehen Sie die Stylingdüse 12 oder den
Diffuser 13 vom Haartrockner ab. Halten Sie den Haartrockner mit der
Luftaustrittsöffnung 11 nach unten. Reinigen Sie die Schutzlamellen mit einem
Pinsel.
Schutzgitter reinigen
1. Drücken Sie das Schutzgitter 1 an den
Seiten etwas zusammen und ziehen es
dann ab.
2. Entnehmen Sie den Filter 3.
3. Halten Sie den Haartrockner mit der
Luftansaugöffnung nach unten. Reinigen Sie das innere und das äußere
Schutzgitter sowie den Filter 3 mit einem Pinsel.
4. Setzen Sie den Filter 3 und das Schutzgitter 1 wieder auf.
8
DE
Page 11
_KRA102826_Haartrockner_B1.book Seite 9 Freitag, 12. September 2014 10:31 10
Zubehörteile reinigen
1. Ziehen Sie das Zubehörteil (12, 13
oder 14) erst vom Haartrockner ab,
wenn es abgekühlt ist.
2. Wischen Sie das Zubehörteil (12, 13
oder 14) mit einem feuchten Tuch ab.
3. Lassen Sie das Zubehörteil (12, 13
oder 14) vollständig trocknen, bevor
Sie es wieder nutzen.
7. Aufbewahrung
WARNUNG vor Sachschäden!
Wickeln Sie das Kabel nicht um das Gerät
(Gefahr von Kabelbruch!).
• Mit der Aufhängeöse 6 können Sie das
Gerät zur Aufbewahrung sicher und
praktisch aufhängen.
8. Entsorgen
Das Symbol der durchgestrichenen Abfalltonne auf Rädern bedeutet, dass das
Produkt in der Europäischen
Union einer getrennten Müllsammlung zugeführt werden
muss. Dies gilt für das Produkt und alle mit diesem Symbol gekennzeichneten Zubehörteile.
Gekennzeichnete Produkte dürfen nicht über
den normalen Hausmüll entsorgt werden, sondern müssen an einer Annahmestelle für das
Recycling von elektrischen und elektronischen
Geräten abgegeben werden. Recycling hilft,
den Verbrauch von Rohstoffen zu reduzieren
und die Umwelt zu entlasten. Informationen
zur Entsorgung und der Lage des nächsten Recyclinghofes erhalten Sie z.|B. bei Ihrer Stadtreinigung oder in den Gelben Seiten.
9. Problemlösung
Sollte Ihr Gerät einmal nicht wie gewünscht
funktionieren, gehen Sie bitte erst diese
Checkliste durch. Vielleicht ist es nur ein kleines Problem, das Sie selbst beheben können.
GEFAHR durch Stromschlag!
Versuchen Sie auf keinen Fall, das
Gerät selbstständig zu reparieren.
Fehler
Keine
Funktion
Mögliche Ursachen /
Maßnahmen
• Ist die Stromversorgung sichergestellt?
• Hat der Überhitzungsschutz
das Gerät ausgeschaltet?
Stellen Sie den Ein-/Ausschalter auf 0 (aus), ziehen
Sie den Netzstecker aus der
Steckdose und lassen Sie
das Gerät ausreichend abkühlen. Vergewissern Sie
sich vor dem erneuten Einschalten, dass keine Haare
oder Fremdkörper die Luftansaugöffnung blockieren.
10. Technische Daten
Modell: SHTR 2200 D2
Netzspannung: 230-240|V ~ 50|Hz
Schutzklasse: II
Leistung: 2000 - 2200 W
Technische Änderungen vorbehalten.
Verpackung
Wenn Sie die Verpackung entsorgen möchten, achten Sie auf die entsprechenden Umweltvorschriften in Ihrem Land.
DE
9
Page 12
_KRA102826_Haartrockner_B1.book Seite 10 Freitag, 12. September 2014 10:31 10
11. Garantie der
HOYER|Handel GmbH
Sehr geehrte Kundin, sehr geehrter Kunde,
Sie erhalten auf dieses Gerät 3|Jahre Garantie ab Kaufdatum. Im Falle von Mängeln
dieses Produkts stehen Ihnen gegen den Verkäufer des Produkts gesetzliche Rechte zu.
Diese gesetzlichen Rechte werden durch unsere im Folgenden dargestellte Garantie
nicht eingeschränkt.
Garantiebedingungen
Die Garantiefrist beginnt mit dem Kaufdatum. Bitte bewahren Sie den Original Kassenbon gut auf. Diese Unterlage wird als
Nachweis für den Kauf benötigt.
Tritt innerhalb von drei Jahren ab dem Kaufdatum dieses Produkts ein Material- oder Fabrikationsfehler auf, wird das Produkt von
uns – nach unserer Wahl – für Sie kostenlos
repariert oder ersetzt. Diese Garantieleistung setzt voraus, dass innerhalb der Dreijahresfrist das defekte Gerät und der
Kaufbeleg (Kassenbon) vorgelegt und
schriftlich kurz beschrieben wird, worin der
Mangel besteht und wann er aufgetreten ist.
Wenn der Defekt von unserer Garantie gedeckt ist, erhalten Sie das reparierte oder
ein neues Produkt zurück. Mit Reparatur
oder Austausch des Produkts beginnt kein
neuer Garantiezeitraum.
Garantiezeit und gesetzliche
Mängelansprüche
Die Garantiezeit wird durch die Gewährleistung nicht verlängert. Dies gilt auch für ersetzte und reparierte Teile. Eventuell schon beim
Kauf vorhandene Schäden und Mängel müssen sofort nach dem Auspacken gemeldet
werden. Nach Ablauf der Garantiezeit anfallende Reparaturen sind kostenpƃichtig.
Garantieumfang
Das Gerät wurde nach strengen Qualitätsrichtlinien sorgfältig produziert und vor Anlieferung gewissenhaft geprüft.
Die Garantieleistung gilt für Material- oder
Fabrikationsfehler. Diese Garantie erstreckt
sich nicht auf Produktteile, die normaler Abnutzung ausgesetzt sind und daher als Verschleißteile angesehen werden können oder
für Beschädigungen an zerbrechlichen Teilen, z. B. Schalter, Akkus oder Teile, die aus
Glas gefertigt sind.
Diese Garantie verfällt, wenn das Produkt
beschädigt, nicht sachgemäß benutzt oder
gewartet wurde. Für eine sachgemäße Benutzung des Produkts sind alle in der Bedienungsanleitung aufgeführten Anweisungen
genau einzuhalten. Verwendungszwecke
und Handlungen, von denen in der Bedienungsanleitung abgeraten oder vor denen
gewarnt wird, sind unbedingt zu vermeiden.
Das Produkt ist lediglich für den privaten und
nicht für den gewerblichen Gebrauch bestimmt. Bei missbräuchlicher und unsachgemäßer Behandlung, Gewaltanwendung und
bei Eingriffen, die nicht von unserem autorisierten Service-Center vorgenommen wurden, erlischt die Garantie.
Abwicklung im Garantiefall
Um eine schnelle Bearbeitung Ihres Anliegens zu gewährleisten, folgen Sie bitte den
folgenden Hinweisen:
• Bitte halten Sie für alle Anfragen die Ar-
tikelnummer IAN:|102826 und den
Kassenbon als Nachweis für den Kauf
bereit.
• Sollten Funktionsfehler oder sonstige Mängel auftreten, kontaktieren Sie zunächst
das nachfolgend benannte Service-Center
telefonisch oder per E-Mail.
• Ein als defekt erfasstes Produkt können
Sie dann unter Beifügung des Kaufbelegs (Kassenbon) und der Angabe, worin der Mangel besteht und wann er
aufgetreten ist, für Sie portofrei an die
Ihnen mitgeteilte Service Anschrift übersenden.
10
DE
Page 13
DE
AT
CH
_KRA102826_Haartrockner_B1.book Seite 11 Freitag, 12. September 2014 10:31 10
Auf www.lidl-service.com können
Sie diese und viele weitere Handbücher, Produktvideos und Software
herunterladen.
Service-Center
Service Deutschland
Tel.: 0800 5435 111
(kostenfrei)
E-Mail: hoyer@lidl.de
Service Österreich
Tel.: 0820 201 222
(0,15 EUR/Min.)
E-Mail: hoyer@lidl.at
Service Schweiz
Tel.: 0842 665566
(0,08 CHF/Min.,
Mobilfunk max. 0,40 CHF/Min.)
E-Mail: hoyer@lidl.ch
IAN: 102826
Lieferant
Bitte beachten Sie, dass die folgende An-
keine Serviceanschrift
schrift
Kontaktieren Sie zunächst das oben benannte
Service-Center.
HOYER Handel GmbH
Kühnehöfe 5
22761 Hamburg
Deutschland
ist.
DE
11
Page 14
_KRA102826_Haartrockner_B1.book Seite 12 Freitag, 12. September 2014 10:31 10
Sommaire
1. Aperçu de l'appareil ...................................................................... 12
2. Utilisation conforme ....................................................................... 13
3. Consignes de sécurité ..................................................................... 14
4. Éléments livrés ............................................................................... 16
5. Utilisation ...................................................................................... 17
6. Nettoyage ..................................................................................... 19
7. Rangement .................................................................................... 19
8. Mise au rebut ................................................................................ 19
9. Dépannage .................................................................................... 20
10. Caractéristiques techniques ............................................................ 20
11. Garantie de HOYER Handel GmbH ................................................. 20
1. Aperçu de l'appareil
1 Grille de protection
2 Ouverture d'aspiration d'air (avec grille de protection amovible)
3 Filtre fin (sous la grille de protection)
4 Interrupteur coulissant de la fonction ionisante
5 Câble avec fiche secteur
6 Anneau de suspension
7 La DEL est allumée lorsque la fonction ionisante est activée.
8 Interrupteur marche/arrêt et bouton de réglage de la vitesse :
0 (arrêt) / (lente) / (rapide)
9 Bouton de réglage de la température de l'air :
(faible) / (moyenne) / (élevée)
10 Touche de la fonction de refroidissement
11 Ouverture de sortie d'air (avec lamelles de protection)
12 Buse de mise en forme (pivotante et amovible)
13 Diffuseur (pivotante et amovible)
14 Embout pour boucles (pivotant et amovible)
La buse de mise en forme 12, le diffuseur|13
et l'embout pour boucles 14 sont des accessoires qui ne sont pas fournis avec tous les modèles (voir « Éléments livrés» à la page 16).
Les 3 variantes sont toutes décrites dans ce
mode d'emploi.
12
FR
Page 15

_KRA102826_Haartrockner_B1.book Seite 13 Freitag, 12. September 2014 10:31 10
Merci beaucoup pour
votre confiance !
Nous vous félicitons pour l'achat de votre nou-
sèche-cheveux avec fonction ionisante
veau
Pour manipuler le produit en toute sécurité et
vous familiariser avec le volume de
livraison :
• Lisez attentivement ce mode
d’emploi avant la première utilisation.
• Respectez en priorité les
consignes de sécurité !
• L'appareil ne doit être utilisé
qu'aux fins décrites dans ce
mode d'emploi.
• Conservez ce mode d'emploi.
• Si vous transmettez l'appareil à
un tiers, n'oubliez pas d'y joindre
ce mode d'emploi.
2. Utilisation conforme
Le sèche-cheveux est uniquement destiné à
sécher et mettre en forme vos propres cheveux, humains et naturels.
.
L'appareil est conçu pour un usage domestique privé et ne peut être utilisé à des fins
commerciales.
L'appareil doit être utilisé uniquement à l'intérieur.
Utilisation impropre prévisible
AVERTISSEMENT : risque de blessures !
N'utilisez pas le sèche-cheveux pour sécher
d'autres parties du corps, des animaux ou
des objets. N'utilisez pas l'appareil sur des
cheveux artificiels ou des extensions.
Nous vous souhaitons beaucoup de plaisir
avec votre nouveau sèche-cheveux avec
fonction ionisante !
FR
13
Page 16

_KRA102826_Haartrockner_B1.book Seite 14 Freitag, 12. September 2014 10:31 10
3. Consignes de sécurité
Avertissements
Les avertissements suivants sont utilisés si nécessaire dans le présent mode d’emploi :
DANGER ! Risque élevé : le non-respect de l’avertissement peut provoquer des
blessures graves, voire la mort.
AVERTISSEMENT ! Risque moyen : le non-respect de l’avertissement peut provoquer des
blessures ou des dommages matériels graves.
ATTENTION : risque faible : le non-respect de l’avertissement peut provoquer des blessures légères ou entraîner des dommages matériels.
REMARQUE : remarques et particularités dont il faut tenir compte en manipulant l’appareil.
Instructions pour une utilisation en toute sécurité
~
Cet appareil peut être utilisés par des enfants de plus de 8 ans et
des personnes ayant des capacités physiques, sensorielles ou mentales réduites ou un manque d'expérience et/ou de connaissance
lorsqu'ils sont surveillés ou qu'ils ont été informés de l'utilisation
sûre de l'appareil et ont compris les risques qui en résultent. Les enfants ne doivent pas jouer avec l'appareil. Les enfants ne doivent
pas nettoyer ni faire l'entretien de l'appareil sauf s’ils sont âgés de
plus de 8 ans et surveillés.
~
L'appareil et le câble de raccordement doivent être hors de portée
des enfants de moins de 8 ans.
~
Lorsque le sèche-cheveux est utilisé dans une salle de bain, il faut
débrancher l'appareil après utilisation. La proximité de l'eau présente un danger même lorsque l'appareil est arrêté.
~
Si le câble de raccordement au secteur de cet appareil est endommagé, il faut le faire remplacer par le fabricant, son service aprèsvente ou une personne ayant une qualification similaire pour éviter
les mises en danger.
~
Comme protection supplémentaire, il est conseillé de pourvoir l'installation d'un dispositif différentiel résiduel (FI/RCD) avec un courant de déclenchement nominal ne dépassant pas 30 mA dans le
circuit. Demandez conseil à votre électricien. Faites exclusivement
appel à un électricien spécialisé pour effectuer le montage.
14
FR
Page 17

_KRA102826_Haartrockner_B1.book Seite 15 Freitag, 12. September 2014 10:31 10
~ Raccordez la fiche secteur uniquement
DANGER pour les enfants
~ Le matériel d'emballage n'est pas un
jouet. Les enfants ne doivent pas jouer
avec les sachets en plastique. Ceux-ci
présentent un risque d'asphyxie.
DANGER ! Risque d'électrocution en raison de l’humidité
~ N'utilisez pas l'appareil à
proximité de baignoires, de
douches, de lavabos ou tout
autre récipient contenant de
l'eau.
~ Veillez toujours à ce que l'appareil ne
puisse pas tomber dans l'eau lorsqu'il
est branché.
~ Protégez l'appareil contre l'humidité, les
gouttes et les éclaboussures.
~ Ne plongez pas l'appareil ni la fiche
secteur dans l'eau ou dans un autre liquide.
~ Si du liquide pénètre dans l'appareil,
débranchez immédiatement la fiche secteur. Faites contrôler l'appareil avant de
le remettre en service.
~ En cas de chute de l'appareil dans
l'eau, débranchez immédiatement la
fiche secteur avant de retirer l'appareil.
Dans ce cas, cessez d'utiliser l'appareil,
faites-le vérifier par un atelier spécialisé.
~ N'utilisez pas l'appareil avec des mains
mouillées.
DANGER ! Risque
d'électrocution !
~ Ne mettez pas l’appareil en service, si
l’appareil ou le câble de raccordement
présente des dommages visibles ou si
l'appareil a subi une chute.
~ Disposez le câble de raccordement de
façon à ce que personne ne puisse mar-
à une prise de courant conforme et facilement accessible, dont la tension correspond aux indications figurant sur la
plaque signalétique. Après avoir branché l'appareil, la prise de courant doit
rester facilement accessible.
~ Évitez toute détérioration du câble de
raccordement par des arêtes vives ou
des surfaces brûlantes. N'enroulez pas
le câble de raccordement autour de
l'appareil (risque de rupture du câble !).
~ Veillez à ne pas coincer ou écraser le
câble de raccordement.
~ Pour débrancher la fiche secteur de la
prise de courant, tirez toujours sur la
fiche secteur, jamais sur le câble de raccordement.
~ Débranchez la fiche secteur de la prise
de courant …
… après chaque utilisation,
… lorsqu'une panne survient,
… quand vous n’utilisez pas l'appareil,
… avant de nettoyer l'appareil et
…en cas d'orage.
~ Afin d'éviter tout risque d'accident, n'ef-
fectuez aucune modification au niveau
de l'article. Ne remplacez pas le câble
de raccordement vous-même. Confiez
les réparations uniquement à un atelier
spécialisé ou au service après-vente.
~ Si le câble d'alimentation est endomma-
gé, il doit être remplacé par le fabricant, son service après vente ou des
personnes de qualification similaire afin
d'éviter un danger.
~ N'essayez jamais d'éliminer de la pous-
sière ou des corps étrangers de l'intérieur de l'appareil à l'aide d'objets
pointus (par ex. avec un peigne à
queue).
cher dessus, se prendre dedans ou trébucher.
FR
15
Page 18

_KRA102826_Haartrockner_B1.book Seite 16 Freitag, 12. September 2014 10:31 10
AVERTISSEMENT : risque de
DANGER ! Risque d'incendie
~ Ne laissez jamais l'appareil sans sur-
veillance lorsqu'il est branché.
~
Ne couvrez jamais l'appareil et ne le posez jamais sur des objets mous (comme
des serviettes de toilettes par ex.).
~ Assurez-vous que les ouvertures d'aspi-
ration et de sortie de l'air soient dégagées en permanence. Tenez l'ouverture
d'aspiration d'air éloignée des cheveux longs ou des objets susceptibles
d'être aspirés.
~ Cet appareil est équipé d'une protection
contre la surchauffe. En cas de surchauffe, par ex. si les ouvertures d'aspiration et de sortie de l'air sont couvertes,
l'appareil s'arrête automatiquement. Le
cas échéant, placez l'interrupteur
marche/arrêt sur 0 (arrêt), débranchez
la fiche secteur de la prise de courant et
laissez suffisamment refroidir l'appareil.
Avant de le remettre en marche, assurezvous que l'ouverture d'aspiration d'air
n'est pas obstruée par des cheveux ou
d'autres corps étrangers.
~ Ne mettez pas en marche l'appareil en
même temps qu'un autre appareil de
puissance absorbée élevée branché sur
la même multiprise.
~ N'utilisez pas de rallonge.
DANGER ! Risque de brûlures
~ N'orientez pas le flux d'air chaud vers
les yeux, les mains ou d'autres parties
du corps sensibles à la chaleur.
~ Ne touchez pas les surfaces chaudes de
l'appareil.
~ Laissez complètement refroidir l'appa-
reil avant de le nettoyer ou de le ranger.
~ Laissez refroidir tous les accessoires
avant de les détacher de l'appareil.
dommages matériels
~ Utilisez uniquement les accessoires
d’origine.
~ Ne placez jamais l'appareil sur des sur-
faces brûlantes (par ex. les plaques de
cuisson) ou à proximité des sources de
chaleur ou de flammes nues.
~ N’utilisez pas de produit de nettoyage
corrosif ou abrasif.
~ N'exposez pas l’appareil à des tempé-
ratures inférieures à -10 °C ou supérieures à +40 °C.
4. Éléments livrés
1 sèche-cheveux
1 buse de mise en forme 12
1 diffuseur 13
1 Embout pour boucles 14
1 mode d’emploi
Accessoires livrés avec les différents modèles :
- sèche-cheveux noir
diffuseur 13, buse de mise en
forme|12
- sèche-cheveux argenté
embout pour boucles 14, buse de
mise en forme 12
- sèche-cheveux rose vif
diffuseur 13, buse de mise en
forme|12
16
FR
Page 19

_KRA102826_Haartrockner_B1.book Seite 17 Freitag, 12. September 2014 10:31 10
5. Utilisation
REMARQUE : avant la première utilisation,
mettez l'appareil en marche et faites-le fonctionner quelques minutes à vitesse et température maximum. Une légère odeur due à la
fabrication peut alors se dégager. Elle ne
présente aucun danger et n'apparaît que
lors de la première utilisation. Assurez une
bonne aération de la pièce.
Marche, arrêt et réglage de la
vitesse
1. Branchez la fiche secteur 5 à une prise
de courant facile d'accès.
2. A l'aide de l'interrupteur marche/arrêt 8
et du bouton de réglage de la vitesse,
mettez l'appareil en marche et sélectionnez la vitesse de flux d'air souhaitée :
0 =arrêt
= lente ; flux d'air faible
= rapide ; flux d'air puissant
3. Une fois que les cheveux sont secs, pla-
cez l'interrupteur marche/arrêt 8 sur 0
(arrêt) et débranchez la fiche secteur.
Fonction ionisante
La touche 4 permet d'ajouter la fonction ionisante à tous les modes de fonctionnement.
Lorsqu'elle est activée, des ions sont appliqués en continu sur les cheveux.
Cela permet de réduire l'électricité statique
des cheveux et de faciliter leur mise en forme.
Les cheveux sont doux, soyeux, brillants et
plus faciles à coiffer.
• Fonction ionisante activée, DEL 7 al-
lumée
• Fonction ionisante désactivée,
DEL 7 éteinte
Buse de mise en forme
La buse de mise en forme 12 permet
d'orienter le flux d'air sur des mèches de
cheveux précises.
1. Emboîtez la buse de mise en forme 12
à l'avant du sèche-cheveux de manière
à ce qu'elle s'encliquète.
2. Il est possible de faire pivoter la buse
de mise en forme 12 dans toutes les
positions souhaitées.
3. Ne retirez la buse de mise en forme 12
du sèche-cheveux qu'une fois qu'elle a
refroidi.
Régler la température
A l'aide du bouton de réglage de la température 9, sélectionnez la température du flux
d'air souhaitée :
= température faible
= température moyenne
= température élevée
Fonction de refroidissement
Pour une meilleure tenue de la coiffure, vous
pouvez à l'aide de la touche 10 refroidir
une mèche de cheveux que vous avez mise
en forme au moyen de l'air chaud.
Maintenez la touche 10 enfoncée pendant le séchage pour obtenir un flux d'air
froid, peu importe la température de départ.
Lorsque vous n'avez plus besoin du flux
d'air froid, relâchez la touche 10 .
Embout pour boucles
L'embout pour boucles 14 vous permet de
réaliser rapidement des boucles et des ondulations. Comme il génère beaucoup moins
de chaleur qu'un fer à boucler, vos cheveux
sont moins sollicités.
REMARQUE : le résultat dépend des facteurs suivants :
- votre type de cheveux ;
- le degré d'humidité de vos cheveux ;
- la longueur de vos cheveux ;
- l'épaisseur des mèches que vous sé-
chez à chaque passage ;
- le soin appliqué sur les cheveux au
préalable.
17
FR
Page 20

_KRA102826_Haartrockner_B1.book Seite 18 Freitag, 12. September 2014 10:31 10
1. Lavez-vous les cheveux avec un shampooing normal.
REMARQUE : n'appliquez pas d'aprèsshampooing. Les boucles seraient moins faciles à former.
2. Séchez vos cheveux à la serviette.
3. Peignez vos cheveux en veillant à éliminer tous les nœuds.
4. Emboîtez la buse de mise en forme 12
à l'avant du sèche-cheveux de manière
à ce qu'elle s'encliquète.
5. Ne séchez les cheveux qu'au niveau
des racines.
6. Retirez la buse de mise en forme 12.
7. Emboîtez l'embout pour boucles 14 à
l'avant du sèche-cheveux de manière à
ce qu'il s'encliquète.
8. Séparez les cheveux en mèches que
vous travaillerez une par une.
9. Figure A : tortillez légèrement une
mèche puis enfoncez-la par le haut
dans l'embout pour boucles 14.
10. Réglez le sèche-cheveux sur la température et la vitesse les plus élevées .
La mèche de cheveux est entortillée par
le flux d'air.
11. Bougez lentement le sèche-cheveux de
haut en bas et inversement. La mèche
de cheveux doit être passée dans l'embout de la pointe à la racine jusqu'à ce
qu'elle soit sèche.
12. Afin de fixer la forme au moyen d'un flux
10
d'air froid, maintenez la touche
enfoncée dans la phase finale du séchage.
13. Procédez de la même façon avec le
reste des cheveux.
14. Arrêtez le sèche-cheveux et laissez les
cheveux refroidir.
15. Désentortillez ensuite chaque mèche
bouclée.
16. Vous pouvez maintenant mettre en
forme vos cheveux selon vos envies.
Aérez par exemple les cheveux en y
passant vos doigts ou brossez-les.
17. Si vous le souhaitez, vous pouvez fixer
vos boucles avec de la laque.
18. Ne retirez l'embout pour boucles 14
du sèche-cheveux que lorsqu'il a refroidi.
Diffuseur
Utilisez l'embout diffuseur 13 pour former
des boucles et de légères ondulations sur les
longueurs et les pointes ou pour donner du
volume à la racine des cheveux.
1. Figure B : Emboîtez le diffuseur 13
sur le sèche-cheveux.
2. Mettez le sèche-cheveux en marche.
3. Utilisation :
- Sur cheveux longs : passez le diffu-
seur 13 sur les pointes des cheveux
et formez de légères ondulations en
direction des racines.
- Sur cheveux courts : utilisez le diffu-
seur 13 pour travailler les cheveux
courts au niveau de la racine et leur
donner du volume.
4. Ne retirez le diffuseur 13 du sèche-cheveux qu'une fois qu'il a refroidi.
18
FR
Page 21

_KRA102826_Haartrockner_B1.book Seite 19 Freitag, 12. September 2014 10:31 10
6. Nettoyage
DANGER !
~ Débranchez la fiche secteur 5 de la
prise de courant avant de nettoyer le
sèche-cheveux.
AVERTISSEMENT : risque de dommages matériels !
~ N’utilisez pas de produit de nettoyage
corrosif ou abrasif.
Nettoyez l'appareil régulièrement. Veillez
particulièrement à ce qu'il n'y ait pas de
poussière, de cheveux ou de peluches dans
les ouvertures d'aspiration et de sortie de
l'air.
• Utilisez un chiffon doux humide pour
nettoyer le boîtier, la grille de protection 1,
l'ouverture d'aspiration d'air et la buse
de mise en forme 12.
• Retirez la buse de mise en forme 12 ou
le diffuseur 13 du sèche-cheveux. Tenez
le sèche-cheveux avec l'ouverture de
sortie d'air 11 vers le bas. Nettoyez les
lamelles de protection à l'aide d'un pinceau.
Nettoyage de la grille de
protection
1. Pressez légèrement les côtés de la grille
de protection 1 puis retirez-la.
2. Retirez le filtre 3.
3. Tenez le sèche-cheveux avec l'ouver-
ture d'aspiration d'air vers le bas. Nettoyez l'intérieur et l'extérieur de la
grille de protection ainsi que le filtre 3
à l'aide d'un pinceau.
4. Remettez le filtre 3 et la grille de pro-
tection 1 en place.
Nettoyage des accessoires
1. Ne détachez l'accessoire (12, 13 ou
14) du sèche-cheveux que lorsqu'il a
refroidi.
2. Nettoyez l'accessoire (12, 13 ou 14)
avec un chiffon humide.
3. Laissez l'accessoire (12, 13 ou 14) sé-
cher complètement avant de l'utiliser à
nouveau.
7. Rangement
AVERTISSEMENT : risque de dommages matériels !
N'enroulez pas le câble autour de l'appareil (risque de rupture du câble !).
• L'anneau de suspension 6, pratique et
sûr, permet d'accrocher l'appareil
lorsque vous souhaitez le ranger.
8. Mise au rebut
Le symbole de la poubelle
sur roues barrée signifie
que, dans l’Union européenne, le produit doit faire
l’objet d’une collecte séparée des déchets. Cela s’applique au produit
et à tous les accessoires portant ce symbole.
Les produits portant ce symbole ne doivent
pas être éliminés avec les déchets ménagers
normaux, mais doivent être déposés dans
un point de collecte chargé du recyclage
des appareils électriques et électroniques.
Le recyclage contribue à réduire l’utilisation
de matières premières et à protéger l’environnement.
Emballage
Si vous souhaitez mettre l’emballage au rebut, respectez les prescriptions environnementales correspondantes de votre pays.
FR
19
Page 22

_KRA102826_Haartrockner_B1.book Seite 20 Freitag, 12. September 2014 10:31 10
9. Dépannage
Si votre appareil ne fonctionne pas correctement, procédez dans un premier temps aux
tests de cette liste de contrôle. Il s’agit peutêtre seulement d’un problème mineur que
vous pouvez résoudre vous-même.
DANGER ! Risque
d'électrocution ! N’essayez en
aucun cas de réparer l'appareil
vous-même.
Pro-
blème
Aucun
fonctionnement
Cause possible / solution
• L’alimentation électrique estelle établie correctement ?
• La protection contre la surchauffe a-t-elle arrêté l'appareil ? Placez l'interrupteur
marche/arrêt sur 0 (arrêt),
débranchez la fiche secteur
de la prise de courant et
laissez suffisamment refroidir l'appareil. Avant de le
remettre en marche, assurez-vous que l'ouverture
d'aspiration d'air n'est pas
obstruée par des cheveux
ou d'autres corps étrangers.
10. Caractéristiques
techniques
Modèle :
Tension secteur : 230-240 V ~ 50 Hz
Classe de
protection : II
Puissance : 2 000 - 2 200 watts
Sous réserves de modifications techniques.
11. Garantie de
HOYER Handel GmbH
Chère cliente, cher client,
Vous obtenez pour cet appareil une garantie
de 3 ans à compter de la date d’achat. En
cas de défauts de ce produit, vous disposez
de droits légaux contre le vendeur de ce produit. Ces droits ne sont pas limités par notre
garantie présentée par la suite.
Indépendamment de la garantie commerciale souscrite, le vendeur reste tenu des défauts de conformité du bien et des vices
rédhibitoires dans les conditions prévues
aux articles L211-4 et suivants du Code de
la consommation et aux articles 1641 et suivants du Code Civil.
Conditions de garantie
Le délai de garantie commence à la date
d’achat. Conservez le ticket de caisse d’origine. Ce document sert de justificatif d’achat.
Si au cours des trois années suivant la date
d’achat, des défauts de matériel ou de fabrication apparaissent sur ce produit, celui-ci
vous est, à notre discrétion, réparé ou remplacé gratuitement. Les conditions pour faire
valoir la garantie sont que l’appareil et la
preuve d’achat (ticket de caisse) soient présentés dans un délai de trois ans et que le
défaut ainsi que le moment où il est survenu
soient brièvement décrits par écrit.
Si le défaut est couvert par notre garantie,
nous vous renvoyons le produit réparé ou
neuf. La réparation ou l’échange du produit
ne constitue pas un nouveau commencement
de période de la garantie.
Durée de garantie et requêtes
légales pour vices de construction
La durée de garantie n’est pas prolongée
par son application. Ceci est également valable sur les pièces réparées et remplacées.
Les dommages et les vices déjà présents au
moment de l’achat doivent être signalés im-
20
FR
Page 23

FR
CH
_KRA102826_Haartrockner_B1.book Seite 21 Freitag, 12. September 2014 10:31 10
médiatement après le déballage. Après l’expiration de la garantie, les réparations à
effectuer sont payantes.
Etendue de la garantie
L’appareil a été fabriqué selon des prescriptions de qualité rigoureuses et a été vérifié
minutieusement avant livraison.
La garantie s’applique aux défauts de matériel ou de fabrication. Cette garantie ne
s’applique pas aux pièces du produit subissant l’usure normale et pouvant donc être
considérées comme pièces d’usure ou aux
dommages sur les pièces fragiles comme le
bouton, la batterie ou les éléments en verre.
Cette garantie est perdue si l’appareil n’a
pas été utilisé ou entretenu de manière
conforme. Pour une utilisation conforme du
produit, respecter précisément toutes les
consignes présentées dans le mode d’emploi. Les fins d’utilisation et les actions
contre-indiquées ou déconseillées dans le
mode d’emploi doivent impérativement être
évitées.
Le produit est exclusivement conçu pour un
usage privé non commercial. La manipulation non autorisée et non conforme, l'utilisation de force et les interventions non
effectuées par notre centre de service autorisé entraînent la perte de garantie.
Déroulement en cas de garantie
Pour assurer un traitement rapide de votre
demande, respectez les éléments suivants :
• Pour toute demande, tenez à disposition
le numéro d’article IAN : 102826 et
le ticket de caisse comme preuve
d’achat.
• En cas d’erreur de fonctionnement ou
autres pannes, contactez d’abord par
téléphone ou par e-Mail le centre de
service cité ci-dessous.
• Envoyez ensuite gratuitement à l’adresse
de service qu’on vous a donnée le produit considéré comme défectueux en y
joignant la preuve d’achat (ticket de
caisse) et l’indication du défaut ainsi que
du moment où il est survenu.
Sur www.lidl-service.com, vous
pouvez télécharger ce mode d’emploi ainsi que ceux d’autres produits, des vidéos sur les produits et
des logiciels.
Centre de service
Service France
Tel.: 0800 919270
E-Mail: hoyer@lidl.fr
Service Suisse
Tel.: 0842 665566 (0,08 CHF/Min.,
mobile max. 0,40 CHF/Min.)
E-Mail: hoyer@lidl.ch
IAN : 102826
Fournisseur
Attention ! L’adresse suivante n’est pas
une adresse de service. Contactez
d’abord le centre de service cité plus haut.
HOYER Handel GmbH
Kühnehöfe 5
22761 Hamburg
Allemagne
FR
21
Page 24

_KRA102826_Haartrockner_B1.book Seite 22 Freitag, 12. September 2014 10:31 10
Indice
1. Panoramica ................................................................................... 22
2. Uso conforme ................................................................................ 23
3. Istruzioni per la sicurezza .............................................................. 24
4. Materiale in dotazione ................................................................... 26
5. Funzionamento .............................................................................. 26
6. Pulizia ........................................................................................... 28
7. Conservazione ............................................................................... 29
8. Smaltimento .................................................................................. 29
9. Risoluzione dei problemi ................................................................ 29
10. Dati tecnici ..................................................................................... 29
11. Garanzia della HOYER Handel GmbH ............................................ 30
1. Panoramica
1 Griglia di protezione
2 Apertura di aspirazione dell'aria (con griglia di protezione amovibile)
3 Filtro fine (sotto la griglia di protezione)
4 Interruttore a scorrimento per la funzione Ioni
5 Cavo con spina
6 Anello di aggancio
7 LED, si accende quando la funzione Ioni è attivata.
8 Interruttore on/off e interruttore per il livelli di velocità:
0 (off) / (lento) / (veloce)
9 Interruttore per i livelli di aria calda:
(basso) / (medio) / (alto)
10 Tasto per la funzione di raffreddamento
11 Apertura di uscita dell'aria (con alette di protezione)
12 Becco per acconciature (girevole e amovibile)
13 Diffusore (girevole e amovibile)
14 Accessorio per ricci (girevole e amovibile)
Il becco per acconciature 12, il diffusore 13
e l'accessorio per ricci 14 non sono inclusi
come accessori nel materiale in dotazione
di tutti i modelli (vedere “Materiale in dotazione” a pagina 26). In questo manuale di
istruzioni vengono descritte tutte e le tre varianti.
22
IT
Page 25

_KRA102826_Haartrockner_B1.book Seite 23 Freitag, 12. September 2014 10:31 10
Vi ringraziamo per la
vostra fiducia!
Congratulazioni per l'acquisto del vostro nuo-
asciugacapelli con funzione Ioni
vo
Per un impiego sicuro del prodotto e per conoscerne tutto il ventaglio di prestazioni:
• Leggere attentamente il presente manuale di istruzioni per l'uso
prima della prima messa in funzione.
• Attenersi soprattutto alle istruzioni per la sicurezza!
• È consentito usare l'apparecchio
solo come descritto nel manuale
di istruzioni per l'uso.
• Conservare il manuale di istruzioni per l'uso.
• Se si cede l'apparecchio a terzi,
consegnare anche il manuale di
istruzioni per l'uso.
.
2. Uso conforme
L'asciugacapelli è destinato ad asciugare e
acconciare esclusivamente capelli umani, naturali e propri.
L'apparecchio è pensato per l'uso domestico
e non va utilizzato in ambito commerciale.
Usare l'apparecchio solo al chiuso.
Uso indebito prevedibile
AVVERTENZA: rischio di lesioni!
Non usare l'asciugacapelli per asciugare altre parti del corpo, animali o oggetti. Non utilizzare l'apparecchio per capelli sintetici o
extension.
Ci auguriamo che il vostro nuovo asciugacapelli con funzione Ioni possa darvi molte
soddisfazioni!
IT
23
Page 26

_KRA102826_Haartrockner_B1.book Seite 24 Freitag, 12. September 2014 10:31 10
3. Istruzioni per la sicurezza
Avvertenze di sicurezza
Laddove necessario, nel presente manuale di istruzioni per l'uso vengono utilizzate le seguenti avvertenze di sicurezza:
PERICOLO! Rischio elevato: la mancata osservanza di questa avvertenza può essere causa di danni a persone.
AVVERTENZA! Rischio medio: la mancata osservanza di questa avvertenza può essere
causa di lesioni o gravi danni materiali.
ATTENZIONE: rischio minimo: la mancata osservanza di questa avvertenza può essere
causa di lievi lesioni o danni materiali.
NOTA: circostanze e particolarità di cui tener conto durante l'uso dell'apparecchio.
Istruzioni per un impiego sicuro
~ Questo apparecchio può essere utilizzato da bambini di età su-
periore a 8 anni e da persone con facoltà fisiche, sensoriali o
mentali ridotte o prive di esperienza e/o conoscenze, a condizione che vengano sorvegliati o istruiti circa l'utilizzo sicuro
dell'apparecchio e che abbiano compreso i rischi derivanti da
tale utilizzo. I bambini non devono giocare con l'apparecchio.
La pulizia e la manutenzione a cura dell'utente non devono essere eseguite da bambini, a meno che abbiano più di 8 anni e siano sorvegliati.
~ Mantenere i minori di 8 anni lontani dall'apparecchio e dal cavo
di collegamento.
~ Quando l'asciugacapelli viene utilizzato nella stanza da bagno,
dopo l'utilizzo è necessario staccare la spina. La vicinanza di
acqua costituisce un pericolo anche quando l'apparecchio è
spento.
~ Il cavo di collegamento alla rete di questo apparecchio non può
essere sostituito. In caso di danni al cavo, l'apparecchio va rottamato.
~ Come protezione supplementare si raccomanda di installare nel
circuito elettrico un dispositivo di protezione contro la corrente di
guasto (FI/RCD) con una corrente di apertura nominale non superiore a 30 mA. Chiedere consiglio ad un elettricista. Far eseguire il montaggio solo da un elettricista specializzato.
24
IT
Page 27

_KRA102826_Haartrockner_B1.book Seite 25 Freitag, 12. September 2014 10:31 10
PERICOLO per i bambini
~ Il materiale di imballaggio non è un gio-
cattolo per bambini. I bambini non devono giocare con i sacchetti di plastica,
poiché ciò comporta un pericolo di soffocamento.
PERICOLO di scossa elettrica a
causa dell'umidità
~ Non utilizzare l'apparecchio in
prossimità di vasche da bagno,
docce, lavandini o altri recipienti contenenti acqua.
~ Non riporre mai l'apparecchio in modo
che possa cadere in acqua quando è
collegato.
~ Proteggere l'apparecchio dall'umidità,
da goccioline o spruzzi d'acqua.
~ Non immergere l'apparecchio, il cavo e
la spina in acqua o altri liquidi.
~ Se nell'apparecchio penetrano liquidi,
staccare immediatamente la spina. Far
controllare l'apparecchio prima di rimetterlo in funzione.
~ Qualora l'apparecchio cadesse in ac-
qua, staccare immediatamente la spina
e solo allora togliere l'apparecchio
dall'acqua. In questo caso non usare
più l'apparecchio e farlo controllare da
una ditta specializzata.
~ Non usare l'apparecchio con le mani
bagnate.
PERICOLO di scossa elettrica
~ Non mettere in funzione l'apparecchio
se esso o il cavo di collegamento presentano danni visibili o se l'apparecchio è caduto.
~ Posare il cavo di collegamento in modo
tale che nessuno possa calpestarlo, restarvi impigliato o inciamparvi.
~ Collegare la spina solo ad una presa
correttamente installata e facilmente accessibile la cui tensione coincida con
quella indicata sulla targhetta. La presa
di corrente deve essere facilmente accessibile anche dopo il collegamento.
~ Assicurarsi che il cavo di collegamento
non possa essere danneggiato da bordi
taglienti o punti molto caldi. Non avvolgere il cavo di collegamento intorno
all'apparecchio (rischio di rottura del
cavo!).
~ Assicurarsi che il cavo di collegamento
non rimanga incastrato o schiacciato.
~ Per staccare la spina dalla presa, tirare
sempre dalla spina, mai dal cavo di collegamento.
~ Staccare la spina dalla presa…
… dopo ogni utilizzo,
… se si verifica un guasto,
… quando non si utilizza l'apparecchio,
… prima di pulire l'apparecchio e
… in caso di temporali.
~ Per evitare rischi non apportare alcuna
modifica al prodotto. Non sostituire autonomamente il cavo di collegamento.
Fare riparare l'apparecchio solo da un
laboratorio specializzato o presso il nostro centro assistenza.
~ Non tentare mai di rimuovere la polvere
o corpi estranei dall'interno dell'apparecchio con oggetti appuntiti (ad es.
con un pettine a coda).
PERICOLO di incendio
~ Non lasciare incustodito l'apparecchio
quando è collegato alla rete elettrica.
~ Non coprire l'apparecchio né collocarlo
su oggetti morbidi (ad es. asciugamani).
~ Assicurarsi che le aperture di aspirazio-
ne e uscita dell'aria siano sempre libere. Mantenere l'apertura di aspirazione
dell'aria lontana da capelli lunghi o oggetti che potrebbero venire aspirati.
Questo apparecchio è provvisto di una
~
protezione contro il surriscaldamento. In
caso di surriscaldamento, ad es. perché
si è coperta l'apertura di aspirazione o
quella di uscita dell'aria, l'apparecchio si
spegne automaticamente. In questo caso
IT
25
Page 28

_KRA102826_Haartrockner_B1.book Seite 26 Freitag, 12. September 2014 10:31 10
portare l'interruttore on/off su 0 (off),
staccare la spina dalla presa di corrente
e far raffreddare l'apparecchio a sufficienza. Prima di riaccenderlo assicurarsi
che non vi siano capelli o corpi estranei
che bloccano l'apertura di aspirazione
dell'aria.
~ Non accendere l'apparecchio contem-
poraneamente ad un altro apparecchio
con un elevato assorbimento di potenza
che sia collegato alla stessa presa multipla.
~ Non usare prolunghe.
PERICOLO di lesioni da
ustione
~ Non dirigere il getto d'aria rovente su-
gli occhi, sulle mani o su altre zone del
corpo sensibili al calore.
~ Non toccare le superfici calde dell'ap-
parecchio.
~ Far raffreddare completamente l'appa-
recchio prima di pulirlo o metterlo da
parte.
~ Far raffreddare tutti gli accessori prima
di staccarli dall'apparecchio.
AVVERTENZA: rischio di danni
materiali
~ Utilizzare solo gli accessori originali.
~ Non riporre mai l'apparecchio su super-
fici calde (ad es. fornelli) o vicino a fonti di calore o fiamme libere.
~ Non utilizzare detergenti corrosivi o
abrasivi.
~ Non esporre l'apparecchio a temperature
inferiori a -10 °C o superiori a +40 °C.
4. Materiale in dotazione
1 asciugacapelli
1 becco per acconciature 12
1 diffusore 13
1 accessorio per ricci 14
1 manuale di istruzioni per l'uso
Accessori inclusi nelle singole varianti:
-asciugacapelli nero
diffusore 13, becco per acconciature|12
- asciugacapelli grigio argento
accessorio per ricci 14, becco per
acconciature 12
- asciugacapelli rosa fucsia
diffusore 13, becco per acconciature|12
5. Funzionamento
NOTA: prima di usare l'apparecchio per la
prima volta, mantenerlo acceso per qualche
minuto e farlo funzionare alla massima velocità e temperatura. È possibile che, per motivi legati alla fabbricazione, l'apparecchio
emani un leggero odore. Si tratta di un fenomeno innocuo che si verifica solo al primo
utilizzo. Assicurare una buona ventilazione
dell'ambiente.
Accensione/spegnimento e regolazione della velocità
1. Infilare la spina 5 in una presa di cor-
rente facilmente accessibile.
2. L'apparecchio si accende con l'interrut-
tore on/off 8, mentre con l'interruttore
per i livelli di velocità si sceglie la velocità desiderata per il getto d'aria:
0 =off
= lento; getto d'aria ridotto
= veloce; getto d'aria forte
26
IT
Page 29

_KRA102826_Haartrockner_B1.book Seite 27 Freitag, 12. September 2014 10:31 10
3. Dopo aver asciugato i capelli, portare
l'interruttore on/off 8 su 0 (off) e staccare la spina.
Selezione della temperatura
Con l'interruttore per i livelli di aria calda 9
si sceglie la temperatura desiderata per il
getto d'aria:
= temperatura ridotta
= temperatura media
= alta temperatura
Funzione di raffreddamento
Per migliorare la tenuta dell'acconciatura, è
possibile raffreddare la ciocca di capelli cui
si è dato forma con l'aria calda per mezzo
del tasto 10 .
Durante l'asciugatura mantenere premuto il
tasto 10 per ottenere un getto d'aria
fredda indipendentemente dalla temperatura iniziale.
Quando non si ha più bisogno del getto
d'aria fredda, rilasciare il tasto 10 .
Funzione di ionizzazione
L'interruttore ioni 4 consente di attivare la
funzione di ionizzazione in aggiunta ad
ogni modalità di funzionamento. In questo
caso ai capelli vengono applicati costantemente ioni.
Ciò riduce la carica elettrostatica e agevola
la pettinatura del capello.
Il capello diventa morbido, soffice, brillante
e più facile da acconciare.
• Funzione Ioni attivata, il LED 7 si accende
• Funzione Ioni disattivata, il LED 7 è
spento
Becco per acconciature
Il becco per acconciature 12 consente di dirigere il getto d'aria in modo mirato su determinate ciocche.
1. Applicare il becco per acconciature 12
alla parte anteriore dell'asciugacapelli
in modo da innestarlo.
2. Il becco per acconciature 12 può esse-
re girato in ogni posizione desiderata.
3. Staccare il becco per acconciature 12
dall'asciugacapelli solo quando si è
asciugato.
Accessorio per ricci
L'accessorio per ricci 14 Vi permette di creare in poco tempo ricci e onde. Poiché la
quantità di calore che agisce sui capelli è di
gran lunga inferiore a quella emanata da un
ferro arricciacapelli, viene limitato anche lo
stress a carico dei Vostri capelli.
NOTA: il risultato dipende dai seguenti fattori:
- il Vostro tipo di capelli;
- l'idratazione dei capelli;
- la lunghezza dei Vostri capelli;
- la grandezza delle ciocche di capelli
che vengono asciugate ad ogni passaggio;
- il pretrattamento dei capelli.
1. Lavare i capelli con uno shampoo normale.
NOTA: non utilizzare il balsamo. Potrebbe
intaccare la formazione dei ricci.
2. Strofinare i capelli con un asciugamano.
3. Spazzolare bene i capelli e fare attenzione a che non vi siano nodi.
4. Applicare il becco per acconciature
12 alla parte anteriore dell'asciugacapelli in modo da innestarlo.
5. Asciugare soltanto l'attaccatura dei capelli.
6. Estrarre il becco per acconciature 12.
7. Applicare l'accessorio per ricci 14 alla
parte anteriore dell'asciugacapelli in
modo da innestarlo.
8. Dividere i capelli in singole ciocche e
lavorare ciocca per ciocca.
IT
27
Page 30

_KRA102826_Haartrockner_B1.book Seite 28 Freitag, 12. September 2014 10:31 10
9. Figura A: arrotolare leggermente una
ciocca e inserirla dall'alto nell'accessorio per ricci 14.
10. Accendere l'asciugacapelli alla massima temperatura e velocità . La
ciocca di capelli viene arrotolata in direzione del getto d'aria.
11. Muovere l'asciugacapelli lentamente
verso l'alto e verso il basso. Far scorrere
la ciocca di capelli nell'accessorio per
ricci dalla punta all'attaccatura fino a
quando è asciutta completamente.
12. Durante l'ultima fase dell'asciugatura
tenere premuto il tasto 10 per stabilizzare la piega mediante un getto
d'aria fredda.
13. Procedete allo stesso modo per le ciocche di capelli restanti.
14. Spegnere l'asciugacapelli e lasciar raffreddare completamente i capelli.
15. Aprite le singole ciocche di ricci.
16. I capelli possono essere sistemati ulteriormente a proprio piacimento. Sciogliere i capelli con le dita ad esempio
o spazzolarli per bene.
17. Se si desidera, si possono fissare i ricci
con dello spray per capelli.
18. Estrarre l'accessorio per ricci 14
dall'asciugacapelli solo quando si è
raffreddato completamente.
Diffusore
Usare l'accessorio diffusore 13 per creare
riccioli e leggere ondulazioni lungo i capelli
e sulle punte, nonché per aumentare la stabilità e il volume dell'attaccatura dei capelli.
1. Figura B: Applicare il diffusore 13
all'asciugacapelli.
2. Accendere l'asciugacapelli.
3. Impiego:
- Con capelli lunghi: far passare il diffuso-
13
sulle punte dei capelli e dare for-
re
ma al capello con morbide ondulazioni
in direzione dell'attaccatura.
- Con capelli corti: lavorare il capello
nella zona dell'attaccatura per mezzo
del diffusore 13, in modo da conferirgli stabilità e volume.
4. Staccare il diffusore 13 dall'asciugaca-
pelli solo quando si è asciugato.
6. Pulizia
PERICOLO!
~ Prima di pulire l'asciugacapelli, stacca-
re la spina 5 dalla presa di corrente.
AVVERTENZA: rischio di danni materiali!
~ Non utilizzare detergenti corrosivi o
abrasivi.
Pulire l'apparecchio regolarmente. Assicurarsi in particolare che le aperture di aspirazione e uscita dell'aria siano sgombre di
polvere, capelli e pelucchi.
• Pulire l'alloggiamento, la griglia di pro-
tezione 1 che copre l'apertura di aspirazione dell'aria e il becco per
acconciature 12 con un panno leggermente inumidito.
• Staccare il becco per acconciature 12
o il diffusore 13 dall'asciugacapelli. Sostenere l'asciugacapelli con l'apertura
di uscita dell'aria 11 rivolta verso il
basso. Pulire le alette di protezione con
un pennello.
Pulizia della griglia di protezione
1. Comprimere un poco la griglia di pro-
tezione 1 sui lati e poi staccarla.
2. Estrarre il filtro.
3. Sostenere l'asciugacapelli con l'apertu-
ra di aspirazione dell'aria rivolta verso
il basso. Pulire la griglia di protezione
interna ed esterna e il filtro 3 con un
pennello.
4. Ricollocare il filtro 3 e la griglia di pro-
tezione 1.
28
IT
Page 31

_KRA102826_Haartrockner_B1.book Seite 29 Freitag, 12. September 2014 10:31 10
Onderdelen reinigen
1. Staccare l'accessorio (12, 13 o 14)
dall'asciugacapelli, solo quando si è
raffreddato completamente.
2. Pulire l'accessorio (12, 13 o 14 con
un panno inumidito.
3. Lasciar asciugare l'accessorio comple-
tamente (12, 13 o 14) prima di riutilizzarlo.
7. Conservazione
AVVERTENZA: rischio di danni materiali!
Non avvolgere il cavo intorno all'apparecchio (rischio di rottura del cavo!).
• L'anello di aggancio 6 consente di ap-
pendere l'apparecchio per conservarlo
in modo pratico e sicuro.
8. Smaltimento
Il simbolo del bidone della
spazzatura su ruote barrato
significa che all'interno
dell'Unione Europea il prodotto deve essere smaltito separatamente. Questo vale per il prodotto e
tutti i suoi accessori contrassegnati da questo simbolo. I prodotti così contrassegnati
non possono essere smaltiti assieme ai normali rifiuti domestici, bensì devono essere
consegnati presso un centro di raccolta per
il riciclaggio degli apparecchi elettrici ed
elettronici. Il riciclaggio contribuisce a ridurre il consumo di materie prime e l'inquinamento ambientale.
9. Risoluzione dei
problemi
Qualora l'apparecchio non funzioni correttamente, scorrere la checklist seguente, poiché
l'anomalia di funzionamento potrebbe essere dovuta a un piccolo problema che l'utente
è in grado di risolvere autonomamente.
PERICOLO di scossa elettrica!
Non tentare mai di riparare autonomamente l'apparecchio.
Guasto Possibili cause / Rimedi
• L'apparecchio è allacciato
alla rete elettrica?
• Il dispositivo di protezione
contro il surriscaldamento
ha spento l'apparecchio?
L'apparecchio
non funziona
Portare l'interruttore on/off
su 0 (off), staccare la spina
dalla presa di corrente e far
raffreddare l'apparecchio a
sufficienza. Prima di riaccenderlo assicurarsi che
non vi siano capelli o corpi
estranei che bloccano
l'apertura di aspirazione
dell'aria.
10. Dati tecnici
Modello: SHTR 2200 D2
Tensione di rete: 230-240 V ~ 50 Hz
Classe di protezione: II
Potenza: 2000 - 2200 W
Confezione
Smaltire la confezione nel rispetto delle normative ambientali vigenti nel proprio paese.
Con riserva di modifiche tecniche.
29
IT
Page 32

_KRA102826_Haartrockner_B1.book Seite 30 Freitag, 12. September 2014 10:31 10
11. Garanzia della
HOYER Handel GmbH
Gentile cliente,
questo apparecchio è dotato di una garanzia di 3 anni a decorrere dalla data d'acquisto. In caso di difetti del prodotto dispone di
diritti legali contro il venditore. Questi diritti
legali non sono limitati dalla garanzia da noi
prestata, che viene descritta di seguito.
Condizioni della garanzia
Il termine della garanzia inizia dalla data
d'acquisto. Conservi con cura lo scontrino
originale. Questo documento è necessario
come prova dell'acquisto.
Se entro tre anni dalla data d'acquisto del
prodotto si presenta un difetto di materiale o
di produzione, ripareremo o sostituiremo gratuitamente il prodotto, a nostra scelta. Per avvalersi di questa garanzia occorre presentare
entro il termine di tre anni l'apparecchio difettoso e la prova d'acquisto (scontrino), descrivendo brevemente per iscritto in cosa consiste
il difetto e quando si è presentato.
Se il difetto è coperto dalla nostra garanzia,
vi verrà consegnato il prodotto riparato o un
prodotto nuovo. La riparazione o sostituzione del prodotto non comporta l'inizio di un
nuovo periodo di garanzia.
Periodo di garanzia e diritti per i
difetti
La prestazione della garanzia non prolunga
il periodo di garanzia. Ciò si applica anche
ai pezzi sostituiti o riparati. Danni e difetti
eventualmente presenti già al momento
dell'acquisto devono essere comunicati
dopo aver aperto la confezione. Le riparazioni effettuate dopo lo scadere del periodo
di garanzia sono a pagamento.
Entità della garanzia
L'apparecchio è stato prodotto con cura basandosi su severe direttive di qualità ed è
stato controllato scrupolosamente prima della consegna.
La garanzia si applica agli errori di materiale o produzione. Questa garanzia non si
estende a parti del prodotto esposte a normale usura e dunque assimilabili a pezzi
soggetti a usura, né si estende ai danni a
parti fragili, ad es. interruttori, batterie o elementi di vetro.
La garanzia decade se il prodotto è stato
danneggiato o non è stato correttamente utilizzato o sottoposto a manutenzione. Per un
uso adeguato del prodotto occorre attenersi
strettamente a tutte le indicazioni riportate
nel manuale di istruzioni per l'uso. Occorre
evitare assolutamente usi o azioni sconsigliati o evidenziati negativamente nel manuale di istruzioni per l'uso.
Il prodotto è destinato esclusivamente
all'uso privato e non commerciale. La garanzia decade in caso di maneggio scorretto e
inadeguato, ricorso alla forza e interventi
non autorizzati dal nostro centro assistenza.
Disbrigo nei casi contemplati
dalla garanzia
Per garantire un rapido disbrigo della richiesta, la preghiamo di attenersi alle seguenti
indicazioni:
• Per tutte le richieste mantenga a portata di
mano il numero di articolo
IAN: 102826
va.
• Qualora si presentassero errori di funzionamento o altri difetti, si rivolga innanzitutto ai centri assistenza indicati di
seguito, telefonicamente o tramite
e-mail.
• Il prodotto registrato come difettoso potrà poi essere inviato a carico del destinatario all'indirizzo del centro assistenza
che Le verrà comunicato, allegando la
prova d'acquisto (scontrino) e indicando
in che cosa consiste il difetto e quando si
è presentato.
e lo scontrino come pro-
30
IT
Page 33

IT
CH
_KRA102826_Haartrockner_B1.book Seite 31 Freitag, 12. September 2014 10:31 10
All'indirizzo www.lidl-service.com
è possibile scaricare questo manuale, molti altri manuali, filmati sui
prodotti e software.
Centri assistenza
Assistenza Italia
Tel.: 02 36003201
E-Mail: hoyer@lidl.it
Assistenza Svizzera
Tel.: 0842 665566 (0,08 CHF/Min.,
telefonia mobile max. 0,40 CHF/Min.)
E-Mail: hoyer@lidl.ch
IAN: 102826
Fornitore
Si tenga presente che il seguente indirizzo
non è un indirizzo di assistenza.
Rivolgersi innanzitutto ai centri assistenza riportati sopra.
HOYER Handel GmbH
Kühnehöfe 5
22761 Hamburg
Germania
IT
31
Page 34

_KRA102826_Haartrockner_B1.book Seite 32 Freitag, 12. September 2014 10:31 10
Contents
1. Overview ...................................................................................... 32
2. Intended purpose .......................................................................... 33
3. Safety information ......................................................................... 34
4. Items supplied ............................................................................... 36
5. Operation ...................................................................................... 36
6. Cleaning ........................................................................................ 38
7. Storage ......................................................................................... 38
8. Disposal ........................................................................................ 38
9. Trouble-shooting ............................................................................ 39
10. Technical specifications .................................................................. 39
11. Warranty of the HOYER Handel GmbH ........................................... 39
1. Overview
1 Protective grid
2 Air inlet (with detachable protective grid)
3 Fine filter (under the protective grid)
4 Slide switch for ion function
5 Cable with mains plug
6 Hook loop
7 LED, lights up when the ion function is active.
8 On/off switch and switch for speed settings:
0 (off) / (slow) / (fast)
9 Switch for hot air settings:
(low) / (medium) / (high)
10 Button for cooling function
11 Air outlet (with protective disc)
12 Styling attachment (rotatable and detachable)
13 Diffuser (rotatable and detachable)
14 Curling attachment (rotatable and detachable)
The styling attachment 12, the diffuser 13
and the curling attachment 14 are not supplied with any model (see “Items supplied”
on page 36). All 3 attachments are described in these operating instructions.
32
GB
Page 35

_KRA102826_Haartrockner_B1.book Seite 33 Freitag, 12. September 2014 10:31 10
Thank you for your trust!
Congratulations on your new
ion function
For a safe handling of the product and in order to get to know the entire scope of features:
• Thoroughly read these operat-
ing instructions prior to initial
commissioning.
• Above all, observe the safety in-
structions!
• The device should only be used
as described in these operating
instructions.
• Keep these operating instruc-
tions for reference.
• If you pass the device on to
someone else, please include
these operating instructions.
.
hair dryer with
2. Intended purpose
The hair dryer is intended exclusively for the
purpose of drying and styling real, own human head hair.
The device is designed for private home use
and must not be used for commercial purposes.
The device must only be used indoors.
Foreseeable misuse
WARNING! Risk of injury!
Do not use the hair dryer for drying any other
body parts, animals or objects. Do not use
the device for artificial hair or with extensions.
We hope you enjoy your new hair dryer
with ion function!
GB
33
Page 36

_KRA102826_Haartrockner_B1.book Seite 34 Freitag, 12. September 2014 10:31 10
3. Safety information
Warnings
If necessary, the following warnings will be used in these operating instructions:
DANGER! High risk: failure to observe this warning may result in injury to life and
limb.
WARNING! Moderate risk: failure to observe this warning may result in injury or serious
material damage.
CAUTION: low risk: failure to observe this warning may result in minor injury or material
damage.
NOTE: circumstances and specifics that must be observed when handling the device.
Instructions for safe operation
~
This device can be used by children from the age of 8 and people
with restricted physical, sensory or intellectual abilities or people
without adequate experience and/or understanding, if they are supervised or instructed on how to use this device safely and if they
are aware of the resulting risks. Children must not play with the device. Cleaning and user maintenance must not be performed by
children unless they are older than 8 years and supervised.
~ Children under the age of 8 must be kept away from the device
and the power cable.
~ If you use the hair dryer in a bathroom, always pull out the mains
plug afterwards because of the safety risks when it is close to water. The proximity of water represents a hazard even when the
device is switched off.
~ If the mains cord is damaged it must be replaced by the manufac-
turer or its service agent or a similarly qualified person, to avoid
danger.
~
Installation of a residual current device (FI/RCD) with a rated residual operating current of no more than 30 mA is recommended to
provide additional protection. Ask your electrician for advice. The
installation should only be carried out by a qualified electrician.
DANGER for children
~ Packing materials are not children's
toys. Children should not be allowed to
play with the plastic bags: there is a risk
of suffocation.
34
GB
DANGER! Risk of electric
shock due to moisture
~ Do not use this device in the vi-
cinity of bathtubs, showers,
washbasins or other vessels
containing water.
Page 37

_KRA102826_Haartrockner_B1.book Seite 35 Freitag, 12. September 2014 10:31 10
~ Never place the device anywhere that it
could fall into water while plugged in.
~ Protect the device from moisture, water
drops and water spray.
~ The device, the cable and the mains
plug must not be immersed in water or
any other liquids.
~ If liquid gets into the device, remove the
mains plug immediately. Have the device checked before reusing.
~ If the device has fallen into water, pull
out the mains plug immediately, and
only then remove the device from the
water. Do not use the device again, and
have it checked by a specialist.
~ Never touch the device with wet hands.
DANGER! Risk of electric
shock
~ Do not use the device if the device or
the power cable has any visible damage, or if the device has previously
been dropped.
Lay the power cable such that no one can
~
step on it, get caught on it, or trip over it.
~ Only connect the mains plug to a proper-
ly installed and easily accessible wall
socket whose voltage corresponds to the
specifications on the rating plate. The
wall socket must continue to be easily accessible after the device is plugged in.
~ Ensure that the power cable cannot be
damaged by sharp edges or hot points.
Do not wrap the power cable around
the device (risk of cable damage!).
~ Ensure that the power cable cannot be
trapped or crushed.
~ To pull the mains plug out of the wall
socket, always pull on the mains plug,
and never on the power cable.
~ Disconnect the mains plug from the wall
socket…
… after every use,
… if there is a fault,
… when you are not using the device,
… before you clean the device, and
… during thunderstorms.
~ To avoid any risk, do not make modifi-
cations to the product. You also must not
replace the power cable yourself. Repairs must be carried out by a specialist
workshop or the Service Centre.
~ Never attempt to remove dust or foreign
bodies from inside the device using a
pointed object (e.g. with a tail comb).
DANGER! Fire hazard!
~ Never leave the device unattended
while it is plugged in.
~ Never cover the device or place it on
soft objects (e.g. towels).
~ Ensure that the air inlet and outlet are al-
ways kept free. Keep the air inlet away
from long hair or objects that could get
sucked in.
~ This appliance is protected against over-
heating. In the event of overheating,
e.g. because the air inlet or outlet is
covered, the device switches off automatically. In this case, set the on/off
switch to 0 (off), pull the mains plug out
of the wall socket and allow the device
to cool down adequately. Ensure that no
hair or foreign bodies are blocking the
air inlet before switching the device
back on.
~ Never switch on the device at the same
time as there is another device with a
high power consumption attached to the
same multi-socket power strip.
~ Do not use an extension cable.
DANGER! Risk of injury
through burning!
~ Do not direct the flow of hot air into
eyes, onto hands, or onto any other
heat-sensitive body parts.
~ Do not touch the hot surfaces of the de-
vice.
~ Allow the device to cool down com-
pletely before you clean it or put it
away.
GB
35
Page 38

_KRA102826_Haartrockner_B1.book Seite 36 Freitag, 12. September 2014 10:31 10
~ Allow all attachments to cool down be-
fore removing it from the device.
WARNING! Risk of material damage
~ Only use the original accessories.
~ Never place the device on hot surfaces
(e.g. hob plates) or near heat sources or
open fire.
~ Do not use any astringent or abrasive
cleaning agents.
~ Do not expose the device to tempera-
tures below -10 °C or above +40 °C.
4. Items supplied
1 hair dryer
1 styling attachment 12
1 diffuser 13
1 curling attachment 14
1 set of operating instructions
Attachment per model:
-black hair dryer
Diffuser 13, styling attachment 12
- silver hair dryer
curling attachment 14, styling attachment 12
- pink hair dryer
Diffuser 13, styling attachment 12
5. Operation
Switching on/off and adjusting
speed
1. Connect the mains plug 5 with an easi-
ly accessible wall socket.
2. Using the on/off switch 8 and the
switch for the speed settings, you can
switch the device on and select the desired speed for the air flow:
0 =off
= slow; gentle air flow
= fast; strong air flow
3. After drying, switch the on/off switch 8
to 0 (off) and pull out the mains plug.
Selecting the temperature
Use the switch for the hot air settings 9 to se-
lect the desired temperature for the air flow:
= low temperature
= medium temperature
= high temperature
Cooling function
In order to improve the durability of your
hair style, you can cool the hair after it has
been styled with hot air using the button
10 .
Keep the button 10 held down during
drying in order to get a cool air flow, irrespective of the starting temperature.
When you no longer require the cool air
flow, release the button 10 .
NOTE: before using for the first time, switch
the device on for a few minutes and allow it
to run at the highest speed and temperature
settings. As a result of the manufacturing
process, you may notice a slight odour. This
is normal and only occurs during first use.
Ensure that the room is well ventilated.
36
GB
Ionisation function
You can use the ion switch 4 to additionally
activate the ionisation function, whatever
setting you are using. This then continuously
applies ions to the hair.
This reduces the static loading of the hair
and improves its stylability.
The hair becomes soft, smooth, glossy, and
easier to style.
• Ion function on, LED 7 lights up
• Ion function off, LED 7 off
Page 39

_KRA102826_Haartrockner_B1.book Seite 37 Freitag, 12. September 2014 10:31 10
Styling attachment
The styling attachment 12 makes it possible
to direct the air flow onto specific sections of
hair.
1. Place the styling attachment 12 onto
the front of the hair dryer, so that it
locks into position.
2. The styling attachment 12 can be rotat-
ed into any position desired.
3. Do not remove the styling attachment 12
from the hair dryer until it has cooled
down.
Curling attachment
With the curling attachment 14 you can easily create curls and waves. Since your hair is
exposed to significantly less heat, it is not
damaged as much as with a curling iron.
NOTE: the result is influenced by the following factors:
- your hair type;
- the humidity of the hair;
- your hair length;
- the thickness of the strand of hair you
dry in one step;
- the pretreatment of the hair.
1. Wash your hair with regular shampoo.
NOTE: do not use any conditioner. It would
reduce the formation of curls.
2. Towel-dry your hair.
3. Brush the hair and ensure that all knots
are untangled.
4. Place the styling attachment 12 onto
the front of the hair dryer, so that it
locks into position.
5. Only dry the hair at the hairline.
6. Take off the styling attachment 12.
7. Place the curling attachment 14 onto
the front of the hair dryer, so that it
locks into position.
8. Separate your hair into individual
strands and treat each strand one by
one.
9. Figure A: slightly curl in a strand and
put it into the curling attachment 14
from above.
10. Select the highest temperature setting
and the highest speed setting on the
hair dryer . The strand of hair is
turned in the air flow of the curling attachment.
11. Slowly move the hair dryer up and
down. The strand must be run through
the curling attachment from the hair
ends almost all the way to the hairline
until it is dry.
12. In order to stabilise the shape by
means of cool air press and hold the
button 10 during the last phase of
drying.
13. Proceed accordingly with the remaining strands of hair.
14. Turn off the hair dryer and let the hair
cool off.
15. Then untwist the individual curled
strands.
16. Now you can continue styling your hair
as you would like. For example, you
can loosen the hair with your fingers or
brush it.
17. If you like, you can use hairspray to set
the style.
18. Do not remove the curling attachment|14
from the hair dryer until it has cooled
down.
Diffuser
Use the diffuser attachment 13 to create
curls and gentle waves in the lengths and
tips, as well as for body and volume at the
roots of the hair.
1. Figure B: Place the diffuser 13 onto
the hair dryer.
2. Switch on the hair dryer.
GB
37
Page 40

_KRA102826_Haartrockner_B1.book Seite 38 Freitag, 12. September 2014 10:31 10
3. Use:
- For long hair: draw diffuser 13
through to the tips, and style the hair
into gentle waves in the direction of
the roots.
- For short hair: use the diffuser 13 to
work on the hair around the roots,
generating body and volume.
4. Do not remove the diffuser 13 from the
hair dryer until it has cooled down.
6. Cleaning
DANGER!
~ Pull the mains plug 5 out of the wall
socket before you clean the hair dryer.
WARNING! Risk of material damage!
~ Do not use any astringent or abrasive
cleaning agents.
Clean the device regularly. Particularly ensure that the air inlet and outlet are free of
dust, hair and fluff.
• Wipe down the casing, the protective
grid 1 over the air inlet, and the styling
attachment 12 using a damp cloth.
• Remove the styling attachment 12 or the
diffuser 13 from the hair dryer. Hold the
hair dryer with the air outlet 11 pointing
downwards. Clean the protective discs
using a brush.
Cleaning the protective grid
1. Squeeze the protective grid 1 slightly
at the sides and then remove it.
2. Remove the filter 3.
3. Hold the hair dryer with the air inlet
pointing downwards. Clean the inside
and the outside of the protective grid
and the filter 3 using a brush.
4. Replace the filter 3 and the protective
grid 1.
Cleaning the attachments
1. Do not remove an attachment (12, 13,
14) from the hair dryer until it has
cooled down.
2. Wipe the attachment (12, 13, 14)
with a damp cloth.
3. Allow the attachment (12, 13, 14) to
dry completely before you use it again.
7. Storage
WARNING! Risk of material damage!
Do not wrap the cable around the device
(risk of cable damage!).
• You can use the hook loop 6 to safely
and practically hang up the device for
storage purposes.
8. Disposal
The symbol showing a
wheelie bin crossed through
indicates that the product requires separate refuse collection in the European Union.
This applies to the product and all accessories marked with this symbol. Products identified with this symbol may not be discarded
with normal household waste, but must be
taken to a collection point for recycling electric and electronic appliances. Recycling
helps to reduce the consumption of raw materials and protect the environment.
Packaging
When disposing of the packaging, make
sure you comply with the environmental regulations applicable in your country.
38
GB
Page 41

_KRA102826_Haartrockner_B1.book Seite 39 Freitag, 12. September 2014 10:31 10
9. Trouble-shooting
If your device fails to function as required,
please try this checklist first. Perhaps there is
only a minor problem, and you can solve it
yourself.
DANGER! Risk of electric
shock! Do not attempt to repair
the device yourself under any circumstances.
Fault Possible causes / Action
• Has the device been connected to the power supply?
• Has the overheating protection switched off the device?
Set the on/off switch to 0
No
function
(off), pull the mains plug out
of the wall socket and allow
the device to cool down adequately. Ensure that no
hair or foreign bodies are
blocking the air inlet before
switching the device back
on.
10. Technical
specifications
Model: SHTR 2200 D2
Mains voltage: 230-240 V ~ 50 Hz
Protection class: II
Power rating: 2000 - 2200 W
Subject to technical modification.
11. Warranty of the
HOYER Handel GmbH
Dear Customer,
your device is provided with a 3 year warranty starting with the purchase date. In the
event of product defects, you are entitled to
statutory rights against the vendor. These
statutory rights are not restricted by our warranty presented in the following.
Warranty conditions
The warranty period starts with the purchase
date. Please keep the original purchase receipt in a safe place. This document is required to verify the purchase.
If within three years from the purchase date
of this product a material or factory defect
occurs, the product will be repaired or replaced by us – at our discretion – free of
charge to you. This warranty implies that
within the period of three years the defective
device and the purchase receipt are presented, including a brief written description of
the defect and the time it occurred.
If the defect is covered by our warranty, the
repaired or a new product will be returned
to you. No new warranty period starts with
a repair or replacement of the product.
Warranty period and statutory
claims for defects
The warranty period is not extended when
the warranty has been claimed. This also applies to replaced and repaired parts. Any
damages and defects already existing at the
time of purchase must be reported immediately upon unpacking. Repairs arising after
the expiration of the warranty period are
subject to a charge.
Warranty coverage
The device was produced carefully according
to strict quality guidelines and tested diligently prior to delivery.
GB
39
Page 42

GB
IE
_KRA102826_Haartrockner_B1.book Seite 40 Freitag, 12. September 2014 10:31 10
The warranty applies to material or factory
defects. This warranty does not include product parts that are subject to standard wear
and therefore can be considered wear parts;
the same applies to damages at fragile parts,
e.g. switches, rechargeable batteries or parts
made of glass.
This warranty expires if the product is damaged, not used as intended or not serviced.
For the proper operation of the product, all instructions listed in the operating instructions
must be observed carefully. Any form of use
and handling that is advised against in the
operating instructions or warned against
must always be avoided.
The product is only intended for private and
not for commercial use. In the case of incorrect and improper treatment, use of force and
interventions not performed by our authorised Service Centre, the warranty shall cease.
Handling in case of a warranty
claim
In order to ensure prompt processing of your
matter, please observe the following notes:
• Please keep the article number
IAN: 102826
as a purchase verification for all inquiries.
• If faulty operation or other defects occur,
first contact the Service Centre listed in
the following by telephone or email.
• Then, you are able to send a product reported as defective free of charge to the
service address specified to you, including the purchase receipt and the information on the defect and when it
occurred.
Please visit www.lidl-service.com to
download this and many other
manuals, product videos and software.
and the purchase receipt
Service Centre
Service Great Britain
Tel.: 0871 5000 720 (£ 0.10/Min.)
E-Mail: hoyer@lidl.co.uk
Service Ireland
Tel.: 1890 930 034
(0,08 EUR/Min., (peak))
(0,06 EUR/Min., (off peak))
E-Mail: hoyer@lidl.ie
IAN: 102826
Supplier
Please note that the following address is no
service address. First contact the afore-
mentioned Service Centre.
HOYER Handel GmbH
Kühnehöfe 5
22761 Hamburg
Germany
40
GB
Page 43

_KRA102826_Haartrockner_B1.book Seite 41 Freitag, 12. September 2014 10:31 10
GB
41
Page 44

_KRA102826_Haartrockner_B1.book Seite 42 Freitag, 12. September 2014 10:31 10
Page 45

_KRA102826_Haartrockner_B1.book Seite 43 Freitag, 12. September 2014 10:31 10
Page 46

HOYER HANDEL GMBH
Kühnehöfe 5
22761 Hamburg
Germany
Stand der Informationen · Version des informations ·
Stato attuale delle conoscenze · Status of information:
08/2014 · Ident.-Nr.: SHTR 2200 D2
IAN 102826
KRA102826_Haartrockner_Cover_LB1.indd 1 17.09.14 11:41
1
 Loading...