


RECHARGEABLE HAND-HELD & UPRIGHT
VACUUM CLEANER
SHSS 16 A1
RECHARGEABLE HAND-HELD &
UPRIGHT VACUUM CLEANER
Operating instructions
AKKU-HAND- UND
BODENSTAUBSAUGER
Bedienungsanleitung
IAN 321850_1901
EΠΑΝΑΦΟΡΤΙΖΟΜΕΝΗ ΣΚΟΎΠΑ
ΚΑΙ ΣΚΟΎΠΑΚΙ ΧΕΙΡΟΣ
Οδηүίες χρήσης

Before reading, unfold the page containing the illustrations and familiarise yourself with all functions of
the device.
Πριν ξεκινήσετε την ανάγνωση, ανοίξτε τη σελίδα με τις εικόνες και εξοικειωθείτε με όλες τις λειτουργίες
της συσκευής.
Klappen Sie vor dem Lesen die Seite mit den Abbildungen aus und machen Sie sich anschließend mit allen
Funktionen des Gerätes vertraut.
GB / IE / NI / CY Operating instructions Page 1
GR / CY Οδηүίες χρήσης Σελίδα 13
DE / AT / CH Bedienungsanleitung Seite 25

A B C

Contents
Introduction ............................................................ 2
Intended use ........................................................... 2
Package contents ....................................................... 2
Appliance description .................................................... 2
Technical data .......................................................... 3
Safety instructions ......................................................3
Before first use ......................................................... 6
Charging the appliance .................................................. 6
Assembly/disassembly ..................................................6
Connecting the hand element to the handle/removal from handle ..............................6
Operation .............................................................7
Using the hand element with the handle ..................................................7
Using the hand element ...............................................................7
Cleaning and maintenance ...............................................7
Emptying the dirt container and cleaning the filter ...........................................8
Cleaning the appliance ...............................................................8
Cleaning the rotary brush ..............................................................8
Storage ...............................................................9
Troubleshooting ........................................................9
Disposal .............................................................. 10
Disposal of the appliance. . . . . . . . . . . . . . . . . . . . . . . . . . . . . . . . . . . . . . . . . . . . . . . . . . . . . . . . . . . . .10
Kompernass Handels GmbH warranty ....................................10
Service ...........................................................................12
Importer ..........................................................................12
Ordering spare parts ................................................... 12
SHSS 16 A1
GB│IE│NI│CY
│
1 ■

Introduction
Congratulations on the purchase of your new
appliance.
You have selected a high-quality product.
The operating instructions are part of this product.
They contain important information about safety,
usage and disposal. Before using the product,
please familiarise yourself with all operating and
safety instructions. Use the product only as
described and for the range of applications
specified. Please also pass these operating
instructions on to any future owner.
Appliance description
Figure A:
1 Grip, hand element
2 On/Off switch
3 Charge indicator lamp
4 Hand element
5 Release button
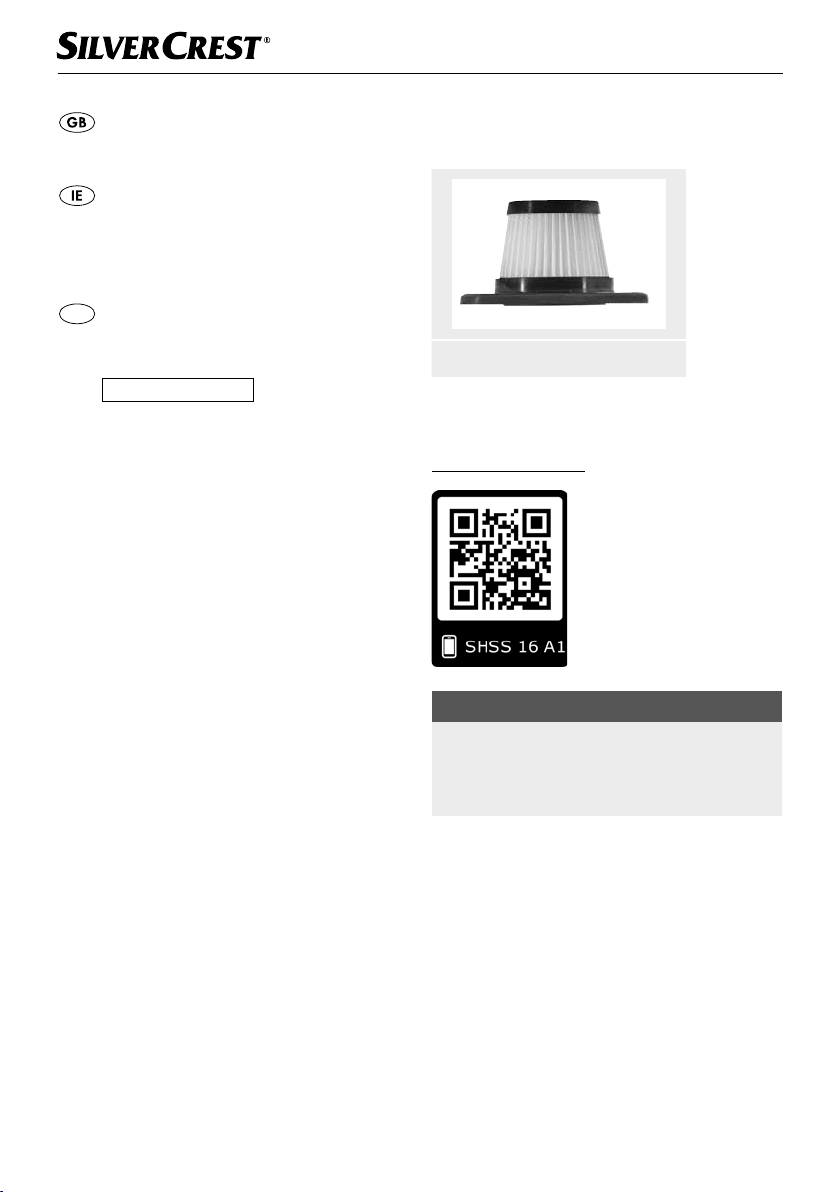
6 HEPA filter
7 Coarse filter
8 Dirt container
(dirt container)
Intended use
This appliance has been designed exclusively for
vacuum cleaning dry surfaces and dry residues.
This appliance is intended solely for use in private
households. The appliance must not be used to
vacuum people or animals. Any other usage or
modification of the appliance is deemed to be
improper and carries a significant risk of accidents.
The manufacturer accepts no liability for damages
that result from improper use of the appliance or
are caused by the incorrect operation of it. The
appliance is not intended for commercial use.
Package contents
▯ Rechargeable Hand-Held & Upright
Vacuum Cleaner
▯ Brush attachment
▯ Upholstery nozzle
▯ Crevice tool
▯ Extension handle with floor nozzle
▯ Cradle (with charging socket)
▯ Knife
▯ Charger
▯ Operating instructions
Figure B:
9 On/Off switch
0 ECO button
q Grip
w Release button
e Release buttons
r Hand element recess
t Rotary brush
z LED light
Figure C:
u Brush attachment
i Crevice tool
o Upholstery nozzle
p Charger
a Charger barrel plug
s Accessories holder
d Accessories holder
f Charging socket (bottom)
g Cradle (with charging socket)
h Knife
(grip)
(hand element)
Check the package contents for completeness
directly after unpacking.
│IE│NI│
CY
SHSS 16 A1■ 2 │ GB

Technical data
Charger
Input: 100 – 240 V ∼ (AC), 50/60 Hz, 0.3 A max.
Output: 18 V
Type identification: SHSS 16 A1--2
Protection type: II /
Polarity:
Energy efficiency class:
Floor nozzle
Rated output: 5 W
Protection type: III /
Polarity:
(DC), 500 mA
(double insulation)
(low voltage)
Hand element
Input: 18 V
Rated output: 90W
Protection type: III /
Polarity:
Batteries
14.4 V 2200mAh
(4 x 3.6 V lithium ion battery)
Operating time with full battery charge
(depending on floor covering):
Level 1, normal mode: approx. 22 min.
Level 2, ECO mode: approx. 28 Min.
Charging time with empty battery: 5 – 6 hours
500 mA
Safety instructions
DANGER! ELECTRIC SHOCK!
► Do not charge or use the appliance outdoors.
► Never use the handheld vacuum cleaner if the cable, plug or casing
are damaged.
► To avoid risks, arrange for damaged power cables and/or plugs to
be replaced as soon as possible by a qualified specialist or by our
Customer Services.
► Have all repairs carried out by a specialist workshop. Under no
circumstances should you open the appliance yourself. Repairs that
are not carried out by a specialist workshop could lead to physical
injuries.
► Before charging the appliance, make sure that the mains voltage
corresponds to the voltage indicated in the technical data for the
mains adapter/appliance.
► Never touch the mains adapter/charger or the appliance with wet
or damp hands.
► Do not use the mains adapter/charger with an extension cable;
connect the mains adapter directly to a power socket.
SHSS 16 A1
GB│IE│NI│CY
│
3 ■

WARNING! RISK OF INJURY!
► Do not change any accessories while the appliance is switched on.
► Do not use the handheld vacuum cleaner for vacuuming up water
or other liquids.
► Do not use the handheld vacuum for vacuuming up sharp objects or
glass shards.
► Never vacuum up burning matches, glowing ashes or cigarette
butts.
► Do not use the handheld vacuum for vacuuming up chemical
products, stone dust, gypsum, cement or similar particles.
► This appliance is not suitable for use with inflammable and
explosive substances or chemical and aggressive liquids.
► Always store the appliance indoors. To prevent accidents, keep the
appliance in a dry location when not in use.
► Under extreme conditions, leaks in the battery cells may occur. In
the event that battery fluid comes into contact with skin or eyes, the
affected area must be rinsed off with water immediately. Contact a
physician.
► This appliance may be used by children aged 8 years and above
and by persons with limited physical, sensory or mental capabilities
or lack of experience and knowledge, provided that they are under
supervision or have been told how to use the appliance safely and
are aware of the potential risks. Do not allow children to use the
appliance as a toy. Cleaning and user maintenance tasks must not
be carried out by children unless they are supervised.
► Be careful when opening and closing the knife and when using it.
The blade is very sharp!
► Keep the knife out of the reach of children.
│IE│NI│
CY
SHSS 16 A1■ 4 │ GB

WARNING! RISK OF INJURY!
► Never use the knife if the blade is damaged.
► Always fold the blade back into the housing after use.
► Use only accessories recommended by the manufacturer.
► The mains adapter must not be used for other purposes.
► Always grip the power plug to disconnect the appliance from the
power supply.
► Always be sure to keep the hand vacuum away from heating
elements, ovens or other heated appliances and surfaces.
► Always make certain that the ventilation slits are not obstructed.
Ablocked ventilation circuit can result in overheating and damage
to the appliance.
► Take special care when using the hand vacuum on stairs.
Risk of falling!
► This product contains rechargeable batteries. Do not throw the
appliance into a fire and do not subject it to high temperatures.
There is a risk of an explosion!
► Always remove the hand element from the handle before cleaning
the rotary brush to avoid accidental starting of the rotary brush.
ATTENTION! PROPERTY DAMAGE!
► Do not use the hand vacuum cleaner without the
HEPA filter inserted.
► Do not use the mains adapter for a different product and do not
attempt to charge this device with a different charging station.
Use only the charging station supplied with this device.
► Never charge non-rechargeable batteries!
The mains adapter is for indoor use only.
SHSS 16 A1
GB│IE│NI│CY
│
5 ■

Before first use
■ Remove all packaging materials and protective
stickers from the appliance, especially the
protective sticker on the contacts on the back of
the hand element 4.
■ Place the cradle g onto the stand so that the
cradle g clicks into place.
NOTE
► This appliance is supplied with non-charged
batteries. The batteries must be charged for
5–6 hours before using the appliance for
the first time.
Charging the appliance
NOTE
► Ensure that the appliance is switched off
before starting to charge the batteries.
■ To charge the appliance, connect the charger p
to a mains socket. Plug the barrel plug a into
the charging socket f on the underside of the
cradle g. Feed the cable through the recess on
the rear of the cradle g so that the cradle g is
not resting on the cable.
■ Place the handle with the attached hand
element 4 onto the cradle g.The charge
indicator lamp 3 lights up red. When the
appliance is fully charged, the indicator light 3
lights up green.
■ Do not recharge the batteries until the suction
power of the appliance has become noticeably
weaker.
NOTE
► When the batteries are weak, the charge
indicator lamp 3 starts flashing green.
When this happens, the appliance can be
operated for another 3 to 5 minutes.
► Once the batteries are completely
discharged, the charge indicator lamp 3
flashes red five times and the appliance
switches off.
Assembly/disassembly
Connecting the hand element to the
handle/removal from handle
Fig. 1 Fig. 2
■ To connect the hand element 4 to the handle,
push the tip of the hand element 4 into the
opening in the hand element recess r.
■ Then press the grip 1 of the hand element 4
into the handle so that the hand element 4
clicks firmly into position (Fig.1).
■ To remove the hand element 4 from the handle,
press the release buttons
■ Then pull the hand element 4 upwards and
forwards out of the hand element recess r
(Fig. 2).
e.
│IE│NI│
CY
SHSS 16 A1■ 6 │ GB

Operation
ATTENTION! PROPERTY DAMAGE!
► The suction opening must always be open
and may not be blocked. Blockages lead to
overheating and damage to the motor.
► Do not vacuum shag pile carpet with the floor
nozzle. The rotary brush t can get caught in
the carpet and block!
NOTE
► Make sure that the HEPA filter 6 and the
coarse filter 7 are always inserted before
using the appliance.
► As soon as the suction power of the appliance
begins to diminish noticeably and the charge
indicator lamp 3 flashes green, connect the
appliance to the charger p.
Using the hand element with the
handle
1) Insert the hand element 4 into the hand
element recess r as described in the chapter
"Assembly/disassembly".
2) Fold out the grip q on the handle by pressing
the release button
pulling the grip q upwards.
3) Switch on the appliance using the On/Off
switch
lights up green, the LED light z on the floor
nozzle lights up and the rotary brush t starts
turning.
NOTE
► Press the ECO button 0 to switch to the
energy-saving ECO mode. The appliance
now uses a lower suction power but can run
for longer.
Press the ECO button 0again to work at full
suction power.
4) Guide the floor nozzle over the area to be
vacuumed. Hold the grip q so that the floor
nozzle moves smoothly over the floor.
9. The charge indicator lamp 3
w and, at the same time,
5) Press the On/Off switch
finished vacuuming. The rotary brush t stops,
the charge indicator lamp 3and the LED
light z go out.
9 when you have
Using the hand element
1) Remove the hand element 4 from the hand
element recess r as described in the chapter
"Assembly/disassembly".
2) If required, you can attach the crevice tool i,
the brush attachment u or the upholstery
nozzle o.
3) Press the On/Off switch
element 4 to start vacuuming the desired
areas. The charge indicator lamp 3 lights
up during operation.
4) When you are finished vacuuming, press the
On/Off switch
indicator lamp 3 goes out.
2 again. The charge
2 on the hand
Cleaning and maintenance
WARNING! RISK OF INJURY!
► Always unplug the charger p from the
mains. Pull the barrel plug a out of the
charging socket f on the cradle g before
cleaning the cradle g.
► Always remove the hand element 4 from the
hand element recess ron the handle before
cleaning
-- the hand element 4,
-- the handle or
-- the rotary brush t.
ATTENTION! PROPERTY DAMAGE!
► Do not use abrasive or aggressive cleaning
materials. These can damage the surface of
the appliance!
NOTE
► The LED light z is maintenance-free.
The LEDs cannot be changed!
SHSS 16 A1
GB│IE│NI│CY
│
7 ■

Emptying the dirt container and
cleaning the filter
NOTE
► To achieve the best results, empty the dirt
container 8 and clean the HEPA filter 6
regularly.
► If you need a new HEPA filter 6, please
contact our service department (see section
“Ordering spare parts”).
1) To open the dirt container 8, remove the hand
element 4 from the hand element recess r.
2) Press the release button
time, pull the dirt container 8 forwards and
off.
3) Start by pulling the HEPA filter 6 and then the
coarse filter 7 out of the dirt container 8 (fig.
3). Tap out both parts over a rubbish bin or
similar. If necessary, you can rinse out the
HEPA filter 6 with fresh water. Allow it to air
dry fully afterwards.
Fig. 3
4) Empty the dirt container 8 into the rubbish bin
or similar.
5) First re-insert the coarse filter 7 and then the
dry HEPA filter 6.
6) Replace the dirt container 8 onto the hand
element 4 by first pushing the lower catch on
the hand element 4 into the recess on the dirt
container 8. Then, press the upper part of the
dirt container 8 onto the hand element 4
until the dirt container 8 clicks into place and
sits firmly.
5 and, at the same
Cleaning the appliance
Wipe the appliance with a damp cloth. For
stubborn dirt, add a little mild detergent to the
cloth. Ensure that the appliance is completely dry
before the next use.
Cleaning the rotary brush
The rotary brush t should be checked regularly
for blockages, and any hairs, threads or dirt should
be removed. Remove the rotary brush t as
follows:
1) Turn the floor nozzle upside down.
2) Push the catch on the cover plate towards the
symbol so that you can remove the cover
plate (fig. 4).
3) Lift out the rotary brush t.
4) Remove dirt (on both sides of the bristles) and
clean the rotary brush t. To do this, take a
damp cloth and wipe the individual bristle
bundles from the inside to the outside.
WARNING! RISK OF INJURY!
► Be careful when handling the knife h.
The blade is very sharp!
NOTE
► You can use the knife h to remove stuck hair
and threads:
– Fold the blade of the knife h carefully out of
the handle and cut stuck hair and threads.
– Fold the blade back in. When doing so, only
touch the blunt edge of the blade! Risk of
injury!
– Remove the cut hairs and threads from the
rotary brush t.
│IE│NI│
CY
SHSS 16 A1■ 8 │ GB

5) To replace the rotary brush t, first push the
broad end onto the drive shaft so that the
rotary brush t hooks into place.
6) Then, push the other end into the mount so that
the rotary brush t sits straight in the floor
nozzle.
7) Replace the cover plate and fasten it firmly
intoplace by pushing the catch towards the
symbol (fig. 4).
Fig. 4
Storage
■ When you are not using the appliance, place
iton the cradle g.
■ Place the accessories on the accessory
holderss/d:
– Place the crevice tool i and the upholstery
nozzle ointo the holders s/d.
– Place the brush attachment u onto the
upper part of the crevice tool i.
■ Store the appliance in a dust-free and dry
location.
Troubleshooting
The appliance is not working.
■ The battery is not charged.
♦ Connect the appliance to the charger p.
■ The appliance is defective.
♦ Contact the Customer Service department.
The appliance is running but hardly
sucking up any dirt.
■ The battery is not sufficiently charged.
♦ Connect the appliance to the charger p.
■ The dirt container 8 is full.
♦ Empty the dirt container 8.
■ The HEPA filter 6 is blocked.
♦ Clean the HEPA filter 6.
The appliance will not charge.
■ The charger p is not correctly connected to
the socket/mains plug.
♦ Check the connections of the charger p.
■ The charger p is defective.
♦ Contact the Customer Service department.
SHSS 16 A1
GB│IE│NI│CY
│
9 ■

Disposal
Disposal of the appliance
Do not dispose of the appliance
in the normal domestic waste.
This product is subject to the
provisions of European
Directive 2012/19/EU.
Dispose of the appliance via an approved disposal
company or your municipal waste facility. Please
comply with all applicable regulations. Please
contact your waste disposal facility if you are in
any doubt.
Your local community or municipal
authorities can provide information on
how to dispose of the worn-out
product.
NOTE
► The appliance contains batteries that cannot
be removed by the user. To prevent risks, the
removal or replacement of the batteries may
only be carried out by the manufacturer,
manufacturer's customer service department
or a similarly qualified person. When disposing
of the appliance, indicate that the appliance
contains batteries.
Kompernass Handels GmbH
warranty
Dear Customer,
This appliance has a 3-year warranty valid from the
date of purchase. If this product has any faults, you,
the buyer, have certain statutory rights. Your
statutory rights are not restricted in any way by the
warranty described below.
Warranty conditions
The warranty period starts on the date of purchase.
Please keep your receipt in a safe place. This will
be required as proof of purchase.
If any material or manufacturing fault occurs within
three years of the date of purchase of the product,
we will either repair or replace the product for you
or refund the purchase price (at our discretion).
This warranty service requires that you present the
defective appliance and the proof of purchase
(receipt) within the three-year warranty period,
along with a brief written description of the fault
and of when it occurred.
If the defect is covered by the warranty, your
product will either be repaired or replaced by us.
The repair or replacement of a product does not
signify the beginning of a new warranty period.
The packaging is made from
environmentally friendly material and
can be disposed of at your local
recycling plant.
Note the labelling on the packaging
and separate the packaging material
components for disposal if necessary.
The packaging material is labelled
with abbreviations (a) and numbers (b) with the
following meanings: 1–7: plastics, 20–22: paper
and cardboard, 80–98: composites.
│IE│NI│
CY
SHSS 16 A1■ 10 │ GB
Warranty period and statutory
claims for defects
The warranty period is not prolonged by repairs
effected under the warranty. This also applies to
replaced and repaired components. Any damage
and defects present at the time of purchase must be
reported immediately after unpacking. Repairs
carried out after expiry of the warranty period shall
be subject to a fee.
Scope of the warranty
This appliance has been manufactured in
accordance with strict quality guidelines and
inspected meticulously prior to delivery.
The warranty covers material faults or production
faults. The warranty does not extend to product
parts subject to normal wear and tear or to fragile
parts which could be considered as consumable
parts such as switches, batteries or parts made of
glass.
The warranty does not apply if the product has
been damaged, improperly used or improperly
maintained. The directions in the operating
instructions for the product regarding proper use of
the product are to be strictly followed. Uses and
actions that are discouraged in the operating
instructions or which are warned against must be
avoided.
This product is intended solely for private use and
not for commercial purposes. The warranty shall be
deemed void in cases of misuse or improper
handling, use of force and modifications / repairs
which have not been carried out by one of our
authorised Service centres.
Warranty claim procedure
To ensure quick processing of your case, please
observe the following instructions:
■ Please have the till receipt and the item number
(e.g.IAN12345) available as proof of purchase.
■ You will find the item number on the type plate
on the product, an engraving on the product, on
the front page of the operating instructions
(below left) or on the sticker on the rear or
bottom of the product.
■ If functional or other defects occur, please
contact the service department listed either by
telephone or by e-mail.
■ You can return a defective product to us free of
charge to the service address that will be
provided to you. Ensure that you enclose the
proof of purchase (till receipt) and information
about what the defect is and when it occurred.
You can download these instructions
along with many other manuals,
product videos and installation
software at www.lidl-service.com.
This QR code will take you directly to
the Lidl service page (www.lidl-service.com) where
you can open your operating instructions by
entering the item number (IAN) 123456.
SHSS 16 A1
GB│IE│NI│CY
│
11 ■
Service
Service Great Britain
Tel.: 0800 404 7657
E-Mail: kompernass@lidl.co.uk
Service Ireland
Tel.: 1890 930 034
(0,08 EUR/Min., (peak))
(0,06 EUR/Min., (off peak))
E-Mail: kompernass@lidl.ie
CY
Service Cyprus
Tel.: 8009 4409
E-Mail: kompernass@lidl.com.cy
IAN 321850_1901
Importer
Please note that the following address is not the
service address. Please use the service address
provided in the operating instructions.
KOMPERNASS HANDELS GMBH
BURGSTRASSE 21
DE - 44867 BOCHUM
GERMANY
www.kompernass.com
Ordering spare parts
You can order the following spare parts for the
product SHSS 16 A1:
1 x HEPA filter 6
Order the spare parts via our service hotline (see
section “Service”) or simply visit our website at
www.kompernass.com.
│IE│NI│
CY
NOTE
► Have the IAN number of the appliance
ready (can be found on the cover of these
operating instructions) when you place your
order.
SHSS 16 A1■ 12 │ GB

Περιεχόμενα
Εισαγωγή ............................................................. 14
Προβλεπόμενη χρήση .................................................. 14
Παραδοτέος εξοπλισμός ................................................14
Περιγραφή συσκευής ...................................................14
Τεχνικά χαρακτηριστικά ................................................. 15
Υποδείξεις ασφαλείας ................................................... 15
Πριν από την πρώτη χρήση ..............................................18
Φόρτιση συσκευής .....................................................18
Συναρμολόγηση/Αποσυναρμολόγηση ....................................18
Σύνδεση/Αποσύνδεση τμήματος χειρός με το/από το κοντάρι ...............................18
Χειρισμός ............................................................. 19
Χρήση του τμήματος χειρός με το κοντάρι ................................................19
Χρήση του τμήματος χειρός ...........................................................19
Καθαρισμός και συντήρηση .............................................19
Άδειασμα δοχείου ακαθαρσιών και καθαρισμός φίλτρου ....................................20
Καθαρισμός συσκευής. . . . . . . . . . . . . . . . . . . . . . . . . . . . . . . . . . . . . . . . . . . . . . . . . . . . . . . . . . . . . . .20
Καθαρισμός κυλίνδρου βούρτσας .....................................................20
Αποθήκευση .......................................................... 21
Διόρθωση σφαλμάτων ..................................................21
Απόρριψη ............................................................22
Απόρριψη συσκευής ................................................................22
Εγγύηση της Kompernass Handels GmbH ..................................22
Σέρβις ...........................................................................24
Εισαγωγέας .......................................................................24
Παραγγελία ανταλλακτικών .............................................24
SHSS 16 A1
GR│CY
│
13 ■

Εισαγωγή
Συγχαρητήρια για την αγορά της νέας σας συσκευής.
Το προϊόν που αποκτήσατε είναι ένα προϊόν υψηλής ποιότητας. Οι οδηγίες χρήσης αποτελούν τμήμα αυτού του προϊόντος. Περιλαμβάνουν σημαντικές υποδείξεις για την ασφάλεια, τη χρήση και την
απόρριψη. Πριν από τη χρήση του προϊόντος,
εξοικειωθείτε με όλες τις υποδείξεις χειρισμού και
ασφάλειας. Χρησιμοποιείτε το προϊόν αποκλειστικά όπως περιγράφεται και για τους αναφερόμενους τομείς χρήσης. Παραδίδετε όλα τα έγγραφα
σε περίπτωση παράδοσης του προϊόντος σε τρίτους.
Προβλεπόμενη χρήση
Αυτή η συσκευή προορίζεται αποκλειστικά για την
απορρόφηση στεγνών επιφανειών ή στεγνών ειδών.
Αυτή η συσκευή προορίζεται αποκλειστικά για χρήση σε νοικοκυριά. Αυτή η συσκευή δεν επιτρέπεται
να χρησιμοποιείται σε ανθρώπους ή ζώα. Κάθε
άλλη χρήση ή μετατροπή της συσκευής ισχύει ως
μη σύμφωνη με τους κανονισμούς και ενέχει σημαντικούς κινδύνους ατυχημάτων. Ο κατασκευαστής
δεν φέρει ευθύνη για βλάβες που προκαλούνται
από χρήση μη σύμφωνη με τους κανονισμούς ή
από λάθος χειρισμό. Η συσκευή δεν προορίζεται
για επαγγελματική χρήση.
Παραδοτέος εξοπλισμός
▯ Eπαναφορτιζόμενη σκούπα και σκουπάκι χειρός
▯ Προσάρτημα βούρτσας
▯ Ακροφύσιο για μαλακές επενδύσεις
▯ Ακροφύσιο αρμών
▯ Λαβή επέκτασης με ακροφύσιο δαπέδου
▯ Στήριγμα (με υποδοχή φόρτισης)
▯ Μαχαίρι
▯ Φορτιστής
▯ Οδηγίες χρήσης
Περιγραφή συσκευής
Εικόνα A:
1 Λαβή τμήματος χειρός
2 Διακόπτης On/Off
3 Λυχνία ελέγχου φόρτισης
4 Τμήμα χειρός
5 Πλήκτρο απασφάλισης
(δοχείο ακαθαρσιών)
6 Φίλτρο HEPA
7 Φίλτρο χονδρών ρύπων
8 Δοχείο ακαθαρσιών
Εικόνα B:
9 Διακόπτης On/Off
0 Πλήκτρο ECO
q Λαβή
w Πλήκτρο απασφάλισης
e Πλήκτρα απασφάλισης
r Κοίλωμα τμήματος χειρός
t Κύλινδρος βούρτσας
z Φωτισμός LED
Εικόνα C:
u Εξάρτημα βούρτσας
i Ακροφύσιο αρμών
o Ακροφύσιο ταπετσαριών
p Φορτιστής
a Κοίλο βύσμα φορτιστή
s Βάση αξεσουάρ
d Βάση αξεσουάρ
f Υποδοχή φόρτισης (κάτω πλευρά)
g Στήριγμα (με υποδοχή φόρτισης)
h Μαχαίρι
(λαβή)
(τμήμα χειρός)
Αμέσως μετά την αποσυσκευασία, ελέγξτε την πληρότητα του παραδοτέου εξοπλισμού.
│
CY
SHSS 16 A1■ 14 │ GR
Τεχνικά χαρακτηριστικά
Φορτιστής
Είσοδος: 100 – 240 V ∼ (εναλλασσόμενο ρεύμα),
50/60 Hz, 0,3 A Max.
Έξοδος: 18 V
Περιγραφή τύπου: SHSS 16 A1-2
Κατηγορία προστασίας: II /
Πολικότητα:
Τάξη ενεργειακής απόδοσης:
Ακροφύσιο δαπέδου
Ονομαστική ισχύς: 5 W
Κατηγορία προστασίας: III /
Πολικότητα:
(συνεχές ρεύμα), 500 mA
(διπλή μόνωση)
(χαμηλή τάση)
Τμήμα χειρός
Είσοδος: 18 V
Ονομαστική ισχύς: 90 W
Κατηγορία προστασίας: III /
Πολικότητα:
Συσσωρευτές
14,4 V 2200 mAh
(4 συσσωρευτές λιθίου-ιόντων 3,6 V)
Χρόνος λειτουργίας με πλήρη φόρτιση συσσωρευτή (αναλόγως της επένδυσης δαπέδου):
Βαθμίδα 1, κανονική λειτουργία: περ. 22 λεπτά
Βαθμίδα 2, λειτουργία ECO: περ. 28 λεπτά
Χρόνος φόρτισης με άδειο συσσωρευτή: 5 – 6 ώρες
500 mA
Υποδείξεις ασφαλείας
ΚΊΝΔΥΝΟΣ! ΗΛΕΚΤΡΟΠΛΗΞΊΑ!
► Μην φορτίζετε ή χρησιμοποιείτε αυτή τη συσκευή σε εξωτερικό χώρο.
► Μη χρησιμοποιείτε το σκουπάκι χειρός όταν το καλώδιο, το βύσμα
ή το περίβλημα έχουν υποστεί βλάβη.
► Η αντικατάσταση του φθαρμένου βύσματος ή καλωδίου πρέπει να
πραγματοποιείται άμεσα από εξουσιοδοτημένο ειδικό προσωπικό,
ώστε να αποφεύγονται κίνδυνοι.
► Οι επισκευές πρέπει να γίνονται μόνο από ειδικό συνεργείο. Σε
καμία περίπτωση μην ανοίγετε οι ίδιοι τη συσκευή. Παρεμβάσεις, οι
οποίες δεν έχουν διεξαχθεί από εξειδικευμένη επιχείρηση, μπορούν
να οδηγήσουν σε τραυματισμούς.
► Πριν από την φόρτιση της συσκευής, βεβαιωθείτε ότι η αναφερόμε-
νη τάση στα τεχνικά δεδομένα του τροφοδοτικού/φορτιστή αντιστοιχεί στην τάση δικτύου.
► Μην πιάνετε το τροφοδοτικό/το φορτιστή ή τη συσκευή με βρεγμέ-
να ή υγρά χέρια.
► Μην χρησιμοποιείτε το τροφοδοτικό/το φορτιστή με καλώδιο προέ-
κτασης, αλλά συνδέστε τα απευθείας σε μια πρίζα.
SHSS 16 A1
GR│CY
│
15 ■

ΠΡΟΕΊΔΟΠΟΊΗΣΗ! ΚΊΝΔΥΝΟΣ ΤΡΑΥΜΑΤΊΣΜΟΥ!
► Μην αλλάζετε εξαρτήματα όταν η συσκευή λειτουργεί.
► Μη χρησιμοποιείτε το σκουπάκι χειρός για την απορρόφηση
νερού ή άλλων υγρών.
► Μη χρησιμοποιείτε το σκουπάκι χειρός για την απορρόφηση
μυτερών αντικειμένων ή γυάλινων θραυσμάτων.
► Ποτέ μην απορροφάτε φλεγόμενα σπίρτα, στάχτες που καίνε ή
αποτσίγαρα.
► Μη χρησιμοποιείτε το σκουπάκι χειρός για την απορρόφηση
χημικών προϊόντων, υπολειμμάτων πέτρας, γύψου, τσιμέντου ή
άλλων παρόμοιων σωματιδίων.
► Η συσκευή δεν ενδείκνυται για εύφλεκτα και εκρηκτικά υλικά ή για
χημικά και επιθετικά υγρά.
► Αποθηκεύετε πάντα τη συσκευή σε κλειστούς χώρους. Για την απο-
φυγή ατυχημάτων φυλάτε τη συσκευή μετά τη χρήση σε ένα στεγνό
σημείο.
► Σε ακραίες συνθήκες μπορεί να εμφανιστούν διαρροές στις κυψέ-
λες του συσσωρευτή. Σε περίπτωση επαφής του υγρού με το δέρμα
ή τα μάτια πρέπει το σχετικό σημείο να καθαριστεί αμέσως με καθαρό νερό. Αναζητήστε έναν γιατρό.
► Αυτή η συσκευή επιτρέπεται να χρησιμοποιείται από παιδιά άνω
αισθητηριακές ή νοητικές ικανότητες ή ελλείψεις από άποψη εμπειρίας και γνώσεων, εφόσον επιτηρούνται ή έχουν ενημερωθεί αναφορικά με την ασφαλή χρήση της συσκευής και κατανοούν τους
προκύπτοντες κινδύνους. Τα παιδιά δεν επιτρέπεται να παίζουν με
τη συσκευή. Ο καθαρισμός και η συντήρηση χρήστη δεν επιτρέπεται να διεξάγονται από παιδιά, χωρίς επίβλεψη.
► Να είστε προσεκτικοί κατά το άνοιγμα και το κλείσιμο του μαχαι-
ριού καθώς και κατά τη χρήση του. Η λεπίδα είναι πολύ κοφτερή!
► Φυλάτε το μαχαίρι μακριά από παιδιά.
► Ποτέ μη χρησιμοποιείτε το μαχαίρι με χαλασμένη λεπίδα.
│
CY
SHSS 16 A1■ 16 │ GR

ΠΡΟΕΊΔΟΠΟΊΗΣΗ! ΚΊΝΔΥΝΟΣ ΤΡΑΥΜΑΤΊΣΜΟΥ!
► Πάντα διπλώνετε τη λεπίδα μετά τη χρήση μέσα στο περίβλημα.
► Χρησιμοποιείτε μόνο εξαρτήματα, τα οποία προτείνονται από τον
κατασκευαστή.
► Το τροφοδοτικό δεν επιτρέπεται να χρησιμοποιείται για άλλους
σκοπούς.
► Πιάνετε πάντα το βύσμα όταν θέλετε να αποσυνδέσετε τη συσκευή
από την παροχή ρεύματος.
► Μην τοποθετείτε ποτέ το σκουπάκι χειρός δίπλα σε θερμαντικά
σώματα, φούρνους ή άλλες θερμαντικές συσκευές ή επιφάνειες.
► Προσέχετε πάντα ώστε οι εγκοπές αερισμού να είναι ελεύθερες.
Ένα φραγμένο κύκλωμα αέρα μπορεί να οδηγήσει σε υπερθέρμανση και βλάβη της συσκευής.
► Δίδετε ιδιαίτερη προσοχή όταν χρησιμοποιείτε το σκουπάκι χειρός
σε σκάλες. Κίνδυνος πτώσης!
► Αυτό το προϊόν περιλαμβάνει επαναφορτιζόμενους συσσωρευτές.
Μην πετάτε τη συσκευή στη φωτιά και μην την εκθέτετε σε υψηλές
θερμοκρασίες. Υπάρχει κίνδυνος έκρηξης!
► Πριν από τον καθαρισμό του κυλίνδρου βούρτσας, απομακρύνετε
πάντα το τμήμα χειρός από το κοντάρι, προς αποφυγή μη ηθελημένης εκκίνησης του κυλίνδρου βούρτσας.
ΠΡΟΣΟΧΉ! ΥΛΙΚΈΣ ΖΉΜΙΈΣ!
► Μη χρησιμοποιείτε το σκουπάκι χειρός χωρίς να έχετε τοποθετήσει
προηγουμένως το φίλτρο HEPA.
► Μη χρησιμοποιείτε το φορτιστή για άλλα προϊόντα και μην προσπα-
θείτε να φορτίζετε αυτή τη συσκευή μέσω ενός άλλου φορτιστή.
Χρησιμοποιείτε μόνο τον απεσταλμένο με αυτή τη συσκευή φορτιστή.
► Ποτέ μην φορτίζετε μη επαναφορτιζόμενες μπαταρίες!
Χρησιμοποιείτε τον προσαρμογέα δικτύου μόνο σε εσωτερικούς
χώρους.
SHSS 16 A1
GR│CY
│
17 ■

Πριν από την πρώτη χρήση
■ Απομακρύνετε όλα τα υλικά συσκευασίας και τα
αυτοκόλλητα από τη συσκευή, κυρίως το προστατευτικό αυτοκόλλητο στις επαφές στην πίσω
πλευρά του τμήματος χειρός 4.
■ Εισάγετε το στήριγμα g στη βάση, έτσι ώστε το
στήριγμα g να κουμπώνει.
ΥΠΟΔΈΙΞΉ
► Η συσκευή αποστέλλεται με αφόρτιστους
συσσωρευτές. Πριν από την πρώτη χρήση
της συσκευής, οι συσσωρευτές πρέπει να
φορτίζονται πρώτα για 5 - 6 ώρες.
Φόρτιση συσκευής
ΥΠΟΔΈΙΞΉ
► Βεβαιωθείτε ότι η συσκευή είναι απενεργοποι-
ημένη, προτού ξεκινήσετε τη φόρτιση.
■ Για να φορτίσετε τη συσκευή, συνδέστε το φορτι-
στή p σε μια πρίζα δικτύου. Περάστε το κοίλο
βύσμα a μέσα στην υποδοχή φόρτισης f
στην κάτω πλευρά του στηρίγματος g. Περάστε
το καλώδιο μέσα από την εγκοπή στην πίσω
πλευρά του στηρίγματος g, έτσι ώστε το στήριγμα g να μην στέκεται επάνω στο καλώδιο.
■ Τοποθετήστε το κοντάρι με τοποθετημένο το τμή-
μα χειρός 4 επάνω στο στήριγμα g.
Η λυχνία ελέγχου φόρτισης 3 ανάβει κόκκινη.
Όταν η συσκευή φορτιστεί, η λυχνία ελέγχου
φόρτισης 3 ανάβει πράσινη.
■ Φορτίστε πάλι τους συσσωρευτές, όταν η από-
δοση απορρόφησης της συσκευής γίνει αισθητά πιο αδύναμη.
ΥΠΟΔΈΙΞΉ
► Όταν μειωθεί η φόρτιση των συσσωρευτών, η
λυχνία ελέγχου φόρτισης 3 αρχίζει να αναβοσβήνει πράσινη. Σε αυτήν την κατάσταση μπορείτε να συνεχίσετε να λειτουργείτε τη συσκευή
για άλλα 3 έως 5 λεπτά.
► Μόλις οι συσσωρευτές αδειάσουν εντελώς, η
λυχνία ελέγχου φόρτισης 3αναβοσβήνει
κόκκινη πέντε φορές και η συσκευή απενεργοποιείται.
Συναρμολόγηση/
Αποσυναρμολόγηση
Σύνδεση/Αποσύνδεση τμήματος
χειρός με το/από το κοντάρι
Εικ. 1 Εικ. 2
■ Για να συνδέσετε το τμήμα χειρός 4 με το
κοντάρι, ωθήστε την άκρη του τμήματος
χειρός4 στην εσοχή του κοιλώματος του
τμήματος χειρός r.
■ Κατόπιν πιέστε τη λαβή 1 του τμήματος
χειρός4 στο κοντάρι, έτσι ώστε το τμήμα
χειρός 4 να κουμπώσει και να εδράζεται
καλά (Εικ. 1).
■ Για να λασκάρετε το τμήμα χειρός 4 από το
κοντάρι, πιέστε τα πλήκτρα απασφάλισης
e.
■ Τραβήξτε το τμήμα χειρός 4 προς τα επάνω/
μπροστά έξω από το κοίλωμα του τμήματος
χειρός r (Εικ. 2).
│
CY
SHSS 16 A1■ 18 │ GR

Χειρισμός
ΠΡΟΣΟΧΉ! ΥΛΙΚΈΣ ΖΉΜΙΈΣ!
► Το άνοιγμα απορρόφησης πρέπει να είναι
πάντα ελεύθερο και χωρίς εμφράξεις. Οι
εμφράξεις οδηγούν σε υπερθέρμανση και σε
βλάβες στο μοτέρ.
► Μην απορροφάτε με το ακροφύσιο δαπέδου
χαλιά με ψηλό πέλος. Ο κύλινδρος βούρτσας t μαγκώνει στο χαλί και μπλοκάρει!
ΥΠΟΔΈΙΞΉ
► Προσέξτε ώστε το φίλτρο HEPA 6 και το φίλ-
τρο χονδρών ρύπων 7 να είναι πάντα τοποθετημένα πριν χρησιμοποιήσετε τη συσκευή.
► Μόλις η απόδοση απορρόφησης μειωθεί
αισθητά και η λυχνία ελέγχου φόρτισης 3
αρχίσει να αναβοσβήνει πράσινη, συνδέστε
πάλι τη συσκευή με το φορτιστή p.
Χρήση του τμήματος χειρός με το
κοντάρι
1) Τοποθετήστε το τμήμα χειρός 4 στο κοίλωμα
του τμήματος χειρός r όπως περιγράφεται
στο κεφάλαιο «Συναρμολόγηση/Αποσυναρμολόγηση».
2) Ανοίξτε τη λαβή q του κονταριού πιέζοντας
το πλήκτρο απασφάλισης
ντας ταυτόχρονα προς τα επάνω τη λαβή q.
3) Ενεργοποιήστε τη συσκευή από το διακόπτη
On/Off
ανάβει πράσινη, ο φωτισμός LED z στο ακροφύσιο δαπέδου ανάβει και ο κύλινδρος βούρτσας t περιστρέφεται.
ΥΠΟΔΈΙΞΉ
► Πατήστε το πλήκτρο ECO 0 για να μεταβείτε
στη λειτουργία εξοικονόμησης ενέργειας ECO.
Η συσκευή εδώ αναρροφά με μειωμένη ισχύ
αναρρόφησης και για μεγαλύτερο διάστημα.
Πατήστε ξανά το πλήκτρο ECO 0 για να εκμεταλλευτείτε ξανά όλη την ισχύ αναρρόφησης.
4) Περάστε το ακροφύσιο δαπέδου επάνω από
τα σημεία αναρρόφησης. Κρατήστε τη λαβή q
έτσι, ώστε το ακροφύσιο δαπέδου να ολισθαίνει επίπεδα επάνω στο δάπεδο.
9. Η λυχνία ελέγχου φόρτισης3
w και τραβώ-
5) Πιέστε το διακόπτη On/Off
να τερματίσετε την αναρρόφηση. Ο κύλινδρος
βούρτσας t σταματάει, η λυχνία ελέγχου
φόρτισης 3και ο φωτισμός LED z σβήνουν.
9 εάν θέλετε
Χρήση του τμήματος χειρός
1) Λασκάρετε το τμήμα χειρός 4 από το κοίλωμα του τμήματος χειρός r όπως περιγράφεται
στο κεφάλαιο «Συναρμολόγηση/Αποσυναρμολόγηση».
2) Εφόσον επιθυμείτε, τοποθετήστε το ακροφύσιο
αρμών i, το εξάρτημα βούρτσας u ή το
ακροφύσιο ταπετσαριών o.
3) Πιέστε το διακόπτη On/Off
χειρός 4και αναρροφήστε στα επιθυμητά
σημεία. Η λυχνία ελέγχου φόρτισης 3ανάβει
κατά τη λειτουργία.
4) Εάν θέλετε να τερματίσετε την αναρρόφηση,
πιέστε ξανά το διακόπτη On/Off
χνία ελέγχου φόρτισης 3σβήνει.
2 στο τμήμα
2. Η λυ-
Καθαρισμός και συντήρηση
ΠΡΟΕΊΔΟΠΟΊΗΣΗ!
ΚΊΝΔΥΝΟΣ ΤΡΑΥΜΑΤΊΣΜΟΥ!
► Αποσυνδέετε πάντα το φορτιστή pαπό την
πρίζα δικτύου. Λασκάρετε το κοίλο
βύσμαa από την υποδοχή φόρτισης f
στο στήριγμα g, πριν καθαρίσετε το
στήριγμα g.
► Αφαιρείτε πάντα το τμήμα χειρός 4 από το
κοίλωμα του τμήματος χειρός rστο
κοντάρι, προτού καθαρίσετε
-- το τμήμα χειρός 4,
-- το κοντάρι ή
-- τον κύλινδρο βούρτσας t
ΠΡΟΣΟΧΉ! ΥΛΙΚΈΣ ΖΉΜΙΈΣ!
► Μην χρησιμοποιείτε τριβικά ή επιθετικά
απορρυπαντικά. Αυτά μπορεί να καταστρέψουν την επιφάνεια!
ΥΠΟΔΈΙΞΉ
► Ο φωτισμός LED z δεν απαιτεί συντήρηση.
Τα LED δεν αντικαθίστανται!
SHSS 16 A1
GR│CY
│
19 ■

Άδειασμα δοχείου ακαθαρσιών και
καθαρισμός φίλτρου
ΥΠΟΔΈΙΞΉ
► Για την επίτευξη καλύτερων αποτελεσμάτων,
αδειάζετε το δοχείο ακαθαρσιών 8 και
καθαρίζετε το φίλτρο HEPA 6 τακτικά.
► Εάν χρειάζεστε νέο φίλτρο HEPA 6, απευ-
θυνθείτε στο τμήμα σέρβις μας (βλ. Κεφάλαιο
«
Παραγγελία ανταλλακτικών
1) Για να ανοίξετε το δοχείο ακαθαρσιών 8,
αφαιρέστε το τμήμα χειρός 4 από το κοίλωμα
του τμήματος χειρός r.
2) Πιέστε το πλήκτρο απασφάλισης
ντας ταυτόχρονα το δοχείο ακαθαρσιών 8
προς τα εμπρός.
3) Τραβήξτε πρώτα το φίλτρο HEPA 6 και στη
συνέχεια το φίλτρο χονδρών ρύπων 7 έξω
από το δοχείο ακαθαρσιών 8 (Εικ. 3). Τινάξτε
και τα δύο εξαρτήματα πάνω από έναν κάδο
απορριμμάτων ή κάτι παρόμοιο. Εάν χρειαστεί,
μπορείτε να ξεπλύνετε το φίλτρο HEPA 6 με
καθαρό νερό. Στη συνέχεια αφήστε το να στεγνώσει καλά στον αέρα.
»).
5τραβώ-
Καθαρισμός συσκευής
Σκουπίζετε τη συσκευή με ένα νωπό πανί. Για πιο
σκληρές βρομιές προσθέτετε στο πανί λίγο ήπιο
απορρυπαντικό. Προσέξτε ώστε η συσκευή να είναι
εντελώς στεγνή πριν από νέα χρήση.
Καθαρισμός κυλίνδρου βούρτσας
Ο κύλινδρος βούρτσας tπρέπει να ελέγχεται
τακτικά για εμφράξεις και να απελευθερώνεται από
τρίχες, κρόσσια ή ρύπους που έχουν αναρροφηθεί. Για τον σκοπό αυτό, αποσυναρμολογήστε τον
κύλινδρο βούρτσας t:
1) Γυρίστε ανάποδα το ακροφύσιο δαπέδου.
2) Ωθήστε την ασφάλιση στην πλάκα επικάλυψης
προς τη φορά του συμβόλου
μπορείτε να αφαιρέσετε την πλάκα επικάλυψης
(Εικ. 4).
3) Ανασηκώστε έξω τον κύλινδρο βούρτσας t.
4) Απομακρύνετε τις ακαθαρσίες (και από τις
δύο πλευρές των τριχών) και καθαρίστε τον
κύλινδρο της βούρτσας t. Για το σκοπό
αυτό, χρησιμοποιήστε ένα νωπό πανί και σκουπίστε από μέσα προς τα έξω τις μεμονωμένες
δέσμες τριχών.
ΠΡΟΕΊΔΟΠΟΊΗΣΗ!
ΚΊΝΔΥΝΟΣ ΤΡΑΥΜΑΤΊΣΜΟΥ!
► Να είστε προσεκτικοί κατά το χειρισμό του
μαχαιριού h. Η λεπίδα είναι πολύ κοφτερή!
, έτσι ώστε να
Εικ. 3
4) Αδειάστε το δοχείο ακαθαρσιών 8πάνω από
έναν κάδο απορριμμάτων ή κάτι παρόμοιο.
5) Τοποθετήστε πάλι πρώτα το φίλτρο χονδρών
ρύπων 7 και κατόπιν το στεγνό φίλτρο
HEPA6.
6) Τοποθετήστε πάλι το δοχείο ακαθαρσιών8
στο τμήμα χειρός 4 ωθώντας την κάτω ασφάλεια στο τμήμα χειρός 4πρώτα μέσα στην
εσοχή στο δοχείο ακαθαρσιών 8. Κατόπιν
σπρώξτε το επάνω μέρος του δοχείου ακαθαρσιών 8 στο τμήμα χειρός 4, μέχρι το δοχείο
ακαθαρσιών 8 να κουμπώσει και να εδράζεται καλά.
│
CY
ΥΠΟΔΈΙΞΉ
► Για να απομακρύνετε σταθεροποιημένες τρί-
χες και ίνες, μπορείτε να χρησιμοποιήσετε το
μαχαίρι h:
– Βγάλτε τη λεπίδα του μαχαιριού h προσεκτικά
έξω από τη λαβή και κόψτε τρίχες και ίνες
που έχουν κολλήσει.
– Διπλώστε πάλι τη λεπίδα. Σε αυτή τη διαδικασία
να πιάνετε μόνο από την πλευρά της λεπίδας
που δεν είναι αιχμηρή! Κίνδυνος τραυματισμού!
– Απομακρύνετε τις κομμένες τρίχες και ίνες
από τον κύλινδρο βούρτσας t.
SHSS 16 A1■ 20 │ GR

5) Για να τοποθετήσετε πάλι τον κύλινδρο βούρτσας t, ωθήστε πρώτα το φαρδύ άκρο στον
άξονα μετάδοσης κίνησης, έτσι ώστε ο κύλινδρος βούρτσας t να κουμπώσει εκεί.
6) Κατόπιν, ωθήστε το άλλο άκρο στην υποδοχή,
έτσι ώστε ο κύλινδρος βούρτσας t να εφάπτεται ευθεία με το ακροφύσιο δαπέδου.
7) Τοποθετήστε πάλι την πλάκα επικάλυψης και
ασφαλίστε την σπρώχνοντας την ασφάλεια
προς τη φορά του συμβόλου
Εικ. 4
(Εικ. 4).
Διόρθωση σφαλμάτων
Η συσκευή δε λειτουργεί.
■ Ο συσσωρευτής δεν είναι φορτισμένος.
♦ Συνδέστε τη συσκευή με το φορτιστή p.
■ Η συσκευή είναι ελαττωματική.
♦ Απευθυνθείτε στο τμήμα εξυπηρέτησης πελατών.
Η συσκευή λειτουργεί αλλά γίνεται
ελάχιστη απορρόφηση.
■ Ο συσσωρευτής δεν είναι επαρκώς φορτισμένος.
♦ Συνδέστε τη συσκευή με το φορτιστή p.
■ Το δοχείο ακαθαρσιών 8 είναι γεμάτο.
♦ Αδειάστε το δοχείο ακαθαρσιών 8.
■ Το φίλτρο HEPA 6 έχει βουλώσει.
♦ Καθαρίστε το φίλτρο HEPA 6.
Η συσκευή δεν φορτίζει.
■ Ο φορτιστής p δεν έχει εισαχθεί σωστά στην
υποδοχή/στο βύσμα δικτύου.
♦ Ελέγξτε τις συνδέσεις του φορτιστή p.
■ Ο φορτιστής p είναι ελαττωματικός.
♦ Απευθυνθείτε στο τμήμα εξυπηρέτησης πελατών.
Αποθήκευση
■ Όταν δεν χρησιμοποιείτε τη συσκευή, τοποθε-
τήστε την στο στήριγμα g.
■ Τοποθετήστε τα αξεσουάρ επάνω στα σχετικά
στηρίγματα s/d:
– Τοποθετήστε το ακροφύσιο αρμών i και
το ακροφύσιο ταπετσαριών oστα στηρίγματα s/d.
– Τοποθετήστε, στη συνέχεια, το εξάρτημα
βούρτσας u στο επάνω μέρος του ακροφυσίου αρμών i.
■ Φυλάξτε τη συσκευή σε έναν στεγνό χώρο
χωρίς σκόνη.
SHSS 16 A1
GR│CY
│
21 ■
Απόρριψη
Απόρριψη συσκευής
Σε καμία περίπτωση μην απορρίπτετε τη συσκευή στα οικιακά
απορρίμματα. Αυτό το προϊόν
υπόκειται στην Ευρωπαϊκή
Οδηγία 2012/19/ΕU
Απορρίπτετε τη συσκευή μέσω μιας εγκεκριμένης
επιχείρησης απόρριψης ή μέσω της κοινοτικής επιχείρησης απόρριψης. Τηρείτε τις ισχύουσες προδιαγραφές. Σε περίπτωση αμφιβολιών, επικοινωνείτε
με την αρμόδια επιχείρηση απόρριψης.
Για τις δυνατότητες απόρριψης του
προϊόντος εκτός χρήσης ενημερώνεστε
από την αρμόδια υπηρεσία της κοινότητας ή της πόλης σας.
ΥΠΟΔΈΙΞΉ
► Η συσκευή αυτή περιέχει συσσωρευτές, οι
οποίοι δεν απεγκαθίστανται. Η αφαίρεση ή η
αντικατάσταση των συσσωρευτών επιτρέπεται
να εκτελείται αποκλειστικά από τον κατασκευαστή, το τμήμα εξυπηρέτησης πελατών του ή
ένα αντιστοίχως εξειδικευμένο άτομο, ώστε να
αποφεύγονται κίνδυνοι. Κατά την απόρριψη
πρέπει να υποδεικνύεται ότι η συσκευή περιέχει συσσωρευτές.
Η συσκευασία αποτελείται από φιλικά
προς το περιβάλλον υλικά, τα οποία
μπορείτε να απορρίψετε μέσω των τοπικών σημείων ανακύκλωσης.
Απορρίπτετε τη συσκευασία με τρόπο
φιλικό προς το περιβάλλον. Λαμβάνετε υπόψη τη σήμανση στα διάφορα
υλικά συσκευασίας και, εφόσον απαι-
τείται, ξεχωρίζετέ τα. Τα υλικά συσκευασίας φέρουν σήμανση με συντομογραφίες (a) και
ψηφία (b) με την εξής σημασία: 1–7: Πλαστικά,
20–22: Χαρτί και χαρτόνι, 80–98: Συνθετικά
υλικά.
Εγγύηση της
Kompernass Handels GmbH
Αξιότιμη πελάτισσα, αξιότιμε πελάτη,
Η παρούσα συσκευή διαθέτει 3 χρόνια εγγύηση
από την ημερομηνία αγοράς. Στην περίπτωση ελλείψεων στο προϊόν έχετε νομικά δικαιώματα έναντι
του πωλητή του προϊόντος. Αυτά τα νομικά δικαιώματα δεν περιορίζονται μέσω της κατωτέρω αναφερόμενης εγγύησης.
Προϋποθέσεις εγγύησης
Η περίοδος εγγύησης ξεκινά την ημερομηνία αγοράς. Φυλάσσετε την απόδειξη αγοράς. Απαιτείται
ως αποδεικτικό αγοράς.
Εάν, εντός τριών ετών από την ημερομηνία αγοράς,
παρατηρηθεί κάποιο σφάλμα υλικού ή κατασκευής
στο προϊόν, θα επισκευάσουμε ή θα αντικαταστήσουμε (κατόπιν κρίσης μας) το προϊόν δωρεάν ή
θα σας επιστραφεί το ποσό αγοράς. Η παρούσα
εγγύηση προϋποθέτει ότι η ελαττωματική συσκευή
και η απόδειξη αγοράς θα υποβληθούν μαζί με
μια σύντομη περιγραφή αναφορικά με το πού βρίσκεται η έλλειψη και πότε παρατηρήθηκε, εντός της
περιόδου των τριών ετών.
Εάν το ελάττωμα καλύπτεται από την εγγύησή μας,
θα λάβετε το επισκευασμένο ή ένα νέο προϊόν.
Περίοδος εγγύησης και νομικές
απαιτήσεις λόγω ελλείψεων
Ο χρόνος εγγύησης δεν παρατείνεται μέσω της παροχής εγγύησης. Αυτό ισχύει και για εξαρτήματα,
τα οποία έχουν αντικατασταθεί και επισκευαστεί.
Ενδεχόμενες ήδη υπάρχουσες ζημιές και ελλείψεις
κατά την αγορά πρέπει να γνωστοποιούνται αμέσως μετά την αποσυσκευασία. Μετά τη λήξη του
χρόνου εγγύησης, τυχόν εμφανιζόμενες επισκευές
χρεώνονται.
│
CY
SHSS 16 A1■ 22 │ GR

Εύρος εγγύησης
Η συσκευή κατασκευάστηκε σύμφωνα με αυστηρές
οδηγίες ποιότητας και ελέγχθηκε προσεκτικά πριν
από την αποστολή.
Η εγγύηση ισχύει για σφάλματα υλικού ή κατασκευής. Η παρούσα εγγύηση δεν καλύπτει εξαρτήματα του προϊόντος που υπόκεινται σε φυσιολογική φθορά και, ως εκ τούτου, θεωρούνται
αναλώσιμα εξαρτήματα ή ζημιές σε εύθραυστα
εξαρτήματα, π.χ. διακόπτες, συσσωρευτές ή γυάλινα εξαρτήματα.
Η παρούσα εγγύηση ακυρώνεται εάν προκληθεί
ζημιά στο προϊόν, εάν δεν γίνεται σωστή χρήση ή
συντήρηση. Για μια σωστή χρήση του προϊόντος
πρέπει να τηρούνται επακριβώς οι αναφερόμενες
υποδείξεις στις οδηγίες χειρισμού. Σκοποί χρήσης
και χειρισμοί που δεν συνιστώνται ή για τους οποίους υπάρχει προειδοποίηση πρέπει απαραίτητα να
αποφεύγονται.
Το προϊόν προορίζεται μόνο για ιδιωτική και όχι
για επαγγελματική χρήση. Σε περίπτωση κακής μεταχείρισης και ακατάλληλης χρήσης, χρήσης βίας
και παρεμβάσεων, οι οποίες δεν διεξήχθησαν από
το εξουσιοδοτημένο μας τμήμα σέρβις, η εγγύηση
παύει να ισχύει.
Διαδικασία σε περίπτωση εγγύησης
Για την εξασφάλιση γρήγορης επεξεργασίας του
ζητήματός σας, τηρείτε τις ακόλουθες υποδείξεις:
■ Για όλες τις ερωτήσεις έχετε έτοιμη την από-
δειξη αγοράς και τον κωδικό προϊόντος
(π.χ.ΙΑΝ12345) ως απόδειξη για την αγορά.
■ Για τον κωδικό προϊόντος, ανατρέξτε στην
πινακίδα τύπου στο προϊόν, σε μια ετικέτα στο
προϊόν, στο εξώφυλλο των οδηγιών χρήσης
(κάτω αριστερά) ή σε ένα αυτοκόλλητο στην
πίσω ή κάτω πλευρά του προϊόντος.
■ Εάν προκύψουν σφάλματα λειτουργίας ή
άλλες ελλείψεις, επικοινωνήστε κατ’ αρχήν
με το ακόλουθο αναφερόμενο τμήμα σέρβις
τηλεφωνικά ή μεE-Mail.
■ Ένα προϊόν που θεωρείται ελαττωματικό μπο-
ρείτε να το αποστείλετε ατελώς στην αναφερόμενη διεύθυνση του σέρβις επισυνάπτοντας
την απόδειξη αγοράς (απόδειξη ταμείου) και
αναφέροντας που βρίσκεται η έλλειψη και πότε
εμφανίστηκε.
Στην ιστοσελίδα
www.lidl-service.com μπορείτε να
πραγματοποιήσετε λήψη των
παρόντων ή άλλων οδηγιών χρήσης,
βίντεο προϊόντων και λογισμικού.
Με αυτόν τον κωδικό QR μεταβαίνετε
απευθείας στη σελίδα εξυπηρέτησης Lidl
(www.lidl-service.com) και εισαγάγοντας τον
κωδικό προϊόντος (IAN) 123456 μπορείτε να
ανοίξετε τις αντίστοιχες οδηγίες χρήσης.
SHSS 16 A1
GR│CY
│
23 ■

Σέρβις
Σέρβις Ελλάδα
Tel.: 801 5000 019 (0,03 EUR/Min.)
E-Mail: kompernass@lidl.gr
CY
Σέρβις Κύπρος
Tel.: 8009 4409
E-Mail: kompernass@lidl.com.cy
IAN 321850_1901
Εισαγωγέας
Η ακόλουθη διεύθυνση δεν είναι διεύθυνση
σέρβις. Επικοινωνήστε, κατ’ αρχήν, με την αναφερόμενη υπηρεσία σέρβις.
Παραγγελία ανταλλακτικών
Μπορείτε να παραγγείλετε τα ακόλουθα ανταλλακτικά για το προϊόν SHSS 16 A1:
1 φίλτρο HEPA 6
KOMPERNASS HANDELS GMBH
BURGSTRASSE 21
DE - 44867 BOCHUM
ΓΕΡΜΑΝΙΑ
www.kompernass.com
Παραγγείλετε τα ανταλλακτικά μέσω της τηλεφωνικής γραμμής άμεσης τεχνικής εξυπηρέτησης (βλ.
Κεφάλαιο «Σέρβις») ή μέσω της ιστοσελίδας μας
www.kompernass.com.
ΥΠΟΔΈΙΞΉ
► Για την παραγγελία σας να έχετε έτοιμο τον
αριθμό ΙΑΝ που θα βρείτε στο κάλυμμα
αυτών των οδηγιών χρήσης.
│
CY
SHSS 16 A1■ 24 │ GR

Inhaltsverzeichnis
Einleitung ............................................................. 26
Bestimmungsgemäßer Gebrauch ......................................... 26
Lieferumfang ..........................................................26
Gerätebeschreibung. . . . . . . . . . . . . . . . . . . . . . . . . . . . . . . . . . . . . . . . . . . . . . . . . . . . 26
Technische Daten ......................................................27
Sicherheitshinweise ....................................................27
Vor dem ersten Gebrauch ............................................... 30
Gerät aufladen ........................................................30
Montage/Demontage ..................................................30
Handteil mit Stiel verbinden/vom Stiel lösen ..............................................30
Bedienen .............................................................31
Handteil mit Stiel verwenden ..........................................................31
Handteil verwenden .................................................................31
Reinigung und Pflege ...................................................31
Schmutzbehälter leeren und Filter reinigen. . . . . . . . . . . . . . . . . . . . . . . . . . . . . . . . . . . . . . . . . . . . . . . .32
Gerät reinigen .....................................................................32
Bürstenrolle reinigen .................................................................32
Lagerung ............................................................. 33
Fehlerbehebung ....................................................... 33
Entsorgung ...........................................................34
Gerät entsorgen ....................................................................34
Garantie der Kompernaß Handels GmbH ..................................34
Service ...........................................................................36
Importeur .........................................................................36
Ersatzteile bestellen .................................................... 36
SHSS 16 A1
DE│AT│CH
│
25 ■

Einleitung
Herzlichen Glückwunsch zum Kauf Ihres neuen
Gerätes.
Sie haben sich damit für ein hochwertiges Produkt
entschieden. Die Bedienungsanleitung ist Bestandteil dieses Produkts. Sie enthält wichtige Hinweise
für Sicherheit, Gebrauch und Entsorgung. Machen
Sie sich vor der Benutzung des Produkts mit allen
Bedien- und Sicherheitshinweisen vertraut.
Benutzen Sie das Produkt nur wie beschrieben und
für die angegebenen Einsatzbereiche. Händigen
Sie alle Unterlagen bei Weitergabe des Produkts
an Dritte mit aus.
Bestimmungsgemäßer
Gebrauch
Dieses Gerät dient ausschließlich dem Saugen von
trockenen Oberflächen bzw. trockenem Sauggut.
Dieses Gerät ist ausschließlich für die Benutzung
in privaten Haushalten bestimmt. Das Gerät darf
nicht dazu verwendet werden Menschen oder
Tiere abzusaugen. Jede andere Verwendung oder
Veränderung des Gerätes gilt als nicht bestimmungsgemäß und birgt erhebliche Unfallgefahren. Der
Hersteller haftet nicht für Schäden, die durch nicht
bestimmungsgemäßen Gebrauch oder falsche Bedienung verursacht werden. Das Gerät ist nicht für
den gewerblichen Gebrauch bestimmt.
Lieferumfang
▯ Akku-Hand- und Bodenstaubsauger
▯ Bürstenaufsatz
▯ Polsterdüse
▯ Fugendüse
▯ Verlängerungsstiel mit Bodendüse
▯ Halterung (mit Ladebuchse)
▯ Messer
▯ Ladegerät
▯ Bedienungsanleitung
Gerätebeschreibung
Abbildung A:
1 Griff Handteil
2 Ein-/Aus-Schalter
3 Ladekontrollleuchte
4 Handteil
5 Entriegelungstaste
6 HEPA-Filter
7 Grobfilter
8 Schmutzbehälter
Abbildung B:
9 Ein-/Aus-Schalter
0 ECO-Taste
q Griff
w Entriegelungstaste
e Entriegelungstasten
r Handteilmulde
t Bürstenrolle
z LED-Beleuchtung
Abbildung C:
u Bürstenaufsatz
i Fugendüse
o Polsterdüse
p Ladegerät
a Hohlstecker Ladegerät
s Zubehörhalter
d Zubehörhalter
f Ladebuchse (Unterseite)
g Halterung (mit Ladebuchse)
h Messer
(Schmutzbehälter)
(Griff)
(Handteil)
Kontrollieren Sie direkt nach dem Auspacken den
Lieferumfang auf Vollständigkeit.
│AT│
CH
SHSS 16 A1■ 26 │ DE

Technische Daten
Ladegerät
Eingang: 100 – 240 V ∼ (Wechselspannung),
50/60 Hz, 0,3 A Max.
Ausgang: 18 V
Typenbezeichnung: SHSS 16 A1--2
Schutzklasse: II /
Polarität:
Energieeffizienzklasse:
Bodendüse
Nennleistung: 5 W
Schutzklasse: III /
Polarität:
(Gleichstrom), 500 mA
(Doppelisolierung)
(Kleinspannung)
Handteil
Eingang: 18 V
Nennleistung: 90 W
Schutzklasse: III /
Polarität:
Akkus
14,4 V
(4 x 3,6 V Lithium-Ionen-Akku)
Betriebszeit bei voller Akkuladung
(abhängig vom Bodenbelag):
Stufe 1, normaler Modus: ca. 22 Min.
Stufe 2, ECO-Modus: ca. 28 Min.
Ladezeit bei leerem Akku: 5 – 6 Std.
500 mA
2200 mAh
Sicherheitshinweise
GEFAHR! ELEKTRISCHER SCHLAG!
► Laden bzw. verwenden Sie dieses Gerät nicht im Freien.
► Den Handstaubsauger niemals gebrauchen, wenn Kabel, Stecker
oder Gehäuse beschädigt sind.
► Lassen Sie beschädigte Netzstecker oder Netzkabel sofort von auto-
risiertem Fachpersonal austauschen, um Gefährdungen zu vermeiden.
► Lassen Sie Reparaturen nur von einer Fachwerkstatt durchführen.
Öffnen Sie unter keinen Umständen selbst das Gerät. Eingriffe, die
nicht durch einen Fachbetrieb vorgenommen wurden, können zu
Verletzungen führen.
► Überzeugen Sie sich vor dem Laden des Gerätes, dass die in den
technischen Daten des Netzteils/Ladegeräts verzeichnete Spannung
der Netzspannung entspricht.
► Fassen Sie das Netzteil/Ladegerät oder das Gerät nicht mit nassen
oder feuchten Händen an.
► Verwenden Sie das Netzteil/Ladegerät nicht mit einem Verlänge-
rungskabel, sondern verbinden Sie das Netzteil direkt mit einer
Steckdose.
SHSS 16 A1
DE│AT│CH
│
27 ■

WARNUNG! VERLETZUNGSGEFAHR!
► Wechseln Sie keine Zubehörteile aus, wenn das Gerät in Betrieb ist.
► Benutzen Sie den Handstaubsauger nicht zum Aufsaugen von
Wasser oder anderen Flüssigkeiten.
► Benutzen Sie den Handstaubsauger nicht zum Aufsaugen von spitzen
Gegenständen oder Glasscherben.
► Niemals brennende Streichhölzer, glimmende Asche oder Zigaretten-
stummel aufsaugen.
► Gebrauchen Sie den Handstaubsauger nicht zum Aufsaugen von
chemischen Produkten, Steinstaub, Gips, Zement, oder anderen
ähnlichen Partikeln.
► Das Gerät ist nicht für entflammbare und explosive Stoffe oder
chemische und aggressive Flüssigkeiten geeignet.
► Lagern Sie das Gerät immer in geschlossenen Räumen. Um Unfälle
zu verhindern, bewahren Sie das Gerät nach Gebrauch an einem
trockenen Ort auf.
► Unter extremen Bedingungen können Leckagen an den Akkuzellen
auftreten. Bei Kontakt der Flüssigkeit mit Haut oder Augen ist die
betreffende Stelle sofort mit sauberem Wasser aus- bzw. abzuspülen.
Suchen Sie einen Arzt auf.
► Dieses Gerät kann von Kindern ab 8 Jahren und darüber sowie von
Personen mit verringerten physischen, sensorischen oder mentalen
Fähigkeiten oder Mangel an Erfahrung und Wissen benutzt werden,
wenn sie beaufsichtigt oder bezüglich des sicheren Gebrauchs des
Gerätes unterwiesen wurden und die daraus resultierenden Gefahren
verstehen. Kinder dürfen nicht mit dem Gerät spielen. Reinigung und
Benutzer-Wartung dürfen nicht von Kindern ohne Beaufsichtigung
durchgeführt werden.
► Seien Sie vorsichtig beim Auf- und Zuklappen des Messers sowie bei
dessen Benutzung. Die Klinge ist sehr scharf!
► Das Messer für Kinder unzugänglich aufbewahren.
► Das Messer niemals mit beschädigter Klinge verwenden.
│AT│
CH
SHSS 16 A1■ 28 │ DE

WARNUNG! VERLETZUNGSGEFAHR!
► Die Klinge nach Gebrauch immer in das Gehäuse zurück klappen.
► Verwenden Sie nur Zubehörteile, die vom Hersteller empfohlen werden.
► Das Netzteil darf nicht für andere Zwecke benutzt werden.
► Fassen Sie immer den Netzstecker an, um das Gerät von der Strom-
versorgung zu trennen.
► Achten Sie unbedingt darauf, dass Sie den Handstaubsauger nicht
neben Heizkörpern, Backöfen oder anderen erhitzten Geräten oder
Flächen abstellen.
► Achten Sie immer darauf, dass die Lüftungsschlitze frei sind. Ein
blockierter Luftkreislauf kann zur Überhitzung und Beschädigung
des Gerätes führen.
► Üben Sie besondere Sorgfalt aus, wenn Sie den Handstaubsauger
auf Treppen benutzen. Sturzgefahr!
► Dieses Produkt enthält wiederaufladbare Akkus. Werfen Sie das
Gerät nicht ins Feuer und setzen Sie es nicht hohen Temperaturen
aus. Es besteht Explosionsgefahr!
► Nehmen Sie vor dem Reinigen der Bürstenrolle immer das Handteil
aus dem Stiel, um ein versehentliches Starten der Bürstenrolle zu
vermeiden.
ACHTUNG! SACHSCHADEN!
► Benutzen Sie den Handstaubsauger nicht ohne eingesetzten
HEPA-Filter.
► Benutzen Sie das Ladegerät nicht für ein anderes Produkt und
versuchen Sie nicht, dieses Gerät mittels eines anderen Lade gerätes
aufzuladen. Verwenden Sie nur das mit diesem Gerät gelieferte
Ladegerät.
► Laden Sie niemals nicht wiederaufladbare Batterien auf!
Verwenden Sie den Netzadapter nur in Innenräumen.
SHSS 16 A1
DE│AT│CH
│
29 ■

Vor dem ersten Gebrauch
■ Entfernen Sie alle Verpackungsmaterialien und
Schutzaufkleber vom Gerät, insbesonders den
Schutzaufkleber an den Kontakten auf der Rückseite des Handteils 4.
■ Stecken Sie die Halterung g auf den Ständer,
so dass die Halterung g einrastet.
HINWEIS
► Das Gerät wird mit nicht geladenen Akkus
geliefert. Vor dem ersten Gebrauch des
Gerätes sind die Akkus zunächst für 5 bis
6Stunden zu laden.
Gerät aufladen
HINWEIS
► Vergewissern Sie sich, dass das Gerät
ausgeschaltet ist, bevor Sie mit dem Laden
beginnen.
■ Um das Gerät aufzuladen, verbinden Sie das
Ladegerät p mit einer Netzsteckdose. Stecken
Sie den Hohlstecker a in die Ladebuchse f an
der Unterseite der Halterung g. Führen Sie das
Kabel durch die Aussparung an der Rückseite
der Halterung g, so dass die Halterung g
nicht auf dem Kabel steht.
■ Stellen Sie den Stiel mit eingesetztem Hand-
teil4 auf die Halterung g.
Die Ladekontrollleuchte 3 leuchtet rot. Wenn
das Gerät aufgeladen ist, leuchtet die Ladekontrollleuchte 3 grün.
■ Laden Sie die Akkus erst wieder auf, wenn die
Saugleistung des Geräts spürbar schwächer
wird.
HINWEIS
► Bei schwachen Akkus beginnt die Lade-
kontrollleuchte 3 grün zu blinken. In diesem
Zustand kann das Gerät für etwa 3 bis 5
weitere Minuten betrieben werden.
► Sind die Akkus vollständig erschöpft, blinkt
die Ladekontrollleuchte 3fünfmal rot auf
und das Gerät schaltet sich ab.
Montage/Demontage
Handteil mit Stiel verbinden/vom
Stiel lösen
Abb. 1 Abb. 2
■ Um das Handteil 4 mit dem Stiel zu verbinden,
schieben Sie die Spitze des Handteils 4 in die
Aussparung der Handteilmulde r.
■ Drücken Sie dann den Griff 1 des Handteils 4
in den Stiel, so dass das Handteil 4 einrastet
und fest sitzt (Abb.1).
■ Um das Handteil 4 vom Stiel zu lösen, drücken
Sie die Entriegelungstasten
■ Ziehen Sie das Handteil 4 nach oben/vorne
aus der Handteilmulde r (Abb.2).
e.
│AT│
CH
SHSS 16 A1■ 30 │ DE

Bedienen
ACHTUNG! SACHSCHADEN!
► Die Saugöffnung muss jederzeit frei und darf
nicht verstopft sein. Verstopfungen führen zu
Überhitzung und Beschädigung des Motors.
► Saugen Sie keine hochflorigen Teppiche mit
der Bodendüse. Die Bürstenrolle t verfängt
sich im Teppich und blockiert!
HINWEIS
► Achten Sie darauf, dass der HEPA-Filter 6
und der Grobfilter 7 immer eingesetzt sind,
bevor Sie das Gerät verwenden.
► Sobald die Saugleistung spürbar nachlässt
und die Ladekontrollleuchte 3grün blinkt,
verbinden Sie das Gerät wieder mit dem
Ladegerät p.
Handteil mit Stiel verwenden
1) Setzen Sie das Handteil 4 in die Handteilmulde r wie im Kapitel „Montage/Demontage“ beschrieben.
2) Klappen Sie den Griff q des Stiels aus, indem
Sie die Entriegelungstaste
gleichzeitig den Griff q nach oben ziehen.
3) Schalten Sie das Gerät am Ein-/Aus-Schalter
9 ein. Die Ladekontrollleuchte 3leuchtet
grün, die LED -Beleuchtung z an der Bodendüse leuchtet auf und die Bürstenrolle t dreht
sich.
HINWEIS
► Drücken Sie die ECO-Taste 0, um in den
energiesparenden ECO-Modus zu wechseln.
Das Gerät saugt nun mit verringerter Saugkraft bei längerer Laufzeit.
Drücken Sie die ECO-Taste 0erneut, um
wieder mit voller Saugkraft zu arbeiten.
4) Fahren Sie mit der Bodendüse über die zu
saugenden Stellen. Halten Sie den Griff q
dabei so, dass die Bodendüse plan über den
Boden gleitet.
w drücken und
5) Drücken Sie den Ein-/Aus-Schalter
Sie das Saugen beenden wollen. Die Bürstenrolle t stoppt, die Ladekontrollleuchte 3und
die LED - Beleuchtung z erlöschen.
Handteil verwenden
1) Lösen Sie das Handteil 4 aus der Handteilmulde r wie im Kapitel „Montage/Demontage“ beschrieben.
2) Setzen Sie, wenn gewünscht, die Fugendüsei, den Bürstenaufsatz u oder die
Polsterdüse o auf.
3) Drücken Sie den Ein-/Aus-Schalter
Handteil 4und saugen Sie die gewünschten
Stellen. Die Ladekontrollleuchte 3leuchtet
während des Betriebs grün.
4) Wenn Sie das Saugen beenden wollen,
drücken Sie noch einmal den Ein-/AusSchalter
erlischt.
2. Die Ladekontrollleuchte 3
Reinigung und Pflege
WARNUNG! VERLETZUNGSGEFAHR!
► Ziehen Sie immer das Ladegerät paus der
Netzsteckdose. Lösen Sie den Hohlstecker a
aus der Ladebuchse f an der Halterung g,
bevor Sie die Halterung g reinigen.
► Nehmen Sie das Handteil 4 immer aus der
Handteilmulde ram Stiel, bevor Sie
-- das Handteil 4,
-- den Stiel oder
-- die Bürstenrolle t
reinigen.
ACHTUNG! SACHSCHADEN!
► Verwenden Sie keine scheuernden oder
aggressiven Reinigungsmittel. Diese können
die Oberfläche beschädigen!
HINWEIS
► Die LED - Beleuchtung z ist wartungsfrei. Die
LEDs können nicht ausgewechselt werden!
9, wenn
2 am
SHSS 16 A1
DE│AT│CH
│
31 ■

Schmutzbehälter leeren und Filter
reinigen
HINWEIS
► Um beste Ergebnisse zu erzielen, leeren Sie
den Schmutzbehälter 8 und reinigen Sie den
HEPA-Filter 6 regelmäßig.
► Falls Sie einen neuen HEPA-Filter 6 benö-
tigen, wenden Sie sich an unseren Service
(siehe Kapitel „Ersatzteile bestellen“).
1) Um den Schmutzbehälter 8 zu öffnen, nehmen
Sie das Handteil 4 aus der Handteilmulde r.
2) Drücken Sie die Entriegelungstaste
ziehen Sie gleichzeitig den Schmutzbehälter8
nach vorne ab.
3) Ziehen Sie zunächst den HEPA-Filter 6 und
dann den Grobfilter 7 aus dem Schmutzbehälter 8 heraus (Abb. 3). Klopfen Sie beide
Teile über einem Mülleimer o. Ä. aus. Bei Bedarf können Sie den HEPA-Filter 6 mit klarem
Wasser abspülen. Lassen Sie ihn anschließend
an der Luft vollständig trocknen.
5und
Gerät reinigen
Wischen Sie das Gerät mit einem feuchten Tuch
ab. Bei hartnäckigen Verschmutzungen geben Sie
ein mildes Spülmittel auf das Tuch. Achten Sie
darauf, dass das Gerät vor der erneuten Benutzung
wieder vollständig trocken ist.
Bürstenrolle reinigen
Die Bürstenrolle t sollte regelmäßig auf Blockierungen kontrolliert und von aufgenommenen
Haaren, Fransen oder Schmutz befreit werden.
Bauen Sie die Bürstenrolle t dazu aus:
1) Drehen Sie die Bodendüse um.
2) Schieben Sie die Verriegelung an der Abdeckplatte Richtung
die Abdeckplatte ab (Abb. 4).
3) Nehmen Sie die Bürstenrolle t raus.
4) Entfernen Sie Verschmutzungen (auf beiden
Seiten der Borsten) und säubern Sie die
Bürsten rolle t. Nehmen Sie dafür ein feuchtes
Tuch und wischen von innen nach außen die
einzelnen Borstenbündel ab.
WARNUNG! VERLETZUNGSGEFAHR!
► Seien Sie Vorsichtig im Umgang mit dem
Messer h. Die Klinge ist sehr scharf!
- Symbol und nehmen Sie
Abb. 3
4) Entleeren Sie den Schmutzbehälter 8über
einer Mülltonne o.Ä.
5) Setzen Sie erst den Grobfilter 7 und dann
den trockenen HEPA-Filter 6 wieder ein.
6) Setzen Sie den Schmutzbehälter 8 wieder auf
das Handteil 4, indem Sie die untere Arretierung am Handteil 4zuerst in die Aussparung
am Schmutzbehälter 8schieben. Schieben
Sie dann den oberen Teil des Schmutzbehälters 8 auf das Handteil 4, bis der Schmutzbehälter 8 einrastet und fest sitzt.
│AT│
CH
HINWEIS
► Um festsitzende Haare und Fäden zu ent-
fernen, können Sie das Messer h benutzen:
– Klappen Sie die Klinge des Messers h vor-
sichtig aus dem Griff heraus und zerschneiden
Sie festsitzende Haare und Fäden.
– Klappen Sie die Klinge wieder ein. Fassen
Sie dabei nur die nicht geschliffene Seite der
Klinge an! Verletzungsgefahr!
– Entfernen Sie die zerschnittenen Haare und
Fäden aus der Bürstenrolle t.
SHSS 16 A1■ 32 │ DE

5) Um die Bürstenrolle t wieder einzusetzen,
schieben Sie zuerst das breite Ende auf die
Antriebswelle, so dass die Bürstenrolle t dort
eingehakt ist.
6) Dann schieben Sie das andere Ende in die Aufnahme, so dass die Bürstenrolle t gerade in
der Bodendüse liegt.
7) Setzen Sie die Abdeckplatte wieder auf und
verriegeln Sie sie, indem Sie die Verriegelung
Richtung
Abb. 4
- Symbol schieben (Abb. 4).
Lagerung
■ Wenn Sie das Gerät nicht benutzen, stellen Sie
es auf die Halterung g.
■ Stecken Sie das Zubehör auf die Zubehör-
halterungen s/dauf:
– Stecken Sie die Fugendüse i und die
Polsterdüse oin die Halterungen s/d.
– Setzen Sie dann den Bürstenaufsatz u auf
den oberen Teil der Fugendüse i.
■ Bewahren Sie das Gerät an einem staubfreien
und trockenen Ort auf.
Fehlerbehebung
Das Gerät funktioniert nicht.
■ Der Akku ist nicht aufgeladen.
♦ Verbinden Sie das Gerät mit dem Ladegerät p.
■ Das Gerät ist defekt.
♦ Wenden Sie sich an den Kundendienst.
Das Gerät läuft, saugt aber kaum den
Schmutz auf.
■ Der Akku ist nicht ausreichend geladen.
♦ Verbinden Sie das Gerät mit dem Ladegerät p.
■ Der Schmutzbehälter 8 ist voll.
♦ Leeren Sie den Schmutzbehälter 8.
■ Der HEPA-Filter 6 ist verstopft.
♦ Reinigen Sie den HEPA-Filter 6.
Das Gerät lädt sich nicht auf.
■ Das Ladegerät p steckt nicht korrekt in der
Buchse/dem Netzstecker.
♦ Kontrollieren Sie die Anschlüsse des Lade-
geräts p.
■ Das Ladegerät p ist defekt.
♦ Wenden Sie sich an den Kundendienst.
SHSS 16 A1
DE│AT│CH
│
33 ■

Entsorgung
Gerät entsorgen
Werfen Sie das Gerät keinesfalls in den normalen Hausmüll. Dieses Produkt unterliegt
der europäischen Richtlinie
2012/19/EU.
Entsorgen Sie das Gerät über einen zugelassenen
Entsorgungsbetrieb oder über Ihre kommunale Entsorgungseinrichtung. Beachten Sie die aktuell
geltenden Vorschriften. Setzen Sie sich im Zweifelsfall mit Ihrer Entsorgungseinrichtung in Verbindung.
Möglichkeiten zur Entsorgung des ausgedienten Produkts erfahren Sie bei
Ihrer Gemeinde- oder Stadtverwaltung.
HINWEIS
► Dieses Gerät enthält Akkus, welche nicht
ausgebaut werden können. Der Ausbau
oder Austausch der Akkus darf nur durch
den Hersteller, seinen Kundendienst oder
eine ähnlich qualifizierte Person erfolgen, um
Gefährdungen zu vermeiden. Bei der Entsorgung ist darauf hinzuweisen, dass dieses
Gerät Akkus enthält.
Die Verpackung besteht aus umweltfreundlichen Materialien, die Sie über
die örtlichen Recyclingstellen entsorgen
können.
Garantie der
Kompernaß Handels GmbH
Sehr geehrte Kundin, sehr geehrter Kunde,
Sie erhalten auf dieses Gerät 3 Jahre Garantie ab
Kaufdatum. Im Falle von Mängeln dieses Produkts
stehen Ihnen gegen den Verkäufer des Produkts
gesetzliche Rechte zu. Diese gesetzlichen Rechte
werden durch unsere im Folgenden dargestellte
Garantie nicht eingeschränkt.
Garantiebedingungen
Die Garantiefrist beginnt mit dem Kaufdatum. Bitte
bewahren Sie den Kassenbon gut auf. Dieser wird
als Nachweis für den Kauf benötigt.
Tritt innerhalb von drei Jahren ab dem Kaufdatum
dieses Produkts ein Material- oder Fabrikationsfehler auf, wird das Produkt von uns – nach unserer
Wahl – für Sie kostenlos repariert, ersetzt, oder der
Kaufpreis erstattet. Diese Garantieleistung setzt voraus, dass innerhalb der Dreijahresfrist das defekte
Gerät und der Kaufbeleg (Kassenbon) vorgelegt
und schriftlich kurz beschrieben wird, worin der
Mangel besteht und wann er aufgetreten ist.
Wenn der Defekt von unserer Garantie gedeckt ist,
erhalten Sie das reparierte oder ein neues Produkt
zurück. Mit Reparatur oder Austausch des Produkts
beginnt kein neuer Garantiezeitraum.
Entsorgen Sie die Verpackung umweltgerecht. Beachten Sie die Kennzeichnung auf den verschiedenen Verpack-
ungsmaterialien und trennen Sie diese
gegebenenfalls gesondert.
Die Verpackungsmate rialien sind gekennzeichnet
mit Abkürzungen (a) und Ziffern (b) mit folgender
Bedeutung: 1–7: Kunststoffe, 20–22: Papier und
Pappe, 80–98: Verbundstoffe.
│AT│
CH
SHSS 16 A1■ 34 │ DE

Garantiezeit und gesetzliche
Mängelansprüche
Die Garantiezeit wird durch die Gewährleistung
nicht verlängert. Dies gilt auch für ersetzte und
reparierte Teile. Eventuell schon beim Kauf vorhandene Schäden und Mängel müssen sofort nach
dem Auspacken gemeldet werden. Nach Ablauf
der Garantiezeit anfallende Reparaturen sind kostenpflichtig.
Garantieumfang
Das Gerät wurde nach strengen Qualitätsrichtlinien
sorgfältig produziert und vor Auslieferung gewissenhaft geprüft.
Die Garantieleistung gilt für Material- oder Fabrikationsfehler. Diese Garantie erstreckt sich nicht auf
Produktteile, die normaler Abnutzung ausgesetzt
sind und daher als Verschleißteile angesehen werden können oder für Beschädigungen an zerbrechlichen Teilen, z. B. Schalter, Akkus oder Teile, die aus
Glas gefertigt sind.
Diese Garantie verfällt, wenn das Produkt beschädigt, nicht sachgemäß benutzt oder gewartet wurde. Für eine sachgemäße Benutzung des Produkts
sind alle in der Bedienungsanleitung aufgeführten
Anweisungen genau einzuhalten. Verwendungszwecke und Handlungen, von denen in der Bedienungsanleitung abgeraten oder vor denen gewarnt
wird, sind unbedingt zu vermeiden.
Das Produkt ist nur für den privaten und nicht für
den gewerblichen Gebrauch bestimmt. Bei missbräuchlicher und unsachgemäßer Behandlung,
Gewaltanwendung und bei Eingriffen, die nicht von
unserer autorisierten Serviceniederlassung vorgenommen wurden, erlischt die Garantie.
Abwicklung im Garantiefall
Um eine schnelle Bearbeitung Ihres Anliegens zu
gewährleisten, folgen Sie bitte den folgenden Hinweisen:
■ Bitte halten Sie für alle Anfragen den Kassenbon
und die Artikelnummer (z.B.IAN123456) als
Nachweis für den Kauf bereit.
■ Die Artikelnummer entnehmen Sie bitte dem Ty-
penschild am Produkt, einer Gravur am Produkt,
dem Titelblatt der Bedienungsanleitung (unten
links) oder dem Aufkleber auf der Rück- oder
Unterseite des Produktes.
■ Sollten Funktionsfehler oder sonstige Mängel
auftreten, kontaktieren Sie zunächst die nachfolgend benannte Serviceabteilung telefonisch
oder per E-Mail.
■ Ein als defekt erfasstes Produkt können Sie dann
unter Beifügung des Kaufbelegs (Kassenbon)
und der Angabe, worin der Mangel besteht und
wann er aufgetreten ist, für Sie portofrei an die
Ihnen mitgeteilte Serviceanschrift übersenden.
Auf www.lidl-service.com können Sie
diese und viele weitere Handbücher,
Produktvideos und Installationssoftware herunterladen.
Mit diesem QR-Code gelangen Sie
direkt auf die Lidl-Service-Seite (www.lidl-service.com)
und können mittels der Eingabe der Artikelnummer
(IAN) 123456 Ihre Bedienungsanleitung öffnen.
SHSS 16 A1
DE│AT│CH
│
35 ■

Service
Service Deutschland
Tel.: 0800 5435 111 (kostenfrei
aus dem dt. Festnetz/Mobilfunknetz)
E-Mail: kompernass@lidl.de
Service Österreich
Tel.: 0820 201 222 (0,15 EUR/Min.)
E-Mail: kompernass@lidl.at
Service Schweiz
Tel.: 0842 665566 (0,08 CHF/Min.,
Mobilfunk max. 0,40 CHF/Min.)
E-Mail: kompernass@lidl.ch
IAN 321850_1901
Ersatzteile bestellen
Folgende Ersatzteile können Sie zum Produkt
SHSS 16 A1 bestellen:
1x HEPA-Filter 6
Importeur
Bitte beachten Sie, dass die folgende Anschrift
keine Serviceanschrift ist. Kontaktieren Sie zunächst
die benannte Servicestelle.
KOMPERNASS HANDELS GMBH
BURGSTRASSE 21
DE - 44867 BOCHUM
DEUTSCHLAND
www.kompernass.com
Bestellen Sie die Ersatzteile über unsere ServiceHotline (siehe Kapitel „Service″) oder bequem auf
unserer Webseite unter www.kompernass.com.
HINWEIS
► Halten Sie die IAN-Nummer, die Sie auf dem
Umschlag dieser Bedienungs anleitung finden,
für Ihre Bestellung bereit.
│AT│
CH
SHSS 16 A1■ 36 │ DE

KOMPERNASS HANDELS GMBH
BURGSTRASSE 21
DE - 44867 BOCHUM
GERMANY
www.kompernass.com
Last Information Update · Έκδοση των πληροφοριών · Stand der Informationen:
05 / 2019 · Ident.- No.: SHSS16A1-032019-2
IAN 321850_1901
 Loading...