

Page 1
AKKU-HAND- UND -BODENSTAUBSAUGER SHSS 12 B2
AKKU-HAND- UND
-BODENSTAUBSAUGER
Bedienungsanleitung
ASPIRAPOLVERE RICARICABILE
Istruzioni per l'uso
IAN 100116
ASPIRATEUR SANS FIL POLYVALENT
Mode d’emploi
RECHARGEABLE HAND-HELD AND
UPRIGHT VACUUM CLEANER
Operating instructions
Page 2
Klappen Sie vor dem Lesen die Seite mit den Abbildungen aus und machen Sie sich anschließend mit allen
Funktionen des Gerätes vertraut.
Avant de lire le mode d'emploi, ouvrez la page contenant les illustrations et familiarisez-vous ensuite avec
toutes les fonctions de l'appareil.
Prima di leggere aprire la pagina con le immagini e prendere confi denza con le diverse funzioni
dell'apparecchio.
Before reading, unfold the page containing the illustrations and familiarise yourself with all functions of
the device.
DE / AT / CH Bedienungsanleitung Seite 1
FR / CH Mode d'emploi Page 11
IT / CH Istruzioni per l'uso Pagina 21
GB Operating instructions Page 31
Page 3
A B C
Page 4

Inhaltsverzeichnis
Einleitung . . . . . . . . . . . . . . . . . . . . . . . . . . . . . . . . . . . . . . . . . . . . . . . . . . . . . . . . . . . . . 2
Bestimmungsgemäßer Gebrauch . . . . . . . . . . . . . . . . . . . . . . . . . . . . . . . . . . . . . . . . . 2
Lieferumfang . . . . . . . . . . . . . . . . . . . . . . . . . . . . . . . . . . . . . . . . . . . . . . . . . . . . . . . . . . 2
Gerätebeschreibung. . . . . . . . . . . . . . . . . . . . . . . . . . . . . . . . . . . . . . . . . . . . . . . . . . . . 2
Technische Daten . . . . . . . . . . . . . . . . . . . . . . . . . . . . . . . . . . . . . . . . . . . . . . . . . . . . . . 3
Sicherheitshinweise . . . . . . . . . . . . . . . . . . . . . . . . . . . . . . . . . . . . . . . . . . . . . . . . . . . . 3
Vor dem ersten Gebrauch . . . . . . . . . . . . . . . . . . . . . . . . . . . . . . . . . . . . . . . . . . . . . . . 6
Gerät aufl aden . . . . . . . . . . . . . . . . . . . . . . . . . . . . . . . . . . . . . . . . . . . . . . . . . . . . . . . . 6
Montage/Demontage . . . . . . . . . . . . . . . . . . . . . . . . . . . . . . . . . . . . . . . . . . . . . . . . . . 6
Handteil mit Stiel verbinden / vom Stiel lösen . . . . . . . . . . . . . . . . . . . . . . . . . . . . . . . . . . . . . . . . . . . . . 6
Bedienen . . . . . . . . . . . . . . . . . . . . . . . . . . . . . . . . . . . . . . . . . . . . . . . . . . . . . . . . . . . . . 7
Handteil mit Stiel verwenden . . . . . . . . . . . . . . . . . . . . . . . . . . . . . . . . . . . . . . . . . . . . . . . . . . . . . . . . . 7
Handteil verwenden . . . . . . . . . . . . . . . . . . . . . . . . . . . . . . . . . . . . . . . . . . . . . . . . . . . . . . . . . . . . . . . . 7
Reinigung und Pfl ege . . . . . . . . . . . . . . . . . . . . . . . . . . . . . . . . . . . . . . . . . . . . . . . . . . . 7
Schmutzbehälter leeren . . . . . . . . . . . . . . . . . . . . . . . . . . . . . . . . . . . . . . . . . . . . . . . . . . . . . . . . . . . . . 8
Gerät reinigen . . . . . . . . . . . . . . . . . . . . . . . . . . . . . . . . . . . . . . . . . . . . . . . . . . . . . . . . . . . . . . . . . . . . 8
Bürstenrolle reinigen . . . . . . . . . . . . . . . . . . . . . . . . . . . . . . . . . . . . . . . . . . . . . . . . . . . . . . . . . . . . . . . . 8
DE
AT
CH
Lagerung . . . . . . . . . . . . . . . . . . . . . . . . . . . . . . . . . . . . . . . . . . . . . . . . . . . . . . . . . . . . . 9
Fehlerbehebung . . . . . . . . . . . . . . . . . . . . . . . . . . . . . . . . . . . . . . . . . . . . . . . . . . . . . . . 9
Garantie und Service . . . . . . . . . . . . . . . . . . . . . . . . . . . . . . . . . . . . . . . . . . . . . . . . . . . 9
Entsorgung . . . . . . . . . . . . . . . . . . . . . . . . . . . . . . . . . . . . . . . . . . . . . . . . . . . . . . . . . . 10
Gerät entsorgen . . . . . . . . . . . . . . . . . . . . . . . . . . . . . . . . . . . . . . . . . . . . . . . . . . . . . . . . . . . . . . . . . . 10
Batterien/Akkus entsorgen . . . . . . . . . . . . . . . . . . . . . . . . . . . . . . . . . . . . . . . . . . . . . . . . . . . . . . . . . . 10
Importeur . . . . . . . . . . . . . . . . . . . . . . . . . . . . . . . . . . . . . . . . . . . . . . . . . . . . . . . . . . . 10
SHSS 12 B2
1
Page 5

AKKU-HAND- UND -BODEN-
DE
AT
STAUBSAUGER SHSS 12 B2
CH
Einleitung
Herzlichen Glückwunsch zum Kauf Ihres neuen
Gerätes.
Sie haben sich damit für ein hochwertiges Produkt
entschieden. Die Bedienungsanleitung ist Bestandteil dieses Produkts. Sie enthält wichtige Hinweise
für Sicherheit, Gebrauch und Entsorgung. Machen
Sie sich vor der Benutzung des Produkts mit allen
Bedien- und Sicherheitshinweisen vertraut. Benutzen
Sie das Produkt nur wie beschrieben und für die
angegebenen Einsatzbereiche. Händigen Sie alle
Unterlagen bei Weitergabe des Produkts an Dritte
mit aus.
Bestimmungsgemäßer
Gebrauch
Dieses Gerät dient ausschließlich dem Saugen von
trockenen Oberfl ächen bzw. trockenem Sauggut.
Dieses Gerät ist ausschließlich für die Benutzung
in privaten Haushalten bestimmt. Das Gerät darf
nicht dazu verwendet werden Menschen oder
Tiere abzusaugen. Jede andere Verwendung oder
Veränderung des Gerätes gilt als nicht bestimmungsgemäß und birgt erhebliche Unfallgefahren.
Der Hersteller haftet nicht für Schäden, die durch
nicht bestimmungsgemäßen Gebrauch oder falsche
Bedienung verursacht werden. Das Gerät ist nicht für
den gewerblichen Gebrauch bestimmt.
Lieferumfang
Handstaubsauger
Bürstendüse
Fugendüse
Verlängerungsstiel mit Bodendüse
Halterung (mit Ladebuchse)
Ladegerät
Bedienungsanleitung
Gerätebeschreibung
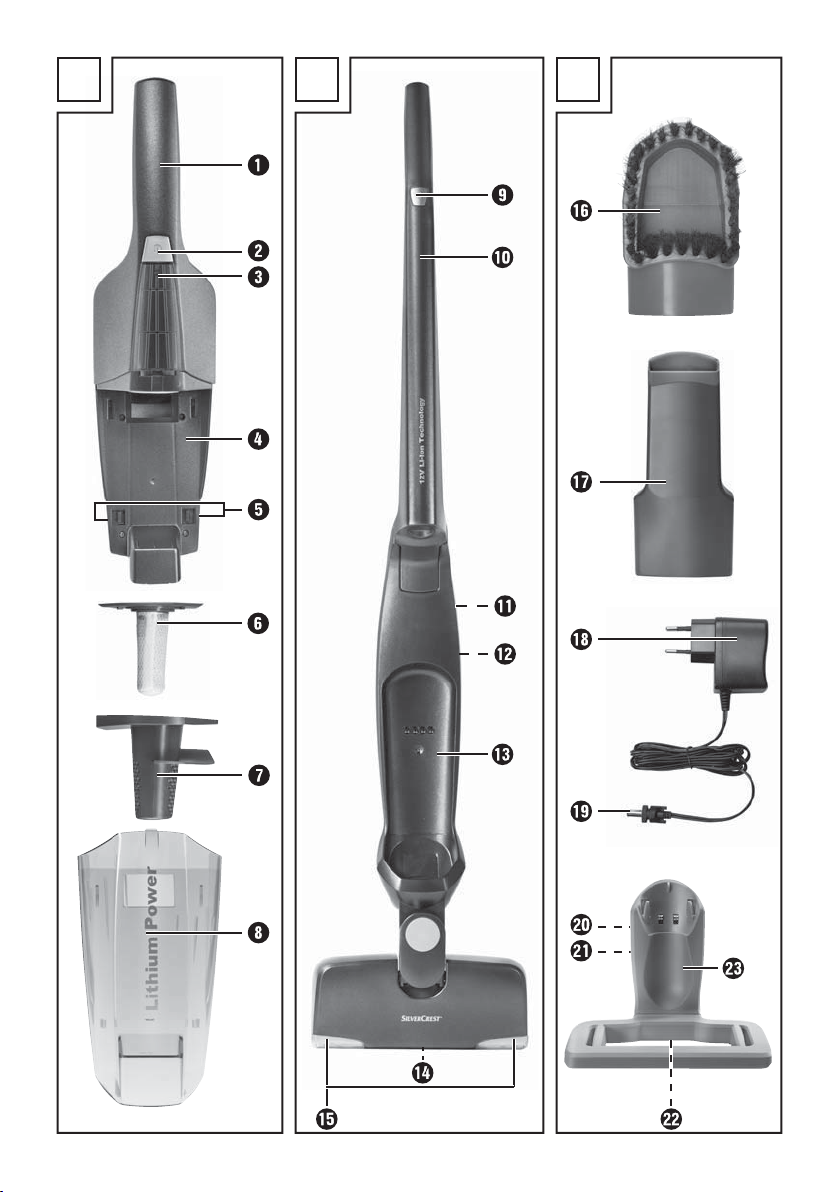
Abbildung A:
1 Griff Handteil
2 Ein-/Aus-Schalter
3 Ladekontrollleuchte
4 Handteil
5 Tasten
6 Staubfi lter
7 Grobfi lter
8 Schmutzbehälter
Abbildung B:
9 Ein-/Aus-Schalter
0 Griff
q Entriegelung „Griff “
w Entriegelung „Handteil“
e Handteilmulde
r Bürstenrolle
t LED - Beleuchtung
Abbildung C:
z Bürstendüse
u Fugendüse
i Ladegerät
o Hohlstecker Ladegerät
p Halterung Bürstendüse
a Halterung Fugendüse
s Ladebuchse
d Halterung (mit Ladebuchse)
Kontrollieren Sie direkt nach dem Auspacken den
Lieferumfang auf Vollständigkeit.
2
SHSS 12 B2
Page 6
Technische Daten
Ladegerät
Eingang: 100 - 240 V ~, 50 / 60 Hz,
300 mA max.
Ausgang: 13,5 V
Typenbezeichnung: SHSS 12 B2-1
Schutzklasse: II /
Bodendüse
Nennleistung: 5 W
Schutzklasse: III /
Eingangsspannung: 10,8 V 1800 mAh
500 mA
Gerät
Eingangsspannung/-strom: 13,5 V
Nennleistung: 75 W
Schutzklasse: III /
Akkus: Li-Ion (10,8 V) 1800 mAh
Akku-Pack: 3 Zellen zu je 3,6 V
Betriebszeit bei voller Akkuladung
(abhängig vom Bodenbelag): ca. 15 Min
Ladezeit bei leerem Akku: 5 - 6 Std.
500 mA
Sicherheitshinweise
GEFAHR - ELEKTRISCHER SCHLAG!
► Laden bzw. verwenden Sie dieses Gerät nicht im Freien.
► Den Handstaubsauger niemals gebrauchen, wenn Kabel, Stecker oder
Gehäuse beschädigt sind.
► Lassen Sie beschädigte Netzstecker oder Netzkabel sofort von autorisiertem
Fachpersonal austauschen, um Gefährdungen zu vermeiden.
► Lassen Sie Reparaturen nur von einer Fachwerkstatt durchführen. Öff nen Sie
unter keinen Umständen selbst das Gerät. Eingriff e, die nicht durch einen
Fachbetrieb vorgenommen wurden, können zu Verletzungen führen.
► Überzeugen Sie sich vor dem Laden des Gerätes, dass die in den techni-
schen Daten des Netzteils/Ladegeräts verzeichnete Spannung der Netzspannung entspricht.
► Fassen Sie das Netzteil/Ladegerät oder das Gerät nicht mit nassen oder
feuchten Händen an.
► Verwenden Sie das Netzteil/Ladegerät nicht mit einem Verlängerungskabel,
sondern verbinden Sie das Netzteil direkt mit einer Steckdose.
DE
AT
CH
SHSS 12 B2
3
Page 7

DE
AT
CH
WARNUNG! VERLETZUNGSGEFAHR!
► Wechseln Sie keine Zubehörteile aus, wenn das Gerät in Betrieb ist.
► Benutzen Sie den Handstaubsauger nicht zum Aufsaugen von Wasser oder
anderen Flüssigkeiten.
► Benutzen Sie den Handstaubsauger nicht zum Aufsaugen von spitzen Ge-
genständen oder Glasscherben.
► Niemals brennende Streichhölzer, glimmende Asche oder Zigarettenstummel
aufsaugen.
► Gebrauchen Sie den Handstaubsauger nicht zum Aufsaugen von che-
mischen Produkten, Steinstaub, Gips, Zement, oder anderen ähnlichen
Partikeln.
► Das Gerät ist nicht für entfl ammbare und explosive Stoff e oder chemische
und aggressive Flüssigkeiten geeignet.
► Lagern Sie das Gerät immer in geschlossenen Räumen. Um Unfälle zu
verhindern, bewahren Sie das Gerät nach Gebrauch an einem trockenen
Ort auf.
► Unter extremen Bedingungen können Leckagen an den Akkuzellen auftreten.
Bei Kontakt der Flüssigkeit mit Haut oder Augen ist die betreff ende Stelle
sofort mit sauberem Wasser aus- bzw. abzuspülen. Suchen Sie einen Arzt
auf.
► Dieses Gerät kann von Kindern ab 8 Jahren und darüber sowie von Perso-
nen mit verringerten physischen, sensorischen oder mentalen Fähigkeiten
oder Mangel an Erfahrung und Wissen benutzt werden, wenn sie beaufsichtigt oder bezüglich des sicheren Gebrauchs des Gerätes unterwiesen
wurden und die daraus resultierenden Gefahren verstehen. Kinder dürfen
nicht mit dem Gerät spielen. Reinigung und Benutzer-Wartung dürfen nicht
von Kindern ohne Beaufsichtigung durchgeführt werden.
4
SHSS 12 B2
Page 8

WARNUNG! VERLETZUNGSGEFAHR!
► Verwenden Sie nur Zubehörteile, die vom Hersteller empfohlen werden.
► Das Netzteil darf nicht für andere Zwecke benutzt werden.
► Fassen Sie immer den Netzstecker an, um das Gerät von der Stromversor-
gung zu trennen.
► Achten Sie unbedingt darauf, dass Sie den Handstaubsauger nicht neben
Heizkörpern, Backöfen oder anderen erhitzten Geräten oder Flächen
abstellen.
► Achten Sie immer darauf, dass die Lüftungsschlitze frei sind. Ein blockierter
Luftkreislauf kann zur Überhitzung und Beschädigung des Gerätes führen.
► Üben Sie besondere Sorgfalt aus, wenn Sie den Handstaubsauger auf
Treppen benutzen. Sturzgefahr!
► Dieses Produkt enthält wiederaufl adbare Akkus. Werfen Sie das Gerät
nicht ins Feuer und setzen Sie es nicht hohen Temperaturen aus. Es besteht
Explosionsgefahr!
► Nehmen Sie vor dem Reinigen der Bürstenrolle immer das Handteil aus
dem Stiel, um versehentliches Starten der Büstenrolle zu vermeiden.
ACHTUNG! SACHSCHADEN!
► Benutzen Sie den Handstaubsauger nicht ohne eingesetzten Staubfi lter.
► Benutzen Sie das Ladegerät nicht für ein anderes Produkt und versuchen
Sie nicht, dieses Gerät mittels eines anderen Ladegerätes aufzuladen. Verwenden Sie nur das mit diesem Gerät gelieferte Ladegerät.
► Laden Sie niemals nicht wiederaufl adbare Batterien auf!
DE
AT
CH
SHSS 12 B2
5
Page 9
Vor dem ersten Gebrauch
DE
AT
HINWEIS
CH
Das Gerät wird mit nicht geladenen Akkus
►
geliefert. Vor dem ersten Gebrauch des
Gerätes sind die Akkus zunächst für 6 Stunden
zu laden.
■ Entfernen Sie alle Verpackungsmaterialien und
Schutzaufkleber vom Gerät, insbesonders den
Schutzaufkleber an den Kontakten auf der
Rückseite des Handteils 4.
Gerät aufl aden
HINWEIS
Vergewissern Sie sich, dass das Gerät
►
ausgeschaltet ist, bevor Sie mit dem Laden
beginnen.
■ Um das Gerät aufzuladen, verbinden Sie das
Ladegerät i mit einer Netzsteckdose und stecken
Sie den Hohlstecker o in die Ladebuchse s an
der Halterung d. Führen Sie das Kabel durch
den Kabelkanal an der Ladebuchse s, so dass
die Halterung d nicht auf dem Kabel steht.
■ Stellen Sie den Stiel mit eingesetztem Handteil
4 auf die Halterung d.
Die rote Ladekontrollleuchte 3 leuchtet.
Wenn das Gerät aufgeladen ist, leuchtet die
Ladekontrollleuchte 3 grün.
Montage/Demontage
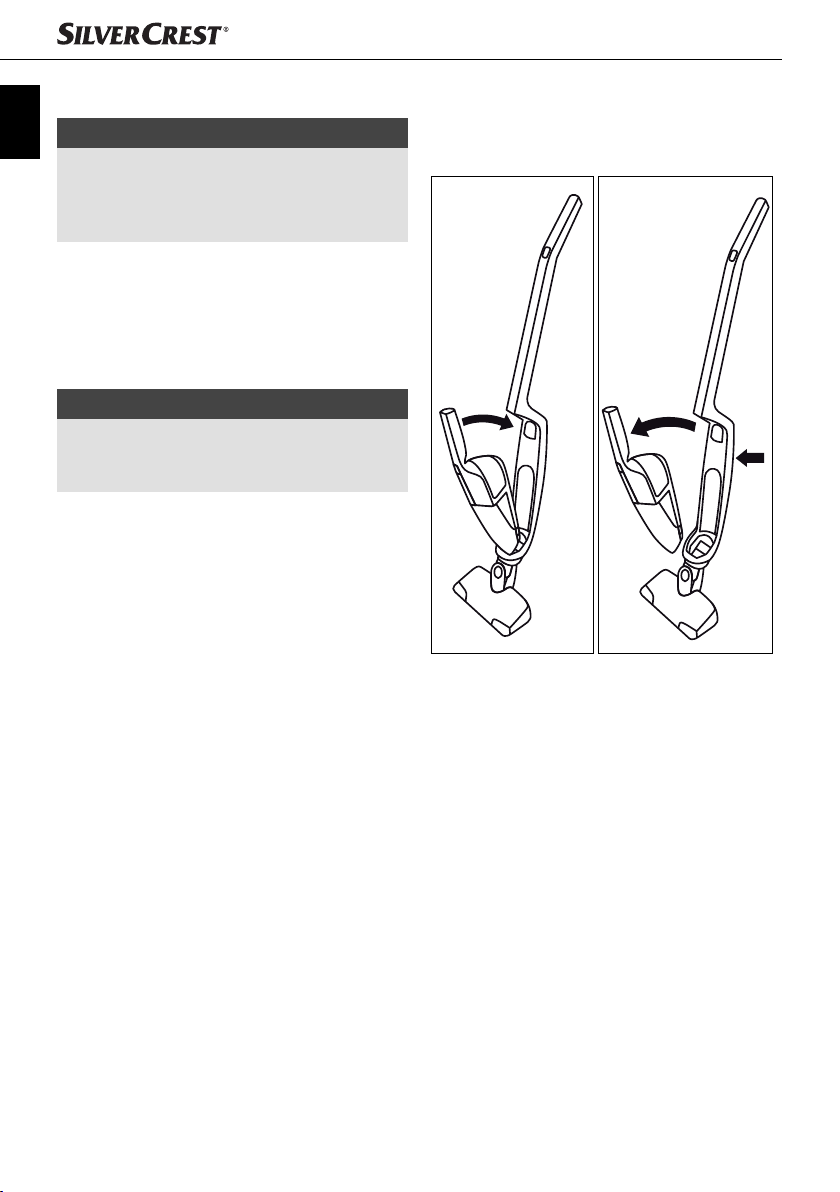
Handteil mit Stiel verbinden /
vom Stiel lösen
Abb. 1 Abb. 2
■ Um das Handteil 4 mit dem Stiel zu verbinden,
schieben Sie die Spitze des Handteils 4 in die
Aussparung der Handteilmulde e.
■ Drücken Sie dann den Griff 1 des Handteils 4
in den Stiel, so dass das Handteil 4 einrastet
und fest sitzt (Abb.1).
■ Um das Handteil 4 vom Stiel zu lösen, drücken
Sie die Entriegelung „Handteil“ w.
■ Ziehen Sie das Handteil 4 nach oben/vorne
aus der Handteilmulde e (Abb.2).
6
SHSS 12 B2
Page 10

Bedienen
ACHTUNG! SACHSCHADEN!
Die Saugöff nung muss jederzeit frei und darf
►
nicht verstopft sein. Verstopfungen führen zu
Überhitzung und Beschädigung des Motors.
► Saugen Sie keine hochfl origen Teppiche mit
der Bodendüse. Die Bürstenrolle r verfängt
sich im Teppich und blockiert!
HINWEIS
Achten Sie darauf, dass der Staubfi lter 6
►
und der Grobfi lter 7 immer eingesetzt sind,
bevor Sie das Gerät verwenden.
► Sobald die Saugleistung spürbar nachlässt,
verbinden Sie das Gerät wieder mit dem
Ladegerät i.
Handteil mit Stiel verwenden
1) Setzen Sie das Handteil 4 in die Handteilmulde e wie im Kapitel „Montage/Demontage“
beschrieben.
2) Klappen Sie den Griff 0 aus, indem Sie die
Entriegelung „Griff “ q drücken und gleichzeitig
den Griff 0 nach oben ziehen.
3) Schalten Sie das Gerät am Ein-/Aus-Schalter 9
ein. Die LED -Beleuchtung t an der Bodendüse leuchtet und die Bürstenrolle r dreht sich.
4) Fahren Sie mit der Bodendüse über die zu
saugenden Stellen. Halten Sie den Griff 0
dabei so, dass die Bodendüse plan über den
Boden gleitet.
5) Drücken Sie den Ein-/Aus-Schalter 9, wenn
Sie das Saugen beenden wollen. Die Bürstenrolle r stoppt und die LED - Beleuchtung t
erlischt.
Handteil verwenden
1) Lösen Sie das Handteil 4 aus der Handteilmulde e wie im Kapitel „Montage/Demontage“
beschrieben.
2) Setzen Sie, wenn gewünscht, die Fugendüse u
oder die Bürstendüse z auf.
3) Drücken Sie den Ein-/Aus-Schalter 2 und
saugen Sie die gewünschten Stellen.
4) Wenn Sie das Saugen beenden wollen, drücken
Sie noch einmal den Ein-/Aus-Schalter 2.
Reinigung und Pfl ege
WARNUNG! VERLETZUNGSGEFAHR!
► Ziehen Sie immer das Ladegerät i aus der
Netzsteckdose und lösen Sie den Hohlstecker o
aus der Ladebuchse s an der Halterung d,
bevor Sie die Halterung d reinigen.
► Nehmen Sie das Handteil 4 immer aus der
Handteilmulde e am Stiel, bevor Sie das
Handteil 4, den Stiel oder die Bürstenrolle r
reinigen.
Um beste Ergebnisse zu erzielen, leeren Sie den
Schmutzbehälter 8 und reinigen Sie den Staubfi lter 6 nach jedem Gebrauch.
ACHTUNG! SACHSCHADEN!
Verwenden Sie keine scheuernden oder
►
aggressiven Reinigungsmittel. Diese können
die Oberfl äche beschädigen!
HINWEIS
Die LED - Beleuchtung t ist wartungsfrei. Die
►
LEDs können nicht ausgewechselt werden!
DE
AT
CH
SHSS 12 B2
7
Page 11
Schmutzbehälter leeren
DE
1) Um den Schmutzbehälter 8 zu öff nen, nehmen
AT
CH
Sie das Handteil 4 aus der Handteilmulde e.
2) Drücken Sie gleichzeitig die beiden Tasten
und ziehen Sie gleichzeitig den Schmutzbehälter 8 nach oben.
Sie können diesen nun nach oben/vorne
abheben.
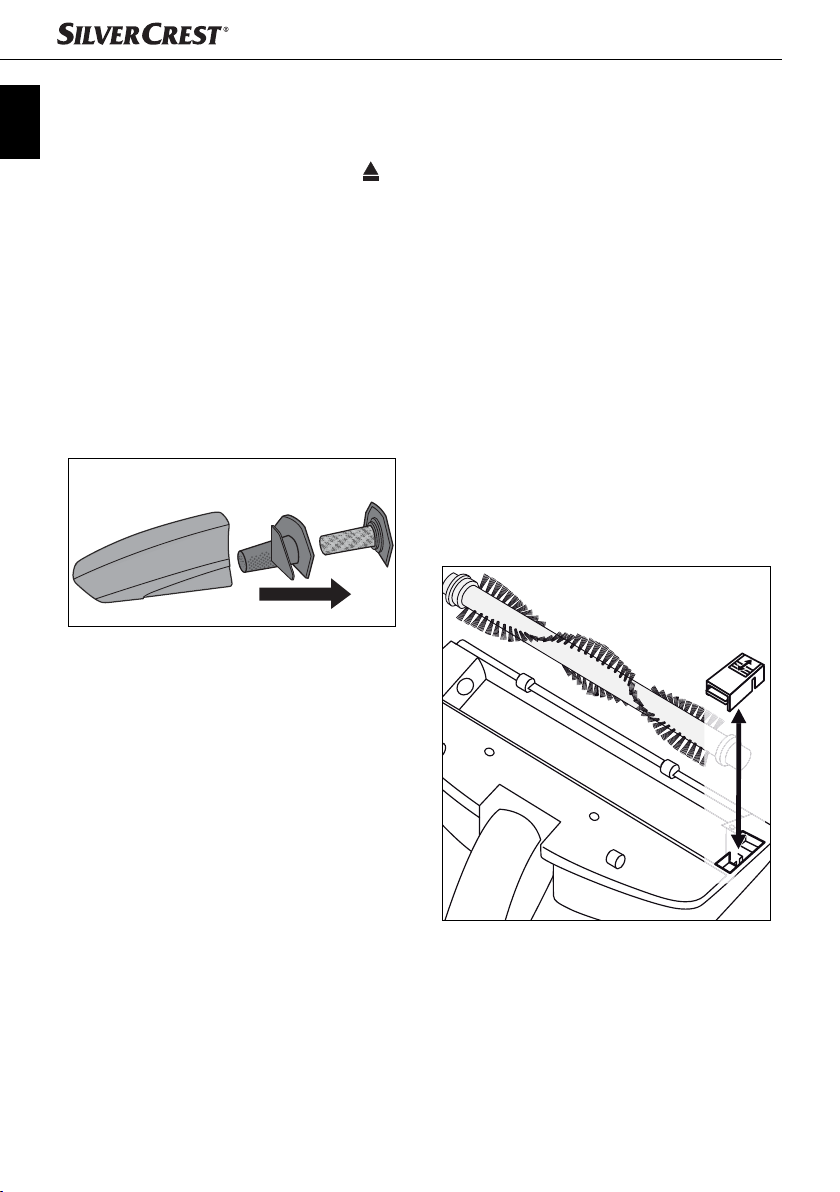
3) Entnehmen Sie den Staubfi lter 6, indem Sie
ihn mit den Fingern herausziehen. Spülen Sie
den Staubfi lter 6 in klarem Wasser aus und
lassen Sie ihn an der Luft trocknen. Benutzen
Sie keine heiße Luft, um den Staubfi lter 6 zu
trocknen.
4) Entnehmen Sie dann den Grobfi lter 7, indem
Sie auch diesen herausziehen.
Abb. 3
5) Entleeren Sie den Schmutzbehälter 8.
6) Setzen Sie erst den Grobfi lter 7 und dann
den trockenen Staubfi lter 6 wieder ein.
7) Setzen Sie den Schmutzbehälter 8 wieder ein,
indem Sie die Arretierung zuerst in die Aussparung am Handteil 4 schieben und dann den
vorderen Teil des Schmutzbehälters 8 kräftig
herunter drücken, so dass der Schmutzbehälter 8
einrastet und fest sitzt.
Bürstenrolle reinigen
An der Bürstenrolle r kann sich mit der Zeit
Schmutz, wie z.B. Haare, festsetzen. Um diesen
Schmutz zu entfernen können Sie die Bürstenrolle r
5
ausbauen (Abb. 4).
1) Drehen Sie die Bodendüse um.
2) Schieben Sie die Verriegelung an der Abdeckplatte nach hinten, so dass Sie die Abdeckplatte
abnehmen können.
3) Heben Sie die Bürstenrolle r raus.
4) Um die Bürstenrolle r wieder einzusetzen,
schieben Sie zuerst das breite Ende auf die
Antriebswelle, so dass die Bürstenrolle r dort
eingehakt ist.
5) Dann schieben Sie das andere Ende in die
Aufnahme, so dass die Bürstenrolle r grade
in der Bodendüse liegt.
6) Setzen Sie die Abdeckplatte wieder auf und
verriegeln Sie sie.
Gerät reinigen
Wischen Sie das Gerät mit einem feuchten Tuch
ab. Bei hartnäckigen Verschmutzungen geben Sie
ein mildes Spülmittel auf das Tuch. Achten Sie
darauf, dass das Gerät vor der erneuten Benutzung
wieder vollständig trocken ist.
8
Abb. 4
SHSS 12 B2
Page 12
Lagerung
■ Wenn Sie das Gerät nicht benutzen, stellen Sie
es auf die Halterung d.
■ Die Fugendüse u und die Bürstendüse z können
Sie auf die Rückseite der Halterung d auf die
Halterung Bürstendüse p und die Halterung
Fugendüse a stecken.
■ Bewahren Sie das Gerät an einem staubfreien
und trockenen Ort auf.
Fehlerbehebung
Das Gerät funktioniert nicht.
■ Der Akku ist nicht aufgeladen.
♦ Verbinden Sie das Gerät mit dem Ladegerät i.
■ Das Gerät ist defekt.
♦ Wenden Sie sich an den Kundendienst.
Das Gerät läuft, saugt aber kaum den
Schmutz auf.
■ Der Akku ist nicht ausreichend geladen.
♦ Verbinden Sie das Gerät mit dem Ladegerät i.
■ Der Schmutzbehälter 8 ist voll.
♦ Leeren Sie den Schmutzbehälter 8.
■ Der Staubfi lter 6 ist verstopft.
♦ Reinigen Sie den Staubfi lter 6.
Das Gerät lädt sich nicht auf.
■ Das Ladegerät i steckt nicht korrekt in der
Buchse/dem Netzstecker.
♦ Kontrollieren Sie die Anschlüsse des Ladegerä-
tes i.
■ Das Ladegerät i ist defekt.
♦ Wenden Sie sich an den Kundendienst.
Garantie und Service
Sie erhalten auf dieses Gerät 3 Jahre Garantie
ab Kaufdatum. Das Gerät wurde sorgfältig
produziert und vor Anlieferung gewissenhaft
geprüft. Bitte bewahren Sie den Kassenbon als
Nachweis für den Kauf auf. Bitte setzen Sie sich
im Garantiefall mit Ihrer Servicestelle telefonisch
in Verbindung. Nur so kann eine kostenlose
Einsendung Ihrer Ware gewährleistet werden.
Die Garantieleistung gilt nur für Material- oder
Fabrikationsfehler, nicht aber für Transportschäden,
Verschleißteile oder für Beschädigungen an
zerbrech lichen Teilen, z. B. Schalter oder Akkus.
Das Produkt ist lediglich für den privaten und nicht
für den gewerblichen Gebrauch bestimmt. Bei
missbräuchlicher und unsachgemäßer Behandlung,
Gewaltanwendung und bei Eingriff en, die nicht
von unserer autorisierten Service-Niederlassung
vorgenommen wurden, erlischt die Garantie. Ihre
gesetzlichen Rechte werden durch diese Garantie
nicht eingeschränkt.
Die Garantiezeit wird durch die Gewährleistung
nicht verlängert. Dies gilt auch für ersetzte und reparierte Teile. Eventuell schon beim Kauf vorhandene
Schäden und Mängel müssen sofort nach dem
Auspacken gemeldet werden, spätestens aber zwei
Tage nach Kaufdatum. Nach Ablauf der Garantiezeit anfallende Reparaturen sind kostenpfl ichtig.
Service Deutschland
Tel.: 0800 5435 111 (Kostenfrei aus dem
dt. Festnetz/Mobilfunknetz)
E-Mail: kompernass@lidl.de
IAN 100116
Service Österreich
Tel.: 0820 201 222 (0,15 EUR/Min.)
E-Mail: kompernass@lidl.at
IAN 100116
DE
AT
CH
SHSS 12 B2
Service Schweiz
Tel.: 0842 665566 (0,08 CHF/Min.,
Mobilfunk max. 0,40 CHF/Min.)
E-Mail: kompernass@lidl.ch
IAN 100116
Erreichbarkeit Hotline: Montag bis Freitag von
8:00 Uhr – 20:00 Uhr (MEZ)
9
Page 13
Entsorgung
DE
AT
Gerät entsorgen
CH
Werfen Sie das Gerät keines-
falls in den normalen Hausmüll.
Dieses Produkt unterliegt
der europäischen Richtlinie
2012/19/EU.
Entsorgen Sie das Gerät über einen zugelassenen
Entsorgungsbetrieb oder über Ihre kommunale
Entsorgungseinrichtung. Beachten Sie die aktuell
geltenden Vorschriften. Setzen Sie sich im Zweifelsfall mit Ihrer Entsorgungseinrichtung in Verbindung.
Batterien/Akkus entsorgen
Batterien/Akkus dürfen nicht
im Hausmüll entsorgt werden.
Jeder Verbraucher ist gesetzlich verpfl ichtet, Batterien /
Akkus bei einer Sammelstelle seiner Gemeinde /
seines Stadtteils oder im Handel abzugeben.
Diese Verpfl ichtung dient dazu, dass Batterien/Akkus einer umweltschonenden Entsorgung zugeführt
werden können. Geben Sie Batterien/Akkus nur im
entladenen Zustand zurück.
ACHTUNG! SACHSCHADEN!
Wenn Sie das Gerät öff nen und die Akkus
►
entsorgen ist das Gerät irreparabel beschädigt!
1) entladen Sie den Akku vollständig, bevor Sie
mit dem Ausbau des Akkus beginnen.
2) Nehmen Sie den Schmutzbehälter 8 ab.
3) Lösen Sie die 5 Schrauben auf der Rückseite
des Handteils 4 und nehmen Sie die beiden
Gehäusehälften auseinander.
4) Ziehen Sie den Motor aus der Gehäusehälfte.
5) Lösen Sie die beiden Schrauben an der
Plastikhalterung, die den blauen Akku hält und
entnehmen Sie die Plastikhalterung.
6) Knipsen Sie mit einer Zange die Adern, die zu
dem blauen Akku führen, einzeln und nacheinander durch. Achten Sie darauf, dass Sie die
blanken Leitungsenden nicht mit den Metallteilen der Zange kurzschließen.
7) Entnehmen Sie den Akku und entsorgen Sie
diesen umweltgerecht.
Die Verpackung besteht aus umweltfreundli-
chen Materialien, die Sie über die örtlichen
Recyclingstellen entsorgen können.
Importeur
KOMPERNASS HANDELS GMBH
BURGSTRASSE 21
44867 BOCHUM
GERMANY
www.kompernass.com
10
SHSS 12 B2
Page 14

Table des matières
Introduction . . . . . . . . . . . . . . . . . . . . . . . . . . . . . . . . . . . . . . . . . . . . . . . . . . . . . . . . . . 12
Usage conforme . . . . . . . . . . . . . . . . . . . . . . . . . . . . . . . . . . . . . . . . . . . . . . . . . . . . . . 12
Matériel livré . . . . . . . . . . . . . . . . . . . . . . . . . . . . . . . . . . . . . . . . . . . . . . . . . . . . . . . . . 12
Description de l'appareil . . . . . . . . . . . . . . . . . . . . . . . . . . . . . . . . . . . . . . . . . . . . . . . 12
Caractéristiques techniques . . . . . . . . . . . . . . . . . . . . . . . . . . . . . . . . . . . . . . . . . . . . . 13
Consignes de sécurité . . . . . . . . . . . . . . . . . . . . . . . . . . . . . . . . . . . . . . . . . . . . . . . . . . 13
Avant la première utilisation . . . . . . . . . . . . . . . . . . . . . . . . . . . . . . . . . . . . . . . . . . . . 16
Charger l'appareil . . . . . . . . . . . . . . . . . . . . . . . . . . . . . . . . . . . . . . . . . . . . . . . . . . . . 16
Montage/démontage. . . . . . . . . . . . . . . . . . . . . . . . . . . . . . . . . . . . . . . . . . . . . . . . . . 16
Assembler la partie portable avec le manche / la démonter du manche . . . . . . . . . . . . . . . . . . . . . . 16
Utilisation . . . . . . . . . . . . . . . . . . . . . . . . . . . . . . . . . . . . . . . . . . . . . . . . . . . . . . . . . . . 17
Utilisation de la partie portable avec le manche . . . . . . . . . . . . . . . . . . . . . . . . . . . . . . . . . . . . . . . . . 17
Utilisation de la partie portable . . . . . . . . . . . . . . . . . . . . . . . . . . . . . . . . . . . . . . . . . . . . . . . . . . . . . . 17
Nettoyage et entretien . . . . . . . . . . . . . . . . . . . . . . . . . . . . . . . . . . . . . . . . . . . . . . . . . 17
Vider le bac à poussière . . . . . . . . . . . . . . . . . . . . . . . . . . . . . . . . . . . . . . . . . . . . . . . . . . . . . . . . . . . . 18
Nettoyage de l'appareil . . . . . . . . . . . . . . . . . . . . . . . . . . . . . . . . . . . . . . . . . . . . . . . . . . . . . . . . . . . . 18
Nettoyage du rouleau-brosse . . . . . . . . . . . . . . . . . . . . . . . . . . . . . . . . . . . . . . . . . . . . . . . . . . . . . . . . 18
FR
CH
Entreposage . . . . . . . . . . . . . . . . . . . . . . . . . . . . . . . . . . . . . . . . . . . . . . . . . . . . . . . . . 19
Dépannage . . . . . . . . . . . . . . . . . . . . . . . . . . . . . . . . . . . . . . . . . . . . . . . . . . . . . . . . . . 19
Garantie et service . . . . . . . . . . . . . . . . . . . . . . . . . . . . . . . . . . . . . . . . . . . . . . . . . . . . 19
Mise au rebut . . . . . . . . . . . . . . . . . . . . . . . . . . . . . . . . . . . . . . . . . . . . . . . . . . . . . . . . 20
Mise au rebut de l'appareil . . . . . . . . . . . . . . . . . . . . . . . . . . . . . . . . . . . . . . . . . . . . . . . . . . . . . . . . . 20
Mise au rebut des piles/accus . . . . . . . . . . . . . . . . . . . . . . . . . . . . . . . . . . . . . . . . . . . . . . . . . . . . . . . 20
Importateur . . . . . . . . . . . . . . . . . . . . . . . . . . . . . . . . . . . . . . . . . . . . . . . . . . . . . . . . . . 20
SHSS 12 B2
11
Page 15

ASPIRATEUR SANS FIL
POLYVALENT SHSS 12 B2
Introduction
FR
Toutes nos félicitations pour l'achat de votre nouvel
CH
appareil.
Ainsi, vous venez d'opter pour un produit de grande
qualité. Le mode d'emploi fait partie de ce produit.
Il contient des remarques importantes concernant la
sécurité, l'usage et la mise au rebut. Avant d'utiliser
le produit, veuillez vous familiariser avec toutes les
consignes d'utilisation et de sécurité. N'utilisez le
produit que conformément aux consignes et pour
les domaines d'utilisation prévus. Si vous cédez le
produit à un tiers, remettez-lui également tous les
documents.
Usage conforme
Cet appareil sert exclusivement à aspirer les surfaces
sèches ou les poussières sèches. Cet appareil est
exclusivement réservé à un usage domestique.
Cet appareil n'est pas prévu pour aspirer sur des
personnes ou des animaux. Toute autre utilisation
ou modifi cation de l'appareil est considérée comme
étant non conforme et s'accompagne de risques
d'accident non négligeables. Le fabricant n'endosse
aucune responsabilité pour l'utilisation non conforme
ou incorrecte de l'appareil.
L'appareil n'est pas destiné à un usage commercial.
Matériel livré
Aspirateur à main
Buse à brosse
Suceur étroit
Manche de prolongement avec buse de sol
Support (avec douille de chargement)
Chargeur
Mode d'emploi
Description de l'appareil
Figure A:
1 Poignée partie portable
2 Interrupteur Marche/Arrêt
3 Voyant de contrôle de charge
4 Partie portable
5 Touches
6 Filtre à poussière
7 Filtre grossier
8 Bac à poussière
Figure B:
9 Interrupteur Marche/Arrêt
0 Poignée
q Déverrouillage "Poignée"
w Déverrouillage "Partie portable"
e Cavité pour la partie portable
r Brosse-rouleau
t Eclairage à LED
Figure C:
z Buse à brosse
u Suceur étroit
i Chargeur
o Fiche creuse chargeur
p Support pour buse à brosse
a Support pour suceur étroit
s Douille de chargement
d Support (avec douille de chargement)
Contrôlez directement après déballage si toutes les
pièces sont présentes.
12
SHSS 12 B2
Page 16

Caractéristiques techniques
Chargeur
Entrée : 100 - 240 V ~, 50 / 60 Hz, 300 mA max
Sortie : 13,5 V
Désignation du type: SHSS 12 B2-1
Classe de protection: II /
Buse de sol
Puissance nominale : 5 W
Classe de protection: III /
Tension d’entrée: 10,8 V 1800 mAh
500 mA
Appareil
Tension/courant d'entrée : 13,5 V
Puissance nominale : 75 W
Classe de protection: III /
Accus: Li-Ion (10,8 V) 1800 mAh
Pack d'accumulateurs :
3 cellules à respectivement 3,6 V
Durée de service avec des accus entièrement chargés
(en fonction du revêtement de sol): env. 15 min.
Durée de chargement en cas d'accu vide : 5 - 6 heures
500 mA
Consignes de sécurité
DANGER - RISQUE D'ÉLECTROCUTION !
► Ne pas charger ou utiliser cet appareil à l'extérieur.
► Ne jamais utiliser l'aspirateur à main avec le cordon, la fi che ou le boîtier
endommagé.
► Faites immédiatement remplacer une fi che secteur ou un câble d'alimentation
endommagé(s) par des spécialisés agréés, pour éviter tous risques.
► Confi ez les réparations uniquement à un atelier spécialisé. L'appareil ne
doit être ouvert en aucune circonstance. Toutes les interventions qui ne sont
pas réalisées par une entreprise spécialisée peuvent entraîner des blessures.
► Avant d'allumer l'appareil, assurez-vous que la tension indiquée dans les
caractéristiques techniques de l'appareil correspond à la tension du secteur.
► Ne manipulez pas le bloc d'alimentation ou chargeur ou bien l'appareil les
mains humides ou mouillées.
► N'utilisez pas le bloc d'alimentation ou chargeur avec un cordon de rallonge
mais branchez le bloc d'alimentation directement dans une prise murale.
FR
CH
SHSS 12 B2
13
Page 17

FR
CH
AVERTISSEMENT ! RISQUE DE BLESSURES!
► Ne remplacez pas d'accessoires alors que l'appareil est en service.
► N'utilisez pas l'aspirateur à main pour aspirer de l'eau ou d'autres liquides.
► N'utilisez pas l'aspirateur à main pour aspirer des objets pointus ou des
tessons de verre.
► N'aspirez jamais des allumettes allumées, de la cendre incandescente ou
des mégots de cigarette.
► N'utilisez pas l'aspirateur à main pour aspirer des produits chimiques, de la
poussière de pierre, du plâtre, du ciment ou toute autre particule analogue.
► L'appareil n'est pas adapté pour des substances infl ammables et explosives
ou des liquides chimiques et agressifs.
► Entreposez toujours l'appareil dans des locaux fermés. Pour éviter les acci-
dents, conservez l'appareil dans un endroit sec après utilisation.
► Si l'appareil est soumis à des contraintes extrêmes, des fuites peuvent se
produire au niveau des cellules de l'accumulateur. En cas de contact du
liquide avec la peau ou les yeux, nettoyez immédiatement la zone concernée
à l'eau claire et rincez abondamment. Consultez ensuite un médecin.
► Cet appareil peut être utilisé par des enfants de plus de 8 ans ainsi que
par des personnes ayant des capacités physiques, mentales ou sensorielles
réduites ou qui n'ont pas l'expérience et les connaissances nécessaires, s'ils
sont sous la surveillance d'une personne responsable de leur sécurité ou
s'ils ont reçu des instructions concernant l'utilisation de l'appareil et qu'ils
comprennent les dangers pouvant en résulter. Ne pas laisser les enfants
jouer avec l'appareil. Il est interdit aux enfants de nettoyer ou d'entretenir
l'appareil sans surveillance.
14
SHSS 12 B2
Page 18

AVERTISSEMENT ! RISQUE DE BLESSURES!
► Utilisez uniquement les accessoires recommandés par le fabricant.
► Le bloc d'alimentation secteur ne doit pas être utilisé à d'autres fi ns.
► Saisissez toujours la fi che secteur pour débrancher l'appareil de l'alimenta-
tion électrique.
► Faites attention à ne pas poser l'aspirateur à main contre des chauff ages,
des fours ou d'autres appareils ou surfaces brûlants.
► Veillez à ce que les fentes d'aération soient toujours dégagées. Lorsque
la circulation de l'air est gênée, l'appareil risque de surchauff er et d'être
endommagé.
► Soyez particulièrement prudent en utilisant l'aspirateur à main dans des
escaliers.
► Ce produit contient des accus rechargeables. Ne jetez pas l'appareil dans
le feu et ne l'exposez pas à des températures élevées. Risque d'explosion!
► Avant le nettoyage du rouleau-brosse, retirez toujours la partie portable du
manche afi n d'éviter une mise en marche involontaire du rouleau-brosse.
ATTENTION! RISQUE DE DÉGÂTS MATÉRIELS!
► N'utilisez pas l'aspirateur à main sans avoir mis en place le fi ltre à poussière.
► N'utilisez pas le chargeur pour un autre produit et n'essayez pas de charger
cet appareil à l'aide d'un autre chargeur. Utilisez exclusivement le chargeur
fourni avec cet appareil.
► N'essayez jamais de recharger des piles non rechargeables !
FR
CH
SHSS 12 B2
15
Page 19

Avant la première utilisation
Montage/démontage
REMARQUE
L'appareil est livré avec des accus non chargés.
►
FR
CH
Avant la première utilisation de l'appareil, les
accus doivent être préalablement chargés
pendant 6 heures.
■ Enlever tout le matériel d'emballage, les fi lms et
les autocollants.
Charger l'appareil
REMARQUE
Assurez-vous que l'appareil est arrêté avant
►
de commencer le chargement.
■ Pour charger l'appareil, branchez le chargeur i
dans une prise de courant et branchez la fi che
creuse o dans la douille de chargement s
sur le support d. Guidez le câble au travers
du canal pour câble sur la douille de chargement s, de manière à ce que le support d
ne se trouve pas sur le câble.
■ Placez-le dans le manche avec la partie por-
table 4 insérée sur le support d.
Le voyant de contrôle rouge 3 s'allume.
Lorsque l'appareil est chargé, le voyant de
contrôle 3 est vert.
Assembler la partie portable avec le
manche / la démonter du manche
Fig. 1 Fig. 2
■ Pour assembler la partie portable 4 avec le
manche, glissez la pointe de la partie portable 4
dans l'évidement de la cavité pour partie portable e.
■ Appuyez ensuite la poignée 1 de la partie
portable 4 dans le manche de manière à ce
que la partie portable 4 s'enclenche et soit
bien serrée (fi g. 1).
■ Pour détacher la partie portable 4 du manche,
appuyez sur le déverrouillage "Partie portable" w.
■ Tirez la partie portable 4 vers le haut/l'avant
de la cavité pour partie portable e (fi g. 2).
16
SHSS 12 B2
Page 20

Utilisation
ATTENTION! RISQUE DE DÉGÂTS
MATÉRIELS!
►
L'ouverture d'aspiration doit être toujours
dégagée et ne pas être bouchée. Un aspirateur bouché surchauff e, ce qui endommage
le moteur.
► N'aspirez pas de tapis à poils longs avec la
buse de sol. Le rouleau-brosse r accroche
dans le tapis et se bloque !
Utilisation de la partie portable
1) Sortez la partie portable 4 de la cavité pour
partie portable e comme décrit dans le chapitre
"Montage/démontage".
2) Si vous le souhaitez, montez le suceur étroit u
ou la buse à brosse z.
3) Appuyez sur l'interrupteur Marche/Arrêt 2 et
aspirez les endroits souhaités.
4) Si vous voulez arrêter d'aspirer, appuyez à
nouveau sur l'interrupteur Marche/Arrêt 2.
FR
CH
REMARQUE
Assurez-vous que le fi ltre à poussière 6 et le
►
fi ltre grossier 7 soient toujours correctement
placés avant d'utiliser l'appareil.
► Dès que la puissance d'aspiration faiblit
sensiblement, branchez à nouveau l'appareil
au chargeur i.
Utilisation de la partie portable avec
le manche
1) Placez la partie portable 4 dans la cavité pour
partie portable e comme décrit dans le
chapitre "Montage/démontage".
2) Basculez la poignée 0 en appuyant sur le
déverrouillage "Poignée" q et en tirant parallèlement la poignée 0 vers le haut.
3) Mettez en marche l'appareil avec l'interrupteur
Marche/Arrêt 9. L'éclairage à LED t s'allume
sur la buse de sol et le rouleau-brosse r tourne.
4) Passez avec la buse de sol sur les endroits à
aspirer. Tenez la poignée 0 de manière à ce
que la buse de sol glisse de manière plane sur
le sol.
5) Appuyez sur l'interrupteur Marche/Arrêt 9
lorsque vous voulez arrêter d'aspirer.
Le rouleau-brosse r s'arrête et l'éclairage à
LED t s'éteint.
Nettoyage et entretien
AVERTISSEMENT !
RISQUE DE BLESSURES!
► Débranchez toujours le chargeur i de la prise
de courant et retirez la fi che creuse o de la
douille de chargement s sur le support d,
avant de nettoyer le support d.
► Retirez toujours la partie portable 4 de la
cavité pour partie portable e sur le manche
avant de nettoyer la partie portable 4, le
manche ou le rouleau-brosse r.
Pour obtenir de meilleurs résultats, videz le bac
à déchets 8 et nettoyez le fi ltre à poussière 6
après chaque utilisation.
ATTENTION! RISQUE DE DÉGÂTS
MATÉRIELS!
N'utilisez pas de produits nettoyants abrasifs
►
ou agressifs. Ceux-ci peuvent en eff et endommager la surface!
REMARQUE
L'éclairage à LED t ne nécessite aucune
►
maintenance. Les LED ne peuvent pas être
remplacées !
SHSS 12 B2
17
Page 21

Vider le bac à poussière
1) Pour ouvrir le bac à poussière 8, retirez la
partie portable 4 de la cavité pour partie
FR
CH
portable e.
2) Appuyez en même temps sur les deux bou-
5 et tirez en même temps le bac à
tons
poussière 8 vers le haut.
Vous pouvez maintenant le soulever vers le
haut/l'avant.
3) Retirez le fi ltre à poussière 6 en l'extrayant
avec les doigts. Rincez le fi ltre à poussière 6
à l'eau claire et laissez-le sécher à l'air libre.
N'utilisez pas d'air chaud pour sécher le fi ltre
à poussière 6.
4) Retirez ensuite le fi ltre grossier 7 en l'extrayant
également.
Fig. 3
5) Videz le bac à poussière 8.
6) Remettez d'abord en place le fi ltre grossier 7
puis le fi ltre à poussière sec 6.
7) Remettez le bac à poussière 8 en place en
glissant d'abord le joint en plastique dans
l'évidement sur la partie portable 4 puis en
appuyant fortement vers le bas sur la partie
avant du bac à poussière 8 de manière à ce
que le bac à poussière 8 s'enclenche et soit
fi x é .
Nettoyage de l'appareil
Essuyez l'appareil avec un chiff on humide. En cas
de taches tenaces, mettez du produit vaisselle doux
sur le chiff on. Assurez-vous que l'appareil soit
entièrement sec avant de le réutiliser.
Nettoyage du rouleau-brosse
Au fi l du temps, de la saleté comme des cheveux
par ex. peuvent s'accrocher au rouleau-brosse r.
Pour éliminer cette saleté, vous pouvez démonter
le rouleau-brosse r (fi g. 4).
1) Retournez la buse de sol.
2) Glissez le verrouillage sur le cache vers
l'arrière de manière à pouvoir retirer le cache.
3) Retirez le rouleau-brosse r par le haut.
4) Pour remettre en place le rouleau-brosse r,
glissez tout d'abord l'extrémité large sur l'arbre
d'entraînement de manière à ce que le rouleaubrosse r s'y enclenche.
5) Glissez ensuite l'autre extrémité dans le logement
de manière à ce que le rouleau-brosse r se
trouve droit dans la buse de sol.
6) Remettez le cache en place et verrouillez-le.
Fig. 4
18
SHSS 12 B2
Page 22

Entreposage
■ Lorsque vous n'utilisez pas l'appareil, placez-le
sur le support d.
■ Vous pouvez ranger le suceur étroit u et la
buse à brosse z au dos du support d sur le
support de la buse à brosse p et sur le support
du suceur étroit a.
■ Conservez l'appareil dans un endroit sec et
exempt de poussières.
Dépannage
L'appareil ne fonctionne pas.
■ L'accu n'est pas chargé.
♦ Branchez l'appareil au chargeur i.
■ L'appareil est défectueux.
♦ Adressez-vous au service clientèle.
L'appareil est en marche mais aspire
à peine la saleté.
■ L'accu n'est pas suffi samment chargé.
♦ Branchez l'appareil au chargeur i.
■ Le bac à poussière 8 est plein.
♦ Videz le bac à poussière 8.
■ Le fi ltre à poussière 6 est obstrué.
♦ Nettoyez le fi ltre à poussière 6.
L'appareil ne se charge pas.
■ Le chargeur i n'est pas correctement branché
dans la douille/la fi che secteur.
♦ Contrôlez les raccords du chargeur i.
■ Le chargeur i est défectueux.
♦ Adressez-vous au service clientèle.
Garantie et service
Cet appareil est garanti 3 ans à partir de la date
d'achat. L'appareil a été fabriqué avec soin et
consciencieusement contrôlé avant sa livraison.
Veuillez conserver le ticket de caisse en guise de
preuve d'achat. Dans le cas où la garantie s'applique, veuillez appeler le service après-vente
compétent. Cette condition doit être respectée
pour assurer l'expédition gratuite de votre
marchandise.
La prestation de garantie s'applique uniquement aux
vices de matériau ou de fabrication, et non aux
dégâts de transport, aux pièces d'usure ou aux
dégâts subis par des pièces fragiles telles que les
commutateurs ou les batteries. Le produit est destiné
uniquement à un usage privé et ne répond pas à
un usage professionnel. La garantie est annulée
en cas de manipulation incorrecte et inappropriée,
d'usage de la force et en cas d'intervention non
réalisée par notre centre de service après-vente
agréé. Vos droits légaux ne sont pas restreints par
la présente garantie.
L'exercice de la garantie ne prolonge pas la période
de garantie. Cette disposition s'applique également
aux pièces remplacées ou réparées. Signalez sans
attendre toute anomalie éventuelle sur le matériel au
moment de l'achat, au plus tard deux jours après la
date d'achat. Toute réparation fera l'objet d'une
facturation après expiration de la période de
garantie.
Service France
Tel.: 0800 919270
E-Mail: kompernass@lidl.fr
IAN 100116
Service Suisse
Tel.: 0842 665566 (0,08 CHF/Min.,
mobile max. 0,40 CHF/Min.)
E-Mail: kompernass@lidl.ch
IAN 100116
Heures de service de notre hotline :
du lundi au vendredi de 8 h à 20 h (HEC)
FR
CH
SHSS 12 B2
19
Page 23

Mise au rebut
Mise au rebut de l'appareil
L'appareil ne doit en aucun cas
FR
CH
Éliminez l'appareil par l'intermédiaire d'une entreprise de traitement des déchets autorisée ou via le
service de recyclage de votre commune. Respectez
la réglementation en vigueur. En cas de doute,
veuillez contacter votre centre de recyclage.
Mise au rebut des piles/accus
Chaque consommateur est légalement tenu de
rapporter les piles/accus à un point de collecte de
sa commune/son quartier ou dans le commerce.
Cette obligation a pour objectif d'assurer le traitement écologique des piles et accus. Ne jetez que
des piles/accus à l'état déchargé.
ATTENTION! RISQUE DE DÉGÂTS
MATÉRIELS!
Si vous ouvrez l'appareil et éliminez les
►
accus, l'appareil est irrémédiablement
endommagé !
1) Déchargez entièrement l'accumulateur avant de
commencer le démontage de l'accumulateur.
2) Retirez le bac à poussière 8.
3) Desserrez les 5 vis au dos de la partie portable 4 et séparez les deux moitiés du boîtier.
4) Sortez le moteur de la moitié du boîtier.
5) Desserrez les deux vis du support en plastique
qui maintient l'accu bleu et retirez le support
plastique.
6) Perforez avec une pince les câbles qui mènent
à l'accumulateur bleu, l'un après l'autre. Veillez
à éviter tout court-circuitage entre les extrémités
de la conduite dénudées et les pièces métalliques de la pince.
être mis aux ordures ménagères normales. Ce produit
est assujetti à la directive
européenne 2012/19/EU.
Il est interdit de jeter les
piles/accus aux ordures
ménagères.
7) Retirez l'accu et éliminez-le en respectant
l'environnement.
L'emballage est réalisé à l'aide de
matériaux écologiques qu'il est
possible d'éliminer auprès de centres
de recyclage proches de chez vous.
Importateur
KOMPERNASS HANDELS GMBH
BURGSTRASSE 21
44867 BOCHUM
GERMANY
www.kompernass.com
20
SHSS 12 B2
Page 24

Indice
Introduzione . . . . . . . . . . . . . . . . . . . . . . . . . . . . . . . . . . . . . . . . . . . . . . . . . . . . . . . . . 22
Uso conforme . . . . . . . . . . . . . . . . . . . . . . . . . . . . . . . . . . . . . . . . . . . . . . . . . . . . . . . . 22
Volume della fornitura . . . . . . . . . . . . . . . . . . . . . . . . . . . . . . . . . . . . . . . . . . . . . . . . . 22
Descrizione dell'apparecchio . . . . . . . . . . . . . . . . . . . . . . . . . . . . . . . . . . . . . . . . . . . . 22
Dati tecnici . . . . . . . . . . . . . . . . . . . . . . . . . . . . . . . . . . . . . . . . . . . . . . . . . . . . . . . . . . . 23
Indicazioni relative alla sicurezza . . . . . . . . . . . . . . . . . . . . . . . . . . . . . . . . . . . . . . . . 23
Prima del primo impiego . . . . . . . . . . . . . . . . . . . . . . . . . . . . . . . . . . . . . . . . . . . . . . . 26
Caricamento dell'apparecchio . . . . . . . . . . . . . . . . . . . . . . . . . . . . . . . . . . . . . . . . . . . 26
Montaggio/Smontaggio . . . . . . . . . . . . . . . . . . . . . . . . . . . . . . . . . . . . . . . . . . . . . . . 26
Collegamento della parte manuale al manico / distacco della parte manuale dal manico . . . . . . . . 26
Uso . . . . . . . . . . . . . . . . . . . . . . . . . . . . . . . . . . . . . . . . . . . . . . . . . . . . . . . . . . . . . . . . . 27
Utilizzo della parte manuale con il manico . . . . . . . . . . . . . . . . . . . . . . . . . . . . . . . . . . . . . . . . . . . . . 27
Utilizzo della parte manuale . . . . . . . . . . . . . . . . . . . . . . . . . . . . . . . . . . . . . . . . . . . . . . . . . . . . . . . . 27
Pulizia e manutenzione . . . . . . . . . . . . . . . . . . . . . . . . . . . . . . . . . . . . . . . . . . . . . . . . 27
Svuotamento del contenitore di raccolta dello sporco . . . . . . . . . . . . . . . . . . . . . . . . . . . . . . . . . . . . . 28
Pulizia dell'apparecchio . . . . . . . . . . . . . . . . . . . . . . . . . . . . . . . . . . . . . . . . . . . . . . . . . . . . . . . . . . . . 28
Pulizia del rullo a spazzola . . . . . . . . . . . . . . . . . . . . . . . . . . . . . . . . . . . . . . . . . . . . . . . . . . . . . . . . . 28
IT
CH
Conservazione . . . . . . . . . . . . . . . . . . . . . . . . . . . . . . . . . . . . . . . . . . . . . . . . . . . . . . . 29
Eliminazione dei guasti . . . . . . . . . . . . . . . . . . . . . . . . . . . . . . . . . . . . . . . . . . . . . . . . 29
Garanzia e assistenza . . . . . . . . . . . . . . . . . . . . . . . . . . . . . . . . . . . . . . . . . . . . . . . . . 29
Smaltimento . . . . . . . . . . . . . . . . . . . . . . . . . . . . . . . . . . . . . . . . . . . . . . . . . . . . . . . . . 30
Smaltimento dell'apparecchio . . . . . . . . . . . . . . . . . . . . . . . . . . . . . . . . . . . . . . . . . . . . . . . . . . . . . . . 30
Smaltimento batterie/pile . . . . . . . . . . . . . . . . . . . . . . . . . . . . . . . . . . . . . . . . . . . . . . . . . . . . . . . . . . . 30
Importatore. . . . . . . . . . . . . . . . . . . . . . . . . . . . . . . . . . . . . . . . . . . . . . . . . . . . . . . . . . 30
SHSS 12 B2
21
Page 25

ASPIRAPOLVERE RICARICABILE
SHSS 12 B2
Introduzione
Congratulazioni per l'acquisto del Suo nuovo apparecchio.
È stato scelto un prodotto di alta qualità. Il manuale
IT
di istruzioni è parte integrante del presente prodotto.
CH
Esso contiene importanti indicazioni per la sicurezza,
l'uso e lo smaltimento. Prima di utilizzare il prodotto,
familiarizzarsi con tutte le indicazioni relative ai
comandi e alla sicurezza. Utilizzare l'apparecchio
solo come descritto e per i campi d'impiego indicati.
In caso di cessione del prodotto a terze persone,
consegnare anche tutta la relativa documentazione.
Uso conforme
Questo apparecchio serve esclusivamente ad
aspirare materiale asciutto da superfi ci asciutte.
Questo apparecchio è destinato esclusivamente
all'uso in ambienti domestici. Non utilizzare l'apparecchio su animali o persone. Qualunque altro
impiego e qualunque modifi ca dell'apparecchio
è da considerarsi non conforme alla destinazione
e comporta il rischio di infortuni. La casa produttrice non è responsabile per i danni causati da un
impiego non conforme alle regole o da un uso non
corretto.
L'apparecchio non è destinato all'uso commerciale.
Volume della fornitura
Aspirapolvere portatile
Bocchetta spazzola
Bocchetta per giunti
Manico di prolunga con bocchetta per pavimento
Supporto (con presa di caricamento)
Caricatore
Istruzioni per l'uso
Descrizione dell'apparecchio
Figura A:
1 Impugnatura parte manuale
2 Interruttore ON/OFF
3 Spia di controllo della carica
4 Parte manuale
5 Tasti
6 Filtro della polvere
7 Filtro a maglie grosse
8 Contenitore di raccolta dello sporco
Figura B:
9 Interruttore ON/OFF
0 Impugnatura
q Sblocco "Impugnatura"
w Sblocco "Parte manuale"
e Incavo parte manuale
r Rullo a spazzola
t Illuminazione LED
Figura C:
z Bocchetta spazzola
u Bocchetta per giunti
i Caricatore
o Spina femmina caricatore
p Supporto bocchetta spazzola
a Supporto bocchetta per giunti
s Presa di caricamento
d Supporto (con presa di caricamento)
Subito dopo il disimballaggio, controllare l'integrità
della fornitura.
22
SHSS 12 B2
Page 26

Dati tecnici
Caricatore
Ingresso: 100 - 240 V ~, 50 / 60 Hz,
300 mA max
Uscita: 13,5 V
Nome del modello: SHSS 12 B2-1
Classe di protezione: II /
Bocchetta per pavimenti
Potenza nominale: 5 W
Classe di protezione: III /
Tensione di ingresso: 10,8 V 1800 mAh
500 mA
Apparecchio
Tensione/corrente di ingresso: 13,5 V
Potenza nominale: 75 W
Classe di protezione: III /
Batterie: Ioni di litio (10,8 V) 1800 mAh
Accumulatore 3 celle ciascuna da 3,6 V
Durata di funzionamento a batteria completamente
carica (a seconda del tipo di pavimento):
circa 15 min
Tempo necessario per il caricamento della batteria
scarica: 5 - 6 ore
500 mA
Indicazioni relative alla sicurezza
PERICOLO DI FOLGORAZIONE!
Non caricare e non usare l'apparecchio all'aperto.
►
► Non utilizzare mai l'apparecchio in presenza di danni al cavo, alla spina
o all'alloggiamento.
► Fare sostituire immediatamente il cavo o la spina danneggiati da personale
specializzato autorizzato, per evitare rischi.
► Fare eseguire questi lavori unicamente da un'offi cina specializzata. Non
aprire mai l'apparecchio di propria iniziativa. Gli interventi non eseguiti
da centri specializzati potrebbero dare luogo a lesioni.
► Prima di accendere l'apparecchio controllare che la tensione riportata nei
dati tecnici corrisponda alla tensione di rete esistente.
► Non toccare mai l'alimentatore/il caricatore o l'apparecchio con mani
bagnate o umide.
► Non usare cavi di prolunga, bensì inserire l'alimentatore/il caricatore diretta-
mente nella spina.
IT
CH
SHSS 12 B2
23
Page 27

IT
CH
AVVISO! PERICOLO DI LESIONI!
► Non cambiare gli accessori ad apparecchio acceso.
► Non usare l'aspirapolvere portatile per aspirare acqua o altri liquidi.
► Non usare l'aspirapolvere portatile per aspirare oggetti a punta o pezzi
di vetro.
► Non aspirare mai fi ammiferi accesi, cenere ancora ardente o mozziconi
di sigarette.
► Non usare l'aspirapolvere per aspirare prodotti chimici, polvere di pietra,
gesso, cemento o sostanze analoghe.
► L'apparecchio non è indicato per materiali infi ammabili ed esplosivi o
liquidi chimici e aggressivi.
► Riporre l'apparecchio sempre in luoghi chiusi. Per evitare infortuni, dopo
l'uso riporre l'apparecchio in un luogo asciutto.
► In condizioni estreme possono verifi carsi delle perdite dagli elementi
dell'accumulatore. In caso di contatto del liquido con la cute o con gli
occhi, lavare e risciacquare immediatamente con acqua pulita.
Contattare un medico.
► Questo apparecchio può essere utilizzato dai bambini di almeno 8 anni
di età e da persone con capacità fi siche, sensoriali o mentali ridotte o
insuffi ciente esperienza o conoscenza, solo se sorvegliati o istruiti sull'uso
sicuro dell'apparecchio e qualora ne abbiano compreso i pericoli associati.
I bambini non devono giocare con l'apparecchio. La pulizia e la manutenzione a cura dell'utente non devono essere eseguite da bambini, a meno
che non siano sorvegliati.
24
SHSS 12 B2
Page 28

AVVISO! PERICOLO DI LESIONI!
► Usare solo accessori consigliati dalla casa produttrice.
► Il cavo di rete non dev'essere utilizzato per altri scopi.
► Aff errare sempre la spina per disconnettere l'apparecchio dalla presa di
corrente.
► Non collocare mai l'aspirapolvere vicino a corpi riscaldanti, forni o altri
apparecchi o superfi ci riscaldate.
► Verifi care sempre che le aperture di ventilazione non siano ostruite.
L'ostruzione alla circolazione dell'aria può dare luogo al surriscaldamento
dell'apparecchio e provocare dei danni.
► Adottare la massima cautela utilizzando l'aspirapolvere per le scale.
► Questo prodotto contiene accumulatori ricaricabili. Non gettare mai l'appa-
recchio nel fuoco e non esporlo a temperature elevate. Sussiste il pericolo
di esplosione!
► Prima di pulire il rullo a spazzola rimuovere sempre dal manico la parte
manuale per evitare un avvio accidentale del rullo a spazzola.
ATTENZIONE! PERICOLO DI DANNI MATERIALI!
► Non usare l'aspirapolvere senza aver prima inserito il fi ltro della polvere.
► Non usare il caricatore per altri prodotti e non cercare di ricaricare l'appa-
recchio con un'altra stazione di carica. Usare esclusivamente il caricatore
incluso nella fornitura dell'apparecchio.
► Non caricare mai pile non ricaricabili.
IT
CH
SHSS 12 B2
25
Page 29

Prima del primo impiego
Montaggio/Smontaggio
AVVISO
L'apparecchio è stato fornito con batterie
►
scariche. Prima di usare l'apparecchio per la
prima volta, mettere le batterie sotto carica
per 6 ore.
■ Rimuovere tutto il materiale di imballaggio e gli
IT
CH
adesivi.
Caricamento dell'apparecchio
AVVISO
Assicurarsi che l'apparecchio sia spento
►
prima di iniziare il caricamento.
■ Per caricare l'apparecchio collegare il carica-
tore i a una presa di rete e infi lare la spina
femmina o nella presa di caricamento s che si
trova sul supporto d. Guidare il cavo attraverso
l'apposita canalina sulla presa di caricamento s,
in modo che il supporto d non sia sul cavo.
■ Disporre il manico con la parte manuale 4
inserita sul supporto d.
La spia di controllo della carica 3 si accende.
Quando l'apparecchio è carico, la spia di controllo della carica 3 si accende di colore verde.
Collegamento della parte manuale
al manico / distacco della parte
manuale dal manico
Fig. 1 Fig. 2
■ Per collegare la parte manuale 4 al manico
spingere la punta della parte manuale 4 nel
vano dell'incavo della parte manuale e.
■ Introdurre poi l'impugnatura 1 della parte
manuale 4 nel manico in modo tale che la
parte manuale 4 si innesti in posizione e
rimanga ben fi ssa (fi g. 1).
■ Per staccare la parte manuale 4 dal manico
premere lo sblocco "Parte manuale" w.
■ Estrarre la parte manuale 4 dall'incavo e
tirandola verso l'alto/in avanti (fi g. 2).
26
SHSS 12 B2
Page 30

Uso
ATTENZIONE! PERICOLO DI DANNI
MATERIALI!
L'apertura di aspirazione deve essere sempre
►
libera e non intasata. Gli intasamenti provocano surriscaldamento e danni al motore.
► Non aspirare tappeti a pelo lungo con la
bocchetta per pavimenti. Il rullo a spazzola r
potrebbe impigliarsi nel tappeto e bloccarsi!
AVVISO
Verifi care che il fi ltro della polvere 6 e il fi ltro
►
a maglie grosse 7 siano sempre inseriti prima
di usare l'apparecchio.
► Non appena la potenza di aspirazione si
indebolisce, collegare nuovamente l'apparecchio al caricatore i.
Utilizzo della parte manuale con il
manico
1) Inserire la parte manuale 4 nell'incavo e come
descritto al capitolo "Montaggio/Smontaggio".
2) Far uscire l'impugnatura 0 premendo lo sblocco
"Impugnatura" q e tirare contemporaneamente
l'impugnatura 0 verso l'alto.
3) Accendere l'apparecchio dall'interruttore ON/
OFF 9. La spia di controllo del funzionamento t che si trova sulla bocchetta per pavimenti
si accende e il rullo a spazzola r ruota.
4) Passare con la bocchetta per pavimenti sopra
i punti da aspirare badando a tenere l'impugnatura 0 in modo tale che la bocchetta
per pavimenti scivoli uniformemente lungo il
pavimento.
5) Se si desidera interrompere l'aspirazione,
premere l'interruttore ON/OFF 9. Il rullo a
spazzola r si ferma e l'illuminazione LED t
si spegne.
Utilizzo della parte manuale
1) Sganciare la parte manuale 4 dall'incavo e
come descritto al capitolo "Montaggio/
Smontaggio".
2) Se si desidera, applicare la bocchetta per
giunti u o la bocchetta spazzola z.
3) Premere l'interruttore ON/OFF 2 e aspirare
nei punti desiderati.
4) Se si desidera terminare l'aspirazione, premere
ancora una volta l'interruttore ON/OFF 2.
Pulizia e manutenzione
AVVERTENZA! PERICOLO DI LESIONI!
► Prima di pulire il supporto d, staccare sempre
il caricatore i dalla presa di rete e allentare
la spina femmina o dalla presa di caricamento s sul supporto d.
► Togliere sempre la parte manuale 4 dal suo
incavo e che si trova sul manico prima di
pulire la parte manuale 4, il manico o il rullo
a spazzola r.
Per ottenere i migliori risultati, svuotare il contenitore
di raccolta dello sporco 8 e pulire il fi ltro 6 dopo
ogni uso.
ATTENZIONE! PERICOLO DI DANNI
MATERIALI!
Non utilizzare detergenti abrasivi o aggressivi.
►
Potrebbero danneggiare la superfi cie!
AVVISO
L'illuminazione LED t non richiede manuten-
►
zione. I LED non possono essere sostituiti!
IT
CH
SHSS 12 B2
27
Page 31

Svuotamento del contenitore di
raccolta dello sporco
1) Per aprire il contenitore di raccolta dello
sporco 8 rimuovere la parte manuale 4 dal
suo incavo e.
2) Premere insieme i due tasti
IT
CH
contemporaneamente il contenitore di raccolta
dello sporco 8 verso l'alto.
Ora si può sollevare quest'ultimo verso l'alto/
in avanti.
3) Prelevare il fi ltro della polvere 6 sfi landolo con
le dita. Lavare il fi ltro della polvere 6 con acqua pulita e lasciarlo asciugare completamente
all'aria. Per asciugare il fi ltro della polvere 6
non utilizzare aria calda.
4) Prelevare il fi ltro a maglie grosse 7 sfi landolo.
Fig. 3
5) Svuotare il contenitore di raccolta dello
sporco 8.
6) Reinserire prima il fi ltro a maglie grosse 7
e poi il fi ltro della polvere asciutto 6.
7) Reinserire il contenitore di raccolta dello sporco
8 spingendo dapprima il blocco nel vano che
si trova sulla parte manuale 4 e poi premendo
fortemente verso il basso la parte anteriore del
contenitore di raccolta dello sporco 8 in modo
tale che si innesti in posizione ben fi ssa.
5 e tirare
Pulizia del rullo a spazzola
Col passare del tempo sul rullo a spazzola r
potrebbe rimanere impigliato dello sporco, come
per es. capelli. Per rimuoverlo si può smontare il
rullo a spazzola r (fi g. 4).
1) Ruotare la bocchetta per pavimento.
2) Far scorrere indietro il bloccaggio sulla piastra
di copertura in modo da poterla rimuovere.
3) Rimuovere il rullo a spazzola r.
4) Per reinserire il rullo a spazzola r infi lare
innanzitutto l'estremità larga sull'albero motore
in modo tale che il rullo a spazzola r si
agganci.
5) Poi far scivolare l'altra estremità nel vano di
ricezione, in modo che il rullo a spazzola r
si trovi nella bocchetta per pavimento.
6) Ricollocare la piastra di copertura e avvitarla
saldamente.
Pulizia dell'apparecchio
Pulire l'apparecchio con un panno umido. In caso
di sporco ostinato, versare un po' di detergente
delicato sul panno. Badare che l'apparecchio
sia completamente asciutto prima del successivo
impiego.
28
Fig. 4
SHSS 12 B2
Page 32

Conservazione
■ Se non si utilizza l'apparecchio, collocarlo sul
supporto d.
■ La bocchetta per giunti u e la bocchetta spaz-
zola z possono venire innestate sul retro del
supporto d sul supporto bocchetta spazzola p
e sul supporto bocchetta per giunti a.
■ Conservare l'apparecchio in un luogo asciutto
e privo di polvere.
Eliminazione dei guasti
L'apparecchio non funziona.
■ L'accumulatore non è caricato.
♦ Collegare l'apparecchio con il caricatore i.
■ L'apparecchio è guasto.
♦ Rivolgersi al servizio clienti.
L'apparecchio è in funzione, ma non
aspira quasi lo sporco.
■ L'accumulatore non è suffi cientemente carico.
♦ Collegare l'apparecchio con il caricatore i.
■ Il contenitore di raccolta dello sporco 8
è pieno.
♦ Svuotare il contenitore di raccolta dello sporco 8.
■ Il fi ltro della polvere 6 è ostruito.
♦ Pulire il fi ltro della polvere 6.
L'apparecchio non si carica.
■ Il caricatore i non è correttamente inserito
nella presa/nella spina di rete.
♦ Controllare gli allacciamenti del caricatore i.
■ Il caricatore i è guasto.
♦ Rivolgersi al servizio clienti.
Garanzia e assistenza
Questo apparecchio è garantito per tre anni a
partire dalla data di acquisto. L'apparecchio è
stato prodotto con cura e debitamente collaudato
prima della consegna. Conservare lo scontrino
come prova di acquisto. Nei casi contemplati
dalla garanzia, mettersi in comunicazione telefonicamente con il centro di assistenza più vicino.
Solo in tal modo è possibile garantire una spedizione gratuita della merce.
La garanzia vale solo per difetti del materiale o di
fabbricazione, ma non per i danni da trasporto,
danni alle parti soggette a usura o alle parti fragili,
come per es. interruttori o accumulatori. Il prodotto
è destinato esclusivamente all'uso domestico e non
a quello commerciale. La garanzia decade in caso
di impiego improprio o manomissione, uso della
forza e interventi non eseguiti dalla nostra fi liale di
assistenza autorizzata. Questa garanzia non costituisce alcun limite ai diritti legali del consumatore.
Il periodo di garanzia non viene prolungato da
interventi in garanzia. Ciò vale anche per le parti
sostituite e riparate. I danni e difetti eventualmente
presenti già all'atto dell'acquisto devono venire
comunicati immediatamente dopo il disimballo, e
comunque entro e non oltre due giorni dalla data di
acquisto. Le riparazioni eseguite dopo la scadenza
del periodo di garanzia sono a pagamento.
Assistenza Italia
Tel.: 02 36003201
E-Mail: kompernass@lidl.it
IAN 100116
Assistenza Svizzera
Tel.: 0842 665566 (0,08 CHF/Min.,
telefonia mobile max. 0,40 CHF/Min.)
E-Mail: kompernass@lidl.ch
IAN 100116
Raggiungibilità della hotline: dal lunedì al
venerdì, dalle 8.00 alle 20.00 (CET)
IT
CH
SHSS 12 B2
29
Page 33

Smaltimento
Smaltimento dell'apparecchio
Non smaltire mai l'apparec-
chio assieme ai normali rifi uti
domestici. Questo prodotto è
soggetto alla Direttiva Europea
IT
Smaltire l'apparecchio attraverso un'azienda di
CH
smaltimento autorizzata o attraverso l'ente di smaltimento comunale. Rispettare le norme attualmente
in vigore. In caso di dubbi mettersi in contatto con
l'ente di smaltimento competente.
Smaltimento batterie/pile
Ogni utente è obbligato per legge a consegnare le
pile/gli accumulatori presso un centro di raccolta
del proprio comune / quartiere o a restituirle al
rivenditore.
Questo obbligo è fi nalizzato allo smaltimento
ecologico delle pile e/o delle batterie. Restituire
le pile/le batterie solo se scariche.
ATTENZIONE! PERICOLO DI DANNI
MATERIALI!
Se si apre l'apparecchio e si gettano via gli
►
accumulatori, l'apparecchio rimane irreparabilmente danneggiato.
1) Scaricare completamente la batteria prima
di iniziare con lo smontaggio della batteria.
2) Rimuovere il contenitore di raccolta dello
sporco 8.
3) Svitare le 5 viti che si trovano sul retro della
parte manuale 4 e separare le due metà
dell'involucro.
4) Staccare il motore dalla metà dell'alloggiamento.
5) Allentate le due viti sul supporto di plastica che
tiene la batteria blu e rimuovere il supporto di
plastica.
2012/19/EU.
Pile e/o batterie non devono
essere smaltite insieme ai
rifi uti domestici.
6) Troncare con una pinza i cavi che portano alla
batteria blu, uno per uno e in successione.
Assicurarsi che le estremità troncate del cavo
non creino un cortocircuito con le parti di
metallo della pinza.
7) Rimuove la batteria e smaltirla secondo le
disposizioni in vigore.
L'imballaggio è composto di materiali
ecocompatibili che possono venire
smaltiti tramite gli appositi centri di
raccolta e riciclaggio.
Importatore
KOMPERNASS HANDELS GMBH
BURGSTRASSE 21
44867 BOCHUM
GERMANY
www.kompernass.com
30
SHSS 12 B2
Page 34

Contents
Introduction . . . . . . . . . . . . . . . . . . . . . . . . . . . . . . . . . . . . . . . . . . . . . . . . . . . . . . . . . . 32
Intended use . . . . . . . . . . . . . . . . . . . . . . . . . . . . . . . . . . . . . . . . . . . . . . . . . . . . . . . . . 32
Package contents . . . . . . . . . . . . . . . . . . . . . . . . . . . . . . . . . . . . . . . . . . . . . . . . . . . . . 32
Appliance description . . . . . . . . . . . . . . . . . . . . . . . . . . . . . . . . . . . . . . . . . . . . . . . . . . 32
Technical data . . . . . . . . . . . . . . . . . . . . . . . . . . . . . . . . . . . . . . . . . . . . . . . . . . . . . . . . 33
Safety guidelines . . . . . . . . . . . . . . . . . . . . . . . . . . . . . . . . . . . . . . . . . . . . . . . . . . . . . 33
Before fi rst use . . . . . . . . . . . . . . . . . . . . . . . . . . . . . . . . . . . . . . . . . . . . . . . . . . . . . . . 36
Charging the appliance . . . . . . . . . . . . . . . . . . . . . . . . . . . . . . . . . . . . . . . . . . . . . . . . 36
Assembly/disassembly . . . . . . . . . . . . . . . . . . . . . . . . . . . . . . . . . . . . . . . . . . . . . . . . 36
Connecting the hand element to the handle/removal from handle . . . . . . . . . . . . . . . . . . . . . . . . . . . 36
Operation . . . . . . . . . . . . . . . . . . . . . . . . . . . . . . . . . . . . . . . . . . . . . . . . . . . . . . . . . . . 37
Using the hand element with the handle . . . . . . . . . . . . . . . . . . . . . . . . . . . . . . . . . . . . . . . . . . . . . . . 37
Using the hand element . . . . . . . . . . . . . . . . . . . . . . . . . . . . . . . . . . . . . . . . . . . . . . . . . . . . . . . . . . . . 37
Cleaning and care . . . . . . . . . . . . . . . . . . . . . . . . . . . . . . . . . . . . . . . . . . . . . . . . . . . . . 37
Emptying the dirt container . . . . . . . . . . . . . . . . . . . . . . . . . . . . . . . . . . . . . . . . . . . . . . . . . . . . . . . . . 38
Cleaning the appliance . . . . . . . . . . . . . . . . . . . . . . . . . . . . . . . . . . . . . . . . . . . . . . . . . . . . . . . . . . . . 38
Cleaning the rotary brush . . . . . . . . . . . . . . . . . . . . . . . . . . . . . . . . . . . . . . . . . . . . . . . . . . . . . . . . . . . 38
Storage . . . . . . . . . . . . . . . . . . . . . . . . . . . . . . . . . . . . . . . . . . . . . . . . . . . . . . . . . . . . . 39
Troubleshooting . . . . . . . . . . . . . . . . . . . . . . . . . . . . . . . . . . . . . . . . . . . . . . . . . . . . . . 39
Warranty and service . . . . . . . . . . . . . . . . . . . . . . . . . . . . . . . . . . . . . . . . . . . . . . . . . 39
Disposal . . . . . . . . . . . . . . . . . . . . . . . . . . . . . . . . . . . . . . . . . . . . . . . . . . . . . . . . . . . . . 40
Disposal of the appliance. . . . . . . . . . . . . . . . . . . . . . . . . . . . . . . . . . . . . . . . . . . . . . . . . . . . . . . . . . . 40
Disposal of (rechargeable) batteries . . . . . . . . . . . . . . . . . . . . . . . . . . . . . . . . . . . . . . . . . . . . . . . . . . 40
GB
Importer . . . . . . . . . . . . . . . . . . . . . . . . . . . . . . . . . . . . . . . . . . . . . . . . . . . . . . . . . . . . 40
SHSS 12 B2
31
Page 35

RECHARGEABLE HAND-HELD
AND UPRIGHT VACUUM
CLEANER SHSS 12 B2
Introduction
Congratulations on the purchase of your new
appliance.
You have selected a high-quality product.
The operating instructions are part of this product.
They contain important information on safety, usage
and disposal. Before using the product, familiarise
GB
yourself with all handling and safety guidelines.
Use the product only as described and for the range
of applications specifi ed. Please also pass these
operating instructions on to any future owner(s).
Intended use
This appliance has been designed exclusively for
vacuum cleaning dry surfaces and dry residues.
This appliance is intended solely for use in private
homes. Do not vacuum people or animals with this
appliance. Any other usage of or modifi cation to
the appliance is deemed to be improper usage
and carries the risk of serious personal injury. The
manufacturer accepts no liability for damages that
result from improper use of the appliance or are
caused by the incorrect operation of it.
The appliance is not intended for commercial use.
Package contents
Handheld vacuum cleaner
Brush nozzle
Crevice tool
Extension handle with fl oor nozzle
Cradle (with charging socket)
Charger
Operating instructions
Appliance description
Figure A:
1 Grip, hand element
2 On/Off switch
3 Charge indicator lamp
4 Hand element
5 Buttons
6 Dust fi lter
7 Coarse fi lter
8 Dirt container
Figure B:
9 On/Off switch
0 Grip
q "Grip" release
w "Hand element" release
e Hand element recess
r Rotary brush
t LED lamp
Figure C:
z Brush nozzle
u Crevice tool
i Charger
o Charger barrel jack
p Holder for brush nozzle
a Holder for crevice tool
s Charging socket
d Cradle (with charging socket)
Check the delivery contents for completeness
immediately after unpacking.
32
SHSS 12 B2
Page 36

Technical data
Charger
Input: 100–240 V ~50/60 Hz 300 mA Max.
Output: 13.5 V
Type designation: SHSS 12 B2-1
Protection class: II /
Floor nozzle
Nominal power: 5 W
Protection class: III /
Input voltage: 10.8 V 1800 mAh
500 mA
Appliance
Input voltage/current: 13.5 V
Nominal power: 75 W
Protection class: III /
Batteries: 10.8 V/1800 mAh Li-ion battery
Battery Pack: 3 cells each of 3.6 V
Operating time with full battery charge
(depending on fl oor covering): approx. 15 min.
Charging time with empty battery: 5–6 hours
500 mA
Safety guidelines
DANGER – ELECTRIC SHOCK!
► Do not charge or use the appliance outdoors.
► Never use the handheld vacuum cleaner if the cable, plug or casing are
damaged.
► To avoid risks, arrange for damaged power cables and/or plugs to be
replaced as soon as possible by a qualifi ed specialist or by our Customer
Services.
► Arrange for repairs to be carried out only by specialist workshops. Under
no circumstances should you open the appliance yourself. Repairs that are
not carried out by a specialist workshop could lead to physical injuries.
► Before charging the appliance, make sure that the mains voltage corresponds
to the voltage indicated in the technical data for the charger.
► Never touch the mains adapter/charger or the appliance with wet or damp
hands.
► Do not use the mains adapter/charger with an extension cable; connect
the mains adapter directly to a power socket.
GB
SHSS 12 B2
33
Page 37

GB
WARNING! RISK OF INJURY!
► Do not change any accessories while the appliance is switched on.
► Do not use the handheld vacuum cleaner for vacuuming up water or other
liquids.
► Do not use the handheld vacuum cleaner for vacuuming up sharp objects
or glass shards.
► Never vacuum up burning matches, glowing ashes or cigarette butts.
► Do not use the handheld vacuum cleaner for vacuuming up chemical
products, stone dust, gypsum, cement or similar particles.
► This appliance is not suitable for use with infl ammable and explosive
substances or chemical and aggressive liquids.
► Always store the appliance indoors. To prevent accidents, keep the appli-
ance in a dry location when not in use.
► Under extreme conditions, leaks in the battery cells may occur. In the event
that battery fl uid comes into contact with skin or eyes, the aff ected area
must be rinsed off with water immediately. Contact a physician.
► This appliance may be used by children aged 8 years and above and by
persons with limited physical, sensory or mental capabilities or lack of experience and knowledge, provided that they are under supervision or have
been told how to use the appliance safely and are aware of the potential
risks. Children must not use the appliance as a plaything. Cleaning and
user maintenance tasks may not be carried out by children unless they are
supervised.
34
SHSS 12 B2
Page 38

WARNING! RISK OF INJURY!
► Use only accessories recommended by the manufacturer.
► The mains adapter may not be used for other purposes.
► Always grip the power plug to disconnect the appliance from the power
supply.
► Always be sure to keep the handheld vacuum cleaner away from heating
elements, ovens or other heated appliances and surfaces.
► Always make certain that the ventilation slits are not obstructed. A blocked
ventilation circuit can result in overheating and damage to the appliance.
► Take special care when using the handheld vacuum cleaner on stairs.
► This product contains rechargeable batteries. Do not throw the appliance
into a fi re and do not subject it to high temperatures. There is a risk of
explosion!
► Always remove the fl oor nozzle from the handle before cleaning the rotary
brush to avoid accidental starting of the rotary brush.
ATTENTION! MATERIAL DAMAGE!
► Do not use the handheld vacuum cleaner without the dust fi lter inserted.
► Do not use the mains adapter for a diff erent product and do not attempt
to charge this appliance with a diff erent charger. Use only the charger
supplied with this appliance.
► Never charge non-rechargeable batteries!
GB
SHSS 12 B2
35
Page 39

Before fi rst use
Assembly/disassembly
NOTE
This appliance is supplied with non-charged
►
batteries. The batteries must be charged for
6 hours before the fi rst use.
■ Remove all packaging materials as well as foils
and stickers
Charging the appliance
NOTE
GB
Ensure that the appliance is switched off
►
before starting to charge the batteries.
■ To charge the appliance, connect the charger i
to a mains socket and insert the barrel jack o
into the charging socket s on the cradle d.
Feed the cable through the cable channel on the
charging socket s, so that the cradle d is not
resting on the cable.
■ Place the handle with the attached hand element
4 onto the cradle d.
The red control lamp 3 illuminates.
When the appliance is fully charged, the indicator
light 3 illuminates green.
Connecting the hand element to the
handle/removal from handle
Fig. 1 Fig. 2
■ To connect the hand element 4 to the handle,
push the tip of the hand element 4 into the
opening in the hand element recess e.
■ Then press the grip 1 of the hand element 4
into the handle so that the hand element 4
clicks fi rmly into position (Fig. 1).
■ To remove the hand element 4 from the handle,
press the "Hand element" release w.
■ Then pull the hand element 4 upwards and
forwards out of the hand element recess e
(Fig. 2).
36
SHSS 12 B2
Page 40

Operation
ATTENTION! MATERIAL DAMAGE!
The suction opening must always be open and
►
unblocked. Blockages lead to overheating and
damage to the motor.
► Do not vacuum shag pile carpet with the fl oor
nozzle. The rotary brush r can get caught in
the carpet and block!
NOTE
Make certain that the dust fi lter 6 and the
►
coarse fi lter 7 are always inserted before
using the appliance.
► As soon as the suction power of the appliance
begins to diminish noticeably, connect the
appliance to the charger i.
Using the hand element with the
handle
1) Insert the hand element 4 into the hand
element recess e as described in the chapter
"Assembly/disassembly".
2) Fold out the grip 0 by pressing the "Grip"
release q and at the same time pulling the
grip 0 upwards.
3) Switch on the appliance using the on/off
switch 9. The LED lamp t on the fl oor nozzle
will illuminate and the rotary brush r starts
turning.
4) Guide the fl oor nozzle over the area to be
vacuumed. Hold the grip 0 so that the fl oor
nozzle moves smoothly over the fl oor.
5) Press the on/off switch 9 when you have
fi nished vacuuming. The rotary brush r stops
and the LED lamp t goes out.
Using the hand element
1) Remove the hand element 4 from the hand
element recess e as described in the chapter
"Assembly/disassembly".
2) If required, attach the crevice tool u or the
brush nozzle z.
3) Set the on/off switch 2 to start vacuuming the
desired areas.
4) When you have fi nished vacuuming, press the
on/off switch 2 again.
Cleaning and care
WARNING! RISK OF INJURY!
► Always disconnect the charger i from the
mains socket and remove the barrel jack o
from the charging socket s on the cradle d
before cleaning the cradle d.
► Always remove the hand element 4 from the
hand element recess e on the handle before
cleaning the hand element 4, the handle or
the rotary brush r.
To achieve the best results, empty the dirt container
8 and clean the dust fi lter 6 after every use.
ATTENTION! MATERIAL DAMAGE!
Do not use abrasive or aggressive cleaning
►
materials. These could damage the surface
of the appliance!
NOTE
The LED lamp t is maintenance-free.
►
The LEDs cannot be changed.
GB
SHSS 12 B2
37
Page 41

Emptying the dirt container
1) To open the dirt container 8, remove the hand
element 4 from the hand element recess e.
2) Press both buttons
pull the dirt container 8 upwards.
You can now lift this off upwards/forwards.
3) Remove the dust fi lter 6 by pulling it out with
your fi ngers. Rinse the dust fi lter 6 in clear
water and let it air dry. Do not use hot air to
dry the dust fi lter 6.
4) Then remove the coarse fi lter 7 also by simply
GB
pulling it out.
Fig. 3
5) Empty the dirt container 8.
6) Now you can re-insert fi rst the coarse fi lter 7
and then the dust fi lter 6.
7) Replace the dirt container 8 by fi rst inserting
the catch into the notch in the hand element 4
and then pushing the front part of the dirt container 8 fi rmly downwards so that the dirt
container 8 clicks fi rmly into place.
5 and, at the same time,
Cleaning the rotary brush
The rotary brush r can become covered in
residues, such as hair, after a while. To remove this
dirt, you can remove the rotary brush r (Fig. 4).
1) Turn the fl oor nozzle upside down.
2) Push the catch on the cover plate to the rear
so that you can remove the cover plate.
3) Lift out the rotary brush r.
4) To replace the rotary brush r, fi rst push the
broad end onto the drive shaft so that the
rotary brush r hooks into place.
5) Then push the other end into the mount so that
the rotary brush r sits straight in the fl oor
nozzle.
6) Replace the cover plate and fasten it fi rmly into
place.
Cleaning the appliance
Wipe the appliance with a damp cloth. For stubborn
dirt, wipe, adding mild detergent to the cloth.
Ensure that the appliance is completely dry before
the next use.
38
Fig. 4
SHSS 12 B2
Page 42

Storage
■ When you are not using the appliance, place it
on the cradle d.
■ You can store the crevice tool u and the brush
nozzle z on the rear side of the cradle d
in the holder for the brush nozzle p and the
holder for the crevice tool a.
■ Store the appliance in a dust-free and dry
location.
Troubleshooting
The appliance is not working.
■ The battery is not charged.
♦ Connect the appliance to the charger i.
■ The appliance is defective.
♦ Contact the Customer Service department.
The appliance is running but hardly
sucking up any dirt.
■ The battery is not suffi ciently charged.
♦ Connect the appliance to the charger i.
■ The dirt container 8 is full.
♦ Empty the dirt container 8.
■ The dust fi lter 6 is blocked.
♦ Clean the dust fi lter 6.
The appliance will not charge.
■ The charger i is not correctly connected to
the socket/mains plug.
♦ Check the connections of the charger i.
■ The charger i is defective.
♦ Contact the Customer Service department.
Warranty and service
You are provided a 3-year warranty on this
appliance, valid from the date of purchase.
This appliance has been manufactured with care
and inspected meticulously prior to delivery.
Please retain your receipt as proof of purchase.
In the event of a warranty claim, please contact
your Customer Service unit by telephone. This
is the only way to guarantee free return of your
goods.
The warranty only covers claims for material and
manufacturing defects, not for damage sustained
during carriage, components subject to wear and
tear or damage to fragile components such as
switches or batteries. This appliance is intended
solely for private use and not for commercial purposes. The warranty shall be deemed void in the
case of misuse or improper handling, use of force
and interventions which have not been carried
out by one of our authorised Service centres. Your
statutory rights are not restricted by this warranty.
The warranty period is not prolonged by repairs
eff ected under the warranty. This also applies to
replaced and repaired components. Any damage
and defects present at the time of purchase must be
reported immediately after unpacking, but no later
than two days after the date of purchase. Repairs
eff ected after expiry of the warranty period shall
be subject to charge.
Service Great Britain
Tel.: 0871 5000 720 (£ 0.10/Min.)
E-Mail: kompernass@lidl.co.uk
IAN 100116
Hotline availability: Monday to Friday 08:00 20:00 (CET)
GB
SHSS 12 B2
39
Page 43

Disposal
Disposal of the appliance
Under no circumstances should
you dispose of the appliance
in the normal domestic waste.
This product is subject to the
provisions of European
Directive 2012/19/EU.
Dispose of the appliance via an approved waste
disposal company or your municipal waste disposal
facility. Please observe applicable regulations.
GB
Please contact your waste disposal facility if you
are in any doubt.
Disposal of (rechargeable) batteries
Used batteries may not be
disposed of in household
waste.
Consumers are legally obliged to dispose of batteries at a collection point in their community/city
district or at a retail store.
The purpose of this obligation is to ensure that
batteries are disposed of in an environmentally
congruent manner. Only dispose of batteries when
they are fully discharged.
ATTENTION! MATERIAL DAMAGE!
If you open the housing and dispose of the
►
batteries, the appliance will be irreparably
damaged!
1) Before you start removing the battery, discharge
it completely.
2) Remove the dirt collector 8.
3) Undo the 5 screws on the rear of the hand
element 4 and pull the two halves of the
housing apart.
4) Remove the motor from the housing half.
5) Undo the two screws on the plastic bracket
that holds the blue battery and remove the
plastic bracket.
6) Use pliers to cut the cable that leads to the
blue battery. Make sure that you do not shortcircuit the bare cable ends with the metal parts
of the pliers.
7) Remove the battery and dispose of it in an
environmentally friendly manner.
The packaging is made from environ-
mentally friendly material and can be
disposed of at your local recycling plant.
Importer
KOMPERNASS HANDELS GMBH
BURGSTRASSE 21
44867 BOCHUM
GERMANY
www.kompernass.com
40
SHSS 12 B2
Page 44

KOMPERNASS HANDELS GMBH
BURGSTRASSE 21
44867 BOCHUM
DEUTSCHLAND / GERMANY
www.kompernass.com
Stand der Informationen · Version des informations
Versione delle informazioni · Last Information Update:
09 / 2014 · Ident.-No.: SHSS12B2-082014-2
IAN 100116
1
 Loading...