

Page 1
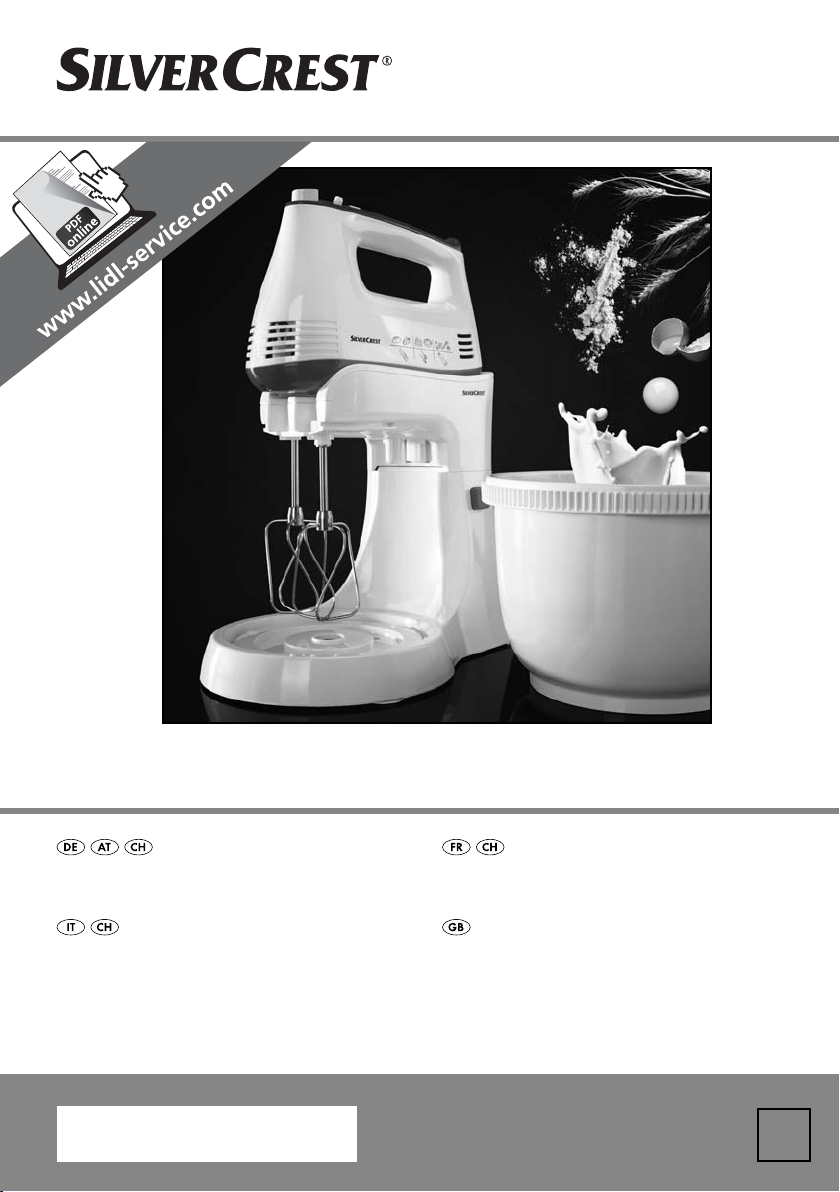
HANDMIXER-SET SHMS 300 B1
HANDMIXER-SET
Bedienungsanleitung
SET SBATTITORE
Istruzioni per l’uso
IAN 60492
SET DE BATTEUR À MAIN
Mode d’emploi
HAND MIXER SET
Operating instructions
1
Page 2
Klappen Sie vor dem Lesen die Seite mit den Abbildungen aus und machen Sie sich anschließend mit allen
Funktionen des Gerätes vertraut.
Avant de lire le mode d‘emploi, ouvrez la page contenant les illustrations et familiarisez-vous ensuite avec
toutes les fonctions de l‘appareil.
Prima di leggere aprire la pagina con le immagini e prendere confi denza con le diverse funzioni
dell’apparecchio.
Before reading, unfold the page containing the illustrations and familiarise yourself with all functions of
the device.
DE / AT / CH Bedienungsanleitung Seite 1
FR / CH Mode d’emploi Page 11
IT / CH Istruzioni per l’uso Pagina 21
GB Operating instructions Page 31
Page 3
A
B
Page 4

INHALTSVERZEICHNIS SEITE
Einführung 2
Bestimmungsgemäßer Gebrauch 2
Lieferumfang 2
Teilebezeichnungen 2
Technische Daten 2
Sicherheitshinweise 3
Auspacken 5
Aufstellen 5
Geschwindigkeits-Stufen 5
Bedienen 5
Kneten und Quirlen . . . . . . . . . . . . . . . . . . . . . . . . . . . . . . . . . . . . . . . . . . . . . . . . . . . . . . . . . .5
Pürieren . . . . . . . . . . . . . . . . . . . . . . . . . . . . . . . . . . . . . . . . . . . . . . . . . . . . . . . . . . . . . . . . . . .7
Reinigen 7
Rezepte 8
Schoko-Amaretto-Creme . . . . . . . . . . . . . . . . . . . . . . . . . . . . . . . . . . . . . . . . . . . . . . . . . . . . . .8
Hefezopf . . . . . . . . . . . . . . . . . . . . . . . . . . . . . . . . . . . . . . . . . . . . . . . . . . . . . . . . . . . . . . . . . .8
Schokoladen-Creme . . . . . . . . . . . . . . . . . . . . . . . . . . . . . . . . . . . . . . . . . . . . . . . . . . . . . . . . .8
Aioli . . . . . . . . . . . . . . . . . . . . . . . . . . . . . . . . . . . . . . . . . . . . . . . . . . . . . . . . . . . . . . . . . . . . . .9
Kräuter-Vinaigrette . . . . . . . . . . . . . . . . . . . . . . . . . . . . . . . . . . . . . . . . . . . . . . . . . . . . . . . . . . .9
Entsorgen 9
Garantie und Service 9
Importeur 10
- 1 -
Page 5

HANDMIXER-SET
Einführung
Herzlichen Glückwunsch zum Kauf Ihres neuen
Gerätes.
Sie haben sich damit für ein hochwertiges Produkt
entschieden. Die Bedienungsanleitung ist Bestandteil dieses Produkts. Sie enthält wichtige Hinweise
für Sicherheit, Gebrauch und Entsorgung. Machen
Sie sich vor der Benutzung des Produkts mit allen
Bedien- und Sicherheitshinweisen vertraut. Benutzen
Sie das Produkt nur wie beschrieben und für die angegebenen Einsatzbereiche. Händigen Sie alle
Unterlagen bei Weitergabe des Produkts an Dritte
mit aus.
Bestimmungsgemäßer
Gebrauch
Dieses Gerät dient ausschließlich dem Kneten von
Teig, Mixen von Flüssigkeiten (z.B. Fruchtsäften),
Sahneschlagen und dem Pürieren von Früchten. Es
ist nur für die Bearbeitung von Lebensmitteln geeignet. Dieses Gerät ist ausschließlich für die Benutzung in privaten Haushalten bestimmt. Benutzen Sie
es nicht gewerblich.
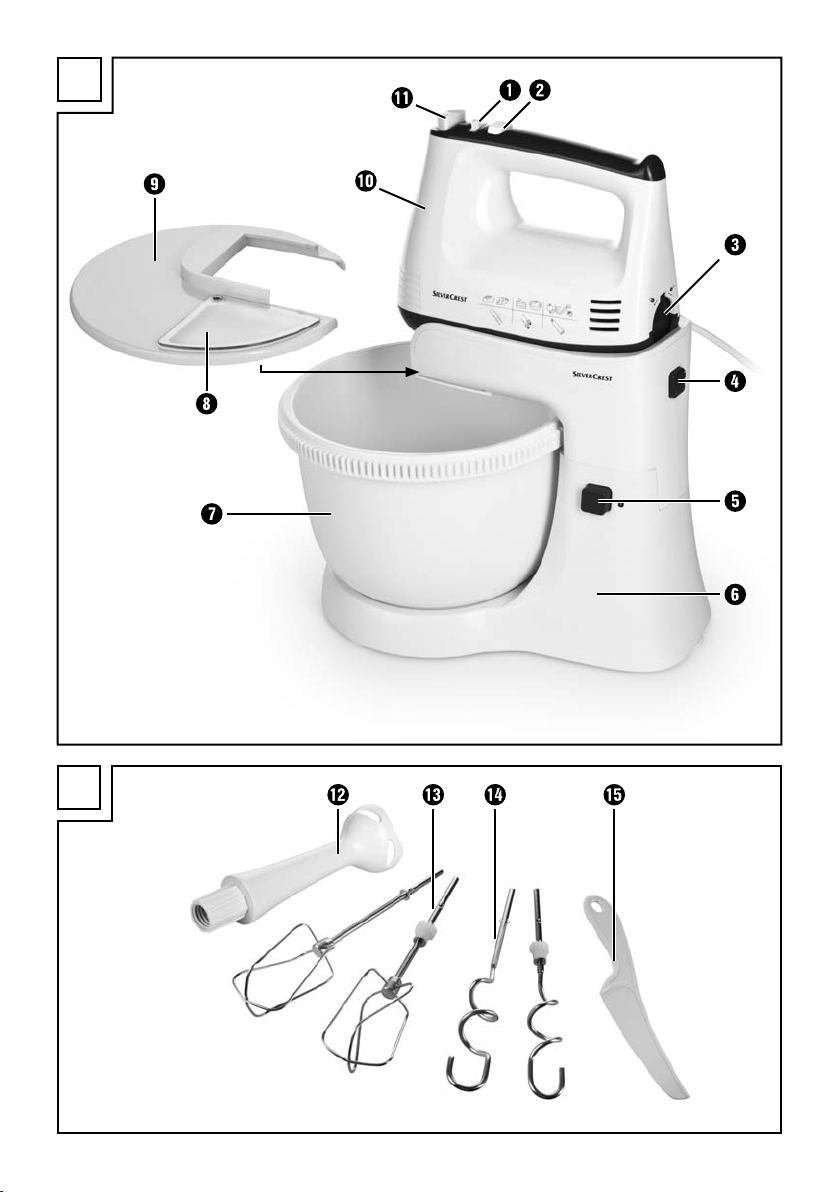
Teilebezeichnungen
Abbildung A:
1 Geschwindigkeits-Schalter
2 Turbo-Taste
3 Einsatz-Vorrichtung für Pürierstab
mit Sicherheitsverschluss
4 Entriegelungs-Knopf für Handmixer
5 Entriegelungs-Knopf
6 Rührständer
7 Rührschüssel
8 Einfüllöffnung
9 Deckel
0 Handteil
q Auswurf-Taste
Abbildung B:
w Pürierstab
e Quirle aus Edelstahl
r Knethaken aus Edelstahl
t Teigschaber
Technische Daten
Nennspannung: 220 - 240 V ~, 50 Hz
Nennleistung: 300 W
Schutzklasse: II/
KB-Zeit: Mixer: 10 Min.
Pürierstab: 1 Min.
Lieferumfang
1 Handmixer
1 Rührständer
1 Rührschüssel mit Deckel
2 Knethaken
2 Quirle
1 Pürierstab
1 Teigschaber
Bedienungsanleitung
KB-Zeit
Die KB-Zeit (Kurzzeitbetrieb) gibt an, wie lange man
ein Gerät betreiben kann, ohne dass der Motor überhitzt und Schaden nimmt. Nach der angegebenen
KB-Zeit muss das Gerät solange ausgeschaltet werden, bis sich der Motor abgekühlt hat.
- 2 -
Page 6

Sicherheitshinweise
Gefahr – Elektrischer Schlag!
• Das Netzkabel darf nie in die Nähe oder in Berührung mit heißen Teilen des
Geräts oder anderen Wärmequellen kommen. Lassen Sie das Netzkabel nicht
auf Kanten oder Ecken aufliegen.
• Knicken oder quetschen Sie das Netzkabel nicht.
• Lassen Sie beschädigte Netzstecker oder Netzkabel sofort von autorisiertem
Fachpersonal oder dem Kundenservice austauschen, um Gefährdungen zu
vermeiden.
• Ziehen Sie immer am Netzstecker, nicht am Netzkabel selber, wenn Sie das
Gerät vom Stromnetz trennen. Ansonsten kann das Netzkabel beschädigt
werden!
Tauchen Sie das Handteil nicht in Wasser oder andere Flüssigkeiten!
Hier kann Lebensgefahr durch elektrischen Schlag entstehen, wenn im
Betrieb Flüssigkeitsreste auf spannungsführende Teile gelangen.
Warnung – Verletzungsgefahr!
• Das Gerät kann von Personen mit reduzierten physischen, sensorischen oder
mentalen Fähigkeiten oder Mangel an Erfahrung und/oder Wissen benutzt
werden, wenn sie beaufsichtigt oder bezüglich des sicheren Gebrauchs
des Gerätes unterwiesen wurden und die daraus resultierenden Gefahren
verstanden haben.
• Das Gerät darf nicht von Kindern benutzt werden.
• Kinder dürfen nicht mit dem Gerät spielen.
• Das Gerät und seine Anschlussleitung sind von Kindern fernzuhalten.
• Das Gerät ist bei nicht vorhandener Aufsicht und vor dem Zusammenbau, dem
Auseinandernehmen oder Reinigen stets vom Netz zu trennen.
• Berühren Sie während des Betriebs nicht die Quirle, Knethaken oder den
Pürierstab. Das Messer des Pürierstabs ist scharf! Lassen Sie kein langes Haar,
keine Schals o.ä. über die Aufsätze hängen.
• Versuchen Sie nie, Aufsätze mit unterschiedlichen Funktionen gleichzeitig zu
montieren.
- 3 -
Page 7

• Ziehen Sie nach jedem Gebrauch und vor jeder Reinigung den Netzstecker,
um ein unbeabsichtigtes Einschalten zu vermeiden.
• Ziehen Sie vor dem Auswechseln von Zubehör immer den Netzstecker, um ein
unbeabsichtigtes Einschalten zu vermeiden.
• Vor dem Auswechseln von Zubehör oder Zusatzteilen, die im Betrieb bewegt
werden, muss das Gerät ausgeschaltet und vom Netz getrennt werden.
• Berühren Sie keine sich bewegenden Teile des Gerätes und warten Sie immer
den Stillstand ab. Verletzungsgefahr!
• Prüfen Sie das Gerät und alle Teile vor jedem Gebrauch auf sichtbare Schäden.
Nur in einwandfreiem Zustand kann das Sicherheitskonzept des Gerätes funktionieren.
• Nehmen Sie das Gerät auf keinen Fall in Betrieb, wenn Teile beschädigt sind
oder fehlen. Andernfalls kann erhebliche Unfallgefahr bestehen.
• Betreiben Sie das Gerät niemals unbeaufsichtigt. Sollten Sie den Arbeitsplatz
verlassen, ziehen Sie den Netzstecker aus der Netzsteckdose.
• Missbrauchen Sie das Gerät nicht für andere Zwecke als in dieser Anleitung
beschrieben. Ansonsten besteht Verletzungsgefahr!
• Seien Sie vorsichtig beim Umgang und bei der Reinigung des Pürierstabs. Das
Messer ist sehr scharf!
Achtung – Sachschaden!
• Verwenden Sie das Gerät nicht im Freien. Das Gerät ist ausschließlich für den
Haushaltsgebrauch und innerhalb des Hauses bestimmt.
• Lassen Sie alle Reparaturen ausschließlich von Fachpersonal ausführen.
Wenden Sie sich in diesem Fall an den jeweiligen Servicepartner in Ihrem Land.
- 4 -
Page 8
Auspacken
Bedienen
• Entnehmen Sie alle Teile aus der Verpackung.
• Entfernen Sie sämtliche Verpackungsmaterialien
und Transportsicherungen.
• Prüfen Sie den Lieferumfang auf Vollständigkeit
und Beschädigungen.
• Reinigen Sie alle Teile, wie im Kapitel „Reinigen“
beschrieben.
Aufstellen
• Stellen Sie den Rührständer 6 auf eine ebene
Fläche. An der Unterseite des Rührständers 6
sind drei Saugnäpfe angebracht, um das Verrutschen während des Betriebes zu verhindern.
• Achten Sie darauf, dass die verwendete Netzsteckdose im Fehlerfall gut zu erreichen ist.
Geschwindigkeits-Stufen
0 Gerät ist ausgeschaltet
1 gute Ausgangsgeschwindigkeit zum Mischen
von „weichen” Zutaten, wie Mehl, Butter etc.
2 beste Geschwindigkeit für das Mixen flüssiger
Zutaten
3 Optimal für das Mischen von Kuchen- und Brot-
teigen
4 Zum Schaumigschlagen von Butter, Zucker, für
Süßspeisen etc.
5 Zum Schlagen von Eischnee, Kuchenguss, Sahne
etc.
Zur Bedienung des Pürierstabs w:
Nur in Kombination mit der Turbo-Taste 2 ver-
wendbar.
Turbo-Taste 2:
• diese Taste erlaubt es Ihnen, sofort die gesamte
Leistung Ihres Gerätes zur Verfügung zu haben.
• zur Bedienung des Pürierstabs w.
Kneten und Quirlen
Warnung:
Betreiben Sie den Mixer nicht länger als 10 Minuten
am Stück. Machen Sie nach 10 Minuten solange
eine Pause, bis sich das Gerät abgekühlt hat. Ansonsten kann das Gerät irreparabel beschädigt werden.
1. Reinigen Sie vor dem ersten Gebrauch die Aufsätze (e,r,t), die Rührschüssel 7 und den
Deckel 9.
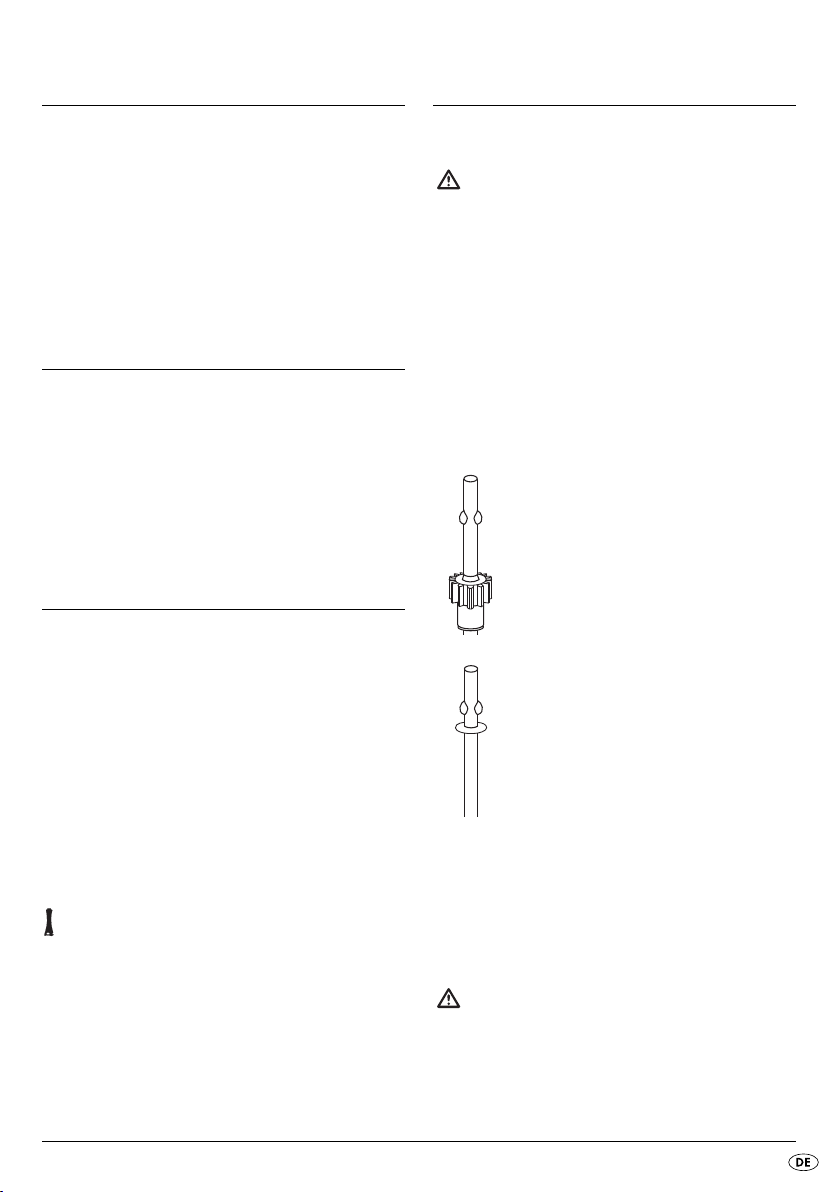
2. Schieben Sie die Quirle e oder Knethaken r
soweit in das Gerät, bis diese sicher und hörbar
einrasten:
Stecken Sie den Knethaken r oder den
Quirl e mit dem gezahnten Ring immer
in den dafür vorgesehenen und mit dem
Piktogramm gekennzeichneten Steckplatz
am Gerät.
Stecken Sie den Knethaken r oder den
Quirl e mit dem glatten Ring am Stab
nur in den dafür vorgesehenen Steckplatz
am Gerät.
3. Entriegeln Sie die Mixer-Halterung durch
Drücken des Entriegelungs-Knopfes 5 und klap-
pen Sie die Mixer-Halterung nach oben.
4. Entnehmen Sie die Rührschüssel 7 und füllen Sie
die Zutaten je nach zuzubereitender Menge ein.
Achtung:
• Füllen Sie nie mehr Zutaten als bis zur MAXMarkierung (ca. 2,5 l) in die Rührschüssel 7.
Die Zutaten laufen sonst während des Betriebes
über den Rand.
- 5 -
Page 9

• Füllen Sie nie mehr Zutaten als insgesamt 1,5 kg
in die Rührschüssel 7. Ansonsten kann der Motor beschädigt werden.
5. Setzen Sie die Rührschüssel 7 wieder auf den
Rührständer 6.
6. Drücken Sie den Entriegelungs-Knopf 5 und
klappen Sie die Halterung nach unten.
7. Setzen Sie das Handteil 0 auf die Halterung,
so dass dieser einrastet.
8. Schieben Sie den Deckel 9 in die Schiene am
Rührständer 6, so dass er fest sitzt.
Hinweis:
Wenn Sie während des Rührvorganges Zutaten hinzugeben wollen, öffnen Sie die Einfüllöffnung 8
und geben Sie die Zutaten hinzu. Schließen Sie danach die Einfüllöffnung 8 unbedingt wieder, um ein
Herausspritzen der Zutaten zu vermeiden!
Sie können den Handmixer auch ohne den Rührständer 6 verwenden. Insbesonders bei geringen
Flüssigkeitsmengen ist es ratsam, den Handmixer
ohne den Rührständer 6 zu benutzen. Ansonsten
wird die Flüssigkeit nicht vollständig erfasst und
nicht richtig durchgemischt.
Achtung:
Benutzen Sie auf keinen Fall Gefäße aus Glas oder
anderen leicht zerbrechlichen Materialien. Diese
Gefäße können beschädigt werden und Verletzungen hervorrufen.
9. Stecken Sie den Netzstecker in eine Netzstek-
kdose ein.
10. Um den Mixer in Betrieb zu nehmen, schieben
Sie den Geschwindigkeits-Schalter 1 auf die
gewünschte Geschwindigkeits-Stufe. Sie können dabei zwischen 5 Geschwindigkeits-Stufen
oder der Turbo-Taste 2 auswählen (s. Kapitel
„Geschwindigkeits-Stufen“).
Warnung:
Betreiben Sie den Mixer nicht länger als 10 Minuten am Stück. Machen Sie nach 10 Minuten solange eine Pause, bis sich das Gerät abgekühlt hat. Ansonsten kann das Gerät irreparabel beschädigt
werden.
Hinweis:
Wenn Zutaten am Rand der Rührschüssel 7 haften
und diese nicht von den Knethaken r/Quirlen e
erfasst werden, schalten Sie den Handmixer aus.
Nehmen Sie den Deckel 9 ab. Schieben Sie mit
Hilfe des Teigschabers t die hängen gebliebenen
Zutaten wieder in die Mitte der Rührschüssel 7.
Setzen Sie den Deckel 9 wieder auf. Schalten Sie
den Handmixer wieder ein.
11. Um den Schüsselinhalt zu entnehmen, schalten
Sie den Handmixer aus. Ziehen Sie den Deckel
9 zur Seite ab. Drücken Sie den EntriegelungsKnopf 5, klappen Sie die Halterung nach oben
und nehmen Sie die Rührschüssel 7 vom Rührständer 6.
Hinweis:
Bei größeren Füllmengen in der Rührschüssel 7
empfiehlt es sich, zuerst den Mixer aus der Halterung zu nehmen.
12. Drücken Sie den Entriegelungs-Knopf für den
Handmixer 4, um den Handmixer abzunehmen
und die Auswurf-Taste q, um die Quirle e
oder Knethaken r zu lösen.
Hinweis:
Aus Sicherheitsgründen lassen sich die Quirle e
oder Knethaken r nur lösen, wenn der Geschwindigkeits-Schalter 1 auf der Position „0“ oder „ “
steht.
- 6 -
Page 10
Pürieren
Warnung:
Benutzen Sie den Pürierstab w nie für harte Lebensmittel, wie etwa: Kaffeebohnen, Eiswürfel, Zucker,
Getreide, Schokolade, sehr hartes Gemüse etc. Das
führt zu Beschädigungen am Gerät.
Achtung:
Benutzen Sie auf keinen Fall Gefäße aus Glas oder
anderen leicht zerbrechlichen Materialien. Diese
Gefäße können beschädigt werden und Verletzungen
hervorrufen.
1. Öffnen Sie die Einsatz-Vorrichtung für den Pürierstab mit Sicherheitsverschluss 3 und halten Sie
den Sicherheitsverschluss 3 fest.
Hinweis:
Der Pürierstab w kann nur eingesetzt werden, wenn
keine Quirle e oder Knethaken r installiert sind.
Warnung:
Betreiben Sie den Pürierstab w nicht länger als eine
Minute am Stück. Machen Sie nach einer Minute solange eine Pause, bis sich das Gerät abgekühlt hat.
5. Wenn Sie mit dem Einsatz des Pürierstabs w fertig
sind, stellen Sie den Geschwindigkeits-Schalter 1
auf die Position „0“ und ziehen Sie den Netzstecker.
Achtung:
Reinigen Sie nur den unteren Teil des Pürierstabs w
unter fließendem Wasser. Es darf kein Wasser ins
Innere des Pürierstabs w gelangen. Das führt zu
Beschädigungen am Gerät.
6. Zur Reinigung des Pürierstabs w drehen Sie ihn
aus der Einsatz-Vorrichtung 3 heraus.
Reinigen
2. Schieben Sie den Pürierstab w in die Einsatz-
Vorrichtung 3 und drehen Sie ihn unter leichten
Druck in Richtung des Pfeiles fest.
3. Um ein Überlaufen zu verhindern, sollten Sie das
Püriergefäß nur zu 2⁄3 befüllen. Wählen Sie
hierzu ein ausreichend großes Gefäß.
Hinweise:
• Um ein wirksames Vermischen der Zutaten zu
garantieren, sollte das zuzubereitende Gut mindestens den Unterteil des Pürierstabs w bedecken.
• Schalten Sie den Handmixer erst ein, wenn Sie
den Pürierstab w in das Püriergut geführt haben.
4. Schieben Sie den Geschwindigkeits-Schalter 1
in die Stellung „Pürierstab“ (s. Kapitel
„Geschwindigkeits- Stufen“) und drücken Sie die
Turbo-Taste 2. Halten Sie die Turbo-Taste 2
während des Einsatzes gedrückt. Sobald Sie diese lösen, wird das Gerät gestoppt.
Achtung:
Ziehen Sie vor jeder Reinigung den Netzstecker. Es
besteht die Gefahr eines elektrischen Schlages!
Auf keinen Fall darf das Handteil 0 mit dem
Motor in Wasser oder andere Flüssigkeiten
getaucht werden! Hier kann Lebensgefahr
durch elektrischen Schlag entstehen, wenn im
Betrieb Flüssigkeitsreste auf spannungsführende Teile gelangen.
• Reinigen Sie das Handteil 0 mit dem Motor nur
mit einem feuchten Tuch und gegebenenfalls mit
einem milden Reinigungsmittel.
• Reinigen Sie den Rührständer 6 nur mit einem
feuchten Tuch und gegebenenfalls mit einem milden Reinigungsmittel.
• Die Quirle e oder Knethaken r können Sie un-
ter fließendem Wasser oder in warmen Wasser
mit Spülmittel reinigen. Trocknen Sie alles nach
der Reinigung gut ab.
- 7 -
Page 11

Achtung:
Reinigen Sie nur den unteren Teil des Pürierstabs w
unter fließendem Wasser. Es darf kein Wasser ins
Innere des Pürierstabs w gelangen. Das führt zu
Beschädigungen am Gerät.
• Wir empfehlen, die Aufsätze direkt nach Gebrauch zu säubern. So werden Nahrungsmittelrückstände beseitigt und die Möglichkeit einer
Bakterienbildung reduziert.
• Reinigen Sie die Rührschüssel 7, den Deckel 9
und den Teigschaber t in warmen Wasser mit
Spülmittel.
Hinweise:
Sie können die Rührschüssel 7, den Deckel 9 und
den Teigschaber t auch in der Spülmaschine reinigen. Legen Sie alles, wenn möglich, in den oberen
Korb der Spülmaschine.
Rezepte
Schoko-Amaretto-Creme
500 ml Sahne
500 ml Mascarpone
100 g Nuss-Nougat-Creme
5 EL Amaretto
1 - 2 EL Honig
Hefezopf
500 g Mehl
60 g Butter
60 g Zucker
7 g Salz
42 g Hefe (1 Päckchen frische Hefe)
200 ml Milch
1 Ei
1 Eigelb
eventuell etwas Hagelzucker
1. Setzen Sie die Hefe in etwas lauwarmer Milch
mit Zucker an.
2. Geben Sie alle Zutaten, sobald die Hefe etwas
gegangen ist, in die Rührschüssel 7.
3. Kneten Sie die Zutaten mit den Knethaken r gut
durch.
4. Lassen Sie den Teig ca. 20 Minuten ruhen.
5. Formen Sie dann den Hefezopf und lassen Sie
das Gebäck weitere 30 Minuten gehen.
6. Bestreichen Sie den Hefezopf mit etwas Eigelb.
Wenn Sie möchten, können Sie noch etwas Hagelzucker auf den Hefezopf streuen.
7. Heizen Sie den Ofen auf ca. 200 °C Umluft vor
und backen Sie den Hefezopf ca. 25 Minuten
bis er goldbraun ist.
Schokoladen-Creme
300 g Sahne
200 g Zartbitterschokolade
1. Geben Sie die Sahne und die Mascarpone in
die Rührschüssel 7 und vermengen Sie es mit
den Quirlen e.
2. Fügen Sie nach und nach den Amaretto, den
Honig und die Nuss-Nougat-Creme hinzu und
vermischen Sie alles gründlich.
Füllen Sie die Creme in Dessertgläser und kühlen
Sie sie bis zum Verzehr.
1. Kochen Sie die Sahne auf.
2. Zerbröckeln Sie die Schokolade und lassen Sie
sie in der Sahne schmelzen.
3. Lassen Sie die Schokoladenmasse im Kühlschrank abkühlen, so dass sie fest wird.
4. Wenn die Masse kalt und fest geworden ist,
schlagen Sie sie mit den Quirlen e cremig auf.
Streuen Sie vor dem Servieren ein paar Mandelsplitter darüber.
Hinweis:
Sie können diese Schokoladen-Creme auch als Füllung für anderes Gebäck verwenden.
- 8 -
Page 12

Aioli
500 g Mayonnaise
1 Becher Schmand
50 g Knoblauch
2 TL Senf (mittelscharf)
1 Pkt. gemischte Kräuter (tiefgekühlt)
1 Prise Zucker
1/2 TL Salz
1/2 TL Pfeffer
1. Häuten Sie den Knoblauch und drücken Sie Ihn
durch eine Knoblauchpresse.
2. Geben Sie die Mayonnaise, den Schmand und
den Knoblauch in die Rührschüssel 7 und mischen Sie alles mit den Quirlen e gut durch.
3. Geben Sie nach und nach den Senf, die Kräuter,
den Zucker, den Pfeffer und das Salz hinzu und
vermengen Sie alles.
4. Zum Schluss schmecken Sie die Aioli noch etwas
ab.
Kräuter-Vinaigrette
3 - 4 Stängel glatte Petersilie
3 - 4 Basilikum
1 Zitrone
1 TL Senf (mittelscharf)
1 Knoblauchzehe
Salz, Pfeffer
100 ml Ölivenöl
evtl 1 Prise Zucker
1. Geben Sie die Blätter der Kräuter, den Saft der
Zitrone, den Senf, den Knoblauch, Salz und Pfeffer in ein hohes Mixgefäß.
2. Vermengen Sie alles mit dem Pürierstab w und
lassen Sie nach und nach dabei das Öl hinzufließen, bis die Sauce cremig ist.
3. Schmecken Sie die Vinaigrette ab, eventuell mit
einer Prise Zucker.
Entsorgen
Werfen Sie das Gerät keinesfalls in den
normalen Hausmüll. Dieses Produkt
unterliegt der europäischen Richtlinie
2012/19/EU.
Entsorgen Sie das Gerät über einen zugelassenen
Entsorgungsbetrieb oder über Ihre kommunale
Entsorgungseinrichtung.
Beachten Sie die aktuell geltenden Vorschriften.
Setzen Sie sich im Zweifelsfall mit Ihrer Entsorgungseinrichtung in Verbindung.
Führen Sie alle Verpackungsmaterialien
einer umweltgerechten Entsorgung zu.
Garantie und Service
Sie erhalten auf dieses Gerät 3 Jahre Garantie ab
Kaufdatum. Das Gerät wurde sorgfältig produziert
und vor Anlieferung gewissenhaft geprüft.
Bitte bewahren Sie den Kassenbon als Nachweis
für den Kauf auf. Bitte setzen Sie sich im Garantiefall
mit Ihrer Servicestelle telefonisch in Verbindung.
Nur so kann eine kostenlose Einsendung Ihrer Ware
gewährleistet werden.
Die Garantieleistung gilt nur für Material- oder
Fabrikationsfehler, nicht aber für Transportschäden,
Verschleißteile oder für Beschädigungen an zerbrechlichen Teilen, z. B. Schalter oder Akkus. Das
Produkt ist lediglich für den privaten und nicht für
den gewerblichen Gebrauch bestimmt.
Bei missbräuchlicher und unsachgemäßer Behandlung, Gewaltanwendung und bei Eingriffen, die
nicht von unserer autorisierten Service-Niederlassung
vorgenommen wurden, erlischt die Garantie. Ihre
gesetzlichen Rechte werden durch diese Garantie
nicht eingeschränkt.
- 9 -
Page 13

Die Garantiezeit wird durch die Gewährleistung
nicht verlängert. Dies gilt auch für ersetzte und reparierte Teile. Eventuell schon beim Kauf vorhandene
Schäden und Mängel müssen sofort nach dem
Auspacken gemeldet werden, spätestens aber zwei
Tage nach Kaufdatum. Nach Ablauf der Garantiezeit
anfallende Reparaturen sind kostenpflichtig.
Service Deutschland
Tel.: 0800 5435 111
(Kostenfrei aus dem dt. Festnetz/Mobilfunknetz)
E-Mail: kompernass@lidl.de
IAN 60492
Service Österreich
Tel.: 0820 201 222 (0,15 EUR/Min.)
E-Mail: kompernass@lidl.at
IAN 60492
Service Schweiz
Tel.: 0842 665566 (0,08 CHF/Min.,
Mobilfunk max. 0,40 CHF/Min.)
E-Mail: kompernass@lidl.ch
IAN 60492
Erreichbarkeit Hotline:
Montag bis Freitag von 8:00 Uhr - 20:00 Uhr (MEZ)
Importeur
KOMPERNASS HANDELS GMBH
BURGSTRASSE 21
44867 BOCHUM
GERMANY
www.kompernass.com
- 10 -
Page 14

SOMMAIRE PAGE
Introduction 12
Usage conforme 12
Accessoires fournis 12
Désignations des pièces 12
Caractéristiques techniques 12
Consignes de sécurité 13
Déballage 15
Installation 15
Niveaux de vitesse 15
Fonctionnement 15
Pétrir et battre . . . . . . . . . . . . . . . . . . . . . . . . . . . . . . . . . . . . . . . . . . . . . . . . . . . . . . . . . . . . .15
Réduire en purée . . . . . . . . . . . . . . . . . . . . . . . . . . . . . . . . . . . . . . . . . . . . . . . . . . . . . . . . . . .17
Nettoyage 17
Recettes 18
Crème au chocolat et à l'amaretto . . . . . . . . . . . . . . . . . . . . . . . . . . . . . . . . . . . . . . . . . . . . .18
Brioche tressée . . . . . . . . . . . . . . . . . . . . . . . . . . . . . . . . . . . . . . . . . . . . . . . . . . . . . . . . . . . .18
Crème au chocolat . . . . . . . . . . . . . . . . . . . . . . . . . . . . . . . . . . . . . . . . . . . . . . . . . . . . . . . . .18
Aïoli . . . . . . . . . . . . . . . . . . . . . . . . . . . . . . . . . . . . . . . . . . . . . . . . . . . . . . . . . . . . . . . . . . . . .19
Vinaigrette aux herbes . . . . . . . . . . . . . . . . . . . . . . . . . . . . . . . . . . . . . . . . . . . . . . . . . . . . . .19
Mise au rebut 19
Garantie et service après-vente 19
Importateur 20
- 11 -
Page 15

SET DE BATTEUR À MAIN
Introduction
Toutes nos félicitations pour l'achat de votre nouvel
appareil.
Vous avez choisi un produit de grande qualité. Le
mode d'emploi fait partie de ce produit. Il contient
des remarques importantes concernant la sécurité,
l'utilisation et la mise au rebut. Veuillez vous familiariser avec l'ensemble des consignes d'opération et
de sécurité avant l'usage du produit. N'utilisez le
produit que conformément aux consignes et pour
les domaines d'utilisation prévus. En cas de transfert
du produit à un tiers, remettez-lui également tous les
documents.
Usage conforme
Ce set batteur électrique sert exclusivement à pétrir
des pâtes, mixer des liquides (jus de fruits par ex.),
battre de la crème chantilly et réduire des fruits en
purée. Il doit être strictement réservé à la préparation
d'aliments. Cet appareil est exclusivement réservé à
l'utilisation dans le cadre domestique. Evitez de
l'utiliser à des fins professionnelles.
Accessoires fournis
1 batteur à main
1 support
1 bol mélangeur avec couvercle
2 crochets de pétrissage
2 fouets
1 pied presse-purée
1 spatule
Mode d'emploi
Désignations des pièces
Figure A :
1 Interrupteur de vitesse
2 Touche turbo
3 Dispositif d'insertion du pied presse-purée
avec fermeture de sécurité
4 Bouton de déverrouillage pour le batteur
5 Bouton de déverrouillage
6 Support
7 Bol mélangeur
8 Orifice de remplissage
9 Couvercle
0 Corps
q Touche d'éjection
Figure B :
w Pied presse-purée
e Fouet en acier inoxydable
r Crochet de pétrissage en acier inoxydable
t Spatule
Caractéristiques techniques
Tension nominale : 220 - 240 V ~, 50 Hz
Puissance nominale : 300 W
Classe de protection : II /
Temps d'opération
par intermittence : Mixeur : 10 minutes
Pied
presse-purée : 1 minute
Temps d'opération par intermittence :
Le temps d'opération par intermittence indique pendant combien de temps l'appareil peut être opéré,
sans que le moteur ne surchauffe ou subisse de dommages. Après le temps d'opération par intermittence
indiqué, l'appareil doit être éteint jusqu'à ce que le
moteur se soit refroidi.
- 12 -
Page 16

Consignes de sécurité
Danger – Choc électrique !
• Le cordon d'alimentation ne doit jamais être en contact avec les pièces
chaudes de l'appareil ou d'autres sources de chaleur. Ne laissez pas le
cordon d'alimentation reposer sur des bords ou des coins.
• Évitez de plier ou d'écraser le cordon d'alimentation.
• Faites immédiatement remplacer les fiches secteur ou les câbles secteur
endommagés par un technicien spécialisé agréé ou par le service clientèle,
pour éviter tout risque.
• Tirez toujours sur la fiche secteur, pas sur le cordon d'alimentation lui-même,
lorsque vous séparez l'appareil du réseau électrique. Vous risquez autrement
d'endommager le cordon d'alimentation !
Ne plongez pas la pièce à main dans de l'eau ou dans d'autres liquides !
Danger de mort par électrocution si des restes d'humidité entrent en contact
avec des pièces sous tension.
Avertissement – Risque d'accident !
• Cet appareil peut être utilisé par des personnes ayant des capacités physiques, sensorielles ou mentales réduites ou disposant de peu d'expérience
et/ou de connaissances, à condition qu'elles soient surveillées ou qu'elles
aient été initiées à l'utilisation sécurisée de l'appareil et qu'elles aient compris
les dangers en résultant.
• Cet appareil ne doit pas être utilisé par des enfants.
• Ne pas laisser les enfants jouer avec l'appareil.
• Tenir l'appareil et son cordon de raccordement hors de portée des enfants.
• En cas d'absence de surveillance et avant l'assemblage, le désassemblage ou
le nettoyage, l'appareil doit toujours être débranché du secteur.
• En cours d'opération, veuillez ne pas toucher le fouet, le crochet ou ou le mixeur
plongeant. La lame du mixeur plongeant est très acérée ! Ne laissez pas
pendre de cheveux longs, un foulard ou quelque chose de similaire au-dessus
des accessoires.
• N'essayez jamais de monter en même temps des accessoires avec des fonctions différentes.
- 13 -
Page 17

• Après chaque utilisation et avant chaque nettoyage, retirez la fiche secteur
pour éviter une mise en marche accidentelle.
• Avant de remplacer des accessoires, retirez toujours la fiche secteur pour
éviter une mise en marche accidentelle.
• Avant de remplacer des accessoires ou des pièces auxiliaires, qui se déplacent
en cours d'opération, l'appareil doit être éteint et coupé du réseau.
• Ne touchez pas de pièces mobiles et attendez toujours que l'appareil soit
immobilisé. Risque de blessures !
• Vérifier l'appareil et toutes les pièces pour repérer des dommages visibles. La
sécurité de l'appareil ne peut être garantie que si ce dernier est en parfait état.
• Ne prenez en aucun cas l'appareil en service si des pièces sont endommagées ou manquent. Risque important d'accident !
• N'opérez jamais l'appareil sans surveillance. Si vous devez quitter le plan de
travail, retirez la fiche secteur de la prise.
• Ne détournez pas l'appareil à des fins autres que celles décrites dans le
présent mode d'emploi. Sinon, il y a un risque de blessures !
• Faites attention en manipulant ou en nettoyant le mixeur plongeant. La lame
est extrêmement tranchante !
Attention – Dommages matériels !
• N'utilisez pas l'appareil à l'extérieur. L'appareil est exclusivement prévu pour
une utilisation domestique et à l'intérieur de la maison.
• Confiez toutes les réparations en exclusivité au personnel qualifié. Dans ce
cas, adressez-vous au partenaire de service respectif dans votre pays.
- 14 -
Page 18

Déballage
Fonctionnement
• Prélevez toutes les pièces de l'emballage.
• Enlevez toutes les sécurités de transport et tout
le matériel d'emballage.
• Vérifiez si la livraison est complète et ne
comporte pas de dommages.
• Nettoyez toutes les pièces comme cela est décrit
dans le chapitre "Nettoyage“.
Installation
• Posez le support 6 sur une surface plane. Trois
ventouses sont appliquées sur le bas du support 6,
pour éviter tout glissement en cours d'opération.
• Veillez à ce que la prise secteur utilisée soit facile d'accès en cas de défaillance.
Niveaux de vitesse
0 L'appareil est éteint.
1 Bonne vitesse de démarrage pour mélanger des
ingrédients "mous" comme la farine, le beurre etc.
2 Vitesse optimale pour le mélange d'ingrédients
liquides
3 Vitesse optimale pour le mélange de pâtes à
gâteau et à pain
4 Pour battre en mousse le beurre, le sucre, pour
les entremets etc.
5 Pour monter les oeufs en neige, réaliser des
nappages, de la crème chantilly, etc.
Pour l'opération du pied presse-purée w :
Utilisable uniquement en combinaison avec la
touche turbo 2.
Pétrir et battre
Avertissement :
N'opérez pas l'appareil plus de 10 minutes d'affilée.
Après 10 minutes, faites une pause jusqu'à ce que
l'appareil se soit refroidi. Sinon, l'appareil peut être
endommagé de façon irréparable.
1. Avant la première utilisation, nettoyez les accessoires (e,r,t) et le bol mélangeur 7 ainsi
que le couvercle 9.
2. Insérez le fouet e ou le crochet de pétrissage r
dans l'appareil, jusqu'à ce qu'ils s'enclenchent
de manière fiable et audible :
Insérez le crochet de pétrissage r ou le
fouet e avec l'anneau denté toujours à
l'endroit prévu à cette fin et doté d'un
pictogramme sur l'appareil.
Insérez le crochet de pétrissage r ou le
fouet e avec l'anneau lisse toujours à
l'endroit prévu à cette fin sur l'appareil.
3. Déverrouillez la fixation du batteur en appuyant
sur le bouton de déverrouillage 5 et repliez la
fixation du batteur vers le haut.
4. Retirez le bol mélangeur 7 et versez les ingrédients selon la quantité préparée.
Touche turbo 2 :
• cette touche vous permet d'accéder immédiatement à toute la performance de votre appareil.
• pour l'opération du pied presse-purée w.
Attention :
• Ne mettez jamais plus d'ingrédients que le marquage MAX (env. 2,5 l) dans le bol mélangeur 7.
Sinon, les ingrédients débordent en cours d'opération.
- 15 -
Page 19

• Ne versez pas plus de 1,5 kg d'ingrédients au
total dans le bol mélangeur 7. Vous risqueriez
dans le cas contraire d'endommager le moteur.
5. Placez à nouveau le bol mélangeur 7 sur le
support 6.
6. Appuyez sur le bouton de déverrouillage 5
et repliez la fixation vers le bas.
7. Placez le corps 0 sur la fixation afin qu'il s'encliquète.
8. Faites glisser le couvercle 9 dans le rail du support 6, jusqu'à parvenir à une assise ferme.
Remarque :
Si vous souhaitez ajouter des ingrédients en cours
d'opération, ouvrez l'orifice de remplissage 8 et
ajoutez les ingrédients. Fermez ensuite à nouveau
impérativement l'orifice de remplissage 8, pour
éviter toute projection des ingrédients !
Vous pouvez utiliser le batteur à main même sans
support 6. En particulier pour des quantités réduites
de liquides, il est recommandé d'utiliser le batteur sans
le support 6. Sinon, le liquide n'est pas saisi dans son
intégralité et n'est pas correctement mélangé.
Attention :
N'utilisez en aucun cas des conteneurs en verre ou à
base d'autres matériaux fragiles. Ces conteneurs peuvent être endommagés ou provoquer des blessures.
9. Enfichez la fiche secteur dans la prise secteur.
10. Pour faire démarrer le batteur, mettez l'interrup-
teur de vitesse 1 sur le niveau de vitesse souhaité. Vous pouvez à cet égard choisir entre
5 niveaux de vitesse ou la touche turbo 2
(voir le chapitre «Niveaux de vitesse»).
Avertissement :
N'opérez pas le batteur plus de 10 minutes d'affilée.
Après 10 minutes, faites une pause jusqu'à ce que
l'appareil se soit refroidi. Sinon, l'appareil peut être
endommagé de façon irréparable.
Remarque :
Lorsque les ingrédients adhérent au bord du bol mélangeur 7 et qu'ils ne sont pas saisis par les crochets
de pétrissage r/fouets e, éteignez le batteur à
main. Retirez le couvercle 9. A l'aide de la spatu-
le t, poussez à nouveau les ingrédients qui sont restés
accrochés au milieu du bol mélangeur 7. Replacez le
couvercle 9. Allumez à nouveau le batteur à main.
11. Si vous souhaitez retirer le contenu du bol
mélangeur, éteignez tout d'abord le batteur.
Retirez le couvercle 9 par le côté. Appuyez
sur le bouton de déverrouillage 5, repliez
la fixation vers le haut et retirez le bol 7 du
support 6.
Remarque :
En cas de quantités plus importantes dans le bol 7,
il est recommandé de retirer dans un premier temps
le batteur de la fixation.
12. Appuyez sur le bouton de déverrouillage 4,
pour retirer le batteur à main et la touche
d'éjection q, pour retirer le fouet e ou le
crochet de pétrissage r.
Remarque :
Par sécurité, il n'est possible de retirer les fouets e
ou les crochets de pétrissage r qu'une fois l'interrupteur de vitesse 1 réglé sur la position «0» ou « ».
- 16 -
Page 20

Réduire en purée
Avertissement :
N'utilisez jamais le pied presse-purée w pour des
denrées alimentaires dures, comme par exemple :
grains de café, glaçons, sucre, céréales, chocolat,
légumes très durs, etc., car cela entraîne des dommages sur l'appareil.
Attention :
N'utilisez en aucun cas des conteneurs en verre ou à
base d'autres matériaux fragiles. Ces conteneurs peuvent être endommagés ou provoquer des blessures.
1. Ouvrez le dispositif d'insertion pour le pied
presse-purée avec la fermeture de sécurité 3 et
tenez fermement la fermeture de sécurité 3.
Remarque :
Le pied presse-purée w peut uniquement être utilisé
lorsqu'aucun fouet e ou crochet de pétrissage r
n'est inséré.
Avertissement :
N'opérez pas le pied presse-purée w plus d'une
minute d'affilée. Après une minute, faites une pause
jusqu'à ce que l'appareil se soit refroidi.
5. Lorsque vous avez fini d'utiliser le pied pressepurée w, mettez l'interrupteur de vitesse 1 en
position «0» et retirez la fiche secteur.
Attention :
Nettoyez uniquement la partie inférieure du pied
presse-purée w à l'eau courante. De l'eau ne doit
pas pénétrer à l'intérieur du pied presse-purée w.
On risquerait d'endommager l'appareil.
6. Pour nettoyer le pied presse-purée w, tournez-le
pour le faire sortir du dispositif d'insertion 3.
Nettoyage
2. Poussez le pied presse-purée w dans le dispositif
d’insertion du pied presse-purée avec fermeture de
sécurité 3 et serrez-le en le tournant dans le sens
de la flèche en exerçant une pression légère.
3. Pour éviter tout débordement, vous devriez remplir le conteneur de réduction en purée aux 2⁄3
seulement. Pour ce faire, sélectionnez un conteneur suffisamment grand.
Remarques :
• Afin de garantir un mélange efficace des ingrédients, le mélange à transformer devrait au
moins recouvrir la partie inférieure du pied
presse-purée w.
• Allumez uniquement le batteur à main, lorsque
vous avez introduit le pied presse-purée w dans
les aliments à réduire en purée.
4. Mettez l'interrupteur de vitesse 1 en position «Pied
presse-purée» (cf. chapitre «Niveaux de vitesse»)
et appuyez sur la touche turbo 2. Maintenez la
touche turbo 2 enfoncée en cours d'usage. Dès
que vous la relâchez, l'appareil s'arrête.
Attention :
• Débranchez la fiche secteur avant chaque nettoyage. Risque d'électrocution !
Le corps 0 de l'appareil avec le moteur ne
doit en aucun cas être plongé dans de l'eau
ou dans d'autres liquides ! Vous risquez votre
vie par électrocution en cas de contact de pièces conductrices d'électricité avec un reste de
liquide alors que l'appareil est en marche.
• Nettoyez le corps 0 de l'appareil avec le moteur
uniquement avec un chiffon humide et éventuellement avec un produit nettoyant doux.
• Nettoyez le support 6 uniquement avec un chiffon
humide et éventuellement avec un produit nettoyant doux.
• Vous pouvez nettoyer les fouets e ou les crochets
de pétrissage r à l'eau courante ou à l'eau
chaude avec du produit vaisselle. Veillez à bien
les sécher après le nettoyage.
- 17 -
Page 21

Attention :
Nettoyez uniquement la partie inférieure du pied
presse-purée w à l'eau courante. De l'eau ne doit
pas pénétrer à l'intérieur du pied presse-purée w.
On risquerait d'endommager l'appareil.
• Nous vous recommandons de nettoyer les accessoires directement après usage. Les restes de
denrées alimentaires sont ainsi éliminés et le
risque de formation de bactéries est limité.
• Nettoyez le bol mélangeur 7, le couvercle 9
et la spatule t dans l'eau chaude additionnée
de détergent.
Remarques :
Vous pouvez également nettoyer le bol mélangeur 7,
le couvercle 9 et la spatule t dans le lave-vaisselle.
Si possible, placez les pièces dans le panier supérieur du lave-vaisselle.
Recettes
Crème au chocolat et à l'amaretto
500 ml de crème fraîche
500 ml de mascarpone
100 g de pâte à tartiner au chocolat et aux noisettes
5 CS d'amaretto
1 - 2 CS de miel
1. Mettez la crème fraîche et le mascarpone dans le
bol mélangeur 7 et mélangez le tout à l'aide
des fouets e.
2. Ajoutez progressivement l'amaretto, le miel et la
pâte à tartiner et mélangez soigneusement le tout.
Versez la crème dans des coupes à dessert et
mettez au frais jusqu'à la dégustation.
Brioche tressée
500 g de farine
60 g de beurre
60 g de sucre
7 g de sel
42 g de levure (1 paquet de levure fraîche)
200 ml de lait
1 œuf
1 jaune d'œuf
éventuellement un peu de sucre grain
1. Diluez la levure dans un peu de lait tiède.
2. Mettez tous les ingrédients, dès que la levure a
un peu levé, dans le bol mélangeur 7.
3. Pétrissez bien les ingrédients avec le crochet à
pétrir r.
4. Laissez reposer la pâte pendant env. 20 minutes.
5. Mettez la brioche tressée en forme et laissez
lever pendant 30 minutes supplémentaires.
6. Badigeonnez la brioche tressée d'un peu de jaune
d'œuf. Si vous le souhaitez, vous pouvez rajouter
un peu de sucre grain sur la brioche tressée.
7. Préchauffez le four à env. 200 °C de chaleur
tournante et faites cuire la brioche tressée pendant
env. 25 minutes jusqu'à ce qu'elle soit dorée.
Crème au chocolat
300 g de crème liquide
200 g de chocolat noir
1. Faites chauffer la crème.
2. Réduisez le chocolat en miettes et faites-le fondre
dans la crème fraîche.
3. Laissez refroidir la préparation au chocolat dans
le réfrigérateur, afin qu'elle se solidifie.
4. Lorsque la préparation a refroidi et qu'elle est
bien solide, battez-la à l'aide des fouets e pour
en faire une préparation crémeuse.
Avant de servir, parsemez de quelques amandes
effilées.
Remarque :
Vous pouvez utiliser cette crème au chocolat pour
garnir d'autres pâtisseries.
- 18 -
Page 22

Aïoli
500 g de mayonnaise
1 pot de crème fraîche
50 g d'ail
2 CC de moutarde (mi-forte)
1 paquet de mélange d'herbes (congelé)
1 pincée de sucre
1/2 CC de sel
1/2 CC de poivre
1. Pelez l'ail et pressez-le à l'aide d'un presse à ail.
2. Ajoutez la mayonnaise, la crème fraîche et l'ail
dans le bol mélangeur 7 et mélangez bien le
tout à l'aide des fouets e.
3. Ajouter progressivement la moutarde, les herbes,
le sucre, le poivre et le sel et mélangez le tout.
4. Pour finir, assaisonnez un peu l'aïoli.
Vinaigrette aux herbes
3 - 4 tiges de persil plat
3 - 4 de feuilles de basilic
1 citron
1 CC de moutarde (mi-forte)
1 gousse d'ail
Sel, poivre
100 ml d'huile d'olive
évtl 1 pincée de sucre
1. Mettez les feuilles, le jus d'un citron, la moutarde,
l'ail, le sel et le poivre dans un bol à mélanger
aux bords élevés.
2. Mélangez le tout à l'aide d'un pied pressepurée w et ajoutez progressivement l'huile
jusqu'à ce que la sauce soit bien crémeuse.
3. Assaisonnez la vinaigrette, éventuellement avec
une pincée de sucre.
Mise au rebut
L’appareil ne doit jamais être jeté dans
la poubelle domestique normale.
Ce produit est soumis à la directive
européenne 2012/19/EU.
Remettez l'appareil destiné au recyclage à une
entre-prise spécialisée ou au centre de recyclage
de votre commune.
Veuillez respecter les règlements actuellement en
vigueur.
En cas de doutes, contactez votre organisation de
recyclage.
Eliminez l'ensemble des matériaux d'emballage d'une manière respectueuse de
l'environnement.
Garantie et service après-vente
Cet appareil bénéficie de 3 ans de garantie à
compter de la date d'achat. L'appareil a été fabriqué
avec soin et consciencieusement contrôlé avant sa
distribution.
Veuillez conserver le ticket de caisse en guise de
preuve d'achat. Si la garantie devait s'appliquer, contactez par téléphone votre interlocuteur du service
après-vente. Cette condition doit être respectée pour
assurer l'expédition gratuite de votre marchandise.
La prestation de garantie s'applique uniquement
pour les erreurs de matériaux et de fabrication, pas
pour les dommages de transport, les pièces d'usure
ou les dommages subis par les pièces fragiles, comme
par ex. les interrupteurs ou les batteries. Le produit
est exclusivement destiné à un usage privé et non
commercial.
La garantie est annulée en cas de manipulation incorrecte et inappropriée, d'utilisation brutale et en
cas d'intervention qui n'aurait pas été réalisée par
notre centre de service après-vente agréé. Cette garantie ne constitue pas une restriction de vos droits
légaux.
- 19 -
Page 23

La durée de la garantie n'est pas prolongée par la
garantie du fabricant. Ceci vaut également pour les
pièces remplacées et réparées. Tous dommages et
défauts présents dès l'achat doivent être notifiés dès
que le produit est déballé, et au plus tard deux jours
après la date d'achat. Toutes réparations survenant
après la période sous garantie ne seront pas prises
Service France
Tel.: 0800 919270
E-Mail: kompernass@lidl.fr
IAN 60492
Service Suisse
Tel.: 0842 665566 (0,08 CHF/Min.,
mobile max. 0,40 CHF/Min.)
E-Mail: kompernass@lidl.ch
IAN 60492
Heures de service de notre hotline :
du lundi au vendredi de 8 h à 20 h (HEC)
Importateur
KOMPERNASS HANDELS GMBH
BURGSTRASSE 21
44867 BOCHUM
GERMANY
www.kompernass.com
- 20 -
Page 24

INDICE PAGINA
Introduzione 22
Uso conforme 22
Fornitura 22
Definizioni dei componenti 22
Dati tecnici 22
Indicazioni di sicurezza 23
Disimballaggio 25
Installazione 25
Livelli di velocità 25
Funzionamento 25
Impastare e frullare . . . . . . . . . . . . . . . . . . . . . . . . . . . . . . . . . . . . . . . . . . . . . . . . . . . . . . . . .25
Ridurre in purea . . . . . . . . . . . . . . . . . . . . . . . . . . . . . . . . . . . . . . . . . . . . . . . . . . . . . . . . . . .27
Pulizia 27
Ricette 28
Crema al cioccolato e amaretto . . . . . . . . . . . . . . . . . . . . . . . . . . . . . . . . . . . . . . . . . . . . . . .28
Treccia lievitata . . . . . . . . . . . . . . . . . . . . . . . . . . . . . . . . . . . . . . . . . . . . . . . . . . . . . . . . . . . .28
Crema al cioccolato . . . . . . . . . . . . . . . . . . . . . . . . . . . . . . . . . . . . . . . . . . . . . . . . . . . . . . . .28
Salsa Aioli . . . . . . . . . . . . . . . . . . . . . . . . . . . . . . . . . . . . . . . . . . . . . . . . . . . . . . . . . . . . . . . .29
Vinaigrette alle erbe . . . . . . . . . . . . . . . . . . . . . . . . . . . . . . . . . . . . . . . . . . . . . . . . . . . . . . . .29
Smaltimento 29
Garanzia e assistenza 29
Importatore 30
- 21 -
Page 25

SET SBATTITORE
Introduzione
Congratulazioni per l'acquisto del nuovo apparecchio.
Lei ha scelto un prodotto di alta qualità. Il manuale
di istruzioni è parte integrante del presente prodotto.
Esso contiene importanti indicazioni per la sicurezza,
l'uso e lo smaltimento. Prima di utilizzare il prodotto,
si familiarizzi con tutte le indicazioni relative ai comandi e alla sicurezza.Utilizzi il prodotto solo come
descritto e per i campi di impiego indicati. In caso
di cessione del prodotto a terzi, consegni anche
tutta la documentazione relativa.
Uso conforme
Questo set di frullatore a mano è idoneo per lavorare
impasti, miscelare liquidi (ad es. succhi di frutta), montare la panna e frullare la frutta. Esso è idoneo solo
alla lavorazione di alimenti. Questo apparecchio è
destinato esclusivamente all'uso in ambienti domestici
privati. Non utilizzare a fini commerciali.
Fornitura
1 frullatore a mano
1 base
1 recipiente con coperchio
2 ganci da impasto
2 fruste
1 asta frullatrice
1 spatola
Istruzioni per l'uso
Definizioni dei componenti
Figura A:
1 Commutatore di velocità
2 Tasto Turbo
3 Dispositivo di inserimento dell'asta frullatrice con
blocco di sicurezza
4 Pulsante di sbloccaggio per il mixer
5 Pulsante di sbloccaggio
6 Base
7 Ciotola
8 Apertura di inserimento
9 Coperchio
0 Impugnatura
q Tasto di espulsione
Figura B:
w Asta frullatrice
e Fruste di acciaio inox
r Ganci di acciaio inox
t Spatola
Dati tecnici
Tensione nominale: 220 - 240 V ~, 50 Hz
Potenza nominale: 300 W
Classe di protezione: II /
Tempo di funzionamento
abbreviato: Mixer: 10 min.
Asta frullatrice: 1 min.
Tempo di funzionamento abbreviato
Il tempo di funzionamento abbreviato indica il tempo
di funzionamento dell'apparecchio senza pericolo
di surriscaldamento e di guasti al motore. Dopo l'uso
per il tempo di funzionamento abbreviato indicato,
l'apparecchio dev'essere spento fino al completo
raffreddamento del motore.
- 22 -
Page 26

Indicazioni di sicurezza
Pericolo di scossa elettrica!
• Il cavo di rete non deve mai entrare in contatto con componenti bollenti
dell'apparecchio o con altre sorgenti di calore. Impedire che il cavo di rete
poggi su spigoli o angoli.
• Non piegare né schiacciare il cavo di alimentazione.
• Al fine di evitare pericoli, fare sostituire immediatamente spine o cavi danneggiati da personale specializzato autorizzato o dal centro di assistenza clienti.
• Per separare l'apparecchio dalla corrente elettrica, tirare sempre dalla spina e
mai dal cavo. In caso contrario, il cavo di rete potrebbe danneggiarsi irreparabilmente!
Non immergere l'impugnatura in acqua o in altri liquidi! Può sussistere il
pericolo di morte a causa di folgorazione in caso di contatto di liquidi con
parti sotto tensione dell'apparecchio in funzione.
Avvertenza – Pericolo di lesioni!
• Questo apparecchio può essere utilizzato da persone con capacità fisiche,
sensoriali o mentali ridotte o insufficiente esperienza o conoscenza, solo se
sorvegliate o istruite sull'uso sicuro dell'apparecchio e qualora ne abbiano
compreso i pericoli associati.
• Questo apparecchio non deve venire utilizzato da bambini.
• I bambini non devono giocare con l'apparecchio.
• Tenere lontani i bambini dall'apparecchio e dal relativo cavo.
- 23 -
Page 27

• Staccare sempre l'apparecchio dalla rete in caso di mancata sorveglianza e
prima del montaggio, dello smontaggio o della pulizia.
• Durante il funzionamento non toccare mai le fruste, i ganci da impasto o l'asta
frullatrice. La lama dell'asta frullatrice è affilata! Assicurarsi che capelli lunghi
o sciarpe non si incastrino nell'apparecchio.
• Non cercare mai di montare contemporaneamente accessori che hanno diverse funzioni.
• Dopo ogni uso e prima di ogni pulizia staccare la spina in modo da impedire
un'accensione involontaria.
• Prima della sostituzione degli accessori, staccare sempre la spina in modo da
impedire un'accensione involontaria.
• Prima della sostituzione di accessori o componenti aggiuntivi che durante il funzionamento si muovono, occorre spegnere l'apparecchio e staccare la spina.
• Non toccare componenti dell'apparecchio in movimento e attenderne sempre
l'arresto completo. Pericolo di lesioni!
• Prima dell'utilizzo controllare sempre se l'apparecchio o i suoi componenti presentano danni. La sicurezza dell'apparecchio è garantita solo in concomitanza alla sua totale integrità.
• Non azionare assolutamente l'apparecchio in caso di elementi danneggiati o
mancanti. In caso contrario, sussiste un forte pericolo di infortuni.
• Non azionare mai l'apparecchio incustodito. Se ci si deve allontanare dall'apparecchio, disconnettere sempre la spina dalla presa di corrente
• Non utilizzare l'apparecchio per scopi diversi da quelli descritti nelle istruzioni
per l'uso. In caso contrario sussiste il rischio di lesioni!
• Prestare attenzione nel maneggio e nella pulizia dell'asta frullatrice. La lama è
molto affilata!
Attenzione – Danni materiali!
• Non utilizzare l'apparecchio all'aperto. L'apparecchio è destinato all'utilizzo
privato in ambiente domestico.
• Far eseguire tutte le eventuali riparazioni esclusivamente da personale esperto
e qualificato. In tali casi rivolgersi al partner di assistenza del proprio paese.
- 24 -
Page 28

Disimballaggio
Funzionamento
• Rimuovere tutti i componenti dalla confezione.
• Rimuovere tutti i fissaggi del trasporto e i materiali
di imballaggio.
• Controllare la fornitura in relazione alla sua
completezza e integrità.
• Pulire tutti i componenti come descritto al
capitolo "Pulizia"
Installazione
• Collocare la base 6 su una superficie piana.
Sul fondo della base 6 sono presenti tre ventose
per impedire lo scivolamento durante l'uso.
• Utilizzare una presa di corrente facilmente
raggiungibile in caso di guasti.
Livelli di velocità
0 Apparecchio spento
1 Buona velocità per mescolare ingredienti „morbidi”,
come farina, burro, ecc.
2 Velocità ottimale per mescolare ingredienti liquidi
3 Velocità ottimale per lavorare impasti per dolci
e panificazione
4 Velocità ottimale per montare a neve burro,
zucchero, dolci, ecc.
5 Per montare albumi, glasse, panna, ecc.
Impastare e frullare
Advertencia:
Non utilizzare l'apparecchio per oltre 10 minuti.
Dopo 10 minuti, fare una pausa per consentire il
raffreddamento dell'apparecchio. In caso contrario,
l'apparecchio potrebbe danneggiarsi irreparabilmente.
1. Prima del primo impiego pulire gli accessori
(e,r,t), la ciotola 7 e il coperchio 9.
2. Spingere le fruste e o i ganci da impasto r
nell'apparecchio, fino all'inserimento udibile:
Inserire i ganci da impasto r o la frusta e
con l'anello dentato sempre nell'inserto
previsto sull'apparecchio e contrassegnato dal pittogramma.
Inserire i ganci da impasto r o la frusta e
con l'anello liscio sull'asta solo nell'apposito inserto previsto sull'apparecchio.
Per l'utilizzo dell'asta frullatrice w:
Utilizzabile solo in combinazione con il tasto
Turbo 2.
Tasto Turbo 2:
• questo tasto consente di avere a disposizione immediatamente tutta la potenza dell'apparecchio.
• per l'uso dell'asta frullatrice w.
3. Sbloccare il supporto del mixer premendo il
pulsante di sbloccaggio 5 e ribaltare il supporto
del mixer verso l'alto.
4. Prelevare la ciotola 7 e inserire gli ingredienti
a seconda delle quantità previste dalla ricetta.
Attenzione:
• Non inserire mai una quantità di ingredienti
superiore a quanto indicato dalla marcatura
MAX (ca. 2,5 l) nella ciotola 7. In caso contrario, gli ingredienti fuoriusciranno durante la
lavorazione.
- 25 -
Page 29

• Non inserire mai ingredienti in quantità superiore
a 1,5 kg nel recipiente 7. In caso contrario, il
motore si può danneggiare.
5. Ricollocare la ciotola 7 sulla base 6.
6. Premere il tasto di sbloccaggio 5 e piegare il
supporto verso il basso.
7. Collocare la parte manuale 0 sul supporto in
modo da ottenerne l'inserimento.
8. Spingere il coperchio 9 nelle guide sulla base 6,
in modo da inserirlo saldamente.
Avvertenza:
Se durante il procedimento di lavorazione si vogliono
aggiungere altri ingredienti, aprire l'apertura di inserimento 8 e inserire gli altri ingredienti. Richiudere
quindi sempre l'apertura di inserimento 8, per evitare
che gli ingredienti spruzzino al di fuori del recipiente!
Il mixer può essere utilizzato anche senza la base 6.
In particolare per piccole quantità di liquidi, è
consigliabile utilizzare il mixer senza la base 6.
In caso contrario, il liquido non verrà lavorato e
mescolato correttamente.
Attenzione:
Non utilizzare in alcun caso contenitori di vetro o
altri materiali fragili. Questi contenitori possono
danneggiarsi e arrecare lesioni.
Advertencia:
Non utilizzare l'apparecchio per oltre 10 minuti.
Dopo 10 minuti, fare una pausa per consentire il
raffreddamento dell'apparecchio. In caso contrario,
l'apparecchio potrebbe danneggiarsi irreparabilmente.
Avviso:
Se gli ingredienti si attaccano ai lati della ciotola 7 e
non riescono a essere lavorati dai ganci r/fruste e,
spegnere il mixer. Rimuovere il coperchio 9. Con l'aiuto della spatola t riportare gli ingredienti nel centro
della ciotola 7. Ricollocare il coperchio 9. Riaccen-
dere il mixer.
11. Per prelevare il contenuto della ciotola, spegnere
il mixer. Spostare il coperchio 9 di lato. Premere
il pulsante di sbloccaggio 5, ribaltare il supporto verso l'alto e prelevare la ciotola 7 dalla
base 6.
Avviso:
In presenza di grandi quantità di alimenti nella
ciotola 7 si consiglia di prelevare prima il mixer
dal supporto.
12. Premere il pulsante di sbloccaggio 4, per
prelevare il mixer e il tasto di espulsione q,
per sganciare le fruste e o i ganci r.
9. Inserire la spina di rete in una presa di rete.
10. Per mettere in funzione il frullatore, spingere il
commutatore di velocità 1 sul livello di velocità
desiderato. In tal caso è possibile scegliere fra i
5 livelli di velocità o il tasto turbo 2 (v. capito-
lo „Livelli di velocità“).
Avviso:
Per motivi di sicurezza, le fruste e o i ganci da im-
pasto r si possono sganciare solo se l’interruttore
di velocità 1 in posizione “0” o “ ”.
- 26 -
Page 30

Ridurre in purea
Advertencia:
Non utilizzare mai l'asta frullatrice w per alimenti
duri come ad esempio: chicchi di caffè, cubetti di
ghiaccio, zucchero, cereali, cioccolata, verdure
molto dure, ecc. Ciò arrecherebbe danni all'apparecchio.
Attenzione:
Non utilizzare in alcun caso contenitori di vetro o
altri materiali fragili. Questi contenitori possono
danneggiarsi e arrecare lesioni.
1. Aprire il dispositivo di inserimento dell'asta frulla-
trice con il blocco di sicurezza 3 e tenere fermo
il blocco di sicurezza 3.
Avviso:
L'asta frullatrice w può essere utilizzata solo se non
sono state installate fruste e o ganci r.
Advertencia:
Non azionare l'asta frullatrice w per un periodo
superiore a un minuto. Dopo un minuto, fare una
pausa per consentire il raffreddamento dell'apparecchio.
5. Dopo aver terminato di utilizzare l'asta frullatrice w, impostare il commutatore di velocità 1 in
posizione „0“ ed estrarre la spina di rete.
Attenzione:
Pulire solo la parte inferiore dell'asta frullatrice w
sotto acqua corrente. Impedire la penetrazione di
acqua all'interno dell'asta frullatrice w. Ciò potrebbe
causare danni all'apparecchio.
6. Per la pulizia dell'asta frullatrice w estrarla dal
dispositivo di inserimento 3.
Pulizia
2. Introdurre l’asta frullatrice w nel dispositivo di
inserimento 3 e avvitarla con una leggera pressione in direzione della freccia .
3. Per evitare che gli alimenti trabocchino, riempire
il contenitore per la frullatura solo fino a 2⁄3.
Selezionare al riguardo un contenitore sufficientemente grande.
Suggerimenti:
• Per garantire l'efficace miscelazione degli ingredienti, gli alimenti da elaborare devono coprire
almeno la parte inferiore dell'asta frullatrice w.
• Accendere il mixer solo dopo aver inserito l'asta
frullatrice w nell'alimento da frullare.
4. Spostare il commutatore di velocità 1 nella po-
sizione „Asta frullatrice“ (v. capitolo „Livelli
di velocità“) e premere il tasto turbo 2. Tenere
premuto il tasto turbo 2 durante l'uso. Non
appena lo si rilascia, l'apparecchio si fermerà.
Attenzione:
Prima di pulire l'apparecchio, staccare sempre la
spina dalla presa di corrente. Sussiste il pericolo di
scossa elettrica!
Non immergere assolutamente l'impugnatura 0
con il motore in acqua o altri liquidi! Il contatto
fortuito di elementi sotto tensione con residui di
liquido durante il funzionamento può comportare il pericolo di morte per scossa elettrica.
• Ripulire l'impugnatura 0 con il motore solo con
un panno umido ed eventualmente con un
detergente delicato.
• Ripulire la base 6 solo con un panno umido ed
eventualmente con un detergente delicato.
• Le fruste e o i ganci r possono essere lavati
sotto acqua corrente o in acqua tiepida con detersivo. Dopo la pulizia, asciugare tutto accuratamente.
- 27 -
Page 31

Attenzione:
Pulire solo la parte inferiore dell'asta frullatrice w
sotto acqua corrente. Nell'interno dell'asta frullatrice w non deve penetrare acqua. Ciò potrebbe
causare danni all'apparecchio.
• Consigliamo di pulire gli accessori immediatamente dopo l'uso. In tal modo è possibile rimuovere i
resti di alimenti, riducendo la possibilità di formazione di batteri.
• Pulire la ciotola 7, il coperchio 9 e la spatola t
in acqua calda saponata.
Suggerimenti:
È possibile lavare il contenitore 7, il coperchio 9
e la spatola t anche in lavastoviglie. Se possibile,
collocarli tutti nel cestello superiore della lavastoviglie.
Ricette
Crema al cioccolato e amaretto
500 ml di panna
500 ml di mascarpone
100 g di crema alla nocciola-nougat
5 cucchiai di amaretto
1 - 2 cucchiai di miele
1. Versare la panna e il mascarpone nella ciotola 7
e mescolarla con le fruste e.
2. Aggiungere l'amaretto, il miele e la crema alla
nocciola-nougat un po' alla volta e mescolare
tutto accuratamente.
Versare la crema in coppe da dessert e fare raffreddare fino al momento del consumo.
Treccia lievitata
500 g di farina
60 g di burro
60 g di zucchero
7 g di sale
42 g lievito (1 pacchetto di lievito fresco)
200 ml di latte
1 uovo
1 tuorlo
granella di zucchero (opzionale)
1. Sciogliere il lievito in poco latte tiepido con aggiunta di zucchero.
2. Non appena il lievito ha reagito un po', versare
tutti gli ingredienti nella ciotola 7.
3. Impastare bene gli ingredienti con i ganci da
impasto r.
4. Fare riposare l'impasto per circa 20 minuti.
5. Formare la treccia lievitata e fare continuare la
lievitazione per altri 30 minuti.
6. Spennellare la treccia lievitata con un po' di tuorlo
d'uovo. Se lo si desidera, si può ancora cospargere la treccia con la granella di zucchero.
7. Riscaldare il forno a circa 200° C con ventilazione e cuocere la treccia lievitata per circa
25 minuti, fino a quando la treccia non assumerà
un colore bruno-dorato.
Crema al cioccolato
300 g di panna
200 g di cioccolato fondente
1. Portare a bollitura la panna.
2. Spezzettare il cioccolato e farlo sciogliere nella
panna.
3. Fare raffreddare in frigorifero fino ad avvenuta
solidificazione.
4. Quando l'impasto ottenuto è diventato freddo
e solido, montarlo con le fruste e fino a farlo
diventare cremoso.
Prima di servire, cospargere la crema con granella
di mandorle.
Avviso:
Questa crema al cioccolato può essere utilizzata
per farcire altri pasticcini.
- 28 -
Page 32

Salsa Aioli
500 g di maionese
1 bicchiere di panna acida
50 g di aglio
2 cucchiaini di senape (semipiccante)
1 pacchetto di erbe aromatiche miste (surgelate)
1 pizzico di zucchero
1/2 cucchiaino di sale
1/2 cucchiaino di pepe
1. Spellare l'aglio e premerlo con un premiaglio.
2. Aggiungere la maionese, la panna acida e l'aglio
nella ciotola 7 e mescolare tutto bene con le
fruste e.
3. Aggiungere poco alla volta la senape, le erbe
aromatiche, lo zucchero, il pepe e il sale,
mescolando il tutto.
4. Per concludere, insaporire ancora un po' la
salsa Aioli.
Vinaigrette alle erbe
3 - 4 gambi di prezzemolo italiano
3 - 4 foglie di basilico
1 limone
1 cucchiaino di senape (semipiccante)
1 spicchio d'aglio
sale, pepe
100 ml di olio d'oliva
a piacere 1 presa di zucchero
1. Aggiungere le foglie delle erbe aromatiche, il
succo del limone, l'aglio, il sale e il pepe in un
contenitore alto.
2. Miscelare tutto con l'asta frullatrice w e aggiun-
gere l'olio poco alla volta, fino a ottenere una
salsa cremosa.
3. Insaporire la vinaigrette se lo si desidera con
una presa di zucchero.
Smaltimento
Non gettare per alcun motivo l’apparecchio insieme ai normali rifiuti
domestici. Questo prodotto sottostà
alla direttiva europea 2012/19/EU.
Smaltire l'apparecchio presso un'azienda autorizzata
o presso l'ente comunale di smaltimento.
Rispettare le norme attualmente in vigore.
In caso di dubbi mettersi in contatto con l'ente
di smaltimento competente.
Smaltire tutti i materiali dell'imballaggio
in modo ecologicamente conforme.
Garanzia e assistenza
Questo apparecchio è garantito per 3 anni a partire
dalla data di acquisto. L'apparecchio è stato prodotto con cura e debitamente collaudato prima della
consegna.
Conservare lo scontrino come prova d'acquisto. In
caso di interventi in garanzia, contattare telefonicamente il proprio centro di assistenza. Solo in questo
modo è possibile garantire una spedizione gratuita
della merce.
La garanzia vale solo per i difetti di materiale o
fabbricazione, non per i danni da trasporto, parti
soggette a usura o danni a parti fragili come ad es.
interruttori o accumulatori. Il prodotto è destinato
esclusivamente all'uso domestico e non a quello
commerciale.
La garanzia decade in caso di impiego improprio o
manomissione, uso della forza e interventi non eseguiti dalla nostra filiale di assistenza autorizzata.
Questa garanzia non costituisce alcun limite ai
diritti legali del consumatore. Il periodo di garanzia
non viene prolungato in caso di un intervento in garanzia.
- 29 -
Page 33

Ciò vale anche per le componenti sostituite e riparate.
I danni e difetti presenti già all'acquisto devono essere comunicati immediatamente dopo il disimballaggio, e non oltre due giorni dalla data di acquisto. Le riparazioni effettuate dopo la scadenza del
periodo di garanzia sono a pagamento.
Assistenza Italia
Tel.: 02 36003201
E-Mail: kompernass@lidl.it
IAN 60492
Assistenza Svizzera
Tel.: 0842 665566 (0,08 CHF/Min.,
telefonia mobile max. 0,40 CHF/Min.)
E-Mail: kompernass@lidl.ch
IAN 60492
Raggiungibilità della hotline:
dal lunedì al venerdì, dalle 8.00 alle 20.00 (CET)
Importatore
KOMPERNASS HANDELS GMBH
BURGSTRASSE 21
44867 BOCHUM
GERMANY
www.kompernass.com
- 30 -
Page 34

CONTENT PAGE
Introduction 32
Intended Use 32
Items supplied 32
Description of Components 32
Technical data 32
Safety instructions 33
Unpacking 35
Placing 35
Speed levels 35
Operation 35
Kneading and Whisking . . . . . . . . . . . . . . . . . . . . . . . . . . . . . . . . . . . . . . . . . . . . . . . . . . . . .35
Blending . . . . . . . . . . . . . . . . . . . . . . . . . . . . . . . . . . . . . . . . . . . . . . . . . . . . . . . . . . . . . . . . .37
Cleaning 37
Recipes 38
Chocolate Amaretto Cream . . . . . . . . . . . . . . . . . . . . . . . . . . . . . . . . . . . . . . . . . . . . . . . . . .38
Braided Bread . . . . . . . . . . . . . . . . . . . . . . . . . . . . . . . . . . . . . . . . . . . . . . . . . . . . . . . . . . . . .38
Chocolate Cream . . . . . . . . . . . . . . . . . . . . . . . . . . . . . . . . . . . . . . . . . . . . . . . . . . . . . . . . . .38
Aioli . . . . . . . . . . . . . . . . . . . . . . . . . . . . . . . . . . . . . . . . . . . . . . . . . . . . . . . . . . . . . . . . . . . . .39
Herb Vinaigrette . . . . . . . . . . . . . . . . . . . . . . . . . . . . . . . . . . . . . . . . . . . . . . . . . . . . . . . . . . .39
Disposal 39
Warranty and Service 39
Importer 40
- 31 -
Page 35

HAND MIXER SET
Introduction
Congratulations on the purchase of your new appliance.
You have clearly decided in favour of a quality
product. These operating instructions are a part of
this product. They contain important information in
regard to safety, use and disposal. Before using the
product, familiarise yourself with all of these operating
and safety instructions. Use the product only as described and only for the specified areas of application.
In addition, pass these documents on, together with
the product, to any future owner.
Intended Use
This Handmixer set is intended exclusively for kneading dough, mixing liquids (e.g. fruit juices), whipping
cream and the pureeing of fruit. It is only suitable
for the processing of foodstuffs. This appliance is
intended exclusively for use in domestic households.
Do not use it for commercial purposes.
Items supplied
1 Hand mixer
1 Mixing stand
1 Mixing bowl with lid
2 Kneading hooks
2 Whisks
1 Blender
1 Dough scraper
Operating instructions
Description of Components
Illustration A:
1 Speed switch
2 Turbo button
3 Fixture for the blender, with safety cover
4 Unlocking button for handmixer
5 Unlocking button
6 Mixing stand
7 Mixing bowl
8 Filler opening
9 Lid
0 Hand element
q Ejection button
Illustration B:
w Blender
e Whisk made of stainless steel
r Kneading hooks made of stainless steel
t Dough scraper
Technical data
Power rating: 220 - 240 V ~, 50 Hz
Rated output: 300 W
Protection class: II /
Continuous
operating time: Mixer: 10 min.
Blender: 1 min.
CO Time
The C.O. Time (Continuous Operation) details how
long an appliance may be used without the motor
overheating and being damaged. When the given
C.O. Time has lapsed, the appliance must be switched
off until the motor has cooled itself down.
- 32 -
Page 36

Safety instructions
Danger – Risk of electric shocks!
• Keep power cable away from hot parts of the appliance and other heat
sources. Do not run power cable over sharp edges or corners.
• Do not kink or crush the power cable.
• To avoid danger, have defective plugs and/or power cables replaced immediately by qualified technicians or our Customer Service Department.
• Always hold the plug when disconnecting the appliance from the power
supply, do not pull on the power cable. Otherwise the power cable could
be damaged!
Do not submerge the hand element in water or any other liquid!
Risk of electrocution if residual liquids come into contact with live components
during operation.
Warning – Risk of injury!
• This appliance may be used by people with reduced physical, sensory or mental
capabilities or lack of experience and/or knowledge if they are supervised and
have been instructed in how to use the appliance safely and have understood
the potential risks.
• This appliance may not be used by children.
• Children must not use the appliance as a plaything.
• The appliance and its connecting cable must be kept away from children.
• The appliance should always be disconnected from the mains when not supervised and before assembly, disassembly or cleaning.
• Do not touch the whisks, kneading hooks or the blender while the appliance is
in use. The blender blade is sharp! Do not dangle long hair, scarves or the like
over the mixing attachments.
• NEVER attempt to fit attachments with differing functions at the same time.
- 33 -
Page 37

• Unplug the appliance after every use and before cleaning to prevent it from
switching on inadvertently.
• Always unplug the appliance before changing the accessories to prevent it
from switching on inadvertently.
• Switch appliance off and disconnect from the power supply before changing
accessories or additional parts that move during operation.
• Do not touch moving parts of the appliance, always wait for them to come to a
complete stop. Risk of injury!
• Always check the appliance and all parts for signs of visible damage before
use. The safety concept can work only if the appliance is in a faultless condition.
• Never use the appliance if parts are damaged, defective or missing. Doing so
will increase the risk of accidents.
• The appliance must always be supervised during use. If you need to leave the
workplace, remove the plug from the mains power socket.
• Never use the appliance for purposes other than those described in these instructions. Otherwise there is a risk of serious injury!
• Be careful when handling and cleaning the blender. The blade is extremely sharp!
Caution – Property Damage!
• Do not use the appliance outdoors. The appliance is intended exclusively for
domestic use indoors.
• Have all repairs carried out by trained personnel. If required, contact our
service partner responsible for your country.
- 34 -
Page 38

Unpacking
Operation
• Take all components out the packaging.
• Remove all packaging materials and transport
restraints.
• Check that all of the items listed are present and
that they do not show signs of damage.
• Clean all of the components as described in the
section “Cleaning”.
Placing
• Place the mixer stand 6 onto a level surface.
Three suction discs have been fixed to the base
of the mixer stand 6 to prevent it sliding during
operation.
• Ensure that the mains power socket is easily
accessible in the event of a risk situation.
Speed levels
0 Appliance is switched off
1 Good starting speed for mixing "soft" ingredients
such as flour, butter, etc.
2 Best speed for blending liquid ingredients
3 Optimum speed for mixing cake and bread
dough
4 For whipping butter to form a fine foam, sugar,
for desserts etc.
5 For beating egg whites, cake glazing, cream etc.
For operating the blender w:
Only usable in combination with the turbo
button 2.
Turbo button 2:
• this button allows you to have the full power of
your appliance immediately at your disposal.
• for operating the blender w.
Kneading and Whisking
Warning:
Do not operate the mixer for longer than 10 minutes
in one session. After 10 minutes, allow the appliance
to rest until it has cooled itself down. Otherwise, the
appliance could be irreparably damaged.
1. Before the first usage, clean the attachments
(e,r,t), the mixing bowl 7 and the lid 9.
2. Push the whisk e or the kneading hooks r
into the appliance until they safely and audibly
engage:
Always insert the kneading hook r or
the whisk e with the toothed ring on
the rod into the intended slot on the
appliance which is marked with an icon.
Insert the kneading hook r or the whisk e
with the smooth ring on the rod only
into the intended slot on the appliance.
3. Release the mixer holder by pressing the unlokking button 5 and lift the mixer holder upwards.
4. Remove the mixing bowl 7 and fill it with the
quantities of ingredients to be prepared.
Attention:
• NEVER fill the mixing bowl 7 beyond the MAX
marking (approx. 2.5 l) with ingredients. If you
do, there is a risk they could spill over the edge
during operation.
- 35 -
Page 39

• Never fill the mixing bowl 7 with more than a
total of 1.5 kg of ingredients. Otherwise the
motor may be damaged.
5. Replace the mixing bowl 7 onto the mixing
stand 6.
6. Press the unlocking button 5 and lower the holder downwards.
7. Place the hand element 0 on the holder so that
it firmly engages.
8. Slide the lid 9 into the guiderails on the mixing
stand 6 so that it is firmly seated.
Note:
Should you wish to add ingredients whilst mixing,
open the filler opening 8 and insert them through
it. To avoid a splattering of the ingredients, be sure
to reclose the filler opening 8!
You can also use the hand mixer without the mixing
stand 6. Especially with minor amounts of liquids
you are advised to use the hand mixer without the
mixing stand 6. Otherwise, the liquid may not be
completely captured and thus not mixed thoroughly.
Warning:
Do not operate the mixer for longer than 10 minutes
in one session. After 10 minutes, allow the appliance
to rest until it has cooled itself down. Otherwise, the
appliance could be irreparably damaged.
Note:
If ingredients become stuck to the side of the mixing
bowl 7 and they cannot be captured with the
kneading hooks r/ whisks e, switch the hand mixer
off. Remove the lid 9. Use the dough scraper t to
push them back into the middle of the mixing bowl 7.
Replace the lid 9. Switch the hand mixer back on.
11. To remove the bowl contents, switch the appliance off. Pull the lid 9 to the side and remove
it. Press the unlocking button 5, lift the holder
upwards and remove the mixing bowl 7 from
the mixing stand 6.
Note:
In the case of larger amounts in the mixing bowl 7,
it is to be recommended that you first remove the
mixer from the holder.
Attention:
Under no circumstance should you use receptacles
made of glass or other very fragile/easily breakable
materials. These containers can be damaged and
then cause potentially serious injuries.
9. Insert the plug into a mains power socket.
10. To set the mixer into motion, push the speed
switch 1 to the desired speed setting. You
can select between 5 speed settings or the
turbo button 2 (see section "Speed levels").
12. Press the unlocking button for the handmixer 4
to remove the hand mixer and the ejection button q to release the whisks e or the kneading
hooks r.
Note:
For safety reasons, the whisks e or the dough
hooks r can only be released when the speed
switch 1 is in the position "0" or " " shows.
- 36 -
Page 40

Blending
Warning:
Never use the blender w for hard foodstuffs such as:
coffee beans, ice cubes, sugar, cereals, chocolate,
raw/hard vegetables etc. They could cause serious
damage to the appliance.
Attention:
Under no circumstance should you use receptacles
made of glass or other very fragile/easily breakable
materials. These containers can be damaged and
then cause potentially serious injuries.
1. Open the fixture for the blender 3 and hold the
safety cover 3 firmly.
Note:
The blender w can only be utilised when the
whisks e or the kneading hooks r are not installed.
2. Push the blender w into the retaining mechanism 3 and tighten it by turning in the direction of
the arrow applying light pressure.
3. To avoid overflows, the container used for blending should only be filled to 2/3rds of its capacity. Select a sufficiently large container.
Tips:
• To ensure an effective blending of the ingredients,
the foodstuffs to be processed should cover at least the lower section of the blender w.
• First switch the hand mixer on when the blender w
has been inserted into the ingredients to be
blended.
4. Push the speed switch 1 into the position "Blen-
der" (s. section " Speed levels“) and press the
turbo button 2 Keep the turbo button 2 pres-
sed down during the whole procedure. The appliance stops as soon as it is released.
Warning:
Do not operate the blender w for longer than 1
minute in one session. After one minute, allow the
appliance to rest until it has cooled itself down.
5. When you have finished working with the blender w, place the speed switch 1 back into the
position "0" and remove the plug from the mains
power socket.
Attention:
Clean only the lower part of the blender w under
running water. Under no circumstances may water
permeate into the blender w. This could result in
damage to the appliance.
6. To clean the blender w twist and remove it from
the retaining mechanism 3.
Cleaning
Attention:
Always remove the power plug before cleaning the
appliance. There is a risk of receiving an electric
shock!
UNDER NO CIRCUMSTANCES may the
hand element 0 be submersed in water or
other liquids! ! This would increase the risk of
a potentially fatal electric shock should liquids
come into contact with powered components.
• Clean the hand element 0 with the electric motor only with a damp cloth and, if necessary,
with a mild detergent.
• Clean the mixing stand 6 only with a moist cloth
and, if required, with a mild cleaning detergent.
• The whisks e and the kneading hooks r can
be cleaned under running water or in warm
water with detergent. Dry everything well after
cleaning.
- 37 -
Page 41

Warning:
Clean only the lower part of the blender w under
running water. Under no circumstances may water
permeate into the blender w. These could result in
damage to the appliance.
• We recommend cleaning the ancillaries directly
after use. Food remnants are then immediately
removed, greatly reducing the risks of bacterial
contamination.
• Clean the mixing bowl 7, the lid 9 and the
dough scraper t in warm water with washing-
up liquid.
Tips:
You can also wash the mixing bowl 7, the lid 9
and the dough scraper t in the dishwasher.
If possible, place everything in the top basket of the
dishwasher.
Recipes
Chocolate Amaretto Cream
500 ml Cream
500 ml Mascarpone
100 g Nut-Nougat Cream
5 tbsp Amaretto
1 - 2 tbsp Honey
Braided Bread
500 g Flour
60 g Butter
60 g Sugar
7 g Salt
42 g Yeast (1 Pkt fresh yeast)
200 ml Milk
1 Egg
1 Egg yolk
perhaps a little coarse sugar
1. Put the yeast in some lukewarm milk with sugar.
2. Once the yeast has raised a little, add all the ingredients to the mixing bowl 7.
3. Knead the ingredients well using the dough
hooks r.
4. Let the dough rise for approx. 20 minutes.
5. Shape the braided bread and then let the pastry
rise for 30 minutes.
6. Brush the braided bread with a little egg yolk.
If you wish, you can sprinkle a little coarse sugar
on the braided bread.
7. Preheat the oven to 200°C fan heat and bake
the braided bread for about 25 minutes until it
is golden brown.
Chocolate Cream
300 g Cream
200 g Bittersweet chocolate
1. Place the cream and the mascarpone into the
mixing bowl 7 and blend it with whisks e.
2. Gradually add the amaretto, the honey and
nut-nougat cream and mix everything together
thoroughly.
Fill the cream into dessert glasses and refrigerate
them until consumption.
1. Boil the cream.
2. Crumble the chocolate and let it melt into the
cream.
3. Leave the chocolate mixture to cool in the refrigerator until it is firm.
4. When the mixture has become cold and firm,
beat it with the whisks e until creamy.
Before serving, sprinkle a few slivered almonds
over it.
Note:
You can also use this chocolate cream as a filling
for other pastries.
- 38 -
Page 42

Aioli
500 g Mayonnaise
1 beaker Sour cream
50 g Garlic
2 tsp Mustard (medium-sharp)
1 pkt. Mixed herbs (frozen)
1 pinch Sugar
1/2 tsp. Salt
1/2 tsp Pepper
1. Skin the garlic cloves and then squeeze them
through a garlic press.
2. Place the mayonnaise, sour cream and the garlic
in the mixing bowl 7 and blend all of it together
thoroughly with the whisks e.
3. Gradually blend the mustard, herbs, sugar,
pepper and salt and mix everything well.
4. Finally, season the Aioli to taste with herbs.
Disposal
Do not dispose of the appliance in your
normal domestic waste. This product is
subject to the European guideline
2012/19/EU.
Dispose of the appliance through an approved waste
disposal centre or at your community waste facility.
Observe the currently applicable regulations.
In case of doubt, please contact your waste disposal
centre.
Dispose of all packaging materials in an
environmentally friendly manner.
Warranty and Service
Herb Vinaigrette
3 - 4 sprigs of flat Parsley
3 - 4 Basil
1 Lemon
1 tsp Mustard (medium-sharp)
1 Garlic clove
Salt, Pepper
100 ml Ölive oil
perhaps 1 pinch of Sugar
1. Place the leaves of the herbs, the juice of the
lemon, the mustard, garlic, salt and pepper into
a tall mixing vessel.
2. Combine everything with a hand blender w
and then gradually add the olive oil until the
sauce is creamy.
3. Season the vinaigrette to taste, perhaps with
a pinch of sugar.
The warranty for this appliance is for 3 years from
the date of purchase. The appliance has been manufactured with care and meticulously examined
before delivery.
Please retain your receipt as proof of purchase. In the
event of a warranty claim, please make contact by
telephone with our Service Department. Only in this
way can a post-free despatch for your goods be assured.
The warranty covers only claims for material and manufacturing defects, but not for transport damage, for
wearing parts or for damage to fragile components,
e.g. buttons or batteries. This product is for private use
only and is not intended for commercial use.
The warranty is void in the case of abusive and improper handling, use of force and internal tampering not
carried out by our authorized service branch. Your
statutory rights are not restricted in any way by this
warranty.
- 39 -
Page 43

The warranty period will not be extended by repairs
made under warranty. This applies also to replaced
and repaired parts. Any damage and defects extant
on purchase must be reported immediately after unpacking the appliance, at the latest, two days after
the purchase date. Repairs made after the expiration
of the warranty period are subject to payment.
Service Great Britain
Tel.: 0871 5000 720 (£ 0.10/Min.)
E-Mail: kompernass@lidl.co.uk
IAN 60492
Hotline availability:
Monday to Friday 08:00 - 20:00 (CET)
Importer
KOMPERNASS HANDELS GMBH
BURGSTRASSE 21
44867 BOCHUM
GERMANY
www.kompernass.com
- 40 -
Page 44

KOMPERNASS HANDELS GMBH
BURGSTRASSE 21
44867 BOCHUM
DEUTSCHLAND / GERMANY
www.kompernass.com
Stand der Informationen · Version des informations
Versione delle informazioni · Last Information Update:
02 / 2014 · Ident.-No.: SHMS300B1-012014-1
IAN 60492
1
 Loading...