

Page 1
SCANNER À MAIN SHM 600 A1
SCANNER À MAIN
Mode d’emploi
HANDHELD SCANNER
Operating instructions
IAN 73767
HANDSCANNER
Bedienungsanleitung
Page 2
Avant de lire le mode d‘emploi, ouvrez la page contenant les illustrations et
familiarisez-vous ensuite avec toutes les fonctions de l‘appareil.
Klappen Sie vor dem Lesen die Seite mit den Abbildungen aus und machen
Sie sich anschließend mit allen Funktionen des Gerätes vertraut.
Before reading, unfold the page containing the illustrations and familiarise
yourself with all functions of the device.
FR Mode d’emploi Page 1
DE / AT / CH Bedienungsanleitung Seite 31
GB Operating instructions Page 61
Page 3
A
B
Page 4

Sommaire
Introduction . . . . . . . . .2
Informations relatives à ce
mode d'emploi . . . . . . . . . . 2
Droits d'auteur . . . . . . . . . . 2
Limitation de responsabilité 2
Avertissements . . . . . . . . . . 3
Utilisation conforme . . . . . . 3
Sécurité . . . . . . . . . . . .4
Manipulation des piles . . . . 4
Consignes de sécurité
fondamentales . . . . . . . . . . 5
Mise en service . . . . . .6
Consignes de sécurité . . . . 6
Accessoires fournis et
inspection de transport . . . . 6
Recyclage de l'emballage . 7
Mise en place / remplace-
ment des piles . . . . . . . . . . . 7
Eléments de réglage . .8
Fonctionnement et
opération . . . . . . . . . . .9
Mise en place / remplacement
de la carte mémoire Micro SD 9
Formatage de la carte
mémoire Micro SD . . . . . . . 9
Réglage de la date et l'heure 10
Réglage de la résolution
du scan . . . . . . . . . . . . . . . 11
Réglage du mode scan . . 11
Scanner . . . . . . . . . . . . . . 11
SHM 600 A1
Procéder au calibrage . . . 12
FR
Affi chages LED . . . . . . . . . 13
Visualisation des documents/
images scannés . . . . . . . . 13
Raccordement à un
ordinateur . . . . . . . . . . . . . 13
Installation du programme
NimoDoc Lite . . . . . . . . . . 14
Démarrage du programme
NimoDoc Lite . . . . . . . . . . 15
Nettoyage . . . . . . . . .23
Consignes de sécurité . . . 23
Nettoyage . . . . . . . . . . . . 23
Dépannage . . . . . . . .24
Causes des pannes et
remèdes . . . . . . . . . . . . . . 24
Entreposage/
Mise au rebut . . . . . . .26
Entreposage . . . . . . . . . . . 26
Mise au rebut de l'appareil 26
Mise au rebut des piles . . 26
Annexe . . . . . . . . . . . .27
Caractéristiques techniques 27
Exigences minimales à
l'ordinateur . . . . . . . . . . . . 28
Remarques relatives à la
déclaration de conformité 28
Garantie . . . . . . . . . . . . . . 29
Service après-vente . . . . . 30
Importateur . . . . . . . . . . . . 30
1
Page 5

Introduction
FR
Informations relatives à ce mode d'emploi
Toutes nos félicitations pour l'achat de votre nouvel appareil.
Vous avez choisi un produit de grande qualité.
Ce mode d'emploi fait partie intégrante du scanner à main portable
SHM 600 A1 (désigné ci-après par appareil) et vous donne des
indications importantes sur l'usage conforme, la sécurité, le raccordement ainsi que l'opération de l'appareil. Le mode d'emploi doit en
tout temps être accessible à proximité de l'appareil. Il devra être lu
et respecté par toute personne chargée d'opérer et de dépanner
l'appareil. Conservez ce mode d'emploi et remettez-le au nouveau
propriétaire de l'appareil.
Droits d'auteur
Cette documentation est protégée par les droits d'auteur.
Toute reproduction, ou toute réimpression, même sous forme d'extraits
ainsi que la reproduction des images, même dans un état modifi é est
uniquement autorisé avec l'accord écrit du fabricant.
Limitation de responsabilité
L'ensemble des informations, données et remarques techniques, pour
le raccordement et l'opération contenues dans le présent mode
d'emploi sont conformes au dernier état lors du passage en presse
en tenant compte de nos expériences passées et de nos connaissances en toute bonne foi. Aucune prétention ne peut être dérivée
des indications, images et descriptions contenues dans le présent
mode d'emploi. Le fabricant n'endosse aucune responsabilité pour
les dommages résultant d'un non respect du mode d'emploi, d'un
usage non conforme, de réparations non conformes, de modifi cations inautorisées ou de l'usage de pièces de rechange non agréées.
Introduction
2
SHM 600 A1
Page 6

Introduction
Avertissements
Les avertissements suivants sont utilisés dans ce mode d'emploi :
AVERTISSEMENT
Un avertissement de ce niveau de danger signale
une situation potentiellement dangereuse.
Des accidents peuvent résulter de l'incapacité à éviter la
situation dangereuse.
► Voilà pourquoi il est important de suivre les instructions fi gurant
d
ans cet avertissement, pour éviter que des personnes ne
soient blessées.
ATTENTION
Un avertissement de ce niveau de danger signale
un dommag
Si vous ne pouvez éviter la situation dangereuse, cela peut
entraîner des dommages matériels.
► Suivre les instructions dans cet avertissement, pour éviter tous
dommages matériels.
REMARQUE
► Une remarque signale des informations supplémentaires qui
facilitent la manipulation de l'appar
Utilisation conforme
Cet appareil est exclusivement destiné à des fi ns non commerciales
pour scanner et numériser des documents et des images. Tout usage
divergent ou toute utilisation allant au-delà seront considérés comme
non conformes. Les prétentions de toutes sortes pour dommages
résultant d'un usage non conforme sont exclues. L'opérateur est seul
à assumer le risque.
e matériel potentiel.
eil.
FR
SHM 600 A1
3
Page 7
Sécurité
FR
Ce chapitre contient des consignes de sécurité importantes se rapportant à la manipulation de l'appareil. Cet appareil est conforme
aux consignes de sécurité prescrites. Tout usage non conforme peut
entraîner des blessures ou des dommages matériels.
Manipulation des piles
AVERTISSEMENT
Danger par l'usage non conforme ! Il y a un risque
d'explosion et d'écoulement !
Veuillez respecter les consignes de sécurité suivantes pour
assurer la manipulation des piles en toute sécurité :
► Ne jetez pas les piles dans le feu.
► Ne court-circuitez pas les piles.
► Ne tentez pas de recharger les piles.
► Vérifi ez régulièrement les piles. Des fuites d'acide de pile
peuv
ent sérieusement endommager l'appareil. Il convient
d'être particulièrement prudent lorsque vous manipulez des
piles endommagées ou ayant coulé. Danger de brûlure par
l'acide ! Porter des gants de protection.
► Conservez les piles hors de portée des enfants.
Consulter immédiatement un médecin en cas d'incident
alement).
(av
► Si vous n'utilisez pas l'appareil pendant une durée prolongée,
etirez les piles.
r
Sécurité
4
SHM 600 A1
Page 8

Sécurité
Consignes de sécurité fondamentales
Pour assurer la manipulation de l'appareil en toute sécurité, veuillez
respecter les consignes de sécurité suivantes :
■ Vérifi ez la présence de dommages visibles extérieurs avant l'usage
de l'appar
ou ayant subi une chute.
■ Cet appareil n'est pas prévu pour des personnes (y compris des
enfants) dont les capacités ph
ou dont le manque d'expérience ou de connaissances les empêchent d'assurer un usage sûr des appareils, s'ils n'ont pas été
surveillés ou initiés au préalable.
■ Les enfants doivent être surveillés afi n d'éviter qu'ils ne jouent
av
■ Confi ez les réparations sur l'appareil exclusivement à des entreprises
agr
peuvent entraîner des risques importants pour l'utilisateur. A cela
s'ajoute l'expiration de la garantie.
■ Toute réparation de l'appareil au cours de la période sous garantie
de
par le fabricant, sinon tous dommages se produisant ultérieurement
ne seront pas couverts par la garantie.
■ Les pièces défectueuses devront impérativement être remplacées
par des pièces de r
sent en eff et la satisfaction des critères de sécurité.
■ Ne procédez pas à des transformations ou des modifi cations sur
l'appar
■ Protégez l'appareil de l'humidité et de la pénétration de liquides.
Ne placez pas d'objets (tels que des v
■ N'opérez pas l'appareil à proximité de fl ammes ouvertes.
eil. Ne mettez pas en service un appareil endommagé
ysiques, sensorielles ou mentales
ec l'appareil.
éées ou au service après-vente. Toutes réparations non conformes
vra être exclusivement confi ée à un service après-vente agréé
echange d'origine. Seules ces pièces garantis-
eil de votre propre initiative.
ases) à côté de l'appareil.
FR
SHM 600 A1
5
Page 9

Mise en service
FR
Consignes de sécurité
AVERTISSEMENT
La mise en service de l'appareil peut entraîner des
dommages sur les personnes et des dommages
matériels !
► Les matériaux d'emballage ne sont pas un jouet et ne doivent donc
e considérés comme tels. Il y a un risque d'étouff ement.
pas êtr
Accessoires fournis et inspection de transport
L'appareil est équipé par défaut des composants suivants :
▯ Scanner à main
▯ Carte mémoire Micro SD 2 GB y compris adaptateur sur carte
mémoir
e SD
▯ 2 x piles 1,5 V de type AA / LR6 / Mignon
▯ CD du programme
▯ Sac de rangement
▯ Câble USB
▯ Tissu de nettoyage
▯ Papier pour le calibrage de la compensation des blancs
▯ Mode d'emploi
REMARQUE
► Vérifi ez que la livraison est bien complète et qu'elle ne présente
pas de dommages appar
► En cas de livraison incomplète ou de dommages résultant d'un
emballage défectueux ou du tr
à la hotline du service après-vente (voir le chapitre Service
après-vente).
ents.
ansport, veuillez vous adresser
Mise en service
6
SHM 600 A1
Page 10
Mise en service
Recyclage de l'emballage
L'emballage protège l'appareil de tous dommages éventuels au
cours du transport. Les matériaux d'emballage ont été sélectionnés
selon des critères de respect de l'environnement et de recyclage, de
sorte qu'ils peuvent être recyclés.
Le retour de l'emballage dans le cycle des matériaux
permet d'économiser les matières premières et réduit la
formation de déchets. Recyclez les matériaux d'emballage qui ne sont plus utilisés en conformité avec les règles
locales en vigueur.
REMARQUE
► Dans la mesure du possible, veuillez conserver l'emballage
d'origine pendant la période sous gar
qu'en cas d'exercice de la garantie, vous puissiez emballer
l'appareil en bonne et due forme.
Mise en place / remplacement des piles
♦ Ouvrez le couvercle du compartiment des piles sur le haut de
l'appareil, en faisant glisser le couvercle vers la droite, puis
retirez-le.
♦ Insérez les piles du type AA/LR6/Mignon (contenues dans la
livr
aison) dans le compartiment à piles .
♦ Refermez le compartiment à piles
et en le faisant glisser vers la gauche.
antie de l'appareil, pour
, en installant le couvercle
FR
SHM 600 A1
7
Page 11
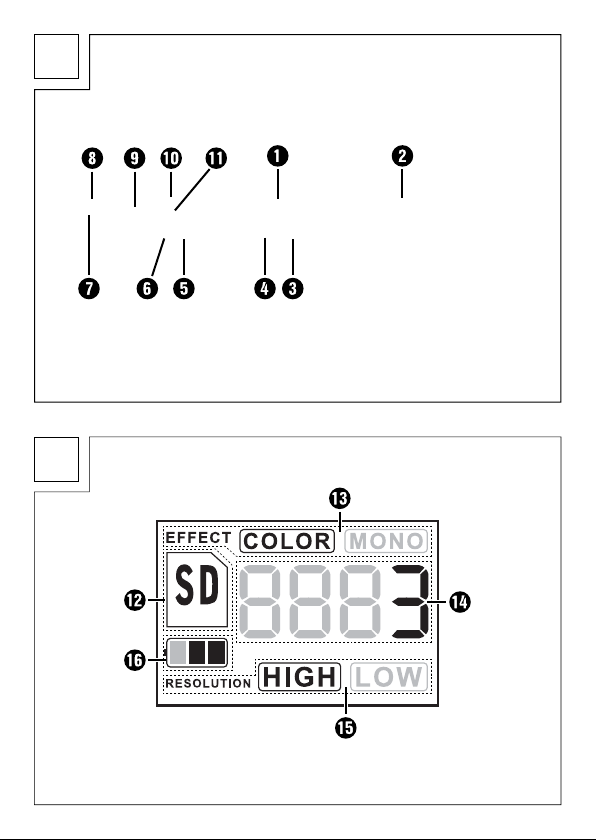
Eléments de réglage
FR
(Voir le côté dépliant Figure A)
Touche /SCAN : Bouton de mise en marche/arrêt ;
Compartiment à piles
Touche FORMAT : formater la carte mémoire Micro SD
Port d'insertion pour la carte mémoire Micro SD
Port USB
Touche TIME SET : régler la date et l'heure
LED ERR : la vitesse de scan est trop élevée
LED SCAN : le scan est exécuté
Ecran
Touche C/BW : réglage du mode scan
Touche DPI : réglage de la résolution du scan
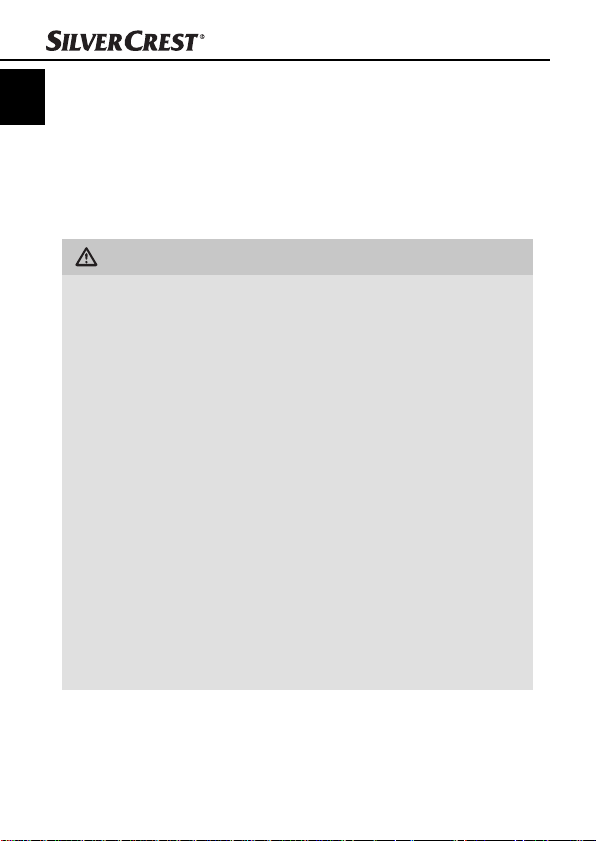
Représentations sur l'écran
(Voir le côté dépliant Figure B)
Affi chage de la carte SD : les photos sont enregistrées sur
Affi chage de l'eff et : les documents sont scannés en
Compteur : affi che le nombre de fi chiers scannés
Résolution sélectionnée : HIGH : 600 dpi ;
Affi chage de la pile : la pile est pleine ;
la pile est vide
Eléments de réglage
Démarrage/arrêt du processus de
scan
la carte mémoire Micro SD
couleur ou en blanc et noir
sur la carte mémoire Micro SD
LOW : 300 dpi
8
SHM 600 A1
Page 12
Fonctionnement et opération
Fonctionnement et opération
Ce chapitre contient des remarques importantes sur le fonctionnement
et l'opération de l'appareil.
Mise en place / remplacement de la carte mémoire
Micro SD
L'appareil a besoin d'une carte mémoire Micro SD (contenue dans
les accessoires fournis), pour scanner des documents ou des images
et les enregistrer.
♦ Eteignez l'appareil avec la touche
♦ Insérez la carte mémoire Micro SD avec les contacts métalliques
ers le haut dans le port d'insertion et appuyez doucement
v
sur la carte jusqu'à ce qu'elle s'enclenche.
ATTENTION
► N'appuyez pas la carte mémoire Micro SD avec violence
dans le por
être endommagées.
t d'insertion. L'appareil et la carte mémoire peuvent
Formatage de la carte mémoire Micro SD
En cas d'usage d'une nouvelle carte mémoire Micro SD, celle-ci doit
être formatée avant le scan.
REMARQUE
► Lors du formatage, toutes les données sont eff acées de la
te mémoire Micro SD.
car
♦ Eteignez l'appareil avec la touche
♦ Insérez la carte mémoire Micro SD avec les contacts métalliques
vers le haut dans le port d'insertion et appuyez doucement
sur la carte jusqu'à ce qu'elle s'enclenche.
♦ Eteignez l'appareil avec la touche /SCAN .
/SCAN .
/SCAN .
FR
SHM 600 A1
9
Page 13
♦ Appuyez avec un objet mince et non pointu, par ex. l'extrémité
FR
d'un trombone, sur la touche FORMAT . Sur l'écran , il
s'affi che un .
♦ Appuyez sur la touche
de la carte mémoire Micro SD. Sur l'écran , l'affi chage de la
carte SD clignote jusqu'à ce que le formatage soit achevé.
Réglage de la date et l'heure
♦ Eteignez l'appareil avec la touche /SCAN .
♦ Appuyez avec un objet mince et non pointu, par ex. l'extrémité
d'un tr
ombone, sur la touche TIME SET . Sur l'écran ##
apparaît pour l'année, en sachant que ## représente une série
de chiff res qui est modifi ée pour correspondre avec le temps ou
la date eff ectives.
♦ Appuyez sur la touche C/B
l'année actuelle.
♦ Appuyez sur la touche
tion. Sur l'écran , il s'affi che un ##.
♦ Répétez les deux dernières étapes pour régler le mois, le jour,
l'heur
e et la minute.
♦ Après le réglage de la minute (
la touche TIME SET
la date et de l'heure.
Fonctionnement et opération
/SCAN pour démarrer le formatage
W ou DPI , pour sélectionner
/SCAN , pour confi rmer la confi gura-
##), appuyez à nouveau sur
pour mettre fi n au mode de réglage de
10
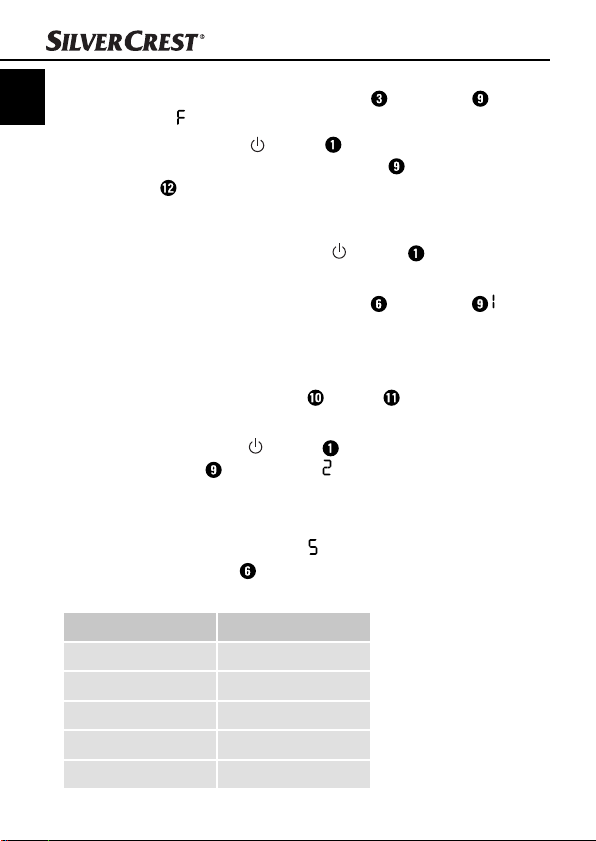
Affi chage Réglage
1 ## année
2 ## mois
3 ## jour
4 ## heure
5 ## minute
SHM 600 A1
Page 14
Fonctionnement et opération
Réglage de la résolution du scan
♦ Appuyez sur la touche DPI , pour choisir entre la résolution
élevée (HIGH = 600 dpi) et la résolution faible (LOW = 300 dpi).
Sur l'écran il s'affi che HIGH ou LOW.
Réglage du mode scan
♦ Appuyez sur la touche C/BW , pour choisir entre le mode
couleur (COLOR) et le mode noir/blanc (MONO).
Sur l'écran il s'affi che COLOR ou MONO.
Scanner
REMARQUE
► Pour scanner, veuillez vous assurer que l'appareil n'est pas
accordé à un ordinateur et que la carte mémoire Micro SD
r
est insérée.
♦ Allumez l'appareil avec la touche
♦ Placez le document sur une surface plane et maintenez-la avec
une main.
♦ Posez l'appareil sur le bord du papier. Veillez à ce que la
one à scanner soit maintenu entre les marques de la largeur
z
à scanner ( ), qui est marquée sur le côté de l'appareil.
♦ Maintenez l'appareil pressé à plat contre le document et appuyez
une fois sur la touche
♦ Déplacez lentement l'appareil au-dessus du document et tenez
v
otre main au calme, pour obtenir la meilleure qualité du docu-
ment scanné.
♦ Appuyez à nouveau sur la touche
au scan.
/SCAN . La LED SCAN s'allume.
/SCAN .
/SCAN , pour mettre fi n
FR
SHM 600 A1
11
Page 15
REMARQUE
FR
► Pour ménager les piles, en cas de non-usage, l'appareil s'éteint
utomatiquement après 3 minutes.
a
Procéder au calibrage
REMARQUE
► Ne procédez au calibrage qu'à partir du moment où il faut
égler la compensation des blancs. Une compensation des
r
blancs est recommandée pour les images scannées, lorsque
le point le plus clair qui en réalité devrait être blanc apparaît
dans des nuances de gris.
♦ Placez l'appareil sur le papier fourni pour le calibrage de
compensation des blancs et allumez l'appar
/SCAN .
♦ Appuyez sur la touche C/B
touche
l'écran
la mémoire interne soit eff acée. Ensuite, la LED SCAN
LED ERR s'allument.
REMARQUE
► Les documents/images disponibles sur la carte mémoire Micro
SD sont conser
♦ Avant de déplacer l'appareil, attendez que la LED ERR
soit éteinte. La LED SCAN s'allume à nouveau.
♦ Commencez à présent à scanner le papier, en déplaçant l'appareil
au-dessus du papier blanc, jusqu'à ce que la LED SC
s'éteigne (faites glisser l'appareil vers l'arrière, si nécessaire).
♦ Le processus de calibrage est terminé. Eteignez l'appareil avec
la touche
Fonctionnement et opération
eil avec la touche
W et appuyez ensuite sur la
/SCAN , pour passer au mode de calibrage. Sur
, l'affi chage de la carte SD clignote jusqu'à ce que
et la
vés en cas de suppression de la mémoire interne.
se
AN
/SCAN .
12
SHM 600 A1
Page 16
Fonctionnement et opération
Affi chages LED
LED SCAN est allumé en vert : le scan est exécuté.
LED SCAN
LED ERR
LED ERR
Visualisation des documents/images scannés
Utilisez soit l'adaptateur de cartes SD fourni ou raccordez l'appareil
avec le câble USB directement à l'ordinateur, pour transférer les
données depuis la carte mémoire Micro SD.
Raccordement à un ordinateur
Exigences système
Il vous faut un ordinateur disposant d'un raccord USB libre et en
tant que système d'exploitation Windows
Windows®7 de la société Microsoft
version supérieure.
♦ Connectez l'appareil par le biais d'un câble USB avec votre
or
nateur devrait reconnaître un "support de données amovible".
♦ Cliquez sur "Ouvrir le dossier pour affi
visualiser les images scannées et les importer.
n'est pas allumé : le mode veille / scan est achevé.
est allumé en orange : la vitesse de scan est trop éle-
vée/le scan est tremblant.
n'est pas allumé : vitesse de scan sans défauts.
®
XPSP2, Windows®Vista,
®
ou MacOS
dinateur et allumez-le avec la touche
®
10.4 ou une
/SCAN . Votre ordi-
cher les fi chiers", pour
FR
REMARQUE
► Lorsque vous avez éteint la fonction d'auto-démarrage et
que le suppor
t de données amovible ne s'affi che pas automatiquement, affi chez le poste de travail (PC) et recherchez
l'appareil sous "Support de données amovible".
SHM 600 A1
13
Page 17

Fonctionnement et opération
Installation du programme NimoDoc Lite
FR
REMARQUE
► Veuillez noter que le programme NimoDoc Lite n'est compatible
ec les PCs Windows. Les utilisateurs de MAC nécessitent un
qu'av
logiciel alternatif ou doivent émuler un environnement Windows.
► Les images et les descriptions se rapportent au système
xploitation Microsoft®Windows®7. La représentation
d'e
sur l'écran peut diverger selon les paramètres de l'affi chage
chez d'autres systèmes d'exploitation.
♦ Insérez le CD du programme dans le lecteur de CD de votre
or
dinateur. La fenêtre "Lecture automatique" s'affi che.
♦ Cliquez sur le champ "Exécuter NimoDoc.exe".
L'installation démarr
REMARQUE
► Si vous avez désactivé la fonction d'autodémarrage et que le
ocessus d'installation ne commence pas automatiquement,
pr
démarrez le processus d'installation en double-cliquant sur le
fi chier "NimoDocLite.exe" dans le répertoire principal du CD.
♦ Cliquez sur le champ "Install NimoDoc Lite" pour installer le
pr
ogramme "NimoDoc Lite".
L'assistant d'installation vous mène à présent pas à pas à travers
le processus d'installation. Après l'installation réussie, on indique
que l'installation est achevée.
♦ Cliquez sur le champ "Achever". La fenêtre de démarrage
à nouveau.
s'affi che
♦ Cliquez sur le champ "Exit" pour mettre fi n au programme
d'installation.
e et la fenêtre de démarrage s'affi che.
14
SHM 600 A1
Page 18
Fonctionnement et opération
Démarrage du programme NimoDoc Lite
♦ Démarrez le programme en double-cliquant sur le symbole du
programme du desktop ou sélectionnez l'entrée correspondante
dans le menu de démarrage.
♦ La fenêtre principale s'ouvre.
1
2
3
FR
5
1. Barre de menu
2. Barre de lancement rapide
3. Champ de recherche
4. Zone de prévisualisation
5. Zone de travail
SHM 600 A1
4
15
Page 19

Confi gurer la zone de travail
FR
♦ Cliquez avec le bouton droit de la souris sur "MyNimoDoc"
dans la z
♦ Cliquez avec le bouton gauche de la souris sur "Gestion des
dossiers". Il s'ouvre une nouvelle fenêtre avec la gestion des
dossiers.
♦ Cliquez sur "Ajouter" pour sélectionner un dossier depuis votre
disque dur ou l'appareil.
one de travail. Un menu contextuel s'ouvre alors.
Fonctionnement et opération
16
SHM 600 A1
Page 20

Fonctionnement et opération
♦ Après avoir sélectionné un dossier, cliquez sur "Enregistrer". Le
dossier sélectionné s'affi
et tous les documents ou images à traiter peuvent être déposés
dans ce dossier.
Importer des images de l'appareil
♦ Dans la barre de lancement rapide, cliquez sur "Ouvrir" pour
ter les images de l'appareil vers un dossier de documents.
impor
La fenêtre "Ouvrir" s'affi che.
♦ Sélectionnez ici si vous souhaitez importer tout un dossier (Folder)
u un fi chier individuel (Image) dans un dossier de documents.
o
Vous pouvez également fi ltrer pour déterminer quels formats de
fi chiers il faut chercher.
♦ Cliquez sur "OK" et sélectionnez ensuite le dossier ou le fi chier
spécifi que que vous souhaitez importer. Un nouveau dossier de
documents avec les photos importées est établi.
♦ Cliquez avec le bouton droit de la souris sur le dossier de docu-
ments et attr
dossier de documents.
ibuez sous "Renommer" un nom pertinent pour le
che à présent dans la zone de travail
FR
REMARQUE
► Vous trouverez les photos de votre appareil sur le support de
données amo
DCIM/100Media.
SHM 600 A1
vible nouvellement reconnu dans le répertoire
17
Page 21

Fonctionnement et opération
Exporter les images d'un dossier de documents
FR
Vous pouvez exporter les photos et documents collectés d'un dossier
de documents dans diff érents formats de fi chiers.
♦ Sélectionnez tout d'abord le dossier de documents correspon-
dant et cliquez ensuite dans l'écr
♦ Une autre fenêtre s'ouvre dans laquelle vous pouvez indiquer
dans quel format de fi
Reconnaissance de texte
♦ Dans la barre de lancement rapide, cliquez sur "Ouvrir" pour
accepter une photo de l'appar
♦ Sélectionnez "Image" en tant que mode d'entrée et cliquez sur
"OK".
♦ Indiquez le chemin vers votre image, marquez la photo et cliquez
sur "Ouvrir". La photo appar
prévisualisation.
♦ Il suffi
t d'eff ectuer un double-clic sur l'image et la surface de
l'éditeur s'ouvre.
chier le dossier de documents doit être émis.
an principal sur "Enregistrer".
eil. La fenêtre "Ouvrir" s'affi che.
aît maintenant dans la zone de
18
SHM 600 A1
Page 22

Fonctionnement et opération
♦ Cliquez sur "Reconnaissance". Une autre fenêtre s'ouvre dans
laquelle vous pouvez indiquer la langue qui sera utilisée dans
l'image.
FR
♦ Sélectionnez la langue correspondante et cliquez sur "OK".
L'éditeur commence à reconnaître le texte.
♦ Cliquez dans la barre de lancement rapide de la surface d'édi-
tion sur "Enr
par ex. "Enregistrer le texte en tant que document Word".
SHM 600 A1
egistrer" et sélectionnez le format de fi chier à exporter,
19
Page 23
Fonctionnement et opération
♦ Indiquez un chemin et un nom de fi chier et cliquez sur "En-registrer".
FR
REMARQUE
► Veillez à ce que le texte défi le à l'horizontale sur la photo
scannée, sinon le pr
fonctionnera pas. Si ce n'est pas le cas, tournez l'image avec
les champs gauche/droite dans la zone inférieure de l'écran
et enregistrez-la à nouveau.
Barre d'outils
La barre d'outils se trouve sur le côté droit de l'écran qui met à votre
disposition diff érents outils de travail :
ocessus de reconnaissance du texte ne
1324
8567
1. Marquage de zones d'écran
2. Réglage de la luminosité, du contraste, de la saturation
et de la couleur
3. Outil de coupe
4. Transformer les couleurs
5. Fonction de miroir
6. Fonction pour tourner les photos
7. Saturation noir et blanc
8. Créer une photo en noir et blanc
20
SHM 600 A1
Page 24

Fonctionnement et opération
91110
12 13 14
9. Reconnaissance de texte
10. Fonction pour couper les bords
11. Supprimer les yeux rouges
12. Insérer des notes dans la photo
13. Insérer du texte dans la photo
14. Fonction de stylo bille
15
15. Fonction de crayon
16. Gomme
17. Colorer les zones
18. Dessiner des lignes
19. Dessiner des carrés
20. Dessiner des cercles
1716
1918
20
FR
SHM 600 A1
21
Page 25

Fonctionnement et opération
Barre de commande
FR
98714652 3 10 1112 13 14 151617
1. Image précédente
2. Image suivante
3. Affi cher la taille d'image optimale
4. Affi cher la taille d'image eff ective
5. Réduire l'image
6. Agrandir l'image
7. Passer en mode image intégrale
8. Tourner l'image vers la gauche
9. Tourner l'image vers la droite
10. Modifi er la taille de l'image (indications de pixel)
11. Annuler
12. Rétablir
13. Imprimer la photo
14. Ouvrir la vue d'impression
15. Enregistrer sous
16. Enregistrer
17. Eff acer
22
SHM 600 A1
Page 26

Nettoyage
Nettoyage
Consignes de sécurité
ATTENTION
Dommages potentiels sur l'appareil.
L'humidité pénétr
► Assurez-vous lors du nettoyage qu'aucune humidité ne pénètre
dans l'appar
l'appareil.
Nettoyage
■ Nettoyez le boîtier exclusivement à l'aide d'un chiff on humidifi é
et d'un détergent doux.
■ Nettoyez la surface de la lentille du scanner avec le tissu de
nettoyage fourni.
ante peut endommager l'appareil.
eil pour éviter tous dommages irréparables sur
FR
SHM 600 A1
23
Page 27

Dépannage
FR
Ce chapitre contient des remarques importantes relatives à la localisation des pannes et au dépannage. Respectez les remarques pour
éviter tous dangers et dommages.
Causes des pannes et remèdes
Le tableau ci-dessous est destiné à vous aider à localiser de petits
dysfonctionnements et à y remédier :
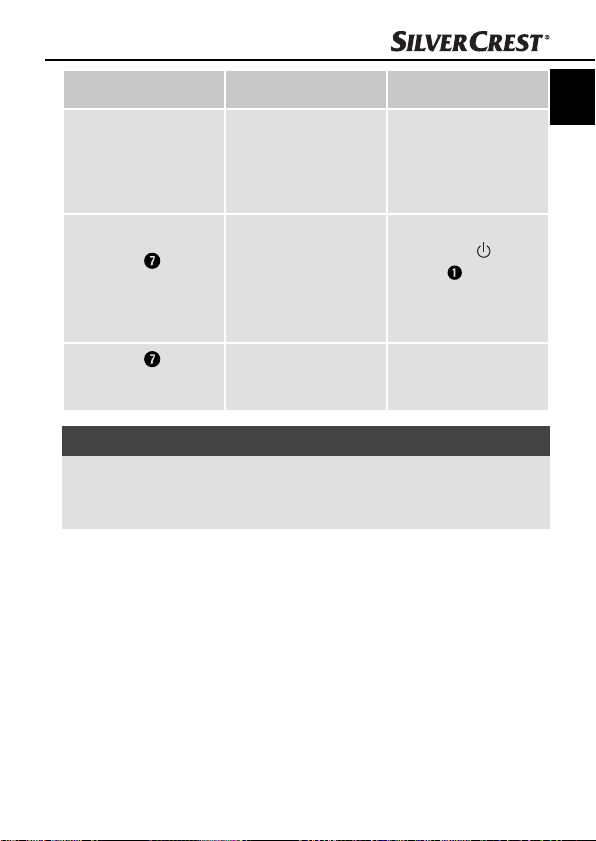
Panne Cause possible Dépannage
L'appareil ne peut pas
être allumé.
Il est impossible d'enregistrer les images lors
du scan.
L'ordinateur ne reconnaît
pas l'appareil après le
raccordement (aucun
support de données
amovible n'est reconnu).
- Les piles sont déchargées.
- Les piles ne sont pas
correctement insérées.
- Aucune carte mémoire
Micro SD n'a été
insérée.
- La carte mémoire
Micro SD est pleine.
- La carte mémoire
Micro SD n'a pas été
correctement formatée
Erreur de raccordement.
- Remplacez les piles.
- Insérez les piles
correctement dans le
compartiment à piles.
- Insérez la carte
mémoire avec les
contacts métalliques
tournés vers le haut.
- Enregistrez les données de la carte
mémoire sur un
ordinateur.
- Formatez la carte mémoire (voir le chapitre
Formatage de la carte
mémoire Micro SD)
- Assurez-vous que tous
les câbles ont été correctement raccordés.
Le cas échéant, redémarrez l'ordinateur.
- Testez un autre port
USB.
Dépannage
24
SHM 600 A1
Page 28
Dépannage
Panne Cause possible Dépannage
- Nettoyez la lentille du
Les images sont fl oues.
La LED ERR
en scannant un document.
La LED ERR
dès que l'appareil est mis
en marche.
s'allume
s'allume
La lentille du scanner
est sale.
La vitesse de scan est
trop élevée.
Les données de calibrage sont annulées.
scanner avec le tissu
de nettoyage.
- Calibrez à nouveau
l'appareil.
Pour annuler, appuyez
sur la touche
SCAN et essayez
de scanner à nouveau
le document à une
vitesse inférieure.
Calibrez à nouveau
l'appareil.
REMARQUE
► Si vous ne pouvez pas résoudre le problème avec les étapes
mentionnées pr
écédemment, veuillez vous adresser au service
après-vente.
FR
/
SHM 600 A1
25
Page 29
Entreposage/Mise au rebut
Entreposage/Mise au rebut
FR
Entreposage
Si vous n'utilisez pas l'appareil pendant une période prolongée,
retirez les piles et entreposez-le dans le sac de rangement fourni
dans un environnement sec et sans poussières.
Mise au rebut de l'appareil
Ne jetez en aucun cas l'appareil dans les
ordures ménagères ordinaires. Ce produit
est assujetti à la directive européenne
2002/96/EC-WEEE (Waste Electrical and
Electronic Equipment).
Remettez l'appareil destiné au recyclage à une entre-
prise spécialisée ou au centre de recyclage de votre
commune. Respectez la réglementation en vigueur.
En cas de doutes, contactez votre organisation de
recyclage.
Mise au rebut des piles
Il est interdit de jeter les piles aux ordures ménagères. Le consommateur est tenu par la loi de remettre les piles au lieu de collecte des
déchets de sa commune ou de son quartier ou dans un magasin.
Cette obligation a pour objectif d'assurer l'élimination écologique
des piles. Ne vous débarrassez des piles que lorsqu'elles sont
déchargées.
26
SHM 600 A1
Page 30

Annexe
Annexe
Caractéristiques techniques
Alimentation en tension
Capteur d'images
Nombre de capteurs 5138 points
Résolution
Format de fi chier JPEG
Coupure automatique 3 minutes
Mémoire externe
Interface USB 2.0
Température de service +5 - +40°C
Humidité (pas de condensation) 5 - 90 %
Dimensions (l x H x P) env. 25,9 x 3 x 2,8 cm
Poids (sans accessoires) env. 146 g
2 x 1,5 V de type AA/
Mignon/LR6/R6
Capteur d'image contraste
de couleurs
LOW : 300 x 300 dpi
HIGH : 600 x 600 dpi
Carte mémoire Micro SD
jusqu'à 32 GB
FR
SHM 600 A1
27
Page 31

Exigences minimales à l'ordinateur
FR
Système d'exploitation
CPU Pentium III ou version supérieure
Mémoire de travail Au moins 256 MB
Interface Port USB 2.0
Windows
Windows®7 et MacOS® 10.4 ou version
supérieure (insérer l'appareil directement,
l'installation d'un pilote n'est pas nécessaire)
®
XPSP2, Windows®Vista™,
Remarques relatives à la déclaration de conformité
Cet appareil est conforme aux exigences fondamentales et aux autres règles pertinentes de la directive de la
compatibilité électromagnétique 2004/108/EC.
La déclaration de conformité originale est disponible
chez l'importateur.
Annexe
28
SHM 600 A1
Page 32

Annexe
Garantie
Cet appareil est garanti 3 ans à partir de la date d'achat. L'appareil
a été fabriqué avec soin et consciencieusement contrôlé avant sa
distribution.
Veuillez conserver le ticket de caisse en guise de preuve d'achat.
Dans le cas où la garantie s'applique, veuillez appeler le service
après-vente compétent. Cette condition doit être respectée pour
assurer l'expédition gratuite de votre marchandise.
REMARQUE
► Cette garantie s'applique uniquement pour les erreurs de
matériaux et de fabrication, et ne couvr
liés au transport, les éléments d'usure ou les dommages subis
par des éléments fragiles, par ex. le commutateur ou les piles.
Le produit est exclusivement destiné à un usage privé et non commercial. La garantie est annulée en cas de manipulation incorrecte et
inappropriée, d'utilisation brutale et en cas d'intervention qui n'aurait
pas été réalisée par notre centre de service après-vente agréé.
Cette garantie ne constitue pas une restriction de vos droits légaux.
La période sous garantie n'est pas prolongée par l'exercice de la
garantie. Ceci s'applique également aux pièces remplacées ou
réparées.
Les dommages et défauts éventuellement présents à l'achat doivent
être notifi és directement après le déballage, mais au plus tard deux
jours après la date d'achat.
Toutes les réparations eff ectuées après expiration de la période sous
garantie sont payantes.
e pas les dommages
FR
SHM 600 A1
29
Page 33

Service après-vente
FR
Service France
Tel.: 0800 919270
E-Mail: kompernass@lidl.fr
IAN 73767
Service Belgique
Tel.: 070 270 171 (0,15 EUR/Min.)
E-Mail: kompernass@lidl.be
IAN 73767
Importateur
KOMPERNASS GMBH
BURGSTRASSE 21
44867 BOCHUM, GERMANY
www.kompernass.com
Annexe
30
SHM 600 A1
Page 34

Inhaltsverzeichnis
Einführung . . . . . . . . .32
Informationen zu dieser
Bedienungsanleitung . . . . 32
Urheberrecht . . . . . . . . . . 32
Haftungsbeschränkung . . . 32
Warnhinweise . . . . . . . . . . 33
Bestimmungsgemäße
Verwendung . . . . . . . . . . . 33
Sicherheit . . . . . . . . . .34
Umgang mit Batterien . . . . 34
Grundlegende
Sicherheitshinweise . . . . . . 35
Inbetriebnahme . . . . .36
Sicherheitshinweise . . . . . . 36
Lieferumfang und Transport-
inspektion . . . . . . . . . . . . . 36
Entsorgung der Verpackung .37
Batterien einlegen/wechseln 37
Bedienelemente. . . . .38
Bedienung und Betrieb 39
Micro-SD-Speicherkarte
einsetzen/wechseln . . . . . 39
Formatieren der Micro-SD-
Speicherkarte . . . . . . . . . . 39
Datum und Uhrzeit einstellen 40
Scanaufl ösung einstellen . 41
Scanmodus einstellen . . . . 41
Scannen . . . . . . . . . . . . . . 41
Kalibrierung durchführen . 42
LED-Anzeigen . . . . . . . . . . 43
Betrachten der gescannten
Dokumente/Bilder . . . . . . 43
Anschluss an einem
Computer . . . . . . . . . . . . . 43
Installation des Programms
NimoDoc Lite . . . . . . . . . . 44
Das Programm NimoDoc
Lite starten . . . . . . . . . . . . 45
Reinigung . . . . . . . . . .53
Sicherheitshinweise . . . . . . 53
Reinigung . . . . . . . . . . . . . 53
Fehlerbehebung . . . .54
Fehlerursachen und -behe-
bung . . . . . . . . . . . . . . . . . 54
Lagerung/Entsorgung 56
Lagerung . . . . . . . . . . . . . 56
Gerät entsorgen . . . . . . . . 56
Batterien entsorgen . . . . . . 56
Anhang . . . . . . . . . . . .57
Technische Daten . . . . . . . 57
Mindestanforderungen an
den Computer . . . . . . . . . 58
Hinweise zur
Konformitätserklärung . . . 58
Garantie . . . . . . . . . . . . . . 59
Service . . . . . . . . . . . . . . . 60
Importeur . . . . . . . . . . . . . 60
DE
AT
CH
SHM 600 A1
31
Page 35

Einführung
Informationen zu dieser Bedienungsanleitung
DE
Herzlichen Glückwunsch zum Kauf Ihres neuen Gerätes.
AT
Sie haben sich damit für ein hochwertiges Produkt entschieden.
CH
Diese Bedienungsanleitung ist Bestandteil des mobilen Handscanners
SHM 600 A1 (nachfolgend als Gerät bezeichnet) und gibt Ihnen
wichtige Hinweise für den bestimmungsgemäßen Gebrauch, die
Sicherheit, den Anschluss sowie die Bedienung des Gerätes. Die
Bedienungsanleitung muss ständig in der Nähe des Gerätes verfügbar
sein. Sie ist von jeder Person zu lesen und anzuwenden, die mit der
Bedienung und Störungsbehebung des Gerätes beschäftigt ist.
Bewahren Sie diese Bedienungsanleitung auf und geben Sie diese
mit dem Gerät an den Nachbesitzer weiter.
Urheberrecht
Diese Dokumentation ist urheberrechtlich geschützt.
Jede Vervielfältigung, bzw. jeder Nachdruck, auch auszugsweise,
sowie die Wiedergabe der Abbildungen, auch im veränderten Zustand
ist nur mit schriftlicher Zustimmung des Herstellers gestattet.
Haftungsbeschränkung
Alle in dieser Bedienungsanleitung enthaltenen technischen Informationen, Daten und Hinweise für den Anschluss und die Bedienung, entsprechen dem letzten Stand bei Drucklegung und erfolgen unter Berücksichtigung unserer bisherigen Erfahrungen und Erkenntnisse nach
bestem Wissen. Aus den Angaben, Abbildungen und Beschreibungen in dieser Anleitung können keine Ansprüche hergeleitet werden.
Der Hersteller übernimmt keine Haftung für Schäden aufgrund von
Nichtbeachtung der Anleitung, nicht bestimmungsgemäßer Verwendung, unsachgemäßen Reparaturen, unerlaubt vorgenommenen
Veränderungen oder Verwendung nicht zugelassener Ersatzteile.
Einführung
32
SHM 600 A1
Page 36

Einführung
Warnhinweise
In der vorliegenden Bedienungsanleitung werden folgende Warnhinweise verwendet:
WARNUNG
Ein Warnhinweis dieser Gefahrenstufe kennzeichnet
eine mögliche gefährliche Situation.
Falls die gefährliche Situation nicht vermieden wird, kann dies
zu Verletzungen führen.
► Die Anweisungen in diesem Warnhinweis befolgen, um
V
erletzungen von Personen zu vermeiden.
ACHTUNG
Ein Warnhinweis dieser Gefahrenstufe kennzeichnet
einen mög
Falls die Situation nicht vermieden wird, kann dies zu Sachschäden führen.
► Die Anweisungen in diesem Warnhinweis befolgen, um
Sachschäden zu v
HINWEIS
► Ein Hinweis kennzeichnet zusätzliche Informationen, die den
Umgang mit dem Ger
Bestimmungsgemäße Verwendung
Dieses Gerät ist ausschließlich für den nicht gewerblichen Gebrauch
zum Scannen und Digitalisieren von Dokumenten und Bildern bestimmt.
Eine andere oder darüber hinausgehende Benutzung gilt als nicht
bestimmungsgemäß. Ansprüche jeglicher Art wegen Schäden aus
nicht bestimmungsgemäßer Verwendung sind ausgeschlossen. Das
Risiko trägt allein der Benutzer.
lichen Sachschaden.
ermeiden.
ät erleichtern.
DE
AT
CH
SHM 600 A1
33
Page 37

Sicherheit
In diesem Kapitel erhalten Sie wichtige Sicherheitshinweise im Umgang
DE
mit dem Gerät. Dieses Gerät entspricht den vorgeschriebenen Sicher-
AT
heitsbestimmungen. Ein unsachgemäßer Gebrauch kann zu Personen-
CH
und Sachschäden führen.
Umgang mit Batterien
WARNUNG
Gefahr durch nicht ordnungsgemäße Verwendung!
Es besteht Explosions- und Auslaufgefahr!
Für den sicheren Umgang mit Batterien beachten Sie folgende
Sicherheitshinweise:
► Werfen Sie Batterien nicht ins Feuer.
► Schließen Sie Batterien nicht kurz.
► Versuchen Sie nicht, Batterien wieder aufzuladen.
► Überprüfen Sie regelmäßig die Batterien. Ausgetretene
Batteriesäur
Im Umgang mit beschädigten oder ausgelaufenen Batterien
besondere Vorsicht walten lassen. Verätzungsgefahr! Schutzhandschuhe tragen.
► Batterien für Kinder unzugänglich aufbewahren.
Bei V
► Entnehmen Sie die Batterien, wenn Sie das Gerät längere Zeit
nicht benutz
e kann dauerhafte Schäden am Gerät verursachen.
erschlucken umgehend einen Arzt aufsuchen.
en.
Sicherheit
34
SHM 600 A1
Page 38

Sicherheit
Grundlegende Sicherheitshinweise
Beachten Sie für einen sicheren Umgang mit dem Gerät die folgenden
Sicherheitshinweise:
■ Kontrollieren Sie das Gerät vor der Verwendung auf äußere
e Schäden. Nehmen Sie ein beschädigtes oder herunter-
sichtbar
gefallenes Gerät nicht in Betrieb.
■ Dieses Gerät ist nicht dafür bestimmt, durch Personen (einschließ-
lich Kinder) mit eingeschr
geistigen Fähigkeiten oder mangels Erfahrung und/oder mangels
Wissen benutzt zu werden, es sei denn, sie werden durch eine für
ihre Sicherheit zuständige Person beaufsichtigt oder erhielten von
ihr Anweisungen, wie das Gerät zu benutzen ist.
■ Kinder sollten beaufsichtigt werden, um sicherzustellen, dass sie
nicht mit dem Ger
■ Lassen Sie Reparaturen am Gerät nur von autorisierten Fachbetrieben
oder dem K
Reparaturen können erhebliche Gefahren für den Benutzer
entstehen. Zudem erlischt der Garantieanspruch.
■ Eine Reparatur des Gerätes während der Garantiezeit darf nur
v
on einem vom Hersteller autorisierten Kundendienst vorgenommen
werden, sonst besteht bei nachfolgenden Schäden kein Garantieanspruch mehr.
■ Defekte Bauteile dürfen nur gegen Original-Ersatzteile ausgetauscht
w
erden. Nur bei diesen Teilen ist gewährleistet, dass sie die
Sicherheitsanforderungen erfüllen werden.
■ Nehmen Sie keine eigenmächtigen Umbauten oder Veränderungen
an dem Ger
■ Schützen Sie das Gerät vor Feuchtigkeit und dem Eindringen von
Flüssigk
de (z.B. Vasen) neben das Gerät.
■ Das Gerät nicht in der Nähe von off enen Flammen betreiben.
undenservice durchführen. Durch unsachgemäße
ät vor.
eiten. Stellen Sie keine mit Flüssigkeit gefüllten Gegenstän-
änkten physischen, sensorischen oder
ät spielen.
DE
AT
CH
SHM 600 A1
35
Page 39

Inbetriebnahme
Inbetriebnahme
Sicherheitshinweise
DE
AT
WARNUNG
CH
Bei der Inbetriebnahme des Gerätes können
Personen- und Sachschäden auftreten!
► Verpackungsmaterialien dürfen nicht zum Spielen verwendet
w
erden. Es besteht Erstickungsgefahr.
Lieferumfang und Transportinspektion
Das Gerät wird standardmäßig mit folgenden Komponenten geliefert:
▯ Handscanner
▯ 2 GB Micro-SD-Speicherkarte inkl. Adapter auf SD-Speicherkarte
▯ 2 x 1,5 V Batterien Typ AA / LR6 / Mignon
▯ Programm-CD
▯ Aufbewahrungstasche
▯ USB-Kabel
▯ Reinigungstuch
▯ Papier für die Weißabgleich-Kalibrierung
▯ Bedienungsanleitung
HINWEIS
► Prüfen Sie die Lieferung auf Vollständigkeit und auf sichtbare
Schäden.
► Bei einer unvollständigen Lieferung oder Schäden infolge
mangelhaf
sich an die Service-Hotline (siehe Kapitel Service).
ter Verpackung oder durch Transport wenden Sie
36
SHM 600 A1
Page 40

Inbetriebnahme
Entsorgung der Verpackung
Die Verpackung schützt das Gerät vor Transportschäden.
Die Verpackungsmaterialien sind nach umweltverträglichen und
entsorgungstechnischen Gesichtspunkten ausgewählt und deshalb
recyclebar.
Die Rückführung der Verpackung in den Materialkreislauf
spart Rohstoff e und verringert das Abfallaufkommen.
Entsorgen Sie nicht mehr benötigte Verpackungsmaterialien
gemäß den örtlich geltenden Vorschriften.
HINWEIS
► Heben Sie, wenn möglich, die Originalverpackung während
antiezeit des Gerätes auf, um das Gerät im
der Gar
Garantiefall ordnungsgemäß verpacken zu können.
Batterien einlegen/wechseln
♦ Öff nen Sie die Abdeckung des Batteriefachs auf der Gerä-
teoberseite, indem Sie die Abdeckung nach rechts schieben und
abheben.
♦ Legen Sie die Batterien vom Typ AA/LR6/Mignon (im Lieferum-
fang enthalten) in das Batteriefach
♦ Schließen Sie das Batteriefach
aufsetzen und sie nach links schieben.
ein.
, indem Sie die Abdeckung
DE
AT
CH
SHM 600 A1
37
Page 41

Bedienelemente
(siehe Ausklappseite Abbildung A)
DE
AT
CH
Displaydarstellungen
(siehe Ausklappseite Abbildung B)
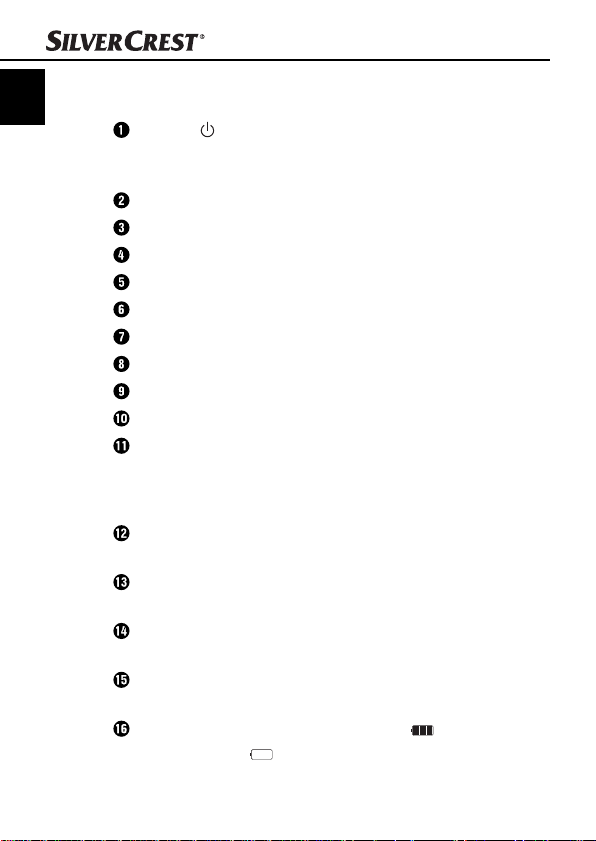
Taste /SCAN: Ein-/Ausschalter; Scanvorgang
Batteriefach
Taste FORMAT: Micro-SD-Speicherkarte formatieren
Steckplatz für Micro-SD-Speicherkarte
USB-Anschluss
Taste TIME SET: Datum und Uhrzeit einstellen
LED ERR: Scangeschwindigkeit zu hoch
LED SCAN: Scannen wird durchgeführt
Display
Taste C/BW: Scanmodus einstellen
Taste DPI: Scanaufl ösung einstellen
Anzeige SD-Karte: Fotos werden auf der Micro-SD-
Anzeige Eff ekt: Dokumente werden in Farbe oder
Zähler: Zeigt die Anzahl der gescannten Dateien auf
der Micro-SD-Speicherkarte an
Gewählte Aufl ösung: HIGH: 600 dpi; LOW: 300 dpi
Anzeige Batterie: Batterie ist voll ; Batterie ist leer
Bedienelemente
starten/beenden
Speicherkarte gespeichert
schwarz/weiß gescannt
38
SHM 600 A1
Page 42

Bedienung und Betrieb
Bedienung und Betrieb
In diesem Kapitel erhalten Sie wichtige Hinweise zur Bedienung und
Betrieb des Gerätes.
Micro-SD-Speicherkarte einsetzen/wechseln
Das Gerät benötigt eine Micro-SD-Speicherkarte (im Lieferumfang
enthalten), um Dokumente oder Bilder zu scannen und zu speichern.
♦ Schalten Sie das Gerät mit der Taste
♦ Stecken Sie die Micro-SD-Speicherkarte mit den Metallkontak-
ten nach oben in den Steckplatz
auf die Karte, bis sie einrastet.
ACHTUNG
► Drücken Sie die Micro-SD-Speicherkarte nicht mit Gewalt in
den Steckplatz. Das Ger
dadurch beschädigt werden.
ät und die Speicherkarte können
Formatieren der Micro-SD-Speicherkarte
Bei Verwendung einer neuen Micro-SD-Speicherkarte muss diese vor
dem Scannen formatiert werden.
HINWEIS
► Beim Formatieren werden alle Daten auf der Micro-SD-
Speicherk
♦ Schalten Sie das Gerät mit der Taste
♦ Stecken Sie eine Micro-SD-Speicherkarte mit den Metallkontak-
ten nach oben in den Steckplatz
auf die Karte, bis sie einrastet.
♦ Schalten Sie das Gerät mit der Taste
♦ Drücken Sie mit einem dünnen und stumpfen Gegenstand, z.B.
das Ende einer Bür
Display erscheint ein .
SHM 600 A1
arte gelöscht.
oklammer, auf die Taste FORMAT . Im
/SCAN aus.
und drücken Sie vorsichtig
/SCAN aus.
und drücken Sie vorsichtig
/SCAN ein.
DE
AT
CH
39
Page 43

♦ Drücken Sie die Taste /SCAN , um mit dem Formatieren
der Micro-SD-Speicherkarte zu beginnen. Im Display blinkt
DE
AT
CH
solange die Anzeige der SD-Karte , bis die Formatierung
abgeschlossen ist.
Datum und Uhrzeit einstellen
♦ Schalten Sie das Gerät mit der Taste /SCAN ein.
♦ Drücken Sie mit einem dünnen und stumpfen Gegenstand, z.B.
das Ende einer Bür
Display erscheint ## für das Jahr, wobei ## für eine Reihe
von Ziff ern steht, die zum Übereinstimmen mit der tatsächlichen
Zeit bzw. dem Datum abgeändert wird.
♦ Drücken Sie die Taste C/B
Jahr auszuwählen.
♦ Drücken Sie die Taste
bestätigen. Im Display erscheint ##.
♦ Wiederholen Sie die letzten zwei Handlungsschritte, um den
Monat, den T
♦ Nach dem Einstellen der Minute (
die Taste TIME SET , um den Einstellmodus von Datum und
Uhrzeit zu beenden.
Anzeige Einstellung
ag, die Stunde und die Minute einzustellen.
1 ## Jahr
2 ## Monat
3 ## Tag
4 ## Stunde
5 ## Minute
Bedienung und Betrieb
oklammer, auf die Taste TIME SET . Im
W oder DPI , um das aktuelle
/SCAN , um die Einstellung zu
##), drücken Sie erneut
40
SHM 600 A1
Page 44

Bedienung und Betrieb
Scanaufl ösung einstellen
♦ Drücken Sie die Taste DPI , um zwischen der hohen
Aufl ösung (HIGH = 600 dpi) und der niedrigen Aufl ösung
(LOW = 300 dpi) auszuwählen. Im Display wird HIGH oder
LOW angezeigt.
Scanmodus einstellen
♦ Drücken Sie die Taste C/BW , um zwischen dem Farb-Modus
(COLOR) und dem Schwarz/Weiß-Modus (MONO) auszu-
wählen. Im Display wird COLOR oder MONO angezeigt.
Scannen
HINWEIS
► Zum Scannen stellen Sie bitte sicher, dass das Gerät nicht an
einem Computer angeschlossen und die Micr
karte eingelegt ist.
♦ Schalten Sie das Gerät mit der Taste
♦ Legen Sie das Dokument auf eine ebene Oberfl äche und
halten es mit einer Hand dar
♦ Legen Sie das Gerät auf den Papierrand. Achten Sie dar-
auf, dass der Scanber
Scanbreite ( ), die auf der Seite des Gerätes markiert ist,
beibehalten wird.
♦ Halten Sie das Gerät fl ach gegen das Dokument gedrückt und
en Sie einmal auf die Taste /SCAN . Die LED SCAN
drück
leuchtet auf.
♦ Fahren Sie langsam mit dem Gerät über das Dokument und
halten Sie dabei Ihr
gescannten Dokuments zu erzielen.
♦ Drücken Sie erneut die Taste
beenden.
SHM 600 A1
e Hand ruhig, um die beste Qualität des
auf fest.
eich zwischen den Markierungen der
/SCAN , um das Scannen zu
o-SD-Speicher-
/SCAN ein.
DE
AT
CH
41
Page 45

HINWEIS
► Um die Batterien zu schonen, schaltet das Gerät bei
DE
AT
CH
Nichtbenutzung automatisch nach 3 Minuten ab.
Kalibrierung durchführen
HINWEIS
► Führen Sie die Kalibrierung nur durch, wenn der Weißab-
gleich eingestellt w
sich, wenn bei gescannten Bildern der hellste Punkt, der in
Wirklichkeit weiß sein sollte, in einem Grauton erscheint.
♦ Platzieren Sie das Gerät auf das mitgelieferte Papier für die
W
eißabgleich-Kalibrierung und schalten Sie das Gerät mit der
Taste /SCAN ein.
♦ Drücken und halten Sie die Taste C/B
dann die Taste /SCAN , um in den Kalibrierungsmodus
zu wechseln. Im Display blinkt die Anzeige der SD-Karte
solange, bis der interne Speicher gelöscht ist. Anschließend
leuchten die LED SCAN und LED ERR auf.
HINWEIS
► Die auf der Micro-SD-Speicherkarte vorhandenen
umente/Bilder bleiben bei Löschung des internen
Dok
Speichers erhalten.
♦ Bewegen Sie das Gerät solange nicht, bis die LED ERR
erlischt. Die LED SCAN leuchtet weiter.
♦ Beginnen Sie nun mit dem Scannen des Papiers, indem Sie das
Ger
ät über das weiße Papier fahren, bis die LED SCAN
erlischt (schieben Sie das Gerät rückwärts, falls notwendig).
♦ Der Kalibriervorgang ist beendet. Schalten Sie das Gerät mit
der T
aste /SCAN aus.
Bedienung und Betrieb
erden muss. Ein Weißabgleich empfi ehlt
W und drücken Sie
42
SHM 600 A1
Page 46

Bedienung und Betrieb
LED-Anzeigen
LED SCAN leuchtet grün: Scannen wird durchgeführt.
LED SCAN
LED ERR
LED ERR
Betrachten der gescannten Dokumente/Bilder
Verwenden Sie entweder den mitgelieferten SD-Karten-Adapter
oder schließen Sie das Gerät mit dem USB-Kabel direkt an einen
Computer an, um Ihre Daten von der Micro-SD-Speicherkarte zu
übertragen.
Anschluss an einem Computer
Systemvoraussetzungen
Sie benötigen einen Computer mit einem freien USB-Anschluss und
als Betriebssystem Windows
der Firma Microsoft
♦ Verbinden Sie das Gerät mittels USB-Kabel mit Ihrem Computer
und schalten Sie es mit der T
ter sollte das Gerät als einen „Wechseldatenträger“ erkennen.
♦ Klicken Sie auf „Ordner öff nen, um Dateien anzuzeigen“, um
die gescannten Bilder zu betr
leuchtet nicht: Standby-Betrieb/Scannen vollständig.
leuchtet orange: Scangeschwindigkeit zu hoch/Scan
verwackelt.
leuchtet nicht: Fehlerfreie Scangeschwindigkeit.
®
®
XP SP2, Windows® Vista, Windows® 7
oder Mac OS
®
10.4 oder höher.
aste /SCAN ein. Ihr Compu-
achten und zu importieren.
DE
AT
CH
HINWEIS
► Wenn Sie die Autostartfunktion ausgeschaltet haben und der
echseldatenträger nicht automatisch angezeigt wird, rufen
W
Sie den Arbeitsplatz (PC) auf und suchen Sie nach dem
Gerät unter „Wechseldatenträger“.
SHM 600 A1
43
Page 47

Bedienung und Betrieb
Installation des Programms NimoDoc Lite
HINWEIS
DE
AT
CH
► Bitte beachten Sie, dass das Programm NimoDoc Lite nur mit
ws-PCs zusammenarbeitet. MAC-User benötigen eine
Windo
alternative Software oder müssen eine Windows-Umgebung
emulieren.
► Die Abbildungen und die Beschreibungen beziehen sich auf
das Betriebssy
darstellung kann in Abhängigkeit der Anzeigeeinstellungen
bei anderen Betriebssystemen abweichen.
♦ Legen Sie die mitgelieferte Programm-CD in das CD-Laufwerk
Ihr
es Computers ein. Das Fenster „Automatische Wiedergabe“
wird angezeigt.
♦ Klicken Sie auf die Schaltfl äche „NimoDoc.exe ausführen“.
Die Installation star
HINWEIS
► Wenn Sie die Autostartfunktion ausgeschaltet haben und der
Installationsv
den Installationsvorgang durch einen Doppelklick auf die
Datei „NimoDocLite.exe“ im Hauptverzeichnis der CD.
♦ Klicken Sie auf die Schaltfl äche „Install NimoDoc Lite“, um das
Pr
ogramm „NimoDoc Lite“ zu installieren.
Der Installationsassistent führt Sie nun schrittweise durch den
Installationsprozess. Nach erfolgreicher Installation wird angezeigt, dass die Installation vollständig erfolgt ist.
♦ Klicken Sie auf die Schaltfl äche „Fertigstellen“. Das Startfenster
d wieder angezeigt.
wir
♦ Klicken Sie auf die Schaltfl äche „Exit“, um das Installationspro-
gr
amm zu beenden.
44
stem Microsoft® Windows® 7. Die Bildschirm-
tet und das Startfenster wird angezeigt.
organg nicht automatisch beginnt, starten Sie
SHM 600 A1
Page 48

Bedienung und Betrieb
Das Programm NimoDoc Lite starten
♦ Starten Sie das Programm durch einen Doppelklick auf das
Programmsymbol auf dem Desktop oder wählen Sie den entsprechenden Eintrag im Startmenü aus.
♦ Das Hauptfenster wird geöff net.
1
2
3
DE
AT
CH
5
1. Menüleiste
2. Schnellstartleiste
3. Suchfeld
4. Vorschaubereich
5. Arbeitsbereich
SHM 600 A1
4
45
Page 49

Arbeitsbereich konfi gurieren
♦ Klicken Sie mit der rechten Maustaste auf „MyNimoDoc“ im
DE
AT
CH
Arbeitsber
♦ Klicken Sie mit der linken Maustaste auf „Ordnermanagement“.
Ein neues Fenster mit der Ordnerverwaltung öff net sich.
♦ Klicken Sie auf „Hinzufügen“, um einen Ordner von Ihrer Fest-
platte oder dem Gerät auszuwählen.
eich. Ein Kontextmenü öff net sich.
Bedienung und Betrieb
46
SHM 600 A1
Page 50

Bedienung und Betrieb
♦ Nachdem Sie einen Ordner ausgewählt haben, klicken Sie auf
„Speichern“. Der ge
angezeigt und alle zu bearbeitenden Dokumente oder Bilder
können in diesem Ordner abgelegt werden.
Bilder vom Gerät importieren
♦ Klicken Sie in der Schnellstartleiste auf „Öff nen“, um Bilder vom
ät in eine Dokumentenmappe zu übernehmen. Das Fenster
Ger
„Öff nen“ wird angezeigt.
♦ Wählen Sie hier, ob Sie einen ganzen Ordner (Folder) oder
eine einz
tieren wollen. Zusätzlich können Sie auch fi ltern, nach welchen
Dateiformaten gesucht werden soll.
♦ Klicken Sie auf „OK“ und wählen Sie anschließend den Ordner
bzw. die einzelne Datei aus, die Sie importieren möchten. Eine
neue Dokumentenmappe mit den importierten Bildern wird
erstellt.
♦ Klicken Sie mit der rechten Maustaste auf die
Dok
einen aussagekräftigen Namen für die Dokumentenmappe.
elne Datei (Image) in eine Dokumentenmappe impor-
umentenmappe und vergeben Sie unter „Umbenennen“
wählte Ordner wird nun im Arbeitsbereich
DE
AT
CH
HINWEIS
► Die Bilder Ihres Gerätes fi nden Sie auf dem neu erkannten
echseldatenträger im Verzeichnis DCIM/100Media.
W
SHM 600 A1
47
Page 51

Bedienung und Betrieb
Bilder einer Dokumentenmappe exportieren
Sie können die gesammelten Bilder und Dokumente einer Dokumentenmappe in verschiedene Dateiformate exportieren.
DE
AT
CH
♦ Wählen Sie zuerst die entsprechende Dokumentenmappe aus
und klick
en dann im Hauptbildschirm auf „Speichern“.
♦ Ein weiteres Fenster wird geöff net, in dem Sie angeben können
in w
elches Dateiformat die Dokumentenmappe ausgegeben
werden soll.
Texterkennung
♦ Klicken Sie in der Schnellstartleiste auf „Öff nen“, um ein Bild
v
om Gerät zu übernehmen. Das Fenster „Öff nen“ wird ange-
zeigt.
♦ Wählen Sie als Input Mode „Image“ und klicken Sie auf „OK“.
♦ Geben Sie den Pfad zu Ihrem Bild an, markieren Sie das
Bild und klick
Vorschaubereich.
♦ Durch einen Doppelklick auf das Bild öff net sich die Editierober-
fl
äche.
en Sie auf „Öff nen“. Das Bild erscheint jetzt im
48
SHM 600 A1
Page 52

Bedienung und Betrieb
♦ Klicken Sie auf „Erkennung“. Ein weiteres Fenster wird geöff net,
in dem Sie angeben können, welche Sprache im Bild verwendet
wird.
DE
AT
CH
♦ Wählen Sie die entsprechende Sprache aus und klicken Sie auf
„OK“. Der Editor beginnt mit der Erkennung des Textes.
♦ Klicken Sie in der Schnellstartleiste der Editieroberfl äche auf
„Speichern“ und w
z.B. „Text als Worddokument speichern“, aus.
SHM 600 A1
ählen Sie das zu exportierende Dateiformat,
49
Page 53

Bedienung und Betrieb
♦ Geben Sie einen Pfad und einen Dateinamen an und klicken
Sie auf „Speichern“.
DE
HINWEIS
AT
CH
► Achten Sie darauf, dass auf dem eingescannten Bild der
ext waagerecht verläuft, da sonst die Texterkennung nicht
T
funktioniert. Wenn dies nicht der Fall ist, drehen Sie das Bild
mit den Links- / Rechts-Schaltfl ächen im unteren Bereich des
Bildschirms und speichern Sie es erneut ab.
Werkzeugleiste
Am rechten Bildrand befi ndet sich die Werkzeugleiste, die Ihnen
verschiedene Bearbeitungswerkzeuge zur Verfügung stellt:
1324
8567
1. Markieren von Bildbereichen
2. Einstellung von Helligkeit, Kontrast, Sättigung und Farbe
3. Schneidewerkzeug
4. Farben umwandeln
5. Spiegelfunktion
6. Funktion zum Drehen der Bilder
7. Schwarz-Weiß-Sättigung
8. Schwarz-Weiß-Bild erstellen
50
SHM 600 A1
Page 54

Bedienung und Betrieb
91110
12 13 14
9. Texterkennung
10. Funktion zum Beschneiden der Ränder
11. Rote Augen entfernen
12. Notizen in das Bild einfügen
13. Text in das Bild einfügen
14. Kugelschreiberfunktion
DE
AT
CH
15
1918
15. Bleistiftfunktion
16. Radiergummi
17. Bereiche einfärben
18. Linien zeichnen
19. Rechtecke zeichnen
20. Kreise zeichnen
SHM 600 A1
1716
20
51
Page 55

Steuerungsleiste
Bedienung und Betrieb
DE
AT
CH
1. Vorheriges Bild
2. Nächstes Bild
3. Optimale Bildgröße anzeigen
4. Tatsächliche Bildgröße anzeigen
5. Bild verkleinern
6. Bild vergrößern
7. In den Vollbildmodus wechseln
8. Bild nach links drehen
9. Bild nach rechts drehen
10. Bildgröße ändern (Pixelangaben)
11. Rückgängig machen
12. Wiederherstellen
13. Bild drucken
14. Druckansicht öff nen
15. Speichern unter
16. Speichern
17. Löschen
98714652 3 10 1112 13 14 151617
52
SHM 600 A1
Page 56

Reinigung
Reinigung
Sicherheitshinweise
ACHTUNG
Mögliche Beschädigung des Gerätes.
Eindringende F
Gerätes führen.
► Stellen Sie sicher, dass bei der Reinigung keine Feuchtigkeit
in das Ger
des Gerätes zu vermeiden.
euchtigkeit kann zu einer Beschädigung des
ät eindringt, um eine irreparable Beschädigung
Reinigung
■ Reinigen Sie das Gehäuse ausschließlich mit einem leicht
feuchten Tuch und einem milden Spülmittel.
■ Reinigen Sie die Oberfl äche der Scannerlinse mit dem
mitgelieferten Reinigungstuch.
DE
AT
CH
SHM 600 A1
53
Page 57

Fehlerbehebung
Fehlerbehebung
In diesem Kapitel erhalten Sie wichtige Hinweise zur Störungslo-
DE
kalisierung und Störungsbehebung. Beachten Sie die Hinweise um
AT
Gefahren und Beschädigungen zu vermeiden.
CH
Fehlerursachen und -behebung
Die nachfolgende Tabelle hilft bei der Lokalisierung und Behebung
kleinerer Störungen:
Fehler Mögliche Ursache Behebung
- Ersetzen Sie die
Batterien.
- Legen Sie die Bat-
- Setzen Sie die Speicherkarte mit den Metallkontakten nach oben ein.
- Speichern Sie die Daten
von der Speicherkarte
auf einem Computer.
- Formatieren Sie die
Speicherkarte (siehe
Kapitel Formatieren der
Micro-SD-Speicherkarte)
- Vergewissern Sie sich,
dass alle Kabel richtig
angeschlossen sind.
Starten Sie ggf. den
Computer neu.
- Probieren Sie einen
anderen USB-Port.
Das Gerät lässt sich
nicht einschalten.
Die Bilder können beim
Scannen nicht
gespeichert werden.
Der Computer erkennt
das Gerät nach dem
Anschließen nicht (Es
wird kein Wechseldatenträger erkannt).
- Batterien sind entladen.
- Batterien sind nicht
richtig eingelegt.
- Es wurde keine MicroSD-Speicherkarte
eingesetzt.
- Die Micro-SDSpeicherkarte ist voll.
- Die Micro-SDSpeicherkarte wurde
nicht richtig formatiert
Anschlussfehler.
terien richtig in das
Batteriefach ein.
54
SHM 600 A1
Page 58

Fehlerbehebung
Fehler Mögliche Ursache Behebung
- Reinigen Sie die
Die Bilder sind
verschwommen.
Die LED ERR
beim Scannen eines
Dokuments auf.
Die LED ERR
nach dem Einschalten
des Gerätes auf.
leuchtet
leuchtet
Die Scannerlinse ist
verschmutzt.
Die Scangeschwindigkeit ist zu hoch.
Die Kalibrierungsdaten
wurden zurückgesetzt.
HINWEIS
► Wenn Sie mit den vorstehend genannten Schritten das Problem
nicht lösen k
önnen, wenden Sie sich bitte an den Kundendienst.
Scannerlinse mit dem
Reinigungstuch.
- Kalibrieren Sie das
Gerät neu.
Drücken Sie zum Abbrechen auf die Taste
/SCAN und
probieren Sie das
Dokument mit einer
langsameren Geschwindigkeit neu zu scannen.
Kalibrieren Sie das
Gerät neu.
DE
AT
CH
SHM 600 A1
55
Page 59

Lagerung/Entsorgung
Lagerung/Entsorgung
Lagerung
DE
AT
Sollten Sie das Gerät längere Zeit nicht benutzen, entnehmen Sie
CH
die Batterien und lagern Sie es in der mitgelieferten Aufbewahrungstasche in einer trockenen und staubfreien Umgebung.
Gerät entsorgen
Werfen Sie das Gerät keinesfalls in den
normalen Hausmüll. Dieses Produkt unterliegt der europäischen Richtlinie 2002/96/EC
WEEE (Waste Electrical and Electronic
Equipment).
Entsorgen Sie das Gerät über einen zugelassenen
Entsorgungsbetrieb oder über Ihre kommunale Entsorgungseinrichtung. Beachten Sie die aktuell geltenden
Vorschriften. Setzen Sie sich im Zweifelsfall mit Ihrer
Entsorgungseinrichtung in Verbindung.
Batterien entsorgen
Batterien dürfen nicht im Hausmüll entsorgt werden. Jeder Verbraucher
ist gesetzlich verpfl ichtet, Batterien bei einer Sammelstelle seiner
Gemeinde / seines Stadtteils oder im Handel abzugeben. Diese
Verpfl ichtung dient dazu, dass Batterien einer umweltschonenden
Entsorgung zugeführt werden können. Geben Sie Batterien nur im
entladenen Zustand zurück.
56
SHM 600 A1
Page 60

Anhang
Anhang
Technische Daten
Spannungsversorgung 2 x 1,5 V Typ AA/Mignon/LR6/R6
Bildsensor Farb-Kontrast-Bildsensor
Anzahl Sensoren 5138 Punkte
Aufl ösung
Dateiformat JPEG
Automatische Abschaltung 3 Minuten
Externer Speicher
Schnittstelle USB 2.0
Betriebstemperatur +5 - +40°C
Feuchtigkeit (keine Kondensation) 5 - 90 %
Abmessungen (B x H x T) ca. 25,9 x 3 x 2,8 cm
Gewicht (ohne Zubehör) ca. 146 g
LOW: 300 x 300 dpi
HIGH: 600 x 600 dpi
Micro-SD-Speicherkarte bis zu
32 GB
DE
AT
CH
SHM 600 A1
57
Page 61

Mindestanforderungen an den Computer
®
Windows
DE
Betriebssystem
AT
CH
CPU Pentium III oder höher
Arbeitsspeicher Mindestens 256 MB
Schnittstelle USB-Port 2.0
Windows® 7 und Mac OS® 10.4 oder
höher (Gerät direkt einstecken, Treiberinstallation nicht erforderlich)
XP SP2, Windows® Vista™,
Hinweise zur Konformitätserklärung
Dieses Gerät entspricht hinsichtlich Übereinstimmung
mit den grundlegenden Anforderungen und den
anderen relevanten Vorschriften der Richtlinie zur
elektromagnetischen Verträglichkeit 2004/108/EC.
Die vollständige Original-Konformitätserklärung ist
beim Importeur erhältlich.
Anhang
58
SHM 600 A1
Page 62

Anhang
Garantie
Sie erhalten auf dieses Gerät 3 Jahre Garantie ab Kaufdatum. Das
Gerät wurde sorgfältig produziert und vor Anlieferung gewissenhaft
geprüft.
Bitte bewahren Sie den Kassenbon als Nachweis für den Kauf auf.
Bitte setzen Sie sich im Garantiefall mit Ihrer Servicestelle telefonisch
in Verbindung. Nur so kann eine kostenlose Einsendung Ihrer Ware
gewährleistet werden.
HINWEIS
► Die Garantieleistung gilt nur für Material- oder Fabrikations-
, nicht aber für Transportschäden, Verschleißteile oder
fehler
für Beschädigungen an zerbrechlichen Teilen, z.B. Schalter
oder Akkus.
Das Produkt ist lediglich für den privaten und nicht für den gewerblichen Gebrauch bestimmt. Bei missbräuchlicher und unsachgemäßer
Behandlung, Gewaltanwendung und bei Eingriff en, die nicht von
unserer autorisierten Service-Niederlassung vorgenommen wurden,
erlischt die Garantie.
Ihre gesetzlichen Rechte werden durch diese Garantie nicht eingeschränkt. Die Garantiezeit wird durch die Gewährleistung nicht
verlängert. Dies gilt auch für ersetzte und reparierte Teile.
Eventuell schon beim Kauf vorhandene Schäden und Mängel müssen sofort nach dem Auspacken gemeldet werden, spätestens aber
zwei Tage nach Kaufdatum.
Nach Ablauf der Garantiezeit anfallende Reparaturen sind kostenpfl ichtig.
DE
AT
CH
SHM 600 A1
59
Page 63

Service
Service Deutschland
DE
AT
CH
Tel.: 0180 5772033 (0,14 EUR/Min. aus dem dt. Festnetz,
Mobilfunk max. 0,42 EUR/Min.)
E-Mail: kompernass@lidl.de
IAN 73767
Service Österreich
Tel.: 0820 201 222 (0,15 EUR/Min.)
E-Mail: kompernass@lidl.at
IAN 73767
Service Schweiz
Tel.: 0842 665566 (0,08 CHF/Min.,
Mobilfunk max. 0,40 CHF/Min.)
E-Mail: kompernass@lidl.ch
IAN 73767
Importeur
KOMPERNASS GMBH
BURGSTRASSE 21
44867 BOCHUM, GERMANY
www.kompernass.com
Anhang
60
SHM 600 A1
Page 64

Index
Introduction . . . . . . . .62
Information for these
operating instructions . . . . 62
Copyright . . . . . . . . . . . . . 62
Limited liability . . . . . . . . . 62
Warnings . . . . . . . . . . . . . 63
Intended use . . . . . . . . . . . 63
Safety . . . . . . . . . . . . .64
Interaction with batteries . 64
Basic Safety Instructions . . 65
Commissioning . . . . .66
Safety instructions . . . . . . . 66
Items delivered and
transport inspection . . . . . 66
Disposal of the packaging 67
Inserting/replacing the
batteries . . . . . . . . . . . . . . 67
Operating Elements .68
Handling and
operation . . . . . . . . . .69
Insertion/exchange of the
Micro-SD memory card . . 69
Formatting the Micro SD
memory card . . . . . . . . . . 69
Setting Time and Date . . . 70
Setting the Scan Resolution 71
Setting the Scan Mode . . . 71
Scanning . . . . . . . . . . . . . 71
Perform calibration . . . . . . 72
LED Indicators . . . . . . . . . . 73
Viewing the scanned
documents/images . . . . . . 73
Connection to a computer 73
Installation of the program-
mme NimoDoc Lite . . . . . . 74
Launching the programme
NimoDoc Lite . . . . . . . . . . 75
Cleaning . . . . . . . . . . .83
Safety instructions . . . . . . . 83
Cleaning . . . . . . . . . . . . . . 83
Troubleshooting . . . .84
Malfunction causes and
remedies . . . . . . . . . . . . . . 84
Storage/Disposal . . .86
Storage . . . . . . . . . . . . . . . 86
Disposal of the appliance . 86
Disposing of the batteries . 86
Appendix . . . . . . . . . .87
Technical data . . . . . . . . . 87
Minimum PC requirements 88
Notes on the Declaration
of Conformity . . . . . . . . . . 88
Warranty . . . . . . . . . . . . . 89
Service . . . . . . . . . . . . . . . 90
Importer . . . . . . . . . . . . . . 90
GB
SHM 600 A1
61
Page 65

Introduction
Information for these operating instructions
Congratulations on the purchase of your new appliance.
You have clearly decided in favour of a quality product.
These operating instructions are a component of the mobile Hand
Scanner SHM 600 A1 (henceforth designated as the appliance)
GB
and they supply you with important information for intended use,
safety and connection as well as operation of the appliance. The
operating instructions must be constantly kept available close to the
appliance. They are to be read and applied by everyone occupied
with operating and troubleshooting the appliance. Retain these
operating instructions and pass them on, with the appliance, to any
future owners.
Copyright
This documentation is copyright protected.
All reproductions or duplications, also as extracts, as well as representations of the illustrations, even in an altered state, are only permitted
with the written approval of the manufacturer.
Limited liability
All technical information, data and instructions for connection and
operation contained in this operating manual correspond to the latest
available at the time of printing and, to the best of our knowledge,
take into account our previous experience and know-how. No claims
can be derived from the details, illustrations and descriptions in
these instructions. The manufacturer assumes no responsibility for
damage caused by failure to observe the instructions, improper use,
incompetent repairs, making unauthorised modifi cations or for using
unapproved replacement parts.
Introduction
62
SHM 600 A1
Page 66

Introduction
Warnings
In these operating instructions the following warnings are used:
WARNING
A warning at this risk level indicates a possible
dangerous situation.
If the dangerous situation is not avoided it could lead to injuries.
► The directives in this warning are there to avoid personal injuries.
IMPORTANT
A warning at this risk level indicates possible
pr
operty damage.
If the situation is not avoided it could lead to property damage.
► Follow the instructions in this warning to avoid property damage.
NOTICE
► A notice indicates additional information that assists in the
handling of the appliance.
Intended use
This appliance is intended solely for non-commercial use in the
scanning and digitising of documents and images. This appliance is
not intended for any other use or for uses beyond those mentioned.
Claims of any kind for damage resulting from unintended use will not
be accepted. The user alone bears liability.
GB
SHM 600 A1
63
Page 67

Safety
In this chapter you receive important safety information regarding
the handling of the appliance. This appliance complies with the
statutory safety regulations. Incorrect usage can lead to personal
injury and property damage.
GB
Interaction with batteries
WARNING
Danger from improper use! The risk of explosions
and leakages exists!
For safe handling of batteries observe the following safety
instructions:
► Do not throw batteries into a fi re.
► Do not short circuit batteries.
► Do not attempt to recharge batteries.
► Regularly check the condition of the batteries. Leaking batter
acid can cause permanent damage to the appliance. Special
caution should be shown when handling damaged or leaking
batteries. Risk of acid burns! Wear protective gloves.
► Store batteries in a place inaccessible to children.
allowed, seek IMMEDIATE medical attention.
If sw
► If you do not intend to use the appliance for an extended
emove the batteries.
period, r
Safety
y
64
SHM 600 A1
Page 68

Safety
Basic Safety Instructions
For safe handling of the appliance observe the following safety
information:
■ Before use, check the appliance for visible external damage. Do
not put into oper
dropped.
■ This appliance is not intended for use by individuals (including
childr
en) with restricted physical, physiological or intellectual
abilities or defi ciences in experience and/or knowledge unless
they are supervised by a person responsible for their safety or
receive from this person instruction in how the appliance is to be
used.
■ Children should be supervised to ensure that they do not play
with the appliance.
■ Repairs should only be carried out by authorised specialist compa-
nies or b
can result in signifi cant risks for the user. In addition, warranty claims
become void.
■ A repair to the appliance during the warranty period may only
be carried out b
the manufacturer, otherwise no additional warranty claims can
be considered for subsequent defects.
■ Defective components may only be replaced with original replace-
ment par
guaranteed that the safety requirements are being complied with.
■ Do not make any unauthorised modifi cations or alterations to the
appliance.
■ Protect the appliance from moisture and liquid penetration. Do
not place container
the appliance.
■ Do not use the appliance adjacent to open fl ames.
ation an appliance that is damaged or has been
y the Customer Services department. Incompetent repairs
y a Customer Service department authorised by
ts. Only by using original replacement parts can it be
s fi lled with fl uids, such as vases, adjacent to
GB
SHM 600 A1
65
Page 69

Commissioning
Commissioning
Safety instructions
WARNING
Personal injury and property damage may be
GB
caused during the commissioning of the appliance!
► Packaging material should not be used as a play thing.
Ther
e is a risk of suff ocation!
Items delivered and transport inspection
The appliance is delivered with the following components as standard:
▯ Hand Scanner
▯ 2GB Micro SD memory card including adapter for
SD memor
▯ 2 x 1.5 V Batteries Type AA / LR6 / Mignon
▯ Programme CD
▯ Storage case
▯ USB Cable
▯ Cleaning cloth
▯ Paper for white balance calibration
▯ Operating Manual
NOTICE
► Check the contents to make sure everything is there and for
visible damage.
► If the contents are not complete or are damaged due to
defectiv
service hotline (see chapter Service).
y card
e packaging or through transportation, contact the
66
SHM 600 A1
Page 70

Commissioning
Disposal of the packaging
The packaging protects the appliance from transport damage.
The packaging materials are selected from the point of view of
their environmental friendliness and disposal technology and are
therefore recyclable.
The recirculation of packaging into the material circuit
saves on raw material and reduces the amount of waste
generated. Dispose of packaging material that is no longer
needed as per the regionally established regulations.
NOTICE
► If possible, preserve the appliance's original packaging during
arranty period so that, in the event of a warranty claim,
the w
you can package the appliance ideally for its return.
Inserting/replacing the batteries
♦ Open the battery compartment cover on the upperside of the
appliance by sliding the cover to the right and then lifting it off .
♦ Insert two batteries of type AAA (supplied) into the battery
compar
tment .
♦ Close the battery compartment
sliding it to the left.
by replacing the cover and
GB
SHM 600 A1
67
Page 71

Operating Elements
(see fold-out side Figure A)
Button /SCAN: On/Off switch;
Battery compartment
GB
Display representations
(see fold-out side Figure B)
Button FORMAT: Format the Micro-SD memory card
Insertion slot for Micro SD memory card
USB port
Button TIME SET: Setting Time and Date
LED ERR: Scanning speed is too high
LED SCAN: Scan is being performed
Display
Button C/BW: Setting the Scan Mode
Taste DPI: Setting the Scan Resolution
Display SD Card: Photos are being stored on the
Display eff ect: Documents are being scanned in colour
Counter: Indicates the number of scanned fi les on the
Selected resolution: HIGH: 600 dpi; LOW: 300 dpi
Battery indicator: Battery is full ; Battery is empty
Operating Elements
Start/end scan process
Micro-SD memory card
or black/white
Micro-SD memory card
68
SHM 600 A1
Page 72

Handling and operation
Handling and operation
In this chapter you receive important information in regard to the
handling and operation of the appliance.
Insertion/exchange of the Micro-SD memory card
The appliance requires a Micro SD memory card (supplied) to be
able to scan and save documents or pictures.
♦ Switch the appliance off with the button
♦ Insert the Micro SD memory card with the metal contacts facing
ards into the slot and carefully press the card until it
upw
clicks into place.
IMPORTANT
► Do not press the Micro-SD memory card into the slot with force.
The appliance and the memor
y card could be damaged.
Formatting the Micro SD memory card
When using a new Micro SD memory card, this must be formatted
prior to scanning.
NOTICE
► Formatting erases all data saved on the Micro-SD memory card.
♦ Switch the appliance off with the button
♦ Insert the Micro SD memory card with the metal contacts facing
upwards into the slot and carefully press the card until it
clicks into place.
♦ Switch the appliance on with the button /SCAN .
♦ Using a blunt and thin object, such as the end of a paper clip,
press the button FORMAT . In the display appears a .
♦ Press the button
memory card. In the display the indicator for the SD card
will blink until formatting is complete.
/SCAN to start formatting the Micro-SD
/SCAN .
/SCAN .
GB
SHM 600 A1
69
Page 73

Setting Time and Date
♦ Switch the appliance on with the button /SCAN .
♦ Using a blunt and thin object, such as the end of a paper clip,
pr
ess the button TIME SET . In the display appears ##
for the year, whereby # # stands for a series of digits that will
GB
be changed to match the actual time and date.
♦ Press the button C/B
♦ Press the button
display appears ##.
♦ Repeat the last two action steps to set the month, day, hour and
minute.
♦ After setting the minute (
once again to exit the setting of date and time.
Display Setting
1 ## Year
2 ## Month
3 ## Day
4 ## Hour
5 ## Minute
Handling and operation
W or DPI to select the current year.
/SCAN to confi rm the setting. In the
##), press the button TIME SET
70
SHM 600 A1
Page 74

Handling and operation
Setting the Scan Resolution
♦ Press the button DPI to choose between either the high
resolution (HIGH = 600 dpi) or the low resolution (300 dpi =
LOW). In the display either HIGH or LOW is indicated.
Setting the Scan Mode
♦ Press the button C/BW to choose between either the colour
mode (COLOR) or the black / white mode (MONO). In the
display either COLOR or MONO is indicated.
Scanning
NOTICE
► To scan, please ensure that the appliance is not connected
to a computer and the Micr
♦ Switch the appliance on with the button
♦ Place the document on a fl at surface and hold it down fi rmly
with one hand.
♦ Place the appliance on the edge of the paper. Ensure that the
ea between the markings for the scan width ( ),
scan ar
which are marked on the side of the appliance, is maintained.
♦ Hold the appliance pressed fl at against the document and press
the button
♦ Proceed slowly with the appliance over the document whilst
k
eeping your hand steady, so as to achieve the best quality for
the scanned document.
♦ Press the button
NOTICE
► To conserve the batteries, the appliance switches off auto-
matically af
/SCAN once. The LED SCAN glows.
ter 3 minutes of not being in use.
o-SD memory card is inserted.
/SCAN .
/SCAN once again to stop scanning.
GB
SHM 600 A1
71
Page 75

Perform calibration
NOTICE
► Perform a calibration only if the white balance needs to be
eset. A white balance is recommended if it should be that
r
the lightest point in scanned images, which in reality should
GB
be white, in fact appears in a shade of grey.
♦ Place the appliance on the paper supplied for white balance cali-
br
ation then switch the appliance on with the button /SCAN .
♦ Press and hold the button C/B
/SCAN to switch into calibration mode. In the display
the indicator for the SD card will blink until the internal
memory is deleted. Subsequently, the LED SCAN
LED ERR glow.
NOTICE
► The documents/pictures extant on the Micro-SD memory card
will be r
♦ Do not move the appliance until the LED ERR
The LED SCAN continues to glow.
♦ Now begin to scan the paper by moving the appliance over
the white paper until the LED SC
appliance backwards if necessary).
♦ The calibration process is fi nished. Switch the appliance off with
the button
Handling and operation
W and then press the button
and the
etained even after the deletion of the internal memory.
extinguishes.
AN extinguishes (push the
/SCAN .
72
SHM 600 A1
Page 76

Handling and operation
LED Indicators
LED SCAN lights up green: Scan is being performed.
LED SCAN
LED ERR
LED ERR
Viewing the scanned documents/images
To transfer your data from the Micro-SD memory card, use either
the supplied SD card adapter or connect the appliance directly to
a computer with the USB cable.
Connection to a computer
System Requirements
You require a computer with a free USB port and, as the operating system, either Microsoft
Windows
♦ Connect the appliance to your computer via the USB cable and
switch it on with the /SCAN button. Your computer should
recognise the appliance as a "Removable Medium".
♦ Click on "Open folder to display fi les" to view and import the
scanned images.
NOTICE
► If you have switched the auto start function off and the re-
mo
My Computer (PC) and search for the appliance under
"Removable Medium".
does not light up: Standby mode/Scan complete.
lights up orange: Scanning speed too high/Scan blurred.
does not light up: Faultless scanning speed.
®
®
7 or Mac OS® 10.4 or higher.
Windows® XP SP2, Windows® Vista,
vable medium does not appear automatically, go to
GB
SHM 600 A1
73
Page 77

Handling and operation
Installation of the programmme NimoDoc Lite
NOTICE
► Please note that the programme NimoDoc Lite only functions
ws PCs. Mac users will need an alternative soft-
®
Windows®7. The screen display may, depending
osoft
. The window "Automatic Playback" is displayed.
ts and the start window is displayed.
ocess does not start automatically, start the installation
GB
with Windo
ware or need to emulate a Windows environment.
► The illustrations and descriptions refer to the operating system
Micr
on the display settings, vary with other operating systems.
♦ Place the supplied software CD into the CD-ROM drive of your
computer
♦ Click on the "Run NimoDoc.exe" button.
The installation star
NOTICE
► If you have switched the auto start function off and the instal-
lation pr
process by double-clicking the fi le "NimoDocLite.exe" in the
root directory of the CD.
♦ Click on the button "Install NimoDoc Lite" to install the pro-
gr
amme "NimoDoc Lite".
The installation wizard will now guide you through the installation process. After successful installation, a display appears
indicating that the installation has been completed.
♦ Click on the button "Finish". The launch window is displayed
once again.
♦ Click on the button "Exit" to end the installation programme.
74
SHM 600 A1
Page 78

Handling and operation
Launching the programme NimoDoc Lite
♦ Start the programme by double clicking on the programme icon
on the desktop or select the corresponding entry in the Start Menu.
♦ The main window is opened.
1
2
3
GB
5
1. Menu bar
2. Quick Launch toolbar
3. Search fi eld
4. Preview area
5. Workspace
SHM 600 A1
4
75
Page 79

Confi guring the work space
♦ Click on "MyNimoDoc" in the work space with the right mouse
button. A conte
GB
♦ Click on "File Management" with the left mouse button. A new
window with the fi le management will open.
♦ Click on "Add" to select a fi le from your hard disc or appliance.
Handling and operation
xt menu opens.
76
SHM 600 A1
Page 80

Handling and operation
♦ After you have selected a fi le, click on "Save". The selected fi le
will no
w be displayed in the work space and all documents or
images to be processed can be stored in this fi le.
Importing images from the appliance
♦ Click in the Quick Launch bar on "Open" to take over images
om the appliance into a document fi le. The window "Open"
fr
appears.
♦ Here, select whether you want to import an entire fi le (folder)
or a single fi
you can also fi lter as to which fi le formats are to searched for.
♦ Click on "OK" and then select the folder or individual fi le that
you wish to import. A new document folder with the imported
images is created.
♦ Click on the document folder with the right mouse button and,
under "r
folder.
le (image) into a document folder. In addition,
ename", assign a descriptive name for the document
GB
NOTICE
► The images from your appliance can be found on the
wly recognised removable medium in the directory
ne
DCIM/100Media.
SHM 600 A1
77
Page 81

Handling and operation
Export images of a document folder
You can export the collected images and documents in a documents
folder in various fi le formats.
♦ First, select the appropriate document fi le and then click on
"Sav
e" in the main screen.
GB
♦ Another window then opens in which you can specify in which
fi
le format the document folder is to be issued.
Text Recognition
♦ Click in the Quick Launch bar on "Open" to take over an image
fr
om the appliance. The window "Open" appears.
♦ Select the Input Mode "Image" and click on "OK".
♦ Specify the path to your image, mark the image and then click
on "Open". The image will no
♦ By double clicking on the image the editing interface opens.
w appear in the preview area.
78
SHM 600 A1
Page 82

Handling and operation
♦ Click on "Recognition". Another window will open in which you
can specify which language is to be used in the image.
GB
♦ Select the appropriate language and click on "OK". The editor
starts with the recognition of the text.
♦ In the Quick Launch toolbar click on "Save" in the editing inter-
face and select the fi
as a Word document".
SHM 600 A1
le format to be exported, e.g. " Save text
79
Page 83

Handling and operation
♦ Specify a path and fi le name and click on "Save".
NOTICE
► Ensure that on the scanned image the text runs horizontally,
wise the text recognition does not work. If this is not the
other
GB
case, rotate the image with the left/right buttons in the lower
area of the screen and save it again.
Toolbar
On the right side of the display there is the tool bar, which provides
you with various editing tools:
1324
8567
1. Marking of image areas
2. Adjustment of brightness, contrast, saturation and colour
3. Cutting tool
4. Convert colours
5. Mirror function
6. Function for rotating the images
7. Black and white saturation
8. Create black and white image
80
SHM 600 A1
Page 84

Handling and operation
91110
12 13 14
9. Text Recognition
10. Function for trimming the edges
11. Red eye removal
12. Insert notes into the image
13. Insert text into the image
14. Ballpoint pen function
15
15. Pencil function
16. Eraser
17. Colourise areas
18. Draw lines
19. Draw rectangles
20. Draw circles
1716
1918
20
GB
SHM 600 A1
81
Page 85

Control bar
GB
1. Previous image
2. Next image
3. Display optimal image size
4. Display actual image size
5. Zoom out
6. Zoom in
7. Switch to full screen mode
8. Rotate image to the left
9. Rotate image to the right
10. Resize image (pixel data)
11. Undo
12. Restore
13. Print image
14. Open print preview
15. Save as
16. Save
17. Delete
Handling and operation
98714652 3 10 1112 13 14 151617
82
SHM 600 A1
Page 86

Cleaning
Cleaning
Safety instructions
IMPORTANT
Possible damage to the appliance.
Moistur
e penetration can cause damage to the appliance.
► In order to avoid irreparable damage, when you are cleaning
he appliance ensure that moisture cannot penetrate inside it.
t
Cleaning
■ Clean the housing exclusively with a soft damp cloth and a mild
dishwashing liquid.
■ Clean the surface of the lens scanner with the supplied cleaning
cloth.
GB
SHM 600 A1
83
Page 87

Troubleshooting
Troubleshooting
In this chapter you will receive important information for malfunction
localization and remedies. Observe the instructions in order to avoid
danger and damage.
Malfunction causes and remedies
GB
The following table will help with localizing and remedying minor
malfunctions:
Defect Possible cause Solution
The appliance will not
switch on.
The images cannot be
saved when scanning.
The computer does not
recognise the appliance
after the connection
is made (it has not
detected removable
medium).
- Batteries are
discharged.
- Batteries are not
inserted correctly.
- The Micro SD memory
card is not fi tted.
- The Micro-SD memory
card is full.
- The Micro-SD memory
card has not been
formatted correctly
Connection error.
- Replace the batteries.
- Insert the batteries into
the battery compartment correctly.
- Insert the memory
card with the metal
contacts facing upwards.
- Save the data from
the memory card onto
a computer.
- Format the memory
card (see section "Formatting the Micro-SD
memory card)
- Ensure that all cables
are connected properly. If necessary,
restart the computer.
- Try a diff erent USB
port.
84
SHM 600 A1
Page 88

Troubleshooting
Defect Possible cause Solution
- Clean the scanner
The images are blurry.
The LED ERR
up when scanning a
document.
The LED ERR
up after switching the
appliance on.
lights
lights
The scanner lens is
dirty.
The scanning speed is
too high.
The calibration data
has been reset.
NOTICE
► If you cannot solve the problem with the aforementioned methods
please contact Customer Ser
vice.
lens with the cleaning
cloth.
- Recalibrate the
appliance.
To cancel, press the
button
and try to scan the
document again at a
slower speed.
Recalibrate the
appliance.
GB
/SCAN
SHM 600 A1
85
Page 89

Storage/Disposal
Storage/Disposal
Storage
If you intend to not use the appliance for an extended period, remove the batteries and store it in the supplied storage bag in a dry
and dust-free environment.
GB
Disposal of the appliance
Do not dispose of the appliance into normal
household waste. This product is subject
to the provisions of European Directive
2002/96/EC-WEEE (Waste Electrical and
Electronic Equipment).
Dispose of the appliance through an approved disposal
centre or at your community waste facility. Observe
the currently applicable regulations. In case of doubt,
please contact your waste disposal centre.
Disposing of the batteries
Do not dispose of the batteries with household waste. Every consumer
is statutorily obliged to dispose of batteries at a collection centre in
his/her community/district or a dealer. This obligation is intended
to ensure that batteries are disposed of in an environmentally safe
fashion. Dispose of batteries only when they are fully discharged.
86
SHM 600 A1
Page 90

Appendix
Appendix
Technical data
Power supply
Image Sensor Colour contrast image sensor
Number of sensors 5138 Points
Resolution
Data format JPEG
Automatic switch-off 3 Minutes
External memory
Interface USB 2.0
Operating temperature +5 - +40°C
Humidity (no condensation) 5 - 90 %
Measurements (W x H x D) approx. 25.9 x 3 x 2.8 cm
Weight (without accessories) 146 g approx.
2 x 1.5 V Type AA/Mignon/
LR6/R6
LOW: 300 x 300 dpi
HIGH: 600 x 600 dpi
Micro-SD memory card
up to 32GB
GB
SHM 600 A1
87
Page 91

Minimum PC requirements
®
XPSP2, Windows®Vista™,
Operating system
GB
CPU Pentium III or higher
Main memory Minimum 256 MB
Interface USB-Port 2.0
Windows
Windows®7 and MacOS® 10.4 or higher
(Insert the appliance directly, driver installation not required)
Notes on the Declaration of Conformity
This appliance satisfi es the fundamental requirements
and other relevant regulations of the EMC Directive
2004/108/EC.
The complete original declaration of conformity can
be obtained from the importer.
Appendix
88
SHM 600 A1
Page 92

Appendix
Warranty
You receive a 3-year warranty for this appliance as of the purchase
date. This appliance has been manufactured with care and meticulously examined before delivery.
Please retain your receipt as proof of purchase. In the case of a
warranty claim, please make contact by telephone with our service
department. Only in this way can a post-free despatch for your
goods be assured.
NOTICE
► The warranty covers only claims for material and manufac-
turing defects, not for tr
for damage to fragile components, e.g. buttons or batteries.
This appliance is intended for domestic use only, NOT for commercial purposes. If this product has been subjected to improper or
inappropriate handling, abuse, or modifi cations not carried out by
one of our authorised sales and service outlets, the warranty will be
considered void.
Your statutory rights are not restricted in any way by this warranty.
The warranty period will not be extended as a result of repairs made
under warranty. This applies also to replaced and repaired parts.
Damages and defects discovered on purchase are to be reported
directly after unpacking, at the latest two days after the date of
purchase.
On the lapse of the warranty period, all repairs carried out are
liable to charges.
ansport damage, wearing parts or
GB
SHM 600 A1
89
Page 93

Service
Service Great Britain
Tel.: 0871 5000 720 (£ 0.10/Min.)
E-Mail: kompernass@lidl.co.uk
IAN 73767
GB
Importer
KOMPERNASS GMBH
BURGSTRASSE 21
44867 BOCHUM, GERMANY
www.kompernass.com
Appendix
90
SHM 600 A1
Page 94

KOMPERNASS GMBH
Burgstraße 21
D-44867 Bochum
www.kompernass.com
Version des informations · Stand der Informationen
Last Information Update: 03 / 2012
Ident.-No.: SHM600A1012012-4
IAN 73767
2
 Loading...