

Page 1

KITCHEN TOOLS
7
Egg Cooker SEKD 400 A1
Egg Cooker
Operating instructions
Kuhalo za jaja
Upute za upotrebu
KOMPERNASS GMBH
BURGSTRASSE 21 · D-44867 BOCHUM
www.kompernass.com
ID-Nr.: SEKD400A1-06/10-V2
R
Fierbător de ouă
Instrucţiunile
ΒΒρραασσττήήρρααςς ααυυγγώώνν
Οδηγίες χρήσης
Яйцеварка
Ръководство за експлоатация
Eierkocher
Bedienungsanleitung
Page 2
SEKD 400 A1
1
2
3
7
4
5
6
Page 3

Egg Cooker 2
Read the operating instructions carefully before using the appliance for the first time
and preserve this booklet for later reference. Pass the manual on to whomsoever might
acquire the appliance at a later date.
Kuhalo za jaja 6
Ove upute sačuvajte za kasnija pitanja – i prilikom predavanja uređaja trećim
osobama obavezno priložite i ove upute!
R
Fierbător de ouă 10
Citiţi cu atenţie instrucţiunile de utilizare înainte de prima utilizare şi păstraţi-le pentru
o consultare ulterioară. Dacă încredinţaţi aparatul unor terţi, ataşaţi şi instrucţiunile
de utilizare.
Яйцеварка 14
Прочетете внимателно ръководството за експлоатация преди да използвате уреда
за първи път и го запазете за по-нататъшна употреба. Когато предавате уреда на
трети лица, предайте и това ръководство с него.
ВсбуфЮсбт бхгюн 18
ЦхлЬофе бхфЮ фзн пдзгЯб гйб есщфЮуейт рп х иб рспкэ ш пхн бсгьфесб – кбй уе
ресЯрфщуз рбсЬдпузт фзт ухукехЮт дюуфе фзн ерЯузт уе бхфпэт рп х иб фзн
брпкфЮупхн!
Eierkocher 22
Lesen Sie die Bedienungsanleitung vor der ersten Verwendung aufmerksam durch und
heben Sie diese für den späteren Gebrauch auf. Händigen Sie bei Weitergabe des
Gerätes an Dritte auch die Anleitung aus.
- 1 -
Page 4
Egg Cooker
4. Safety instructions
1. Intended use
This appliance is intended exclusively for cooking
and keeping warm chicken eggs in private
households.
It is not intended for use with other foods or other
materials. It is also not intended for commercial or
industrial use.
2. Technical data
Voltage: 220-240 V ~50 Hz
Power consumption: 400 W
Capacity: Max. 6 eggs
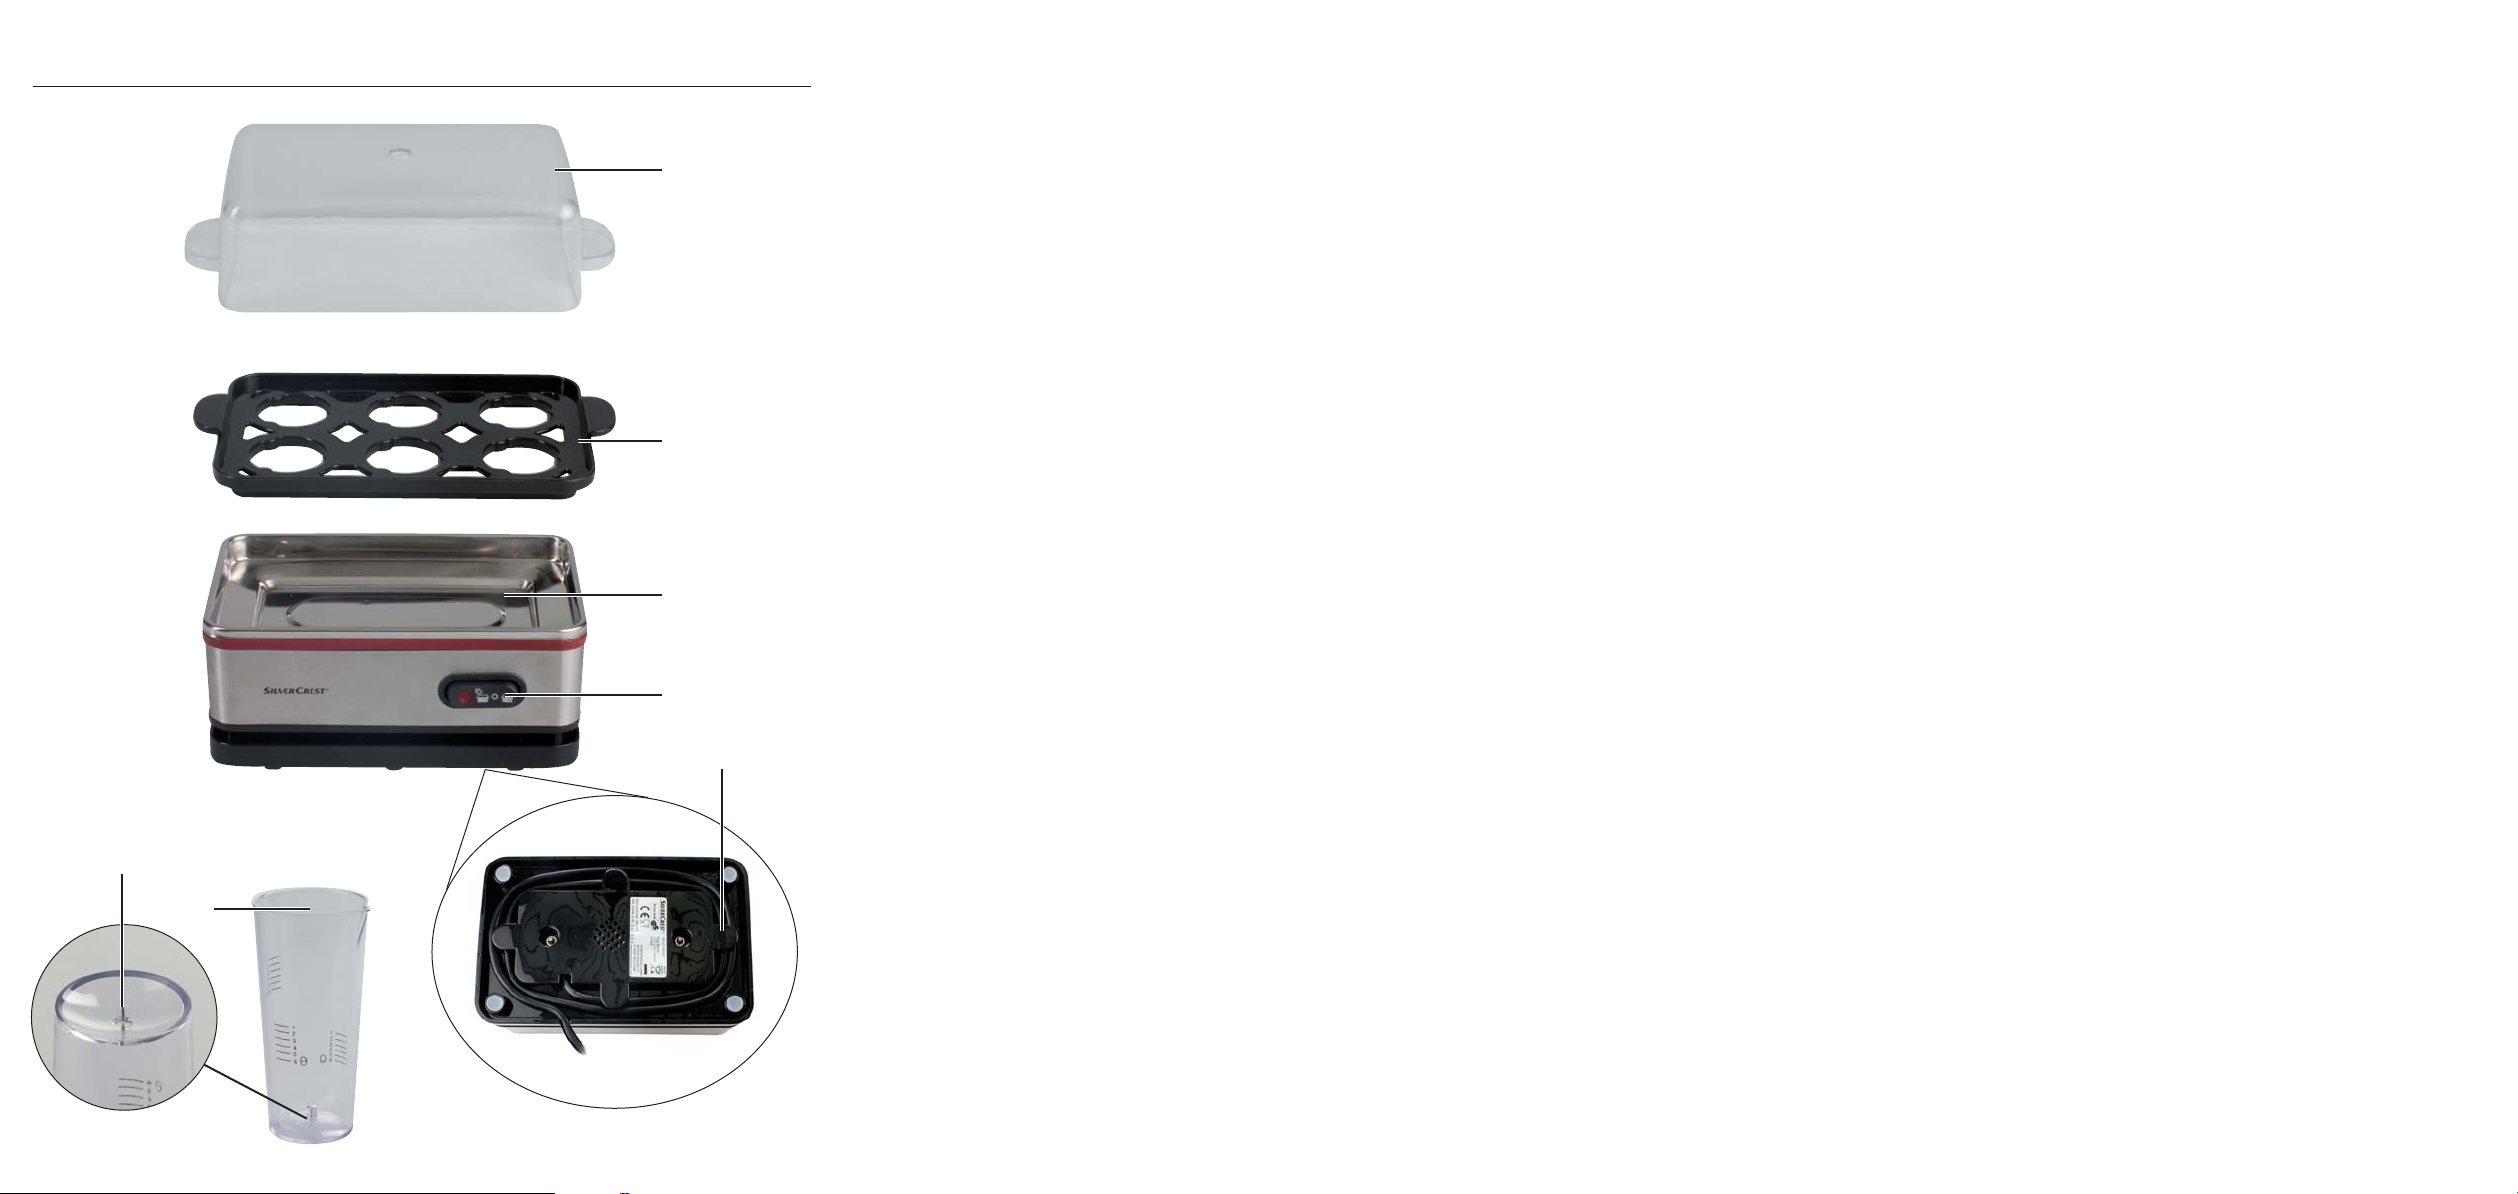
3. Appliance description
Lid
q
Egg holder
w
Cooking bowl
e
Operating switch
r
(position “ “: cook)
(position "O": off)
(position " ": keep warm)
Rolled-up cable
t
Measuring cup
y
Egg pick (integrated in the measuring cup)
u
DANGER! Electric shock!
Risk of fire!
• Only connect the egg cooker to a properly
installed and grounded socket with a main
voltage of 220 - 240 V ~ 50 Hz.
• Always pull the power plug from the socket
when you move or fill the device, in event of problems, before cleaning the appliance and while
the cooker is not in use! Never pull on the power
cord, only on the power plug. Never touch the
appliance plug with wet or moist hands.
Never submerge the appliance in liquid, never
subject it to moisture and never use it outdoors.
• If the appliance does fall into liquid, immediately
pull the power plug from the socket. Then refrain
from operating the appliance until it has been
inspected by an approved service company.
• Do not use the egg cooker if it is located on a
wet surface or if your hands or the appliance
are wet.
• Position the power cord so that it does not come
into contact with hot or sharp-edged objects.
• Do not kink or crush the power cord and do not
wind it around the appliance.
• Arrange for defective power plugs and/or cables to be replaced as soon as possible by a
qualified technician or by our Customer Service
Department to avoid the risk of injury.
• Do not use an external time switch or a separate
remote control system to operate the appliance.
- 2 -
Page 5

Danger of injuries!
• Never leave the appliance unattended during
operation.
• Do not allow individuals (including children) to
use the appliance whose physical, sensorial or
mental abilities or lack of experience and knowledge hinder their safe usage of it if they have
not previously been supervised or instructed in its
correct usage.
• Tell children about the appliance and its potential dangers so that they do not play with it.
• Be careful with the egg pick
the measuring cup.
• The casing surfaces become very hot during
operation. Therefore, only grip the lid
egg holder
removing them.
CAUTION! Hot steam escapes from the
steam hole and upon opening the lid
Danger of scalding!
by the grips provided when
w
on the bottom of
u
q
and the
q
5. Starting up
Before starting up the appliance, make certain
that ...
- egg cooker, plug and power cable are in good
working order and...
- all packaging materials have been removed
from the egg cooker.
First clean the appliance as described under 8.
6. Cooking eggs
Pick a hole in the top or bottom side of the egg
with the egg pick
Place the eggs on the egg holder
picked side up.
Fill the measuring cup
amount of water. The amount of water depends
on the number of eggs and the desired degree
of hardness.
u
.
y
with the
w
with the required
Always open the lid
and removing it to the side. Avoid letting the
escaping steam contact your hand and arm.
Remove the egg holder
has completely escaped.
Attention! Property damage!
• Never place the appliance near heat sources.
• Never open the housing. If the housing is opened, the safety of the device is no longer assured
and the warranty becomes void.
• Only use the accessories included and never use
the appliance without the egg holder
place.
• Let the appliance and the accessory parts cool
down completely before cleaning and storing
them.
by lifting up with the grip
q
only once the steam
w
w
in
Explanation of the symbols on the measuring cup:
hard
medium
soft
Tip:
Depending on the size of the egg, to obtain the desired hardness you may need to vary the volume of
water used from that detailed by the scale markings
on the measuring cup
a little more water (about one mark on the measuring scale). The cooking time will be extended. The
egg will be harder. If the egg is too hard, use a little
less water the next time (about one mark on the measuring scale). The cooking time will be shortened.
The egg will be softer.
Now pour the water into the cooking bowl
Place the egg holder
and place the lid qon top.
- 3 -
. If the egg is too soft, use
y
in the cooking bowl
w
e
.
e
Page 6
Press the operating switch rto the left (position
“ “) to turn the appliance on for cooking.
As soon as the eggs are cooked, a signal sounds.
Push the operating switch back to the position
“O” to turn the appliance off.
After cooking, peel the eggs under cold, flowing
water.
7. Keeping eggs warm
Use the keep-warm function only for hard boiled
eggs.
After boiling, rinse the eggs under cold flowing
water.
Push the operating switch to the right to activate
the keeping warm function (position " ")
after cooking the eggs.
Push the operating switch back to the position
"O" to turn the appliance off.
Note:
Never use cleaning agents or solvents. This can cause damage to the appliance.
Cleaning the appliance:
Pull the power plug out from the power socket.
Let the appliance cool off.
Then clean the cooking bowl
cord with a slightly damp cloth.
Remove calcified residue with a solution of
vinegar and water.
Afterward, operate the appliance only with
clear water to remove the vinegar smell.
Always dry the appliance well before using it
again.
Cleaning the accessories:
Wash the lid
measuring cup
water.
• The egg holder w, lid qand measuring cup
can be cleaned in a dishwasher.
, the egg holder wand the
q
with soap under flowing
y
and the power
e
y
9. Storage
8. Cleaning and care
Life-threatening danger of electrical
shock:
• Never open the egg cooker housing. There are
no operating elements inside.
Never immerse the egg cooker components
into water or other liquids!
Caution:
When cleaning the measuring cup, be careful of the
egg pick
. Danger of injury!
u
Let the egg cooker cool off completely before
storing it.
Wind the power cord around the cord winder
on the bottom of the appliance.
t
Store the appliance in a dry place.
- 4 -
Page 7
10. Disposal
Do not dispose of the appliance in your
normal domestic waste. This product is
subject to the European guideline
2002/96/EC.
Dispose of the appliance through an approved disposal centre or at your community waste facility.
Observe the currently applicable regulations.
In case of doubt, please contact your waste disposal
centre.
Dispose of all packaging materials in an
environmentally friendly manner.
The warranty period will not be extended by repairs
made under warranty. This applies also to replaced
and repaired parts. Any damage and defects extant
on purchase must be reported immediately after unpacking the appliance, at the latest, two days after
the purchase date. Repairs made after the expiration of the warranty period are subject to payment.
DES UK LTD
Tel.: 0871 5000 700
e-mail: support.uk@kompernass.com
Kompernass Service Ireland
Tel.: 1850 930 412 (0,082 EUR/Min.)
Standard call rates apply. Mobile operators may vary.
e-mail: support.ie@kompernass.com
(£ 0.10 / minute)
11. Warranty & Service
The warranty for this appliance is for 3 years from
the date of purchase. The appliance has been manufactured with care and meticulously examined before delivery. Please retain your receipt as proof of
purchase. In the event of a warranty claim, please
make contact by telephone with our Service Department. Only in this way can a post-free despatch for
your goods be assured.
The warranty covers only claims for material and
maufacturing defects, but not for transport damage,
for wearing parts or for damage to fragile components, e.g. buttons or batteries. This product is for
private use only and is not intended for commercial
use. The warranty is void in the case of abusive and
improper handling, use of force and internal tampering not carried out by our authorized service
branch. Your statutory rights are not restricted in
any way by this warranty.
CY
Kompernass Service Cyprus
Tel.: 800 9 44 01
e-mail: support.cy@kompernass.com
12. Importer
KOMPERNASS GMBH
BURGSTRASSE 21
D-44867 BOCHUM
www.kompernass.com
- 5 -
Page 8
Kuhalo za jaja
4. Sigurnosne upute
1. Upotrebna namjena
Ovaj uređaj je isključivo predviđen za kuhanje i
održavanje temperature kokošjih jaja u privatnim
domaćinstvima.
Nije predviđen za uporabu sa drugim namirnicama
ili drugim materijalima. Takođe nije predviđen za
uporabu u gospodarskim ili industrijskim
područjima.
2. Tehnički podaci
Napon: 220-240 V ~50 Hz
Snaga: 400 W
Kapacitet: maks. 6 jaja
3. Opis uređaja
Poklopac
q
Držač jaja
w
Zdjela za kuhanje
e
Pogonski prekidač
r
(Pozicija “ “: Kuhanje)
(Pozicija “O“: Isklj)
(Pozicija “ “: Održavanje temperature)
Namotač za kabel
t
Mjerna čašica
y
Bodež za jaje (integrirano u mjernoj čaši)
u
Opasnost! Strujni udar!
Opasnost od požara!
• Uređaj za kuhanje jaja priključite isključivo na
propisno instaliranu i uzemljenu utičnicu sa mrežnim naponom od 220 V - 240 V / 50 Hz.
• Kada pokrećete uređaj, u slučaju smetnji, prije
čišćenja ili ako ne koristite uređaj, uvijek izvucite
mrežni utikač iz utičnice! Nikada ne povlačite
kabel, nego uvijek samo za mrežni utikač. Ne
dirajte utikač uređaja sa mokrim ili vlažnim
rukama.
Uređaj ne smijete zaroniti u tekućine, izložiti
vlazi ili koristiti na otvorenom.
• Ukoliko je uređaj ipak upao u tekućinu, odmah
izvucite mrežni utikač iz utičnice. Nakon toga
uređaj više ne pustite u pogon, nego ga prvo
dajte prekontrolirati od strane autorizirane
servisne ispostave.
• Uređaj za kuhanje jaja ne koristite, kada se nalazite na vlažnom tlu, kada su Vaše ruke mokre
ili ako je uređaj mokar.
• Mrežni kabel provucite tako, da ne dođe u dodir
sa vrućim ili oštrim predmetima.
• Ne savijajte i ne gnječite mrežni kabel, i ne motajte ga oko uređaja.
• Oštećene mrežne utikače ili oštećen mrežni kabel neizostavno dajte zamijeniti od strane autoriziranog stručnog osoblja ili servisa za kupce,
kako biste izbjegli nastanak opasnosti.
• Ne koristite eksterni rasklopni sat ili odvojeni daljinski sustav, da biste pogonili uređaj.
- 6 -
Page 9
Opasnost od ozljeđivanja!
• Uređaj za vrijeme rada ne ostavite bez
nadzora.
• Ovaj uređaj nije namijenjen, da bude korišten
od strane osoba (uključujući djecu) sa ograničenim fizičkim, senzoričnim i mentalnim osobinama
i nedostatkom iskustva ili znanja, osim ako ove
osobe stoje pod nadzorom druge osobe zadužene za njihovu sigurnost, ili ako su od nje primili
upute za ispravno korištenje uređaja.
• Djeca bi trebala biti pod nadzorom, čime treba
biti osigurano da se ne mogu igrati ovim
uređajem.
• Oprezno rukujte sa bodežom
čaše.
• Površine kućišta u pogonu postaju vrlo vruće.
Stoga hvatajte isključivo poklopac
jaja
na za to predviđenom rukohvatu, kako bi
w
iste uklonili.
na dnu mjerne
u
i držač za
q
5. Stavljanje uređaja u pogon
Prije nego što uređaj stavite u pogon, uvjerite se u
to, da ...
- su uređaj, utikač i kabel za napajanje u besprijekornom stanju i ...
- da su svi materijali od pakiranja odstranjeni sa
uređaja.
Prvo očistite uređaj na način opisan pod
točkom 8.
6. Kuhanje jaja
Sa bodežom za jaja uzabodite po jedan otvor
u gornju ili donju stranu svakog jajeta.
Jaja postavite sa zabodenom stranom prema
gore na držač za jaja
Napunite mjernu čašu
nom vode. Količina vode ovisi o broju jaja i
željenog stupnja tvrdoće.
.
w
sa potrebnom količi-
y
Oprez! Iz otvora za paru i prilikom otvaranja poklopca
Opasnost od ozljeđivanja vrućom
parom
Otvorite poklopac
rukohvatu i bočno ukloniti. Izbjegavajte kontakt
ruke i šake sa izlazećom parom.
Uklonite držač za jaja
para potpuno otišla.
izlazi vruća para!
q
tako, što ćete ga nadići na
q
tek onda, kada je
w
Oprez! Predmetne štete!
• Uređaj nikada ne postavljajte u blizini izvora
toplote.
• Nikada ne otvarajte kućište. U tom slučaju sigurnost nije garantirana i jamstvo prestaje važiti.
• Koristite isključivo u obimu isporuke sadržane
dijelove opreme, a uređaj nikada ne koristite
bez umetnutog držača za jaja
• Ostavite uređaj i dijelove opreme da se potpuno
ohlade, prije nego što ih očistite i spremite.
w
.
Objašnjenje simbola na mjernoj čaši:
Tvrdo
Srednje
Meko
Napomena:
Ovisno o veličini jaja može se dogoditi, da odstupajući od skale na mjernoj čaši
veću ili manju količinu vode, da biste postigli željeni
stupanj tvrdoće.
Ako je jaje premekano, umetnite nešto više vode
(približno jednu mjernu crticu na skali više). Vrijeme
kuhanja se produžava. Jaje će biti tvrđe.
Ako je jaje postalo pretvrdo, prilikom slijedećeg postupka kuhanja umetnite nešto manju količinu vode
(približno jednu mjernu crticu na skali manje). Vrijeme kuhanja se skraćuje. Jaje će biti mekše.
Sada vodu umetnite u zdjelu za kuhanje
Postavite držač za jaja
i postavite poklopac q.
e
morate napuniti
y
u zdjelu za kuhanje
w
e
.
- 7 -
Page 10

Pritisnite pogonski prekidač ru lijevu stranu
(položaj “ “), kako biste uključili uređaj.
8. Čišćenje i održavanje
Čim su jaja pripremljena, oglašava se zvučni signal.
Pritisnite pogonski prekidač natrag u položaj
“O”, kako biste isključili uređaj.
Jaja nakon kuhanja držite pod mlaz tekuće
hladne vode.
7. Održavanje temperature jaja
Funkciju održavanja temperature koristite isključi-
vo za tvrdo kuhana jaja.
Jaja nakon kuhanja držite pod mlaz hladne teku-
će vode.
Gurnite pogonski prekidač u desnu stranu, kako
biste nakon kuhanja jaja funkciju održavanja
temperature (položaj “ “) aktivirali.
Pritisnite pogonski prekidač natrag u položaj “O”,
kako biste isključili uređaj.
Opasnost po život od strujnog
udara:
• Nikada ne otvarajte kućište uređaja. U njemu se
ne nalaze elementi za posluživanje.
Dijelove uređaja nikada ne uronite u vodu ili
druge tekućine!
Oprez:
Prilikom čišćenja mjerne čaše obratite pažnju na bodež za jaje
Napomena:
Ne upotrebljavajte nikakva sredstva za čišćenje ili
otapala. Ova sredstva mogu dovesti do oštećenja
uređaja.
Čišćenje uređaja:
Izvucite utikač iz utičnice.
Ostavite uređaj, da se prvo ohladi.
Nakon toga očistite zdjelu za kuhanje
ni kabel pomoću blago navlažene krpe za pranje suđa.
Odstranite naslage vapnenca pomoću otopine
od nešto octa i vode.
Nakon toga uređaj u pogon pustite samo sa
bistrom vodom, kako biste uklonili miris na ocat.
U svakom slučaju dobro osušite uređaj, prije
nego što ga ponovo upotrebljavate.
. Opasnost od ozljeđivanja!
u
e
i mrež-
Čišćenje opreme:
Isperite poklopac
čašu
sa sredstvom za pranje suđa pod
y
mlazom tekuće vode.
• Držač za jaja w, poklopac qi mjerna čaša
mogu biti čišćeni u stroju za pranje posuđa.
- 8 -
, držač za jaja wi mjernu
q
y
Page 11

9. Čuvanje
Ostavite uređaj da se potpuno ohladi, prije nego
što ga odnesete.
Namotajte mrežni kabel oko namotača tispod
dna uređaja.
Uređaj čuvajte na suhom mjestu.
10. Zbrinjavanje
Uređaj nikako ne bacajte u obično kućno smeće. Ovaj pzoizvod spada u
važnost uredbe evropske direktive
2002/96/EC.
Uređaj zbrinite preko autoriziranog poduzeća za
zbrinjavanje otpada ili preko Vašeg komunalnog
poduzeća.
Obratite pažnju na aktualno važeće propise. U
slučaju dvojbe se povežite sa svojim mjesnim
poduzećem za zbrinjavanje otpada.
Sve materijale ambalaže zbrinite na način
neškodljiv za okoliš.
11. Jamstvo & servis
Na ovaj uređaj vrijedi jamstvo u trajanju od 3 godine od datuma kupovine. Uređaj je pažljivo proizveden i prije isporuke brižljivo kontroliran. Molimo sačuvajte blagajnički račun kao dokaz o kupnji.
Molimo da se u slučaju ostvarivanja prava na jamstvo telefonski povežete sa Vašom servisnom ispostavom. Samo na taj način vaša roba može biti besplatno uručena.
Jamstvo vrijedi samo za greške materijala i izrade,
a ne za transportne štete, potrošne dijelove ili oštećenja lomljivih dijelova, na primjer prekidača ili baterija.
Proizvod je namijenjen isključivo za privatnu, a ne
za gospodarstvenu uporabu.
U slučaju nestručnog rukovanja, rukovanja protivnog namjeni uređaja, primjene sile i zahvata, koji
nisu izvršeni od strane našeg ovlaštenog servisnog
predstavništva, važenje jamstva prestaje. Vaša zakonska prava ovim jamstvom ostaju netaknuta.
Jamstveni rok se ne produžava uslijed ostvarivanja
prava na jamstvo. To vrijedi i za zamijenjene i popravljene dijelove. Eventualno već prilikom kupovine prisutna oštećenja i nedostaci moraju biti javljena neposredno nakon raspakiranja, ali najkasnije
dva dana nakon datuma kupovine. Popravke vršene
nakon isteka jamstvenog roka podliježu obavezi
plaćanja.
Ovlašteni servis: Microtec sistemi d.o.o.
Tel.: 01/3692-008
email: support.hr@kompernass.com
Uvoznik
Lidl Hrvatska d.o.o. k.d.,
p.p. 61
10020 Novi Zagreb
Proizvođač:
KOMPERNASS GMBH
BURGSTRASSE 21
D-44867 BOCHUM, Njemačka
www.kompernass.com
- 9 -
Page 12

FIERBĂTOR DE OUĂ
4. Indicaţii de siguranţă
1. Scopul utilizării
Acest aparat este destinat exclusiv fierberii şi păstrării
calde a ouălor de găină în locuinţele private.
Este interzisă utilizarea împreună cu alte alimente sau
cu materiale. De asemenea, este interzisă utilizarea
profesională sau industrială.
2. Date tehnice
Tensiune: 220-240 V ~ 50 Hz
Consum: 400 W
Capacitate: max. 6 ouă
3. Descrierea aparatului
Capac
q
Suport de ouă
w
Vas de fiert
e
Întrerupător cu LED de control
r
(Poziţia “ “: fierbere)
(Poziţia „O“: oprit)
(Poziţia “ “: păstrare caldă)
Mosor cablu
t
Pahar gradat
y
Perforator ou (integrat în paharul gradat)
u
PERICOL!
PERICOL DE INCENDIU!
• Conectaţi fierbătorul de ouă numai la o priză instalată reglementar şi pământată, cu o tensiune
de 220 V - 240 V ~/ 50 Hz.
• Dacă schimbaţi locul aparatului, dacă îl umpleţi,
în caz de defecţiuni, la curăţare sau dacă nu-l
utilizaţi, scoateţi totdeauna ştecărul din priză!
Când scoateţi ştecărul din priză, nu trageţi de
cablu, ci de ştecăr. Nu atingeţi ştecărul cu mâinile
ude sau umede.
Este interzisă introducerea aparatului în lichide, expunerea la umezeală sau utilizarea în aer
liber.
• Dacă s-a întâmplat ca aparatul să cadă într-un
recipient cu lichid, scoateţi imediat ştecărul din priză. Nu mai puneţi aparatul în funcţiune, ci transportaţi-l la un centru de service pentru verificare.
• Nu utilizaţi fierbătorul de ouă dacă este amplasat
pe o suprafaţă umedă sau dacă mâinile dvs. ori
aparatul este ud.
• Aşezaţi cablul astfel încât să nu intre în contact
cu obiecte fierbinţi sau cu muchii ascuţite.
• Nu îndoiţi şi nu striviţi cablul şi nu-l înfăşuraţi în
jurul aparatului.
• Dacă ştecărul sau cablul de alimentare se defectează, solicitaţi imediat repararea de către personal
specializat sau de către serviciul clienţi, pentru a
evita periclitările.
• Nu utilizaţi temporizatoare externe sau sisteme
separate de comandă de la distanţă pentru operarea aparatului.
Electrocutare
!
R
- 10 -
Page 13

PERICOL DE RĂNIRE!
• Nu lăsaţi aparatul să funcţioneze nesupravegheat.
• Acest aparat nu este destinat utilizării de către
persoane (inclusiv copii) cu capacităţi fizice, senzoriale sau mentale limitate sau cu o experienţă
limitată şi/sau cunoştinţe limitate, cu excepţia cazului în care sunt supravegheate de către o persoană responsabilă cu siguranţa lor sau au primit instrucţiuni de la aceasta privind modul de
utilizare a aparatului.
• Copiii trebuie supravegheaţi, pentru a împiedica
utilizarea aparatului ca jucărie.
• Manipulaţi cu atenţie perforatorul
paharului gradat.
• Suprafaţa carcasei se încălzeşte foarte tare în
timpul funcţionării. De aceea, pentru a deschide
capacul
w
şi pentru a scoate suportul de ouă
q
prindeţi-le numai de mânerul prevăzut.
Atenţie! Din orificiul de abur şi la deschiderea
capacului qse degajă aburi fierbinţi!
Pericol de opărire
de pe fundul
u
5. Punerea în funcţiune
Înainte de a pune aparatul în funcţiune asiguraţi-vă
că ...
- aparatul, cablul de alimentare şi ştecărul sunt în
stare ireproşabilă de funcţionare;
– aţi îndepărtat toate ambalajele de la aparat.
➪ Apoi, curăţaţi paratul în modul descris la punctul 8.
6. Fierberea ouălor
➪ Faceţi o gaură mică cu perforatorul uîn capă-
tul neascuţit al oului.
➪ Aşezaţi ouăle cu partea perforată în sus pe supor-
tul de ouă
➪ Umpleţi paharul gradat
de apă. Cantitatea de apă depinde de numărul
de ouă pe care le fierbeţi şi de cât de tari doriţi
să fie ouăle.
Explicarea simbolurilor de pe paharul gradat:
w
.
cu cantitatea necesară
y
➪ Deschideţi capacul qridicându-l de mâner şi
poziţionându-l în lateral. Evitaţi contactul mâinii
şi braţului cu aburul fierbinte care se degajă.
➪ Scoateţi mai întâi suportul de ouă
a risipit aburul.
ATENŢIE! Daune materiale!
• Nu aşezaţi aparatul în apropierea surselor de
căldură.
• Nu deschideţi niciodată carcasa. În astfel de
cazuri nu mai este asigurată siguranţa şi se pierde
garanţia.
• Utilizaţi numai accesoriile din furnitură. Nu
utilizaţi aparatul fără suportul de ouă
• Înainte de a le curăţa sau depozita lăsaţi aparatul
şi accesoriile să se răcească.
după ce s-
w
w
.
tare
mediu
moale
Indicaţie
În funcţie de dimensiunea ouălor, va trebui să folosiţi o
cantitatea de apă care nu se încadrează în gradaţiile
respective ale paharului gradat
fierbe ouăle aşa cum vă doriţi.
Dacă oul este prea moale, mai completaţi cu apă
(o gradaţie mai mult). Timpul de fierbere se prelungeşte astfel. Oul este fiert mai tare.
Dacă oul s-a întărit prea tare, următoarea dată
când fierbeţi ouă, adăugaţi mai puţină apă (cam o
gradaţie mai puţin). Timpul de fierbere este redus. Oul
este mai moale.
- 11 -
, pentru a putea
y
R
Page 14

➪ Turnaţi acum apa în vasul de fier e.
➪ Aşezaţi suportul de ouă
puneţi capacul
➪ Apăsaţi butonul de pornire
pentru a porni aparatul.
Când ouăle sunt gata, se aude un semnal sonor.
Apăsaţi din nou butonul în poziţia „O”, pentru
a opri aparatul.
➪ După fierbere, puneţi ouăle sub jet rece de apă.
q
.
în vasul de fiert eşi
w
(poziţia “ “),
r
7. Păstrarea caldă a ouălor
Utilizaţi funcţia de păstrare caldă pentru ouăle
fierte tare.
După fierbere, puneţi ouăle sub jet rece de apă.
Atenţie
La curăţarea paharului gradat, aveţi grijă la perforator
.
u
Pericol de rănire!
Indicaţie
Nu utilizaţi detergenţi sau dizolvanţi. Aceştia pot
deteriora aparatul.
Curăţarea aparatului
➪ Scoateţi mai întâi ştecărul din priză.
➪ Aşteptaţi ca aparatul să se răcească.
➪ Curăţaţi apoi vasul de fiert
mentare cu o lavetă de spălat puţin umedă.
➪ Îndepărtaţi resturile de calcar cu o soluţie pe
bază de apă şi oţet.
➪ Apoi porniţi aparatul umplut cu apă curată pentru a
alunga mirosul de oţet.
➪ Ştergeţi bine de apă aparatul înainte de o nouă
utilizare.
şi cablul de ali-
e
➪ Apăsaţi butonul spre dreapta pentru a activa
funcţia de păstrare caldă a ouălor după fierbere
(poziţia “ “).
➪ Apăsaţi din nou butonul în poziţia „O”, pentru a
opri aparatul.
8. Curăţarea şi îngrijirea
Pericol de moarte prin electrocutare!
Nu deschideţi niciodată carcasa aparatului.
În aceasta nu se găsesc elemente de operare.
Nu introduceţi componentele aparatului în
apă sau alte lichide!
R
Curăţarea accesoriilor
➪ Spălaţi capacul
gradat
y
• Suportul de ouă
dat
pot fi de asemenea spălat în maşina de
y
spălat vase.
, suportul de ouă wşi paharul
q
cu detergent sub jet de apă.
, capacul qşi paharul gra-
w
9. Depozitarea
Înainte de a-l pune la păstrare lăsaţi aparatul să se
răcească.
➪ Înfăşuraţi cablul pe mosorul tde sub aparat.
➪ Depozitaţi aparatul într-un loc uscat.
- 12 -
Page 15

10. Eliminarea aparatelor uzate
R
Nu aruncaţi aparatul sub nicio formă în
gunoiul menajer obişnuit. Acest produs
cade sub incidenţa directivei europene
2002/96/EC.
Eliminaţi aparatul prin intermediul unei firmei specializate şi autorizate sau prin intermediul serviciului local de eliminare a deşeurilor.
Respectaţi reglementările actuale în vigoare.
Dacă aveţi nelămuriri, contactaţi serviciul dumneavoastră local de eliminare a deşeurilor.
Perioada de garanţie nu este prelungită după realizarea reparaţiilor realizate în perioada garanţie.
Acest lucru este valabil şi pentru piesele înlocuite şi
reparate. Deteriorările şi deficienţele prezente deja
la cumpărare trebuie semnalate imediat după dezambalare sau cel târziu în două zile de la data
cumpărării. Reparaţiile necesare după expirarea
perioadei de garanţie se efectuează contra cost.
Kompernass Service Romania
Tel.: 031/82 70 1 70
E-mail: support.ro@kompernass.com
Eliminaţi toate materialele de ambalare într-un
mod ecologic.
11. Garanţia şi service-ul
Pentru acest aparat, se acordă o garanţie de 3 ani
începând cu data cumpărării. Aparatul a fost produs cu grijă şi verificat cu scrupulozitate înaintea livrării.
Păstraţi bonul de casă pentru a dovedi cumpărarea.
Dacă aveţi solicitări privind garanţia, contactaţi telefonic centrul dumneavoastră de service. Numai astfel
poate fi asigurată o expediere gratuită a produsului
dumneavoastră.
Garanţia acoperă numai defectele de material sau
de fabricaţie, nu şi deteriorările rezultate în urma
transportului, piesele de uzură sau deteriorările
apărute la componentele fragile, de ex. comutatoare sau acumulatoare. Aparatul este destinat numai
pentru uz privat şi nu pentru o utilizare profesională.
În cazul manevrării abuzive sau necorespunzătoare, uzului de forţă şi intervenţiilor care nu au fost realizate de către filiala noastră autorizată de service, garanţia îşi pierde valabilitatea. Drepturile
dumneavoastră legale nu sunt limitate prin această
garanţie.
12. Importator
KOMPERNASS GMBH
BURGSTRASSE 21
D-44867 BOCHUM
www.kompernass.com
- 13 -
R
Page 16
Яйцеварка
4. Указания за безопасност
1. Предназначение
Този уред е предназначен само за варене и
поддържане в топло състояние на кокоши яйца
при домашни условия.
Той не е предвиден за използване с други
хранителни продукти или други материали.
Той не е предвиден също така за употреба в
професионални или индустриални условия.
2. Технически характеристики
Напрежение: 220-240 V ~ 50 Hz
Консумирана мощност: 400 W
Вместимост: макс. 6 яйца
3. Описание на уреда
Капак
q
Поставка за яйцата
w
Купа за варене
e
Превключвател за режима на работа с
r
вграден контролен индикатор
(позиция “ “: варене)
(позиция “O“: изкл.)
(позиция “ “: поддържане в топло състояние)
Ролка за навиване на кабела
t
Мерителна чаша
y
Игла за пробождане на яйцата (вградена в
u
мерителната чаша)
ОПАСНОСТ! Токов удар!
ОПАСНОСТ ОТ ПОЖАР!
• Включвайте яйцеварката само към инсталиран
според инструкциите и заземен контакт с
напрежение на мрежата 220 V - 240 V ~/
50 Hz.
• Винаги изключвайте щепсела от контакта,
когато премествате или пълните уреда, при
повреди, преди почистване на уреда или ако
няма да го използвате! Никога не дърпайте
кабела, а винаги само щепсела. Не докосвайте
щепсела на уреда с мокри или влажни ръце.
В никакъв случай не трябва да потапяте
уреда в течности, да го излагате на влага
и да го използвате на открито.
• В случай че все пак уредът падне в течност,
изключете веднага щепсела от контакта. След
това не пускайте повече уреда да работи, а
първо го дайте за проверка от лицензиран
сервиз.
• Не използвайте яйцеварката, ако се намирате
на влажен под или ако ръцете ви или уредът
са мокри.
• Полагайте кабела така, че да не влиза в допир
с горещи предмети или предмети с остри
ръбове.
• Не пречупвайте и не притискайте кабела и
не го увивайте около уреда.
• Дайте веднага повредения щепсел или кабел
за смяна от оторизиран електротехник или
сервиз, за да избегнете опасности.
• За работа с уреда не използвайте външен
таймер или отделна система за дистанционно
управление.
- 14 -
Page 17
ОПАСНОСТ ОТ НАРАНЯВАНЕ!
• Не оставяйте уреда без наблюдение по време
на работа.
• Този уред не е предвиден за използване от лица
(включително и деца) с ограничени физически,
органолептични или умствени способности или
от лица, които не притежават необходимия опит
и/или знания, освен ако не са под надзора на
лица, отговорни за тяхната безопасност или
не са получили от тях указания как трябва да
се използва уредът.
• Децата трябва да се наблюдават, за да се
гарантира, че не играят с уреда.
• Работете внимателно с иглата за пробождане
на яйцата
• По време на работа повърхностите на уреда
се нагорещяват силно. Затова за сваляне на
капака
яйцата
тази цел дръжка.
ВВННИИММААННИИЕЕ!!
отваряне на капака
ООппаасснноосстт оотт ппооппааррввааннее
Отворете капака q, като го повдигнете с
дръжката и го свалите странично. Избягвайте
контакт на китката и ръката с излизащата пара.
Изваждайте поставката за яйцата
парата е излязла напълно.
ВНИМАНИЕ! Материални щети!
• Никога не поставяйте уреда в близост до
източници на топлина.
• Никога не отваряйте корпуса. В такъв случай
безопасността не е осигурена и даването на
гаранция отпада.
• Употребявайте само включените в окомплектовката на доставката принадлежности и никога
не използвайте уреда без да сте сложили
поставката за яйцата
• Оставяйте уреда и принадлежностите да се
охладят напълно, преди да ги почистите и
приберете.
на дъното на мерителната чаша.
u
и изваждане на поставката за
q
хващайте само предвидената за
w
От отвора за парата и при
излиза гореща пара!
q
w
.
w
, когато
5. Работа с уреда
Преди да пуснете уреда, се уверете, че ...
– уредът, щепселът и кабелът са в изправно
състояние и...
– от уреда са отстранени всички опаковъчни
материали.
Най-напред почистете уреда, както е описано
в точка 8.
6. Варене на яйца
С иглата за пробождане на яйцата uнаправете
дупка от горната или долната страна на яйцата.
Поставете яйцата с прободената страна нагоре
върху поставката за яйцата
Напълнете мерителната чаша
необходимото количество вода. Количеството
вода зависи от броя на яйцата и желаната
степен на твърдост.
Разяснение на символите върху мерителната чаша:
твърдо сварени
средно сварени
рохко сварени
Указание:
В зависимост от големината на яйцата, за постигане
на желаната степен на твърдост на сваряване на
яйцата, може да се наложи да налеете повече
или по-малко количество вода, различно от
показаното на скалата на мерителната чаша
Ако яйцата са твърде рохки, напълнете малко
повече вода (около едно деление на скалата
повече). Продължителността на варене се
удължава. Яйцата стават по-твърди.
Ако яйцата са станали много твърди, при следващото варене напълнете малко по-малко вода
(около едно деление на скалата по-малко).
Продължителността на варене се скъсява.
Яйцата стават по-рохки.
w
y
.
с
y
.
- 15 -
Page 18

Налейте водата в купата за варене e.
Сложете поставката за яйцата
за варене
Натиснете превключвателя за режима на
работа
включите уреда.
Щом се сварят яйцата, прозвучава сигнал.
Натиснете превключвателя за режима на работа
обратно в позиция “O”, за да изключите уреда.
След сваряването охладете яйцата под
студена, течаща вода.
и поставете капака q.
e
наляво (позиция “ “), за да
r
в купата
w
7. Поддържане на яйцата в
топло състояние
Използвайте функцията за поддържане в
топло състояние само за твърдо сварени яйца.
Внимание:
При почистването на мерителната чаша внимавайте за иглата за пробождане на яйцата
Опасност от нараняване!
u
.
Указание:
Не използвайте почистващи препарати или разтворители. Те могат да доведат до повреди на
уреда.
ППооччииссттввааннее ннаа ууррееддаа::
Първо изключете щепсела от контакта.
Оставете уреда да се охлади.
След това почистете купата за варене
кабела с леко навлажнена кърпа за миене.
Отстранете остатъците от котлен камък с
разтвор от малко оцет и вода.
След това пуснете уреда да работи само с чиста
вода, за да отстраните миризмата на оцет.
Непременно подсушете уреда добре, преди
да го използвате отново.
e
и
След сваряването охладете яйцата под
студена, течаща вода.
Натиснете превключвателя за режима на
работа надясно, за да активирате функцията
за поддържане в топло състояние (позиция
“ “) след сваряването на твърдите яйца.
Натиснете превключвателя за режима на работа
обратно в позиция “O”, за да изключите уреда.
8. Почистване и поддържане
Опасност за живота от токов удар:
Никога не отваряйте корпуса на уреда.
В него няма елементи за обслужване.
Никога не потапяйте частите на уреда във
вода или други течности!
ППооччииссттввааннее ннаа ппррииннааддллеежжннооссттииттее::
Измивайте капака
и мерителната чаша yс миещ препарат под
течаща вода.
• Поставката за яйцата w, капакът qи мерителната чаша
машина.
y
, поставката за яйцата
q
са годни за миене и в съдомиялна
9. Съхранение
Първо оставяйте уреда да се охлади напълно,
преди да го приберете.
Навивайте кабела около ролката за навиване
на кабела
Съхранявайте уреда на сухо място.
- 16 -
под дъното на уреда.
t
w
Page 19
10. Изхвърляне
В никакъв случай не изхвърляйте
уреда с битовите отпадъци. Този уред
подлежи на европейската Директива
2002/96/EC
Изхвърляйте уреда чрез лицензирана фирма за
изхвърляне на отпадъци или общинската служба
за изхвърляне на отпадъци.
Спазвайте актуално валидните разпоредби.
В случай на съмнение се свържете със службата
за изхвърляне на отпадъци.
Гаранционният срок не се удължава от гаранцията.
Това важи и за сменени и ремонтирани части.
За евентуалните, налични още при закупуването
повреди и недостатъци трябва да се съобщи
веднага след разопаковането, но най-късно два
дена след датата на закупуване. След като
изтече гаранционният срок, ремонтите трябва да
се заплащат.
Kompernass Service България
Тел.:02/4917478
Е-мейл: support.bg@kompernass.com
Предавайте опаковъчните материали
за екологично изхвърляне.
11. Гаранция и сервиз
За този уред вие получавате гаранция от 3 години
от датата на закупуване. Уредът е произведен
старателно и е проверен добросъвестно преди
доставката.
Запазете касовата бележка като доказателство
за покупката. В гаранционен случай се свържете
по телефона с вашия сервиз. Само по този начин
може да се осигури безплатното изпращане на
вашата стока.
Даването на гаранция важи само за материални
или фабрични дефекти, но не и за транспортни
щети, износващи се части или при повреда на
лесно чупливи части, напр. ключове или акумулаторни батерии. Продуктът е предназначен единствено за домашна, а не за професионална
употреба.
При непозволена и неправилна употреба, при
прилагане на сила или интервенции, които не
са извършени от нашия оторизиран сервизен
филиал, гаранцията отпада. Законните ви права
не се ограничават от тази гаранция.
12. Вносител
KOMPERNASS GMBH
BURGSTRASSE 21
D-44867 BOCHUM
www.kompernass.com
- 17 -
Page 20
ΒΒρραασσττήήρρααςς ααυυγγώώνν
1. Σκοπός χρήσης
Αυτή η συσκευή προβλέπεται αποκλειστικά για το
βράσιμο και τη διατήρηση ζεστού αυγών από
κοτόπουλα στο οικιακό νοικοκυριό.
Δεν προβλέπεται για τη χρήση με άλλα τρόφιμα ή
άλλα υλικά. Επίσης δεν προβλέπεται για τη χρήση
σε επαγγελματικά ή βιομηχανικά πεδία.
2. Τεχνικά στοιχεία
Τάσ: 220-240 V ~ 50 Hz
Μέγιστη
απορρόφηση ισχύος: 400 W
Χωρητικότητα: μεγ. 6 αυγά
3. Περιγραφή συσκευής
Καπάκι
q
Στήριγμα αυγών
w
Μπολ βρασίματος
e
Διακόπτης λειτουργίας
r
(Θέση “ “: Βράσιμο)
(Θέση “O“: Off)
(Θέση “ “: Διατήρηση ζεστού)
Περιέλιξη καλωδίου
t
Δοχείο μέτρησης
y
Τρυπητήρι αυγών
u
(ενσωματωμένο στο δοσομετρητή)
4. Υποδείξεις ασφαλείας
ΚΙΝΔΥΝΟΣ! Ηλεκτροπληξία!
Κίνδυνος πυρκαγιάς!
• Συνδέστε το βραστήρα αυγών μόνο σε μια
σύμφωνα με τις προδιαγραφές εγκατεστημένη και
γειωμένη υποδοχή με μια τάση δικτύου
220 - 240 V ~50 Hz.
• Βγάζετε πάντα το βύσμα από την πρίζα όταν
κινείτε τη συσκευή, τη γεμίζετε, σε βλάβες, πριν
καθαρίσετε τη συσκευή ή όταν δεν την
χρησιμοποιείτε! Ποτέ μην τραβάτε στο καλώδιο
αλλά πάντα μόνο στο βύσμα. Μην αγγίζετε το
βύσμα συσκευής με βρεγμένα ή υγρά χέρια.
Δεν επιτρέπεται σε καμία περίπτωση να
βυθίσετε τη συσκευή σε υγρό, να την εκθέσετε
στην υγρασία και να την χρησιμοποιήσετε σε
εξωτερικό χώρο.
• Εάν κάποια φορά η συσκευή πέσει σε υγρό,
βγάλτε αμέσως το βύσμα από την πρίζα. Στην
συνέχεια μην τη θέσετε σε λειτουργία αλλά δώστε
τη να ελεγχθεί από ένα εξουσιοδοτημένο
συνεργείο σέρβις.
• Μην χρησιμοποιείτε το βραστήρα αυγών όταν
βρίσκεστε σε υγρό δάπεδο ή όταν τα χέρια σας ή
η συσκευή είναι βρεγμένα.
• Τοποθετήστε το καλώδιο έτσι ώστε να μην έρχεται
σε επαφή με καυτά ή μυτερά αντικείμενα.
• Μην λυγίζετε ή σφίγγετε το καλώδιο και μην το
τυλίγετε γύρω από τη συσκευή.
• Τα χαλασμένα βύσματα ή καλώδια δικτύου
πρέπει να αντικαθίστανται αμέσως από
εξουσιοδοτημένο ειδικό προσωπικό ή από το
τμήμα εξυπηρέτησης πελατών ώστε να
αποφεύγονται κίνδυνοι.
• Μη χρησιμοποιείτε εξωτερικό χρονοδιακόπτη ή
ένα ξεχωριστό τηλεχειριστήριο για να λειτουργείτε
τη συσκευή.
- 18 -
Page 21

Κίνδυνος ατυχήματος!
• Μην αφήνετε τη συσκευή χωρίς επιτήρηση κατά
τη λειτουργία.
• Αυτή η συσκευή δεν προορίζεται για χρήση
από άτομα (συμπεριλαμβανομένων παιδιών)
με περιορισμένες, φυσικές, αισθητηριακές ή
πνευματικές δυνατότητες ή με έλλειψη εμπειρίας
και/ ή με έλλειψη γνώσεων, εκτός εάν
επιτηρούνται μέσω ενός υπεύθυνου ατόμου για
την ασφάλειά τους ή εάν αυτά τα άτομα έχουν
λάβει υποδείξεις για το πως χρησιμοποιείται η
συσκευή.
• Τα παιδιά πρέπει να επιτηρούνται ώστε να
εξασφαλίζεται ότι δεν παίζουν με τη συσκευή.
• Να μεταχειρίζεστε προσεκτικά το τρυπητήρι
αυγών
• Οι επιφάνειες επικάλυψης είναι πολύ καυτές κατά
τη λειτουργία. Για αυτό πιάνετε το κάλυμμα
το στήριγμα αυγών
αυτά προβλεπόμενη λαβή, ώστε να τα
απομακρύνετε.
Ανοίξτε το κάλυμμα qανασηκώνοντας το στη
λαβή και απομακρύνοντας το πλευρικά.
Αποφύγετε την επαφή του χεριού και μπράτσου
με τον εξερχόμενο ατμό.
Απομακρύνετε πρώτα το στήριγμα αυγών
έχει απομακρυνθεί πλήρως ο ατμός.
στο κάτω μέρος του δοχείου μέτρησης.
u
αποκλειστικά στην για
w
ΠΠΡΡΟΟΣΣΟΟΧΧΗΗ!!
άνοιγμα του καλύμματος
ατμός!
Από την οπή ατμού και κατά το
βγαίνει καυτός
q
ΚΚίίννδδυυννοοςς εεγγκκααύύμμααττοοςς
w
q
και
όταν
Προσοχή! Εμπράγματες ζημιές!
• Ποτέ μην τοποθετείτε τη συσκευή κοντά σε πηγές
θερμότητας.
• Ποτέ μην ανοίγετε την επικάλυψη. Σε αυτή την
περίπτωση δεν υπάρχει ασφάλεια και η εγγύηση
ακυρώνεται.
• Χρησιμοποιείτε μόνο τα εξαρτήματα που
περιλαμβάνονται στο σύνολο αποστολής και
ποτέ μην χρησιμοποιείτε τη συσκευή χωρίς το
τοποθετημένο στήριγμα αυγών
• Αφήνετε τη συσκευή και τα εξαρτήματα να
κρυώνουν πλήρως πριν τα καθαρίζετε και
απομακρύνετε.
w
.
5. Θέση σε λειτουργία
Πριν θέσετε σε λειτουργία τη συσκευή, εξασφαλίστε
ότι ...
- η συσκευή, το βύσμα, το καλώδιο δικτύου είναι σε
τέλεια κατάσταση και ...
- όλα τα υλικά συσκευασίας έχουν απομακρυνθεί
από τη συσκευή.
Καθαρίστε πρώτα τη συσκευή όπως περιγράφεται
στο 8.
6. Βράσιμο αυγών
Κάντε με το τρυπητήρι αυγών uμια οπή στην
επάνω ή κάτω μεριά των αυγών.
Τοποθετείτε τα αυγά με την τρυπημένη μεριά προς
τα επάνω στο στήριγμα αυγών
Γεμίστε το δοχείο μέτρησης
ποσότητα νερού. Η ποσότητα νερού εξαρτάται
από τον αριθμό των αυγών και τον επιθυμητό
βαθμό σκληρότητας.
Διευκρίνιση των συμβόλων στο δοχείο μέτρησης:
σκληρό
μεσαίο
μαλακό
Υπόδειξη:
Ανάλογα με το μέγεθος των αυγών μπορεί να
χρειαστεί να εισάγετε περισσότερο ή λιγότερο νερό
κατά απόκλιση από την διαβάθμιση στο δοχείο
μέτρησης
βαθμός σκληρότητας των αυγών.
για να επιτευχθεί ο επιθυμούμενος
y
.
w
με την απαραίτητη
y
- 19 -
Page 22
Εάν το αυγό είναι πολύ μαλακό εισάγετε λίγο
περισσότερο νερό (περίπου μία γραμμή
περισσότερη στη διαβάθμιση). Ο χρόνος
βρασίματος επιμηκύνεται. Το αυγό θα γίνει
σκληρότερο.
Εάν το αυγό έχει γίνει πιο σκληρό, εισάγετε κατά την
επόμενη διαδικασία βρασίματος λίγο λιγότερο νερό
(περίπου μία γραμμή λιγότερη στη διαβάθμιση).Ο
χρόνος βρασίματος μειώνεται. Το αυγό γίνεται πιο
μαλακό.
Γεμίστε τώρα το νερό στο μπολ βρασίματος
Τοποθετήστε το στήριγμα αυγών
βρασίματος
Πιέστε τον διακόπτη λειτουργίας
αριστερά (θέση “ “) για να ενεργοποιήσετε
τη συσκευή.
Μόλις βράσουν τα αυγά ακούγεται ένα σήμα.
Πιέστε τον διακόπτη λειτουργίας πίσω στη θέση
“O” για να απενεργοποιήσετε τη συσκευή.
Βάλτε τα αυγά μετά το βράσιμο κάτω από κρύο,
ρέον νερό.
και τοποθετήστε το κάλυμμα q.
e
w
r
e
στο μπολ
προς τα
7. Πως διατηρούμε τα αυγά
ζεστά
Χρησιμοποιείτε τη λειτουργία ζεστάματος μόνο
για σφιχτά βρασμένα αυγά.
8. Καθαρισμός και φροντίδα
Κίνδυνος ζωής από ηλεκτροπληξία:
• Μην ανοίγετε ποτέ το περίβλημα της συσκευής.
Δεν υπάρχουν στοιχεία χειρισμού στο εσωτερικό
τους.
Ποτέ μην βυθίζετε τα εξαρτήματα συσκευής
στο νερό ή σε άλλα υγρά!
Προσοχή:
Κατά τον καθαρισμό του δοχείου μέτρησης
.
προσέξτε το τρυπητήρι αυγών
τραυματισμού!
Υπόδειξη:
Μην χρησιμοποιείτε απορρυπαντικά ή διαλύτες.
Αυτά μπορεί να οδηγήσουν σε βλάβες στη συσκευή.
ΚΚααθθααρριισσμμόόςς ττηηςς σσυυσσκκεευυήήςς::
Τραβήξτε πρώτα το φις από την πρίζα.
Αφήστε πρώτα τη συσκευή να κρυώσει.
Καθαρίστε μετά το μπολ βρασίματος
καλώδιο δικτύου με ένα ελαφρά νωπό πανί
καθαρισμού.
Απομακρύνετε τα υπολείμματα αλάτων με ένα
διάλυμα από λίγο ξίδι και νερό.
Μετά θέστε σε λειτουργία τη συσκευή μόνο με
φρέσκο νερό ώστε να απομακρύνετε τη μυρωδιά
ξιδιού.
Στεγνώστε τη συσκευή σε κάθε περίπτωση καλά
πριν την χρησιμοποιήσετε εκ νέου.
. Κίνδυνος
u
e
και το
Μετά το βράσιμο κρυώστε τα αυγά κάτω από
κρύο τρεχούμενο νερό.
Πιέστε τον διακόπτη λειτουργίας προς τα δεξιά
ώστε μετά το βράσιμο των αυγών να
ενεργοποιήσετε τη λειτουργία διατήρησης ζεστού
(θέση “ “).
Πιέστε τον διακόπτη λειτουργίας πίσω στη θέση
“O” για να απενεργοποιήσετε τη συσκευή.
ΚΚααθθααρριισσμμόόςς ττωωνν εεξξααρρττηημμάάττωωνν::
Πλύντε το κάλυμμα
το δοχείο μέτρησης
από ρέον νερό.
• Η αυγουλιέρα w, το καπάκι qκαι το δοχείο
μέτρησης
πλύσιμο με το πλυντήριο των πιάτων.
- 20 -
ενδείκνυνται και αυτά για το
y
, το στήριγμα αυγών wκαι
q
με καθαριστικό μέσο κάτω
y
Page 23
9. Διαφύλαξη
Αφήστε πρώτα τη συσκευή να κρυώσει εντελώς, πριν
την απομακρύνετε σε άλλη θέση.
Τυλίξτε το καλώδιο δικτύου γύρω από την
περιέλιξη καλωδίου
συσκευής.
Αποθηκεύστε τη συσκευή σε ένα στεγνό χώρο.
κάτω από τη βάση
t
10. Απομάκρυνση
Σε καμία περίπτωση μην πετάξετε τη
συσκευή στα οικιακά απορρίμματα.
Αυτό το προϊόν υπόκειται στην
Ευρωπαϊκή Οδηγία 2002/96/EC.
Απομακρύνετε τη συσκευή μέσω μιας εγκεκριμένης
επιχείρησης απόρριψης ή μέσω της κοινοτικής
επιχείρησης απόρριψης.
Προσέχετε τις τρέχουσες ισχύουσες προδιαγραφές.
Σε περίπτωση αμφιβολιών ελάτε σε επαφή με την
επιχείρηση απόρριψης.
Η απόδοση εγγύησης ισχύει μόνο για σφάλματα
υλικού ή κατασκευής, όχι όμως για ζημιές από τη
μεταφορά, για εξαρτήματα φθοράς ή για βλάβες σε
εύθραυστα εξαρτήματα, π.χ. διακόπτες ή
συσσωρευτές. Το προϊόν προορίζεται μόνο για την
ιδιωτική και όχι για την επαγγελματική χρήση.
Σε περίπτωση κακής μεταχείρισης και ακατάλληλης
χρήσης, σε χρήση βίας και σε παρεμβάσεις οι
οποίες δεν διεξήχθησαν από το εξουσιοδοτημένο
μας τμήμα σέρβις, η εγγύηση παύει να ισχύει. Τα νομικά σας δικαιώματα δεν περιορίζονται μέσω αυτής
της εγγύησης.
Ο χρόνος εγγύησης δεν επεκτείνεται μέσω της
απόδοσης εγγύησης. Αυτό ισχύει και για
εξαρτήματα τα οποία έχουν αντικατασταθεί ή
επισκευαστεί. Ενδεχόμενες ήδη υπάρχουσες κατά
την αγορά, ζημιές και ελλείψεις πρέπει να
αναφέρονται αμέσως μετά την αποσυσκευασία, το
αργότερο όμως δύο ημέρες μετά την ημερομηνία
αγοράς. Επισκευές που εμφανίζονται μετά τη λήξη
του χρόνου εγγύησης χρεώνονται.
Kompernass Service Greece
Tel.: 801 200 10 18
(local charge 0,031EUR/minute (including VAT 19 %))
e-mail: support.gr@kompernass.com
Απομακρύνετε όλα τα υλικά συσκευασίας
με έναν φιλικό προς το περιβάλλον τρόπο.
11. Εγγύηση & Σέρβις
Έχετε για αυτή τη συσκευή 3 χρόνια εγγύηση από
την ημερομηνία αγοράς. Η συσκευή κατασκευάστηκε
και ελέγχθηκε προσεκτικά πριν από την αποστολή.
Παρακαλούμε φυλάξτε την απόδειξη ταμείου ως
απόδειξη για την αγορά. Παρακαλούμε
επικοινωνήστε τηλεφωνικά με την υπηρεσία σέρβις σε
περίπτωση εγγύησης. Μόνο έτσι μπορεί να
εξασφαλιστεί μια δωρεάν αποστολή του
εμπορεύματός σας.
CY
Kompernass Service Cyprus
Tel.: 800 9 44 01
e-mail: support.cy@kompernass.com
12. Εισαγωγέας
KOMPERNASS GMBH
BURGSTRASSE 21
D-44867 BOCHUM
www.kompernass.com
- 21 -
Page 24
Eierkocher
4. Sicherheitshinweise
1. Verwendungszweck
Dieses Gerät ist ausschließlich vorgesehen für das
Kochen und Warmhalten von Hühnereiern in
privaten Haushalten.
Es ist nicht vorgesehen für die Verwendung mit
anderen Lebensmitteln oder anderen Materialien.
Es ist ebenfalls nicht zur Verwendung in gewerblichen oder industriellen Bereichen vorgesehen.
2. Technische Daten
Spannung: 220-240 V ~ 50 Hz
Leistungsaufnahme: 400 W
Fassungsvermögen: max. 6 Eier
3. Gerätebeschreibung
Deckel
q
Eierhalter
w
Kochschale
e
Betriebsschalter mit integrierter Kontrollleuchte
r
(Position “ “: Kochen)
(Position “O“: Aus)
(Position “ “: Warmhalten)
Kabelaufwicklung
t
Messbecher
y
Eipick (im Messbecher integriert)
u
GEFAHR! Elektrischer Schlag!
BRANDGEFAHR!
• Schließen Sie den Eierkocher nur an eine vorschriftsmäßig installierte und geerdete Steckdose
mit einer Netzspannung von 220 V - 240 V ~/
50 Hz an.
• Ziehen Sie, wenn Sie das Gerät bewegen, befüllen, bei Störungen, bevor Sie das Gerät reinigen
oder wenn Sie es nicht gebrauchen, immer den
Netzstecker aus der Netzsteckdose! Ziehen Sie
niemals am Netzkabel, sondern immer nur am
Netzstecker. Berühren Sie den Gerätestecker
nicht mit nassen oder feuchten Händen.
Sie dürfen das Gerät keinesfalls in Flüssigkeit
tauchen, keiner Feuchtigkeit aussetzen und
nicht im Freien benutzen.
• Sollte das Gerät doch einmal in Flüssigkeit gefallen sein, ziehen Sie sofort den Netzstecker aus
der Netzsteckdose. Danach das Gerät nicht
mehr in Betrieb nehmen, sondern erst von einer
zugelassenen Servicestelle überprüfen lassen.
• Benutzen Sie den Eierkocher nicht, wenn Sie sich
auf feuchtem Boden befinden oder wenn Ihre
Hände oder das Gerät nass sind.
• Verlegen Sie das Netzkabel so, dass es nicht mit
heißen oder scharfkantigen Gegenständen in
Berührung kommt.
• Knicken oder quetschen Sie das Netzkabel
nicht, und wickeln Sie es nicht um das Gerät.
• Lassen Sie beschädigte Netzstecker oder Netzkabel sofort von autorisiertem Fachpersonal
oder dem Kundenservice austauschen, um Gefährdungen zu vermeiden.
• Benutzen Sie keine externe Zeitschaltuhr oder
ein separates Fernwirksystem um das Gerät zu
betreiben.
- 22 -
Page 25
VERLETZUNGSGEFAHR!
• Lassen Sie das Gerät während des Betriebes
nicht ohne Aufsicht.
• Dieses Gerät ist nicht dafür bestimmt, durch
Personen (einschließlich Kinder) mit eingeschränkten physischen, sensorischen oder geistigen Fähigkeiten oder mangels Erfahrung
und/oder mangels Wissen benutzt zu werden,
es sei denn, sie werden durch eine für ihre
Sicherheit zuständige Person beaufsichtigt oder
erhielten von ihr Anweisungen, wie das Gerät
zu benutzen ist.
• Kinder sollten beaufsichtigt werden, um sicherzustellen, dass sie nicht mit dem Gerät spielen.
• Gehen Sie vorsichtig mit dem Eipick
Boden des Messbechers um.
• Die Gehäuseoberflächen werden im Betrieb
sehr heiß. Fassen Sie daher ausschließlich den
Deckel
vorgesehenen Griff an, um diese zu entfernen.
und den Eierhalter wan dem dafür
q
VORSICHT! Aus dem Dampfloch und beim
Öffnen des Deckels
aus! Verbrühungsgefahr
tritt heißer Dampf
q
u
am
5. In Betrieb nehmen
Bevor Sie das Gerät in Betrieb nehmen, überzeugen Sie sich davon, dass ...
- das Gerät, Netzstecker und Netzkabel in
einwandfreiem Zustand sind und ...
- alle Verpackungsmaterialien vom Gerät entfernt
sind.
Reinigen Sie zunächst das Gerät, wie unter 8.
beschrieben.
6. Eier kochen
Picken Sie mit dem Eipick uein Loch in die
Ober- oder Unterseite der Eier.
Setzen Sie die Eier mit der angestochenenen Sei-
te nach oben auf den Eierhalter
Füllen Sie den Messbecher
ten Menge Wasser. Die Wassermenge hängt
von der Anzahl der Eier und dem gewünschten
Härtegrad ab.
Erläuterung der Symbole auf dem Messbecher:
.
w
mit der benötig-
y
Öffnen Sie den Deckel qindem Sie ihn am
Griff anheben und seitlich entfernen. Vermeiden
Sie den Kontakt von Hand und Arm mit dem
austretenden Dampf.
Entfernen Sie erst den Eierhalter
Dampf vollständig abgezogen ist.
ACHTUNG! Sachschäden!
• Stellen Sie das Gerät niemals in der Nähe von
Wärmequellen auf.
• Öffnen Sie niemals das Gehäuse. In diesem Fall
ist die Sicherheit nicht gegeben und die Gewährleistung erlischt.
• Verwenden Sie nur die im Lieferumfang enthaltenen Zubehörteile und benutzen Sie das Gerät
nie ohne den eingesetzten Eierhalter
• Lassen Sie das Gerät und die Zubehörteile vollständig abkühlen, bevor Sie sie reinigen und verstauen.
wenn der
w
w
.
hart
mittel
weich
Hinweis:
Je nach Größe der Eier kann es sein, dass Sie abweichend von der Skala am Messbecher
oder weniger Wasser einfüllen müssen, um den gewünschten Härtegrad der Eier zu erreichen.
Wenn das Ei zu weich ist, füllen Sie etwas mehr
Wasser ein (etwa einen Eichstrich auf der Skala
mehr). Die Kochzeit wird verlängert. Das Ei wird
härter.
Wenn das Ei zu hart geworden ist, füllen Sie beim
nächsten Kochvorgang etwas weniger Wasser ein
(etwa einen Eichstrich auf der Skala weniger). Die
Kochzeit wird verkürzt. Das Ei wird weicher.
- 23 -
y
mehr
Page 26

Füllen Sie das Wasser nun in die Kochschale e.
Setzen Sie den Eierhalter
und setzen Sie den Deckel qauf.
e
Drücken Sie den Betriebsschalter
(Position “ “), um das Gerät einzuschalten.
Sobald die Eier gar sind ertönt ein Signal.
in die Kochschale
w
nach links
r
Vorsicht:
Achten Sie bei der Reinigung des Messbechers auf
den Eipick
. Verletzungsgefahr!
u
Hinweis:
Verwenden Sie keine Reinigungs- oder Lösemittel.
Diese können zu Schäden am Gerät führen.
Drücken Sie den Betriebsschalter zurück in die
Position “O” um das Gerät auszuschalten.
Schrecken Sie die Eier nach dem Kochen unter
kaltem, fließendem Wasser ab.
7. Eier Warmhalten
Nutzen Sie die Warmhaltefunktion nur für hart
gekochte Eier.
Schrecken Sie die Eier nach dem Kochen unter
kaltem, fließendem Wasser ab.
Drücken Sie den Betriebsschalter nach rechts,
um nach dem Kochen der harten Eier die Warmhaltefunktion (Position “ “) zu aktivieren.
Drücken Sie den Betriebsschalter zurück in die
Position “O”, um das Gerät auszuschalten.
8. Reinigen und Pflegen
Das Gerät reinigen:
Ziehen Sie erst den Netzstecker aus der
Steckdose.
Lassen Sie das Gerät abkühlen.
Reinigen Sie danach die Kochschale
Netzkabel mit einem leicht angefeuchteten
Spültuch.
Entfernen Sie Kalkrückstände mit einer Lösung
aus etwas Essig und Wasser.
Setzen Sie das Gerät danach nur mit klarem
Wasser in Betrieb, um den Essiggeruch zu
entfernen.
Trocken Sie das Gerät auf jeden Fall gut ab,
bevor Sie es erneut verwenden.
Das Zubehör reinigen:
Spülen Sie den Deckel
den Messbecher
fließendem Wasser.
• Der Eierhalter w, Deckel qund Messbecher
sind auch spülmaschinengeeignet.
, den Eierhalter wund
q
mit Spülmittel unter
y
e
und das
9. Aufbewahren
y
Lebensgefahr durch elektrischen
Schlag:
Öffnen Sie niemals das Gehäuse des Gerätes. Es
befinden sich keinerlei Bedienelemente darin.
Tauchen Sie die Geräteteile niemals in
Wasser oder andere Flüssigkeiten!
Lassen Sie das Gerät erst vollständig auskühlen,
bevor Sie es wegstellen.
Wickeln Sie das Netzkabel um die Kabelaufwik-
klung
Lagern Sie das Gerät an einem trockenen Ort.
- 24 -
unter dem Geräteboden.
t
Page 27

10. Entsorgen
Werfen Sie das Gerät keinesfalls in den
normalen Hausmüll. Dieses Produkt
unterliegt der europäischen Richtlinie
2002/96/EC.
Entsorgen Sie das Gerät über einen zugelassenen
Entsorgungsbetrieb oder über Ihre kommunale
Entsorgungseinrichtung.
Beachten Sie die aktuell geltenden Vorschriften.
Setzen Sie sich im Zweifelsfall mit Ihrer Entsorgungseinrichtung in Verbindung.
Führen Sie alle Verpackungsmaterialien
einer umweltgerechten Entsorgung zu.
11. Garantie & Service
Die Garantiezeit wird durch die Gewährleistung
nicht verlängert. Dies gilt auch für ersetzte und reparierte Teile. Eventuell schon beim Kauf vorhandene
Schäden und Mängel müssen sofort nach dem
Auspacken gemeldet werden, spätestens aber zwei
Tage nach Kaufdatum. Nach Ablauf der Garantiezeit anfallende Reparaturen sind kostenpflichtig.
Schraven
Service- und Dienstleistungs GmbH
Tel.: +49 (0) 180 5 008107
(0,14 EUR/Min. aus dem dt. Festnetz,
Mobilfunk max. 0,42 EUR/Min.)
Fax: +49 (0) 2832 3532
e-mail: support.de@kompernass.com
Kompernaß Service Österreich
Tel.: 0820 899 913 (
e-mail: support.at@kompernass.com
0,20 EUR/Min.)
Sie erhalten auf dieses Gerät 3 Jahre Garantie ab
Kaufdatum. Das Gerät wurde sorgfältig produziert
und vor Anlieferung gewissenhaft geprüft.
Bitte bewahren Sie den Kassenbon als Nachweis
für den Kauf auf. Bitte setzen Sie sich im Garantiefall mit Ihrer Servicestelle telefonisch in Verbindung.
Nur so kann eine kostenlose Einsendung Ihrer Ware
gewährleistet werden.
Die Garantieleistung gilt nur für Material- oder
Fabrikationsfehler, nicht aber für Transportschäden,
Verschleißteile oder für Beschädigungen an zerbrechlichen Teilen, z. B. Schalter oder Akkus. Das
Produkt ist lediglich für den privaten und nicht für
den gewerblichen Gebrauch bestimmt.
Bei missbräuchlicher und unsachgemäßer Behandlung, Gewaltanwendung und bei Eingriffen, die
nicht von unserer autorisierten Service-Niederlassung vorgenommen wurden, erlischt die Garantie.
Ihre gesetzlichen Rechte werden durch diese
Garantie nicht eingeschränkt.
Kompernaß Service Switzerland
Tel.: 0848 000 525 (
e-mail: support.ch@kompernass.com
max. 0,0807 CHF/Min.)
12. Importeur
KOMPERNASS GMBH
BURGSTRASSE 21
D-44867 BOCHUM
www.kompernass.com
- 25 -
 Loading...