


VL-Z400H
Digital Still Camera Features
Digital Still Camera Features
Camera Recording
Camera Recording
Card Recording
Available mode:
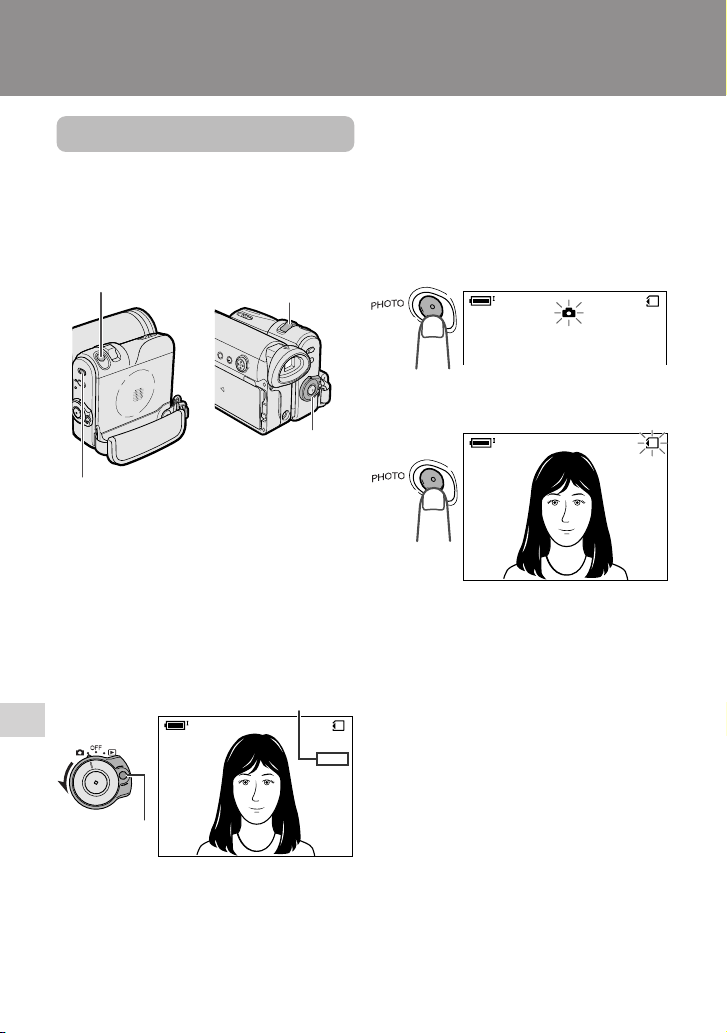
Card Camera
You can take a still picture in the same way
as you do with a standard camera and
record that image on the card.
PHOTO button
Media Selection switch
Power Zoom control
1 Insert a card into the camcorder (see
page 11).
2 Remove the lens cap.
3 Set the Media Selection switch to u.
4 Hold down the Lock button and set
the Power switch to v.
• The picture from the lens now
displays.
Number of shots taken/remaining
Lock button
AUTO
5 Adjust the Power Zoom control to
frame the subject as you desire.
Digital Still Camera Features
70
Power switch
/981
NORMAL
6 Press the PHOTO button half-way
down to focus on the subject.
• The camcorder automatically focuses
on the subject. When it is set, you will
hear a sound and see T mark with
green light, then the camcorder locks
the focus.
• When camcorder locks out of focus,
T mark lights up yellow.
NORMAL
7 Press the PHOTO button fully to
begin recording.
NORMAL
AUTO
• The S indicator flashes red while
data is being recorded on the card,
and returns to white when recording
completes.
• To record another image, release the
PHOTO button and make sure the
picture is not frozen in the monitor,
then perform steps 6 and 7.
Notes:
• Recording under insufficient lighting may
result in blurred images. It is recommended
that you use a tripod to record insufficiently
illuminated subjects.
• Recording under the light of a fluorescent,
mercury, or sodium lamp may cause
flickering in the image and, depending on the
timing of the shot, may result in changes to
colour hue in the image.
• Set the BEEP menu item to “OFF” to turn off
the focus locking sound.
• Do not turn the power off or remove the
card while the S indicator is flashing in
step 7.
/981
/981
Selecting the Picture
REC MODE
ECONOMY
Quality
Available mode:
Card Camera
The picture quality of still images recorded
on the card depends on the picture quality
setting. Select the appropriate setting to
match your recording objectives.
Types
NORMAL: Records images with
standard picture quality.
ECONOMY: Allows you to take more
shots than in NORMAL mode but with
lower quality.
FINE: Records images with higher
quality than in NORMAL mode but
with lower number of recordable
images.
Approximate number of recordable images with 8 MB SD memory
card
Picture quality
setting
NORMAL
ECONOMY
FINE
Note:
• The number of recordable images differs
depending on the combination of picture
quality settings used and the images shot.
Approx. number of
images
90
160
50
1 Set the Media Selection switch to u,
then hold down the Lock button and
set the Power switch to v.
Lock button
2 In Card Camera mode, press the
MENU button to display the menu
screen.
3 Press l or m on the Operation
button to select Y, then press the
centre of the Operation button.
4 Press l or m to select “REC
MODE”, then press the centre of the
Operation button.
SETT ING
FILE
NO.
SELF T IMER
REC
MOD E
RETURN
NORMAL
ECONOMY
FINE
5 Press l or m to select the desired
setting, then press the centre of the
Operation button.
6 Press the MENU button to turn off the
menu screen.
• The selected picture quality indicator
only appears when the on-screen
indicators are turned on.
Digital Still Camera Features
/090
EC ONOMY
Picture quality indicator
71

Digital Still Camera Features
Camera Recording
Recording with the
Self-timer
Available mode:
Card Camera
The self-timer function allows you to record
images after a time lag. This is convenient
when you want to record an image of you
and your friends together.
Selecting the time-lag
When you hold the PHOTO button half-way
down in 2 SEC mode, the camcorder will
lock the focus. This will prevent the camera
movement. But it will not lock the focus in 10
SEC mode.
1 In Card Camera mode, press the
MENU button to display the menu
screen.
2 Press l or m on the Operation
button to select Y, then press the
centre of the Operation button.
3 Press l or m to select “SELF
TIMER”, then press the centre of the
Operation button.
SETT ING
FILE
NO.
SELF T IMER
REC
MOD E
RETURN
10 SEC
2 SEC
4 Press l or m to select the desired
time-lag, then press the centre of the
Operation button.
SEL F T IMER
SEC10
5 Press the MENU button to turn off the
menu screen.
Digital Still Camera Features
72
Recording
1 Select the desired time lag.
2 Press the DISPLAY/MODE SET
button until the mode screen appears.
EXECUTE
ANUAL
SET
M
FOCUS
AUTO FOCUS
BLC/GAIN
3 Press l or m on the Operation
button to select “SELF TIMER”, then
press the centre of the Operation
button.
• The self timer mode indicator, U
(10 SEC mode) or T (2 SEC
mode), appears.
Self timer mode indicator
To cancel the countdown
Press the PHOTO button in step 4.
To cancel the self-timer
Press the centre of the Operation button
again in step 3.
Notes:
• When recording with the self-timer, stabilize
the camcorder in the horizontal plane by
attaching it to a tripod, etc.
• Self-timer mode cancels after recording one
image. Repeat steps 1 to 4 to record another
image with the self-timer.
• Do not turn the power off or remove the card
once the self-timer operating indicator begins
flashing.
10
NORMAL
AUTO
CANCEL
4 Press the PHOTO button to start the
self-timer.
• The self-timer operating indicator
flashes while the timer counts down.
Self-timer operating indicator
10
NORMAL
AUTO
• The shutter automatically releases
after the time lag you selected, and a
still image of the subject is recorded.
81/9
Digital Still Camera Features
81/9
73
Digital Still Camera Features
OTHERS 2
RETURN
PO
W
ER SAVE
EXECUTEFORMAT
SETT ING
DAT E D I SP.
12H 24H/
SELECT SET
62005.2.
10 30:00:
OFF
24H
DAT E+TIME
FORMAT
ALL DATA WI LL
BE
NO
YES
ERASED.
Camera Recording
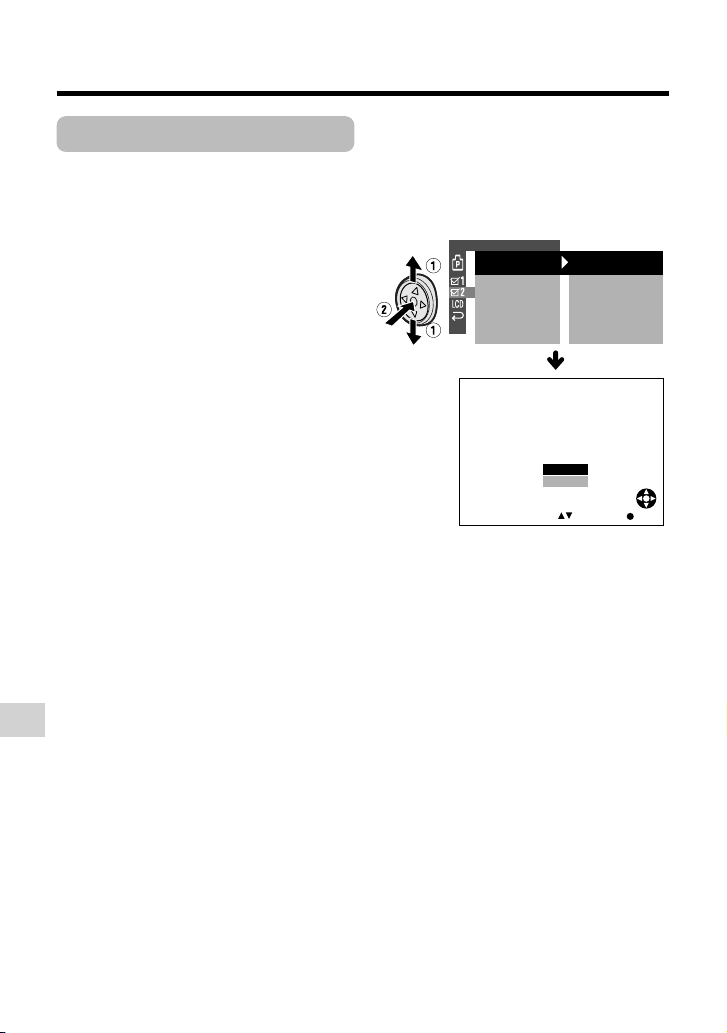
Formatting a Card
Available modes:
Card Camera, Card Playback
Before using a commercially available card
with this camcorder, you must first have it
formatted. Also, if any of the following
warning indicators displays, you will need to
format your card.
• “FORMAT MEMORY CARD”
• “MEMORY CARD ERROR”
• “MEMORY CARD READ ERROR”
• “CANNOT STORE DATA”
Notes:
• Formatting a card erases all stored images,
including delete-protected images. Be sure
to backup important data on your computer
or other media before formatting the card
(see pages 83–88).
• Do not remove the power source during
formatting, as this may cause damage to the
camcorder or card. It is recommended that
you use the AC outlet for the power supply.
• The example screens shown are for Card
Camera mode.
1 In Card Camera or Card Playback
mode, press the MENU button to
display the menu screen.
2 Press l or m on the Operation
button to select ~, then press the
centre of the Operation button.
3 Press l or m to select “FORMAT”,
then press the centre of the Operation
button.
• To cancel formatting, press l or m
to select “RETURN”, then press the
centre of the Operation button.
4 Press l or m to select “YES”, then
press the centre of the Operation
button to begin formatting.
• The menu screen displays when
formatting finishes.
5 Press the MENU button to turn off the
menu screen.
Notes:
• The supplied card is preformatted for
immediate use.
• Use this camcorder to format a card. The
camcorder may not recognize the images
on a card formatted by a computer or other
equipment.
Digital Still Camera Features
74

Setting the File
Numbering Method
Available mode:
Card Camera
The camcorder automatically assigns file
numbers to captured images. You can
select two different methods of file numbering.
Types
SERIAL: Defines file numbers by
incrementing up from the last image
captured when inserting a new card.
RESET: Defines a new set of file
numbers when inserting a new card.
1 In Card Camera mode, press the
MENU button to display the menu
screen.
2 Press l or m on the Operation
button to select Y, then press the
centre of the Operation button.
3 Press l or m to select “FILE NO.”,
then press the centre of the Operation
button.
SETTING
FILE
SELF TIMER
REC MODE
RETURN
NO.
SERIAL
RESET
4 Press l or m to select “SERIAL” or
“RESET”, then press the centre of the
Operation button.
RESETFILE NO.
5 Press the MENU button to turn off the
menu screen.
Note:
• When a warning indicator “MAXIMUM FILE
NUMBER” appears on the screen, set FILE
NO. menu item to “RESET”, then format the
card (see page 74) or replace the card with a
new one (see page 11).
Digital Still Camera Features
75
 Loading...