


CLT-9922NEW 7/2/02 11:09 AM Page 1
INSTRUCTION |
CLT-9922 |
MANUAL |
CLT-9925 |
|
|
|
CLT-9935 |
900-MHz
Cordless Telephone with Caller ID
IMPORTANT
Charge the handset battery for 12 continuous hours prior to first use.
SANYO Canada Inc.
www.sanyocanada.com
The exclamation point within the triangle is a warning sign alerting you of important instructions accompanying the product.
SOS HELP LINE
At Sanyo, fulfilling the needs of our customers is a priority. That’s why we created our SOS customer service program that guarantees satisfaction.
NATIONWIDE CUSTOMER SUPPORT
SOS is there to help you. Our friendly and knowledgeable product specialists will quickly answer your questions about setup and use of Sanyo telephone products. Simply call toll free from anywhere in Canada to connect to our nocharge, SOS support and service network:
1-800-263-2244
between 8:30 am – 7:00 pm EST
Or visit our website at www.sanyoservice.com, and click the Customer Relations button to get access to our FAQ’s (Frequently Asked Questions) and other helpful features.
STAY-AT-HOME CONVENIENCE
It’s a nuisance making another trip to the store when you’re stuck. Now with SOS, all that’s necessary is a quick call from your home for product assistance.
HASSLE-FREE EXCHANGE
Should your Sanyo telephone require servicing due to a manufacturing defect during the warranty period, SANYO Canada will ship prepaid a replacement unit* within two business days after receiving your defective unit. Consumers are responsible for the shipping costs of the unit back to Sanyo.
•For older, non-current models, replacement units may not be available, in which case our regular warranty conditions will apply.
GUARANTEED QUALITY
All SOS replacement sets are checked and serviced by factory-authorized technicians before being sent out. SOS means you never have to worry.
C.O.D. and/or Collect shipments will not be accepted.
Unit must be returned to Sanyo in its original box with all accessories, ie: owner’s manual, battery, adaptor, telephone cord, etc.
SANYO E2002-2
INTRODUCTION
Congratulations on your purchase of this Sanyo cordless telephone.
Your Sanyo 900-MHz cordless telephone is a fine-quality home communications product. It is carefully designed and produced by a world leader of consumer and industrial electronics equipment. With proper maintenance and care, it will provide you with years of enjoyment and convenience.
Main Features
900-MHz Technology
Extended Range -The use of 900-MHz frequency band for signal transmission between base and handset means greater communication range compared to conventional 43 – 49 MHz cordless telephones.
Ultra-Low Noise -The high frequency communication has also significantly reduced noise level.
40-Channel Auto/Manual Scan -Your new telephone uses one of 40 channels in the 900-MHz frequency band. It automatically selects a clear channel every time you receive or place a call on the handset.
COMPANDER PLUS Noise Reduction
This fourth generation of the Sanyo’s original noise reduction technology now filters out more background noise.
• Caller ID* and Caller ID with Call Waiting*.
(*Each feature works with your telephone company. A subscription is required.)
•40-number Caller ID list
•10-name/number directory
•Lighted keypad (CLT-9935 only)
•3-line trilingual display
•Ringer on/off switch
•Wall-mountable
•Belt clip (CLT-9925 and 9935 only)
*Important:
To use all of the features of this phone, you must subscribe to either the standard Name/Number Caller ID Service or Caller ID with Call Waiting Service. To know who is calling while you are on the phone, you must subscribe to Caller ID with Call Waiting Service.
GETTING STARTED
Checking the package contents
Make sure your package includes the items shown here.
|
AC adaptor |
Belt clip |
Base |
A10920 |
(CLT-9925/9935 only) |
Handset |
Telephone line |
Replacement Battery |
|
cord |
Order Form |
INSTALLATION
Modular jack
To properly connect your phone to your telephone lines, you will need an RJ11 type modular phone jack. If you do not have a modular jack, call your local phone company to find out how to get one installed.
Installation note: Avoid places near electrical equipment such as refrigerators, computers, TVs or fluorescent lamps. These may cause interference or reduce the operating range of the cordless telephone.
Connections
1
2 |
3 |
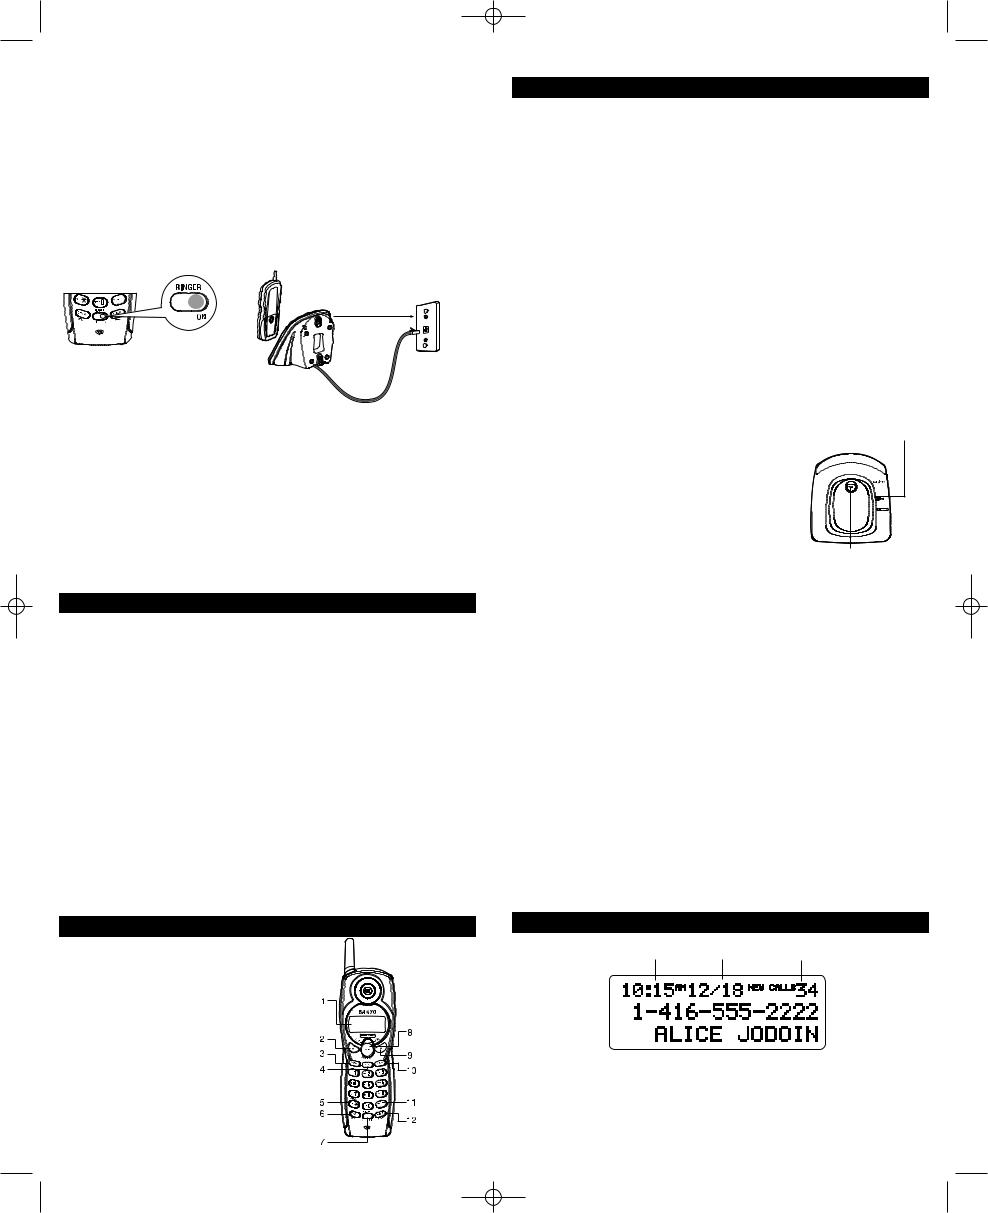
1.Set the RINGER switch on the front of the handset to ON and place the handset in the base.
2.Plug the AC adaptor into the POWER 9V DC jack on the bottom of the base and the other end into an electrical outlet. The VOICE MAIL/CHARGE/IN USE indicator lights, verifying the battery is charging.
Charge the handset battery for 12 continuous hours prior to first use. The initial battery charge is important for best performance.
Note: The handset can be charged facing up or down.
CLT-9922NEW 7/2/02 11:09 AM Page 2
Low Battery Warning: When the battery is low you will hear a short beep every 7 seconds.
Important: Do not connect the telephone line to the modular jack until the phone has been charged for 12 continuous hours.
3.Plug the telephone line cord into the PHONE LINE jack on the bottom of the base and into a modular jack.
Caution: Use only Sanyo AC adaptor, A10920, that came with this phone. Using other adaptors may damage the phone.
Note: The phone automatically defaults to touch tone dialing. To change to pulse (rotary) dialing, see Tone/Pulse Dialing. If you do not know which type of service you have, check with your telephone company.
Mounting on a wall
Do not attempt to wall-mount the phone before initial 12-hour charging is completed.
1
4  3
3
2
1.Follow previous steps 1–2 to charge the handset. Wait at least 12 hours.
2.Plug the telephone line cord into the PHONE LINE jack on the bottom of the base and the other end into a modular jack.
3.Slip the mounting holes on the bracket over the wall plate posts and firmly slide the base down into place (wall plate not included).
4.Place the handset in the base.
Note: If desired, gather the extra line cord together, and fasten with a wire tie.
Digital Security System
Your cordless phone uses a digital security system to provide protection against false ringing, unauthorized access and charges to your phone line.
When you place the handset in the base, the unit verifies its security code. After a power outage or battery replacement, place the handset in the base for about 20 seconds to reset the code.
INITIAL PROGRAMMING
Before using this telephone the following 3 initial program set-ups must be completed:
Language setting
1.Make sure the phone is off (not in TALK mode).
2.Press FLASH/PROG until 1ENG 2FRA 3ESP shows on screen. English is factory set.
3.Use the handset number keys to enter the desired setting. For example, to choose French, press the number 2 key.
4.Press FLASH/PROG to store selection. You will hear a confirmation tone.
Tone/pulse setting
1.Make sure the phone is off (not in TALK mode).
2.Press FLASH/PROG until 1 TONE 2 PULSE shows on screen. Tone is factory set.
3.Use the number keys to enter the desired setting. For example, to choose Tone dialing, press the number 1 key.
4.Press FLASH/PROG to store selection. You will hear a confirmation tone.
Area code setting
This is required to use Caller ID service from your telephone company.
1. Make sure the phone is off (not in TALK mode).
2. Press FLASH/PROG until --- SET AREA CODE shows on screen.
3.Use the handset key pad to enter your 3-digit area code.
4.Press FLASH/PROG to store selection. You will hear a confirmation tone.
NAMES AND CONTROLS
1.LCD screen
2.CID/VOL ▼ (volume) key
3. REDIAL key
4. MEM (memory) key
5. TONE/CANCEL key
6. CHAN (channel)/DEL (delete) key
7. Ringer switch: RINGER ON/OFF
8. TALK/CALLBACK key
9. CID/VOL ▲ (volume) key
10. 7-10-11 key
11. PAUSE key
12. FLASH/PROG (program) key
BASICS
Receiving a call
1.When the phone rings the screen shows caller information*.
2.Press TALK.
*If you do not subscribe to a caller ID service, there will be no information on display.
Ringer switch
The RINGER switch must be ON for the handset to ring during incoming calls.
Volume
While talking, press CID/VOL keys ( ▲ and ▼ ) to control the receiver volume.
There are four volume levels. Press ▲ to increase the volume level, and press ▼ to decrease. VOL 1 is the lowest level and VOL 4 is the loudest.
Making a call
Press TALK/CALL BACK before you dial and press it again to hang up.
Redialing a call
Press TALK/CALL BACK and then REDIAL to redial the last number you dialed (up to 32 digits). If you get a busy signal, and want to keep dialing the number, just press REDIAL again (you do not have to turn the phone off and back on).
FLASH key
Use the FLASH/PROG key to use special calling services such as Call Waiting or Call Transfer. You must subscribe to these services available through your local phone company.
Tip: Do not use TALK/CALL BACK to activate custom calling services or you’ll hang up the phone.
VOICE MAIL/CHARGE/IN USE indicator
•Flashes when you have a new voice mail.
•Lights when the handset is being charged in the base.
•Lights when the handset is in use.
Voice mail
When you subscribe to a voice mail service offered by your phone company, the phone alerts you when voice mail has been received. MESSAGE WAITING appears on screen for 60 seconds when a voice mail is received. The
VOICE MAIL/CHARGE/IN USE indicator on the base flashes to indicate there is voice mail waiting. After the voice mail has been reviewed MSG WAITING OFF appears on screen and the VOICE MAIL/CHARGE/IN USE indicator stops flashing.
This indicator does not work with your answering machine.
VOICE MAIL/IN USE/ CHARGE indicator
PAGE button
Note: The phone will only work with an FSK type of VMWI system. It will not work with the Stutter Dial Tone type of VMWI system.
CHAN (Channel) key
Press and release CHAN/DEL to advance to the next channel to get rid of static while talking.
Temporary tone
This feature enables pulse (rotary) service phone users to access touch-tone services offered by banks, credit card companies, etc.
1.Call the bank’s information line.
2.Press TONE/CANCEL after your call is connected.
3.Follow the voice instructions to complete your transaction.
4.Hang up when finished. The phone returns to pulse (rotary) service.
CANCEL key
Press TONE/CANCEL to cancel any command you initiated.
Handset locator
This feature helps to locate a misplaced handset. Press PAGE on the base. The handset beeps continuously for about two minutes or until you press any key on the handset. Press PAGE to cancel.
Note: The RINGER switch does not have to be ON for this feature to work.
CALLER ID FEATURES
Time |
Date |
Number of calls |
This phone receives and displays caller’s information when you subscribe to a Caller ID service from your telephone company. This information can include the phone number, date, and time; or the name, phone number, date, and time. The phone can store up to 40 callers for later review.
 Loading...