


INSTRUCTION MANUAL
Micro Component System
DC-DA1465M
e
 e
e
i
1465AUfcover.indd |
1 |
2008-7-28 |
10:00:58 |
|
|
|
|
|
|
||||
|
|
|
||||
|
|
|
|
|
|
|
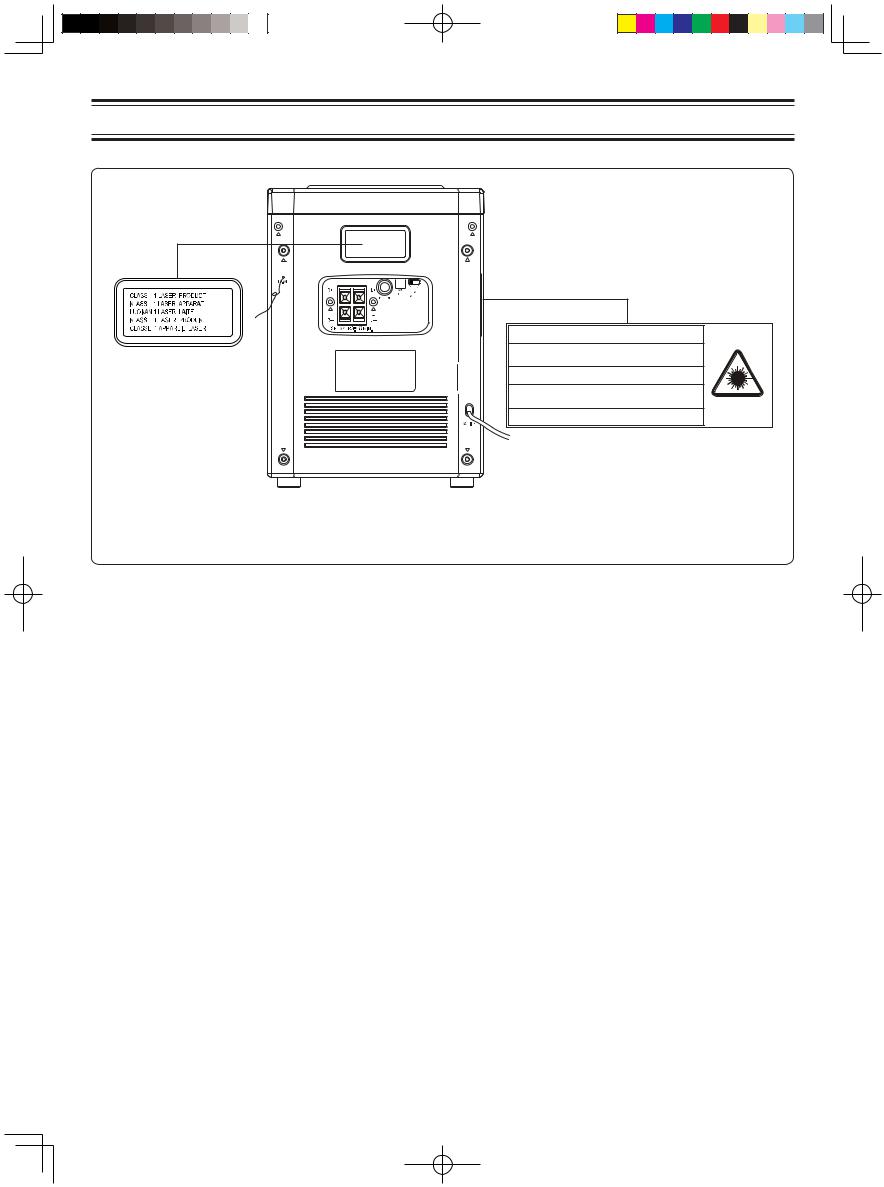
PRECAUTIONS
CAUTION - INVISIBLE LASER RADIATION WHEN OPEN AND
INTERLOCKS DEFEATED. AVOID EXPOSURE TO BEAM.
ADVARSEL - USYNLIG LASER STRÅLING VED ÅBNING, NÅR
SIKKERHEDSAFBRYDERE ER UDE AF FUNKTION, UNDGÅ UDS ÆTTELSE
FOR STRÅLING.
VARNING - OSYNLIG LASER STRÅLNING NÄR DENNA DEL ÄR ÖPPNAD
OCH SPÄRR ÄR URKOPPLAD. STRÅLEN ÄR FARLIG.
VORSICHT - UNSICHTBARE LASERSTRAHLUNG TRITT AUS, WENN DECKEL GEÖFFNET UND WENN SICHERHEITSVERRIEGELUNG ÜBERBRÜCKT IST. NICHT, DEM STRAHL AUSSETZEN.
VARO - AVATTAESSA JA SUOJALUKITUS OHITETTAESSA OLET ALTTIINA
NÄKYMÄTTÖMÄLLE LASERSÄTEILYLLE. ÄLÄ KATSO SÄTEESEEN.
CAUTION
USE OF CONTROLS OR ADJUSTMENTS OR PERFORMANCE OF PROCEDURES OTHER THAN THOSE SPECIFIED HEREIN MAY
RESULT IN HAZARDOUS RADIATION EXPOSURE.
THIS PRODUCT SHOULD NOT BE ADJUSTED OR REPAIRED BY ANYONE EXCEPT PROPERLY QUALIFIED PERSONNEL.
-The apparatus shall not be exposed to dripping or splashing.
-Do not use where there are extremes of temperature (below 5 °C or exceeding 35 °C) or where direct sunlight may strike it.
-Because of the CD players extremely low noise and wide dynamic range, there might be a tendency to set the volume on the amplifier unnecessarily high. Doing so may produce an excessively large output from the amplifier which could damage your speakers.
-Sudden changes in the ambient temperature may cause condensation to form on the optical lens inside the unit. If this happens, take out the disc, leave the unit for about 1 hour, and then proceed to operate.
-The systems speakers use powerful magnets. Do not place time pieces, credit cards, cassette tapes or video tapes, etc. near the speakers.
-Do not install this equipment in a confined space, such as a bookcase or built in cabinet.
-No objects filled with liquids, such as vases, shall be placed on the apparatus.
-The ventilation should not be impeded by covering the ventilation openings with items, such as newspapers, table-cloths, curtains etc.
-No naked flame sources, such as lighted candles, should be placed on the apparatus.
-To be completely disconnect the power input, the mains plug of apparatus shall be disconnect from the mains.
-The rating label is located on the rear of cabinet.
-A t t e n t i o n s h o u l d b e d r a w n t o t h e environmental aspects of battery disposal.
-Battery shall not be exposed excessive heat such as sunshine, fire or the like.
-MAINS plug or an appliance coupler is used as the disconnect device, the disconnect device shall remain readily operable.
-Minimum distance around the apparatus for sufficient ventilation.
1
1465AUEnglish.indd |
1 |
2008-7-28 |
10:00:17 |
|
|
|
|
|
|
||||
|
|
|
||||
|
|
|
|
|
|
|

CONNECTIONS
BACK
R ch speaker |
L ch speaker |
Black Red
Red
Black
FM aerial |
AM loop aerial |
|
To an AC outlet
Note:
-Do not connect the mains lead to an AC outlet until all connections have been made.
-The system is not completely disconnected from the AC power when the z/ON button is set to the z (standby) position.
Speakers
Connect the red speaker wire to the red terminal (+) and the other wire to the black terminal (-) .
Aerial
FM aerial
Extend the aerial wire as straight as possible and, while listening to the sound from the system, secure it in a position which yields minimal distortion and noise.
AM loop aerial
Assemble the loop aerial. Unwind the aerial wires, then connect them to the AM LOOP terminals. Place the loop aerial in a position which yields the best AM reception, or attach it to a wall or other surface.
Note:
To minimize noise, the speaker, mains and any other leads should not come close to the FM aerial lead and AM loop aerial. Do not place the aerial leads close to the system.
Headphones
Connect stereo headphones (not supplied) to the PHONES socket for monitoring or for private listening. The speakers are automatically disconnected when headphones are connected.
-Excessive sound pressure from earphones and headphones can cause hearing loss.
Screws (not supplied)
2
1465AUEnglish.indd |
2 |
2008-7-28 |
10:00:17 |
|
|
|
|
|
|
||||
|
|
|
||||
|
|
|
|
|
|
|
CONTROLS
9 |
10 |
8 |
11 |
7 |
12 |
6 |
|
5 |
13 |
4 |
14 |
3 |
15 |
|
|
2 |
|
1 |
16 |
|
17 |
18
5 |
4 |
3 |
21 |
1 |
20 |
24 |
23 |
22 |
20 |
19 |
1.Line in socket (LINE IN)
2.Stop button (STOP n)
3.Skip/Search/File select/Tuning button (- TUN/FILE +, f, e)
4.Band select button (BAND)
5.Folder/Channel select button (FOLDER/CHANNEL)
6.Function button (FUNCTION)
7.Remote sensor (IR)
8.Power button (z/ON)
9.Display
10.CD Compartment (OPEN/CLOSE q)
11.Bass expander button (DBBS)
12.Play mode button (PLAY MODE)
13.Program/Clock button (PROGRAM/CLOCK)
14.Timer button (TIMER)
15.Volume control (VOLUME)
16.Play/Pause button (PLAY/PAUSE i)
17.Cassette holder
18.Tape buttons cover (OPEN a)
19.Pause button (K)
20.Stop/Eject button (N/Q)
21.Fast forward button (C)
22.Rewind button (D)
23.Play button (A)
24.Record button (M)
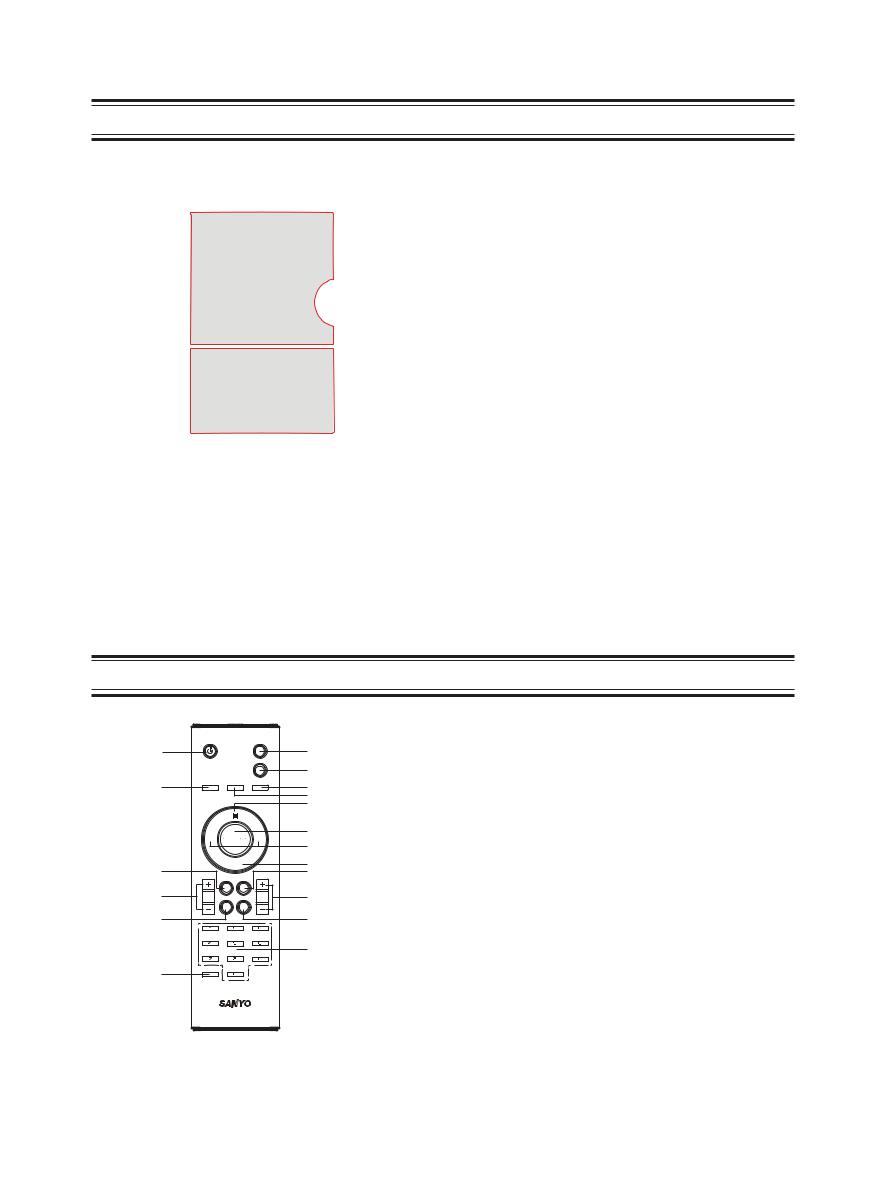
REMOTE CONTROLLER
1 |
|
|
2 |
|
|
|
3 |
18 |
|
|
4 |
|
|
|
5 |
|
|
|
6 |
|
|
|
7 |
|
e |
e |
8 |
|
|
|
|
17 |
i |
|
9 |
|
|
10 |
|
16 |
|
|
11 |
15 |
|
|
12 |
|
|
|
13 |
14 |
|
|
|
1.Power/Stand by button(z/STANDBY)
2.Mute button (MUTE)
3.Timer button (TIMER)
4.Program/Clock button (PROGRAM/CLOCK)
5.Play mode button (PLAY MODE)
6.Stop button (n)
7.Display button (DISPLAY)
8.Skip/Search/File select/Tuning button (f, e)
9.Play/Pause button (i)
10.FM mode button (FM MODE)
11.Volume button (VOLUME -, +)
12.Bass expander button (DBBS)
13.Number button (0,1~9)
14.Sleep button (SLEEP)
15.Sound mode select button (SOUND)
16.Folder/Channel select button (FOLDER/CHANNEL -, +)
17.Tuner function/Band select button (TUN/BAND)
18.Function button (FUNCTION)
Number buttons (0, 1-9)
Example:
Tuner/Audio CD
To select No. 3, press 3.
To select No. 10, press 1, then press 0.
MP3/WMA
To select No. 3, press 3.
To select No. 10, press 1, then press 0.
To select No. 126, press 1, 2, then press 6.
3
1465AUEnglish.indd |
3 |
2008-7-28 |
10:00:17 |
|
|
|
|
|
|
||||
|
|
|
||||
|
|
|
|
|
|
|
 Loading...