


CLT2435 ENG-5/28 5/28/01 13:46 Page i
INSTRUCTION MANUAL |
CLT-2435 |
|
2.4-GHz
Digital Spread Spectrum Cordless Telephone
with Call Manager Features
IMPORTANT
Charge the handset battery pack for a full 15 hours before using your cordless handset for the first time.
www.sanyocanada.com
CLT2435 ENG-5/28 5/28/01 13:50 Page ii
Introduction
of the CLT-2435 cordless telephone.
long life, and outstanding performance utilizing the Spectrum technology.
this manual may differ from the actual unit for
Features
Technology
ID, Caller ID on Call Waiting and Call Waiting with Options
service. A subscription required.
Key
on Base and Handset on the Handset
Handset Display
TALK/END Key on the Handset
the Base
in the Handset
-Hour Talk Time
Scan
Volume Controls
Off setting
Technology utilizes a “wider frequency band” used in standard digital transmissions. The result is the range and a secure conversation with virtually no
.4-GHz cordless phones or radio transmission devices.
selected for each transmission. The phone digital security codes for the handset and base.
phone’s security and also prevent unauthorized calls being activated by other equipment.
CLT2435 ENG-5/28 5/28/01 13:46 Page iii
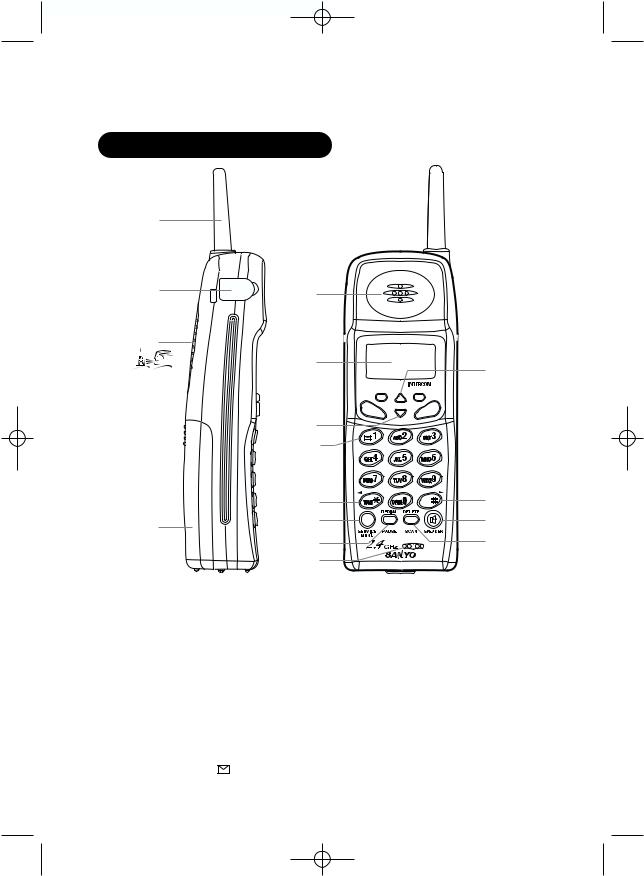
Controls and functions
15 


 16
16 


 17
17
18
19
20
 21
21
12. SERVICE MENU key
13. REDIAL/PAUSE key
14. Microphone
15. CALL REVIEW/VOLUME (up) key
16. INTERCOM/SELECT key
17. CID/FLASH key
18. Right cursor key ( 
 ) 19. SPEAKER key
20. DELETE/SCAN key
21. Handset charging contacts
11. Left cursor key (TONE/  /
/  )
)

CLT2435 ENG-5/28 5/28/01 13:46 Page iv
22
23
24 25
3738 39 40
37.Ringer Volume switch
38.Pulse-Tone switch
39.DC power input
40.TEL LINE jack
35
34
33
32
31
30
29
28
36
27
26
22.Handset retainer
23.Base charging contacts
24.INTERCOM/PAGE/FIND key
25.FLASH key
26.SPEAKER key
27.REDIAL/PAUSE key
28.MEMORY key
29.CALLERS indicator
30.CHARGE/IN USE indicator
31.INTERCOM indicator
32.SPEAKER indicator
33.VOICE MAIL indicator
34.Base antenna
35.Bottom bracket
36.VOLUME control

CLT2435 ENG-5/28 5/28/01 13:46 Page 1
CONTENTS
Introduction/Features.............................................. |
inside front cover |
Controls and Functions............................................ |
inside front cover |
Getting started |
|
Read this first.......................................................................................... |
E2 |
Step 1: Checking the package contents......................................... |
E3 |
Step 2: Setting up the base unit ....................................................... |
E4 |
Desktop use ............................................................................. |
E5 |
Mounting the base unit on a wall ...................................... |
E7 |
Step 3: Preparing the battery pack .................................................. |
E9 |
Basics |
|
Making a call ........................................................................................ |
E11 |
HandsFree Speakerphone in the Handset ................................... |
E12 |
Receiving a call.................................................................................... |
E14 |
Call Waiting .......................................................................................... |
E15 |
Out of Range ........................................................................................ |
E15 |
Lighted keypad .................................................................................... |
E16 |
Scanning ............................................................................................... |
E16 |
Adjusting the ringer and earpiece volume................................... |
E16 |
Redialing a call..................................................................................... |
E17 |
Directory/speed-dial |
|
Using the handset directory............................................................. |
E19 |
Using the base station speed-dial memory ................................. |
E26 |
Caller ID features |
|
Caller ID ................................................................................................. |
E28 |
When the telephone rings................................................................ |
E30 |
Viewing the Caller ID list................................................................... |
E31 |
Deleting information from the Caller ID list ................................. |
E32 |
Using the Caller ID list ....................................................................... |
E34 |
Using Caller ID on Call Waiting service......................................... |
E36 |
Advanced calling features |
|
List of features ..................................................................................... |
E37 |
Voice mail access ............................................................................... |
E38 |
Call transfer feature............................................................................ |
E40 |
Intercom feature.................................................................................. |
E41 |
3-way conference feature ................................................................ |
E42 |
Accessing calling features ............................................................... |
E43 |
Pre-programmed calling features................................................... |
E44 |
Adding new features ......................................................................... |
E45 |
Call Waiting with Options................................................................. |
E47 |
Additional Information |
|
Changing the digital security code ................................................ |
E48 |
Installing the belt clip......................................................................... |
E49 |
Headset installation ........................................................................... |
E49 |
Note on power source....................................................................... |
E50 |
Maintenance........................................................................................ |
E50 |
Troubleshooting............................................................................... |
E51 |
Technical Information .................................................................... |
E52 |
Warranty ........................................................................................... |
E53 |
Sanyo-On-Site (SOS) Information ............................................... |
E54 |
Getting Started
Basics
Directory/
speed-dial
Caller ID
Features
Advanced Calling
Features
Additional
Information
E1
CLT2435 ENG-5/28 5/28/01 13:46 Page 2
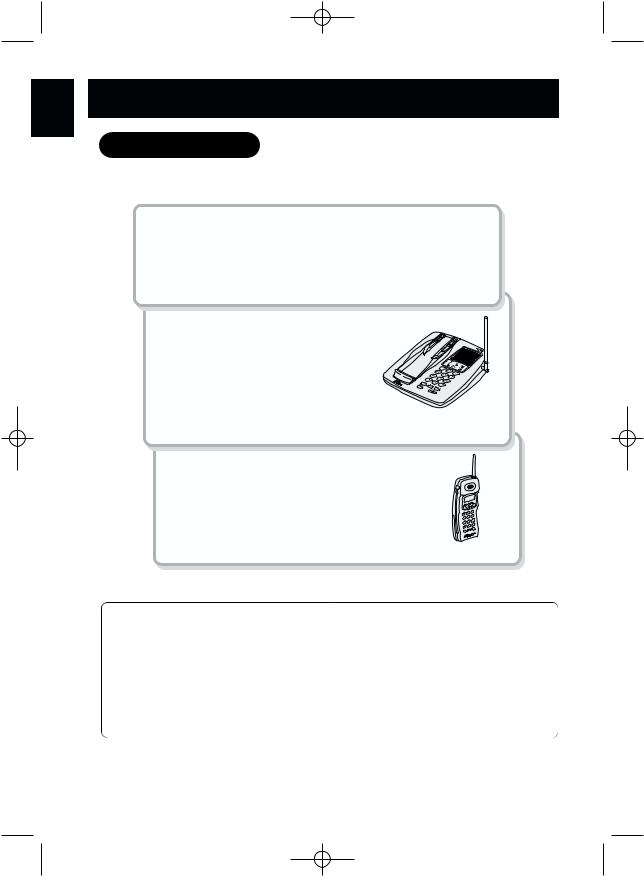
GETTING STARTED
Read this first
This cordless telephone must be set up before use. Follow these steps:
Step 1 (page E3)
Unpack and check the telephone and accessories.
Step 2 (page E4 to E8)
Choose the best location to set up the base unit.
Base unit
Step 3 (page E9 to E10)
Insert the battery pack into the handset. You must charge the battery pack for a full 15 hours before using the phone.
Handset
About the digital security code
This cordless telephone uses a digital security code to prevent unauthorized access to your base unit. This security code prevents other cordless handsets from making calls through your base unit.
A random security code will be assigned automatically between your base unit and handset when you charge the battery pack for the first time.
If you want to reset the security code, see page E48.
E2

CLT2435 ENG-5/28 5/28/01 13:46 Page 3
GETTING STARTED
Checking the package contents
.
• AC adaptor (AD-350)
• Bottom bracket for desktop use and wall-mounting
• Belt clip
E3
CLT2435 ENG-5/28 5/28/01 13:46 Page 4
GETTING STARTED
Setting up the base unit
refrigerators, computers, TVs,
cause interference or reduce the operating
•The location should be close to both a phone jack and a continuous power outlet which is not switchable.
•Be sure there is sufficient space to raise the base antenna fully to a vertical position.
•The base can be placed on a desk, tabletop or mounted on a standard wall plate.
E4
CLT2435 ENG-5/28 5/28/01 13:46 Page 5
GETTING STARTED
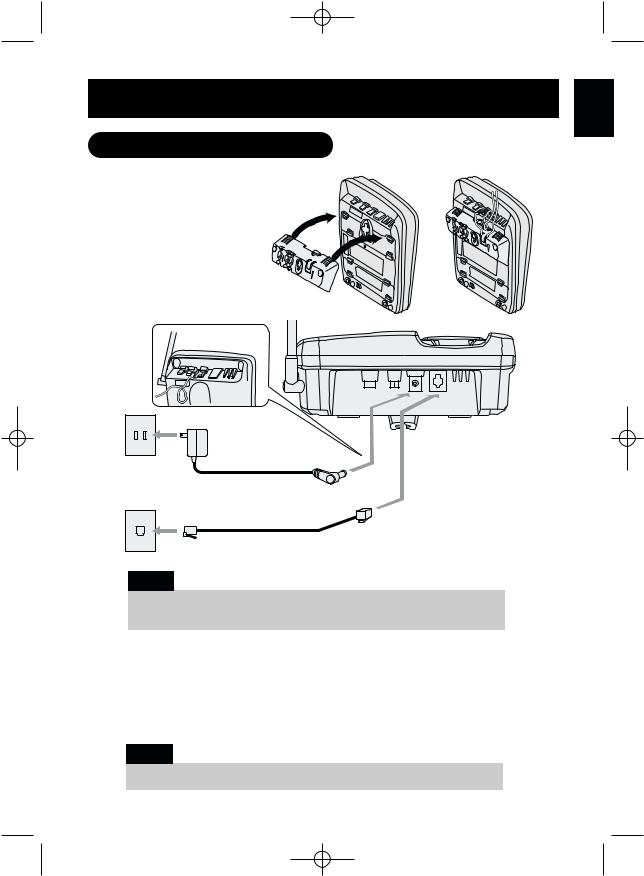
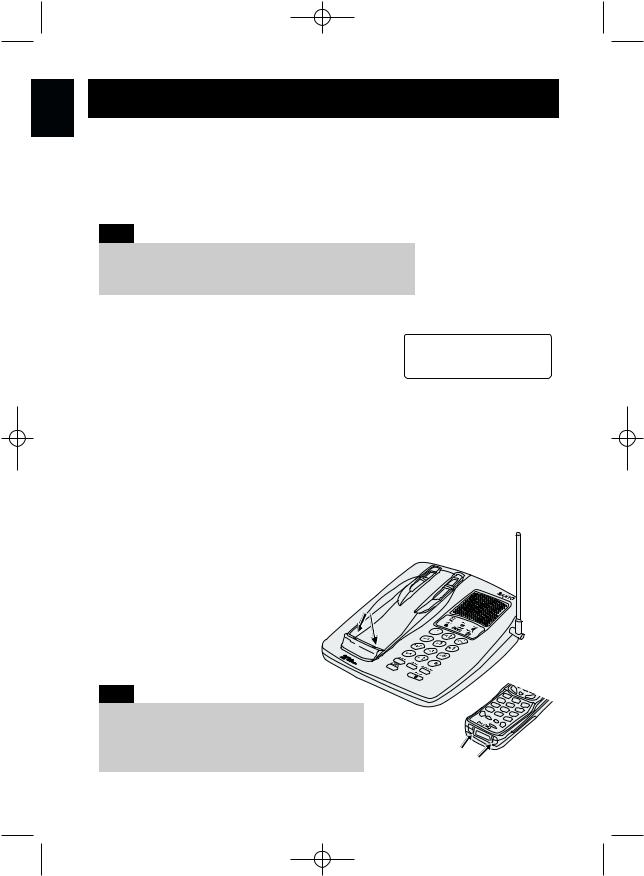
Desktop use
1
9V
To TEL LINE
When connecting the power cord, make sure it does not create a trip or fire/electrical hazard. Avoid places where it could become chafed.
1 Snap the bottom bracket into the notches on the base.
2Connect the AC adaptor to the DC IN 9V jack and to a standard 120-V AC wall outlet. Then raise the antenna to a vertical position.
3 Connect the telephone line cord to the TEL LINE jack and to a telephone outlet.
Note:
To assure proper handset charging, the bottom bracket must be attached.
E5
CLT2435 ENG-5/28 5/28/01 13:46 Page 6
GETTING STARTED
Notes:
•Use only the supplied AD-350 AC adaptor. Do not use any other AC adaptor.
•Connect the AC adaptor to a continuous power supply.
•Place the base unit close to the AC outlet so that you can unplug the AC adaptor easily.
•If your telephone outlet is not modular, contact your telephone company for assistance.
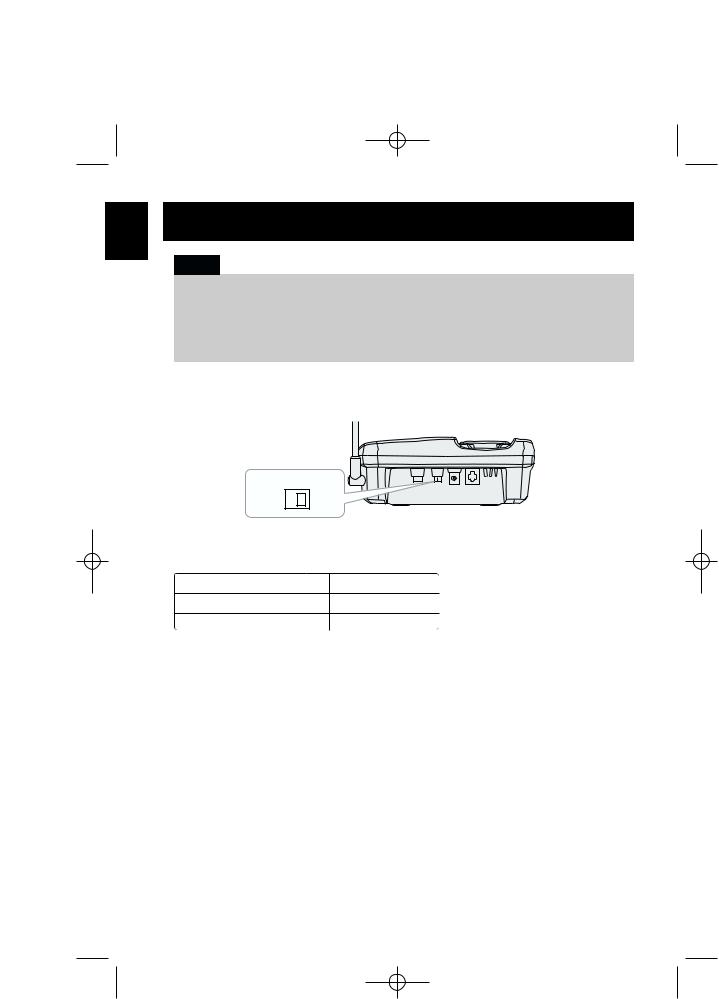
Choose the dialing mode
PULSE  TONE
TONE
Depending on your dialing system, set the PULSE-TONE switch as follows:
If your dialing system is |
Set the switch to |
Tone |
TONE |
Pulse |
PULSE |
If you are not sure of your dialing system
Make a trial call with the PULSE-TONE switch set to TONE.
If the call connects, leave the switch as is; otherwise, set to PULSE.
E6
CLT2435 ENG-5/28 5/28/01 13:46 Page 7
GETTING STARTED
Mounting the base unit on a wall
.
bracket to the base as all tabs snap into the
.
line cord to the the small plug of
DC IN 9V jack.
line cord into the
cord into the molded the cord around the
5 Plug the AC adaptor into a standard
120-V AC wall outlet.
6 Raise the antenna to a vertical position.
7 Align the mounting slots on the base with the mounting posts on the wall. Push in and down until the phone is firmly seated.
E7
CLT2435 ENG-5/28 5/28/01 13:46 Page 8
GETTING STARTED
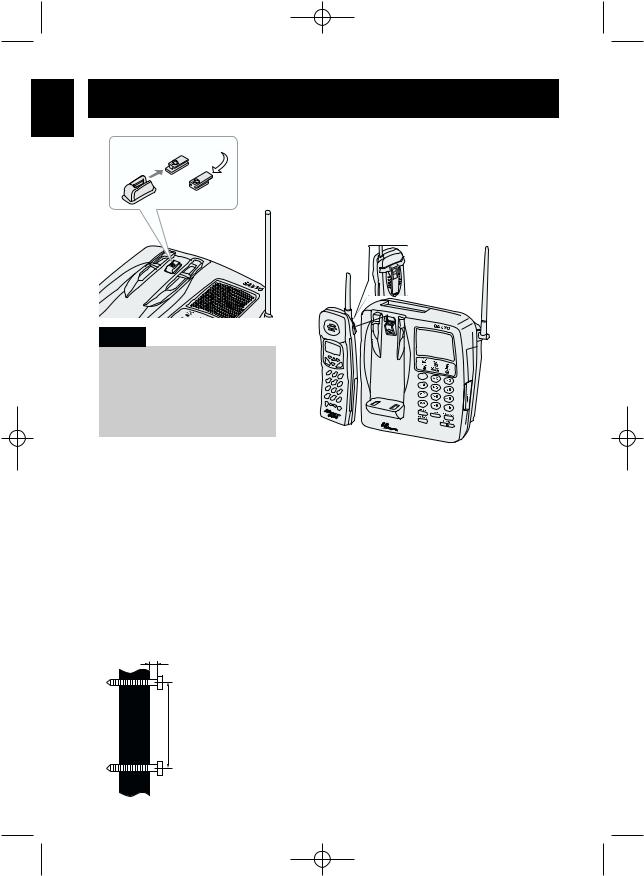
Handset retainer
Note:
When the phone is mounted on the wall, the handset belt clip must be attached to hold the handset in the charging position. Do not place the handset with the display facing inside.
Direct wall-mounting
8On the base unit, pull the handset retainer out of the slot. Rotate it clockwise 180 degrees.
9Flip the retainer. Slide it back into the slot so that the lip of the retainer is up and the  points down. The retainer holds the handset in place.
If you do not have a standard wall plate, you can still mount your phone directly to the wall. Before doing this, consider the following:
•Avoid electrical cables, pipes, or other items behind the mounting location, that could cause a hazard when inserting screws into the wall.
•Try to mount your phone within 10 –15 feet (3 – 4.5 m) of a working phone jack to avoid excessive cord lengths.
•Make sure the wall material is capable of supporting the weight of the base and handset.
•Use #10 screws with anchoring devices suitable for the wall material where the base unit will be placed.
TOP
1/8 in.
(3 mm)
3-15/16 in.
(100 mm)
1Insert two mounting screws with a minimum length of 1-3/8 inches (35.5 mm) into the wall, 3-15/16 inches (100 mm) apart. Allow about 1/8 of an inch (3 mm) between the wall and screwheads for mounting the phone.
2Refer to steps 1 through 9 on pages E7 and E8 to mount the telephone.
E8
CLT2435 ENG-5/28 5/28/01 13:46 Page 9
GETTING STARTED
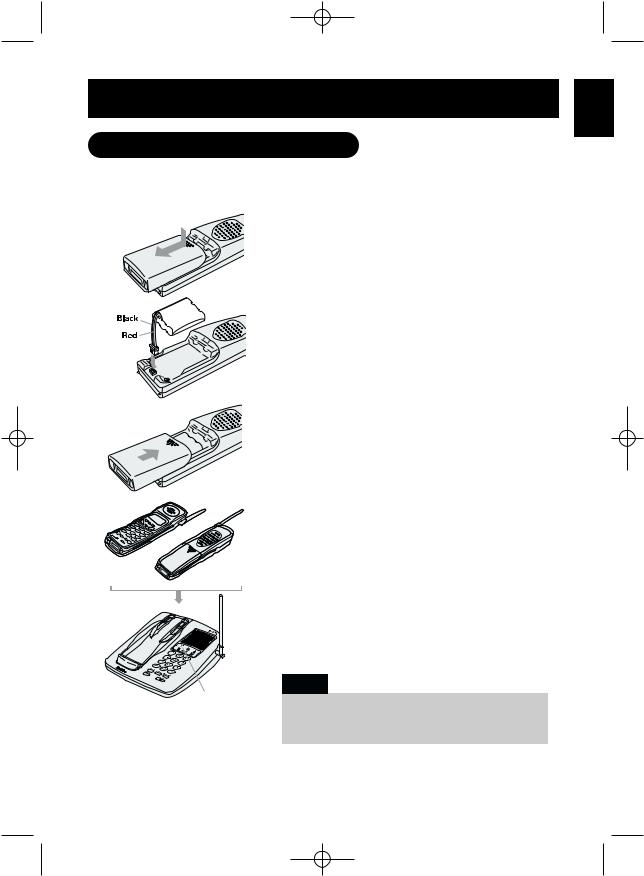
Preparing the battery pack
start using your phone.
battery cover and slide the cover it comes off.
battery pack connector with the polarity (black and red wires), then insert
pack into the battery compartment.
battery cover on until it snaps into
handset on the base.
that the CHARGE/IN USE lights. If the indicator does not light,
that the AC adaptor is plugged in handset makes good contact with
charging contacts.
CHARGE/IN USE
Use only the battery pack supplied or the specified
Sanyo types with your phone.
Type: SANYO 3KR-600AAL or SANYO/GE GES-PCF01
E9
CLT2435 ENG-5/28 5/28/01 13:46 Page 10
GETTING STARTED
Battery use time (per charge)
With a fully charged battery:
•Six hours continuous use.
•Ten days when the handset is in the standby mode.
Note:
While Voice Mail is displayed the battery discharges faster than in normal standby mode. To conserve the battery charge check your messages regularly to clear the display. (See page E39)
When the battery charge level becomes low
When the voltage of the battery pack in the handset is very low and needs to be charged, the phone is programmed to stop functioning in order to save power.
Low Battery
If the phone is not in use, Low Battery flashes and none of the keys will operate. If the phone is in use, Low Battery flashes and the handset beeps. Complete your conversation as quickly as possible and return the handset to the base unit for charging.
Cleaning the battery contacts
To maintain a good charge, it is important to clean the battery contacts with a dry cloth on the handset and base unit about once a month.
Do not use any liquids or solvents.
Note:
Repeated short chargings may cause memory effect in the battery pack, which reduces use time of the battery. It is recommended not to replace the handset to the base unit after each call.
E10
CLT2435 ENG-5/28 5/28/01 13:46 Page 11
BASICS
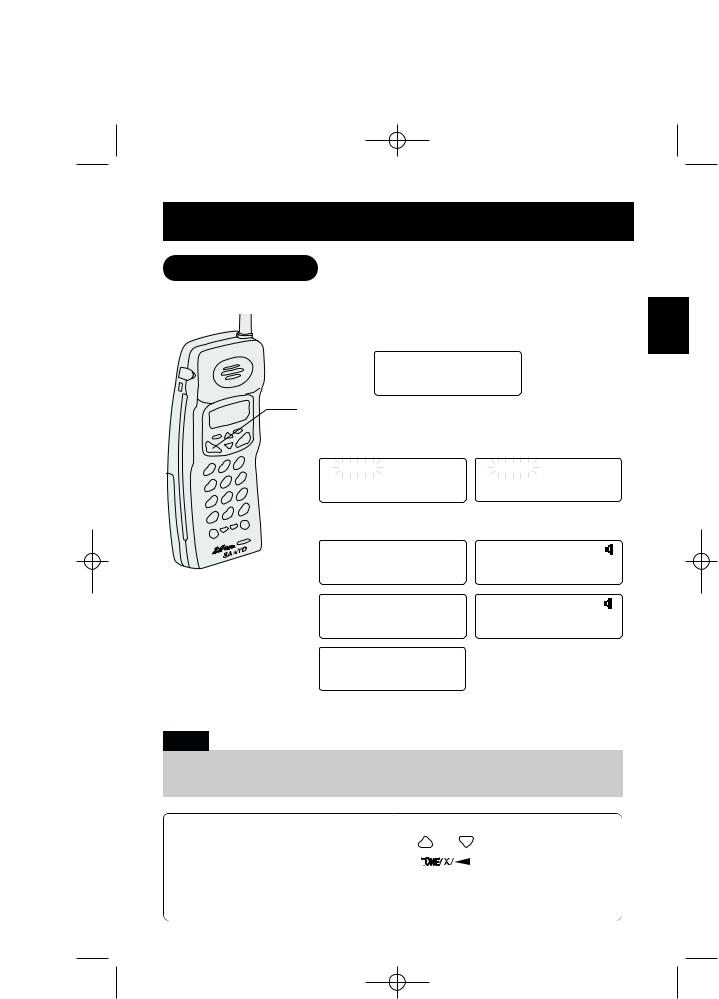
Making a call
With the handset Dialing from standby mode
Enter the phone number. (Up to 32 digits.)
Example: Enter 9057609944
9057609944
Press TALK/END or SPEAKER  . Talk flashes in the display.
Press TALK/END |
Press SPEAKER |
Talk |
Talk |
9057609944 |
9057609944 |
The volume setting is displayed. For example, if the volume is set to high, the display shows:
Talk |
|
Talk |
|
<High> |
<High> |
||
Talk |
0:00 |
Talk |
0:17 |
9057609944 |
9057609944 |
||
|
5:15 |
|
|
 (or place the handset on the base). for about 5 seconds after disconnection.
•Press DELETE/SCAN if you enter a wrong number at step 1.
•Press and hold DELETE/SCAN to delete all numbers at once.
•You must press a key within 20 seconds or the phone will return to standby mode.
Other Operations |
|
|
|
|
|
|
|
|
|
|
When you want to: |
Do this: |
|
|
|
|
|
|
|
||
Adjust the earpiece volume |
Press |
|
|
or |
during the call. |
|
||||
Temporarily switch to tone dialing |
Press |
|
|
|
|
|
|
|
. The subsequent numbers |
|
|
|
|
|
|
|
|
|
|||
(When the base is set to pulse mode) |
dialed will be sent as tone dialing. |
|
||||||||
Enter a pause in the dialing sequence |
Press REDIAL/PAUSE. |
|
||||||||
Improve reception |
Press DELETE/SCAN. |
E11 |
||||||||
CLT2435 ENG-5/28 5/28/01 13:46 Page 12
BASICS
Dialing from talk mode
1 Press TALK/END or SPEAKER  . Talk flashes on the display.
Press TALK/END |
Press SPEAKER |
Talk |
Talk |
The volume setting is displayed.
For example, if the volume is set to high, the display shows:
Talk |
Talk |
<High> |
<High> |
The call-time display appears.
2Dial the phone number. Example: Enter 9057609944
Talk 0:17 |
Talk 0:17 |
9057609944 |
9057609944 |
3To hang up, press TALK/END or SPEAKER  (or place the handset in the base). The call time display remains for about 5 seconds after disconnection.
10:03
HandsFree Speakerphone in the Handset
• Press SPEAKER during a call to switch to HandsFree conversation using the handset speakerphone.
• Press SPEAKER again to end the call.
• Press TALK/END to return to normal conversation using the earpiece speaker.
E12
CLT2435 ENG-5/28 5/28/01 13:46 Page 13
BASICS
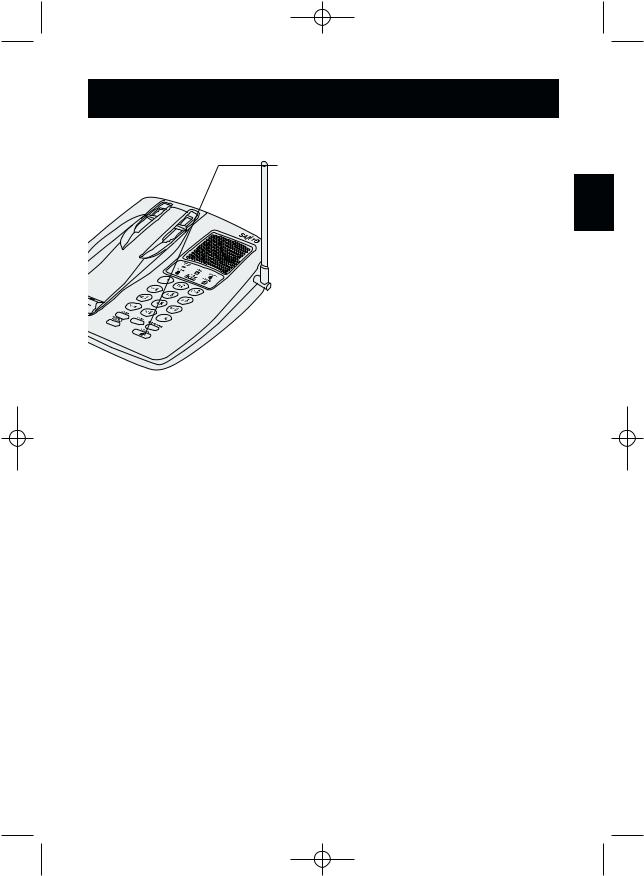
With the base
1Press SPEAKER on the base. The SPEAKER indicator lights.
2 Dial the number on the keypad.
3 When you finish the call, press SPEAKER on the base to hang up.
E13

CLT2435 ENG-5/28 5/28/01 13:46 Page 14
BASICS
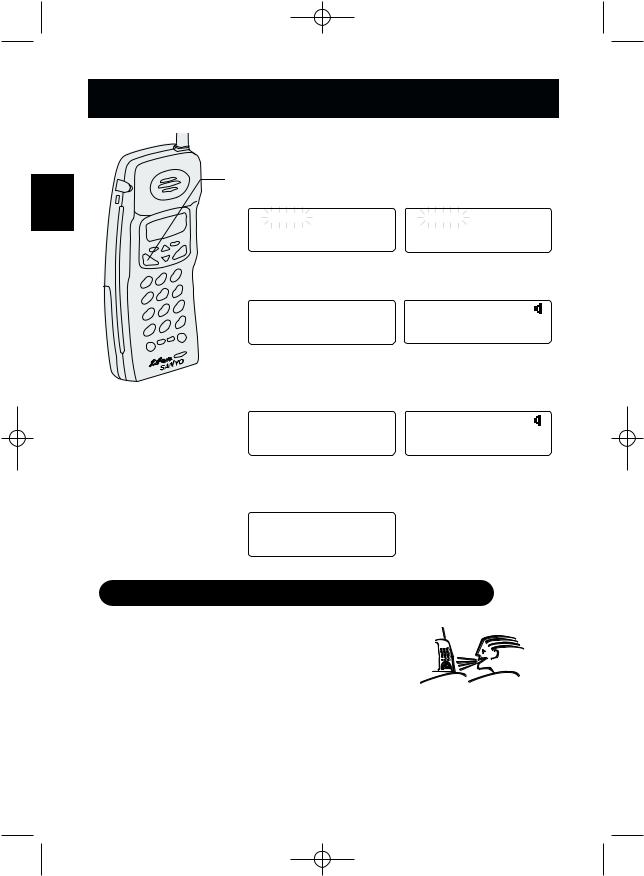
Receiving a call
With the handset
1 The phone rings. Incoming call appears.
Incoming Call
2 Press TALK/END or SPEAKER  . Talk, the call time display and the volume setting appear.
You can also press SPEAKER on the handset to answer the call.
Press TALK/END |
Press SPEAKER |
Talk 0:00 |
Talk 0:00 |
<Normal> |
<Normal> |
If you subscribe to Caller ID service, the display may show the caller’s name/number. (See page E30)
3 Talk with the caller.
Talk 0:02 |
Talk 0:02 |
4To hang up, press TALK/END or SPEAKER  . The call time display remains for about
5 seconds after disconnection.
5:15
Any key answer when ringing
When the handset is off the base, press any handset key to answer the incoming call.
AutoTalk when ringing
When the AutoTalk setting is on, you can simply lift the handset from the base to answer the call. See “Setting Caller ID options” on page E28 for more details.
E14
 Loading...