


répondeurnumériqueetrangez-lepourconsultation.future Veuillezlireleprésentmanuelavantd’utiliservotrenouveau
à3boîtesvocales Répondeurnumérique ModèleDAS203
INSTRUCTION MANUAL
20 Min Digital Answerer
with 3 Mailboxes
Mailboxes |
with3 |
DigitalAnswerer |
20Min |
MANUELD’UTILISATION
Model DAS203
Digital Answering System with 3 Mailboxes
Please read this operation manual before using your new digital answering system and keep it for further reference
TABLE OF CONTENTS |
|
LOCATION AND FUNCTION OF CONTROLS . . . . . . . . . . . . . . . . . . . . . . . |
.1 |
INSTALLATION . . . . . . . . . . . . . . . . . . . . . . . . . . . . . . . . . . . . . . . . . . . . . . |
.4 |
BATTERY INSTALLATION . . . . . . . . . . . . . . . . . . . . . . . . . . . . . . . . . . . . . . . |
5 |
BEFORE OPERATION . . . . . . . . . . . . . . . . . . . . . . . . . . . . . . . . . . . . . . . . |
6 |
OPERATING INSTRUCTIONS . . . . . . . . . . . . . . . . . . . . . . . . . . . . . . . . . . . |
.7 |
Setting the clock |
|
Playing the current time |
|
Recording an outgoing message |
|
Playing outgoing message |
|
Recording a memo |
|
Recording a two-way conversation |
|
Playing memos and two-way conversation |
|
Selecting outgoing message to be played to callers |
|
Ring and toll saver |
|
Recording incoming calls |
|
Playing callers’ message |
|
Erasing messages |
|
Call screen |
|
Remote control security code |
|
Remote control operation |
|
Call breakthrough |
|
Call breakthrough operation |
|
LED DISPLAY DESCRIPTION . . . . . . . . . . . . . . . . . . . . . . . . . . . . . . . . . . . |
13 |
TROUBLESHOOTING GUIDE . . . . . . . . . . . . . . . . . . . . . . . . . . . . . . . . . . . |
14 |
CARE AND SAFETY . . . . . . . . . . . . . . . . . . . . . . . . . . . . . . . . . . . . . . . . . . |
15 |
WARRANTY . . . . . . . . . . . . . . . . . . . . . . . . . . . . . . . . . . . . . . . . . . . . . . . . . |
17 |
.........17 |
GARANTIE........................................ |
.........15 |
ENTRETIENETMESURESDESÉCURITÉ............... |
.........14 |
GUIDEDEDÉPANNAGE............................. |
..........13 |
DESCRIPTIONDESCODESD’AFFICHAGE.............. |
|
FonctionnementdelaPrioritéd’appel(CBT) |
|
Prioritéd’appel(CBT) |
|
Accèsàdistance |
|
Codedesécuritépouraccèsàdistance |
|
Filtred’appels |
|
Effacementdesmessages |
|
Lecturedesmessagesdesappelants |
|
Enregistrementdesappelsentrants |
|
Sonnerieetéconomiseurdefraisd’interurbain |
|
Sélectiond’uneannonceàlireauxappelants |
|
Lecturedesmémosetdesconversationsàdoublesens |
|
Enregistrementd’uneconversationàdoublesens |
|
Enregistrementd’unmémo |
|
Lecturedesannonces |
|
Enregistrementd’uneannonce |
|
Lecturedel’heurecourante |
|
Réglagedel’horloge |
...........7 |
GUIDED’UTILISATION.............................. |
...........6 |
AVANTD’UTILISERL’APPAREIL...................... |
...........5 |
INSTALLATIONDELAPILE.......................... |
...........4 |
INSTALLATION.................................... |
...........1 |
DESCRIPTIONDESFONCTIONS..................... |
TABLEDESMATIÈRES

1
mode.Répondeur |
|
ToucheANSWER(Répondeur):Permetd’activeroudedésactiverle |
.3 |
prêtàrépondreaux.appels |
|
VoyantàDELANSWER(Répondeur):S’allumelorsqueleDAS203est |
.2 |
numérodeséquencedumessageentraind’être.lu |
|
■Unchiffreapparaîtdurantlalecturedevosmessagespourindiquerle |
|
nombretotaldemessagesactuellementdanslamémoiredu.DAS203 |
|
■Unnombreapparaîtavantlalecturedevosmessagespourindiquerle |
|
été.réglée |
|
■CLapparaîtbrièvementàl’afficheurpourindiquerquel’horlogen’apas |
|
aucuneannonce.enregistrée |
|
■A1ouA2clignotequatrefoisàl’afficheurpourindiquerqu’iln’ya |
|
Afficheur:Affichel’étatcourantdu.répondeur |
.1 |
8 |
9 |
|
|
7 |
10 |
|
|
6 |
11 |
|
|
5 |
12 |
|
|
|
13 |
4 |
|
3 |
with3Mailboxes |
20MinDigitalAnswerer |
|
2 |
14 |
1 |
|
DESCRIPTIONDESFONCTIONS
LOCATION AND FUNCTION OF CONTROLS
|
1 |
14 |
2 |
|
20 Min Digital Answerer |
3 |
|
with 3 Mailboxes |
|
|
|
4 |
13 |
|
|
12 |
|
5 |
|
|
|
11 |
|
6 |
|
|
|
10 |
|
7 |
|
|
|
9 |
|
8 |
|
|
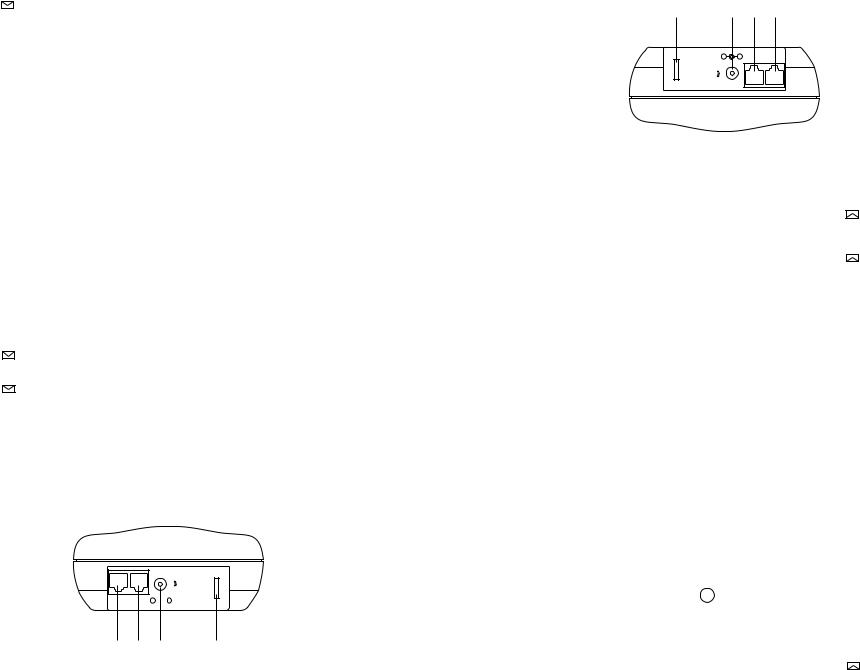
1.LED Display: Shows the answering system current status.
■A1 or A2 flashes four times in the display to indicate that there is no OGM (outgoing message) recorded.
■CL flashes once on the display to indicate that the clock is not set.
■A number displayed before playing your messages indicates the total number of messages currently in the DAS203 memory.
■A number displayed while playing your messages indicates the sequential number of the message currently being played.
2.ANSWER LED Indicator: Lights up when the DAS203 is ready to answer calls.
3.ANSWER Key: Used to set the Answer Mode On or Off.
1
4. 1 (Mailbox 1)/ PAUSE Key: Used to play messages recorded in mailbox 1. Press MEMO and this key for memo recording and playing messages. Press to pause message playback.
5. TIME/STOP  Key: Stops current operation. Also allows you to set the day and time.
6.NEXT c Key: Press to change time and date indication forward or to select a higher digit when setting security code. You can also proceed to the next message.
7.REPT d Key: Press to change time and date backward or to select a lower digit when setting security code. You can also go back to the previous message.
8.Microphone: Used to record outgoing messages and memos.
9.ERASE Key: Can be used to erase a single message or all messages in memory.
10.OGM Key: The DAS203 allows you to record two outgoing messages.
OGM1 is a conventional message, and OGM2 is an “answer only” message. The DAS203 will automatically switch to the OGM2 message if your memory is full, and the system is unable to take a message.
11. MEMO/2WAY Key: Allows you to leave messages for other family members when you leave the house. Also allows you to record both sides of a conversation you are having on the telephone.
12. 3 (Mailbox 3) Key: Used to play messages recorded in mailbox 3. Press MEMO and this key for memo recording.
13. 2 (Mailbox 2) Key: Used to play messages recorded in mailbox 2. Press MEMO and this key for memo recording.
14.Speaker
15.Modular Line Jack (Line): Used to connect the DAS203 to your household phone jack.
16. Modular Phone Jack (TEL): Used to connect the DAS203 to your telephone.
DC IN 9V
LINE TEL –  +
+
15 16 17 |
18 |
2 |
|
|
|
18 |
151617 |
||
+ |
– |
TEL |
LINE |
DCIN9V |
|
|
|
|
|
|
Haut-parleur |
.14 |
|
|
|
touchepourenregistrerun.mémo |
|
||
gistrésdanslaboîtevocale.2AppuyezsurlatoucheMEMOetsurcette |
|
||||
2(Boîtevocale2):Ellepermetdelirelesmessagesenre- |
Touche |
.13 |
|||
|
|
touchepourenregistrerun.mémo |
|
||
gistrésdanslaboîtevocale.3AppuyezsurlatoucheMEMOetsurcette |
|
||||
3(Boîtevocale3):Ellepermetdelirelesmessagesenre- |
Touche |
.12 |
|||
|
|
conversation.téléphonique |
|
||
.domicileEllevouspermetaussid’enregistrerlesdeuxinterlocuteursd’une |
|
||||
messagesauxautresmembresdevotrefamillelorsquevousquittezvotre |
|
||||
Touche2WAY/MEMO(2sens/Mémo):Ellevouspermetdelaisserdes |
.11 |
||||
|
|
prendreun.message |
|
||
silamémoireestsaturéeetquelerépondeurn’estpasenmesurede |
|
||||
“réponse.seulement”LeDAS203passeautomatiquementàl’annonceA2 |
|
||||
A1estuneannonceconventionnelleetA2estuneannoncedetype |
|
||||
|
|
|
|
.annonces |
|
.10ToucheOGM(Annonce):LeDAS203vouspermetd’enregistrerdeux |
|||||
|
|
touslesmessagesen.mémoire |
|
||
ToucheERASE(Effacer):Ellepermetd’effacerunmessagespécifiqueou |
.9 |
||||
Microphone:Ilpermetd’enregistrerdesannoncesoudes.mémos |
.8 |
||||
|
|
|
|
.précédent |
|
établissezuncodede.sécuritéEllepermetaussidereveniraumessage |
|
||||
l’heureouladate,oupoursélectionnerunchiffreinférieurlorsquevous |
|
||||
ToucheREPTd(Précédent):Appuyezsurcettetouchepourfairereculer |
.7 |
||||
|
|
|
message.suivant |
|
|
Ellepermetaussidepasserau |
vousétablissezuncodede.sécurité |
|
|||
avancerl’heureouladate,oupoursélectionnerunchiffresupérieurlorsque |
|
||||
(Suivant):Appuyezsurcettetouchepourfaire |
ToucheNEXTc |
.6 |
|||
Ellepermetaussideréglerlejouret.l’heure |
.courante |
|
|||
:Ellepermetd’arrêterl’opération |
|
ToucheTIME/STOP(Heure/Arrêt) |
.5 |
||
|
|||||
|
|||||
|
|
|
|
.message |
|
Appuyezsurcettetouchepourinterrompretemporairementlalectured’un |
|
||||
cettetouchepourenregistrerunmémoouliredes.messages |
|
||||
enregistrésdanslaboîtevocale.1AppuyezsurlatoucheMEMOetsur |
|
||||
1(Boîtevocale1)/PAUSE:Permetdelirelesmessages |
Touche |
.4 |
|||
2

3
pleasepulllinecordout |
|
|
Whenyoureplacethebattery |
|
20 |
WARNING |
OPEN |
|
CheckyourOGMafterpowerfailure |
||
inpowerfailure |
||
Thisbatterystands24hours |
|
|
19
VOL
sauvegardeducontenudelamémoireencasdepannede.courant |
|
Compartimentàpile:Illogeunepilede9V(noncomprise)auxfinsde |
.20 |
Réglageduvolume:Faitesglisserpourréglerlevolumeduhaut-.parleur |
.19 |
l’adaptateur.a.cdese.dégager |
|
Pincederetenueducordondel’adaptateur:Elleempêchelecordonde |
.18 |
teura.c..fourni |
|
Prisepouradaptateur:EllepermetdeconnecterleDAS203àl’adapta- |
.17 |
DAS203àvotre.téléphone |
|
Prisemodulairedetéléphone(TEL):Ellepermetdeconnecterle |
.16 |
leDAS203àlaprisedetéléphonedevotre.domicile |
|
Prisemodulairedelignetéléphonique(LINE):Ellepermetdeconnecter |
.15 |
17.Adapter receptacle: Used to connect the DAS203 to the supplied AC power adapter.
18.Adapter Cord Holder: Prevents the AC adapter cord from falling out.
19.Volume adjustment: Slide to adjust the speaker volume.
20.Battery Cover: Houses one 9V battery (not included) for Memory Backup in case of power failure.
VOL 
19
20 |
|
This battery stands 24 hours |
OPEN |
in power failure |
|
WARNING |
||
|
|
Check your OGM after power failure |
When you replace the battery please pull line cord out
3
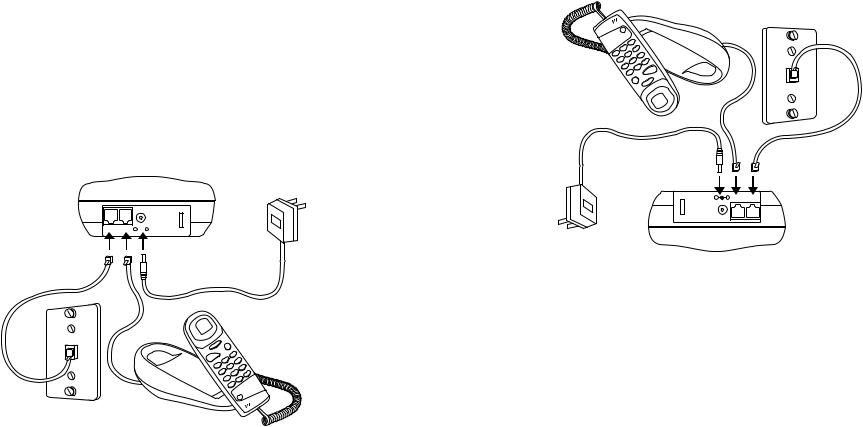
INSTALLATION
1.The DAS203 includes a modular telephone line cord with a modular plug at each end. Insert one plug into the LINE input jack on the DAS203, and the other end into your household telephone jack ( Figure 1). You may have to unplug your telephone to do this.
2.To use a phone in the same area of the DAS203, simply plug the telephone into the TEL input jack on the DAS203 (Figure 2).
3.Connect the AC Adapter (DC9V 300mA) to a standard electrical outlet (AC 110V) and plug the other end into the DC power input jack on the DAS203 (Figure 3). (AC power adapter included)
DAS203
DC IN 9V
LINE TEL – +
+
Figure 3
Figure 1
Figure 2
4
Figure2 |
Figure1 |
|
Figure3
+ |
– |
TEL |
LINE |
9V |
DCIN |
|
|
DAS203
DAS203(Figure.3)(L’adaptateur.a.cest.compris) |
|
standard(110V.a.c)etl’autreextrémitéàlaprised’alimentation.c.cdu |
|
Connectezl’adaptateur.a.c(9V,.c.c300mA)àuneprisedecourant |
.3 |
téléphonedanslaprised’entréeTELduDAS203(Figure.2) |
|
PourutiliseruntéléphoneprèsduDAS203,branchezsimplementvotre |
.2 |
effectuercette.opération |
|
(Figure.1)Vousdevrezpeut-êtredébranchervotretéléphonepour |
|
LINEduDAS203etl’autredanslaprisedetéléphonedevotredomicile |
|
modulaireàchaque.extrémitéInsérezunefichedanslaprised’entrée |
|
LeDAS203estlivréavecuncordondelignetéléphoniquemunid’unefiche |
.1 |
INSTALLATION |
|
4
 Loading...