


 Loading...
Instruction Manual
DVD-R155
www.samsung.com
AK68-01317A-01

Getting Started


 Getting Started
Warning
TO REDUCE THE RISK OF ELECTRIC SHOCK, DO NOT REMOVE THE COVER(OR BACK).
NO USER-SERVICEABLE PARTS ARE INSIDE. REFER SERVICING TO QUALIFIED SERVICE PERSONNEL.
This symbol indicates that dangerous voltage consisting a risk of electric shock is present within this unit.
This symbol indicates that there are important operating and maintenance instructions in the literature accompanying this unit.
Do not install this equipment in a confined space such as a bookcase or similar unit.
WARNING : To prevent damage which may result in fire or electric shock hazard, do not expose this appliance to rain or moisture.
CAUTION : DVD RECORDERS USE AN INVISIBLE LASER BEAM WHICH CAN CAUSE HAZARDOUS RADIATION EXPOSURE IF DIRECTED. BE SURE TO OPERATE THE RECORDER CORRECTLY AS INSTRUCTED.
CAUTION
THIS PRODUCT UTILIZES A LASER.
USE OF CONTROLS OR ADJUSTMENTS OR PERFORMANCE OF PROCEDURES OTHER THAN THOSE SPECIFIED HEREIN MAY RESULT IN HAZARDOUS RADIATION EXPOSURE.
DO NOT OPEN COVERS AND DO NOT REPAIR YOURSELF. REFER SERVICING TO QUALIFIED PERSONNEL.
CAUTIONS
Caution: To prevent electric shock, match wide blade of plug to wide slot, fully insert.
Attention: Pour éviter les chocs électriques, introduíre la lame la plus large de la fiche dans la borne correspondante de la prise et pousser jusqu au fond.
This product satisfies FCC regulations when shielded cables and connectors are used to connect the unit to other equipment. To prevent electromagnetic interference with electric appliances, such as radios and televisions, use shielded cables and connectors for connections.
FCC NOTE (for U.S.A):
This equipment has been tested and found to comply with the limits for a Class B digital device, pursuant to Part 15 of the FCC Rules. These limits are designed to provide reasonable protection against harmful interference in a residential installation.
This equipment generates, uses and can radiate radio frequency energy and, if not installed and used in accordance with the instructions, may cause harmful interference to radio communications. However, there is no guarantee that interference will not occur in a particular installation.
If this equipment does cause harmful interference to radio or television reception, which can be determined by turning the equipment off and on, the user is encouraged to try to correct the interference by one or more of the following measures:
•Reposition or relocate the receiving antenna.
•Increase the separation between the equipment and receiver.
•Connect the equipment into an outlet on a circuit different from that to which the receiver is connected.
•Consult the dealer or an experienced radio/TV technician for help.
Caution: FCC regulations state that any unauthorized changes or modifications to this equipment may void the user's authority to operate it.
■ This unit can be used only where the power supply is AC 120V, 60Hz. It cannot be used elsewhere.
■This DVD Recorder is designed and manufactured to respond to the Region Management Information.
If the Region number of a DVD disc does not correspond to the Region number of this DVD Recorder, the DVD Recorder cannot play the disc.
■This device is protected by U.S. Patent Nos.4,631,60 3;4,577,216;4,819,098;4,907,093; and 6,516,132.This product incorporates copyright protection technology that is protected by U.S. patents and other intellectual property rights.Use of this copyright protection technology must be authorized by Macrovision,and is intended for home and other limited viewing uses only unless otherwise authorized by Macrovision.Reverse engineering or disassembly is prohibited.
■This product is covered by one or more of the following U.S. patents:
5,060,220 5,457,669 5,561,649 5,705,762 5,987,417
6,043,912 6,222,983 6,272,096 6,377,524 6,377,531
6,385,587 6,389,570 6,408,408 6,466,532 6,473,736
6,477,501 6,480,829 6,556,520 6,556,521 6,556,522
6,578,163 6,594,208 6,631,110 6,658,588 6,674,697
6,674,957 6,687,455 6,697,307 6,707,985 6,721,243
6,721,493 6,728,474 6,741,535 6,744,713 6,744,972
6,765,853 6,765,853 6,771,890 6,771,891 6,775,465
6,778,755 6,788,629 6,788,630 6,795,637 6,810,201
6,862,256 6,868,054 6,894,963 6,937,552
English - 2

Precaution
▌Important Safety Instructions
Read these operating instructions carefully before using the unit. Follow all the safety instructions listed below. Keep these operating instructions handy for future reference.
1)Read these instructions.
2)Keep these instructions.
3)Heed all warnings.
4)Follow all instructions.
5)Do not use this apparatus near water.
6)Clean only with a dry cloth.
7)Do not block any ventilation openings, Install in accordance with the manufacturer's instructions.
8)Do not install near any heat sources such as radiators, heat registers, stoves, or other apparatus (including amplifiers) that produce heat.
9)Do not defeat the safety purpose of the polarized or groundingtype plug. A polarized plug has two blades with one wider than the other. A groundingtype plug has two blades and a third grounding prong. The wide blade or the third prong is provided for your safety. If the provided plug does not fit into your outlet, consult an electrician for replacement of the obsolete outlet.
10)Protect the power cord from being walked on or pinched particularly at plugs, convenience receptacles, and the point where they exit from the apparatus.
11)Only use attachments/accessories specified by the manufacturer.
12)Use only with the cart, stand, tripod,
bracket, or table specified by the manufacturer, or sold with the apparatus. When a cart is used, use caution when moving the cart/
apparatus combination to avoid injury from tip-over.
13)Unplug this apparatus during lightning storms or when unused for long periods of time.
14)Refer all servicing to qualified service personnel. Service is required when the apparatus has been damaged in any way, such as the power-supply cord or plug is damaged, liquid has been spilled or objects have fallen into the apparatus. Service is also required if the apparatus has been exposed to rain or moisture, does not operate normally, or has been dropped.
•Exterior interference such as lightning and static electricity can affect normal operation of this recorder. If this occurs, turn the recorder off and on again with the POWER button, or disconnect and then reconnect the AC power cord to the AC power outlet.
The recorder will operate normally.
•Be sure to remove the disc and turn off the recorder after use.
•Disconnect the AC power cord from the AC outlet when you don’t intend to use the recorder for long periods of time.
•Clean the disc by wiping in a straight line from the inside to the outside of the disc.
•Apparatus shall not be exposed to dripping or splashing and no objects filled with liquids, such as vases, shall be placed on the apparatus.
•The Mains plug is used as a disconnect device and shall stay readily operable at any time.
▌Maintenance of Cabinet
For safety reasons, be sure to disconnect the AC power cord from the AC outlet.
•Do not use benzene, thinner, or other solvents for cleaning.
•Wipe the cabinet with a soft cloth.
▌Disc Handling
• Use discs with regular shapes. If an irregular disc (a disc with a special shape) is used, this DVD Recorder may be damaged.
Holding discs
•Avoid touching the surface of a disc where recording is performed.
DVD-RAM, DVD-RW and DVD-R
• Clean with an optional DVD-RAM/PD disc cleaner . Do not use cleaners or cloths for CDs to clean DVDRAM/ DVD-RW/DVD-R discs.
DVD-Video, Audio CD
•Wipe off dirt or contamination on the disc with a soft cloth.
▌Handling Cautions
•Before connecting other components to this recorder, be sure to turn them all off.
•Do not move the recorder while a disc is being played, or the disc may be scratched or broken, and the recorder’s internal parts may be damaged.
•Do not put a flower vase filled with water or any small metal objects on the recorder.
•Be careful not to put your hand into the disc tray.
•Do not place anything other than the disc in the disc tray.
Cautions on handling discs
•Do not write on the printed side with a ball-point pen or pencil.
•Do not use record cleaning sprays or antistatic. Also, do not use volatile chemicals, such as benzene or thinner.
•Do not apply labels or stickers to discs. (Do not use discs fixed with exposed tape adhesive or leftover peeled-off stickers.)
•Do not use scratch-proof protectors or covers.
•Do not use discs printed with label printers available on the market.
•Do not load warped or cracked discs.
Started ettingG
English - 3

Getting Started
▌Disc Storage
Be careful not to damage the disc because the data on these discs are highly vulnerable to the environment.
•Do not keep under direct sunlight.
•Keep in a cool ventilated area.
•Store vertically.
•Keep in a clean protection jacket.
•If you move your DVD Recorder suddenly from a cold place to a warm place, condensation may generate on the operating parts including the lens and cause abnormal disc playback. When this occurs, do not
connect the plug to the power outlet. Wait for two hours, then insert the disc and try to playback again. It will work properly when condensation has evaporated.
▌Disc Specifications
DVD-Video
•A digital versatile disc (DVD) can contain up to 135-minutes of images, 8-language audio and 32 subtitle languages. It is equipped with MPEG-2 picture compression and Dolby 3D surround sound, allowing you to enjoy vivid and clear theater quality images in the comfort of your own home.
•When switching from the first layer to the second layer of a double-layered DVD Video disc, there may be momentary distortion in the image and sound. This is not a malfunction of the unit.
•Once a DVD-R/DVD-RW(V) recorded is finalized, it is playable in a standard DVD player.
Audio CD
•An audio disc on which 44.1kHz PCM Audio is recorded
•Plays CD-DA format audio CD-R and CD-RW discs. The unit may not be able to play some CD-R or CD-RW discs due to the condition of the recording.
CD-R/-RW
MP3 CD-R/-RW
•Only CD-R discs with MP3 files recorded with ISO9660 or JOLIET format can be played back
•Only MP3 files with the ".mp3", ".MP3" extension can be used.
•For MP3 files recorded with a VBR(Variable Bit Rates), from 32 Kbps to 320 Kbps, the sound may cut in out.
•Playable bitrate range is from 56Kbps to 320Kbps.
•The unit can handle a maximum of 1000 files and folders.
•DVD-RAM/DVD±RW/±R disc recorded with MP3 files can be played back.
JPEG CD-R/-RW
•Only JPEG files with the ".jpg", ".JPG" extension can be used.
•The unit can handle a maximum of 1000 files and folders.
•Maximum size of progressive JPEG is 3M pixels.
•MOTION JPEG is not supported.
•DVD-RAM/±RW/±R discs that contain JPEG files can be played back.
Using CD-R/-RW
•Use a 700MB(80 minutes) CD-R/-RW disc. If possible, do not use a 800MB(90 minutes) or above disc, as the disc may not play back.
•If the CD-R/-RW disc was not recorded as a closed session, you may experience a delay in the early playback time, and all recorded files may not play.
•Some CD-R/-RW discs may not be playable with this unit, depending on the device which was used to burn them.
•When recording from CDs for your personal use to CD- R/-RW discs, playability may vary depending on the contents and discs.
DVD-R Disc Playback and Recording
•Once a DVD-R recorded is finalized, it is playable in a standard DVD player.
You can record onto the available space on the disc and perform editing functions such as giving titles to discs and programs and erasing programs before finalizing.
•When programming is erased from a DVD-R, that space does not become available. Once an area on a DVD-R is recorded on, that area is no longer available for recording, whether the recording is erased or not.
•It takes about 30 seconds for the unit to complete recording management information after recording finishes.
•This product optimizes the DVD-R for each recording. Optimization occurs when you start recording after inserting the disc or turning on the unit. Recording onto the disc may become impossible if optimization is carried out too many times.
•Playback may be impossible in some cases due to the condition of recording.
•This unit can play back DVD-R discs recorded and finalized with a Samsung DVD video recorder. It may not be able to play some DVD-R discs depending on the disc and the condition of the recording.
DVD-RW Disc Playback and Recording
•Recording and playback can be performed on DVD-RW discs in both the Video and VR Modes.
•Once a DVD-RW is recorded in VR or Video mode is finalized, you cannot perform additional recording.
•Once a DVD-RW is recorded in Video Mode and finalized, it becomes a DVD-Video.
•In both modes, playback can be performed before and after finalization, but additional recording, deleting and editing can not be performed after finalization.
•If you want to record the disc in VR Mode and then record in V Mode, be sure to first reformat the disc. Please be aware that formatting will erase all of the discs content.
•When inserting an unused disc, a message will appear asking whether to initialize the disc or not. If you select "YES", the disc will be formatted in VR mode.
•DVD-RW (VR mode)
-This is a format that is used for recording data on a DVD-RW disc. You can record multiple titles, edit, delete, partial delete, create a playlist, etc.
-A disc that is recorded in this mode will not play in standard DVD players.
English - 4

• DVD-RW (Video mode)
-This is a format that is used for recording data on a DVD-RW or DVD-R disc. The disc can be played by an existing DVD player once it has been finalized.
-If a disc that has been recorded in Video Mode by a different manufacturer's recorder but has not been finalized, it cannot be played or recorded by this recorder.
DVD-RAM Disc Playback and Recording
•For cartridge type DVD-RAM discs, remove the cartridge and use only the disc
•Ensure that the recording mode is set to VR mode. Otherwise, this product will not be able to play the recording.
•You cannot play a DVD-RAM in most DVD players due to compatibility issues.
•Only DVD-RAM standard Version 2.0 discs can be played in this unit.
•DVD-RAM discs recorded on this unit may not work with other DVD Players. To determine compatibility with these DVD-RAM discs, refer to the user’s manual for the player.
Do not use the following discs!
•LD, CD-G, CD-I, CD-ROM and DVD-ROM discs should not be used in this product.
•Some commercial discs and DVD discs purchased outside your region may not be playable with this product. When these discs are played, either “No Disc." or "The disc cannot be played. Please check the regional code of the disc." will be displayed.
•If your DVD-RAM/DVD-RW/DVD-R disc is an illegal copy or is not in DVD video format, it may also not be playable.
Disc Compatibility
•Not all brands of discs will be compatible with this unit.
•The latest firmware upgrade to improve recording & playback quality can be downloaded from our web site. (Download Center at www.samsung.com)
•If disc compatibility problems continue, or there is an issue upgrading your recorder, contact the Call Center at 1-800-SAMSUNG.
COPY PROTECTION
•Many DVD discs are encoded with copy protection. Because of this, you should only connect your DVD Recorder directly to your TV, not to a VCR.
Connecting your DVD recorder to a VCR results in a distorted picture from copy-protected DVD discs.
•This product incorporates copyright protection technology that is protected by methods claims of certain U.S. patents and other intellectual property rights owned by Macrovision Corporation and other rights owners. Use of this copyright protection technology must be authorized by Macrovision Corporation, and is intended for home and other limited viewing uses only unless otherwise authorized by Macrovision Corporation.
Reverse engineering or disassembly is prohibited.
Started ettingG
Protection
This DVD Recorder can allow you to protect the contents of your discs, as described below.
•Program-protection: See page 58 “Locking a Title”
•Disc-protection: See page 65 “Disc Protection”
DVD-RAM/DVD-RW/DVD-R discs that are incompatible with the DVD-VIDEO format cannot be played with this product.
For more information on DVD recording compatibility, consult your DVD-RAM/DVD-RW/DVD-R manufacturer.
Use of poor quality DVD-RAM/DVD-RW/DVD-R discs may cause the following unexpected problems including, recording failure, loss of recorded or edited materials or damage to the recorder.
English - 5

Getting Started
Contents
Getting Started |
|
|
System Setup |
|
■ Warning ................................................................... |
2 |
|
■ Initial Setup.............................................................. |
25 |
■ Precaution |
3 |
|
OSD Language Setup ............................................. |
25 |
|
|
|
||
Important Safety Instructions .................................. |
3 |
|
■ Using the Setup Menu............................................. |
25 |
Handling Cautions................................................... |
3 |
|
■ Setting Up the System Options |
26 |
Maintenance of Cabinet |
3 |
|
||
|
CM Skip Time Setting |
26 |
||
Disc Handling |
3 |
|
||
|
EP Mode Time Setting |
27 |
||
Disc Storage |
4 |
|
||
|
Automatic Chapter Creation |
27 |
||
Disc Specifications |
4 |
|
||
|
Quick Recording Setting |
28 |
||
|
|
|
||
■ Contents .................................................................. |
6 |
|
Anynet+(HDMI-CEC)............................................... |
28 |
■ General Features .................................................... |
8 |
|
■ Clock Set ................................................................. |
29 |
■ Before Reading the Instruction Manual................... |
9 |
|
■ Language Setting .................................................... |
29 |
■ How to use the DVD Recorder ................................ |
9 |
|
■ Setting Up the Audio Options .................................. |
30 |
■ Unpacking ............................................................... |
10 |
|
■ Video(Display) Setting............................................. |
31 |
Accessories............................................................. |
10 |
|
TV Aspect................................................................ |
31 |
Preparing the Remote Control ................................ |
10 |
|
Input Level............................................................... |
31 |
Tour of the Remote Control ..................................... |
12 |
|
Black Level.............................................................. |
31 |
■ Description |
13 |
|
3D Noise Reduction ................................................ |
31 |
|
HDMI/DVI Resolution |
32 |
||
Front Panel |
13 |
|
||
|
|
|
||
Front Panel Display................................................. |
13 |
|
■ Parental Control ...................................................... |
32 |
Rear Panel .............................................................. |
14 |
|
Setting the Rating Level .......................................... |
33 |
|
|
|
Changing the Password .......................................... |
33 |
Connecting & Setting Up |
|
■ Step 1 : Connecting HDMI/DVI to a TV ................... |
15 |
Connecting to a TV with an HDMI Jack .................. |
15 |
Connecting to a TV with a DVI Jack........................ |
16 |
■ Step 2 : Connecting the Video Cable ...................... |
17 |
Connecting to Component Video Input Jacks |
|
(Y,PB,PR).................................................................. |
17 |
Connecting to an S-Video Input Jack..................... |
18 |
Connecting to a Video Input Jack ........................... |
19 |
■ Step 3 : Connecting the Audio Cable ...................... |
20 |
Connecting to your TV ............................................ |
20 |
Connecting to a Stereo Amplifier with Analog Input |
|
Jacks ....................................................................... |
21 |
Connecting to an AV Amplifier with a Digital Input |
|
Jack......................................................................... |
22 |
■ Step 4 : Connecting External Devices..................... |
23 |
Connecting a VCR, Set Top Box(STB) or DVD Player |
|
to the AV 1 IN or S-VIDEO IN jacks ........................ |
23 |
Connecting a Camcorder ........................................ |
24 |
Recording |
|
■ Recordable discs..................................................... |
34 |
Compatibility between Samsung and Other |
|
manufacturer's Recorders....................................... |
34 |
■ Recording Formats.................................................. |
35 |
DVD-RW(Video mode)/-R ....................................... |
35 |
DVD-RAM/-RW(VR mode)...................................... |
35 |
■ Recording Mode ...................................................... |
35 |
■ Unrecordable Video................................................. |
36 |
About the INFO Button............................................ |
37 |
■ Recording from External Equipment ....................... |
38 |
■ Copying from a Camcorder ..................................... |
39 |
■ Making a One Touch Recording (OTR) ................... |
40 |
■ Setting a Timer Recording....................................... |
41 |
■ Flexible Recording (for Timer Recording only) ........ |
42 |
■ Editing the Scheduled Record List .......................... |
42 |
■ Deleting the Scheduled Record List ........................ |
43 |
■ Recording the Scheduled Record List..................... |
43 |
■ EZ REC MODE ....................................................... |
44 |
English - 6

Playback |
|
■ Region code (DVD-Video only) ............................... |
45 |
■ Logos of Discs that can be played .......................... |
45 |
■ Disc types that can be played ................................. |
45 |
Discs That Cannot be Played.................................. |
46 |
■ Playing a Disc.......................................................... |
46 |
Using the Disc Menu & Title Menu .......................... |
47 |
Using the Playback Related Buttons....................... |
47 |
Slow Motion Play..................................................... |
48 |
Step Motion Play ..................................................... |
48 |
Using the ANYKEY Button ...................................... |
49 |
■ Playing an Audio CD/MP3 ....................................... |
53 |
Playing an Audio CD(CD-DA) ................................. |
53 |
Playing an MP3 Disc ............................................... |
54 |
Playing Repeatedly ................................................. |
54 |
■ Playing a Picture CD ............................................... |
55 |
■ Playing the Title List ................................................ |
56 |
Additional Information |
|
■ Troubleshooting....................................................... |
68 |
■ Error Message Solutions ......................................... |
70 |
■ Specifications .......................................................... |
72 |
■ Warranty.................................................................. |
73 |
Started ettingG
Editing |
|
■ Basic Editing (Title List)........................................... |
57 |
Renaming (Labeling) a Title .................................... |
57 |
Locking (Protecting) a Title...................................... |
58 |
Deleting a Title ........................................................ |
58 |
Deleting a Section of a Title .................................... |
59 |
■ Advanced Editing (Playlist)...................................... |
60 |
Creating a Playlist ................................................... |
60 |
Playing Entries in the Playlist .................................. |
60 |
Renaming a Playlist Entry ....................................... |
61 |
Editing a Scene for the Playlist ............................... |
61 |
Copying a Playlist Entry to the Playlist.................... |
64 |
Deleting a Playlist Entry from the Playlist................ |
64 |
■ Disc Manager .......................................................... |
64 |
Editing the Disc Name............................................. |
64 |
Disc Protection ........................................................ |
65 |
Formatting a Disc .................................................... |
65 |
Finalizing a Disc ...................................................... |
66 |
Unfinalizing a Disc (V/VR mode)............................. |
66 |
Delete All Title Lists ................................................. |
67 |
English - 7

Getting Started
General Features
The DVD-R155 allows you to record and play high quality digital video on DVD-RAM/DVD-RW/DVD-R discs.
High quality digital audio and video recording and playback
You can record up to approximately 16-hours of video on a double side 9.4 GB DVD-RAM disc,up to 15-hours on a dual-layer 8.5GB DVD-R disc, and up to 8-hours on a 4.7 GB DVD-RAM/DVD-RW/DVD-R disc, depending on the recording mode.
Selectable Record Mode
You can set your recorder to one of five different recording speeds, each varying in recording quality and length. EP mode yields the most recording time, LP & SP modes provide less recording time with higher quality recording, and XP mode gives you the highest quality recording. There's also the FR (Flexible Recording) mode that lets you record with the best picture quality possible for the recording time and remaining space on the disc in timer recording.
Automated Quality Adjustment for Timer Recording
If FR mode is selected, the video quality is adjusted automatically so that all video for the scheduled time can be recorded onto the free disc space. (See pages 41~42)
Create a DVD video title using a DVD-RW/DVD-R disc
With the DVD-R155, you can create your own DVD video title on 4.7 GB DVD-RW/DVD-R or 8.5GB DVD-R discs.
Copying data from a digital camcorder using a DV input jack
Record digital camcorder video onto DVD-RAM, DVD-RW or DVD-R discs using the DV input jack (IEEE 1394-4pin). (See page 39.)
High quality progressive scan
Progressive scanning provides high resolution and flicker free video.
The 10-bit 54-MHz DAC and 2D Y/C Separating Circuitry provides the highest video playback and recording quality. (See page 17.)
A variety of functions with an easy-to-use user interface
The integrated menu system and the messaging function allows you to perform desired operations both easily and conveniently. With a DVD-RAM or DVD-RW (VR mode) disc, you can edit recorded images, create a playlist, and edit videos in a specific sequence according to your requirements.
HDMI (High Definition Multimedia Interface)
HDMI reduces picture noise by allowing a pure digital video/audio signal path from the DVD Recorder to your TV.
Tunerless DVD Recorder
The DVD-R155 does not have a TV tuner. Recording TV broadcasts is possible via Connection to Cable/Satellite boxes and Multi Channel Video Services.
EZ REC MODE
This function allows you Initialize and Finalize a disc automatically. (See page 44.)
English - 8
Before Reading the Instruction
Manual
Make sure to check the following before reading the user’s manual.
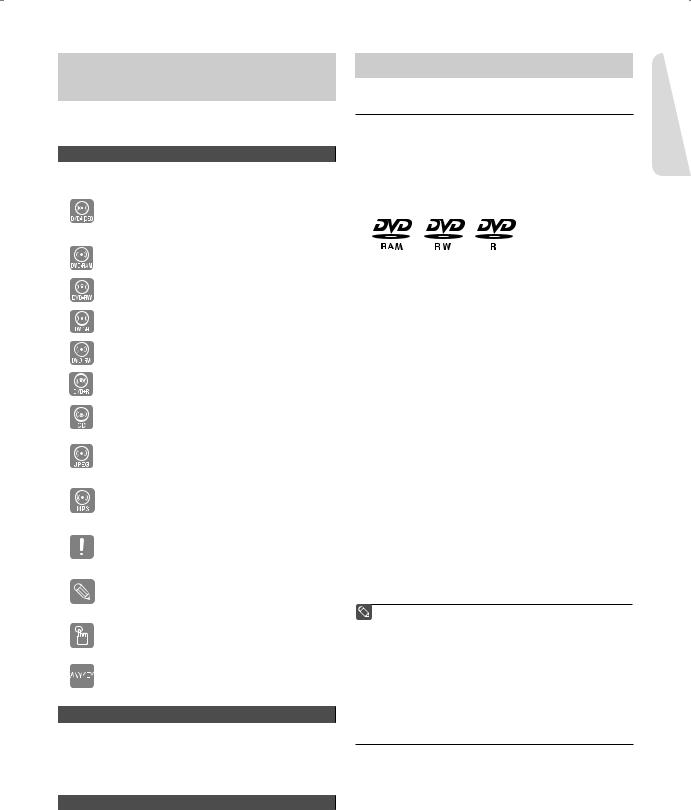
Icons that will be used in manual
Icon |
Term |
Definition |
|
|
This involves a function available |
|
DVD |
with DVD or DVD-R/DVD-RW(V) |
|
discs that have been recorded and |
|
|
|
|
|
|
finalized. |
|
RAM |
This involves a function available |
|
with DVD-RAM discs. |
|
|
|
|
|
-RW |
This involves a function available |
|
with DVD-RW discs. |
|
|
|
|
|
-R |
This involves a function available |
|
with DVD-R discs. |
|
|
|
|
|
+RW |
This involves a function available |
|
with DVD+RW discs. |
|
|
|
|
|
+R |
This involves a function available |
|
with DVD+R discs. |
|
|
|
|
|
CD |
This involves a function available |
|
with a data CD (CD-R or CD-RW). |
|
|
|
|
|
|
This involves a function available |
|
JPEG |
with CD-R/-RW or DVD-RAM/ |
|
|
DVD±RW/DVD±R discs. |
|
|
This involves a function available |
|
MP3 |
with CD-R/-RW or DVD-RAM/ |
|
|
DVD±RW/DVD±R discs. |
|
|
This involves a case where a |
|
Caution |
function does not operate or |
|
|
settings may be cancelled. |
|
|
This involves tips or instructions on |
|
NOTE |
the page that help each function |
|
|
operate. |
|
One- |
A function that can be operated by |
|
Touch |
|
|
using only one button. |
|
|
button |
|
|
|
|
|
ANYKEY |
A function that can be operated by |
|
button |
using the ANYKEY button. |
About the use of this Instruction Manual
1)Be sure to familiarize yourself with the Safety Instructions before using this product. (See pages 2 ~ 5)
2)If a problem occurs, check the Troubleshooting section. (See pages 68 ~69)
Copyright
©2007 Samsung Electronics Co.
All rights reserved; No part or whole of this user’s manual may be reproduced or copied without the prior written permission of Samsung Electronics Co.
How to use the DVD Recorder
▌Step 1 : Select the disc type
This unit can record on the following types of discs.
If you want to repeatedly record on the same disc or you want to edit the disc after recording, select a rewritable DVD-RW or DVD-RAM type disc.
If you want to save the recording without making any changes, choose a non-rewritable DVD-R.
▌Step 2 : Format the disc to start recording
The recorder automatically starts formatting when an unused disc is inserted. This is required for the preparation of disc recording.
Using a DVD-RAM
This type of disc can be formatted in DVD-Video Recording format (VR mode). You can edit recorded video, create a playlist or edit video in a specific sequence according to your requirements.
Using a DVD-RW
•When an unused DVD-RW disc is first inserted, the message “Uninitialized Disc. Do you want to initialize this disc?” will be displayed.
If you select Yes, initializing will begin. A DVD-RW disc can be formatted in either DVD-Video format (Video mode) or DVD-Video Recording format (VR mode)
Using a DVD-R
When using a DVD-R disc, only V mode recording is possible and no initialization is needed to play it on this recorder. However, finalization is necessary to play this disc on other DVD players.
■ You can only use either the VR or Video mode on a DVD-RW, but not both at the same time.
■You can format a DVD-RW to V or VR mode using disc manager.
It should be noted that the disc's data will be lost when changing formats.
▌Step 3 : Recording
There are two different recording methods. Direct Recording (recording a program you are currently watching) and Timer Recording. Timer recording is determined as a Date : MM/DD, MON-FRI, Every SAT, etc.. There are 5 recording modes : XP(high quality mode), SP(standard quality mode), LP(long recording mode), EP(extended mode) and FR mode. When using FR mode to record, the picture quality is determined by the remaining time on the disc.
Started ettingG
English - 9
Getting Started
▌Step 4 : Playing
To start playback select the title you want to play from the Title list.
A DVD consists of sections called titles, and sub sections called chapters.
During recording, a title is created between two points where you start and stop recording. Chapters will be created automatically when you finalize recording on DVD-R/DVD-RW discs in Video mode.
▌Step 5 : Editing a recorded disc
Editing a DVD disc is easier than editing on conventional video tapes. The recorder supports many different editing functions, possible only with DVDs.
With a simple and easy edit menu, you can perform various editing functions, such as delete, copy, rename, lock, etc., on a recorded title.
With this recorder, you can create playlists using a DVD- RAM/DVD-RW in VR mode. Once a playlist is created you can create/edit a new playlist on the same disc without changing the original recording.
▌Step 6 : Finalizing & Playing on other DVD components
To play your DVD on other DVD components, finalizing may be necessary. First, finish all editing and recording operations, then finalize the disc.
When using a DVD-RW disc in VR Mode
Although finalizing is generally unnecessary when playing the disc on a VR Mode compatible component, a finalized disc should be used for playback.
When using a DVD-RW disc in Video Mode
The disc should be finalized first to enable playback on other DVD players. No more editing or recording can be made on the disc once it has been finalized.
When using a DVD-R disc
The disc should be finalized first to enable playback on other DVD players. No more editing or recording can be made on the disc once it has been finalized.
■ You can finalize automatically using the EZ REC MODE. (See page 44)
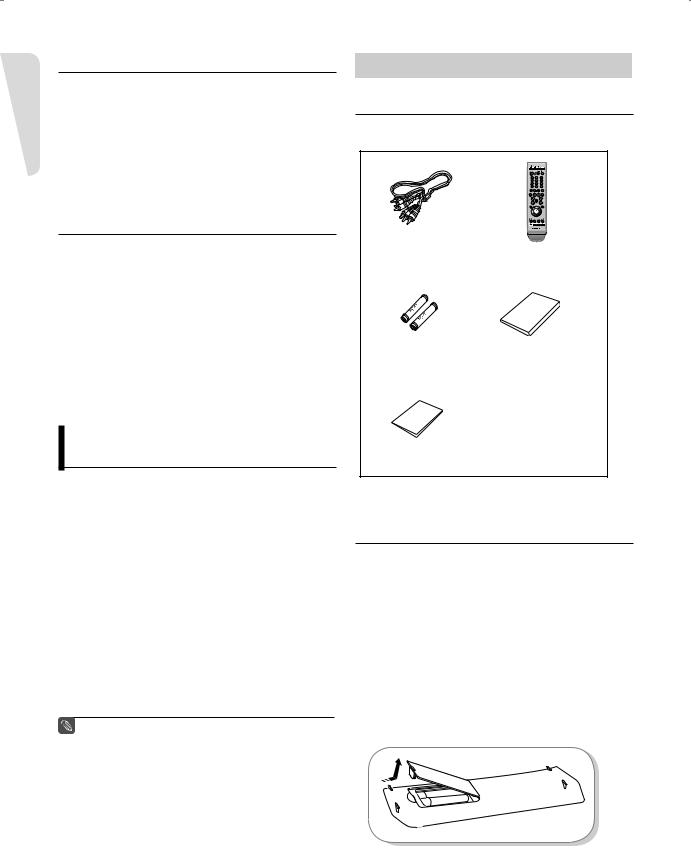
Unpacking
▌Accessories
Check for the supplied accessories below.
Video/Audio Cable |
Remote Control |
(AC39-00073A) |
(AK59-00061B) |
Batteries for Remote |
Instruction Manual |
Control (AAA Size) |
(AK68-01317A) |
(AC43-12002H) |
|
Quick Guide (AK68-01319A)
▌Preparing the Remote Control
Install Batteries in the Remote Control
•Open the battery cover on the back of the remote.
•Insert two AAA batteries. Make sure that the polarities (+ and -) are aligned correctly.
•Replace the battery cover.
If the remote control does not operate properly:
•Check the polarity + - of the batteries.
•Check if the batteries are drained.
•Check if the remote sensor is blocked by obstacles.
•Check if there is any fluorescent lighting nearby.
Dispose of the batteries according to local environmental regulations. Do not put them in the household trash.
English - 10
To determine whether your television is compatible, follow the instructions below.
1.Switch your television on.
2.Point the remote control towards the television.
3.Press and hold the POWER button and enter the two-figure code simultaneously corresponding to the brand of your television by pressing the appropriate number buttons.
Brand |
BUTTON |
AIWA |
82 |
ANAM |
10, 11, 12, 13, 14, 15, 16, 17, 18 |
BANG & |
57 |
OLUFSEN |
|
BLAUPUNKT |
71 |
BRANDT |
73 |
BRIONVEGA |
57 |
CGE |
52 |
CONTINENTAL EDISON |
75 |
DAEWOO |
19, 20, 23, 24, 25, 26, 27, 28, 29, 30, 31, 32, 33, 34 |
EMERSON |
64 |
FERGUSON |
73 |
FINLUX |
06, 49, 57 |
FORMENTI |
57 |
FUJITSU |
84 |
GRADIENTE |
70 |
GRUNDIG |
49, 52, 71 |
HITACHI |
60, 72, 73, 75 |
IMPERIAL |
52 |
JVC |
61, 79 |
LG |
06, 19, 20, 21, 22, 78 |
LOEWE |
06, 69 |
LOEWE OPTA |
06, 57 |
MAGNAVOX |
40 |
METZ |
57 |
MITSUBISHI |
06, 48, 62, 65 |
MIVAR |
52, 77 |
NEC |
83 |
NEWSAN |
68 |
NOBLEX |
66 |
NOKIA |
74 |
NORDMENDE |
72, 73, 75 |
PANASONIC |
53, 54, 74, 75 |
PHILIPS |
06, 55, 56, 57 |
PHONOLA |
06, 56, 57 |
PIONEER |
58, 59, 73, 74 |
RADIOLA |
06, 56 |
RADIOMARELLI |
57 |
RCA |
45, 46 |
REX |
74 |
BRAND |
BUTTON |
SABA |
57, 72, 73, 74, 75 |
SALORA |
74 |
SAMSUNG |
01,02,03,04,05,06,07,08,09 |
SANYO |
41, 42, 43, 44, 48 |
SCHNEIDER |
06 |
SELECO |
74 |
SHARP |
36, 37, 38, 39, 48 |
SIEMENS |
71 |
SINGER |
57 |
SINUDYNE |
57 |
SONY |
35, 48 |
TELEAVA |
73 |
TELEFUNKEN |
67, 73, 75, 76 |
THOMSON |
72, 73, 75 |
THOMSON ASIA |
80, 81 |
TOSHIBA |
47, 48, 49, 50, 51, 52 |
WEGA |
57 |
YOKO |
06 |
ZENITH |
63 |
Result: If your television is compatible with the remote control, it will switch off.
It is now programmed to operate with the remote control.
■ If several codes are indicated for your television brand, try each one in turn until you find one that works. If you replace the remote control’s batteries, you must set the brand code again.
You can then control the television using the following buttons.
Button |
Function |
POWER |
Used to switch the television on and off. |
INPUT SEL. |
Used to select an external source. |
TV VOL +/- |
Used to adjust the volume of the television. |
TV CH |
Used to select the desired channel. |
TV MUTE |
Used to toggle the sound on and off. |
0~9 |
Used to input number directly. |
TV 100+ |
Used to select channels over 100. |
■ The various functions may be able to be controlled on all televisions. If you encounter problems, operate the television directly.
Started ettingG
English - 11
Getting Started
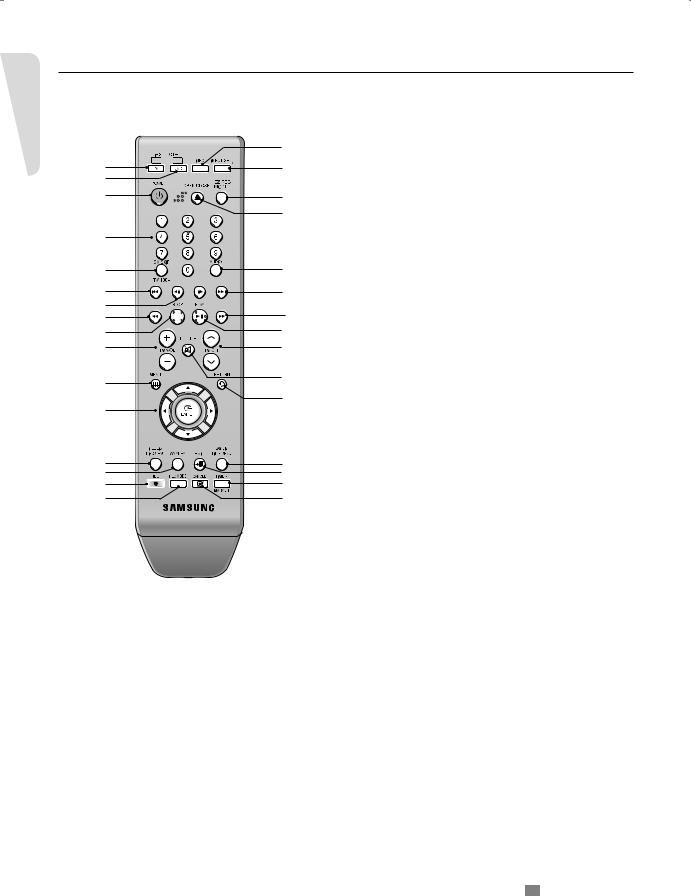
▌Tour of the Remote Control
You can control part of another manufacturer’s TV functions with this remote control.
•Buttons that can be controlled on your TV : POWER, INPUT SEL., TV VOL (+/-), TV CH ( /
/  ), TV MUTE, 0~9, TV 100+.
|
17 |
1 |
18 |
2 |
|
3 |
19 |
|
|
|
20 |
4 |
|
5 |
21 |
6 |
6 |
7 |
8 |
8 |
|
9 |
22 |
10 |
23 |
11 |
24 |
|
|
12 |
25 |
|
|
13 |
26 |
14 |
27 |
15 |
28 |
16 |
29 |
1.TV Button
Press this to operate your TV.
2.DVD Button
Press this to operate your DVD Recoder.
3.POWER Button
Press to power the DVD Recorder on and off.
4.NUMBER Buttons
5.TV 100+/CM SKIP Button
Press this to select channel 100 or higher. Press this to skip a portion of the program automatically during playback of a DVD disc.
6.REVERSE/FORWARD SKIP Buttons
Press to skip a disc backwards or forwards.
7.REVERSE/FORWARD STEP Buttons
Press to play frame by frame.
8.REVERSE/FORWARD SEARCH Buttons
Press to search a disc backwards or forwards.
9. STOP Button
Press to stop a disc or to stop the recording.
10.TV VOL Buttons
Volume adjustment.
11.MENU Button
Brings up the DVD recorder’s setup menu.
12.ENTER/DIRECTION Buttons
(UP/DOWN and LEFT/RIGHT Buttons) This button functions as a toggle switch.
13.TITLE LIST/DISC MENU Button
Use this to enter the View Recording list/Disc menu.
14.ANYKEY Button
Use this to view the status of the disc that is being played.
15.REC Button
Use to make a recording on writable/rewritable discs.
16.REC MODE Button
Use this to set the desired Recording time and picture quality. (XP/SP/LP/EP)
17.INFO Button
This will display current setting or disc status.
18.INPUT SEL. Button
Selects line input signal in external input mode. (AV1, AV2 or DV)
19.EZ REC MODE Button
Use this to set the EZ REC MODE.
20.OPEN/CLOSE Button
To open and close the disc tray.
21.AUDIO Button
Use this to access various audio functions on a disc. (DVD mode)
22.PLAY/PAUSE Button
Press to play/pause a disc.
23.TV CH Buttons
Use this to select a TV channel.
24.TV MUTE Button
This operates as Sound Mute. (TV mode)
25.RETURN Button
Returns to the previous menu.
26.PLAY LIST/TITLE MENU Button
Use this to return to the Title menu, or to view the recorded Playlist.
27.EXIT Button
Exit the current menu.
28.TIMER/MARKER Button
Press to directly enter the Timer Recording Mode menu. Use this to Bookmark or mark a position while playing a disc.
29.CANCEL Button
ÃThis is a special remote control for the visually impaired, and has Braille points on the POWER( ), STOP(
  ) and PLAY(
  ) buttons.
English - 12
Description
▌Front Panel
Started ettingG
1.POWER Button
Turns the recorder on and off.
2.AV 2 IN
Connects external equipment.
3.DV-IN
Connects external digital equipment with a DV jack. (such as a camcorder)
4.DISC TRAY
Opens to accept a disc.
5.P.SCAN Button
Selects the progressive scan mode.
6.OPEN/CLOSE Button
Opens and closes the disc tray.
7.DISPLAY
Displays the playing status, time, etc.
8.INPUT SEL. Button
Selects line input signal in external mode. (AV1, AV2, or DV)
9.REC MODE Button
Uses this to set the desired Recording time and picture quality. (XP/SP/LP/EP)
10.REC Button
Starts recording.
11.STOP Button
Stops disc playback.
12.PLAY/PAUSE Button
Plays a disc or pauses playback.
13.SKIP Buttons
Goes to the next title/chapter/track, or go back to the previous title/chapter/track.
▌Front Panel Display
1.Lights when a disc is loaded.
2.Lights in the record mode.
3.Lights to indicate the timer record mode.
4.Lights when a DVD-RAM/DVD±RW/DVD±R disc is loaded.
5.Alpha/Numeric display.
6.Lights in the progressive scan mode.
English - 13

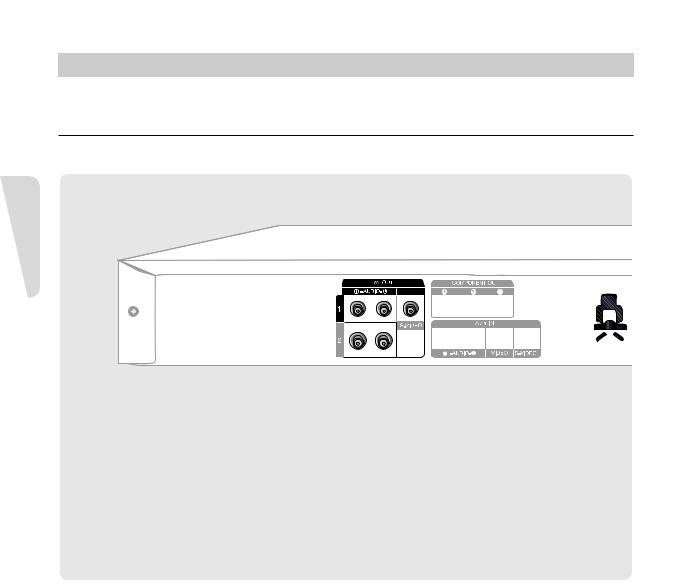
▌Rear Panel
Getting Started
1.DIGITAL AUDIO OUT(OPTICAL)
Connects to an amplifier having a digital optical audio input jack.
2.DIGITAL AUDIO OUT (COAXIAL)
Connects to an amplifier having a digital coaxial audio input jack.
3.AV AUDIO OUT
Connects to the audio input of external equipment using audio cables.
4.AV VIDEO OUT (good video quality)
Connects the input of external equipment using a Video cable.
5.AV S-VIDEO OUT (better video quality)
Connects the input of external equipment using an S-Video cable.
6.COMPONENT VIDEO OUT (excellent video quality)
Connects to equipment having Component video input jacks.
7.AV 1 AUDIO IN
Connects the output of external equipment using audio cables
8.AV 1 VIDEO IN
Connects the output of external equipment using a video cable.
9.AV 1 S-VIDEO IN
Connects the output of external equipment using an S-Video cable.
10.HDMI OUT (best video quality)
Connects the input of external equipment using a HDMI cable.
English - 14


 Connecting & Setting Up
Step 1 : Connecting HDMI/DVI to a TV
If your TV has a HDMI/DVI input, connect an HDMI/DVI cable to your TV. You will enjoy the best quality image and sound.
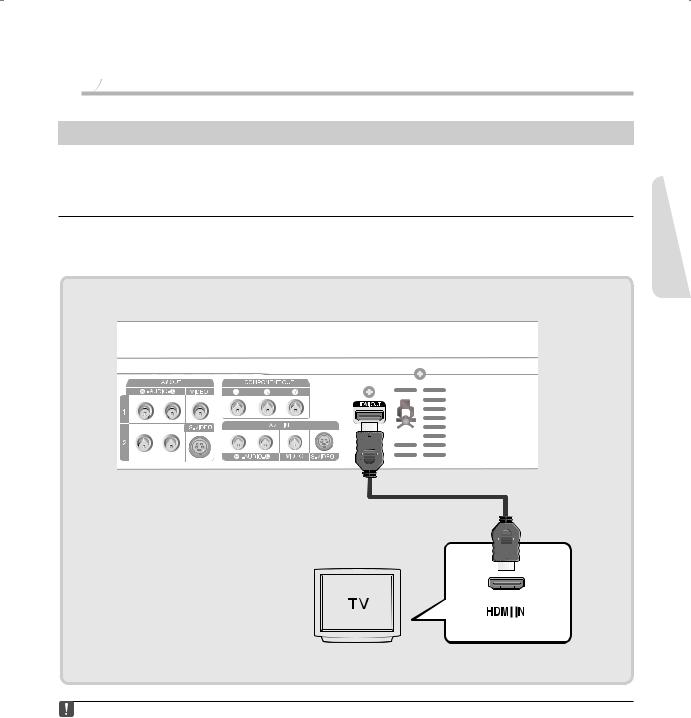
▌Connecting to a TV with an HDMI Jack
Using an HDMIHDMI cable (not included) connect the HDMI OUT jack on the rear of the DVD Recorder to the HDMI IN jack of your TV. Press the input selector on your TV remote control until the HDMI signal from the DVD Recorder appears on your TV screen.
Up Setting & onnectingC
■To watch through the HDMI output, set the digital audio output to PCM.(See page 30)
■Depending on the HDMI device(TV/HDMI Receiver) you use, audio may not be supported. If your TV does not support Dolby digital/DTS, Audio output is not available when you set the Digital output to Bitstream or select DTS On in the Audio setup menu. In this case, set the digital audio output to PCM or DTS Off.
■If you use an HDMI cable to connect a Samsung TV to the DVD recorder, you can operate the recorder using the TV's remote control. (This is only available with SAMSUNG TVs that support Anynet+(HDMI-CEC).) (See page 28)
■Please check the 

 logo (If your TV has an


 logo, then it supports Anynet+ function.)
English - 15
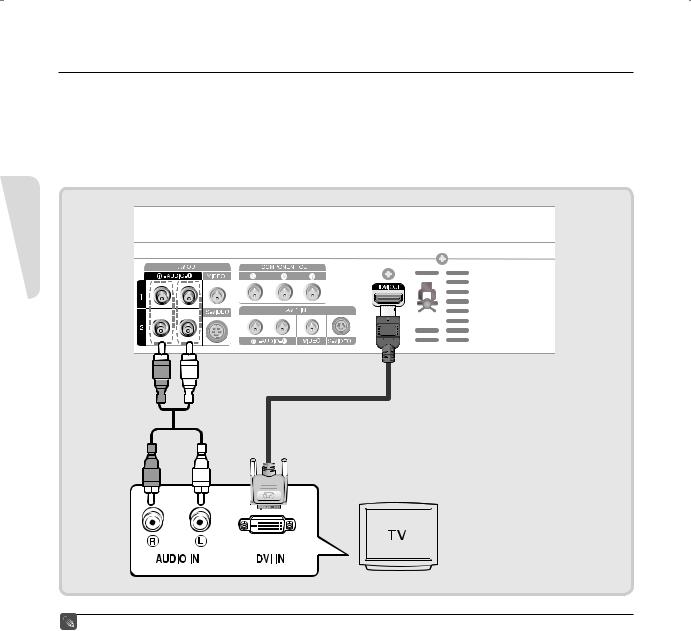
▌Connecting to a TV with a DVI Jack
Using an HDMI-DVI cable (not included), connect the HDMI OUT terminal on the rear of the DVD Recorder to the DVI IN terminal of your TV.
An HDMI to DVI connection requires a separate audio connection. Using the audio cables, connect the AUDIO (red and white) OUT terminals on the rear of the DVD Recorder to the AUDIO (red and white) IN terminals of your TV. Turn on the DVD Recorder and TV.
Press the input selector on your TV remote control until the DVI signal from the DVD Recorder appears on your TV screen.
Connecting & Setting Up
■To set the HDMI output resolution(480p/720p/ 1080i), see page 32.
■HDMI (High Definition Multimedia Interface)
HDMI enables you to make a digital video and audio connection with a single cable.
Using HDMI, the DVD player transmits a digital video and audio signal and displays a vivid picture on a TV having an HDMI input jack.
■HDMI is completely compatible with DVI. The only difference between HDMI and DVI is that HDMI supports multi-channel audio.
■HDMI connection description
HDMI connector - Both uncompressed video data and digital audio data (LPCM or Bit Stream data).
-The DVD recorder outputs a pure digital signal to the TV.
-If your TV does not support HDCP (Highbandwidth Digital Content Protection), snow noise appears on the screen.
■Why does Samsung use HDMI?
Analog TVs require an analog video/audio signal.However, when playing a DVD, the data transmitted to a TV is digital. Therefore either a digital-to-analog converter (in the DVD Recorder) or an analog-to-digital converter (in the TV) is required. During this conversion, the picture quality is degraded due to noise and signal loss. HDMI technology is superior because it requires no D/A conversion and is a pure digital signal from the DVD recorder to your TV.
■What is the HDCP?
HDCP (High-bandwidth Digital Content Protection) is a system for protecting DVD content output
via HDMI from being copied. It provides a secure digital link between a video source (PC, DVD. etc) and a display device (TV, projector. etc). Content is encrypted at the source device to prevent unauthorized copies from being made.
English - 16
Step 2 : Connecting the Video Cable
There are several ways to connect your DVD Recorder. Select one of the video connections on the following pages.
You must use one of the following audio/video connections on this unit.
▌Connecting to Component Video Input Jacks (Y,PB,PR)
Up Setting & onnectingC
1.Connect the Component video cables(not supplied) between the COMPONENT OUT(Y,PB,PR) jacks on the DVD Recorder and COMPONENT IN(Y,PB,PR) jacks on your TV (or AV amplifier).
This connection outputs the 480i or 480p resolution to your TV.
2.If the connected TV supports Progressive Scan, press the P.SCAN button on the front of the DVD Recorder to enjoy best quality video. Pressing the P.SCAN button alternately switches the Progressive(480p) or Interlace(480i) scan mode on.
•You will enjoy the best quality accurate color reproduction images. Component video separates the picture element into black and white(Y), blue(PB) and red(PR) signals to present clear and clean images.
•Connect the audio cables(white and red) between the AUDIO OUT jacks on the DVD Recorder and AUDIO IN jacks on your TV(or AV amplifier).
(See pages 20~22)
■Compared to standard interlaced video, progressive scan doubles the amount of video lines fed to your TV, resulting in a clearer, more stable, and flicker free image than interlaced video. The component output jack of the DVD player can be used for progressive output mode, which is only available with TVs that support progressive scan.
■Progressive Scan Output (480p).
Not all high definition television sets are fully compatible with this product. If the 480p progressive scan picture is not satisfactory, press the P.SCAN button on the unit to switch to the Interlace mode.
If there are questions regarding TV set compatibility with this model, please contact our customer service center at 1-800-SAMSUNG.
■The Component jacks will not output video resolutions above 480p. To view 720p and 1080i, connect the DVD-R155 to your TV with an HDMIHDMI cable. With HDMI connected, press the P.SCAN button to alternate between all available resolutions. (See page 32)
English - 17
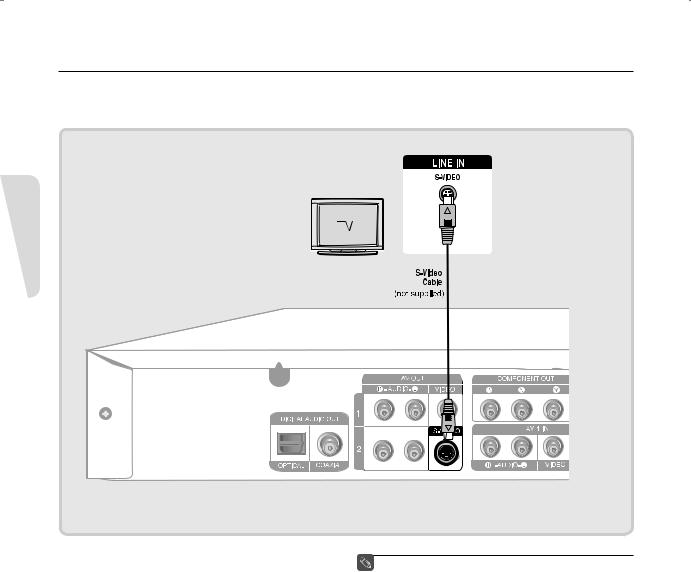
▌Connecting to an S-Video Input Jack
Connect an S-Video cable(not supplied) between the S-VIDEO OUT jack on DVD Recorder and S-VIDEO IN jack on your TV (or AV amplifier).
Connecting & Setting Up
•You will enjoy high quality images. S-Video separates the picture element into black and white (Y) and color
(C) signals to present clearer images than regular video input mode. This connection outputs the 480i resolution to your TV.
•Connect the audio cables(white and red) between the AUDIO OUT jacks on the DVD Recorder and AUDIO IN jacks on your TV(or AV amplifier). (See pages 20~22)
■ S-Video or Component video outputs are available only if your TV supports S-Video input or Component video input, respectively.
If S-Video or Component video output does not work, check your TV connections and the TV input selection settings.
English - 18

▌Connecting to a Video Input Jack
Connect a video(yellow) cable between the VIDEO(yellow) OUT jack on DVD Recorder and VIDEO(yellow) IN jack on the TV (or AV amplifier).
Up Setting & onnectingC
•You will enjoy normal quality images. This connection outputs the 480i resolution to your TV.
•Connect the audio cables(white and red) between the AUDIO OUT jacks on the DVD Recorder and AUDIO IN jacks on your TV(or AV amplifier). (See pages 20~22)
English - 19
Step 3 : Connecting the Audio Cable
Select one of the Audio connections on the following pages.
▌Connecting to your TV
This connection will use your TV’s speakers.
Connecting & Setting Up
English - 20
▌Connecting to a Stereo Amplifier with Analog Input Jacks
If your stereo amplifier only has AUDIO INPUT jacks(L and R), use the AUDIO OUT jacks.
Up Setting & onnectingC
English - 21
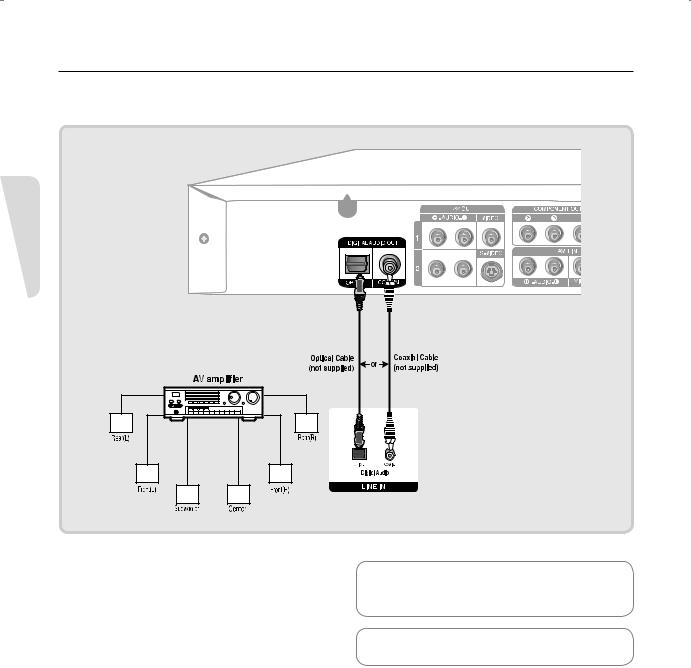
▌Connecting to an AV Amplifier with a Digital Input Jack
If your AV amplifier has a Dolby Digital or DTS decoder and a digital input jack, use this connection. To enjoy Dolby Digital or DTS sound, you will need to set up the audio settings. (See page 30)
Connecting & Setting Up
Manufactured under license from Dolby Laboratories. “Dolby” and the double-D symbol are trademarks of Dolby Laboratories.
“DTS” and “DTS Digital Out” are trademarks of DTS, Inc.
English - 22
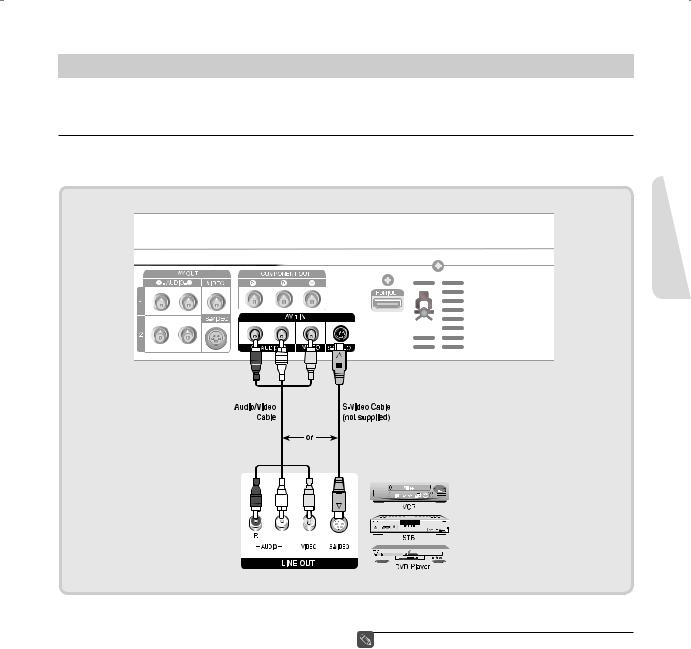
Step 4 : Connecting External Devices
This allows you to connect your DVD Recorder to other external devices and view or record their outputs.
▌Connecting a VCR, Set Top Box(STB) or DVD Player to the AV 1 IN or S-VIDEO IN jacks
Connect the VCR or external device to the AV 1 IN jacks of the DVD Recorder.
You can record from the connected equipment (VCR, STB or DVD Player).
Up Setting & onnectingC
■ The DVD-R155 does not have a TV tuner. Recording TV broadcasts is possible via Connection to Cable/Satellite boxes and Multi Channel Video Services.
English - 23
Loading...