

Page 1
DVD PLAYER
LECTEUR DVD
DVD-SPELER
DVD-E232
DVD-E234
DVD-E235
DVD-E335
DVD-E435
AK68-00141G
ENG FRA DEU NL
SETUP
CONNECTIONS
BASIC
FUNCTIONS
ADVANCED
FUNCTIONS
CHANGING
SETUP MENU
REFERENCE
Page 2

ENG ENG
2 3
PrecautionsPrecautions
1
2
3
4 5
Ensure that the mains supply in your house complies with that indicated on the identification sticker
located at the back of your play. Install your player horizontally, on a suitable base (furniture),
with enough space around it for ventilation (7~10cm). Make sure the ventilation slots are not
covered. Do not stack other, or heavy devices on top of the player. Do not place the player on
amplifiers or other equipment which may become hot. Before moving the player ensure the disc
tray is empty. This player is designed for continuous use.
Switching off the DVD player to the stand-by mode does not disconnect the electricity supply In
order to separate the player completely from the mains,it has to be disconnected by unplugging the
main plug, especially when left unused for a long period of time.
Be careful handle your discs with care. Hold a disc with finger on the border or hole. Always place
disc with the label facing upward (in case of a single side disc). Always use a soft cloth to clean
disc if necessary, wipe from the centre to the border. Always put disc back into their cases after
playing and store in vertical position. Always place the disc properly into the tray using the proper
guide area. Never use record cleaning sprays, benzine, static electricity liquids or any other solvent,
if the disc surface is dirty. Wipe gently with a soft damp (water only) cloth, never wipe the disc in a
circular motion, since circular scratches are likely to occur and could cause noise during playback.
Batteries: The battery used in this product contains chemicals that are harmful to the environment.
Do not dispose of batteries in the general domestic waste. It is recommended that the replacement of
the battery should be done by a technician.
Disposal of old equipment and packaging: Old equipment and packaging should not be disposed of as
domestic waste, but in accordance with the appliable regulations.
For safety reasons, be sure to disconnect the AC power cord from the AC outlet.
• Do not use benzene, thinner, or other solvents for cleaning.
• Wipe the cabinet with a soft cloth.
1. Setting up
4. Disc
5. Environmental info
6. Maintenance of Cabinet
Never open the player or any of its components. It can be dangerous for you or certain fragile
components. You could receive an electric shock or touch the laser beam. Do not place your eyes
close to the opening of the disc tray or any other opening to look inside the player.
2. For your safety
Protect the player from moisture (dripping or splashing and objects filled with liquids), and excess
heat (e.g.fireplace) or equipment creating strong magnetic or electric fields (i.e.speakers...).
Disconnect the power cable from the mains electricity supply if the player malfunctions.
Your player is not intended for industrial use but for domestic purposes only. Use of this product is
for personal use only. If your player or disc has been stored in a cold atmosphere for example
during transportation in the winter, wait for approximately 2 hours until they have reached room
temperature, before use.
3. Caution
Page 3
ENG ENG
4 5
Before You Start
Table of contents
If remote doesn’t operate
properly:
Open the battery cover on the back of
the remote.
Insert two AAbatteries. Make sure that
the polarities (+ and -) are aligned
correctly.
Replace the battery cover.
• Check the polarity + - of the
batteries (Dry-Cell)
• Check if the batteries are drained.
• Check if remote sensor is blocked
by obstacles.
• Check if there is any fluorescent
lighting nearby.
Install Batteries in the
Remote
1
2
3
Setup
General Features ........................................................................................................6
Disc Type and Characteristics
......................................................................................
7
Description-Front Panel
................................................................................................
8
Display Indicators ....................................................................................................10
Description-Rear Panel
..............................................................................................
11
Tour of the Remote Control
........................................................................................
14
Connections
Choosing a Connection
..............................................................................................
18
Basic Functions
Playing a Disc
............................................................................................................
20
Using the Search & Skip Functions
..........................................................................
22
Using the Display Function
........................................................................................
23
Using the Disc and Title Menu ..................................................................................24
Using the Function Menu ..........................................................................................25
Repeat Play
................................................................................................................
26
Advanced Functions
Adjusting the Aspect Ratio (EZ View)
........................................................................
27
Slow Repeat play
........................................................................................................
29
Selecting the Audio Language
....................................................................................
30
Selecting the Subtitle Language
................................................................................
31
Changing the Camera Angle
......................................................................................
32
Using the Instant Replay/Skip Function
....................................................................
33
Using the Bookmark Function
....................................................................................
34
Using the Zoom & 3D Sound Functions
..........................................................................
35
MP3/WMA Play
..........................................................................................................
36
Program Play & Random Play
....................................................................................
38
Picture CD Playback
..................................................................................................
39
Changing Setup menu
Using the Setup Menu
................................................................................................
41
Setting Up the Language Features
............................................................................
42
Setting Up the Audio Options
....................................................................................
44
Surround Sound Speaker Setup
................................................................................
45
Setting Up the Display Options
..................................................................................
46
Setting Up the Parental Control
..................................................................................
48
Controlling a TV with the remote
................................................................................
49
Reference
Troubleshooting
..........................................................................................................
50
Specifications
..............................................................................................................
51
Warranty ....................................................................................................................52
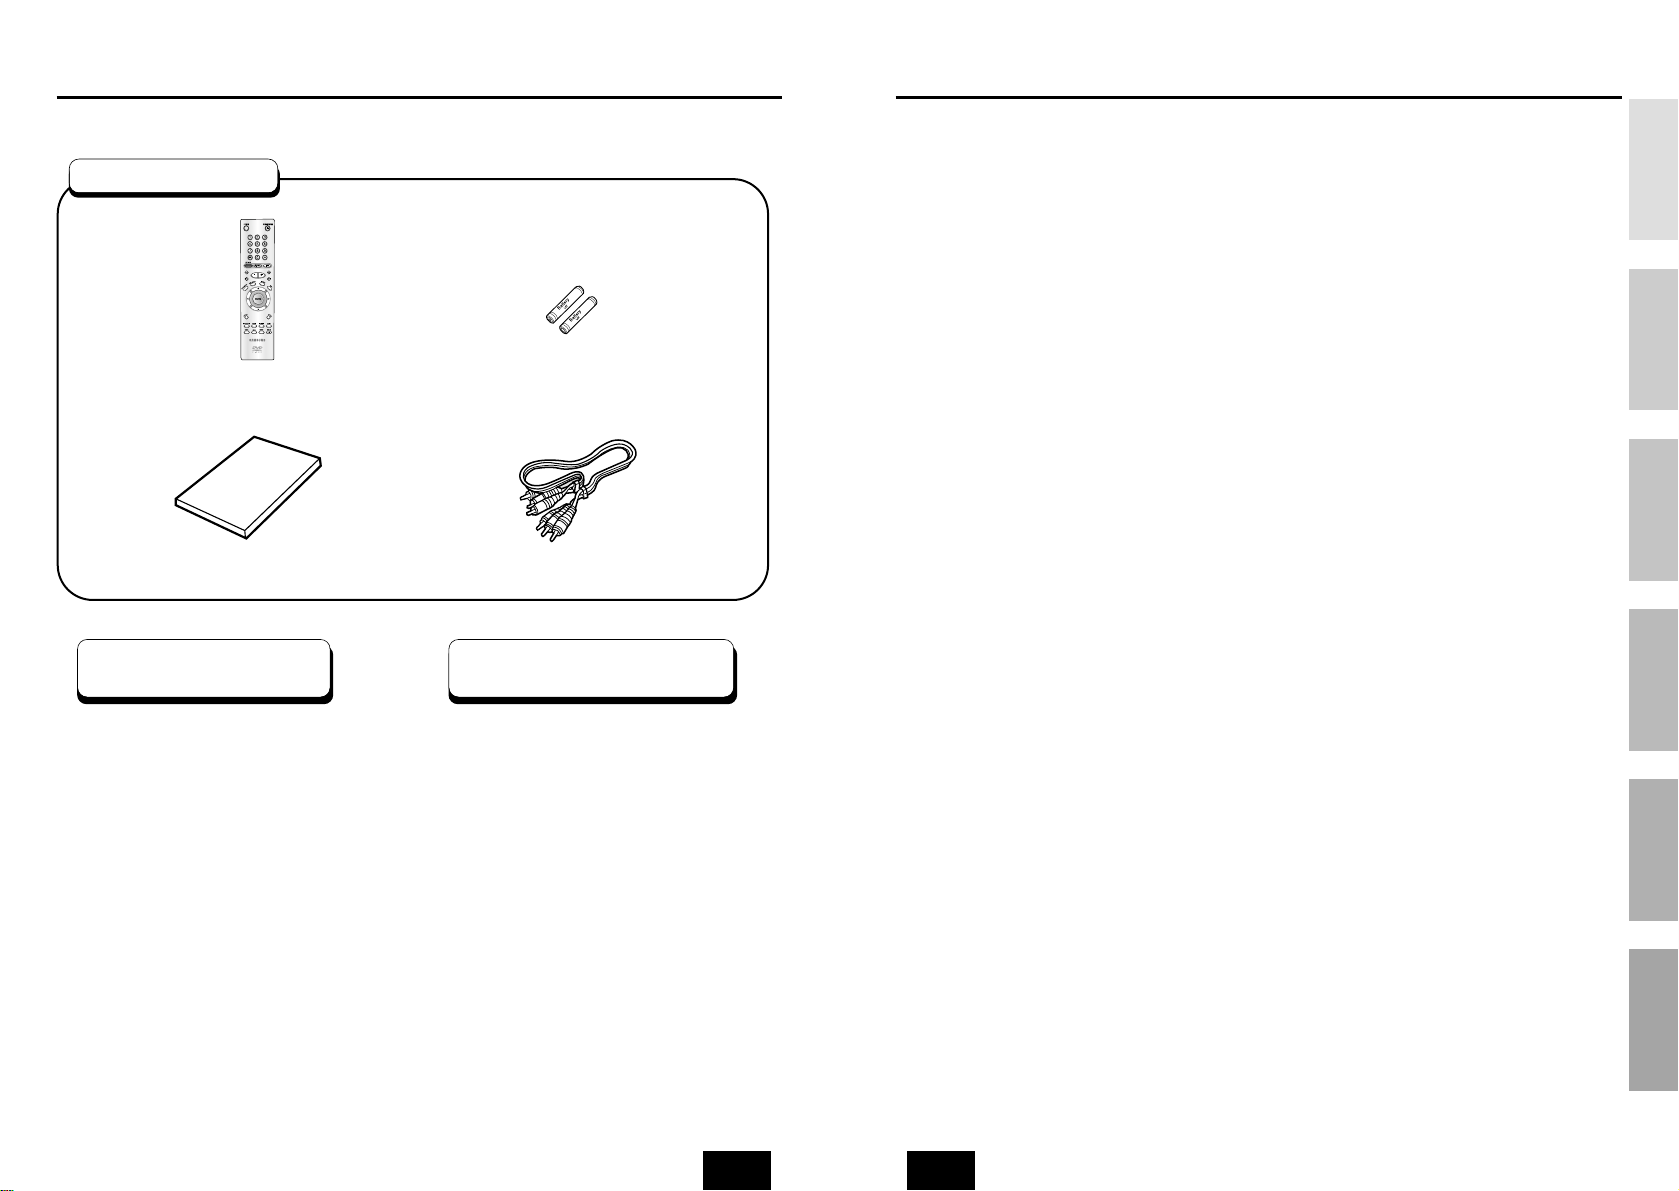
Remote Control
Batteries for
Remote Control (AA Size)
User’s Manual
Video/Audio Cable
Accessories
SETUP
CONNECTIONS
BASIC
FUNCTIONS
ADVANCED
FUNCTIONS
CHANGING
SETUP MENU
REFERENCE
Page 4
ENG ENG
SETUP
6 7
General Features
Disc Type and Characteristics
Excellent Sound
Dolby Digital, a technology developed by
Dolby Laboratories provides crystal clear
sound reproduction.
Screen
Video with MPEG-2 compression technology.
Both regular and widescreen(16:9) pictures
can be viewed.
Slow Motion
An important scene can be viewed in slow
motion.
Programmed Play
You can program tracks to play in desired
order. (CD, WMA, MP3)
Parental Control
The parental control allows users to set the
level necessary to prohibit children from
viewing harmful movies such as those with
violence, adult subject matter, etc.
Various On-Screen Menu Functions
You can select various languages
(Audio/Subtitle) and screen angles while
enjoying movies.
Easy View
Easy View can convert Letter Box images to
full screen viewing on your conventional TV.
Digital Photo Viewer (JPEG)
You can view the Digital Photos on your TV.
Repeat
You can repeat a song or movie simply by
pressing the REPEAT button.
MP3/WMA
This unit can play discs created from
MP3/WMA files.
Instant Replay
This function is used to replay the previous
10 seconds of the movie from the current
position.
Instant Skip
This function skips playback ahead 10 seconds.
• Many DVD discs are encoded with copy protection. Because of this, you should only connect your
DVD player directly to your TV, not to a VCR. Connecting to a VCR results in a distorted picture from
copy-protected DVD discs.
• This product incorporates copyright protection technology that is protected by methods claims of certain U.S.
patents and other intellectual property rights owned by Macrovision Corporation and other rights owners.
Use of this copyright protection technology must be authorized by Macrovision Corporation, and is intended
for home and other limited viewing uses only unless otherwise authorized by Macrovision Corporation.
Reverse engineering or disassembly is prohibited.
* Discs which cannot be played with this player.
• DVD-ROM • DVD-RAM
• CD-ROM • CDV
• CDI
• HD layer of super Audio CD
• CDGs play audio only, not graphics.
*
Ability to play back may depend on recording conditions.
• DVD-R, +R • CD-RW
• DVD+RW, -RW
NOTE
COPY PROTECTION
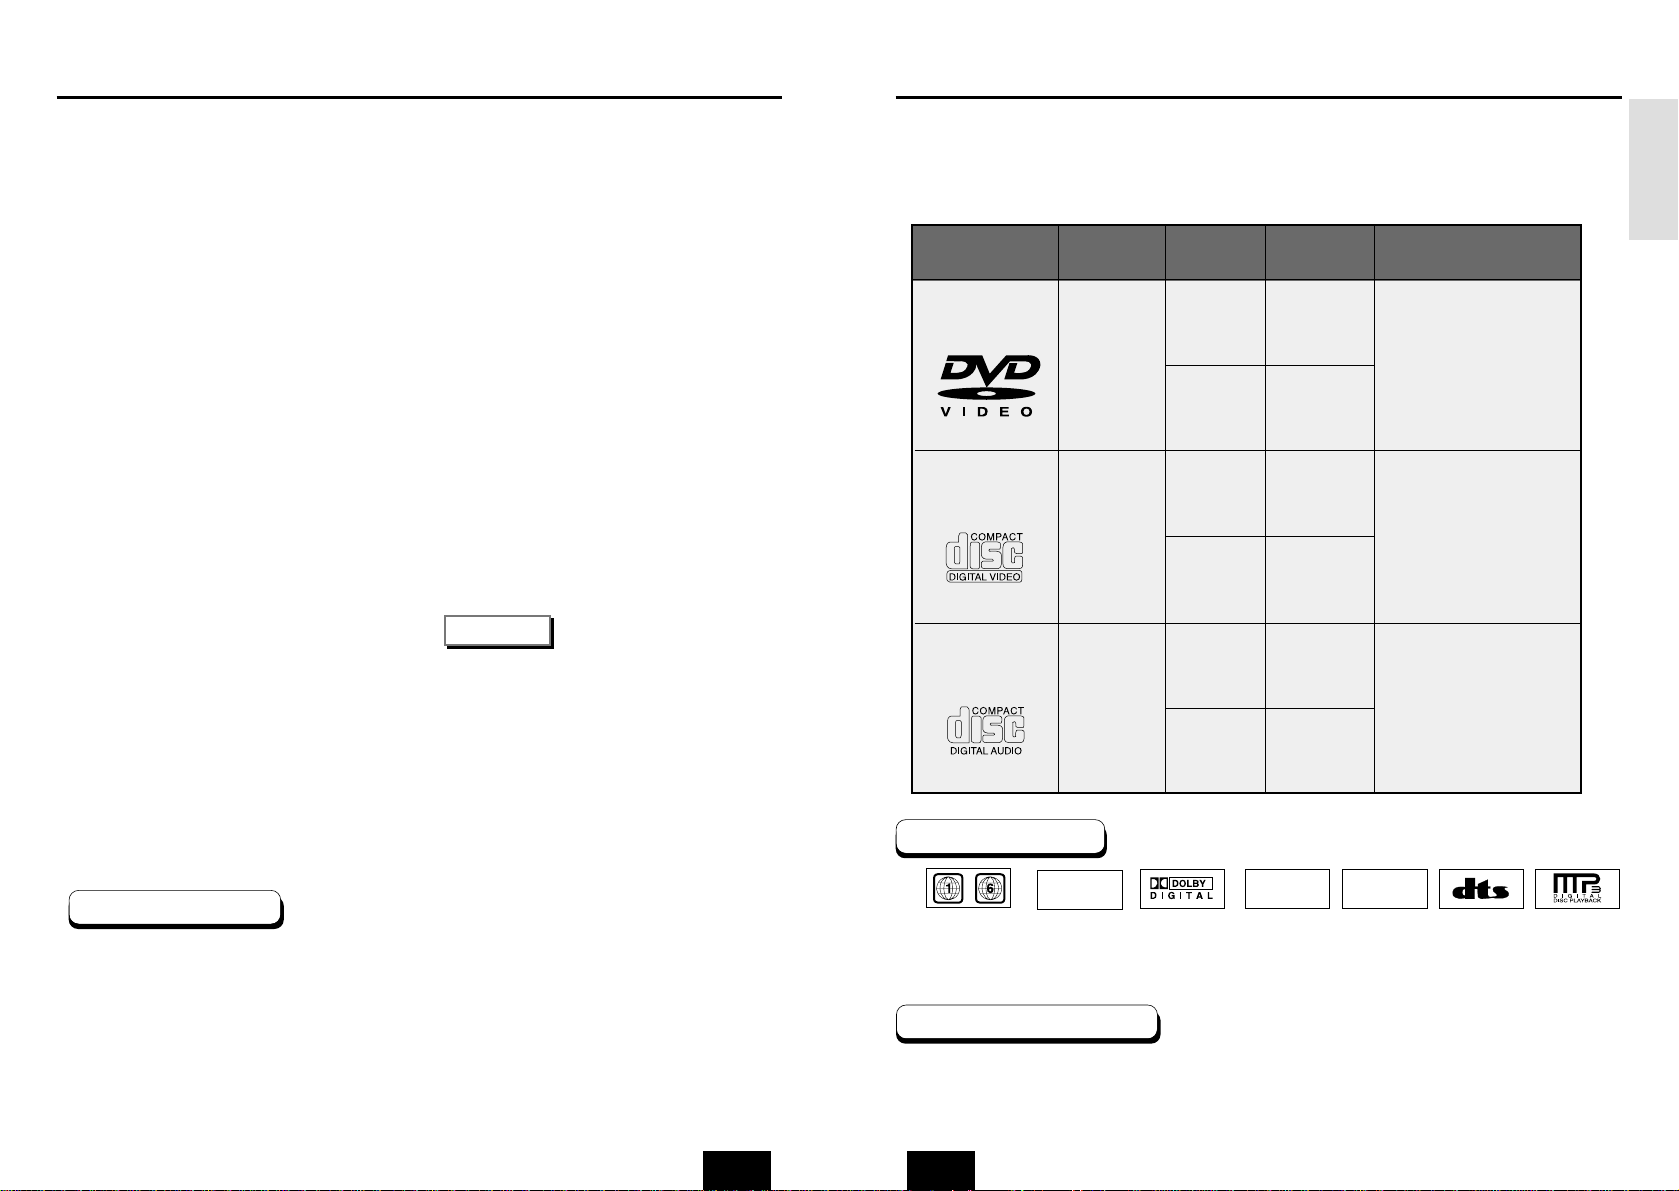
This DVD player is capable of playing the following types of discs with the
corresponding logos:
Both the DVD player and the discs are coded by region. These regional codes must match in order for the
disc to play. If the codes do not match, the disc will not play.
The Region Number for this player is described on the rear panel of the player.
Play Region Number
Disc Markings
12 Cm
8 Cm
Single-sided
240 min.
Double-sided
480 min.
Single-sided
80 min.
Double-sided
160 min.
Audio
+
Video
Audio
+
Video
Audio
• CD is recorded as a
Digital Signal with better
audio quality, less
distortion and less
deterioration of audio
quality over time.
• Video with CD sound, VHS
quality & MPEG-1
compression technology.
• DVD contains excellent
sound and video due to
Dolby Digital and MPEG-2
system.
• Various screen and audio
functions can be easily
selected through the onscreen menu.
VIDEO-CD
AUDIO-CD
12 Cm
8 Cm
74 min.
20 min.
12 Cm
8 Cm
74 min.
20 min.
Disc Types
(Logos)
Recording
Types
Disc Size
Max.
Playing Time
Characteristics
DVD
~
DIGITAL
SOUND
STEREO
PAL
• Play
Region
Number
• PALbroadcast
system in U.K,
France,
Germany, etc.
• Dolby
Digital disc
• Stereo disc
• Digital
Audio disc
• DTS disc
• MP3 disc
Page 5
ENG ENG
SETUP
Description-Front Panel
8 9
Description-Front Panel
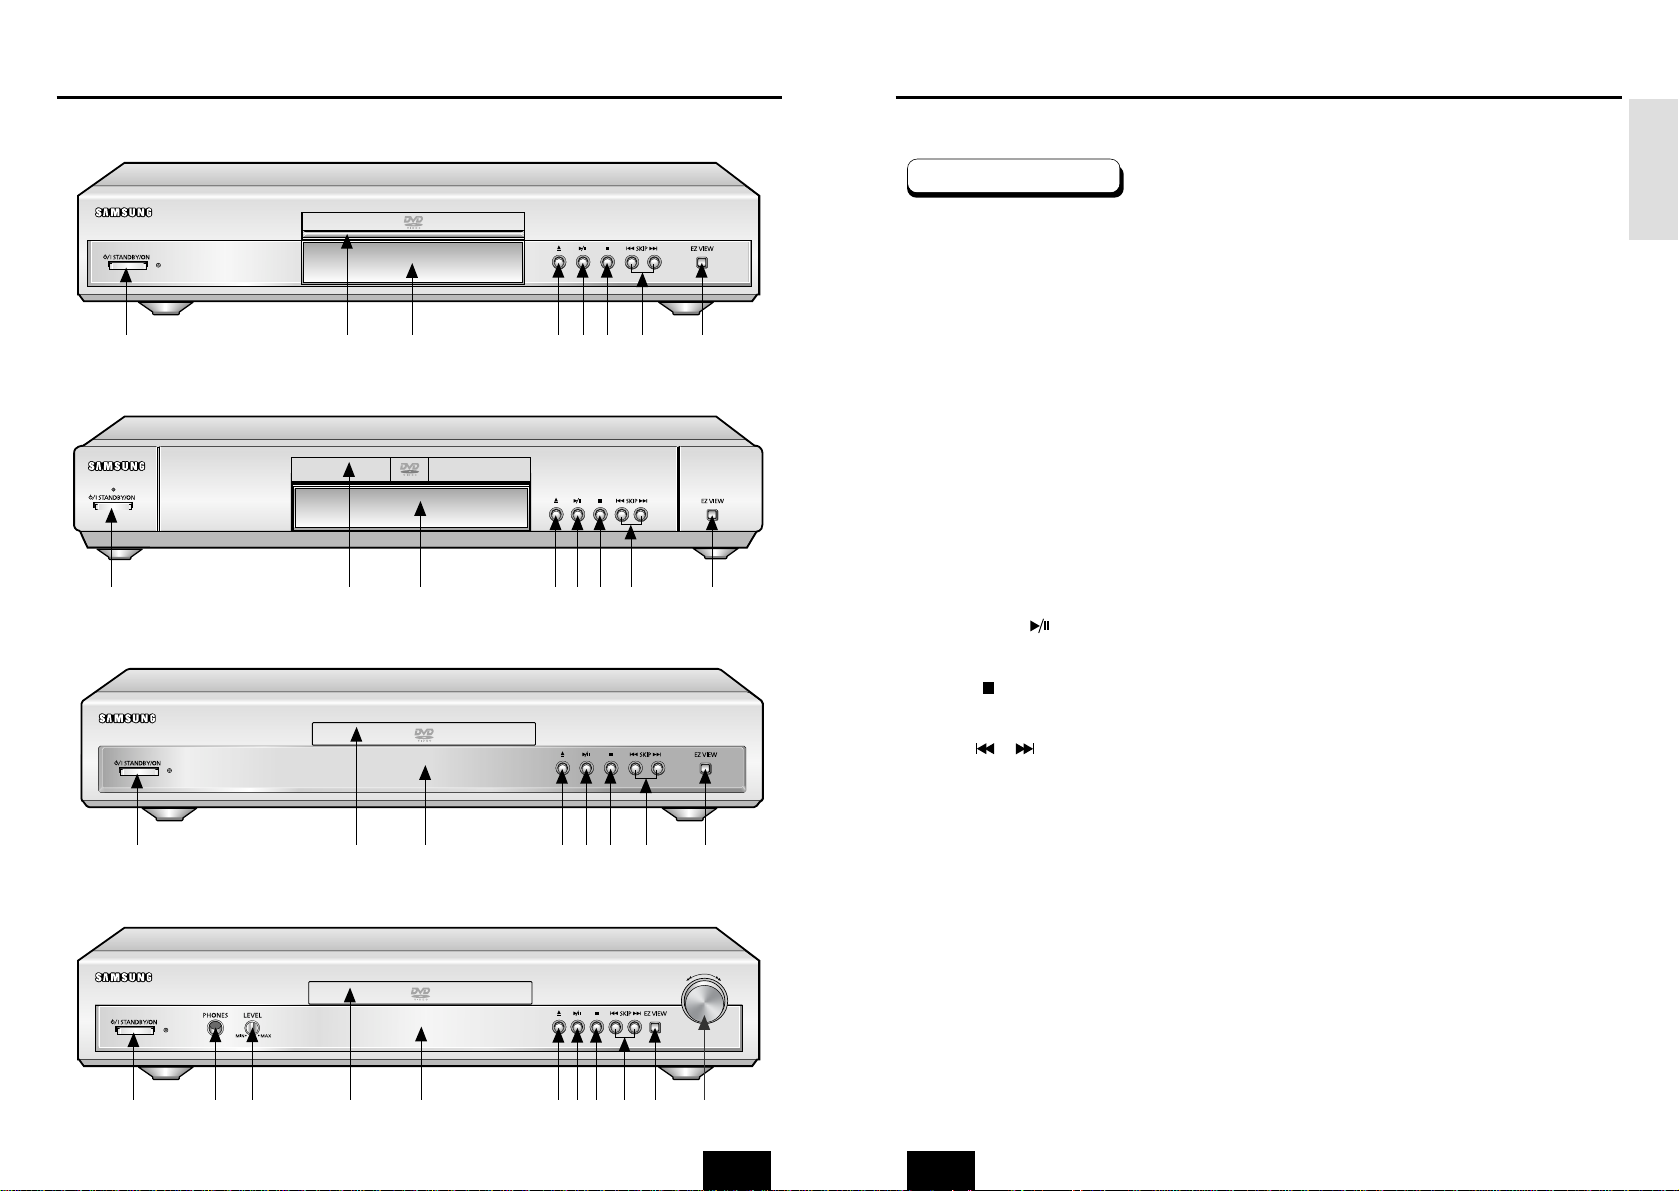
Front Panel Controls
1. STANDBY/ON
• When the unit is first plugged in, the indicator lights. When STANDBY/ON is pressed on again,
the light goes out and the player is turned on.
2. HEADPHONE JACK
•
You can attach headphones here for private listening.
3. HEADPHONE VOLUME
•
Use to adjust headphones volume level.
4. DISC TRAY
• Load the disc here.
5. DISPLAY
• Operation indicators are displayed here.
6. OPEN/CLOSE
• Press to open and close the disc tray.
7. PLAY/PAUSE ( )
• Begin or pause disc play.
8. STOP( )
• Stops disc play.
9. SKIP ( / )
• Use to skip a scene or music.
10. EZ VIEW
• Easy View can convert Letter Box images to full screen viewing on your conventional TV.
11. SHUTTLE
• Use during DVD and CD play to fast forward or reverse.
1
4
5678910
DVD-E232
1
4
5
6789 10
DVD-E235
DVD-E234
1
4
5678910
DVD-E335/DVD-E435
1
42
5367891011
Page 6
ENG ENG
SETUP
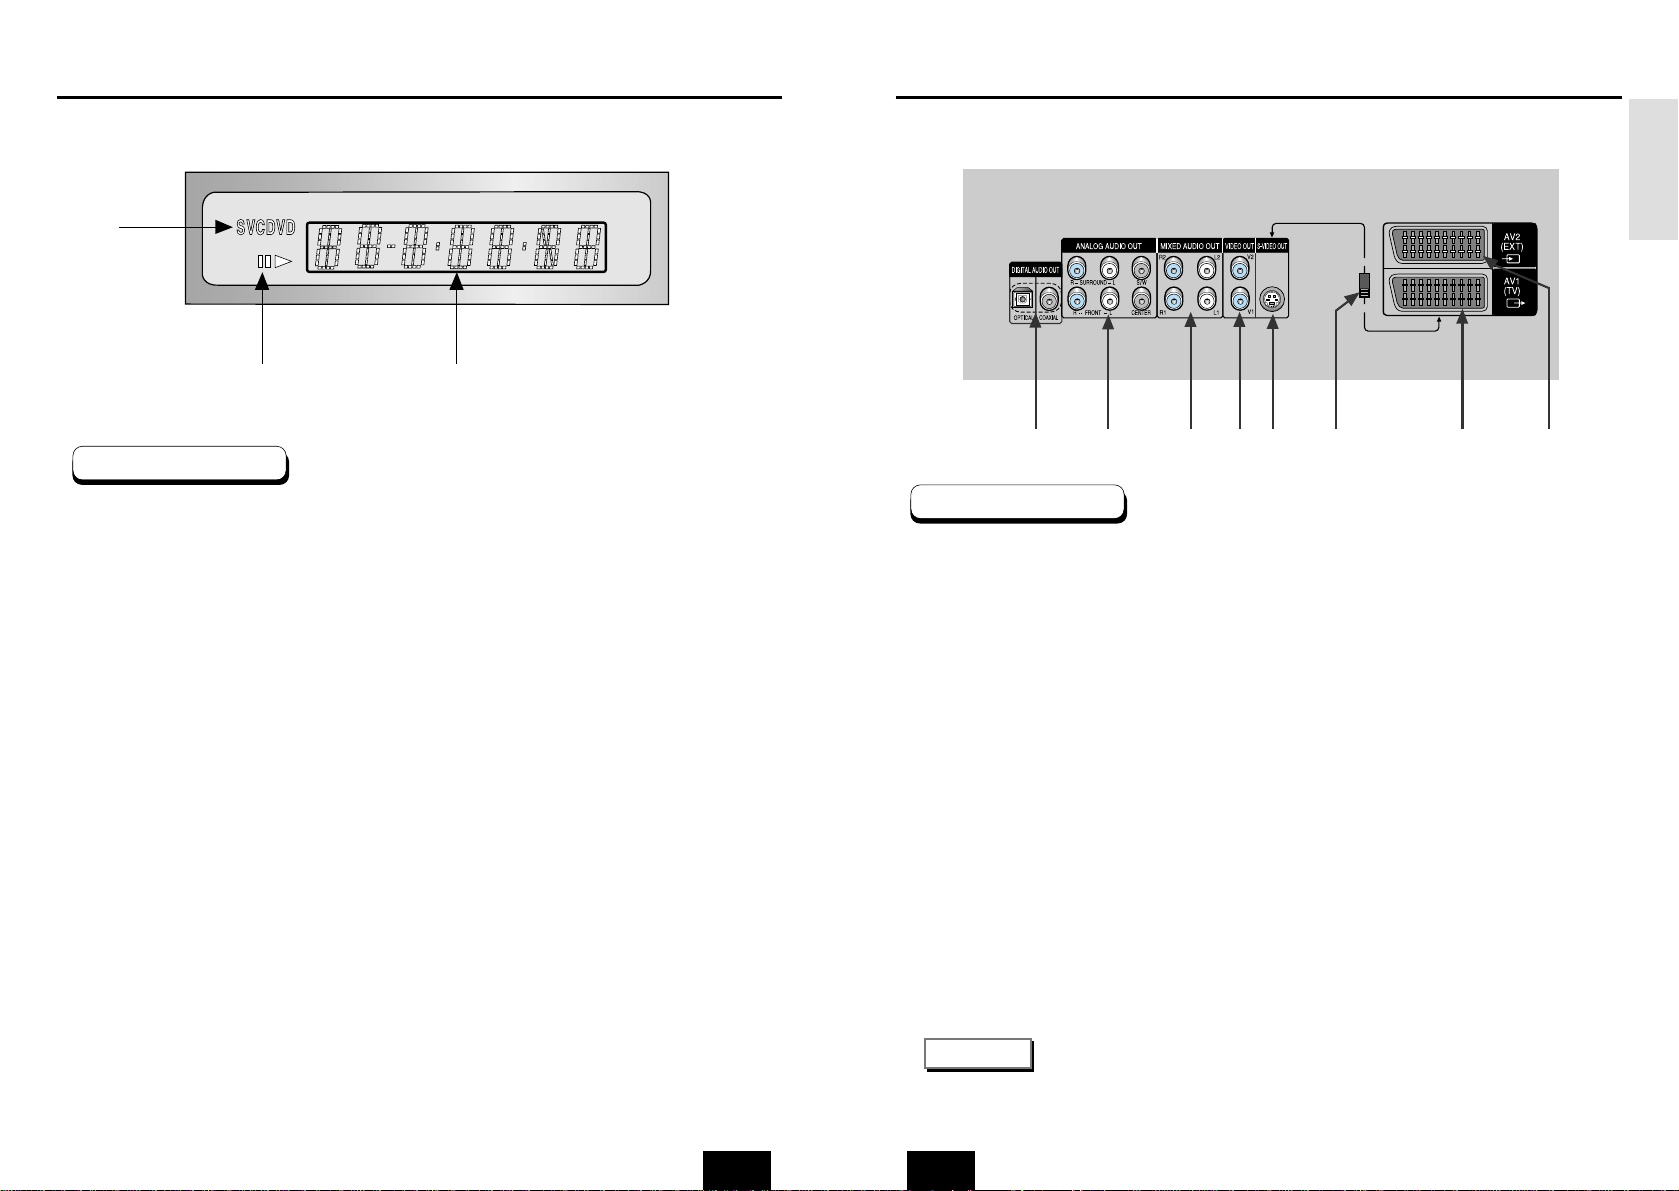
Display Indicators
10 11
1. Disc type indicators
2. Play / Pause / Forward play
3. Displays various messages concerning operations such as PLAY, STOP, LOAD ...
no DISC : No disc loaded.
OPEN : The disc tray is open.
LOAD : Player is loading disc information.
1
2
3
Front Panel Display
Rear Panel
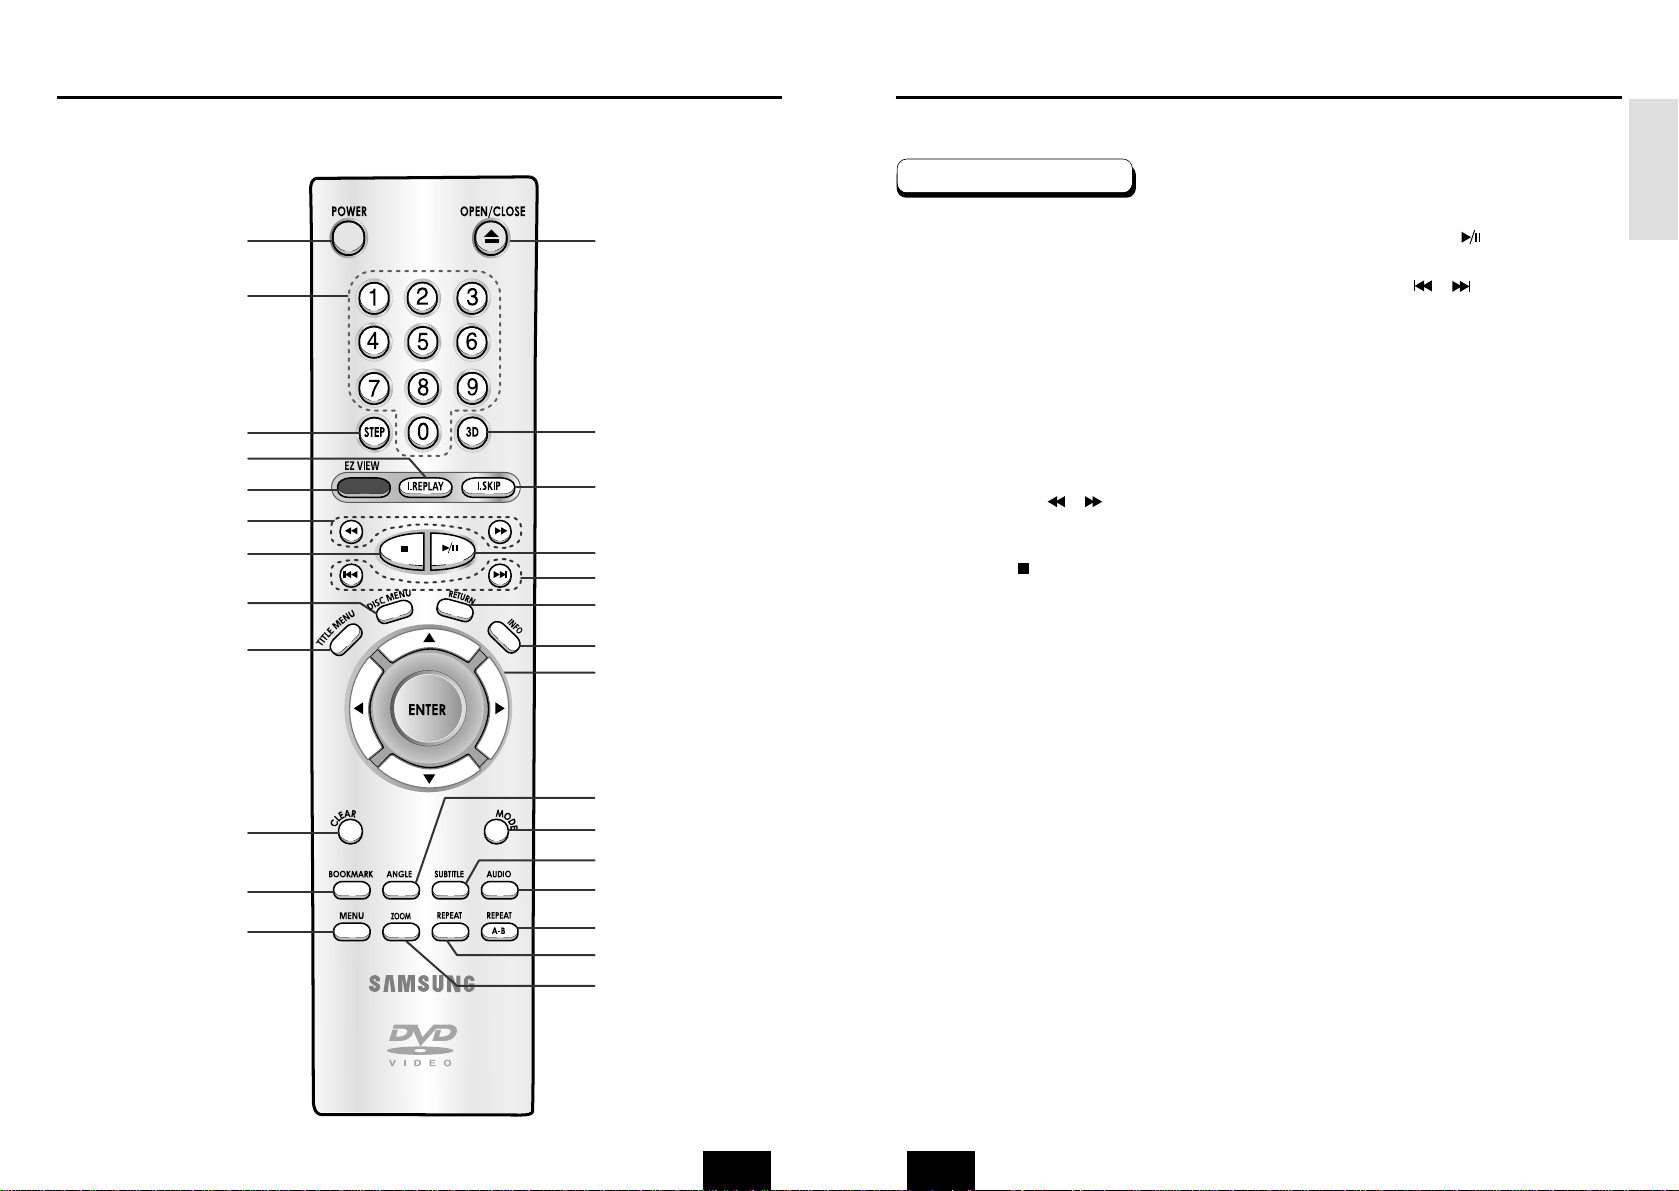
Description-Rear Panel
S-VIDEO
SCART
VIDEO OUT
SELECT
1. DIGITAL AUDIO OUT JACKS
• Use either an optical or coaxial digital cable to connect to a compatible Dolby Digital, receiver.
Use to connect to an A/V Amplifier that contains a Dolby Digital, MPEG-2 or DTS decoder.
2. 5.1CH ANALOG AUDIO OUT JACKS
• Connect to an amplifier with 5.1ch analog input jacks.
3. MIXED AUDIO OUT JACKS
• Connect to the Audio input jacks of your television, audio/video receiver.
4. VIDEO OUT JACKS
• Use a video cable to connect to the Video input jack on your television.
5. S-VIDEO OUT JACK
• Use the S-Video cable to connect this jack to the S-Video jack on your television for a higher quality
picture. The S-Video must be selected in the VIDEO OUT SELECT.
6. VIDEO OUT SELECT SWITCH
• Use this switch to set video out. If Scart jack is selected, S-Video may not work.
If S-Video is selected, Scart jack may not work.
7. SCART AV1 JACK
• Connect to a TV with scart input jack.
8. SCART AV2 JACK
• Connect to a video recorder or other equipment.
12 3456 7 8
DVD-E435
* Select the VIDEO OUT SELECT switch in the Stop or Power Off mode.
NOTE
Page 7

ENG
SETUP
ENG
RL
S-VIDEO
SCART
VIDEO OUT
SELECT
1. DIGITAL AUDIO OUT JACKS
• Use either an optical or coaxial digital cable to connect to a compatible Dolby Digital, receiver.
Use to connect to an A/V Amplifier that contains a Dolby Digital, MPEG-2 or DTS decoder.
2. ANALOG AUDIO OUT JACKS
• Connect to the Audio input jacks of your television, audio/video receiver.
3. VIDEO OUT JACKS
• Use a video cable to connect to the Video input jack on your television.
4. S-VIDEO OUT JACK
• Use the S-Video cable to connect this jack to the S-Video jack on your television for a higher quality
picture. The S-Video must be selected in the VIDEO OUT SELECT.
5. VIDEO OUT SELECT SWITCH
• Use the switch to set video out. If Scart jack is selected, S-Video may not work.
If S-Video is selected, Scart jack may not work.
6. SCART AV1 JACK
• Connect to a TV with scart input jack.
7. SCART AV2 JACK
• Connect to a video recorder or other equipment.
DVD-E232/DVD-E234/DVD-E235
DVD-E335
1
1234567
234 5 6
* Select the VIDEO OUT SELECT switch in the Stop or Power Off mode.
NOTE
Description-Rear Panel Description-Rear Panel
Rear Panel
12 13
Page 8
ENG ENG
SETUP
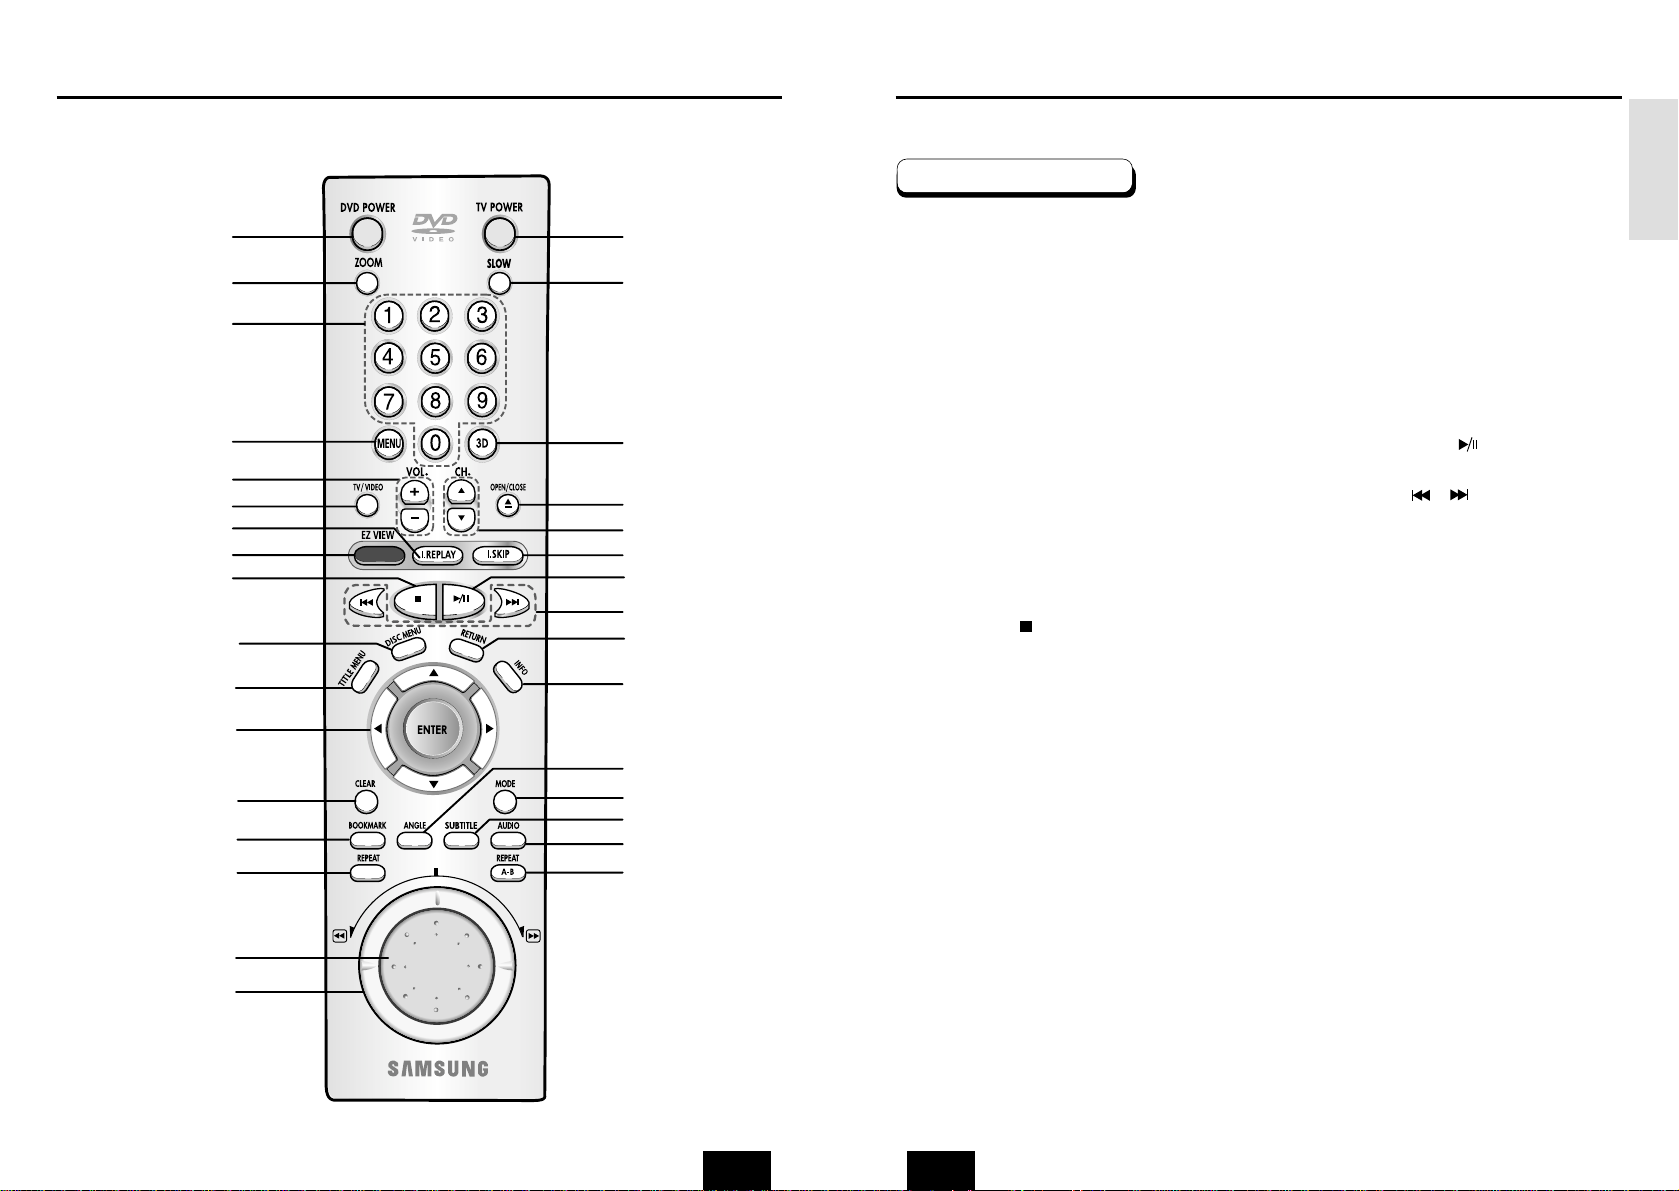
Tour of the Remote Control
1. DVD POWER Button
• Turns the power on or off.
2. NUMBER Buttons
3. STEP Button
• Advances play one frame at a time.
4. I.REPLAY Button
• This function is used to replay the previous 10
seconds of the movie from the current position.
5. EZ VIEW Button
• Easy View can convert Letter Box images to full
screen viewing on your conventional TV.
6. SEARCH Buttons ( / )
• Allows you to search forward/backward through a
disc.
7. STOP Button ( )
8. DISC MENU Button
• Brings up the Disc menu.
9. TITLE MENU Button
• Brings up the Title menu.
10. CLEAR Button
• Use to remove menus or status displays from the
screen.
11. BOOKMARK Button
12. MENU Button
• Brings up the DVD player’s setup menu.
13. OPEN/CLOSE Button
• To open and close the disc tray.
14. 3D Button
15. I.SKIP Button
• This function skips playback ahead 10 seconds.
16. PLAY/PAUSE Button ( )
• Begin/Pause disc play.
17. SKIP Buttons ( / )
• Use to skip the title, chapter, or track.
18. RETURN Button
• Returns to a previous menu.
19. INFO Button
• Displays the current disc mode.
20. ENTER/DIRECTION Button
(UP/DOWN or LEFT/RIGHT Buttons)
• This button functions as a toggle switch.
21. ANGLE Button
• Use to access various camera angles on a DVD.
22. MODE Button
• Allows you to program a specific order.
23. SUBTITLE Button
24. AUDIO Button
• Use this button to access various audio functions
on a disc.
25. REPEAT A-B Button
• Use to mark a segment to repeat between Aand
B.
26. REPEAT Button
• Allows you to repeat play a title, chapter, track, or
disc.
27. ZOOM Button
• Enlarges the DVD picture.
DVD Function Buttons
Tour of the Remote Control
14 15
113
14
15
16
17
18
19
20
21
22
23
24
25
26
27
2
3
4
5
6
7
8
9
10
11
12
DVD-E232/DVD-E234/DVD-E235/DVD-E335
Page 9
ENG
SETUP
ENG
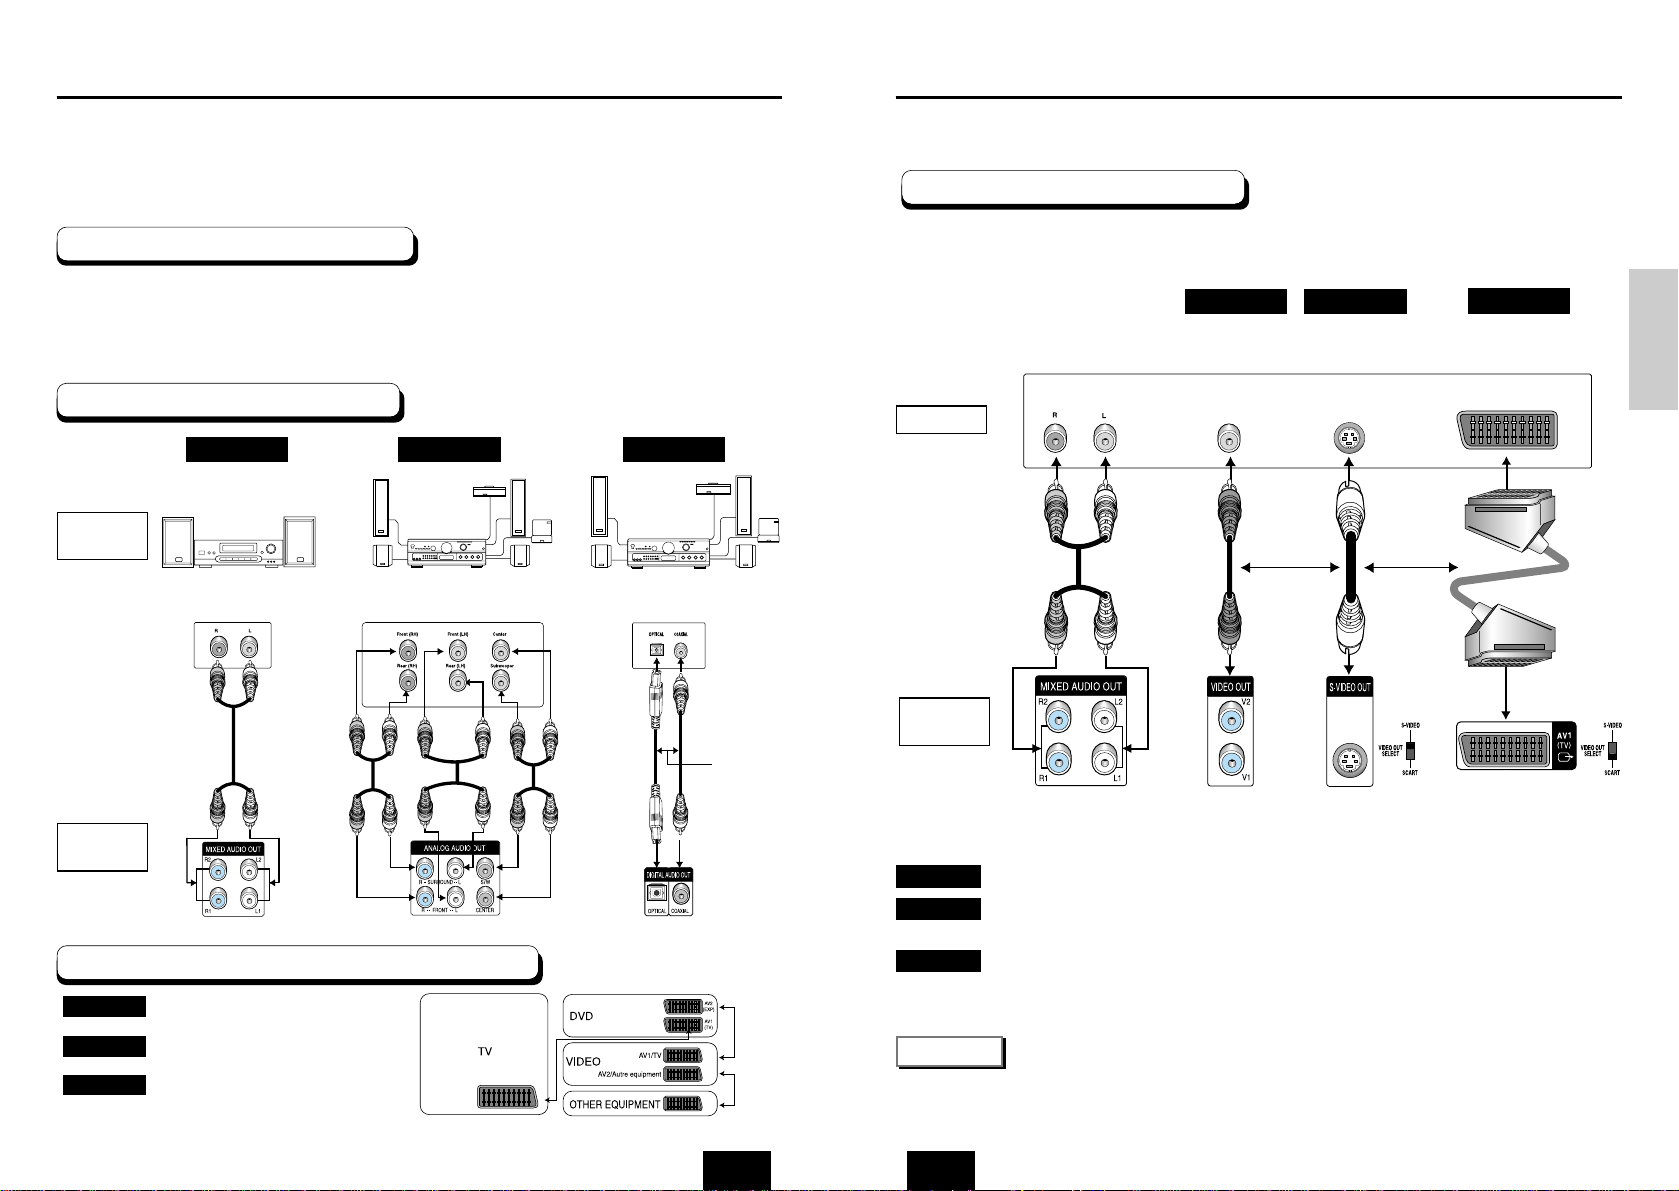
Tour of the Remote Control
1. DVD POWER Button
• Turns the power on or off.
2. ZOOM Button
• Enlarges the DVD picture.
3. NUMBER Buttons
4. MENU Button
• Brings up the DVD player’s setup menu.
5. VOLUME Buttons
6. TV/VIDEO Button
7. I.REPLAY Button
•
This function is used to replay the previous 10 seconds of
the movie from the current position.
8. EZ VIEW Button
• Easy View can convert Letter Box images to full
screen viewing on your conventional TV.
9. STOP Button ( )
10. DISC MENU Button
• Brings up the Disc menu.
11. TITLE MENU Button
• Brings up the Title menu.
12. ENTER/DIRECTION Button
(UP/DOWN or LEFT/RIGHT buttons)
• This button functions as a toggle switch.
13. CLEAR Button
•
Use to remove menus or status displays from the screen.
14. BOOKMARK Button
15. REPEAT Button
•
Allows you to repeat play a title, chapter, track, or disc.
16. JOG DIAL
• Operates frame by frame play. In CD mode,
performs track search.
17. SHUTTLE DIAL
• Performs fast motion play.
18. TV POWER Button
19. SLOW Button
20. 3D Button
21. OPEN/CLOSE Button
22. CHANNEL Buttons
23. I.SKIP Button
• This function skips playback ahead 10 seconds.
24. PLAY/PAUSE Button ( )
• Begin/Pause disc play.
25. SKIP Buttons ( / )
• Use to skip the title, chapter, or track.
26. RETURN Button
• Returns to a previous menu.
27. INFO Button
• Displays the current disc mode.
28. ANGLE Button
• Use to access various camera angles on a DVD.
29. MODE Button
• Allows you to program a specific order.
30. SUBTITLE Button
31. AUDIO Button
•
Use this button to access various audio functions on a disc.
32. REPEAT A-B Button
•
Use to mark a segment to repeat between Aand B.
DVD Function Buttons
Tour of the Remote Control
DVD-E435
1
18
19
20
21
22
23
24
25
26
27
28
29
30
31
32
2
3
4
5
6
7
8
9
10
11
12
13
14
15
16
17
16 17
Page 10
ENG
CONNECTIONS
ENG
Choosing a Connection
TV (Normal, Widescreen, Projection, etc..)
Method 1
Method 2
Method 3
Connection to a TV (For Video)
TV
Method 1
Method 2
Method 3
18 19
Choosing a Connection
Before Connecting the DVD Player
Connection to an Audio System
Method 1 Method 2 Method 3
AUDIO
SYSTEM
DVD
PLAYER
e.g) DVD-E435
DVD
PLAYER
The following show examples of connections commonly used to connect the DVD player
with a TV and other components.
• Always turn off the DVD player, TV, and other components before you
connect or disconnect any cables.
• Refer to the owner’s manual of the additional components you are connecting for
more information on those particular components.
Mixed Audio Out Analog Audio Out Digital Audio Out
2ch Amplifier
Audio Input Jacks
5.1ch Analog Amplifier
Audio Input Jacks
Dolby Digital Decoder
Digital Audio Input Jacks
Good
picture
Better
picture
Best
picture
Basic Audio
Audio Output Jacks
OR
OR
OR
AV Cable
S-Video
Cable
Scart Cables
(not included)
Video Output Jack
S-Video Jack
Scart Jack
DVD Player + TV with Video Input Jack
DVD Player + TV with S-Video Input Jack
(If S-Video is selected in the VIDEO OUT SELECT.)
DVD Player + TV with Scart Input Jack (Audio & Video)
(If Scart jack is selected in the VIDEO OUT SELECT.)
NOTE
• If Scart Jack is selected, S-Video will not work.
• If S-Video is selected, Scart Jack will not work.
DVD Player + 2ch Stereo
Amplifier or Dolby Pro Logic Decoder
DVD Player + Amplifier with 5.1ch
Analog Input Jacks
DVD Player + Amplifier with Dolby
Digital Decoder/DTS Decoder/MPEG-2
An Example of Connecting DVD with Other Equipment
(DVD-E335/DVD-E435)
Method 1
Method 2
Method 3
e.g) DVD-E435
Page 11
ENG
BASIC
FUNCTIONS
ENG
Playing a Disc
RESUME function
When you stop disc play, the player remembers where you stopped, so when you press PLAY ( ) again,
it will pick up where you left off. (unless the disc is removed, the STOP ( ) button is pressed twice or the
player is unplugged.)
• If the player is left for 5 minutes in pause mode, it will stop.
• If the player is left in the stop mode for more than 30 minutes, the power will automatically shut off.
(Automatic Power-Off Function)
• If the player is left in the stop mode for more than one minute without any user interaction, a screen
saver will be activated, and the TV screen will fade in and out repeatedly. Press the PLAY ( )
button to resume normal play.
• This icon indicates an invalid button press.
NOTE
Step Motion Play (Except CD)
DVD-E435 : If turning Jog Dial, you can view one by one.
DVD-E232/DVD-E234/DVD-E235/DVD-E335 : Press the STEP button on the remote during play.
- Each time the button is pressed, a new frame will appear.
- No sound is heard during STEP mode.
- Press PLAY/PAUSE ( ) to resume normal play.
(You can only perform step motion play in the forward direction.)
Slow Motion Play (Except CD)
DVD-E232/DVD-E234/DVD-E235/DVD-E335 : Press the button on the remote during PAUSE
or STEP mode. By pressing the button, you can select slow motion play for 1/8, 1/4 or 1/2 of
normal speed.
DVD-E435 : Press and hold the button to choose the play speed between 1/8X, 1/4X and 1/2X
of normal during PAUSE or STEP mode, or press the SLOW button you can play slow motion for
1/8 of normal speed.
- No sound is heard during slow mode.
- Press PLAY/PAUSE ( ) to resume normal play.
- When playing a DVD/VCD, reverse slow motion play will not work.
7
8
20 21
Playing a Disc
Before Play
Play
• Turn on your TV and press the TV/VIDEO button to select the video
mode.
• Turn on your Audio System and select AUX, CD or DVD.
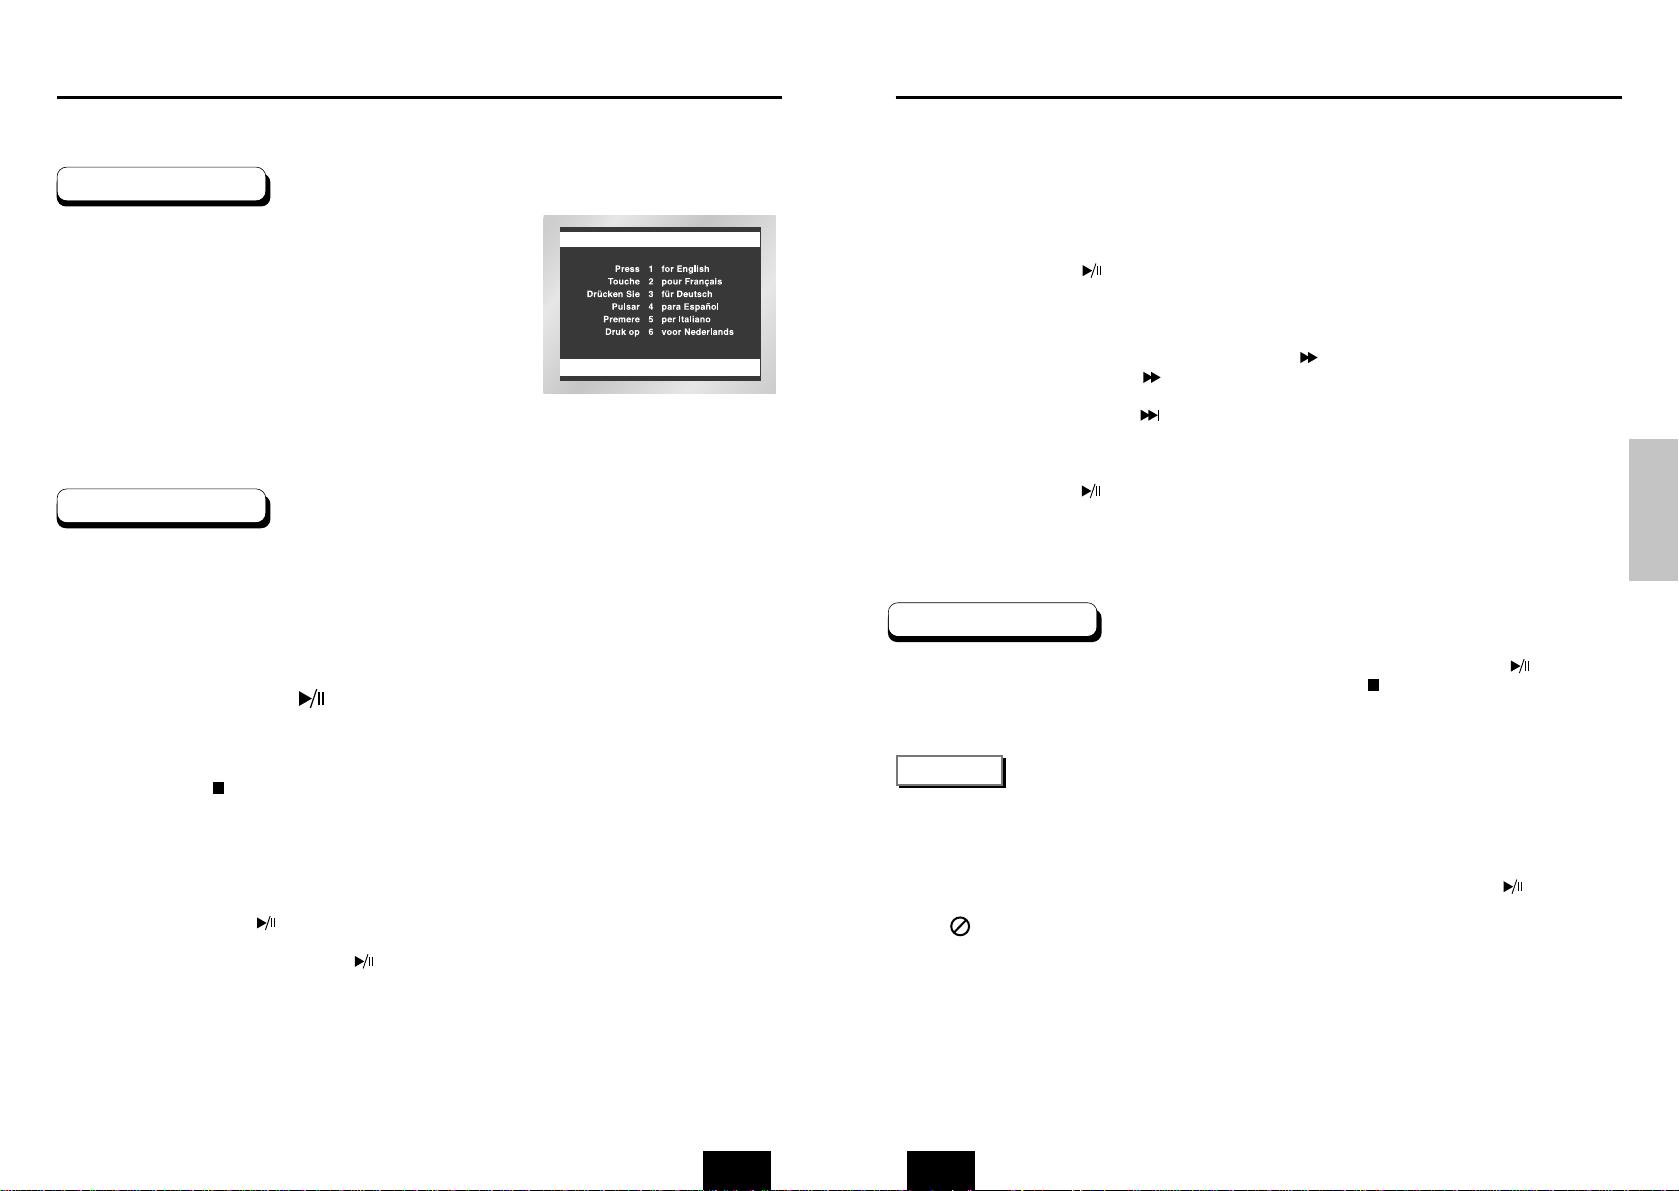
After plugging in the player, the first time you press the DVD
POWER button, this screen comes up :
If you want to select the language, press a NUMBER button.
(This screen will only appear the very first time you plug in the player.)
Press the OPEN/CLOSE button.
The STANDBY indicator light goes out and the tray opens.
Place a disc gently into the tray with the disc’s label
facing up.
Press the PLAY/PAUSE ( ) button or OPEN/CLOSE
button to close the disc tray.
Stopping Play
Press the STOP ( ) button during play.
Removing Disc
Press the OPEN/CLOSE button.
Pausing Play
Press the PLAY/PAUSE ( ) or STEP button on the remote during play.
- Screen stops, no sound.
- To resume again, press PLAY/PAUSE ( ) button once again.
SELECT MENU LANGUAGESELECT MENU LANGUAGE
1
2
3
4
5
6
Page 12
ENG
BASIC
FUNCTIONS
ENG
Using the Display Function
When Playing a DVD/VCD/CD
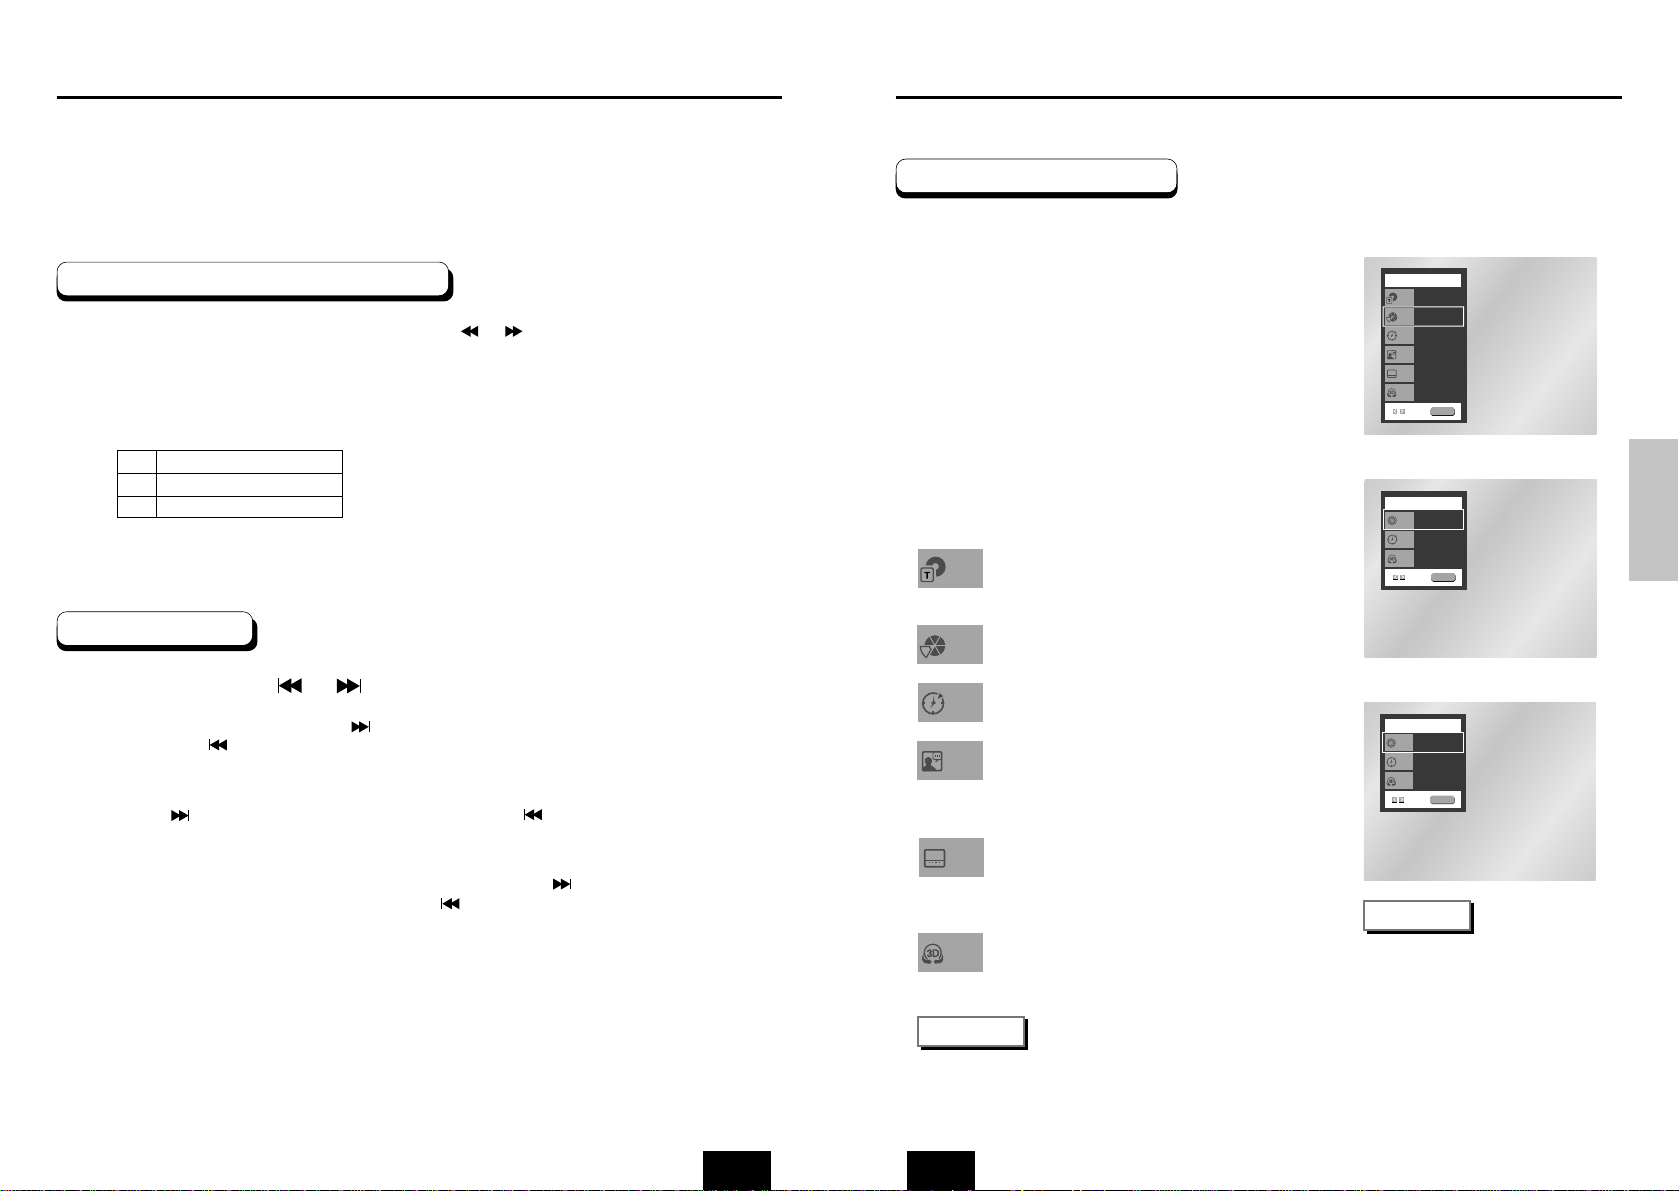
During play, press the INFO button on the remote.
Use the UP/DOWN buttons to select the desired
item.
Use the LEFT/RIGHT buttons to make the desired
setup, then press ENTER.
• You may use the number buttons of the remote control to
directly access a title, chapter or to start the playback from
the desired time.
To make the screen disappear, press the INFO
button again.
To access the desired title when there is more than
one in the disc. For example, if there is more than one
movie on a DVD, each movie will be identified.
Most of DVD discs are recorded in chapters so that
you can quickly find a specific passage.
Allows playback of the film from a desired time.
You must enter the starting time as a reference.
Refers to the language of the film soundtrack. In the
example, the soundtrack is played in English 5.1CH.
A DVD disc can have up to eight different
soundtracks.
Refers to the subtitle languages available in the disc.
You will be able to choose the subtitles language or,
if you prefer, turn them off from the screen.
A DVD disc can have up to 32 different subtitles.
A surround sound effect is generated using only two
front speakers.
What is a Chapter?
Each Title on a DVD is usually divided
into chapters (similar to tracks on an
audio CD).
What is a Title?
A DVD may contain several different
titles. For example, if a disc contains
four different movies, each might be
considered a title.
NOTE
1
2
3
4
DVD
Title
Time
Audio
Chapter
Subtitle
01
02
0:00:13
ENG 5.1CH
Off
Off
ENTER
3D Sound
CD
Track
Time
3D Sound
01
0:00:48
Off
ENTER
DVD
CD
Title
Chapter
Time
Audio
Subtitle
3D Sound
22 23
Using the Search & Skip Functions
During play, you can search quickly through a chapter or track or use the skip
function to jump to the next selection.
Searching through a Chapter or Track
Skipping Tracks
DVD-E232/DVD-E234/DVD-E235/DVD-E335 : Press the or button on the
remote and press again to search at a faster speed on the DVD, VCD, CD.
DVD-E435 : Turn the shuttle dial of remote control during disc play.
DVD-E335/DVD-E435 : Turn the shuttle dial on the front can a multiple-speed
operation if desiring to use the key on the front.
1
DVD
VCD
CD
2X, 4X, 8X, 16X, 32X, 128X
4X, 8X
2X, 4X, 8X
During play, press the or button.
• When playing a DVD, if you press the button, it moves to the next chapter.
If you press the button, it moves to the beginning of the chapter.
One more press makes it move to the beginning of the previous chapter.
• When playing a VCD 2.0 in MENU OFF mode, a VCD 1.1 or a CD, if you
press the button, it moves to the next track. If you press the button,
it moves to the beginning of the track.
One more press makes it move to the beginning of the previous track.
• If a track exceeds 15 minutes when playing a VCD and you press the
button, it moves forward 5 minutes. If you press the button, it moves
backward 5 minutes.
1
VCD
Track
Time
3D Sound
01
0:00:48
Off
ENTER
VCD
*
When in VCD 2.0 mode (MENU ON mode), this function does
not work.
NOTE
Page 13
ENG
BASIC
FUNCTIONS
ENG
Using the Function Menu
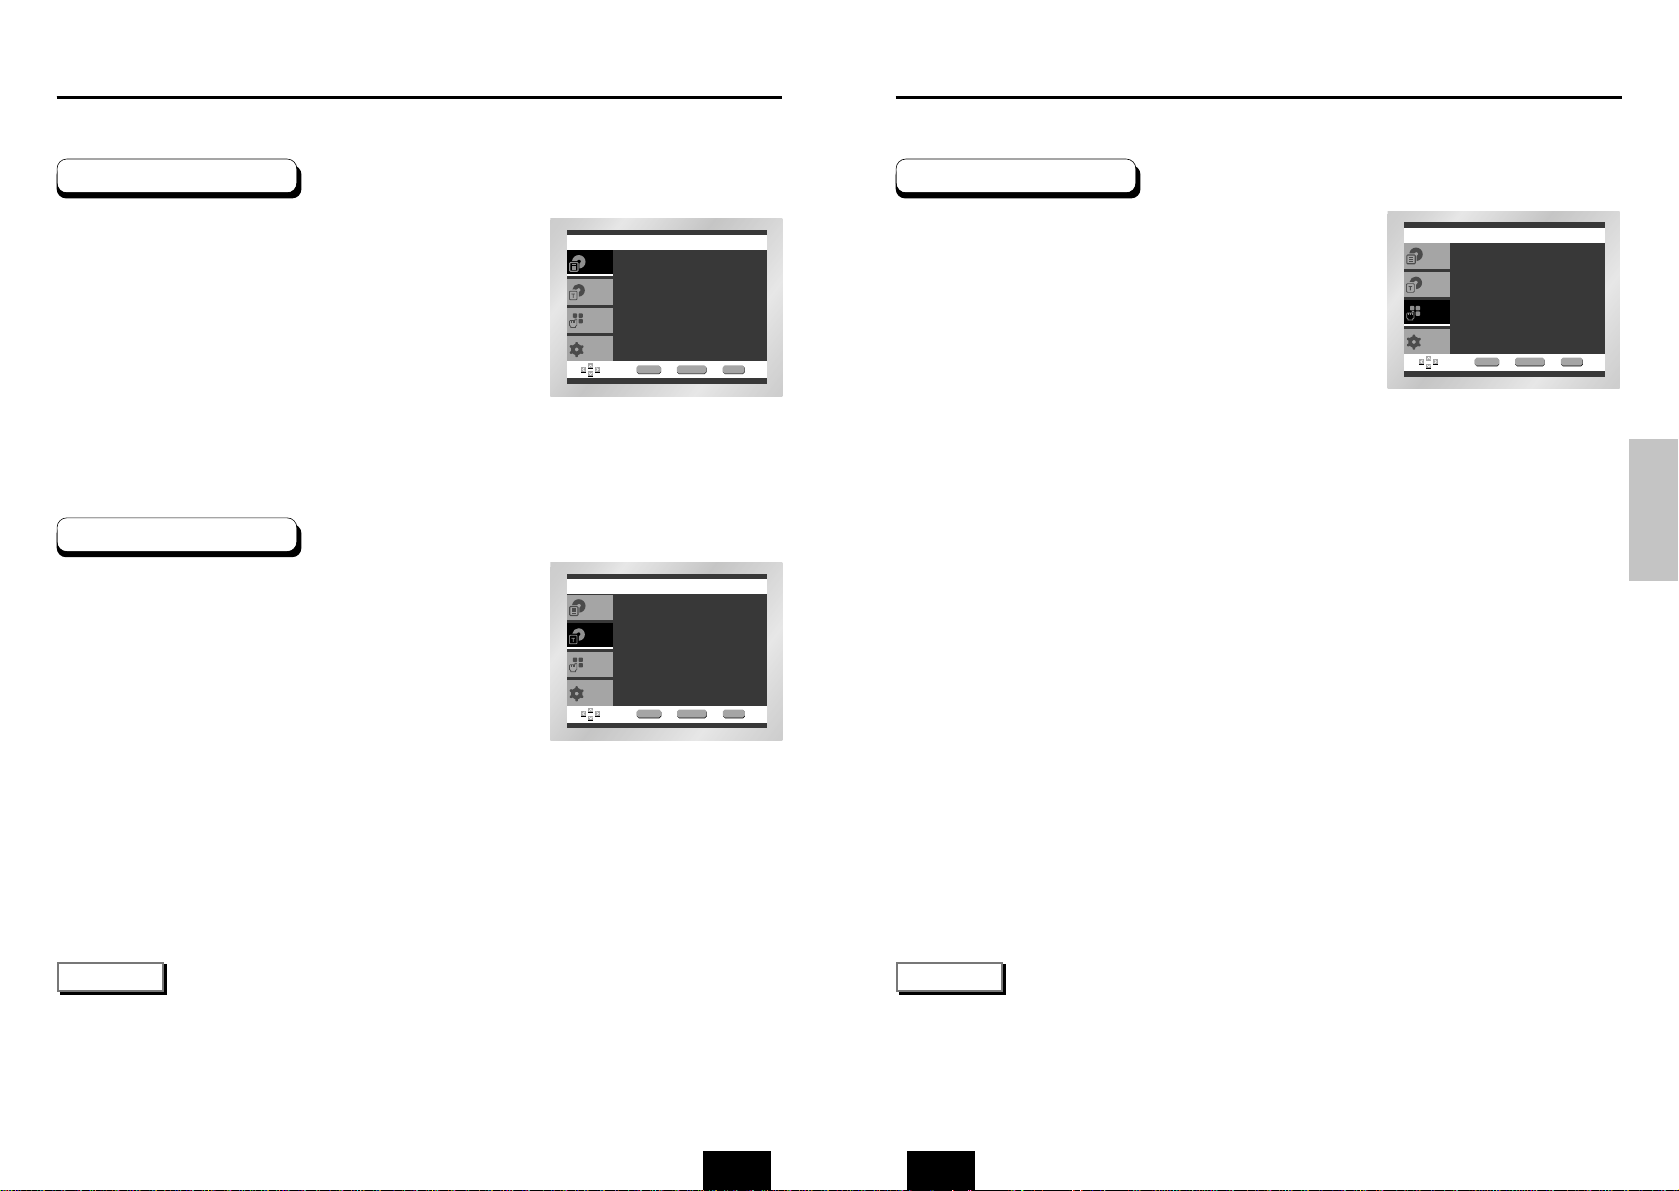
Press the MENU button during playback.
Use the UP/DOWN buttons to highlight Function,
then press the RIGHT or ENTER button.
Function selection screen appears, Info, Zoom,
Bookmark, Repeat and EZ View.
- Info (See Page 23)
- Zoom (See Page 35)
- Bookmark (See Page 34)
- Repeat (See Page 26)
- EZ View (See Page 27~28)
Use the UP/DOWN button to highlight one of the 5
functions. Then press the RIGHT or ENTER button
to access the function.
1
2
3
4
• You can also directly select these functions using thier respective buttons on the remote.
NOTE
Using the Function Menu
DVD
Setup
Title Menu
Disc Menu
Function
Info
Zoom
Bookmark
Repeat
EZ View
ENTER RETURN MENU
24 25
Using the Disc and Title Menu
DVD
Setup
Press ENTER key
for Disc Menu
Title Menu
Function
Disc Menu
ENTER RETURN MENU
DVD
Setup
Disc Menu
Title Menu
Function
ENTER RETURN MENU
Press ENTER key
for Title Menu
Using the Title Menu
During the playback of a DVD disc, Press the
MENU button on the remote.
Select Title Menu using the UP/DOWN buttons,
then press the RIGHT or ENTER button.
1
2
Using the Disc Menu
During the playback of a DVD disc, press the
MENU button on the remote.
Select Disc Menu using the UP/DOWN buttons,
then press the RIGHT or ENTER button.
1
2
• Depending on the disc, the Title and Disc Menus may not work.
• Title Menu will only be displayed if there are at least two titles in the disc.
• You can also use the Title Menu and the Disc Menu, using the TITLE MENU and the DISC MENU buttons
on the remote.
• In VCD2.0, the DISC MENU button works as a conversion switch between Menu On and Menu Off mode.
NOTE
Page 14
ENG
BASIC
FUNCTIONS
Adjusting the Aspect Ratio (EZ View)
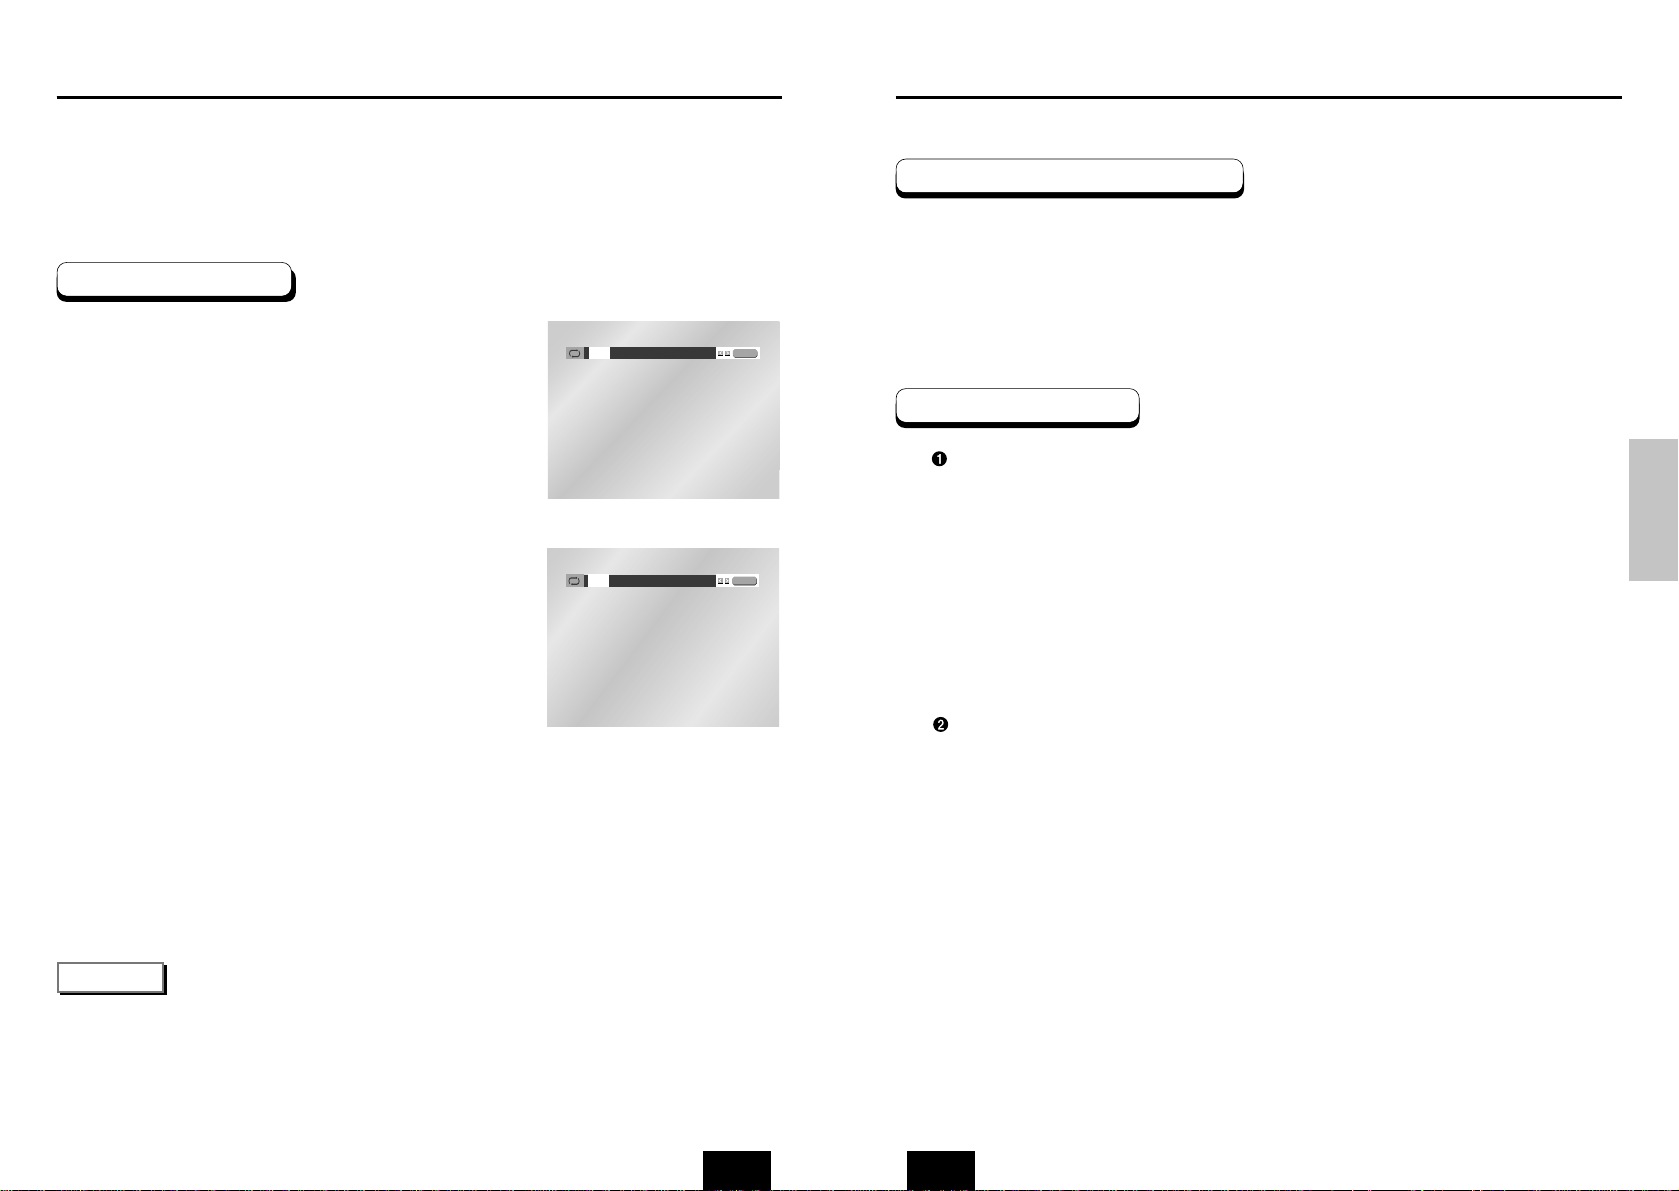
To play back using aspect ratio (DVD)
If you are using a 16:9 TV
Press the EZ VIEW button.
• The screen size changes when the button is pressed repeatedly.
• The screen zoom mode operates differently depending on the screen
setting in the initial setup menu.
• To ensure correct operation of the EZ VIEW button, you should set the
correct aspect ratio in the initial setup (See page 47).
For 16:9 aspect ratio discs
• Wide Screen
Displays the content of the DVD title in 16:9 aspect ratio.
• Screen Fit
The top and bottom of the screen are cut off. When playing a
2.35:1 aspect ratio disc, the black bars at the top and bottom of the
screen will disappear. The picture will look vertically stretched.
(Depending on the type of disc, the black bars may not disappear
completely.)
• Zoom Fit
The top, bottom, left and right of the screen are cut off and the central
portion of the screen is enlarged.
For 4:3 aspect ratio discs
• Normal Wide
Displays the content of the DVD title in 16:9 aspect ratio. The picture
will look horizontally stretched.
• Screen Fit
The top and bottom of the screen are cut off and the full screen
appears. The picture will look vertically stretched.
• Zoom Fit
The top, bottom, left and right of the screen are cut off and the central
portion of the screen is enlarged.
• Vertical Fit
When a 4:3 DVD is viewed on a 16:9 TV, black bars will appear at
the left and right of the screen in order to prevent the picture from
looking horizontally stretched.
1
ENG
Repeat the current track, chapter, title, a chosen section (A-B), or all of the disc.
When playing a DVD
Press the REPEAT button on the remote.
Repeat screen appears.
Select Chapter, Title or A-B using the
LEFT/RIGHT buttons.
*
REPEATA-B
• Press the REPEAT button. Select A-B on screen with the
LEFT/RIGHT buttons or press the 'REPEAT A-B' button on
the remote.
• Press ENTER at the point where you want the repeat play to
start (A). The B is automatically highlighted.
• Press ENTER at the point where you want the repeat play to
stop (B).
• To terminate the function, press the 'CLEAR' button or the
'REPEATA-B' button again.
• A-B REPEAT does not allow you to set point (B) until at least
5 seconds has elapsed after point (A) has been set.
Press ENTER.
To return to normal play, press REPEAT again,
then press the LEFT/RIGHT buttons to select Off.
Press ENTER, then press the PLAY/PAUSE
button.
OfOff
Chapter Title A - B
ENTER
Off
Track Disc A - B
ENTER
NOTE
• DVD repeats play by chapter or title, CD and VCD repeat play by disc or track.
• Depending on the disc, the Repeat function may not work.
• When in VCD 2.0 mode (MENU ON mode), this function does not work.
DVD
VCD/CD
1
2
3
4
26 27
Repeat Play
Page 15
ENG
ADVANCED
FUNCTIONS
ENG
28 29
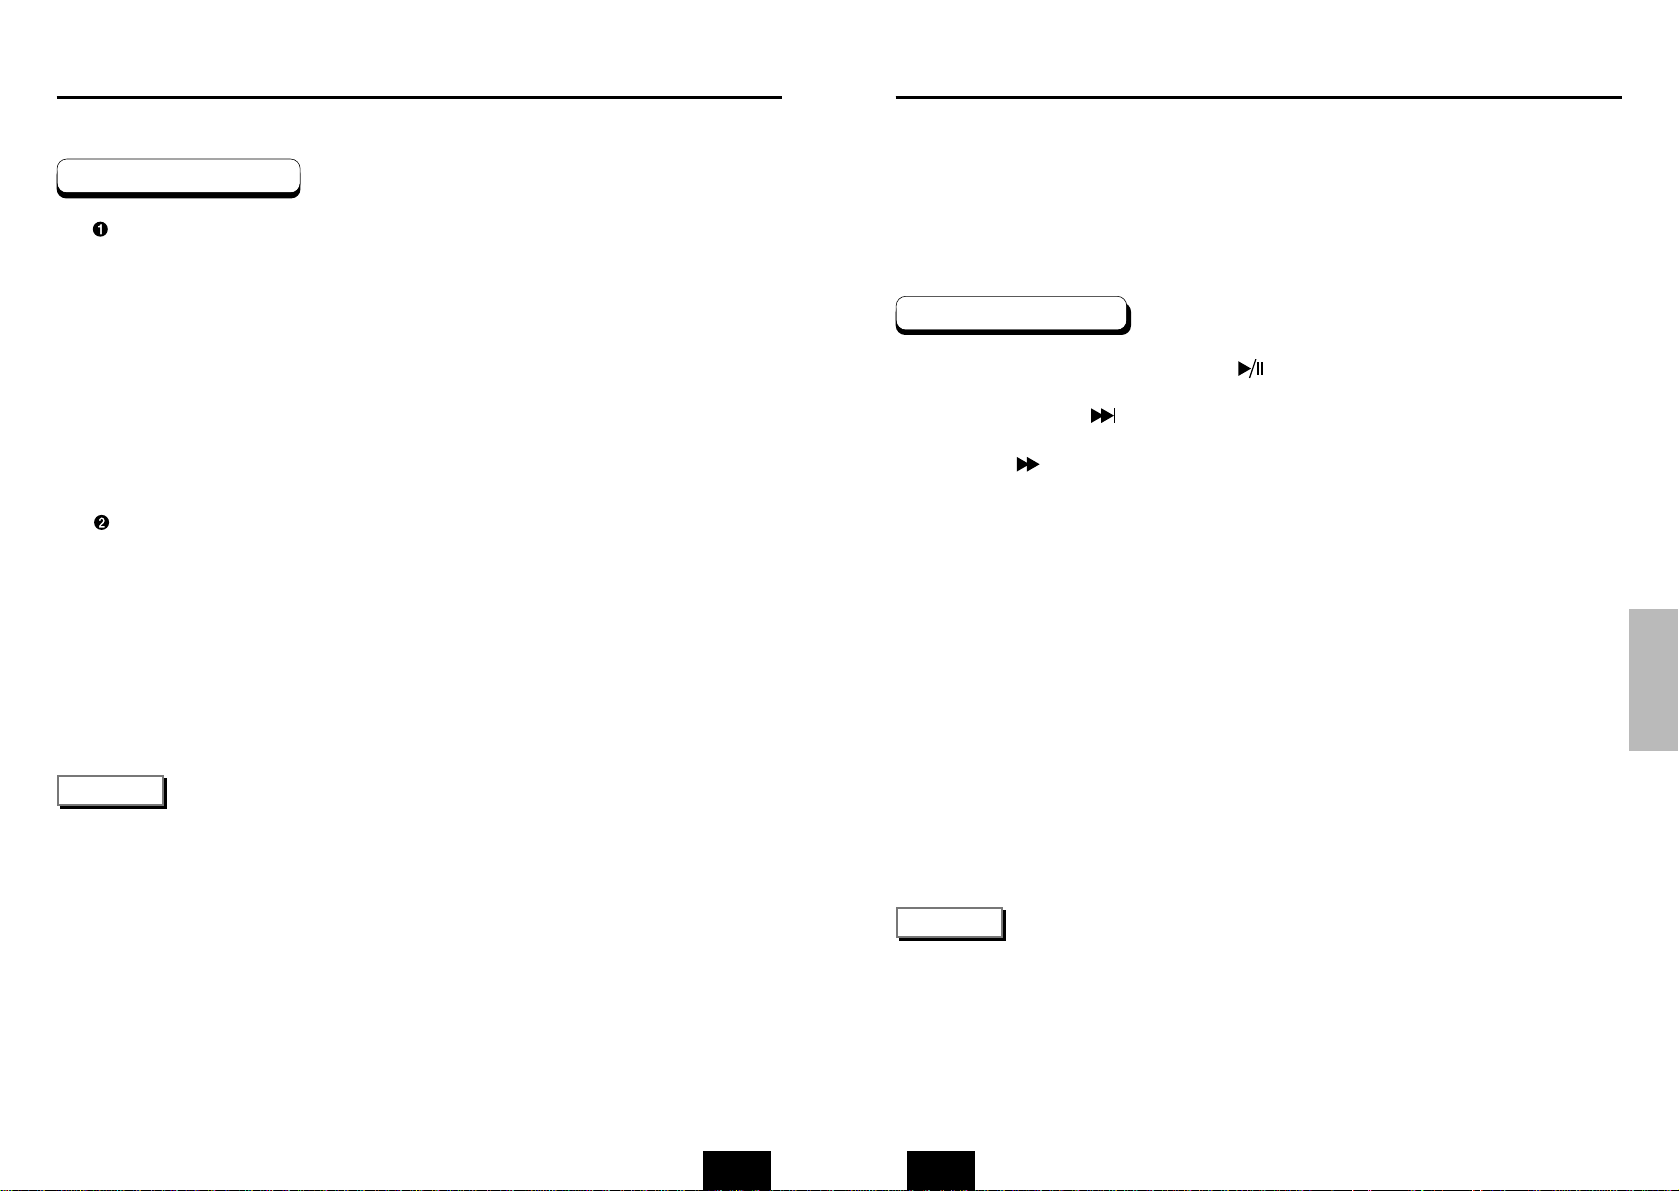
Slow Repeat play
When playing a DVD
During play, press the PLAY/PAUSE ( ) button.
Press and hold the button to choose the play speed between 1/8X, 1/4X and
1/2X of normal. (DVD-E435 only)
Press the button to choose the play speed between 1/8X, 1/4X and 1/2X of
normal. (DVD-E232/DVD-E234/DVD-E235/DVD-E335 only)
Press the REPEAT A-B button to select the point where the function starts. (A)
Press the REPEAT A-B button to select the point where the function ends. (B)
NOTE
• The disc will play from A to B repeatedly at the speed you chose.
• To terminate the function, press the 'CLEAR' button or the 'REPEATA-B' button again.
• A-B REPEAT does not allow you to set point (B) until at least 5 seconds has elapsed after point (A) has been set.
This feature allows you slowly repeat scenes containing sports, dancing,
musical instruments being played etc. so you can study them more closely.
1
2
3
4
Adjusting the Aspect Ratio (EZ View)
For 16:9 aspect ratio discs
• 4:3 Letter Box
Displays the content of the DVD title in 16:9 aspect ratio.
The black bars will appear at the top and bottom of the screen.
• 4:3 Pan Scan
The left and right of the screen are cut off and displays the central
portion of the 16:9 screen.
• Screen Fit
The top and bottom of the screen are cut off and the full screen
appears. The picture will look vertically stretched.
• Zoom Fit
The top, bottom, left and right of the screen are cut off and the central
portion of the screen is enlarged.
For 4:3 aspect ratio discs
• Normal Screen
Displays the content of the DVD title in 4:3 aspect ratio.
• Screen Fit
The top and bottom of the screen are cut off and the full screen
appears. The picture would look vertically stretched.
• Zoom Fit
The top, bottom, left and right of the screen are cut off and the central
portion of the screen is enlarged.
NOTE
• This function may behave differently depending on the type of disc.
If you are using a 4:3 TV
Page 16
ENG
ADVANCED
FUNCTIONS
ENG
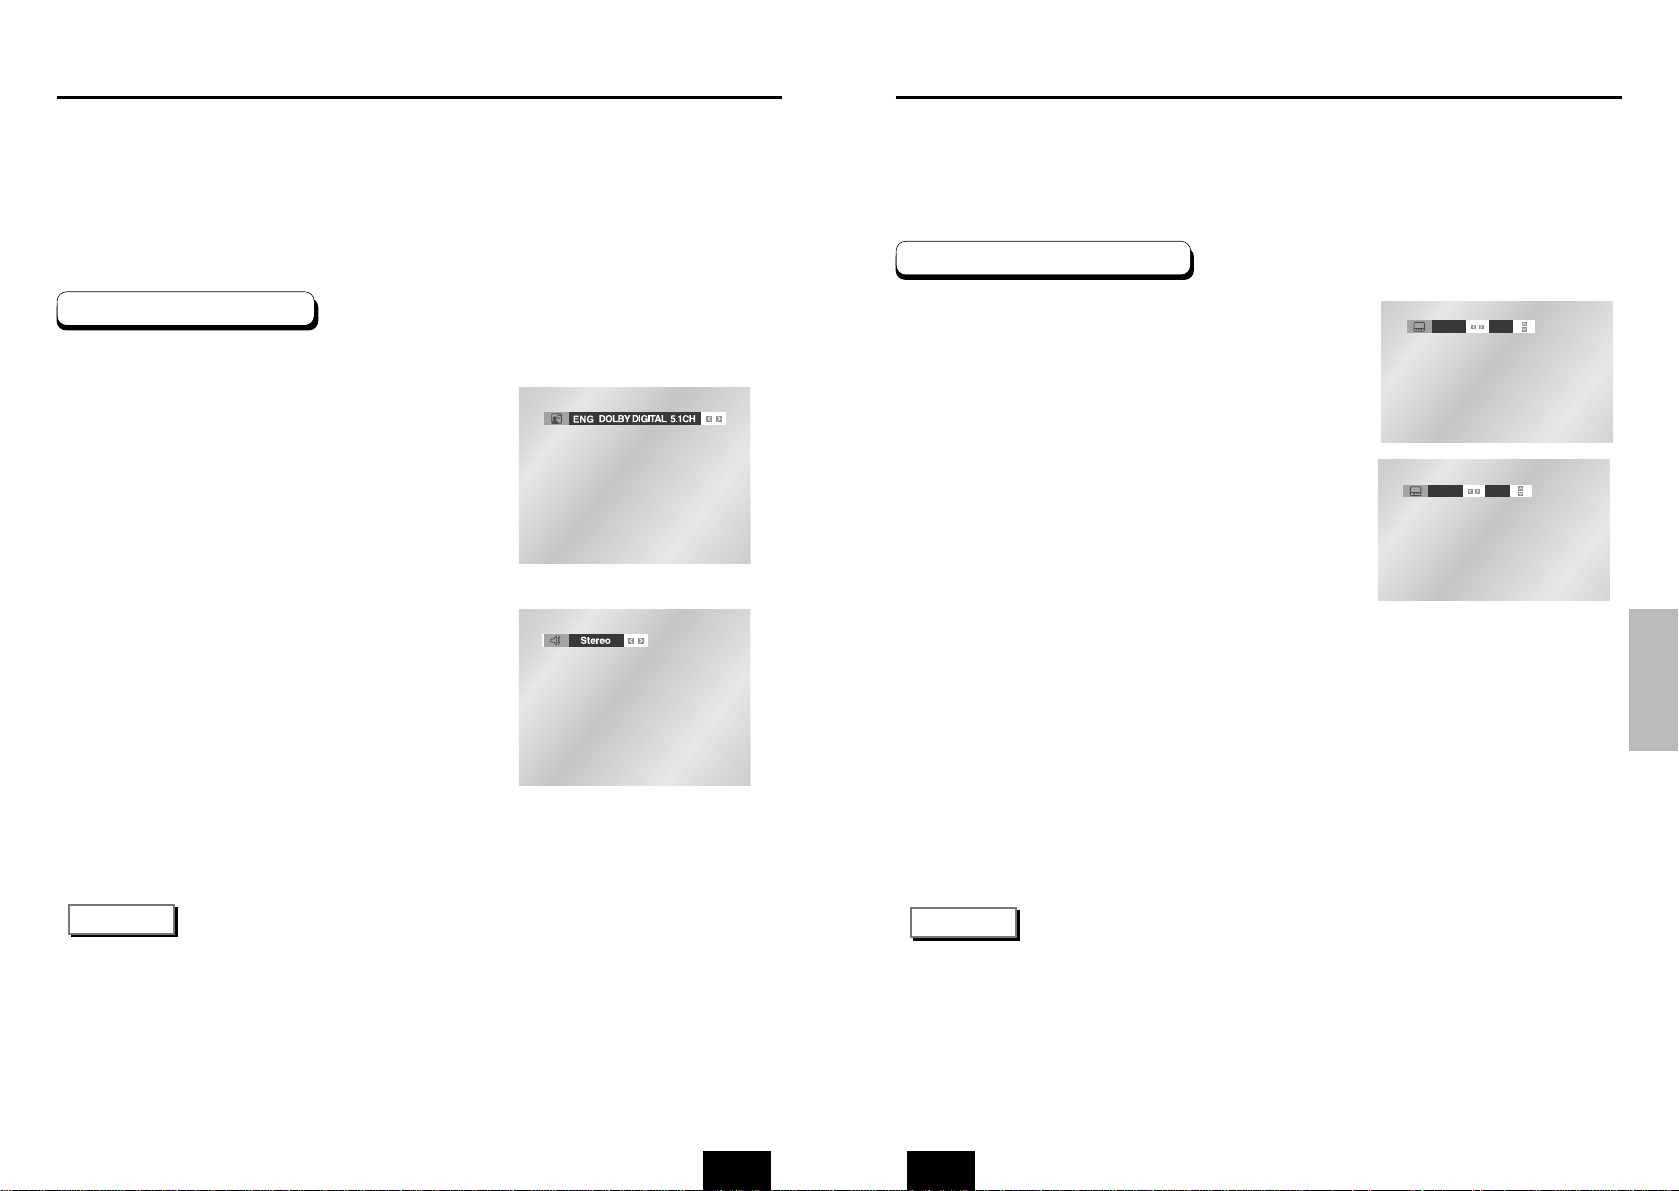
Selecting the Audio Language
You can select a desired language quickly and easily with the AUDIO button.
Using the AUDIO button
Press the AUDIO button.
Use the LEFT/RIGHT buttons to select the
desired language on a DVD.
- The audio languages are represented by abbreviations.
Use the LEFT/RIGHT buttons to select Stereo,
LEFT or RIGHT. (On VCD/CD)
NOTE
• This function depends on what languages are encoded on the disc and may not work with all DVDs.
• ADVD disc can contain up to 8 audio languages.
•
How to have the same audio language come up whenever you play a DVD;
Refer to “Setting Up the Language Features” on page 43.
DVD
VCD/CD
1
2
3
30 31
Selecting the Subtitle Language
You can select a desired subtitle quickly and easily with the SUBTITLE button.
Using the SUBTITLE button
Press the SUBTITLE button.
Use the LEFT/RIGHT buttons to select the
desired subtitle language.
Use the UP/DOWN buttons to determine
whether or not the subtitle will be displayed.
- Initially, the subtitling will not appear on screen.
- The subtitle languages are represented by abbreviations.
ENG On
ENG Off
NOTE
• This function depends on what languages are encoded on the disc and may not work with all DVDs.
• ADVD disc can contain up to 32 subtitle languages.
•
How to have the same subtitle language come up whenever you play a DVD;
Refer to “Setting Up the Language Features” on page 43.
1
2
3
Page 17
ENGENG
32 33
ADVANCED
FUNCTIONS
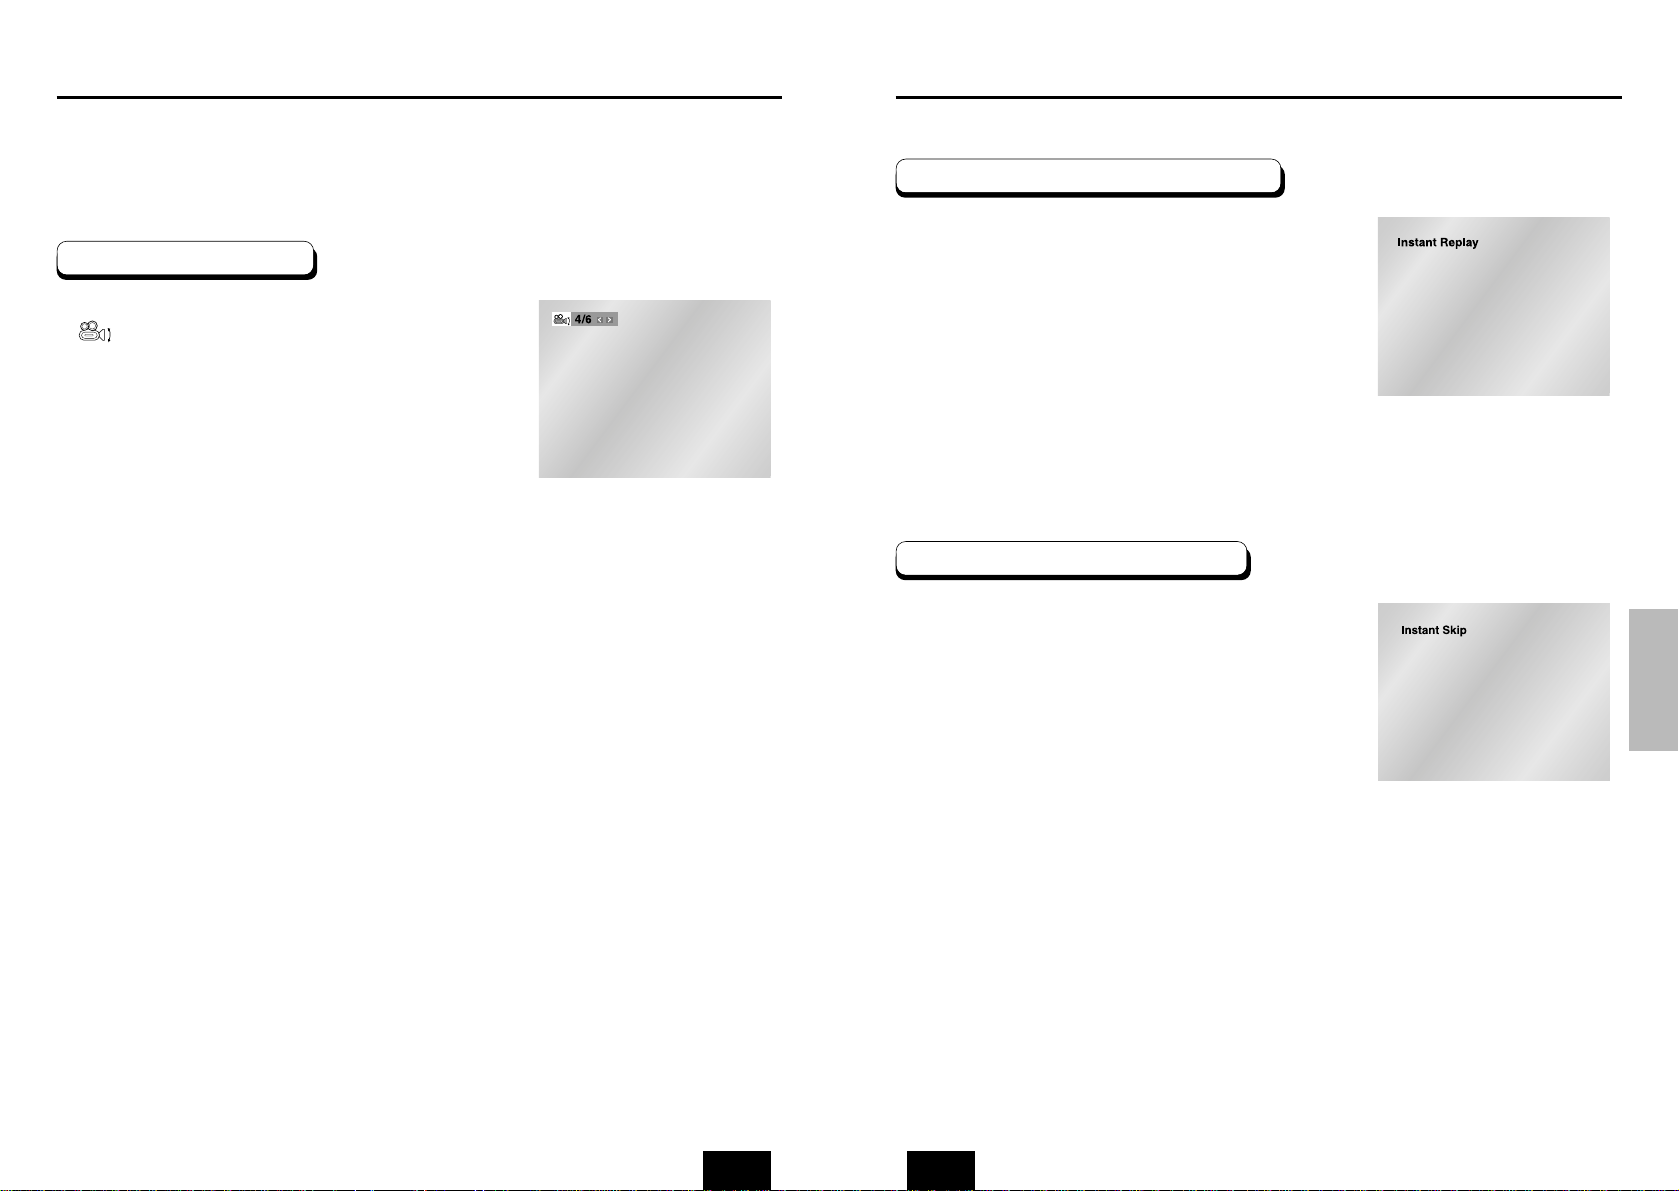
Changing the Camera Angle
Press the ANGLE button to see if an ANGLE
( ) mark is present at the upper left hand
corner of the screen.
When an ANGLE mark is shown, press the
ANGLE button, then an ANGLE select icon
will appear at the upper left hand corner of
the screen.
Use the LEFT/RIGHT buttons to select the
desired screen angle.
To turn off the display, press the ANGLE
button again.
When a DVD contains multiple angles of a particular scene, you can select the Angle
function.
Using the ANGLE button
1
2
3
Using the Instant Replay/Skip Function
If you miss a scene, you can see it again using
this function.
If you press the I.REPLAY button, the current
scene moves backward about 10 seconds,
and plays back.
- Depending on the disc, the Instant Replay
function may not work.
Using the Instant Replay function (DVD)
1
Use this function to skip playback 10 seconds
ahead of the current scene.
Press the I.SKIP button.
- Playback will skip ahead 10 seconds.
- Depending on the disc, this function may not work.
Using the Instant Skip function (DVD)
1
Page 18
ENGENG
ADVANCED
FUNCTIONS
34 35
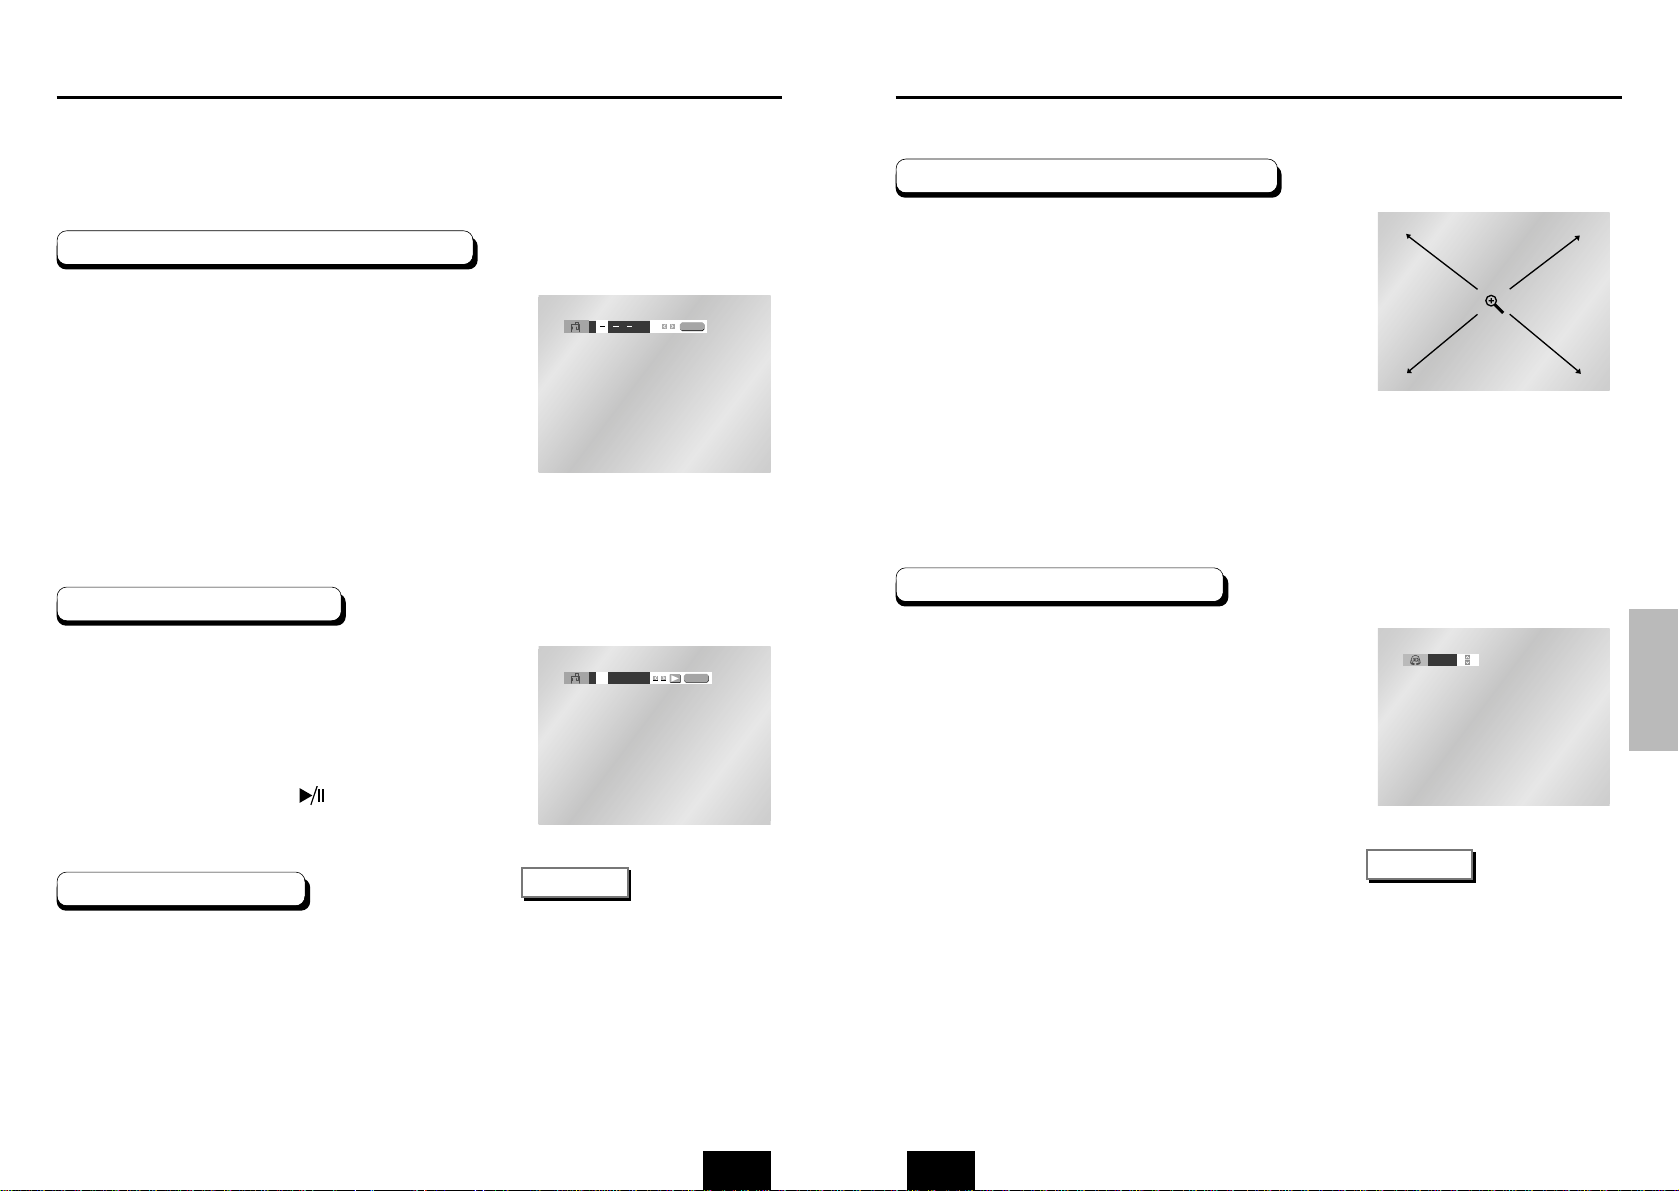
Using the Bookmark Function
1
2
3
4
1
2
1
2
3
3
This feature lets you bookmark sections of a DVD or VCD (MENU OFF mode) so you can
quickly find them at a later time.
Using the Bookmark Function (DVD/VCD)
During play, press the BOOKMARK button on the
remote. The Bookmark icons will be displayed.
Use the LEFT/RIGHT buttons to move to the
desired bookmark icon.
When you reach the scene you want to mark,
press the ENTER button. The icon will change to
a number (1, 2, or 3).
Press the BOOKMARK button to turn off the
display.
Recalling a Marked Scene
During play, press the BOOKMARK button
on the remote.
Use the LEFT/RIGHT buttons to select a
marked scene.
Press the PLAY/PAUSE ( ) buttons to skip
to the marked scene.
Clearing a Bookmark
During play, press the BOOKMARK button
on the remote.
Use the LEFT/RIGHT buttons to select the
bookmark number you want to delete.
Press the CLEAR button to delete a
bookmark number. Press the BOOKMARK
button to turn off the display.
ENTER
1 – –
CLEAR
Using the Zoom & 3D Sound Functions
Using the Zoom Function (DVD)
During play or pause mode, press the ZOOM button
on the remote.
A zoom mark will be displayed on screen.
Use the UP/DOWN or LEFT/RIGHT buttons to select
the part of the screen you want to zoom in on.
Press the ENTER button.
- During DVD play, press ENTER to zoom in 2X/4X/2X/Normal
in order.
- During VCD play, press ENTER to zoom in 2X/Normal in order.
Using the 3D Sound Function
The simulated surround effect depends on the disc
contents. If you connect the unit to your stereo
system, you can enhance sound quality and
produce a greater surround effect.
This feature is useful when you are using the DVD
player with a two channel stereo through the
analog outputs.
(Discs which are recorded with LPCM or DTS will
not work. )
During play, press the 3D button.
The 3D SOUND mark will be displayed on
screen.
Press the UP/DOWN buttons to turn the
3D Sound feature on or off.
Off
NOTE
• 3D Sound is possible only on discs
recorded using DOLBY SURROUND
or DOLBY DIGITAL. However, some
of these discs do not contain rear
channel sound signals.
• Depending on the disc, the Zoom and
3D Sound function may not work.
1
2
3
1
2
NOTE
• Up to three scenes may be marked
at a time.
• When in VCD 2.0 mode (MENU ON
mode), this function does not work.
• Depending on the disc, the
Bookmark function may not work.
Page 19
ENGENG
ADVANCED
FUNCTIONS
36 37
MP3/WMA Play
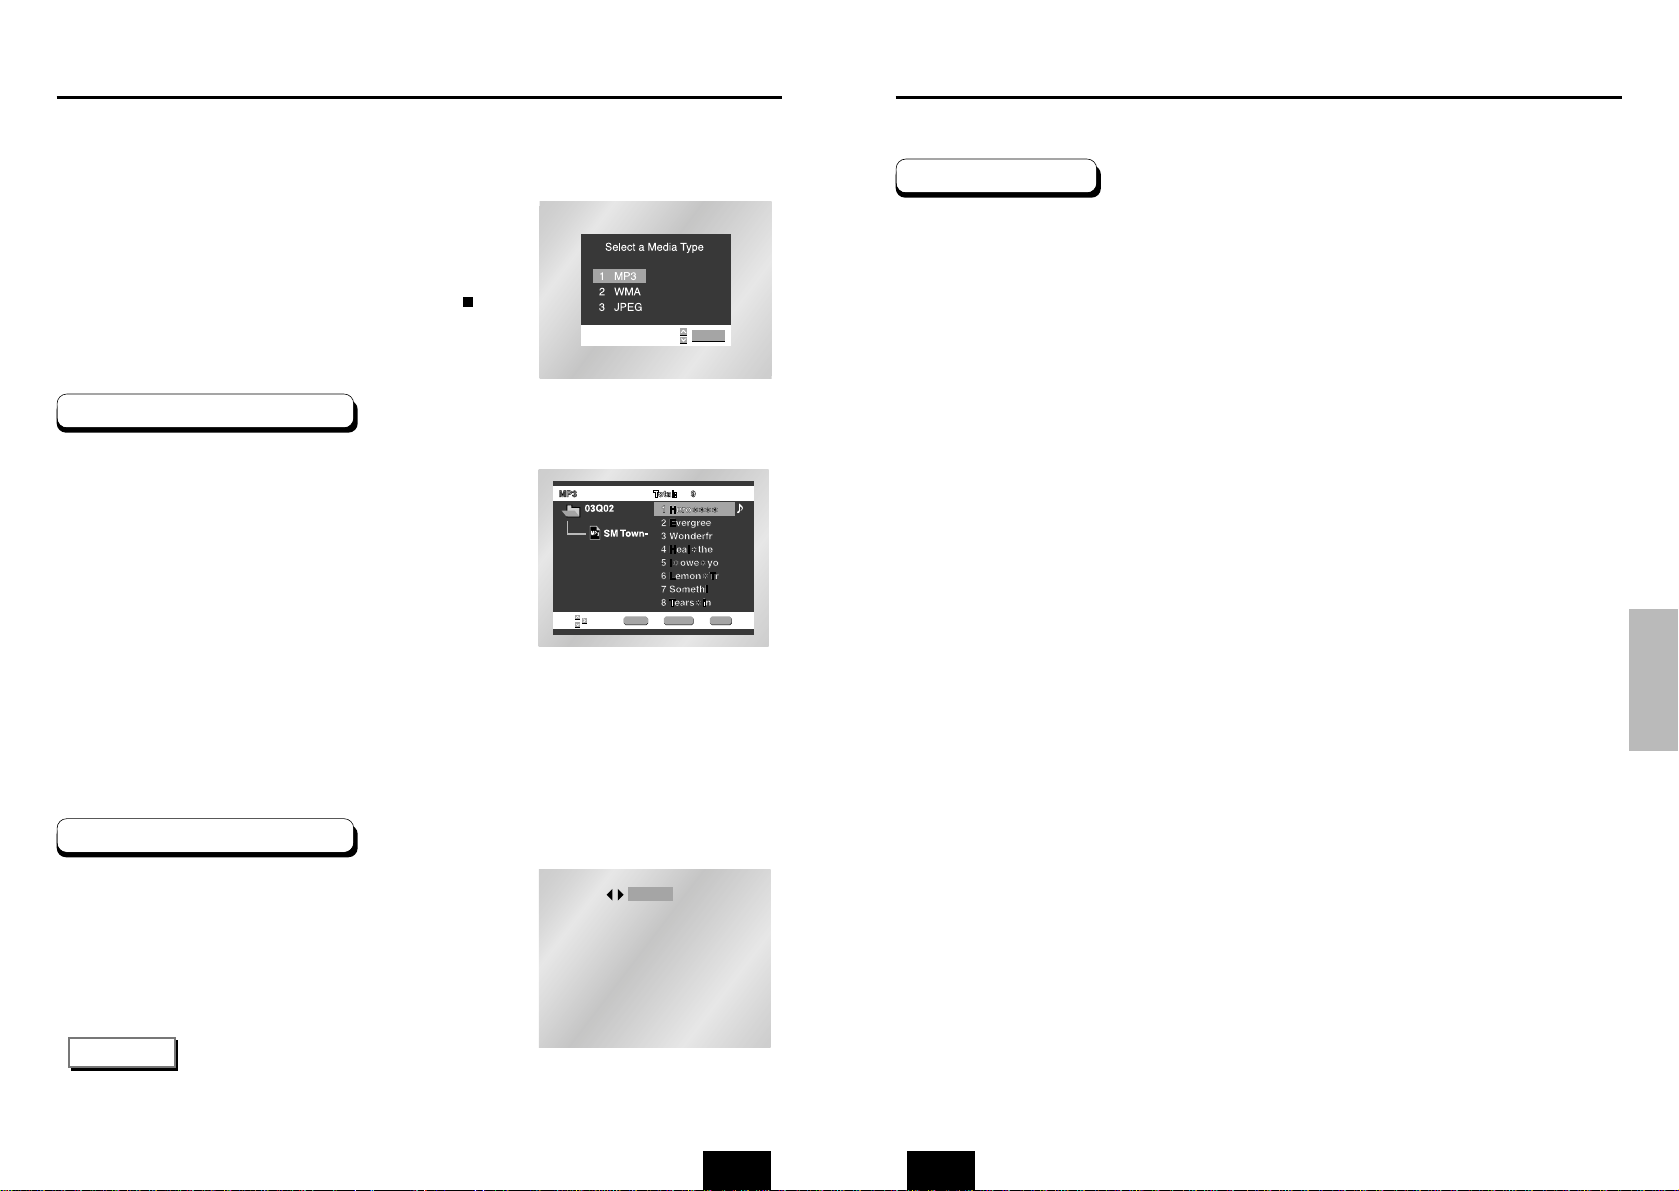
When the first song file is playing, the music
folder menu will appear on the right side of the
screen.
Up to 8 music folders can be displayed at a
time. If you have more than 8 folders on a
disc, press the LEFT/RIGHT buttons to bring
them up on the screen.
Use the UP/DOWN buttons to select the
desired music folder, then press ENTER.
Use the UP/DOWN buttons again to select a
song file. Press ENTER to begin playback of
the song file.
When an MP3/WMA Disc is inserted into the DVD player, the first song file of the first folder
plays.
ENTER RETURN MENU
ENTER
PROGRAM
RANDOM
NOTE
•
Press the REPEAT button to hear only music continuously and press it once again to release.
• PROGRAM/RANDOM playback cannot be used if the disc contains more than two types of file extensions.
•
If more than two file extensions are present, select the media
of your choice by pressing UP/DOWN, then the press ENTER
button.
•
To change the currently playing media, press the STOP ( )
button twice and then press the MENU button.
•
If no button on the remote controller is pressed for 60 seconds,
the menu will disappear and the selected item will be played.
Press the MODE button to switch between the
PROGRAM and RANDOM modes. See page 38
for more information on these modes.
Program/Random playback
MP3/WMA Play Function
1
2
MP3/WMA Play
• Your MP3 or WMA files should be ISO 9660 or JOLIET format.
ISO 9660 format and Joliet MP3 or WMA files are compatible with Microsoft's DOS and Windows,
and with Apple's Mac. These two formats are the most widely used.
• When naming your MP3 or WMA files do not exceed 8 characters, and place ".mp3, .wma" as
the file extension.
General name format of: Title.mp3. or Title.wma. When composing your title, make sure that you use
8 characters or less, have no spaces in the name, and avoid the use of special characters including:
(.,/,\,=,+).
• Use a decompression transfer rate of at least 128 Kbps when recording MP3 files.
Sound quality with MP3 files basically depends on the rate of compression/decompression you
choose. Getting audio CD quality sound requires an analog/digital sampling rate, that is conversion to
MP3 format, of at least 128 Kbps and up to 160 Kbps. However, choosing higher rates, like 192 Kbps
or more, only rarely give better sound quality.
Conversely, files with decompression rates below 128 Kbps will not be played properly.
• Use a decompression transfer rate of at least 64Kbps when recording WMA files.
Sound quality with WMA files basically depends on the rate of compression/decompression you
choose. Getting audio CD quality sound requires an analog/digital sampling rate, that is conversion to
WMA format, of at least 64Kbps and up to 192Kbps.
Conversely, files with decompression rates below 64Kbps or over 192Kbps will not be played
properly.
• Do not try recording copyright protected MP3 files.
Certain "securized" files are encrypted and code protected to prevent illegal copying. These files are
of the following types: Windows MediaTM(registered trade mark of Microsoft Inc) and SDMI
TM
(registered trade mark of The SDMI Foundation). You cannot copy such files.
• Important: The above recommendations cannot be taken as a guarantee that the DVD player will
play MP3 recordings, or as an assurance of sound quality.
You should note that certain technologies and methods for MP3 file recording on CD-Rs prevent
optimal playback of these files on your DVD player (degraded sound quality and in some cases,
inability of the player to read the files).
• This unit can play a maximum of 500 files and 300 folders per disc.
CD-R MP3/WMA discs
When playing CD-R/MP3 or WMA discs, please follow all the recommendations for CD-R
above, plus the comments below:
Page 20
ENGENG
ADVANCED
FUNCTIONS
38 39
Picture CD Playback
ALBUM PHOTO: 1 /215
ENTER
PHOTPHOTO: 1 /215O: 1 /215
ENTER RETURN
PHOTO: 1 /215
ENTER
TIMER:
RETURN
ENTER
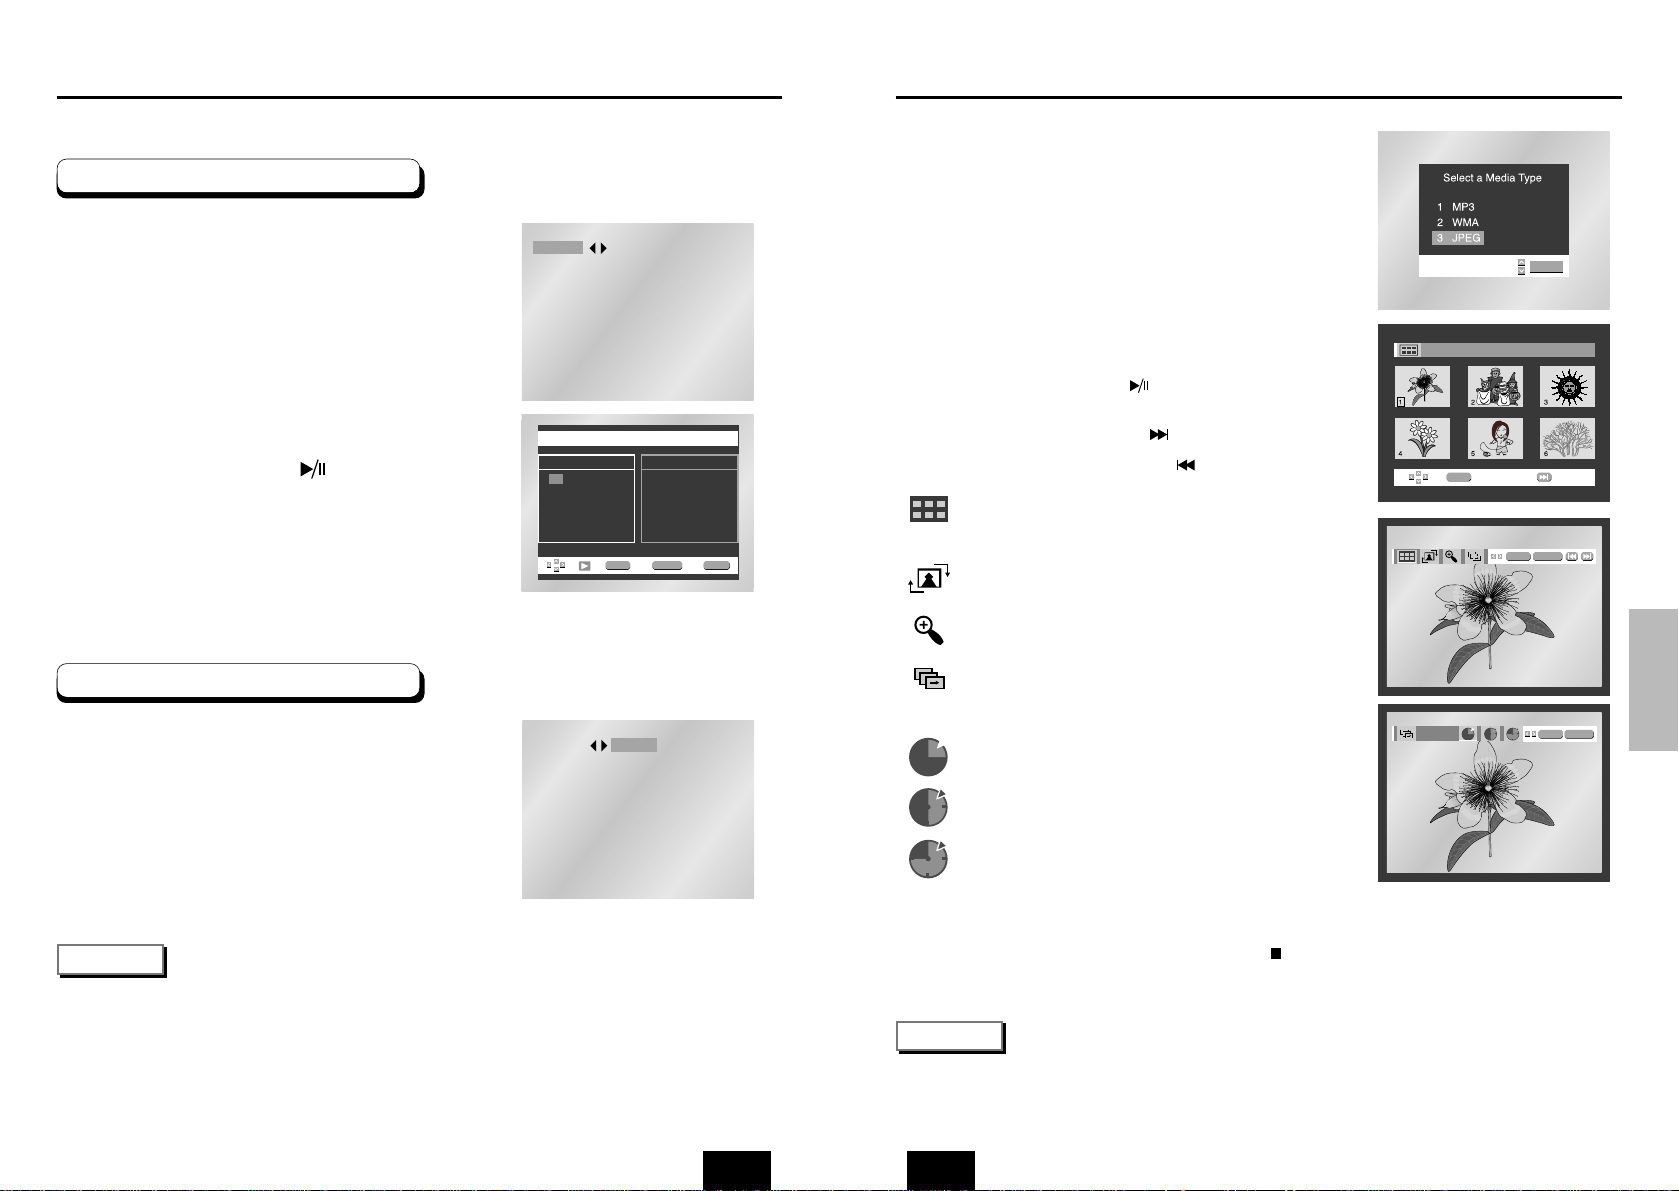
• Select JPEG in the menu to view a Photo CD.
• Use the UP/DOWN or LEFT/RIGHT buttons on the remote controller
to select the picture you want to view and then press the ENTER
button. (Press the PLAY/PAUSE ( ) button if you want to play it
in the Slide Show mode.)
• To see the next 6 pictures, press the button.
• To see the previous 6 pictures, press the button.
• : Return to the Album Screen.
Press the UP/DOWN or LEFT/RIGHT buttons on the remote
controller to display the menu again.
• : Each time the ENTER button is pressed, the picture rotates
90 degrees clockwise.
• : Each time the ENTER button is pressed, the picture is
enlarged up to 2X. (Normal ➝ 2X ➝ Normal)
• : The unit enters slide show mode.
*Press the RETURN button to return to the album screen.
*Before the Slide Show can begin, the picture interval must be set.
• :
When this icon is selected and ENTER is pressed, the pictures
change automatically with about an 6 second interval.
• : The pictures change automatically with about an 12 second
interval.
• : The pictures change automatically with about an
18 second interval.
*Depending on the file size, each interval between images may take
longer or shorter than the manual suggests.
Open the disc tray.
Load the disc on the tray.
- Load the disc with the labeled side up.
Close the tray.
- The tray closes and you should get a screen that looks like the
one to the right.
1
2
3
NOTE
• Press the TITLE MENU button to return to the album screen.
• Press the RETURN button to return to the slide show.
• If no buttons on the remote controller pressed for 10 seconds, the menu will disappear.
Press the UP/DOWN or LEFT/RIGHT buttons on the remote controller to display the menu again.
Program Play & Random Play
NOTE
• Depending on the disc, the Program and Random Play functions may not work.
• To resume normal play, press the CLEAR button.
• PROGRAM/RANDOM playback cannot be used if the disc contains more than two types of file extensions.
• This unit can support a maximum of 99 programmed order.
Program Play (CD/MP3/WMA)
Random Play (CD/MP3/WMA)
Press the MODE button.
Use the LEFT/RIGHT buttons to select
PROGRAM. Press the ENTER button.
Use the UP/DOWN/LEFT/RIGHT buttons to
select the first track to add to the program.
Press the ENTER button. The selection
numbers appear in the Program Order box.
Press the PLAY/PAUSE ( ) button.
The disc will be played in programmed order.
Press the MODE button.
Use the LEFT/RIGHT buttons to select
RANDOM. Press the ENTER button.
The disc will be played in random order.
PROGRAM
RANDOM
PROGRAM 01PROGRAM 01
Track
05 06 07 08
09 10 11 12
13 14 15 16
- - - - - - - -
- - - - - - - -
- - - - - - - -
- - - - - - - -
- - - - - - - -
Program Order
01 02 03 04
ENTER RETURN CLEAR
1
1
2
2
3
4
•
To change the currently playing media, press the STOP ( ) button twice and then press the DISC MENU button.
•
If no button on the remote controller is pressed for 60 seconds, the menu will disappear and the selected
item will be played.
PROGRAM
RANDOM
Page 21
ENGENG
CHANGING
SETUP MENU
Picture CD Playback
40 41
• Only files with the ".jpg" and ".JPG" extensions can be played.
• If the disc is not closed, it will take longer to start playing and not all of the recorded files may be
played.
• Only CD-R discs with JPEG files in ISO 9660 or Joliet format can be played.
• The name of the JPEG file may not be longer than 8 characters and should contain no blank spaces
or special characters (. / = +).
• Only a consecutively written multisession disc can be played. If there is a blank segment in the
multisession disc, the disc can be played only up to the blank segment.
• Amaximum of 500 images can be stored on a single CD.
• Only Kodak Picture CDs can be played.
• When playing a Kodak Picture CD, only the JPEG files in the pictures folder can be played.
• Picture discs other than Kodak Picture CD may take longer to start playing or may not play at all.
• If a number of files in 1 Disc is over 500, only 500 JPEG file can be played.
• If a number of folders in 1 Disc is over 300, only JPEG files in 300 folders can be played.
CD-R JPEG Discs
Using the Setup Menu
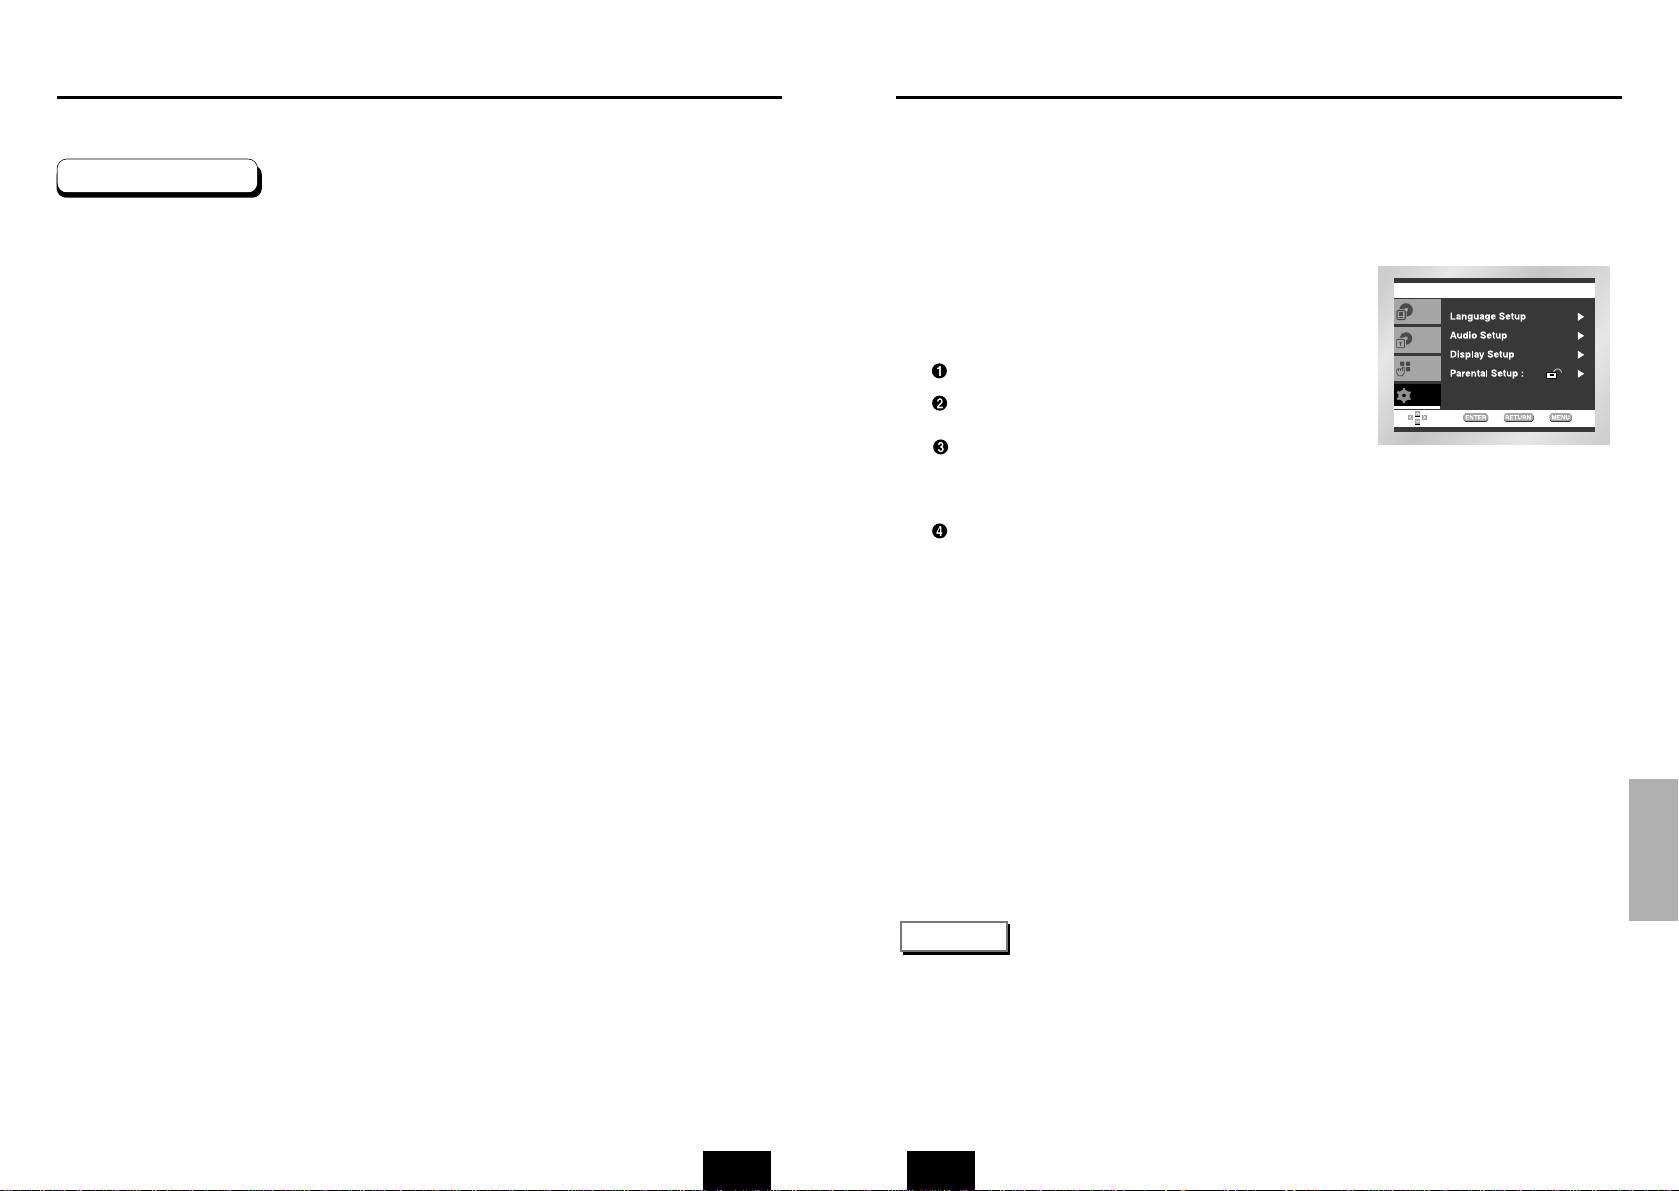
The Setup menu lets you customize your DVD player by allowing you to select various
language preferences, set up a parental level, even adjust the player to the type of
television screen you have.
To make the setup screen disappear after setting up, press the
MENU button again.
With the unit in Stop mode, press the MENU button
on the remote. Select Setup using UP/DOWN
buttons, then press the RIGHT or ENTER button.
Language Setup : Setup of the Language.
Audio Setup : Setup of the Audio Options
Display Setup : Setup of the Display Options
Use to select which type of screen you want to
watch and several display options.
Parental Setup : Setup of the Parental Level
Allows users to set the level necessary to
prevent children from viewing unsuitable movies
such as those with violence, adult subject
matter, etc.
Use the UP/DOWN buttons on the remote to access
the different features.
Press the ENTER button to access the sub features.
DVD
Setup
Disc Menu
Title Menu
Function
NOTE
Depending on the disc, some Setup Menu selections may not work.
1
2
3
Page 22
ENGENG
CHANGING
SETUP MENU
42 43
Setting Up the Language Features Setting Up the Language Features
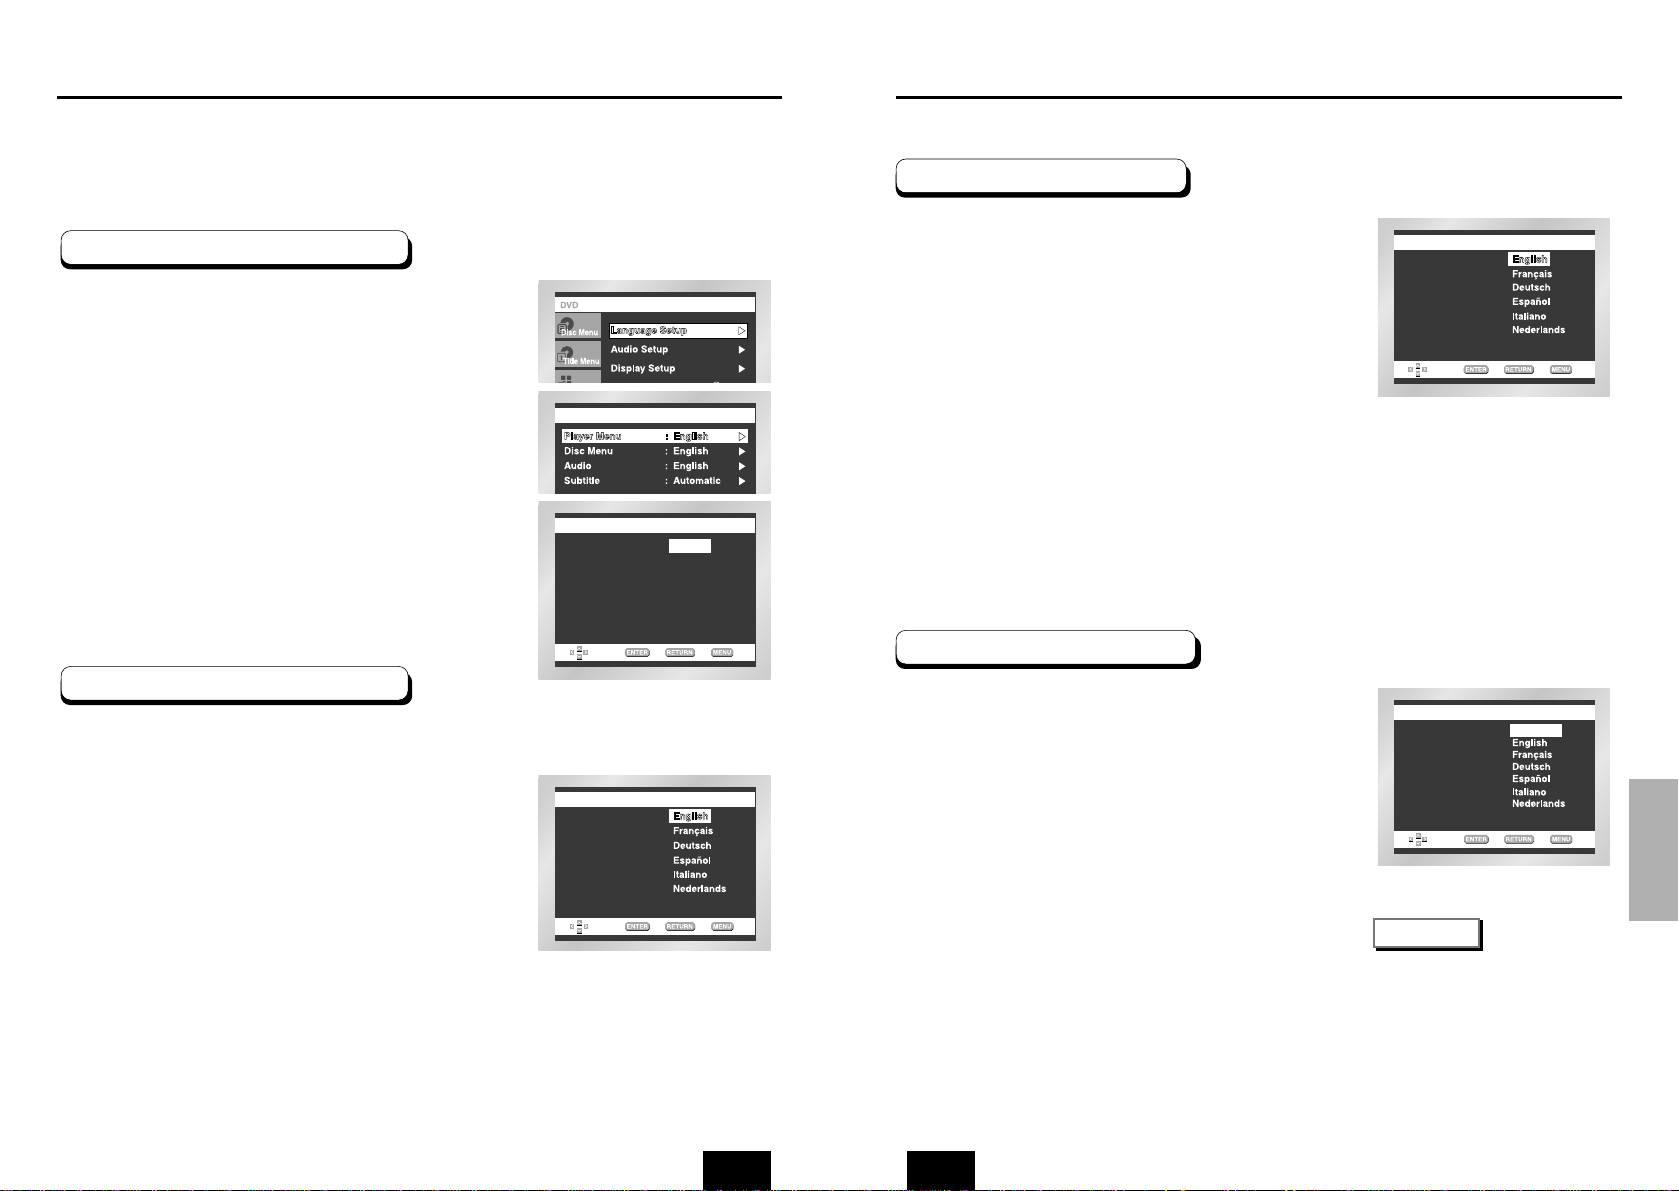
Using the Player Menu Language
Using the Disc Menu Language
If you set the player menu, disc menu, audio and subtitle language in advance,
they will come up automatically every time you watch a movie.
With the unit in Stop mode, press the MENU button.
Select Setup using UP/DOWN buttons, then RIGHT
or ENTER button.
Select Language Setup using UP/DOWN buttons,
then press the RIGHT or ENTER button.
Select Player Menu using UP/DOWN buttons, then
press the RIGHT or ENTER button.
Use the UP/DOWN buttons to select ‘English’.
Press the ENTER button.
- English is selected and the screen returns to SETUP menu.
- To make the SETUP menu disappear, press the RETURN or
LEFT button.
e.g) Setting up in English.
e.g) Setting up in English.
LANGUAGE SETUPLANGUAGE SETUP
PLAPLA YER MENU LANGUYER MENU LANGUAGEGE
Français
Deutsch
Español
Italiano
Nederlands
Player Menu English
DISC MENU LANGUDISC MENU LANGUAGEGE
Others
Disc Menu
This function changes the text language only on the disc
menu screens.
With the unit in Stop mode, press the MENU button.
Select Setup using UP/DOWN buttons, then RIGHT
or ENTER button.
Select Language Setup using UP/DOWN buttons,
then press the RIGHT or ENTER button.
Select Disc Menu using UP/DOWN buttons, then
press the RIGHT or ENTER button.
Use the UP/DOWN buttons to select ‘English’.
- Select “Others” if the language you want is not listed.
Press the ENTER button.
- English is selected and the screen returns to SETUP menu.
1
2
3
4
5
6
1
2
3
4
5
6
With the unit in Stop mode, press the MENU button.
Select Setup using UP/DOWN buttons, then RIGHT
or ENTER button.
Select Language Setup using UP/DOWN buttons,
then press the RIGHT or ENTER button.
Select Audio using UP/DOWN buttons, then press
the RIGHT or ENTER button.
Press the UP/DOWN buttons to select ‘English’.
- Select “Original” if you want the default soundtrack language to
be the original language the disc is recorded in.
- Select “Others” if the language you want is not listed.
Press the ENTER button.
- English is selected and the screen returns to SETUP menu.
With the unit in Stop mode, press the MENU button.
Select Setup using UP/DOWN buttons, then RIGHT
or ENTER button.
Select Language Setup using UP/DOWN buttons,
then press the RIGHT or ENTER button.
Select Subtitle using UP/DOWN buttons, then press
the RIGHT or ENTER button.
Use the UP/DOWN buttons to select ‘English’.
- Select “Automatic” if you want the subtitle language to be the
same as the language selected as the audio preference.
- Select “Others” if the language you want is not listed.
Some discs may not contain the language you select as
your initial language; in that case the disc will use its
original language setting.
Press the ENTER button.
- English is selected and the screen returns to SETUP menu.
AUDIO LANGUUDIO LANGUAGEGE
Original
Others
Audio
SUBTITLE LANGUSUBTITLE LANGUAGEGE
Others
Subtitle
Automatic
NOTE
• If the selected language is not
recorded on the disc, the original
pre-recorded language is selected.
•
Howto make the SETUP menu
disappear or
return to menu screen
during set up; Press RETURN or
LEFT button.
Using the Audio Language
Using the Subtitle Language
1
2
3
5
4
6
1
2
3
4
5
6
Page 23
ENGENG
CHANGING
SETUP MENU
44 45
Setting Up the Audio Options
Surround Sound Speaker Setup (DVD-E435 only)
AUDIO SETUPAUDIO SETUP
MPEG-2 Digital Out : PCM
DTS : Off
Dynamic Compression : On
PCM Down Sampling : On
Multi Channel Output : Digital
Dolby Digital Out : PCM
Speaker Setup
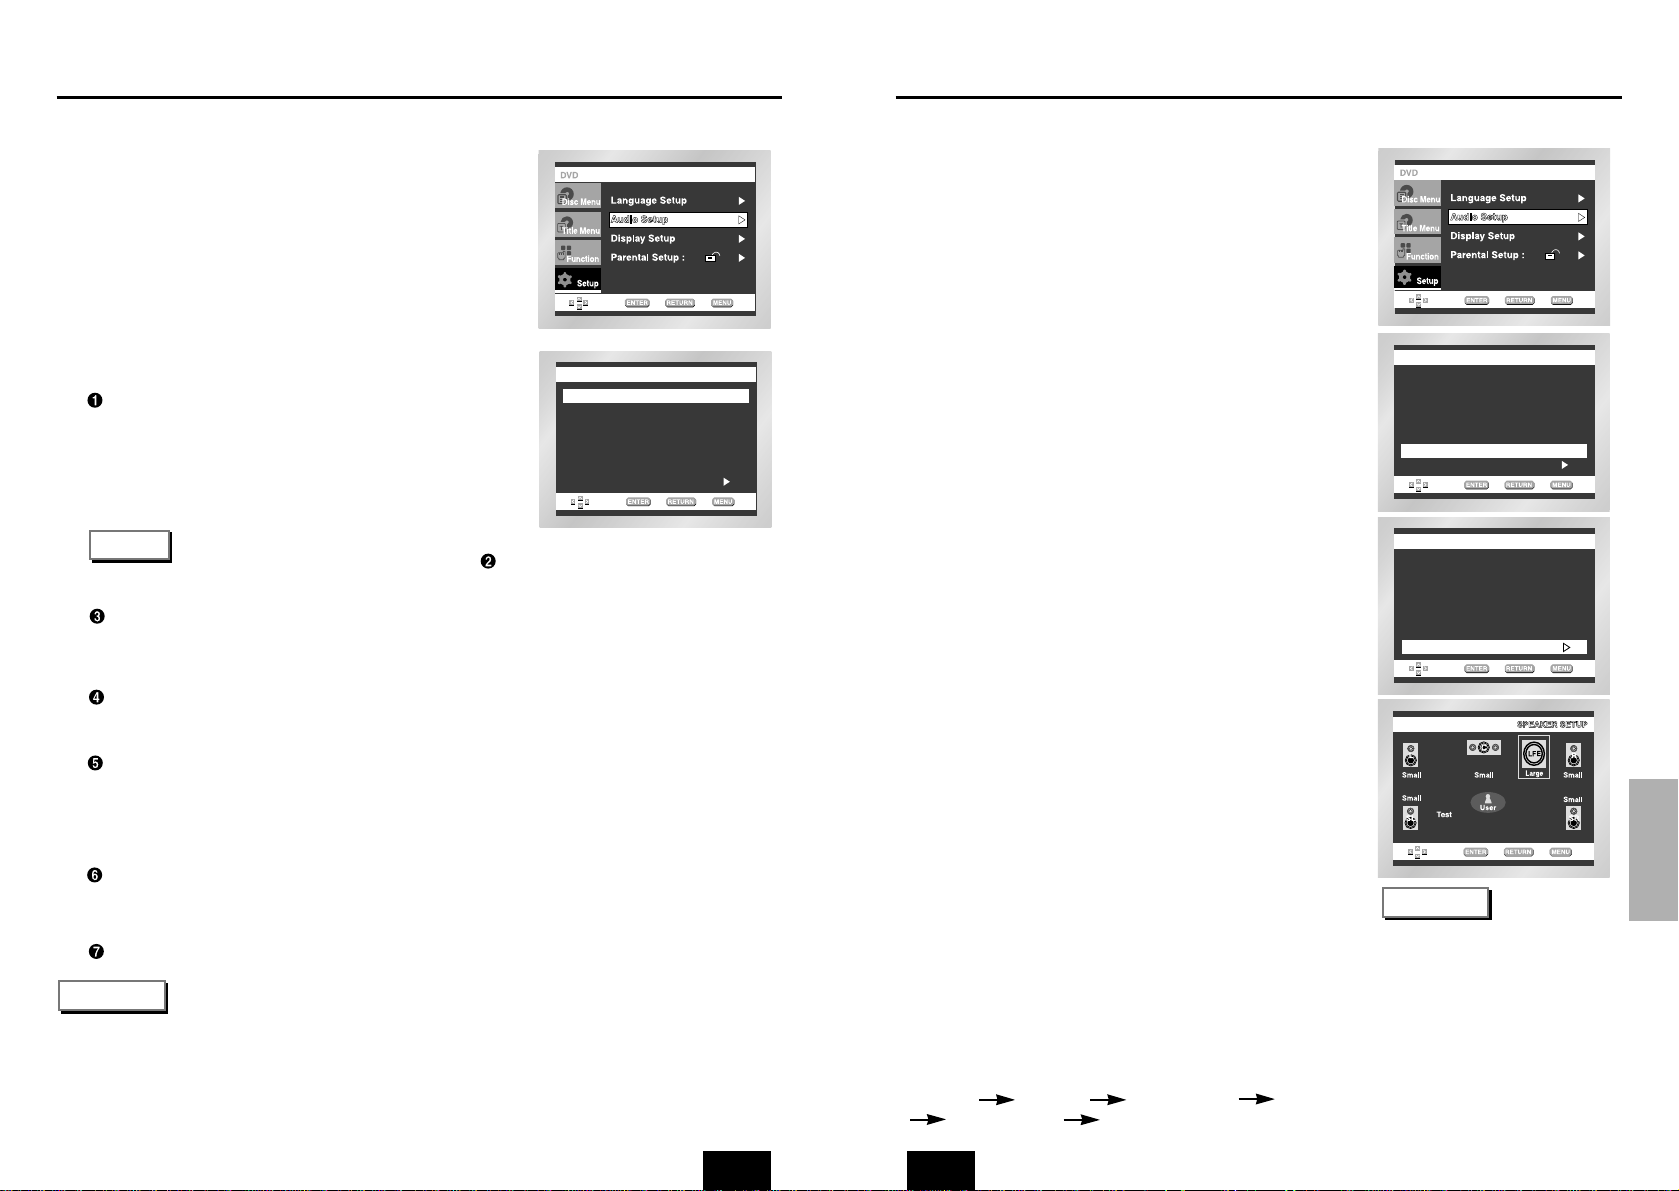
With the unit in Stop mode, press the MENU button.
Select Setup using UP/DOWN buttons, then RIGHT
or ENTER button.
Select Audio Setup using UP/DOWN buttons, then
press the RIGHT or ENTER button.
Use the UP/DOWN buttons to select the desired
item. Then press the RIGHT or ENTER button.
NOTE
•
How to make the SETUP menu disappear or return to menu screen during set up;
Press RETURN or LEFT button.
• Manufactured under license from Dolby Laboratories.
“Dolby” and the double-D symbol are trademarks of Dolby Laboratories.
• “DTS” and “DTS Digital Out” are trademarks of Digital Theater Systems, Inc.
1
2
3
4
MPEG-2 Digital Out
1. PCM :
Converts to PCM(2CH) audio.
Select PCM when using the Analog
Audio Outputs.
2. Bitstream :
Converts to MPEG-2 Digital
Bitstream (5.1CH or 7.1CH).
Select Bitstream when using the
Digital Audio Output.
Dolby Digital Out
1. PCM :
Converts to PCM(2CH) audio.
Select PCM when using the Analog Audio Outputs.
2. Bitstream :
Converts to Dolby Digital Bitstream (5.1CH).
Select Bitstream when using the Digital Audio Output.
• Be sure to select the correct Digital Output
or no audio will be heard.
• When Multi Channel Output select Digital.
Dolby & MPEG-2 Digital Out works.
DTS
1. Off : Doesn’t output digital signal.
2. On : Outputs DTS Bitstream via digital output only.
Select DTS when connecting to a DTS Decoder.
Dynamic Compression
1. On : To select dynamic compression.
2. Off : To select the standard range.
PCM Down Sampling
1. On : Select this when the amplifier connected to the player is not 96KHz compatible.
In this case, the 96KHz signals will be down converted to 48KHZ.
2. Off : Select this when the amplifier connected to the player is 96KHz compatible.
In this case, all signals will be output without any changes.
Multi Channel Output (DVD-E435 only)
1. Digital : Select this when using the multichannel digital audio output.
2. Analog : Select this when using the multichannel analog audio output.
NOTE
Speaker Setup (DVD-E435 only)
AUDIO SETUPAUDIO SETUP
MPEG-2 Digital Out : PCM
DTS : Off
Dynamic Compression : On
PCM Down Sampling : On
Dolby Digital Out : PCM
Speaker Setup
Multi Channel Output : Analog
AUDIO SETUPAUDIO SETUP
MPEG-2 Digital Out : PCM
DTS : Off
Dynamic Compression : On
PCM Down Sampling : On
Dolby Digital Out : PCM
Speaker Setup
Multi Channel Output : Analog
With the unit in Stop mode, press the MENU button.
Select Setup using UP/DOWN buttons,
then RIGHT or ENTER button.
Select Audio Setup using UP/DOWN buttons,
then press the RIGHT or ENTER button.
Select Multi Channel Output using UP/DOWN
buttons. Then select Analog pressing the RIGHT
or ENTER button.
Use the UP/DOWN buttons to select Speaker Setup.
Then press the RIGHT or ENTER button.
Use the UP/DOWN or LEFT/RIGHT buttons to select
the desired item. Then press the ENTER button.
1
2
3
4
5
6
The default settings : FRONT L, R (Large), CENTER (None),
SURROUND (None)
Select the size of the speakers to be connected.
• Front (FL, FR)
- Large: Normally select this.
- Small: When the sound cracks or the surround sound effects are
difficult to hear, select this. This activates the Dolby Digital bass
redirection circuitry and outputs the bass frequencies of the speaker
from the subwoofer.
• Center
- None: If you do not connect a center speaker, select this.
- Large: Normally select this.
- Small: When the sound cracks, select this. This activates the Dolby
Digital bass redirection circuitry and outputs the bass frequencies of
the center speaker from other speakers.
• Surround (SL, SR)
- None: If you do not connect a center speaker, select this.
- Large (Rear/Side): Normally select either of these according to the
rear speaker’s position.
- Small (Rear/Side): When the sound cracks or the surround sound
effects are difficult to hear, select either of these according to the
rear speaker’s position. This activates the Dolby Digital bass
redirection circuitry and outputs the bass frequencies of the rear
speaker from other speakers.
Setting up TEST
The test output signals come clockwise starting from the Front
Speaker(L). Adjust Channel Balance to match to the volume of test
signals memorized in the system.
FRONT(L) CENTER SUBWOOFER FRONT(R)
SURROUND(R) SURROUND(L)
NOTE
•
How to make the SETUP
menu disappear or return to
menu screen during set up.
Press RETURN or LEFT button.
• The subwoofer test output
signal is lower than the other
speakers.
• The MPEG Multichannel logo
is a trademark registered by
PHILIPS Corporation.
Page 24
CHANGING
SETUP MENU
ENGENG
46 47
Setting Up the Display Options
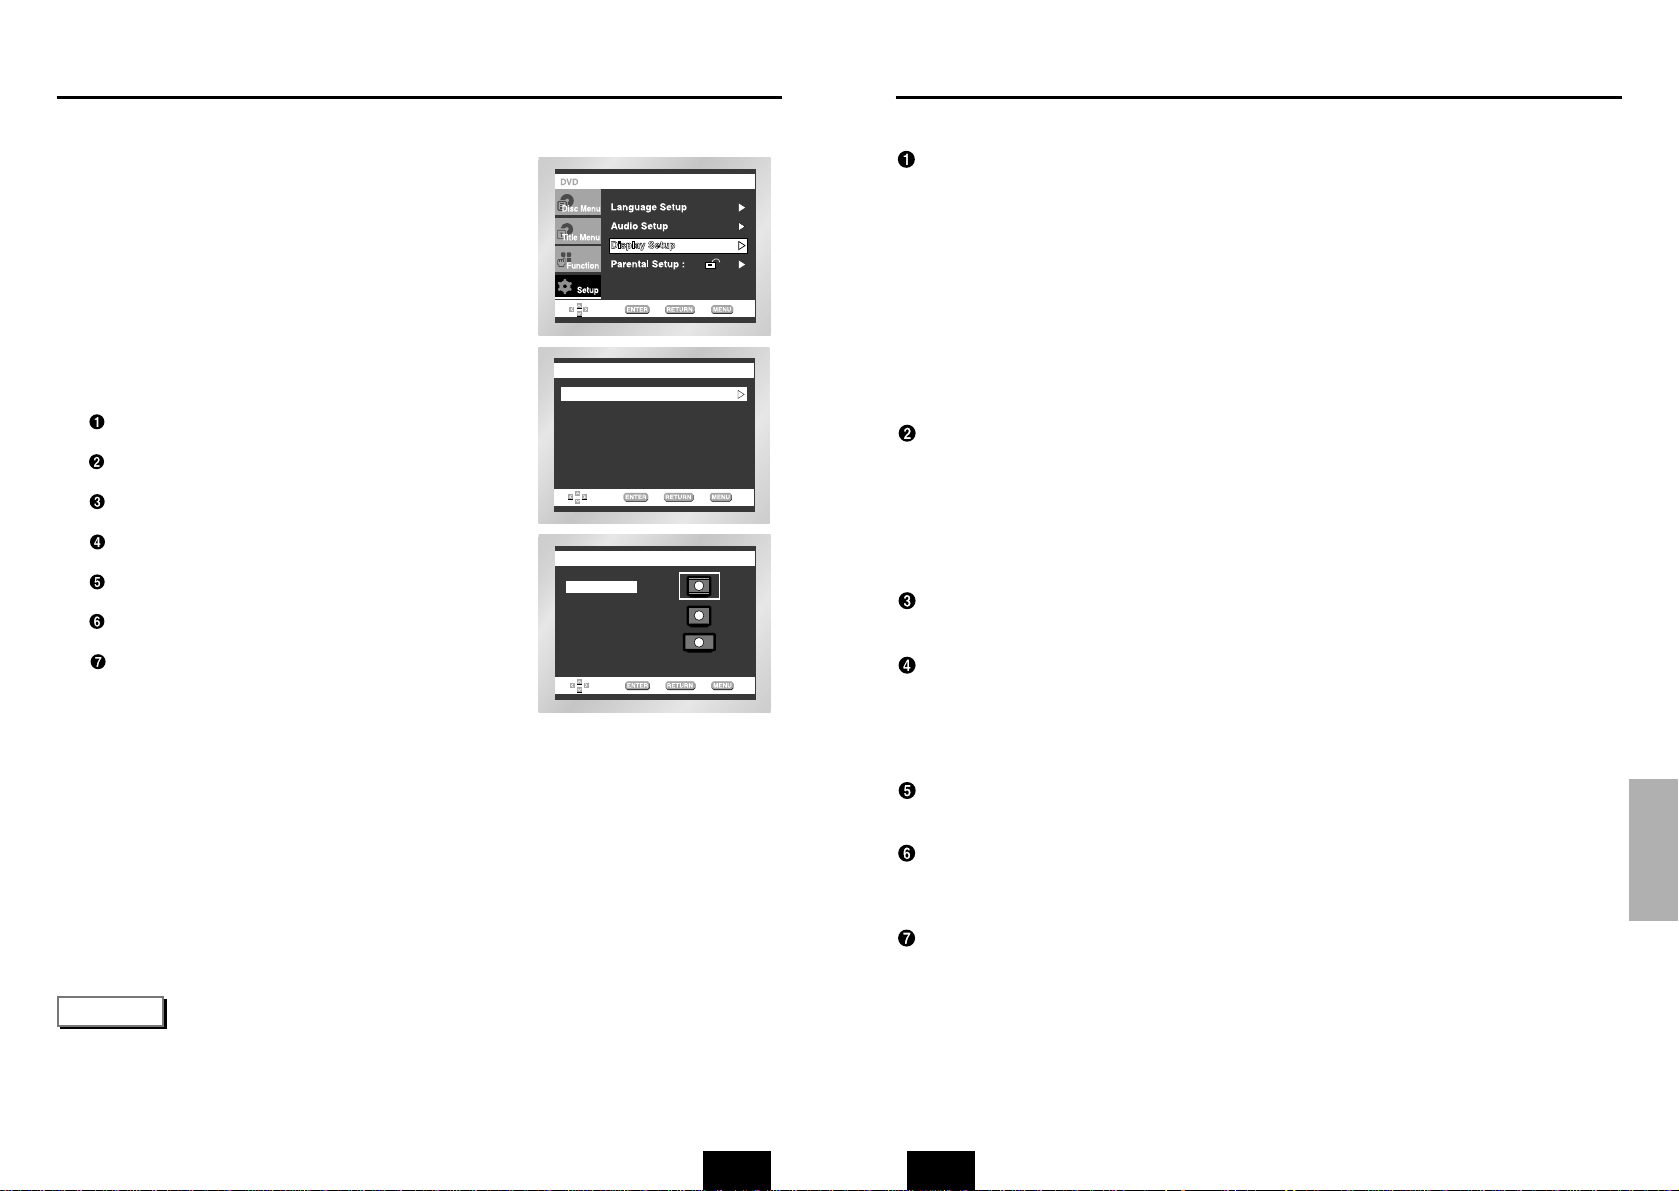
With the unit in Stop mode, press the MENU button.
Select Setup using UP/DOWN buttons,
then RIGHT or ENTER button.
Select Display Setup using UP/DOWN buttons,
then press the RIGHT or ENTER button.
Use the UP/DOWN buttons to select the desired
item. Then press the RIGHT or ENTER button.
DISPLADISPLAY SETUP SETUP
Still Mode : Auto
Screen Massages : On
Front Display : Auto Dim
Black Level : Off
NTSC Disc Output : PAL 60 Hz
SCART Output : RGB
TV Aspect : 4:3 L-Box
TV TV ASPECTASPECT
4:3 Pan Scan
16:9 Wide
4:3 Letter Box
NOTE
•
How to make the SETUP menu disappear or return to menu screen during set up;
Press the RETURN or LEFT button.
1
2
3
4
Setting Up the Display Options
TV Aspect
Depending on the type of television you have, you may want to adjust the screen
setting (aspect ratio).
1. 4:3 Letter Box :
Select when you want to see the total 16:9 ratio screen DVD supplies, even
though you have a TV with a 4:3 ratio screen. Black bars will appear at the top
and bottom of the screen.
2. 4:3 Pan Scan :
Select this for conventional size TVs when you want to see the central portion of
the 16:9 screen. (Extreme left and right side of movie picture will be cut off.)
3. 16:9 Wide :
You can view the full 16:9 picture on your widescreen TV.
Still Mode
These options will help prevent picture shake in still mode and display small text
clearer.
1. Auto : When selecting Auto, Field/Frame mode will be automatically converted.
2. Field : Select this feature when the screen shakes in the Auto mode.
3. Frame : Select this feature when you want to see small letters more clearly in the
Auto mode.
Screen Messages
Use to turn on-screen messages On or Off.
Front Display
Adjust the brightness of the unit’s front panel display.
1. Auto Dim : Makes the Front Panel Display dim automatically when playing a DVD.
2. Bright : Makes the Front Panel Display bright.
3. Dim : Makes the Front Panel Display dim.
Black Level
Adjusts the brightness of the screen.(On/Off)
NTSC Disc Output
“NTSC” if the screen only has one NTSC-video entrance. If this is not the case,
you can choose to leave “ PAL 60Hz” as is.
SCART Output
1. RGB : Sends RGB signal from the AV JACK(SCART terminal).
2. S-Video : Sends S-VIDEO signal from the AV JACK(SCART terminal).
3. Video : Sends COMPOSITE VIDEO signal from the AV JACK(SCART terminal).
TV Aspect
Still Mode
Screen Messages
Front Display
Black Level
NTSC Disc Output
SCART Output
Page 25
REFERENCE
ENGENG
48 49
Controlling a TV with the Remote
(DVD-E435 only)
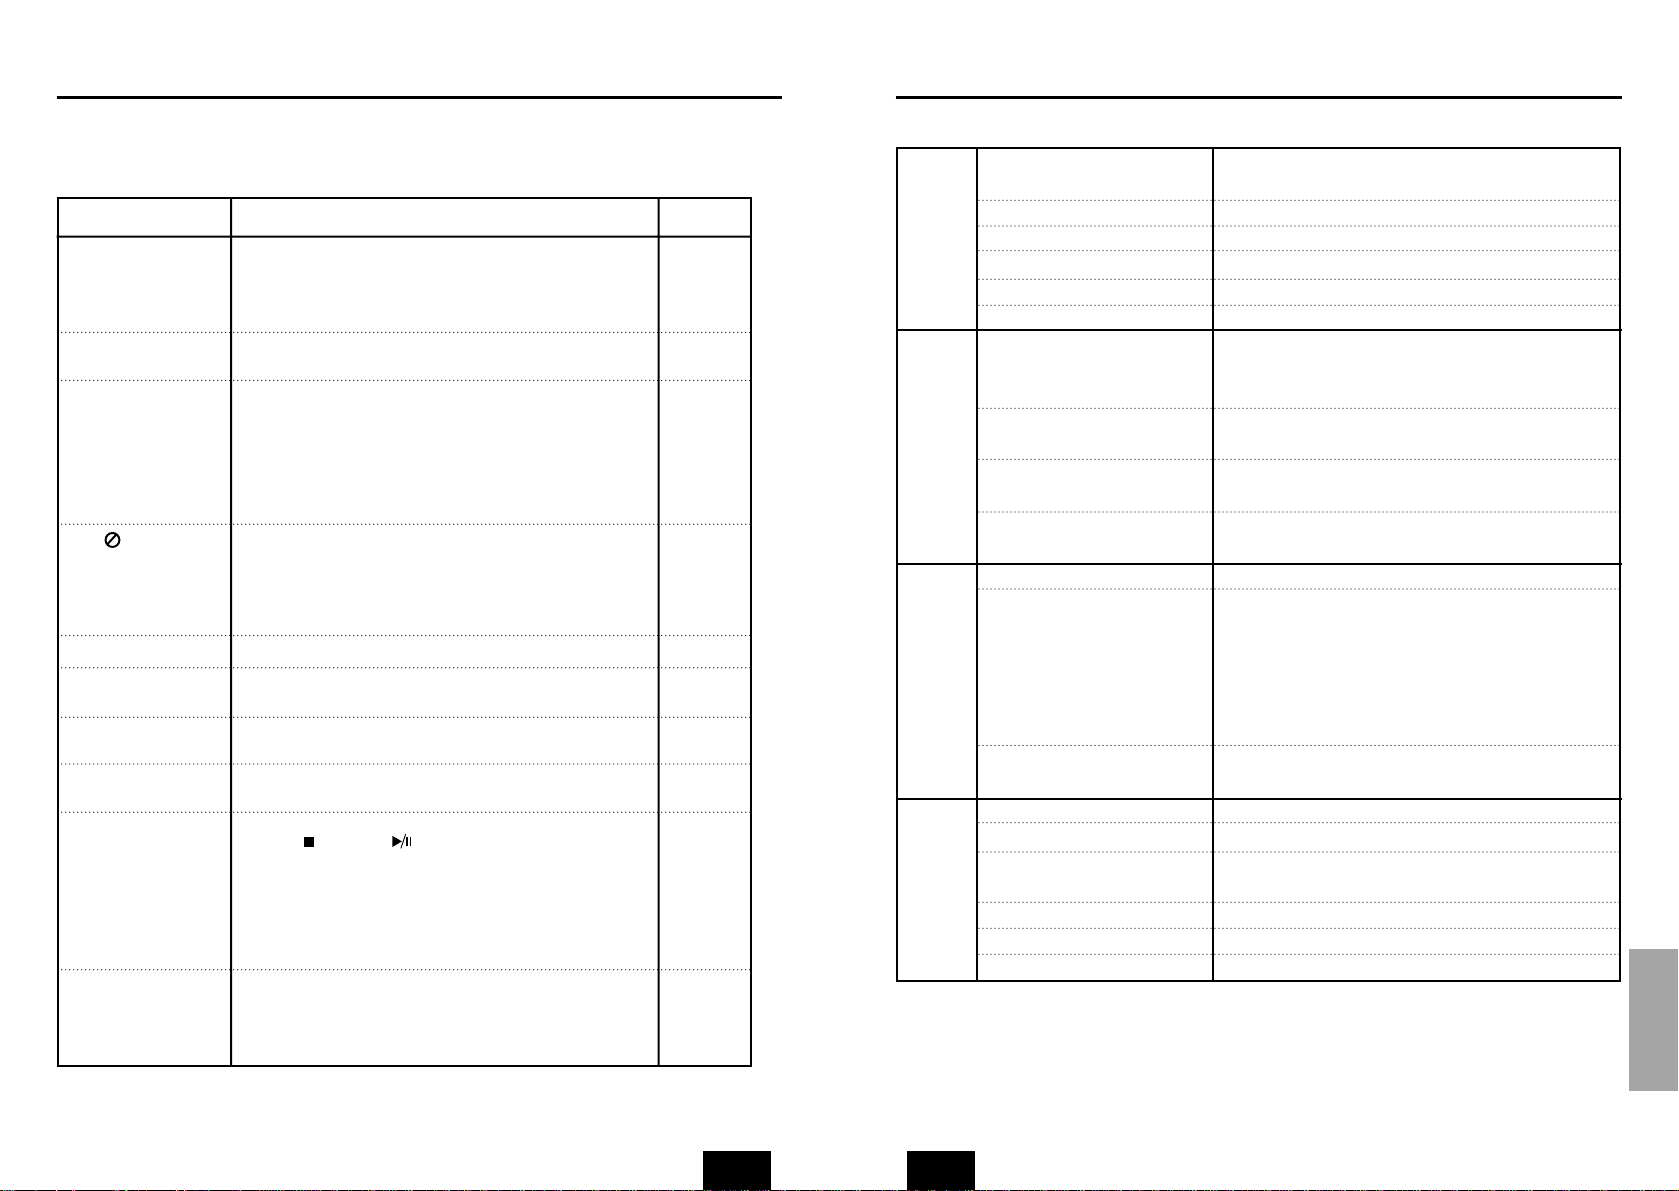
The remote can also be set up to control most TVs. To program the remote, use the
code that corresponds to your brand.
e.g) For SAMSUNG 4 TVs
While holding down the TV POWER button,
enter 0 and then 1.
The remote may not be able to control every
model TV of the brands listed.
NOTE
Turn on the TV.
Point the DVD’s remote at the TV.
While holding the TV POWER button
down, enter the code for your brand.
1
2
3
If the TV turns off, setup is complete.
Enter other codes of the same brand
if the first code does not work.
To operate the TV, use the “TV Function
Buttons” described on page 17.
4
5
CODE BRAND
01 SAMSUNG_4
02 SAMSUNG_6, LG, LOEWE, PHILIPS,
FINLUX, YOKO, LOEWE OPTA,
MITSUBISHI, PHONOLA, RADIOLA,
SCHNEIDER
03 SAMSUNG_1
04 SAMSUNG_2
05 SAMSUNG_3
06 SAMSUNG_5
07 TOSHIBA
08 PANASONIC_4
09 GRUNDIG, BLAUPUNKT, SIEMENS
10 SHARP
11 HITACHI
12 SANYO, AKAI, FISHER
13
HITACHI, SABA, THOMSON, NORDMENDE
14 HITACHI, NORDMENDE, SABA,
TELEFUNKEN, THOMSON, BRANDT,
FERGUSON, PIONEER, TELEAVA
15 SONY
16 TOSHIBA, SANYO, SHARP, SONY,
MITSUBISHI
17 TOSHIBA, GRUNDIG, FINLUX
18 TOSHIBA
CODE BRAND
19 TOSHIBA
20 PHILIPS, PHONOLA, RADIOLA
21 TOSHIBA, GRUNDIG, CGE,
IMPERIAL, MIVAR
22 PHILIPS, SABA, BANG&OLUFSEN,
BRIONVEGA, FINLUX,
FORMENTI, LOEWE OPTA, METZ,
WEGA, PHONOLA, RADIOMARELLI,
SINGER, SINUDYNE
23 NOKIA, PANASONIC, SABA, PIONEER,
REZ, SELECO, SALORA
24 HITACHI, NORDMENDE, PANASONIC,
SABA,TELEFUNKEN, THOMSON,
CONTINENTAL, EDISON
25 PANASONIC_2
26 PANASONIC_3
27 PANASONIC_6
28 TELEFUNKEN
29 MIVAL
30 LG_2
31 SHARP_2
32 JVC
33 THOMSON ASIA
34 THOMSON ASIA
TV Codes
Setting Up the Parental Control
The Parental Control function works in conjunction with DVDs that have been assigned
a rating - which helps you control the types of DVDs that your family watches.
There are up to 8 rating levels on a disc.
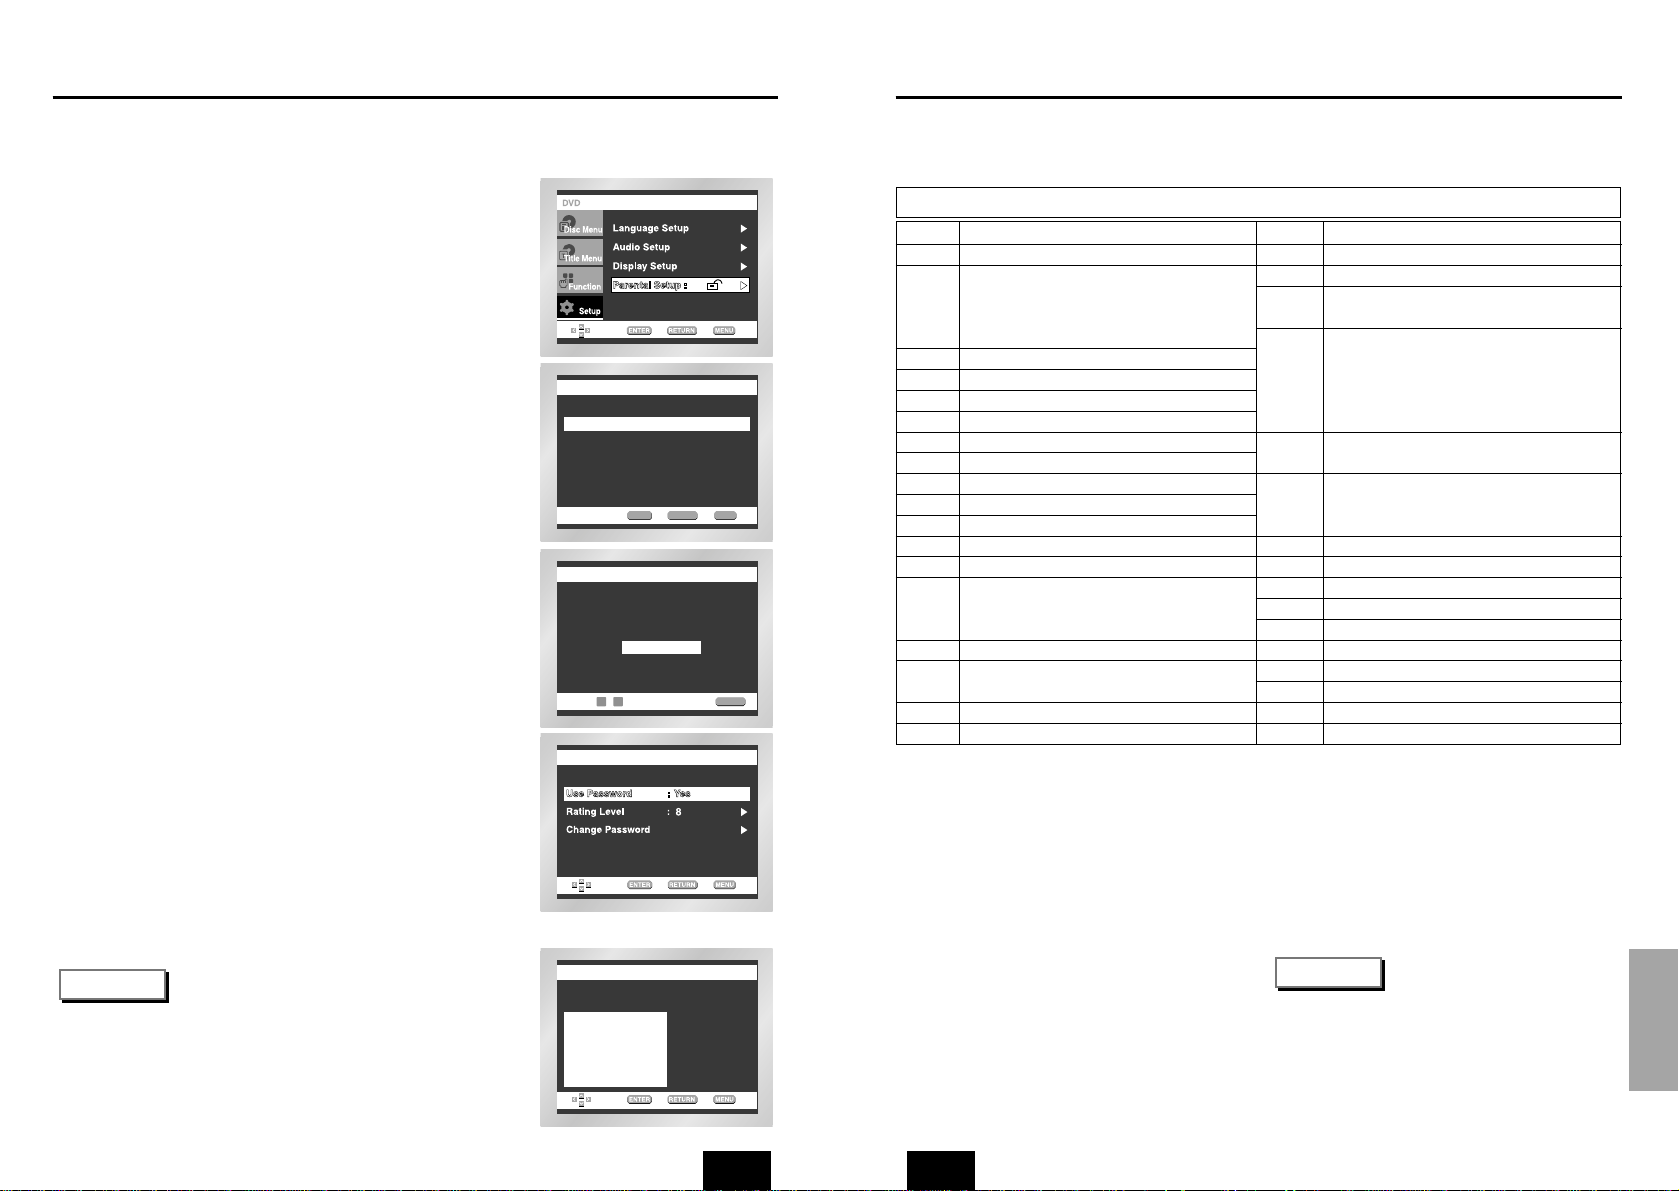
With the unit in Stop mode, press the MENU button.
Select Setup using UP/DOWN buttons, then RIGHT
or ENTER button.
Select Parental Setup using UP/DOWN buttons,
then press the RIGHT or ENTER button.
Use RIGHT or ENTER to select Yes if you want to
use a password. The Enter Password screen
appears.
Enter your password. The Re-enter Password
screen appears to confirm the password.
Enter your password again.
The Parental Control screen appears.
About the Rating Level ;
The Rating Level will work only when Use Password
is set to Yes. To unlock the player, use UP/DOWN to
select No. Use RIGHT or ENTER to select Rating
Level. Press ENTER.
- Use UP/DOWN to select the level(e.g. Level 6) and press
ENTER. Discs that contain Level 7 will now not play.
- To cancel the rating level, use RIGHT or ENTER to select No in
Use Password.
About the Change Password ;
- Use UP/DOWN to select Change Password.
Press ENTER. The Change Password screen appears.
- Enter your new password. Re-enter the new password again.
CREACREATE PTE PASSWASSWORDORD
Enter Password
- - - -
0 ~ 9
RETURN
PARENTARENTALAL SETUP SETUP
PARENTARENTALAL SETUP SETUP
Use Password : No
ENTER RETURN MENU
RARATING LEVELTING LEVEL
Level 8 Adult
Level 7
LeLevel 6vel 6
LeLevel 5vel 5
LeLevel 4vel 4
LeLevel 3vel 3
LeLevel 2vel 2
LeLevel 1 Kids Safvel 1 Kids Safe
e.g) Setting up in LEVEL6.
NOTE
•
How to make the SETUP menu disappear or return to
menu screen during set up;
Press RETURN or LEFT button.
• If you have forgotten your password, see Forget Password in
the Troubleshooting Guide.
1
2
3
4
5
Page 26
REFERENCE
ENGENG
51
Specifications
*: Nominal specification
• Samsung Electronics Co., Ltd reserves the right to change the specifications without notice.
• Weight and dimensions are approximate.
Power Requirements
Power Consumption
Weight
Dimensions
Operating Temperature Range
Operating Humidity Range
DVD
(DIGITALVERSATILE DISC)
CD : 12Cm
(COMPACT DISC)
CD : 8Cm
(COMPACT DISC)
VCD : 12Cm
Composite Video
SCART
Jack
S-VIDEO
SCART Jack
2 channel
*Frequency Response
*S/N Ratio
*Dynamic Range
*Total Harmonic Distortion
AC 230V, 50 Hz
AC110-240V, 50/60 Hz (DVD-E435 only)
12 W
2.4 Kg
430mm (W) X 240mm (D) X 60mm (H)
+5°C to +35°C
10 % to 75 %
Reading Speed : 3.49 m/sec
.
Approx. Play Time
(Single Sided, Single Layer Disc) : 135 min.
Reading Speed : 1.2 to 1.4 m/sec.
Maximum Play Time : 74 min.
Reading Speed : 1.2 to 1.4 m/sec.
Maximum Play Time : 20 min.
Reading Speed : 1.2 to 1.4 m/sec.
Maximum Play Time : 74 min. (Video + Audio)
2 channel : 1.0 Vp-p (75 Ω load)
R(Red) : 0.7 Vp-p (75 Ω load)
G(Green) : 0.7 Vp-p (75 Ω load)
B(Blue) : 0.7 Vp-p (75 Ω load)
Composite Video : 1.0 Vp-p (75 Ω load)
Luminance Signal : 1.0 Vp-p (75 Ω load)
Color Signal : 0.3 Vp-p (75 Ω load)
Luminance Signal : 1.0 Vp-p (75 Ω load)
Chrominance Signal : 0.3 Vp-p (75 Ω load)
2 Channel : L(1/L), R(2/R)
L(1/L), R(2/R)
48 kHz Sampling : 4 Hz to 22 kHz
96 kHz Sampling : 4 Hz to 44 kHz
110 dB
100 dB
0.004 %
General
Disc
Video
Output
Audio
Output
50
Troubleshooting
Before requesting service (troubleshooting), please check the following.
No operations can be
performed with remote.
The screen ratio cannot
be changed.
No audio.
Play mode differs from the
Setup Menu selection.
Disc Menu doesn’t appear.
The icon appears on
screen.
Forgot password
If you experience other
problems.
5.1 channel sound is not
being reproduced.
Disc does not play.
• Check the batteries in the remote. May need replacing.
• Operate the remote control at a distance of no more than 20 feet.
• Remove batteries and hold down one or more buttons for several
minutes to drain the microprocessor inside the remote to reset it.
Reinstall batteries and try remote again.
• Ensure that the disc is installed with the label side facing up.
• Check the region number of the DVD.
• 5.1 channel sound is reproduced only when the following conditions
are met. :
1) The DVD player is connected with the proper amplifier
2) The disc is recorded with 5.1 channel sound.
• Check whether the disc being played has the “Dolby 5.1 ch” mark
on the outside.
• Check if your audio system is connected and working properly.
• In a SETUP Menu, is the Audio Output set to Bitstream?
• The features or action cannot be completed at this time because:
1. The DVD’s software restricts it.
2. The DVD’s software doesn’t support the feature (e.g., angles).
3. The feature is not available at the moment.
4. You’ve requested a title or chapter number or search time that is
out of range.
• Check if the disc has a Menu.
• Some of the functions selected in the Setup Menu may not work
properly if the disc is not encoded with the corresponding function.
• The Screen Ratio is fixed on your DVDs.
• Make sure you have selected the correct Digital Output in the Audio
Options Menu.
• Press power on from a cold start with no disc in the unit. Press the
STOP ( ) and PLAY( ) buttons simultaneously on the front panel
for three seconds. The Select Menu Language display will appear.
Select the desired language button. Press the MENU button on the
remote control to select the Parental Mode. The Parental Mode is now
unlocked as indicated on the display. Press the DOWN button to select
Parental. Press ENTER and the Create Password display will appear.
You can now set your rating level and change your password to a new
number.
• Go to the contents and find the section of the instruction book that
contains the explanations regarding the current problem, and follow
the procedure once again.
• If the problem still cannot be solved, please contact your nearest
authorized service center.
Action
Problem Page
P4
P7
P18
P44~45
P21
P41~42
P41~48
P46~47
P44~45
P48
Page 27

REFERENCE
ENGENG
st) lucniveı fouvrnwn mikrokumavtwn
z) prosarmogevı, metatropeı hv ruqmivseiı hv prospavqeieı proı touvto, anexavrthta
tou eavn hvnan epituceiı hv anepituceivı ouvte opoiadhvpote zhmiva pou eivnai
apotevlesma touı.
5. H egguvhsh authv den kaluvptei kammiva apov tiı pio kavtw periptwvseiı
A. Periodikouvı elevcouı, sunthvrhsh kai episkeuhv hv antikatavstash merwvn pou
ofeivlontai se fusiologikhv fqorav.
B. Ta evxoda kai touı kinduvnouı metaforavı pou scetivzontai me thn egguvhsh
autouv pou proi‹ovntoı.
G. Zhmiva se autov to proi>ovn tou proevrcetai apov
1) Katavcrhsh hv kakhv crhvsh, sumperilambanomevnhı allav kai mh
periorismevnhı se
a. mh crhvsh autouv tou proivovntoı gia touı skopouvı pou fusiologikav
proorivzetai hv suvmfwna me tiı odhgiveı crhvsewı gia thn swsthv crhvsh
kai sunthvrhsh autouv tou proi>ovntoı kai
b. thn egkatavstash kai crhvsh tou proi>ovntoı me trovpo pou antivkeitai
stiı tecnikevı prodiagrafevı asfaleivaı pou iscuvoun sthn cwvra ovrou
crhsimopoieivtai to proi‹ovn.
2) Episkeuevı pou evginan apov mh exousiodothmevna ergasthvria service.
3) Atuchvmata, qeomhniveı hv opoiadhvpote aitiva pevra tou elevgcou thı
SAMSUNG sumperilambanomevnwn allav mh periorizomevnwn twn keraunwvn,
tou nerouv, thı fwtiavı, twn dhmovsiwn anataracwvn kai tou kakouv aerismouv.
4) H egguvhsh authv den ephreavzei ta dikaiwvmata tou katanalwthv pou
problevpontai apov thn efarmosteva eqnikhv nomoqesiva pou iscuvei, ouvte ta
dikaiwvmata tou katanalwthv enantivon tou lianopwlhthv pou aporrevoun apov
thn suvmbash pwvlhsh .
5) Se perivptwsh pou den upavrcei eqnikhvn omoqesiva, authv h egguvhsh qa eivnai
h monadikhv kai apokleistikhv kavluyh tou katanalwthv, kai ouvte h
SAMSUNG ouvte h qugatrikhv thı, o antiprovswpoı thı pou anagravfetai se
authv thn Kavrta Egguvhshı, qa euquvnetai gia kavqe qetikhv hv apoqematikhv
zhmiva gia evlleiyh kavqe rhthvı hv nomizovmenhı idiovthtaı tou proi>ovntoı.
EEUURRWWPPAAIIKKHH EEGGGGUUHHSSHH
EEUURROOEELLEECCTTRRIICC SS..AA
52 53
Agaphtoiv pelavteı,
Saı eucaristouvme gia thn empistosuvnh pou deivxate sthn SAMSUNG me thn
agorav authvı thı suskeuhvı.
To proi>ovn autov thı SAMSUNG eivnai egguhmevno gia perivodo dwvdeka (12) mhnwvn
apov thn pragmatikhv hmeromhniva agoravı tou gia antallaktikav kai ergatikav.
Sthn perivptwsh pou qa creiasteiv episkeuhv, to proi>ovn autov thı SAMSUNG qa
prevpei na staleiv sto exousiodothmevno service. Exousiodothmevnoi antiprovswpoi kai
exousiodothmevna kevntra service thı SAMSUNG, se avlleı Eurwpai‹kevı cwvreı, qa
apodectouvn touı ovrouı thı egguvhshı sthn cwvreı ovpou evcei agorasteiv to proi>ovn.
Plhroforiveı gia ta exousiodothmevna kevntra service mporeivte na pavrete apov thn
EUROELECTRIC S.A.
17o clm. Eqnikhvı Odouv Aqhnwvn - Aamivaı
145 10 Khfisiav
Thl. 620.32.46/-7/-8
■ OROI THS EGGUHSHS
1. H egguvhsh iscuvei eavn kai movnon ovtan to proi>ovn creiavzetai service kai h
egguhtikhv kavrta evcei plhvrwı sumplhrwqeiv kai proskomisqeiv maziv me to
pragmatikov
timolovgio hv thn apovdeixh plhrwmhvı kai o ariqmovı tou proi‹ovntoı eivnai
eukrinhvı.
2. H upocrevwsh thı SAMSUNG aforav movno thn episkeuhv tou proi‹ovntoı.
3. H episkeuhv tou proi>ovntoı prevpei na anativqetai se exousiodothmevna kevntra
service hv se exousiodothmevnouı antiproswvpouı thı SAMSUNG. Kammiva
apovzhmivwsh den qa givnei apodekthv gia episkeuevı pou evcoun givnei apov mh
exousiodothmevna apov thn SAMSUNG sunergeiva hv antiproswvpouı, kaqwvı epivshı
kai gia kavqe episkeuhv kai zhmiveı pou proklhvqhkan katav thn episkeuhv authv pou
den kaluvptontai apov tou ovrouı thı egguhvsewı.
4. To proi>ovn autov den qa qewrhqeiv ellatwmatikov sta ulikav hv sthn ergasiva
kataskeuhvı eavn qa prevpei na prosarmosteiv, metatrapeiv hv ruqmisteiv wvste na
summorfwqeiv me tiı eqnikevı hv topikev tecnikevı prodiagrafevı hv prodiagrafevı
pou iscuvoun se opoiadhvpote cwvha avllh ap j authv gia thn opoiva prooriıovtan kai
kataskeuavsthke.
H egguvhsh authv den kaluvptei apozhmiwvseiı gia
a) Belovneı kai kefaleı pik-ap
b) kefalevı video kai kasetofwvnwn
g) kefalevı camcordor
d) gennhvtrieı aktivnwn laser sta compact disk
e) thleceiristhvria
ELLAS (GREECE)
Page 28

ENG
Magyarország
Ezt a Samsung terméket az eredeti vásárlás idôpontjától számítva tizenkét (12) hónapig
garantáljuk anyaghiba és hibás kidolgozás esetére. Kérjük, hogy amennyiben
szükségessé válna garanciális szolgáltatás igénybevétele, küldje vissza a terméket ahhoz
a kereskedôhöz, akinél vásárolta.
Mindazonáltal, az Európai Közösség más országaiban mûködô hivatalos Samsung
kereskedôk és hivatalos szolgáltató központok is eleget tesznek a garanciális
kötelezettségnek az adott országokban a vevôk részére kibocsátott feltételek szerint.
Amennyiben probléma merülne fel, hivatalos szolgáltató központjainkról további
részleteket az alábbi címen kaphat:
A GARANCIA FELTÉTELEI
1. Garanciális szolgáltatás igénylése esetén a garancia csak akkor érvényes, ha a
garanciakártyát hiánytalanul és helyesen kitöltve az eredeti számlával, pénztári blokkal
vagy az eladásról szóló igazolással együtt bemutatják, és ha a terméken a sorozatszám
sértetlen.
2. Samsung kötelezettsége a javításra, vagy - választása szerint - a termék illetve a hibás
alkatrész kicserélésére korlátozódik.
3. Agaranciális javításokat hivatalos Samsung kereskedôknek vagy hivatalos szolgáltató
központoknak kell végezniük. Nem térítjük meg a nem Samsung kereskedôk által
végzett javításokat, a jelen garancia nem terjed ki ezekre a javításokra, sem pedig azokra a
károkra, amelyeket ezek a javítások a termékben elôidéztek.
4. Nem tekinthetô anyaghibának vagy gyártási hibának, ha szükségessé válik a termék
átalakítása, hogy megfeleljen egy ország nemzeti vagy helyi mûszaki vagy biztonsági
szabványainak, ha ez az ország nem azonos azzal, amely részére a terméket eredetileg szánták
és elôállították. Ajelen garancia nem fedezi és nem téríti meg az ilyen adaptáció költségét, sem
pedig az abból eredô esetleges kárt.
5. Ajelen garancia nem terjed ki az alábbiakra:
a) Idôszakos ellenôrzések, karbantartás a normál használat következtében elkopott
alkatrészek javítása vagy kicserélése,
b) Atermék szállításának, leszerelésének és üzembe állításának költsége,
c) Helytelen használat, beleértve a termék nem rendeltetésszerû használatát vagy a
helytelen üzembehelyezést,
d) Villámcsapás, víz, tûz, vis major, háború, politikai zavargások, helytelen hálózati
feszültség, nem megfelelô szellôzés és minden egyéb olyan ok, amely kívül esik Samsung
ellenôrzésén.
6. Ajelen garanciát minden olyan személy érvényesítheti, aki a garanciális idôszakban
jogszerûen került a termék birtokába.
7. Ajelen garancia nem érinti a vásárlóknak a kereskedôvel szemben az adásvételi
szerzôdésbôl fakadó vagy egyéb, a nemzeti törvényekben biztosított alkotmányos
jogait. Amennyiben a nemzeti törvények másképpen nem rendelkeznek, a vásárlók
egyedüli jogai azok, amelyeket a jelen garancia nyújt. Samsung, leányvállalatai és
kiskereskedôi nem felelnek a lemezek, kompakt lemezek, videó- vagy magnókazetták
vagy bármely ezekkel kapcsolatos berendezés illetve anyag közvetett vagy
következményként felmerülô elvesztéséért vagy károsodásáért.
54
 Loading...