


Samsung XUSK24C6RE/XST, XUSK12G6VE/XST, XUSK18C6RE, XUSK09G6VE/XST, XUSK13F6VENXST User Manual [en, ms, th]
...OWNER’S
INSTRUCTIONS
Indoor Unit |
Outdoor Unit |
ASK09F8VE |
USK09F8VE |
ASK09F6VE |
USK09F6VE |
ASK13F6VE |
USK13F6VE |
ASK18C6RE |
USK18C6RE |
ASK24C6RE |
USK24C6RE |
Split-type Room Air Conditioner
(Cool)
E DB98-07233A(2)
Safety Precautions
The following safety precautions must be taken when using your air conditioner.
1Make sure that the indoor unit is correctly ventilated at all times; do NOT place clothing or other materials over it.
2NEVER spill liquid of any kind into the indoor unit. Should this happen, switch off the breaker used for your air conditioner and contact your installation specialist.
3Do NOT insert anything between the air flow blades, as the inner fan may become damaged and you may be hurt. Keep children away from the indoor unit.
4Do NOT place any obstacles in front of the outdoor unit.
5If the remote control will not be used for a long time, remove the batteries.
6Users of this product are cautioned not to attempt repair of this product at their own discretion. Instead, they are requested to directly contact a designated service center or the outlet at which the product was purchased.
7If the supply cord is damaged, it must be replaced by a special cord or assembly available from the manufacturer or its service centre.
8This device must be installed according to the national electrical rules.
9Before disposing of the remote control it is necessary to remove batteries.
10The appliance is not intended for use by young children or infirm person without supervision; young children should be supervised to ensure that they do not play with the appliance.
11Max current is measured according to IEC standard for safety
and current is measured according to ISO standard for energy efficiency.
CAUTION
The manufacturer does not take any responsibility for any accidents that occur because the air conditioner is not fixed firmly or installed securely, during installing or using the product. In case you experience difficulty in installation, you must use an installation specialist. An accident will occur if the installation is not done as recommends in the installation guide.
E-2

Contents
PREPARING YOUR AIR CONDITIONER
■ Safety Precautions . . . . . . . . . . . . . . . . . . . . . . . . . . . . . . . . . . .2
■ View of the Unit . . . . . . . . . . . . . . . . . . . . . . . . . . . . . . . . . . . . . .4
■ Remote Control-Buttons and Display . . . . . . . . . . . . . . . . . . . . .6
■ Getting Started . . . . . . . . . . . . . . . . . . . . . . . . . . . . . . . . . . . . . .7
■ Inserting the Remote Control Batteries . . . . . . . . . . . . . . . . . . . .8
OPERATING YOUR AIR CONDITIONER |
|
■ 5 Way Function . . . . . . . . . . . . . . . . . . . . . . . . . . . . . . . . . . . . |
. .9 |
■ Selecting the Automatic Operating Mode . . . . . . . . . . . . . . . . |
.10 |
■ Cooling Your Room . . . . . . . . . . . . . . . . . . . . . . . . . . . . . . . . . |
.11 |
■ Changing the Room Temperature Quickly . . . . . . . . . . . . . . . . |
12 |
■ Removing Excess Humidity . . . . . . . . . . . . . . . . . . . . . . . . . . . |
13 |
■ Airing Your Room . . . . . . . . . . . . . . . . . . . . . . . . . . . . . . . . . . . |
14 |
■ Adjusting the Air Flow Direction Vertically . . . . . . . . . . . . . . . . |
15 |
■ Adjusting the Air Flow Direction Horizontally . . . . . . . . . . . . . . |
15 |
PROGRAMMING YOUR AIR CONDITIONER
■ Setting the On Timer . . . . . . . . . . . . . . . . . . . . . . . . . . . . . . . . .16
■ Setting the Off Timer . . . . . . . . . . . . . . . . . . . . . . . . . . . . . . . . .17
■ Setting the Sleep Timer . . . . . . . . . . . . . . . . . . . . . . . . . . . . . . .18
RECOMMENDATIONS FOR USE |
|
■ Operating Recommendations . . . . . . . . . . . . . . . . . . . . . . . . . |
.19 |
■ Temperature and Humidity Ranges . . . . . . . . . . . . . . . . . . . . . |
.20 |
■ Cleaning Your Air Conditioner . . . . . . . . . . . . . . . . . . . . . . . . . . |
20 |
■ Solving Common Problems . . . . . . . . . . . . . . . . . . . . . . . . . . . |
21 |
■ Installing a Filter (Option) . . . . . . . . . . . . . . . . . . . . . . . . . . . . . |
22 |
TECHNICAL SPECIFICATIONS |
|
E-3

View of the Unit
Indoor Unit 09/13
On/Off switch (operation without remote control)
|
Power |
|
|
Timer indicator |
Standard |
Nature |
Saving |
Silence |
Timer |
Standard indicator |
|
|
|
Silence indicator |
Nature indicator |
|
|
Saving indicator |
|
|
Power indicator |
|
|
|
Indoor Unit 18/24
|
|
|
|
|
|
|
|
|
|
|
|
|
|
|
|
|
|
|
|
|
|
|
|
|
|
|
|
|
|
|
|
|
|
|
|
Air filter |
|
|
|
|
Air Inlet |
||||||
(under the grille) |
|
Air flow blades |
|||||||||
|
|
|
|
|
(outlet) |
||||||
On/Off & 5 Way selection button/ Remote Control Sensor
STANDARD indicator |
|
|
|
|
|
|
|
|
TIMER indicator |
||
|
|
|
|
|
|
|
|
||||
|
|
|
|
|
|
|
|
|
|
||
|
|
|
|
|
|
|
SILENCE indicator |
||||
|
|
||||||||||
NATURE indicator |
|
|
|
|
|
|
|
|
|
||
|
|
|
|
|
|
|
|||||
|
|
|
|
|
SAVING indicator |
||||||
|
|
|
|
||||||||
|
|
|
|
|
|
|
|
|
|
|
|
POWER indicator
Note For details on the 5 Way, refer to page 9.
E-4

|
|
|
|
|
|
|
|
|
Outdoor Unit |
USK09F8VE |
|
Air Inlet(Rear)
Air Outlet
Connection Valve (inside)
Outdoor Unit |
USK09F6VE USK13F6VE |
Air Inlet(Rear)
Air Outlet 
Connection Valve (inside)
Outdoor Unit |
USK18C6RE USK24C6RE |
Air Inlet(Rear)
Air Outlet

 Connection Valve
E-5
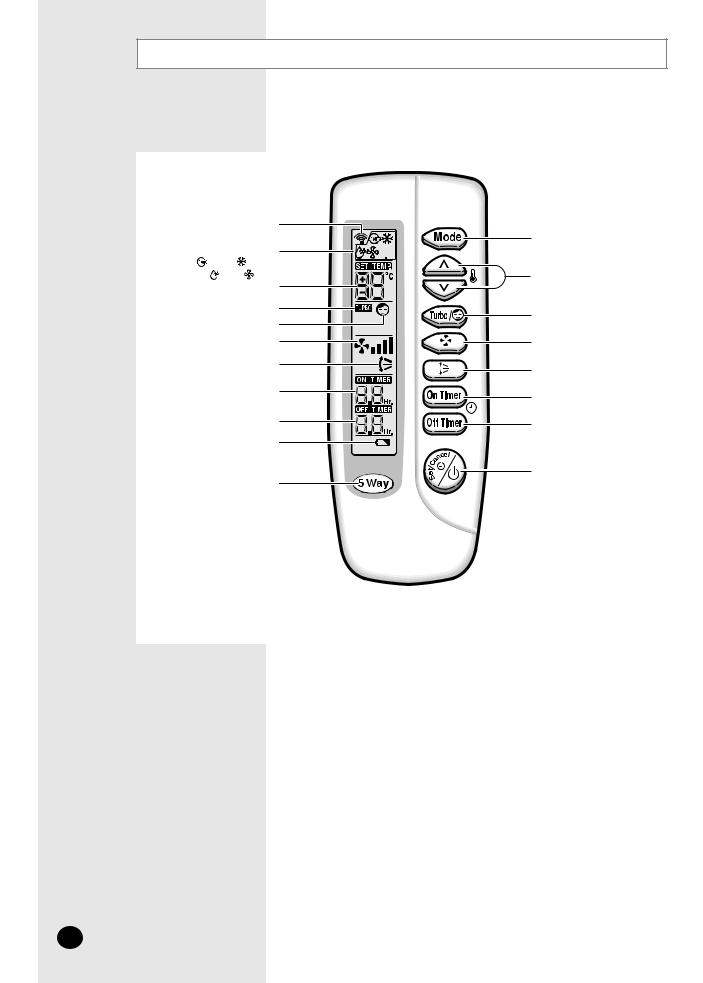
Remote Control - Buttons and Display
Remote control |
|
||
transmission indicator |
Mode selection button |
||
|
|
||
Operating mode |
(AUTO, COOL, DRY, FAN) |
||
( AUTO, |
COOL, |
|
|
DRY, |
FAN) |
Temperature adjustment |
|
Temperature setting |
buttons |
||
Turbo mode |
Turbo/Sleep mode |
||
Sleep mode |
|||
selection button |
|||
|
|
||
Fan speed |
Fan speed adjustment |
||
Air flow direction |
button |
||
Swing button |
|||
|
|
||
On Timer setting |
On Timer button |
||
|
|
||
Off Timer setting |
Off Timer button |
||
|
|
||
Battery discharge indicator |
|
||
5 Way selection button |
On/Off & |
||
Timer Set/Cancel button |
|||
E-6
Getting Started
You have just purchased a split type air conditioner and it has been installed by your installation specialist.
Your Owner’s Instructions contains valuable information on using your air conditioner. Please take the time to read it as it will help you take full advantage of the unit’s features.
The booklet is organized as follows.
The following figures are shown on pages from 4 to 6 :
-Indoor and outdoor units
-Remote control(buttons and display)
They will help you find the buttons and understand the symbols displayed.
In the main part of the installation book, you will find a series of step-by-step procedures for each function available.
The illustrations in the step-by-step procedures use three different symbols:
PRESS |
PUSH |
HOLD DOWN |
|
|
|
E-7
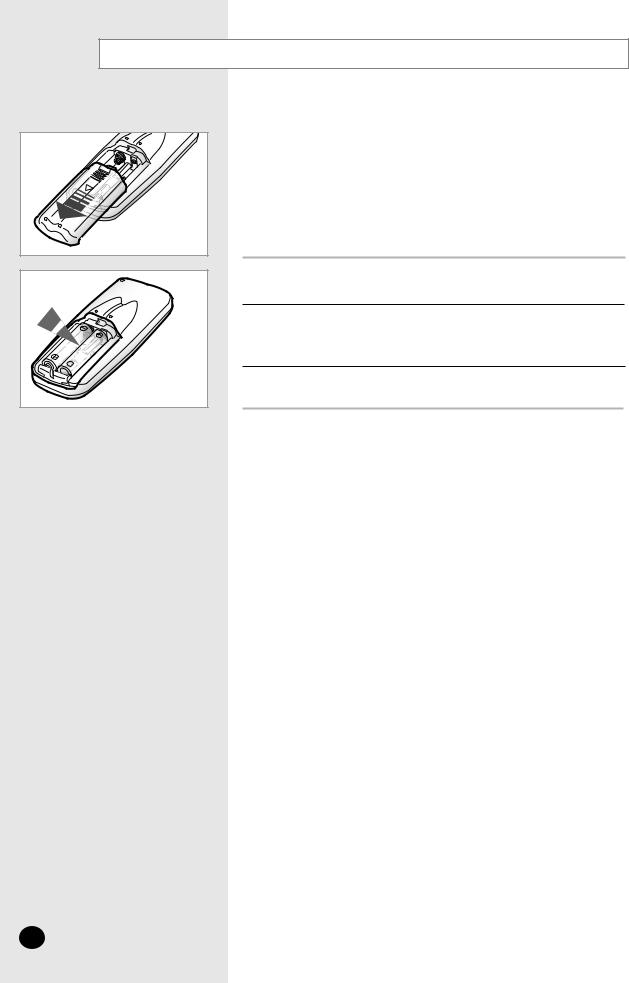
Inserting the Remote Control Batteries
You must insert or replace the remote control batteries when :You purchase the air conditioner
The remote control does not work correctly
Note Use two AAA, LR03 1.5V batteries.
Do not use old batteries or different kinds of batteries together.Batteries may be completely discharged after 12 months, evenif they have not actually been used.
1Push the battery cover on the rear of the remote control with your thumb in the direction of the arrow and remove it.
2 Insert the two batteries, taking care to respect the polarities :+ on the battery with + on the remote control.
- on the battery with - on the remote control.
3 Close the cover by sliding it back until it clicks into place.
E-8
 Loading...