


WW80H7600E*
WW80H7400E*
WW90H7600E*
WW90H7400E*
Washing Machine
user manual
This manual is made with 100% recycled paper.
Imagine the possibilities
Thank you for purchasing this Samsung product.
|
|
|
|
WW90H7600EW-03403K-06_EN.indd 1 |
2015/8/29 11:00:58 |
||
|
|
|
|
Contents |
|
Safety information |
3 |
What you need to know about safety instructions |
....................................................................... 3 |
Important safety symbols............................................................................................................. |
3 |
Important safety precautions ....................................................................................................... |
4 |
Instruction about the WEEE ....................................................................................................... |
10 |
Installation |
11 |
What’s included.......................................................................................................................... |
11 |
Installation requirements ............................................................................................................ |
12 |
Step-by-step installation............................................................................................................ |
14 |
Before you start |
18 |
lnitial settings ............................................................................................................................. |
18 |
Laundry guidelines..................................................................................................................... |
19 |
Detergent drawer guidelines ...................................................................................................... |
21 |
Operations |
23 |
Control panel.............................................................................................................................. |
23 |
Simple steps to start .................................................................................................................. |
24 |
Course overview ........................................................................................................................ |
25 |
Settings...................................................................................................................................... |
28 |
Maintenance |
29 |
Eco Drum Clean ......................................................................................................................... |
29 |
Smart Care................................................................................................................................. |
30 |
Emergency drain ........................................................................................................................ |
31 |
Cleaning..................................................................................................................................... |
32 |
Recovery from freezing .............................................................................................................. |
35 |
Care against an extended time of disuse................................................................................... |
35 |
Troubleshooting |
36 |
Checkpoints............................................................................................................................... |
36 |
Information codes ...................................................................................................................... |
37 |
Specifications |
38 |
Protecting the environment ........................................................................................................ |
38 |
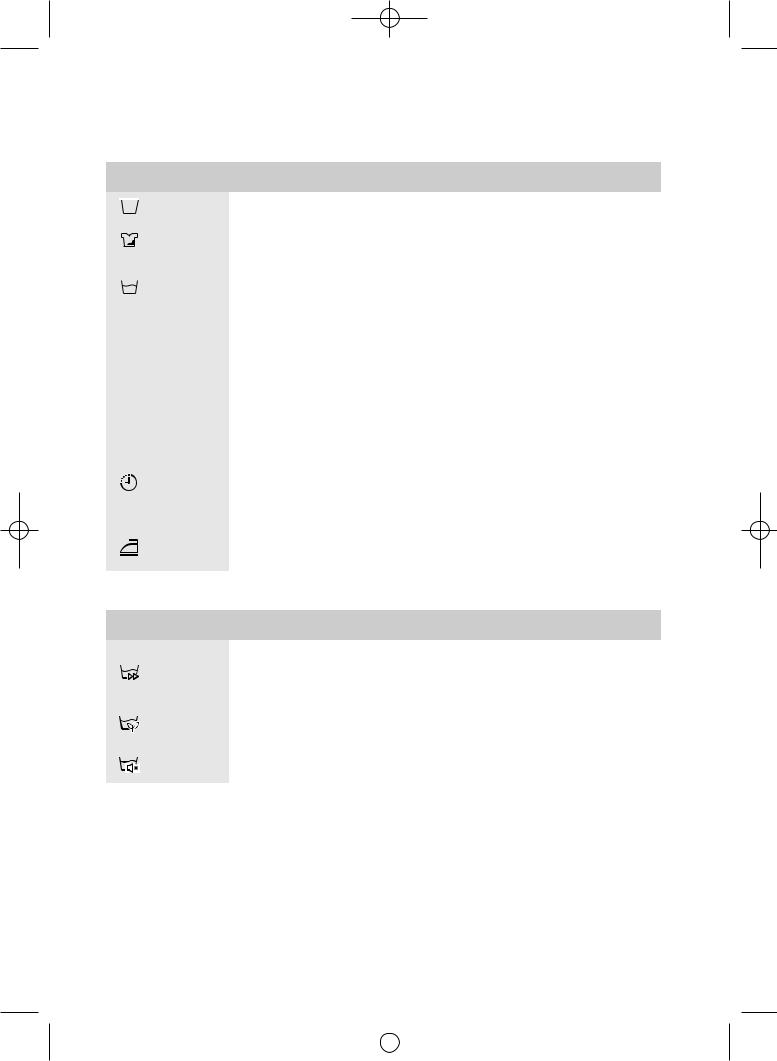
Fabric care chart ........................................................................................................................ |
39 |
Sheet of household washing machines...................................................................................... |
40 |
Information of main washing programmes................................................................................. |
42 |
English - 2
|
|
|
|
WW90H7600EW-03403K-06_EN.indd 2 |
2015/8/29 11:00:58 |
||
|
|
|
|

Safety information
Congratulations on your new Samsung washing machine. This manual contains important information on the installation, use and care of your appliance. Please take some time to read this manual to take full advantage of your washing machine’s many benefits and features.
What you need to know about safety instructions
Please read this manual thoroughly to ensure that you know how to safely and efficiently operate the extensive features and functions of your new appliance. Please store the manual in a safe location close to the appliance for future reference. Use this appliance only for its intended purpose as described in this instruction manual.
Warnings and Important Safety Instructions in this manual do not cover all possible conditions and situations that may occur. It is your responsibility to use common sense, caution and care when installing, maintaining and operating your washing machine.
Because the following operating instructions cover various models, the characteristics of your washing machine may differ slightly from those described in this manual and not all warning signs may be applicable. If you have any questions or concerns, contact your nearest service centre or find help and information online at www.samsung.com.
Important safety symbols
What the icons and signs in this user manual mean:
WARNING: Hazards or unsafe practices that may result in severe personal injury, death and/or property damage.
CAUTION: Hazards or unsafe practices that may result in personal injury and/or property damage.
NOTE
These warning signs are here to prevent injury to yourself and others. Please follow them explicitly.
After reading this manual, store it in a safe place for future reference.
Read all instructions before using the appliance.
As with any equipment that uses electricity and moving parts, potential hazards exist. To safely operate this appliance, familiarize yourself with its operation and exercise care when using it.
English - 3
 INFORMATION SAFETY 01
|
|
|
|
WW90H7600EW-03403K-06_EN.indd 3 |
2015/8/29 11:00:59 |
||
|
|
|
|

Important safety precautions
WARNING: To reduce the risk of fire, electric shock, or injury to persons when using your appliance, follow basic precautions, including the following:
1.This appliance is not to be used by persons (including children) with reduced physical, sensory or mental capabilities, or lack of experience and knowledge, unless they have been given supervision or instruction concerning use of the appliance by a person responsible for their safety.
2.For use in Europe: This appliance can be used by children aged from 8 years and above and persons with reduced physical, sensory or mental capabilities or lack of experience and knowledge if they have been given supervision or instruction concerning use of the appliance in a safe way and understand the hazards involved. Children shall not play with the appliance. Cleaning and user maintenance shall not be made by children without supervision.
3.Children should be supervised to ensure that they do not play with the appliance.
4.If the supply cord is damaged, it must be replaced by the manufacturer, its service agent or similarly qualified persons in order to avoid a hazard.
5.The new hose-sets supplied with the appliance are to be used and that old hose-sets should not be reused.
6.For appliances with ventilation openings in the base, that a carpet must not obstruct the openings.
7.For use in Europe: Children of less than 3 years should be kept away unless continuously supervised.
English - 4
|
|
|
|
WW90H7600EW-03403K-06_EN.indd 4 |
2015/8/29 11:00:59 |
||
|
|
|
|

CAUTION: In order to avoid a hazard due to inadvertent resetting of the thermal cut-out, this appliance must not be supplied through an external switching device, such as a timer, or connected to a circuit that is regularly switched on and off by the utility.
WARNING: Critical installation WARNINGS
The installation of this appliance must be performed by a qualified technician or service company.
Ř )DLOXUH WR GR VR PD\ UHVXOW LQ HOHFWULF VKRFN ƂUH DQ H[SORVLRQ SUREOHPV ZLWK WKH SURGXFW RU LQMXU\
The appliance is heavy, therefore take care when lifting it.
Plug the power cord into an AC 220 - 240 V / 50 Hz wall socket or higher and use the socket for this appliance only. Never use an extension cord.
Ř 6KDULQJ D ZDOO VRFNHW ZLWK RWKHU DSSOLDQFHV XVLQJ D SRZHU VWULS RU H[WHQGLQJ WKH SRZHU FRUG PD\ UHVXOW in electric shock or fire.
Ř (QVXUH WKDW WKH SRZHU YROWDJH IUHTXHQF\ DQG FXUUHQW DUH WKH VDPH DV WKRVH RI WKH SURGXFW specifications. Failure to do so may result in electric shock or fire. Plug the power plug into the wall socket firmly.
Remove all foreign substances such as dust or water from the power plug terminals and contact points using a dry cloth on a regular basis.
Ř 8QSOXJ WKH SRZHU SOXJ DQG FOHDQ LW ZLWK D GU\ FORWK
Ř )DLOXUH WR GR VR PD\ UHVXOW LQ HOHFWULF VKRFN RU ƂUH
Plug the power plug into the wall socket so that the cord is running towards the floor.
Ř ,I \RX SOXJ WKH SRZHU SOXJ LQWR WKH VRFNHW LQ WKH RSSRVLWH GLUHFWLRQ WKH HOHFWULF ZLUHV ZLWKLQ WKH FDEOH may be damaged and this may result in electric shock or fire.
Keep all packaging materials out of the reach of children as these may be dangerous.
Ř ,I D FKLOG SODFHV D EDJ RYHU LWV KHDG LW PD\ VXIIRFDWH
When the appliance, power plug or power cord is damaged, contact your nearest service centre.
This appliance must be properly grounded.
Do not ground the appliance to a gas pipe, plastic water pipe, or telephone line.
Ř 7KLV PD\ UHVXOW LQ HOHFWULF VKRFN ƂUH DQ H[SORVLRQ RU SUREOHPV ZLWK WKH SURGXFW
Ř 1HYHU SOXJ WKH SRZHU FRUG LQWR D VRFNHW WKDW LV QRW JURXQGHG FRUUHFWO\ DQG PDNH VXUH WKDW LW LV LQ accordance with local and national regulations.
Do not install this appliance near a heater or any inflammable material.
Do not install this appliance in a humid, oily or dusty location, or in a location exposed to direct sunlight or water (rain drops).
Do not install this appliance in a location exposed to low temperatures.
Ř )URVW PD\ FDXVH WKH WXEHV WR EXUVW
English - 5
 INFORMATION SAFETY 01
|
|
|
|
WW90H7600EW-03403K-06_EN.indd 5 |
2015/8/29 11:00:59 |
||
|
|
|
|
Do not install this appliance in a location where gas may leak.
Ř 7KLV PD\ UHVXOW LQ HOHFWULF VKRFN RU ƂUH
Do not use an electric transformer.
Ř 7KLV PD\ UHVXOW LQ HOHFWULF VKRFN RU ƂUH
Do not use a damaged power plug, damaged power cord, or loose wall socket.
Ř 7KLV PD\ UHVXOW LQ HOHFWULF VKRFN RU ƂUH
Do not pull or excessively bend the power cord.
Do not twist or tie the power cord.
'R QRW KRRN WKH SRZHU FRUG RYHU D PHWDO REMHFW SODFH D KHDY\ REMHFW RQ WKH SRZHU FRUG LQVHUW WKH SRZHU FRUG EHWZHHQ REMHFWV RU SXVK WKH SRZHU FRUG LQWR WKH VSDFH EHKLQG WKH DSSOLDQFH Ř 7KLV PD\ UHVXOW LQ HOHFWULF VKRFN RU ƂUH
Do not pull the power cord when unplugging the power plug.
Ř 8QSOXJ WKH SRZHU SOXJ E\ KROGLQJ WKH SOXJ
Ř )DLOXUH WR GR VR PD\ UHVXOW LQ HOHFWULF VKRFN RU ƂUH
This appliance should be positioned so that the power plug, the water supply taps, and the drain pipes are accessible.
CAUTION: Installation CAUTIONS
This appliance should be positioned in such a way that the power plug is easily accessible.
Ř )DLOXUH WR GR VR PD\ UHVXOW LQ HOHFWULF VKRFN RU ƂUH GXH WR HOHFWULF OHDNDJH
Install your appliance on a solid, level floor that can support its weight.
Ř )DLOXUH WR GR VR PD\ UHVXOW LQ DEQRUPDO YLEUDWLRQV PRYHPHQW QRLVH RU SUREOHPV ZLWK WKH SURGXFW
Do not install this appliance in a location exposed to low temperatures.
Ř )URVW PD\ FDXVH WKH WXEHV WR EXUVW
WARNING: Critical usage WARNINGS
If the appliance is flooded, turn off the water & power supplies immediately and contact your nearest service centre.
Ř 'R QRW WRXFK WKH SRZHU SOXJ ZLWK ZHW KDQGV
Ř )DLOXUH WR GR VR PD\ UHVXOW LQ HOHFWULF VKRFN
If the appliance generates a strange noise, a burning smell, or smoke, unplug the power plug immediately and contact your nearest service centre.
Ř )DLOXUH WR GR VR PD\ UHVXOW LQ HOHFWULF VKRFN RU ƂUH
In the event of a gas leak (such as propane gas, LP gas, etc.), ventilate immediately without touching the power plug. Do not touch the appliance or power cord.
Ř 'R QRW XVH D YHQWLODWLQJ IDQ
Ř $ VSDUN PD\ UHVXOW LQ DQ H[SORVLRQ RU ƂUH
Do not let children play in or on the washing machine. In addition, when disposing of the appliance, remove the washing machine door lever.
Ř ,I WUDSSHG LQVLGH WKH SURGXFW FKLOGUHQ PD\ VXIIRFDWH WR GHDWK
English - 6
|
|
|
|
WW90H7600EW-03403K-06_EN.indd 6 |
2015/8/29 11:00:59 |
||
|
|
|
|

Make sure to remove the packaging (sponge, styrofoam) attached to the bottom of the washing machine before using it.
Do not wash items contaminated with gasoline, kerosene, benzene, paint thinner, alcohol or other inflammable or explosive substances.
Ř 7KLV PD\ UHVXOW LQ HOHFWULF VKRFN ƂUH RU DQ H[SORVLRQ
Do not open the washing machine door by force while it is operating (high-temperature washing/drying/ spinning).
Ř :DWHU ƃRZLQJ RXW RI WKH ZDVKLQJ PDFKLQH PD\ UHVXOW LQ EXUQV RU FDXVH WKH ƃRRU WR EH VOLSSHU\ 7KLV PD\ UHVXOW LQ LQMXU\
Ř 2SHQLQJ WKH GRRU E\ IRUFH PD\ UHVXOW LQ GDPDJH WR WKH SURGXFW RU LQMXU\
Do not insert your hand under the washing machine while an operation is in progress.
Ř 7KLV PD\ UHVXOW LQ LQMXU\
Do not touch the power plug with wet hands.
Ř 7KLV PD\ UHVXOW LQ HOHFWULF VKRFN
Do not turn the appliance off by unplugging the power plug while an operation is in progress.
Ř 3OXJJLQJ WKH SRZHU SOXJ LQWR WKH ZDOO VRFNHW DJDLQ PD\ FDXVH D VSDUN DQG UHVXOW LQ HOHFWULF VKRFN RU ƂUH
Do not let children or the infirm use this washing machine without proper supervision. Do not let children climb in or onto the appliance.
Ř 7KLV PD\ UHVXOW LQ HOHFWULF VKRFN EXUQV RU LQMXU\
'R QRW LQVHUW \RXU KDQG RU D PHWDO REMHFW XQGHU WKH ZDVKLQJ PDFKLQH ZKLOH LW LV RSHUDWLQJ Ř 7KLV PD\ UHVXOW LQ LQMXU\
Do not unplug the appliance by pulling the power cord. Always grip the plug firmly and pull it straight out of the outlet.
Ř 'DPDJH WR WKH SRZHU FRUG PD\ FDXVH D VKRUW FLUFXLW ƂUH DQG RU HOHFWULF VKRFN
Do not attempt to repair, disassemble, or modify the appliance yourself.
Ř 'R QRW XVH D IXVH VXFK DV FRSSHU VWHHO ZLUH HWF RWKHU WKDQ D VWDQGDUG IXVH
Ř :KHQ WKH DSSOLDQFH QHHGV WR EH UHSDLUHG RU UHLQVWDOOHG FRQWDFW \RXU QHDUHVW VHUYLFH FHQWUH Ř )DLOXUH WR GR VR PD\ UHVXOW LQ HOHFWULF VKRFN ƂUH SUREOHPV ZLWK WKH SURGXFW RU LQMXU\
If the water supply hose comes loose from the water tap and floods the appliance, unplug the power plug.
Ř )DLOXUH WR GR VR PD\ UHVXOW LQ HOHFWULF VKRFN RU ƂUH
Unplug the power plug when the appliance is not being used for long periods of time or during a thunder or lightning storm.
Ř )DLOXUH WR GR VR PD\ UHVXOW LQ HOHFWULF VKRFN RU ƂUH
If any foreign substance enters into the appliance, unplug the power plug and contact you nearest Samsung Customer Service.
Ř 7KLV PD\ UHVXOW LQ HOHFWULF VKRFN RU ƂUH
Do not let children (or pets) play in or on your washing machine. The washing machine door does not open
HDVLO\ IURP WKH LQVLGH DQG FKLOGUHQ PD\ EH VHULRXVO\ LQMXUHG LI WUDSSHG LQVLGH
English - 7
 INFORMATION SAFETY 01
|
|
|
|
WW90H7600EW-03403K-06_EN.indd 7 |
2015/8/29 11:00:59 |
||
|
|
|
|

CAUTION: Usage CAUTIONS
When the washing machine is contaminated by a foreign substance such as detergent, dirt, food waste, etc., unplug the power plug and clean the washing machine using a damp, soft cloth.
Ř )DLOXUH WR GR VR PD\ UHVXOW LQ GLVFRORXUDWLRQ GHIRUPDWLRQ GDPDJH RU UXVW
The front glass may be broken by a strong impact. Take care when using the washing machine.
Ř ,I WKH JODVV LV EURNHQ LW PD\ UHVXOW LQ LQMXU\
After a water supply failure or when reconnecting the water supply hose, open the water tap slowly.
Open the water tap slowly after a long period of non-use.
Ř 7KH DLU SUHVVXUH LQ WKH ZDWHU VXSSO\ KRVH RU WKH ZDWHU SLSH PD\ GDPDJH D SURGXFW SDUW RU UHVXOW LQ D water leak.
If a draining error occurs during an operation, check if there is a draining problem.
Ř ,I WKH ZDVKLQJ PDFKLQH LV XVHG ZKHQ LW LV ƃRRGHG EHFDXVH RI D GUDLQLQJ SUREOHP LW PD\ UHVXOW LQ HOHFWULF shock or fire.
Insert the laundry into the washing machine completely so that the laundry does not get caught in the door.
Ř ,I ODXQGU\ JHWV FDXJKW LQ WKH GRRU LW PD\ UHVXOW LQ GDPDJH WR WKH ODXQGU\ RU WKH ZDVKLQJ PDFKLQH RU result in a water leak.
Turn the water supply off when the washing machine is not being used.
Ensure that the screws on the water supply hose connector are properly tightened.
Ř )DLOXUH WR GR VR PD\ UHVXOW LQ SURSHUW\ GDPDJH RU LQMXU\
Ensure that the rubber seal and front door glass are not contaminated by a foreign substance (e.g. waste, thread, hair, etc.).
Ř ,I D IRUHLJQ VXEVWDQFH LV FDXJKW LQ WKH GRRU RU WKH GRRU LV QRW FRPSOHWHO\ FORVHG LW PD\ FDXVH D ZDWHU leak.
Open the water tap and check if the water supply hose connector is firmly tightened and that there is no water leak before using the product.
Ř ,I WKH VFUHZV RQ WKH ZDWHU VXSSO\ KRVH FRQQHFWRU DUH ORRVH LW PD\ UHVXOW LQ D ZDWHU OHDN
The product you have purchased is designed for domestic use only.
Using the product for business purposes qualifies as a product misuse. In this case, the product will not be covered by the standard warranty provided by Samsung and no responsibility can be attributed to Samsung for malfunctions or damages resulting from such misuse.
'R QRW VWDQG RQ WKH DSSOLDQFH RU SODFH REMHFWV VXFK DV ODXQGU\ OLJKWHG FDQGOHV OLJKWHG FLJDUHWWHV GLVKHV FKHPLFDOV PHWDO REMHFWV HWF RQ WKH DSSOLDQFH
Ř 7KLV PD\ UHVXOW LQ HOHFWULF VKRFN ƂUH SUREOHPV ZLWK WKH SURGXFW RU LQMXU\
Do not spray volatile material such as insecticide onto the surface of the appliance.
Ř $V ZHOO DV EHLQJ KDUPIXO WR KXPDQV WKLV PD\ UHVXOW LQ HOHFWULF VKRFN ƂUH RU SUREOHPV ZLWK WKH SURGXFW
English - 8
|
|
|
|
WW90H7600EW-03403K-06_EN.indd 8 |
2015/8/29 11:00:59 |
||
|
|
|
|
'R QRW SODFH REMHFWV WKDW JHQHUDWH HOHFWURPDJQHWLF ƂHOGV QHDU WKH ZDVKLQJ PDFKLQH Ř 7KLV PD\ UHVXOW LQ LQMXU\ GXH WR D PDOIXQFWLRQ
Water drained during a high-temperature wash or drying cycle is hot. Do not touch the water.
Ř 7KLV PD\ UHVXOW LQ EXUQV RU LQMXU\
Do not wash, spin, or dry water-proof seats, mats, or clothing (*) unless your appliance has a special cycle for washing these items.
(*): Woollen bedding, rain covers, fishing vests, ski pants, sleeping bags, diaper covers, sweat suits, and bicycle, motor cycle and car covers, etc.
Ř 'R QRW ZDVK WKLFN RU KDUG PDWV HYHQ LI WKH ZDVKLQJ PDFKLQH PDUN LV RQ WKH FDUH ODEHO 7KLV PD\ UHVXOW LQ LQMXU\ RU GDPDJH WR WKH ZDVKLQJ PDFKLQH ZDOOV ƃRRU RU FORWKLQJ GXH WR DEQRUPDO YLEUDWLRQV
Ř 'R QRW ZDVK WKURZ UXJV RU GRRUPDWV ZLWK UXEEHU EDFNLQJ 7KH UXEEHU EDFNLQJ PD\ FRPH RII DQG VWLFN to inside the drum, and this may result in malfunction such as a drainage error.
Do not operate the washing machine when the detergent drawer is removed.
Ř 7KLV PD\ UHVXOW LQ HOHFWULF VKRFN RU LQMXU\ GXH WR D ZDWHU OHDN
'R QRW WRXFK WKH LQVLGHV RI WKH GUXP GXULQJ RU MXVW DIWHU GU\LQJ DV LW LV KRW Ř 7KLV PD\ UHVXOW LQ EXUQV
Do not insert your hand into the detergent drawer.
Ř 7KLV PD\ UHVXOW LQ LQMXU\ DV \RXU KDQG PD\ EH FDXJKW E\ WKH GHWHUJHQW LQSXW GHYLFH
'R QRW SODFH DQ\ REMHFWV VXFK DV VKRHV IRRG ZDVWH DQLPDOV RWKHU WKDQ ODXQGU\ LQWR WKH ZDVKLQJ machine.
Ř 7KLV PD\ UHVXOW LQ GDPDJH WR WKH ZDVKLQJ PDFKLQH RU LQMXU\ DQG GHDWK LQ WKH FDVH RI SHWV GXH WR WKH abnormal vibrations.
'R QRW SUHVV WKH EXWWRQV XVLQJ VKDUS REMHFWV VXFK DV SLQV NQLIHV ƂQJHUQDLOV HWF Ř 7KLV PD\ UHVXOW LQ HOHFWULF VKRFN RU LQMXU\
Do not wash laundry contaminated by oils, creams or lotions usually found in skincare shops or massage clinics.
Ř 7KLV PD\ FDXVH WKH UXEEHU VHDO WR EHFRPH GHIRUPHG DQG UHVXOW LQ D ZDWHU OHDN
'R QRW OHDYH PHWDO REMHFWV VXFK DV VDIHW\ SLQV KDLU SLQV RU EOHDFK LQ WKH GUXP IRU ORQJ SHULRGV RI WLPH Ř 7KLV PD\ FDXVH WKH GUXP WR UXVW
Ř ,I UXVW VWDUWV DSSHDULQJ RQ WKH VXUIDFH RI WKH GUXP DSSO\ D QHXWUDO FOHDQVLQJ DJHQW WR WKH VXUIDFH DQG use a sponge to clean it. Never use a metal brush.
Do not use dry cleaning detergent directly and do not wash, rinse, or spin laundry contaminated by dry cleaning detergent.
Ř 7KLV PD\ UHVXOW LQ VSRQWDQHRXV FRPEXVWLRQ RU LJQLWLRQ GXH WR WKH KHDW IURP WKH R[LGDWLRQ RI WKH RLO
Do not use water from water cooling/heating devices.
Ř 7KLV PD\ UHVXOW LQ SUREOHPV ZLWK WKH ZDVKLQJ PDFKLQH
English - 9
 INFORMATION SAFETY 01
|
|
|
|
WW90H7600EW-03403K-06_EN.indd 9 |
2015/8/29 11:00:59 |
||
|
|
|
|
Do not use natural hand-washing soap for the washing machine.
Ř ,I LW KDUGHQV DQG DFFXPXODWHV LQVLGH WKH ZDVKLQJ PDFKLQH LW PD\ UHVXOW LQ SUREOHPV ZLWK WKH SURGXFW discolouration, rust, or bad odours.
Place socks and brassieres in a washing net and wash them with the other laundry.
Do not wash large laundry items such as bedding in the washing net.
Ř )DLOXUH WR GR VR PD\ UHVXOW LQ LQMXU\ GXH WR DEQRUPDO YLEUDWLRQV
Do not use hardened detergent.
Ř ,I LW DFFXPXODWHV LQVLGH WKH ZDVKLQJ PDFKLQH LW PD\ UHVXOW LQ D ZDWHU OHDN
Make sure that the pockets of all the clothing items to be washed are empty.
Ř +DUG VKDUS REMHFWV VXFK DV FRLQV VDIHW\ SLQV QDLOV VFUHZV RU VWRQHV FDQ FDXVH H[WHQVLYH GDPDJH WR the appliance.
'R QRW ZDVK FORWKLQJ ZLWK ODUJH EXFNOHV EXWWRQV RU RWKHU KHDY\ PHWDO REMHFWV
Sort the laundry by color on the basis of its colorfastness and select the recommended cycle, water temperature and additional functions.
Ř 7KLV PD\ UHVXOW LQ GLVFRORUDWLRQ RU IDEULF GDPDJH
Take care that children’s fingers are not caught in the door when you close it.
Ř )DLOXUH WR GR VR PD\ UHVXOW LQ LQMXU\
WARNING: Critical cleaning WARNINGS
Do not clean the appliance by spraying water directly onto it.
Do not use the a strong acidic cleaning agent.
Do not use benzene, thinner or alcohol to clean the appliance.
Ř 7KLV PD\ UHVXOW LQ GLVFRORXUDWLRQ GHIRUPDWLRQ GDPDJH HOHFWULF VKRFN RU ƂUH
Before cleaning or performing maintenance, unplug the appliance from the wall socket.
Ř )DLOXUH WR GR VR PD\ UHVXOW LQ HOHFWULF VKRFN RU ƂUH
Instruction about the WEEE
Correct Disposal of This Product (Waste Electrical & Electronic Equipment)
(Applicable in countries with separate collection systems)
This marking on the product, accessories or literature indicates that the product and its electronic accessories (e.g. charger, headset, USB cable) should not be disposed of with other household waste at the end of their working life. To prevent possible harm to the environment or human health from uncontrolled waste disposal, please separate these items from other types of waste and recycle them responsibly to promote the sustainable reuse of material resources.
Household users should contact either the retailer where they purchased this product, or their local government office, for details of where and how they can take these items for environmentally safe recycling.
Business users should contact their supplier and check the terms and conditions of the purchase contract. This product and its electronic accessories should not be mixed with other commercial wastes for disposal.
For information on Samsung’s environmental commitments and product specific regulatory obligations e.g. REACH visit: samsung.com/uk/aboutsamsung/samsungelectronics/ corporatecitizenship/data_corner.html
English - 10
|
|
|
|
WW90H7600EW-03403K-06_EN.indd 10 |
2015/8/29 11:00:59 |
||
|
|
|
|

Installation
Follow these instructions carefully to ensure a proper installation of the washing machine, and to prevent accidents when doing the laundry.
What’s included
Make sure all the parts are included in the product package. If you have a problem with the washing machine or the parts, contact a local Samsung customer center or the retailer.
3
1 |
4 |
|
|
|
5 |
2 |
6 |
|
|
|
7 |
9 |
|
10 |
8 |
|
|
11 |
|
Spanner |
Bolt caps |
Hose guide |
Cold water supply hose |
Hot water supply hose |
1Detergent drawer
2Door
3Work top
4Control panel
5Power plug
6Drain hose
7Drum
8Levelling feet
9Debris filter
10Emergency drain tube
11Filter cover
Cap fixer
Liquid detergent container
Ř %ROW KROH FRYHUV : The number of bolt hole covers depends on the model (3~6 covers). Ř +RW ZDWHU VXSSO\ KRVH : Applicable models only.
Ř /LTXLG GHWHUJHQW FRQWDLQHU : Applicable models only.
English - 11
 INSTALLLATION 02
|
|
|
|
WW90H7600EW-03403K-06_EN.indd 11 |
2015/8/29 11:01:00 |
||
|
|
|
|

,QVWDOODWLRQ UHTXLUHPHQWV
Electrical supply and grounding
ŘAC 220-240 V / 50 Hz fuse or circuit breaker equipped
ŘIndividual branch circuit specific to the washing machine
To ensure a proper grounding, the washing machine comes with a power cord featuring a threeprong grounding plug for use in a properly installed and grounded outlet.
Check with a qualified electrician or serviceperson if you are not sure about the grounding.
Do not modify the provided plug. If it does not fit the outlet, call a qualified electrician and install a proper outlet.
WARNING
ŘDo NOT use an extension cord.
ŘUse only the power cord that comes with the washing machine.
ŘDo NOT connect the ground wire to plastic plumbing, gas lines, or hot water pipes.
ŘImproperly connected grounding conductors may cause electric shock.
Water supply
A proper water pressure for this washing machine is between 50 kPa and 800 kPa. Water pressures less than 50 kPa may cause the water valve not to close completely. Or, it may take a longer time to fill the drum, turning off the washing machine resultantly. Water taps must be within 120 cm from the rear of the washing machine so that the provided inlet hoses reach the washing machine.
To reduce a risk of leak
ŘMake water taps easily accessible.
ŘTurn off taps when the washing machine is not in use.
ŘCheck for any leak at water inlet hose fittings on a regular basis.
CAUTION: Before using the washing machine for the first time, check all connections at the water valve and taps for any leak.
English - 12
|
|
|
|
WW90H7600EW-03403K-06_EN.indd 12 |
2015/8/29 11:01:00 |
||
|
|
|
|

Drain
Samsung recommends a standpipe in height of 65cm. The drain hose must be connected through the hose clip to the standpipe, and the standpipe must fully cover the drain hose.
Flooring
For best performance, the washing machine must be installed on a solid floor. Wood floors may need to be reinforced to minimize vibration and/or unbalanced loads. Carpeting and soft tile surfaces are not a good resistance to vibrations and may cause the washing machine to move slightly during the spin cycle.
CAUTION: Do NOT install the washing machine on a platform or a poorly supported structure.
Water temperature
Do not install the washing machine in areas where water may freeze as the washing machine always retains some water in its water valves, pumps, and/or hoses. Frozen water left in the connection parts may cause damage to belts, the pump, and other components of the washing machine.
Alcove or closet installation
Minimum clearance for a stable operation:
Sides |
25 mm |
Rear |
50 mm |
|
|
|
|
Top |
25 mm |
Front |
500 mm |
|
|
|
|
If both the washing machine and a dryer are installed in one location, the front of the alcove or closet must have at least 500 mm unobstructed air opening. Your washing machine alone does not require a specific air opening.
English - 13
 INSTALLLATION 02
|
|
|
|
WW90H7600EW-03403K-06_EN.indd 13 |
2015/8/29 11:01:00 |
||
|
|
|
|
Step-by-step installation
STEP 1 - Select a location
Location requirements:
Ř 6ROLG OHYHO VXUIDFH ZLWKRXW FDUSHWLQJ RU ƃRRULQJ WKDW PD\ REVWUXFW YHQWLODWLRQ Ř $ZD\ IURP GLUHFW VXQOLJKW
Ř $GHTXDWH URRP IRU YHQWLODWLRQ DQG ZLULQJ
Ř 7KH DPELHQW WHPSHUDWXUH LV DOZD\V KLJKHU WKDQ WKH IUHH]LQJ SRLQW ņ& Ř $ZD\ IURP D KHDW VRXUFH
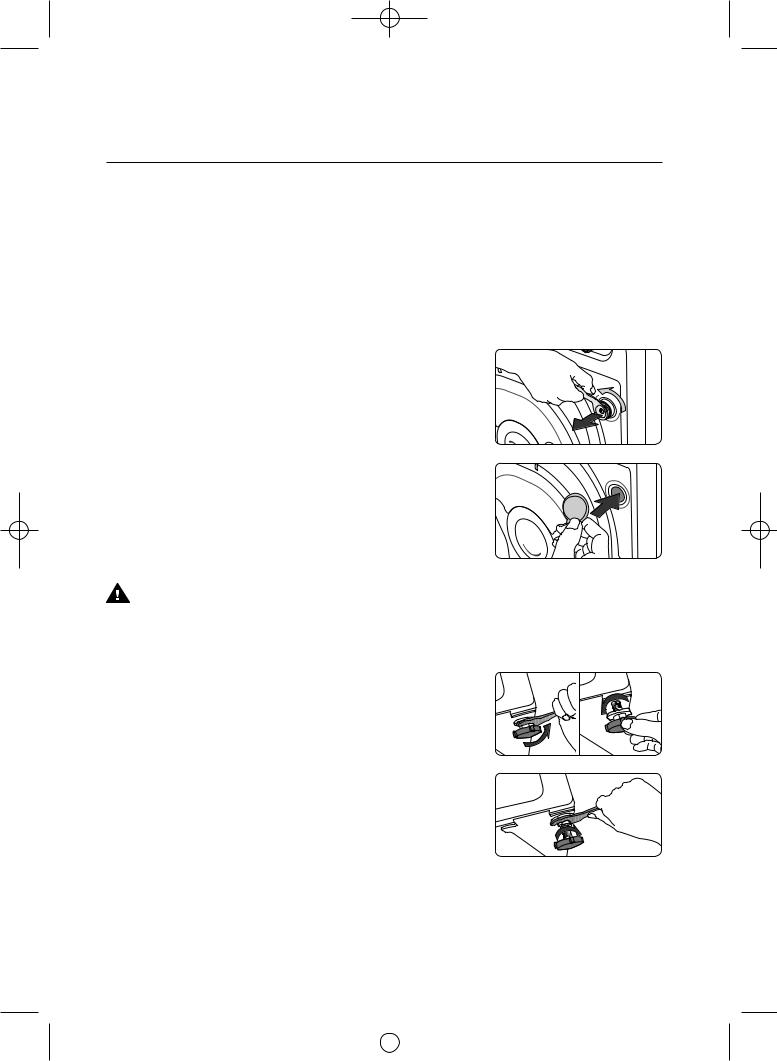
STEP 2 - 5HPRYH WKH VKLSSLQJ EROWV
Unpack the product package and remove all shipping bolts.
1. Loosen all shipping bolts on the rear of the machine using the supplied spanner.
2. Fill the holes with the supplied plastic bolt caps. Keep the shipping bolts for future use.
WARNING
Packaging materials can be dangerous to children. Dispose all packaging material (plastic bags, polystyrene, etc.) out of children’s reach.
STEP 3 - Adjust the levelling feet
1. Gently slide the washing machine into position. Excessive force may damage the levelling feet.
2. /HYHO WKH ZDVKLQJ PDFKLQH E\ PDQXDOO\ DGMXVWLQJ WKH OHYHOOLQJ IHHW
3. When levelling is complete, tighten the nuts using the spanner.
English - 14
|
|
|
|
WW90H7600EW-03403K-06_EN.indd 14 |
2015/8/29 11:01:00 |
||
|
|
|
|

STEP 4 - Connect the water hose
Connect the water supply hose to the water tap.
1. Remove the adaptor (A) from the ZDWHU VXSSO\ KRVH % .
A
B
2. Use a Philips screwdriver to loosen four screws on the adaptor.
3. Hold the adaptor and turn part (C) in the arrow direction to loosen it by 5 mm (*).
C
 INSTALLLATION 02
4.Insert the adaptor into the water tap, and tighten the screws while lifting up the adaptor.
5.Turn part (C) in the arrow direction to tighten it.
C
6.While holding down part (E), connect the water supply hose to the adaptor. Then, release part (E). The hose fits into the adaptor with a
clicking sound.
E
English - 15
|
|
|
|
WW90H7600EW-03403K-06_EN.indd 15 |
2015/8/29 11:01:00 |
||
|
|
|
|

7.Connect the other end of the water supply hose to the inlet valve on the back of the washing machine. Turn the hose clockwise to tighten.
8.Open the water tap and check if there are any leaks around the
connection areas. If there are water leaks, repeat the steps above.
Ř If using a screw type of water tap, connect the water hose to the water tap as shown.
Ř Use a popular type of water taps. If the current tap is squareshaped or too big, remove the spacer ring before inserting the adaptor into the water tap.
WARNING
Stop using the washing machine if there is a water leak, and contact a local Samsung service centre. Otherwise, this may cause electric shock.
CAUTION
Do not stretch the water supply hose by force. If the hose is too short, replace the hose with a longer, high-pressure hose.
Ř After connecting the water supply hose to the adaptor, check if it is connected properly by pulling the water supply hose downwards.
Ř Use a popular type of water taps. If the tap is square-shaped or too big, remove the spacer ring before inserting the tap into the adaptor.
For models having an additional hot water inlet:
1.Connect the red end of the hot water supply hose to the hot water inlet on the back of the machine.
2. Connect the other end of the hot water supply hose to the hot water tap.
English - 16
|
|
|
|
WW90H7600EW-03403K-06_EN.indd 16 |
2015/8/29 11:01:00 |
||
|
|
|
|
Aqua hose (applicable models only)
The aqua hose alerts users of a risk of water leaks. It senses the water flow and turns red on the centre indicator (A) in case of a leak.
A
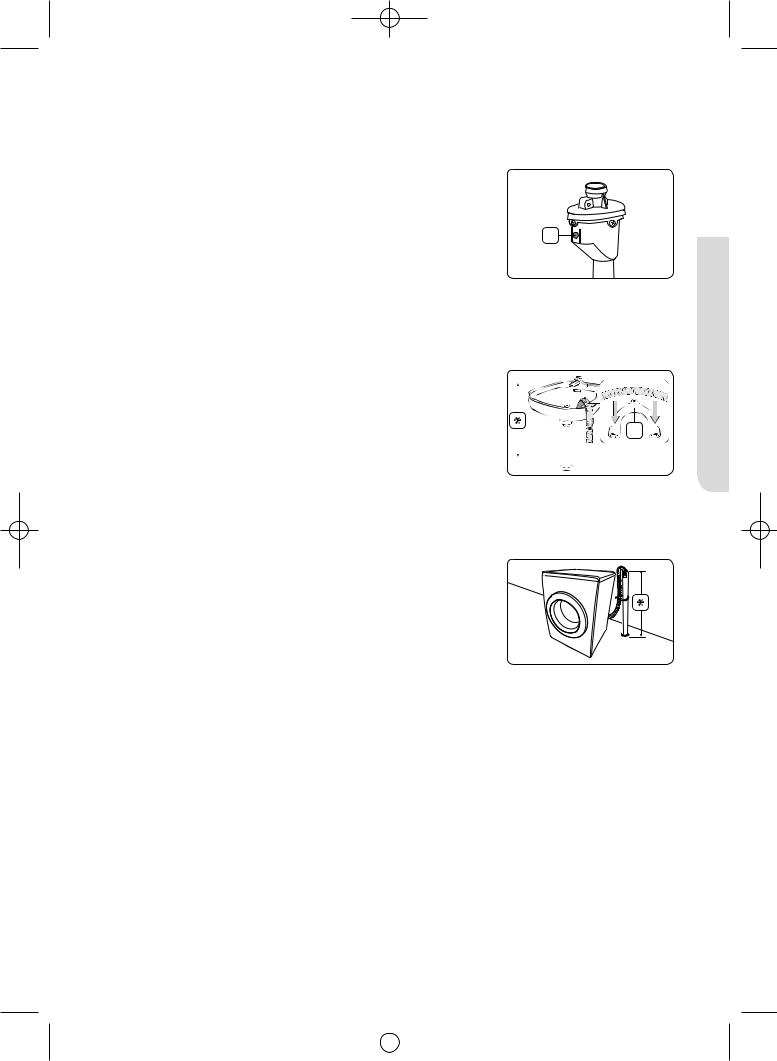
STEP 5 - Position the drain hose |
|
The drain hose can be positioned in three ways: |
|
Over the edge of a wash basin |
|
The drain hose must be placed at a height of between 60 cm and 90 |
|
cm (*) from the floor. To keep the spout of the drain hose bent, use the |
|
supplied plastic hose guide (A). Secure the guide to the wall using a |
|
hook to ensure stable drainage. |
A |
|
ln a sink drain pipe
The drain pipe must be above the sink siphon so that the end of the hose is at least 60 cm above the floor.
ln a drain pipe
The drain pipe should be between 60 cm and 90 cm high (*). It is advisable to use a 65 cm high vertical pipe. Make sure the drain hose is connected to the stand pipe at a slant.
Drain standpipe requirements:
Ř 0LQLPXP GLDPHWHU RI FP
Ř 0LQLPXP FDUU\ DZD\ FDSDFLW\ RI OLWUHV SHU PLQXWH
STEP 6 - Turn on the washing machine
TPlug the power cord into a wall socket featuring an AC 220-240V / 50Hz approved electrical outlet protected by a fuse or circuit breaker. Then, press the Power button to turn on the washing machine.
English - 17
 INSTALLLATION 02
|
|
|
|
WW90H7600EW-03403K-06_EN.indd 17 |
2015/8/29 11:01:01 |
||
|
|
|
|

Before you start
lnitial settings
Run Calibration mode (recommended)
Samsung washing machine detects the laundry weight automatically. For more accurate weight detection, please run Calibration Mode after the installation. Calibration mode is done by following the steps below.
1.Remove laundry or any contents in the machine and turn off the machine.
2.Press the Power button and release it, and then press the Temp button and Delay End button simultaneously. Then the machine turns on.
3.Press the Start/Pause button to activate “Calibration Mode”.
4.The drum rotates clockwise and counterclockwise approximately for 3 minutes.
5.When “Calibration Mode” is finished, “END(En)” appears on the display, and the machine automatically turns off. The washing machine is now ready for use.
English - 18
|
|
|
|
WW90H7600EW-03403K-06_EN.indd 18 |
2015/8/29 11:01:01 |
||
|
|
|
|

/DXQGU\ JXLGHOLQHV
STEP 1 - Sort
Sort the laundry according to these criteria:
Ř &DUH /DEHO: Sort the laundry into cottons, mixed fibres, synthetics, silks, wools and rayon. Ř Colour: Separate whites from colours.
Ř Size: Mixing different-sized items together in the drum improves the washing performance.
Ř 6HQVLWLYLW\: Wash delicate items separately using an EasyIron option for pure, new woollen items, curtains and silk items. Check the labels on the items.
 Make sure to check the care label on the clothing, and sort them accordingly before starting the wash.
STEP 2 - Empty pockets
Empty all the pockets of your laundry items.
Ř 0HWDO REMHFWV VXFK DV FRLQV SLQV DQG EXFNOHV RQ FORWKLQJ PD\ GDPDJH RWKHU ODXQGU\ LWHPV DV ZHOO DV the drum.
Turn clothing with buttons and embroiders inside out.
Ř ,I ]LSV RI SDQWV DQG MDFNHWV DUH RSHQ ZKLOH ZDVKLQJ WKH GUXP PD\ EH GDPDJHG =LSV VKRXOG EH FORVHG and fixed with a string.
Ř &ORWKLQJ ZLWK ORQJ VWULQJV PD\ EHFRPH HQWDQJOHG ZLWK RWKHU FORWKHV %H VXUH WR Ƃ[ WKH VWULQJV EHIRUH starting the wash.
STEP 3 - Use a laundry net
Ř %UDVVLHUHV ZDWHU ZDVKDEOH PXVW EH SODFHG LQ D ODXQGU\ QHW 0HWDO SDUWV RI WKH EUDVVLHUHV PD\ EUHDN through and rip other laundry items.
Ř 6PDOO OLJKW FORWKLQJ VXFK DV VRFNV JORYHV VWRFNLQJV DQG KDQGNHUFKLHIV PD\ EHFRPH FDXJKW DURXQG the door. Place them inside a fine laundry net.
Ř 'R QRW ZDVK WKH ODXQGU\ QHW E\ LWVHOI ZLWKRXW RWKHU ODXQGU\ 7KLV PD\ FDXVH DEQRUPDO YLEUDWLRQV WKDW FRXOG PRYH WKH ZDVKLQJ PDFKLQH DQG UHVXOW LQ LQMXU\
STEP 4 - Prewash (if necessary)
Add a Prewash option to the selected course with a protein-based detergent for cotton items that are contaminated severely.
English - 19
 START YOU BEFORE 03
|
|
|
|
WW90H7600EW-03403K-06_EN.indd 19 |
2015/8/29 11:01:01 |
||
|
|
|
|

STEP 5 - Determine the load capacity
Do not overload the washing machine or the laundry may not wash properly. For the load capacity for the type of cothing, see page 25.
When washing bedding or bedding covers, the wash time may be lengthened or the spin efficiency may be reduced. For bedding or bedding covers, the recommended maximum spin cycle speed is 800 rpm and the load capacity is 2.0 kg or less.
CAUTION: If the laundry is unbalanced and the “UE” error code is displayed, redistribute the load. Unbalanced laundry may reduce the spinning performance.
STEP 6 - Apply a proper detergent
The type of detergent depends on the type of fabric (cotton, synthetic, delicate items, wool), colour, wash temperature, and degree of soiling. Always use “low suds” laundry detergent, which is designed for automatic washing machines.
Ř Follow the detergent manufacturer’s recommendations based on the weight of the laundry, the degree of soiling, and the hardness of the water in a local area. If you are not sure about the water hardness, contact a local water authority.
Ř Do not use detergent that tends to be hardened or solidified. This detergent may remain after the rinse cycle, blocking the drain outlet.
CAUTION: Use only a neutral liquid detergent for wool in the Wool course. A powder detergent with the Wool course may remain on the laundry and discolour the laundry.
English - 20
|
|
|
|
WW90H7600EW-03403K-06_EN.indd 20 |
2015/8/29 11:01:01 |
||
|
|
|
|
Detergent drawer guidelines
The washing machine provides a three-compartment dispenser: the left compartment for the main wash, the centre for fabric softeners, and the right for the preliminary wash.
Prewash detergent compartment
Main wash detergent compartment: powder detergents, water softeners, pre-soaking agents, bleach, and stain removers
Fabric softener compartment
CAUTION
Ř 'R QRW RSHQ WKH GHWHUJHQW GUDZHU ZKLOH WKH ZDVKLQJ PDFKLQH LV RSHUDWLQJ Ř 'R QRW XVH WKH IROORZLQJ W\SHV RI GHWHUJHQW
Ř 7DEOHW RU FDSVXOH W\SHV Ř %DOO RU QHW W\SHV
Ř 7R SUHYHQW WKH FRPSDUWPHQW FORJJLQJ FRQFHQWUDWHG RU KLJKO\ HQULFKHG DJHQWV IDEULF VRIWHQHU RU detergent) must be diluted with water before applied.
The detergent drawer is located at the top-left corner of the washing machine. 1. Slide open the detergent drawer.
2. Apply an appropriate amount of detergent to the left compartment (  ). To use a liquid detergent, see the Liquid detergent guide below.
3. Apply an appropriate amount of fabric softener to the centre compartment ( ) if necessary.
Do not exceed the max line (  ) which is marked on the compartment.
English - 21
 START YOU BEFORE 03
|
|
|
|
WW90H7600EW-03403K-06_EN.indd 21 |
2015/8/29 11:01:02 |
||
|
|
|
|

4. If selecting the Prewash option, apply an appropriate amount of detergent to the right compartment ( ).
).
5. Slide the detergent drawer inward to close it.
Liquid detergent container (Applicable models only)
To use a liquid detergent, first put the provided OLTXLG GHWHUJHQW
container (A) in the main wash detergent compartment (  ). Then, apply
an appropriate amount of detergent to the container. Do not exceed the max line which is marked on the inner of the container.
CAUTION: Remove the liquid detergent container if using a powder detergent.
English - 22
|
|
|
|
WW90H7600EW-03403K-06_EN.indd 22 |
2015/8/29 11:01:02 |
||
|
|
|
|
Operations
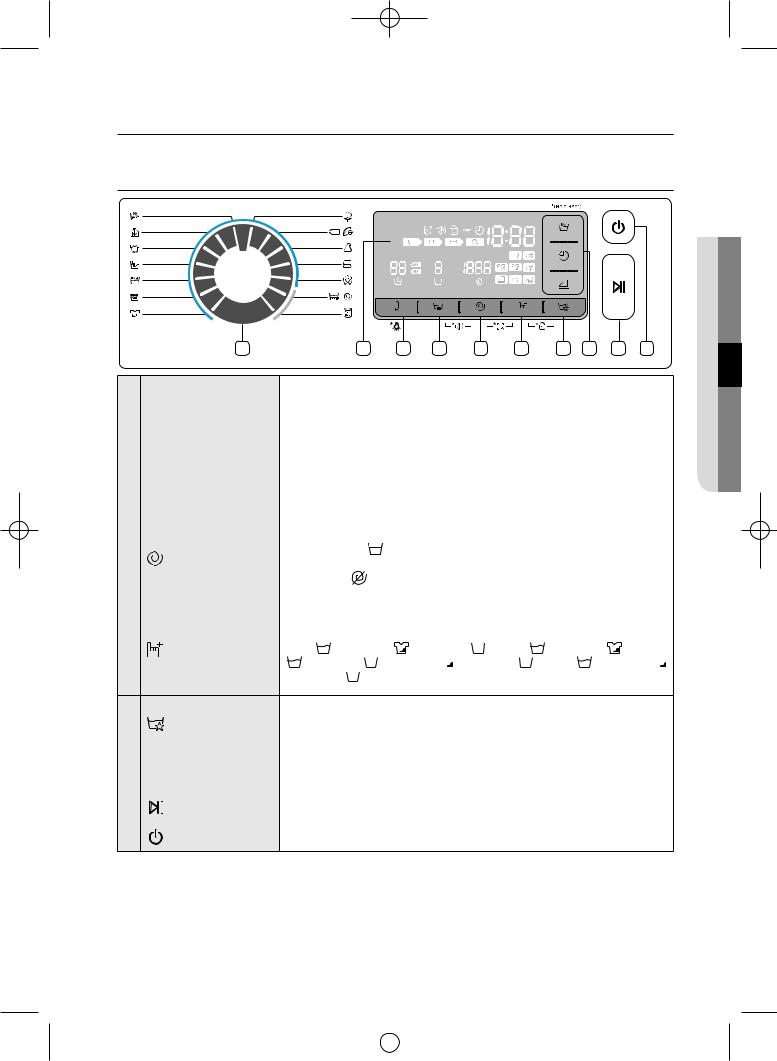
Control panel
OPERATIONS 04
1 2 3 4 5 6 7 8 9 10
1 |
Course Selector |
Turn the dial to select a course. |
|
|
|
|
|
|
|
|
|
|
||||||||
|
|
|
|
|
|
|
|
|
|
|
|
|
||||||||
2 |
Display area |
Displays information of remaining washing time, and settings. |
|
|
|
|||||||||||||||
|
|
|
|
|
|
|
|
|
|
|
|
|
||||||||
3 |
Temp. |
Press to change the water temperature for the current course. |
|
|
|
|||||||||||||||
Press and hold for 3 seconds to turn on/off the Drum Light. |
|
|
|
|
||||||||||||||||
|
|
|
|
|
|
|||||||||||||||
|
|
|
|
|
|
|
|
|
|
|
|
|
|
|||||||
4 |
Rinse |
Press to change the rinse times for the current course. |
|
|
|
|
||||||||||||||
You can set the rinse times up to 5. |
|
|
|
|
|
|
|
|
|
|||||||||||
|
|
|
|
|
|
|
|
|
|
|
||||||||||
|
|
|
|
|
|
|
|
|
|
|
|
|
|
|||||||
|
|
Press to change the spinning speed for the current course. |
|
|
|
|
||||||||||||||
5 |
Spin |
Ř |
Rinse Hold : The final rinse cycle is suspended so that the laundry |
|||||||||||||||||
|
remains in the water. To unload the laundry, run a drain or spin cycle. |
|||||||||||||||||||
|
|
|
||||||||||||||||||
|
|
Ř |
No Spin |
: The drum does not spin after the final drain cycle. |
||||||||||||||||
|
|
|
|
|
|
|
|
|
|
|
|
|||||||||
|
|
Press to select an option. Each time you press this button, the option |
||||||||||||||||||
|
|
selection changes in this sequence: |
|
|
|
|
|
|
|
|
|
|||||||||
6 |
Options |
Soak |
> Intensive |
> Prewash |
|
> Soak |
+ Intensive |
> Soak |
||||||||||||
|
||||||||||||||||||||
|
||||||||||||||||||||
|
|
|
+ Prewash |
|
> Intensive |
|
+ Prewash |
|
|
> Soak |
+ Intensive |
|
|
|||||||
|
|
|
|
|
||||||||||||||||
|
|
|
|
|
||||||||||||||||
|
|
+ Prewash |
|
|
> off |
|
|
|
|
|
|
|
|
|
|
|
|
|||
|
|
|
|
|
|
|
|
|
|
|
|
|
|
|
||||||
|
|
|
|
|
|
|
|
|
|
|
|
|
|
|
||||||
7 |
|
|
Prefer Mode |
Press to enter custom options screen. 3 custom options are available but |
|
|
|
multiple selection is not allowed. |
|||
|
|
|
|
||
|
|
|
|
|
|
8 |
)UHTXHQW RSWLRQV |
Three frequent options are provided separately for easy access. |
|||
To select or deselect, press the corresponding button. |
|||||
|
|
|
|
||
|
|
|
|
|
|
9 |
|
|
Start/Pause |
Press to start or stop an operation. |
|
|
|
||||
|
|
|
|
|
|
10 |
|
|
Power |
Press to turn on/off the washing machine. |
|
|
|
||||
|
|
||||
English - 23
|
|
|
|
WW90H7600EW-03403K-06_EN.indd 23 |
2015/8/29 11:01:03 |
||
|
|
|
|
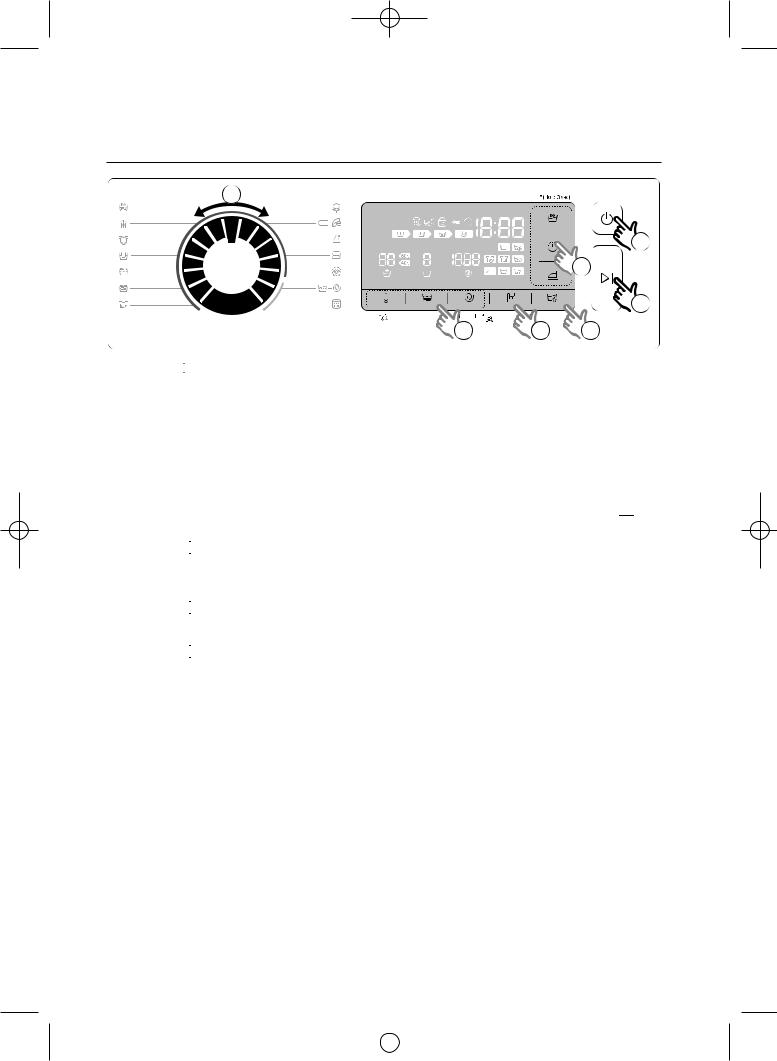
Simple steps to start
2
1
6
7
3 |
4 |
5 |
1.Press the  Power button to turn on the washing machine.
2.Turn the Course Selector to select a course.
3.Change the course settings (  Temperature,
  Rinse, and
  Spin) as necessary.
4.To add an option, press the 
 Options button repeatedly until the corresponding option icon(s) turns on.
5.To select a preferred mode, press the  Prefer Mode button repeatedly until the corresponding mode icon turns on.
6.To add a frequent option, press the corresponding button ( Quick wash,
  Delay End, and
Easy Iron).
7.Press the 

 Start/Pause button.
To change the course during operation
1.Press the 

 Start/Pause button to stop operation.
2.Select a different course.
3.Press the 

 Start/Pause button again to start the new course.
English - 24
|
|
|
|
WW90H7600EW-03403K-06_EN.indd 24 |
2015/8/29 11:01:04 |
||
|
|
|
|

&RXUVH RYHUYLHZ
Standard courses
|
Course |
Description & Max load (kg) |
|
|||
|
|
|
|
|
|
|
|
|
|
|
Ř )RU FRWWRQV EHG OLQHQV WDEOH OLQHQV XQGHUZHDU WRZHOV RU VKLUWV |
|
|
|
|
|
COTTON |
Ř |
7KH ZDVKLQJ WLPH DQG WKH QXPEHU RI ULQVH F\FOHV DUH DXWRPDWLFDOO\ |
Max |
|
|
|
|
DGMXVWHG DFFRUGLQJ WR WKH ORDG |
|
|
|
|
|
|
|
|
|
|
|
|
COTTON |
Ř 2SWLPDO SHUIRUPDQFH ZLWK ORZHU HQHUJ\ IRU FRWWRQ IDEULFV EHG OLQHQV |
Max |
|
|
|
|
|
table linens, underwear, towels, or shirts. |
||
|
|
|
|
|
||
|
|
|
|
|
|
|
|
|
|
SYNTHETICS |
Ř )RU EORXVHV RU VKLUWV WKDW DUH PDGH RI SRO\HVWHU GLROHQ WUHYLUD |
3.5 |
|
|
|
|
|
polyamide (perlon, nylon), or the like. |
||
|
|
|
|
|
||
|
|
|
|
|
|
|
|
|
|
|
Ř |
)RU EHG VSUHDGV EHG VKHHWV EHGGLQJ FRYHUV HWF |
|
%('',1* |
Ř |
For best results, wash only 1 type of bedding and make sure the load |
2 |
|||
|
|
|
|
|
weighs less than 2 kg. |
|
|
|
|
|
|
|
|
|
|
|
|
Ř Specific for machine-washable wool for loads less than 2.0 kg. |
|
|
:22/ |
Ř The wool course features gentle cradling and soaking to protect the |
2 |
||||
|
wool fibres from shrinkage/distortion. |
|||||
|
|
|||||
|
|
|
|
Ř A neutral detergent is recommended. |
|
|
|
|
|
|
|
|
|
|
|
|
SUPER ECO WASH |
Ř |
Low-temperature Eco Bubble contributes to power saving. |
4 |
|
|
|
|
|
|
|
|
|
|
OUTDOOR CARE |
Ř )RU PRXQWDLQ FORWKHV VNLZHDU DQG VSRUWVZHDU WKDW DUH PDGH RI |
2 |
|
|
|
|
||||
|
|
|
|
functional materials such as spandex, stretch, and micro-fiber |
||
|
|
|
|
|
||
|
|
|
|
|
|
|
%$%< &$5( |
Ř )HDWXULQJ D KLJK WHPSHUDWXUH ZDVK DQG H[WUD ULQVHV WR HQVXUH WKDW QR |
4 |
||||
|
powder detergent remains. |
|||||
|
|
|||||
|
|
|
|
|
|
|
'(/,&$7(6 |
Ř |
)RU VKHHU IDEULFV EUDV OLQJHULH VLON DQG RWKHU KDQGZDVK RQO\ IDEULFV |
2 |
|||
|
|
|
|
|
|
|
'$,/< :$6+ |
Ř )DVW FRPSOHWLRQ ZLWKLQ DSSUR[LPDWHO\ DQ KRXU IRU GDLO\ LWHPV VXFK DV |
4 |
||||
|
underwear and shirts. |
|||||
|
|
|||||
|
|
|
|
|
|
|
'$5. *$50(17 |
Ř )HDWXULQJ DGGLWLRQDO ULQVHV DQG UHGXFHG VSLQQLQJ WR HQVXUH WKDW WKH |
4 |
||||
|
laundry is washed gently and rinsed thoroughly. |
|||||
|
|
|||||
|
|
|
|
|
|
|
|
|
|
|
Ř )HDWXULQJ WKH VRDNLQJ F\FOH WR HIIHFWLYHO\ UHPRYH VWDLQV IURP WKH ODXQGU\ |
|
|
|
|
|
STAIN AWAY |
|
During the soaking cycle, the drum stops rotating. This is not a system |
4 |
|
|
|
|
|
failure. |
|
|
|
|
|
|
|
|
RINSE+SPIN |
Ř |
)HDWXULQJ DQ DGGLWLRQDO ULQVH DIWHU DSSO\LQJ IDEULF VRIWHQHU WR WKH ODXQGU\ |
- |
|||
|
|
|
||||
|
|
|
|
|
|
|
|
|
|
|
Ř 6SHFLƂF WR GUXP FOHDQLQJ DQG UHPRYHV GLUW DQG EDFWHULD IURP WKH GUXP |
|
|
(&2 '580 &/($1 |
Ř 3HUIRUP RQFH HYHU\ ZDVKHV ZLWK QR GHWHUJHQW RU EOHDFK DSSOLHG |
- |
||||
Ř |
0DNH VXUH WKH GUXP LV HPSW\ |
|||||
|
|
|
|
Ř |
'R QRW XVH DQ\ FOHDQLQJ DJHQWV IRU FOHDQLQJ WKH GUXP |
|
|
|
|
|
|
|
|
English - 25
OPERATIONS 04
|
|
|
|
WW90H7600EW-03403K-06_EN.indd 25 |
2015/8/29 11:01:06 |
||
|
|
|
|
Options
Option |
|
Description |
||
|
|
|
|
|
|
|
Prewash |
Ř 7KLV ZLOO DGG D SULOLPLQDU\ ZDVKLQJ F\FOH EHIRUH WKH PDLQ ZDVK F\FOH |
|
|
|
|||
|
|
|||
|
|
|
|
|
|
|
,QWHQVLYH |
Ř )RU EDGO\ VRLOHG ODXQGU\ 7KH RSHUDWLRQ WLPH IRU HDFK F\FOH LV ORQJHU WKDQ |
|
|
|
normal. |
||
|
|
|
||
|
|
|
|
|
|
|
|
Ř 7KLV RSWLRQ HIIHFWLYHO\ UHPRYHV VWDLQV E\ VRDNLQJ WKH ODXQGU\ |
|
|
|
Soak |
Ř (DFK VRDN F\FOH VSLQV WKH GUXP IRU PLQXWH DQG VWDQGV VWLOO IRU PLQXWHV |
|
|
|
|
totaling 6 times for 30 minutes. |
|
|
|
|
|
|
|
|
|
Ř 6SHFLƂF WR OHVV VRLOHG JDUPHQWV ZLWK OHVV WKDQ D NJ ORDG |
|
|
|
|
Ř ,W WDNHV DERXW PLQXWHV GHSHQGLQJ RQ WKH FRQGLWLRQV VXFK DV WKH ZDWHU |
|
- |
Quick Wash |
pressure, water hardness, and/or extra options selected. |
||
Ř 7KH 4XLFN :DVK WLPH LQFUHDVHV LQ WKLV VHTXHQFH 2II ! PLQ ! PLQ ! |
||||
|
|
|
||
|
|
|
min > 40 min > 50 min > 60 min. |
|
|
|
|
Ř $ UHFRPPHQGHG DPRXQW RI GHWHUJHQW LV OHVV WKDQ J IRU D NJ ORDG |
|
|
|
|
|
|
|
|
|
Ř The displayed time refers to the end time of a selected course. |
|
|
|
Delay End |
Ř You can set the time of Delay End in hourly units more than estimated time of |
|
|
|
current cycle. |
||
|
|
|
||
|
|
|
Ř Set the Delay End time between 1 hour and 19 hours. |
|
|
|
|
|
|
|
|
Easy Iron |
Ř The spinning speed increases to reduce wrinkles of the laundry. |
|
|
|
Ř Set the spinning speed up to 800 rpm. |
||
|
|
|
||
|
|
|
|
|
Prefer Mode |
|
|||
Mode |
|
Description |
||
|
|
|
|
|
|
|
|
Ř 7KLV FKDQJHV WKH FRXUVH VHWWLQJV WR UHGXFH WKH RYHUDOO ZDVKLQJ WLPH |
|
|
|
Speed Wash |
Ř 7KH UHFRPPHQGHG ODXQGU\ ORDG LV OHVV WKDQ NJ IRU WKH &27721 FRXUVH |
|
|
|
|
with Speed Wash enabled. |
|
|
|
|
|
|
|
|
Eco Wash |
Ř )7KLV FKDQJHV WKH FRXUVH VHWWLQJV WR VDYH WKH RYHUDOO SRZHU FRQVXPSWLRQ |
|
|
|
|
|
|
|
|
Silent Wash |
Ř 7KLV FKDQJHV WKH FRXUVH VHWWLQJV WR UHGXFH RSHUDWLQJ QRLVH DQG YLEUDWLRQ |
|
|
|
|
|
|
English - 26
|
|
|
|
WW90H7600EW-03403K-06_EN.indd 26 |
2015/8/29 11:01:07 |
||
|
|
|
|
Delay End
You can set the washing machine to finish the current course at specific hours later. This is useful if you want to finish the wash by the time you come home from business.
1.Select a course. Then change the course settings if necessary.
2.Press the Delay End button repeatedly to set the Delay End time.
3.Press the Start/Pause button.
Case study
You want to finish a two-hour course after 3 hours from now. For this, you add the Delay End option to the current course with the 3-hour setting, and press the Start/Pause button at 2:00 p.m. Then, what
happens? The washing machine starts operating at 3:00 p.m., and ends at 5:00 p.m. Provided below is the time line for this case.
|
|
|
|
|
2:00 pm |
3:00 pm |
5:00 pm |
|
Set the Delay End to 3 hours. |
Start |
End |
|
|
|
|
English - 27
OPERATIONS 04
|
|
|
|
WW90H7600EW-03403K-06_EN.indd 27 |
2015/8/29 11:01:07 |
||
|
|
|
|
Settings
Child Lock
To prevent accidents by children or infants, Child Lock locks all buttons.
Ř 7R VHW RU UHOHDVH WKH &KLOG /RFN SUHVV DQG KROG WKH Options and Prefer Mode buttons simultaneously for 3 seconds.
To add detergent or more laundry in the drum, or to change the course settings in the Child Lock state, you must first release the Child Lock.
Sound
Mute or unmute the sound.
Ř 7R PXWH RU XQPXWH WKH VRXQG SUHVV DQG KROG WKH Rinse and Spin buttons simultaneously for 3 seconds.
Drum Light
Ř 7R WXUQ WKH 'UXP /LJKW RQ RU RII SUHVV DQG KROG WKH Temp. button for 3 seconds. Ř 7KH GUXP OLJKW WXUQV RII DXWRPDWLFDOO\ DIWHU PLQXWHV
English - 28
|
|
|
|
WW90H7600EW-03403K-06_EN.indd 28 |
2015/8/29 11:01:07 |
||
|
|
|
|
Maintenance
Keep the washing machine clean to prevent deteriorated performance, and to preserve the life cycle.
Eco Drum Clean
Perform this course regularly to clean the drum, and to remove bacteria from it.
1.Press the Power button to turn on wasing machine.
2.Turn the Course Selector to select a Eco Drum Clean.
3.Press the Start/Pause button.
The water temperature for Eco Drum Clean is set to 70 °C, which cannot be changed.
CAUTION: Do not use any cleaning agents for cleaning the drum. Chemical residues in the drum deteriorates the washing performance.
Eco Drum Clean reminder
The Eco Drum Clean reminder  appears on the main screen once every 40 washes. Run the Eco Drum Clean cycle. It is advisable to perform the Eco Drum Clean regularly.
When you first see this reminder, you can ignore the reminder for 6 consecutive times. From the 7th wash, the reminder does not appear. However, it appears again on the second 40th wash.
English - 29
 MAINTENANCE 05
|
|
|
|
WW90H7600EW-03403K-06_EN.indd 29 |
2015/8/29 11:01:07 |
||
|
|
|
|
Smart check
To enable this function, you must first download the “Samsung Smart Washer” app from Google Play or App Store, and install it on a mobile device featuring the camera operation.
The Smart Check function has been optimized for:
Galaxy & iPhone series (cannot be supported for some models)
1.Press and hold the Spin and Options buttons simultaneously for 3 seconds to enter the Smart Check mode.
2.The washing machine starts the self-diagnosis procedure, and display an error code if an error is found.
3.Run the Samsung Smart Washer app on your mobile device, and tap Smart Check.
4.Present the mobile device to the washing machine’s display panel so that the mobile device and the washing machine face each other. Then, the error code will be recognized automatically by the app.
5.When the error code is recognized correctly, the app provides detailed information for the error with further actions.
Ř The function name, Smart Check, may differ depending on the language.
ŘIf the washing machine reflects light on the display, the app may fail to recognize the error code.
ŘIf the app fails to recognize the Smart Check code consecutively, enter the error code manually onto the app screen.
English - 30
|
|
|
|
WW90H7600EW-03403K-06_EN.indd 30 |
2015/8/29 11:01:07 |
||
|
|
|
|
 Loading...