


RCC-955
CD MULTI-DISC CHANGER
CHANGEUR MULTIDISQUES CD
CD-WECHSLER
LECTOR DE DISCOS COMPACTOS MULTICARGA
CD WISSELAAR
CD MULTIDISC CHANGER RCC-955
POWER |
|
|
PROGRAM |
|
|
|
|
|
|
|
|
|
|
|
1 |
|
|
|
|
|
|
|
|
|
|
|
|
||
2 |
|
TRACK |
RANDOM |
1 |
2 |
3 |
4 |
OPN/CLS |
PLAY |
STOP |
PAUSE |
TRACK |
DISC |
|
3 |
DISC |
REPEAT ALL MIN |
SEC 5 |
6 |
7 |
8 |
||||||||
|
|
|
|
|
|
|
||||||||
4 |
|
|
1 DISC |
9 10 11 12 |
|
|
|
|
|
|
||||
5 |
|
|
REMAIN |
13 14 15 16 |
|
|
|
|
|
|
||||
Owner’s Manual
Manuel de l’utilisateur
Bedienungsanleitung
Manual de Instrucciones
Gebruiksaanwijzing

CAUTION
RISK OF ELECTRIC SHOCK
DO NOT OPEN
CAUTION: T O REDUCE THE RISK OF ELECTRIC SHOCK, DO NOT REMOVE COVER. NO USER-SERVICEABLE PARTS INSIDE REFER SERVICING TO QUALIFIED SERVICE PERSONNEL.
APPLICABLE FOR USA, CANADA OR WHERE APPROVED FOR THE USAGE
CAUTION: TO PREVENT ELECTRIC SHOCK, MATCH WIDE BLADE OF PLUG TO WIDE SLOT. INSERT FULLY.
ATTENTION: POUR EVITER LES CHOCS ELECTRIQUES, INTRODUIRE LA LAME LA PLUS LARGE DE LA FICHE DANS LA BORNE CORRESPONDANTE DE LA PRISE ET POUSSER JUSQU AU FOND.
This symbol is to alert the user to the presence of uninsulated dangerous voltages inside the product's enclosure that may constitute a risk of electric shock.
This symbol is to alert the user to important operating and maintenance (service) instructions in this manual and literature accompanying the product.
WARNING:
There are no user serviceable parts inside. Refer all servicing to qualified service personnel.
WARNING:
To reduce the risk of fire or electrical shock, do not expose the unit to moisture or water. Do not allow foreign objects to get into the enclosure. If the unit is exposed to moisture, or a foreign object gets into the enclosure, immediately disconnect the power cord from the wall. Take the unit to a qualified service person for inspection and necessary repairs.
Read all the instructions before connecting or operating the unit. Keep this manual so you can refer to these safety instructions.
Heed all warnings and safety information in these instructions and on the product itself. Follow all operating instructions.
Clean the unit only with a dry cloth or a vacuum cleaner.
Do not place the unit on a bed, sofa, rug, or similar surface that could block the ventilation slots. If the unit is placed in a bookcase or cabinet, there must be sufficient clearance around the unit and ventilation of the cabinet to allow proper cooling.
Keep the unit away from radiators, heat registers, stoves, or any other appliance that produces heat.
The unit must be connected to a power supply only of the type and voltage specified on the rear panel of the unit.
Connect the unit to the power outlet only with the supplied 2-pin polarized power supply cable or an exact equivalent. Do not modify the supplied cable in any way. Do not attempt to defeat grounding and/or polarization provisions. The cable should be connected to a 2-pin polarized wall outlet, matching the wide blade of the plug to the wide slot of the receptacle. Do not use extension cords.
Do not route the power cord where it will be crushed, pinched, bent at severe angles, exposed to heat, or damaged in any way. Pay particular attention to the power cord at the plug and where it exits the back of the unit.
The power cord should be unplugged from the wall outlet if the unit is to be left unused for a long period of time.
Immediately stop using the unit and have it inspected and/or serviced by a qualified service agency if:
•The power supply cord or plug has been damaged.
•Objects have fallen, or liquid has been spilled, into the unit.
•The unit has been exposed to rain.
•The unit shows signs of improper operation
•The unit has been dropped or damaged in any way
Place the unit on a fixed, level surface strong enough to support its weight. Do not place the unit on a moveable cart that could tip over.
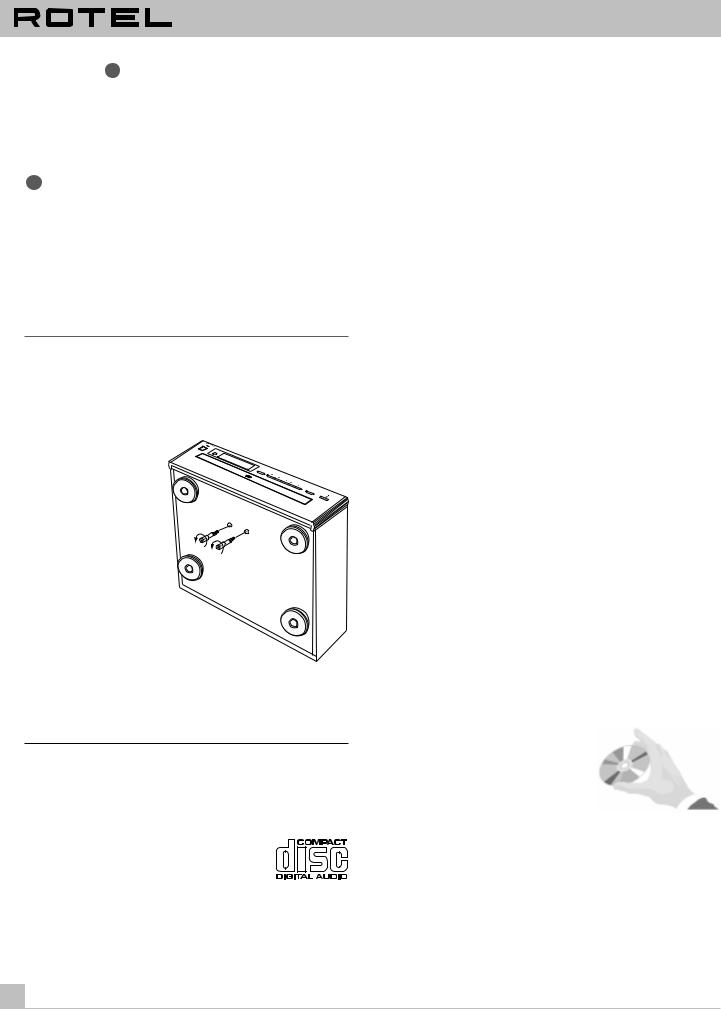
NOTE: There are 2 screws that hold the disc drawer securely in place during shipment.
These screws must be removed before using the RCC-955. See the Getting Started section for more information.
CD MULTI-DISC CHANGER RCC-955
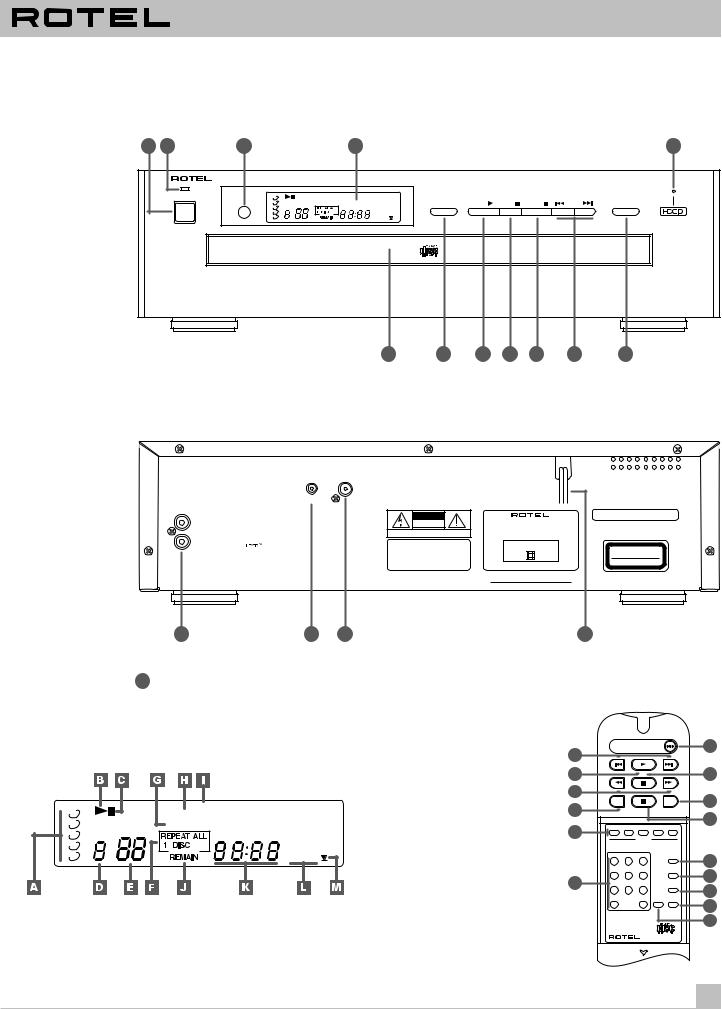
Figure 1: Front Panel Controls
Commandes de la face avant
Bedienelemente an der Gerätefront
Controles del Panel Frontal
De bedieningsorganen
1 |
2 |
3 |
|
|
4 |
|
|
|
|
|
|
|
|
12 |
|
|
CD MULTIDISC CHANGER RCC-955 |
|
|
|
|
|
|
|
|
|
|||
|
|
POWER |
|
|
PROGRAM |
|
|
|
|
|
|
|
|
|
|
|
1 |
|
|
|
|
|
|
|
|
|
|
|
|
|
|
2 |
|
TRACK |
RANDOM |
1 |
2 |
3 |
4 |
OPN/CLS |
PLAY |
STOP PAUSE |
TRACK |
DISC |
|
|
3 |
DISC |
MIN SEC |
5 |
6 |
7 |
8 |
||||||
|
|
|
|
|
|
|
|
|||||||
|
|
4 |
|
|
|
9 10 11 12 |
|
|
|
|
|
|||
|
|
5 |
|
|
|
13 14 15 16 |
|
|
|
|
|
|||
5 |
6 |
7 |
8 |
9 |
10 |
11 |
Figure 2: Rear Panel Connections
Branchements sur la face arrière
Anschlußmöglichkeiten an der Rückseite
Conexiones del Panel Posterior
De aansluitingen
EXT. REMOTE DIGITAL OUT
|
|
|
|
|
|
|
|
|
|
IN |
|
|
|
|
|
|
|
|
|
|
|
|
|
|
ANALOG OUT |
|
|
|
|
|
|
|
|
|
|
PRODUCT COMPLIES WITH DHHS |
|
||||
|
|
|
|
|
|
|
|
|
|
|
|
|
CAUTION |
|
|
|||||
|
|
|
|
|
|
|
|
|
|
|
|
|
|
21 CFR 1040.10 AND 1040.11 |
|
|||||
|
|
|
|
L |
|
|
|
|
|
|
|
RISK OF ELECTRIC SHOCK |
CD MULTIDISC CHANGER |
|
|
|
|
|
|
|
|
|
|
|
|
|
|
|
|
|
|
|
DO NOT OPEN! |
|
|
|
|
|
|
||
|
|
|
|
|
|
|
|
|
|
|
|
AVIS:RISQUE DE CHOC ÈLECTRIQUE-NE PAS OUVRIR |
MODEL NO. RCC-955 |
|
|
|
|
|
|
|
|
|
|
|
R |
|
|
|
|
|
|
|
POWER CONSUMPTION-15W |
|
|
|
|
|
|
||
|
|
|
|
|
|
|
|
|
|
|
WARNING: TO REDUCE THE RISK |
|
|
|
|
|
|
|
||
|
|
|
|
|
|
, HDCD®, High Definition Compatible Digital® and Pacific Microsonics™ |
|
|
CLASS 1 |
|
|
|
||||||||
|
|
|
|
|
|
are either registered trademarks or trademarks of Pacific Microsonics, Inc. in the |
OF FIRE OR ELECTRICAL SHOCK, |
|
|
|
|
|
||||||||
|
|
|
|
|
|
|
LASER PRODUCT |
|
|
|||||||||||
|
|
|
|
|
|
United States and/or other countries. HDCD system manufactured under license |
DO NOT EXPOSE THIS EQUIPMENT |
|
|
|
||||||||||
|
|
|
|
|
|
from Pacific Microsonics, Inc. This product is covered by one or more of the |
|
LASER KLASS 1 |
|
|
||||||||||
|
|
|
|
|
|
following: In the USA: 5,479,168, 5,638,074, 5,640,161, 5,808,574, 5,838,274, |
TO RAIN OR MOISTURE |
|
|
|
||||||||||
|
|
|
|
|
|
|
|
|
|
|
|
|
||||||||
|
|
|
|
|
|
5,854,600, 5,872,531, and in Australia 669114. Other patents pending. |
|
|
|
|
|
|
|
|
|
|||||
|
|
|
|
|
|
|
|
|
|
|
|
|
|
SERIAL No: |
|
|
|
|
|
|
|
|
|
|
13 |
|
|
|
|
14 |
15 |
|
|
16 |
|
|
|
|
|
|
|
Figure 3: |
Display Panels |
4 |
|
|
|
|
|
|
Figure 4: |
RR-D92 Remote Control |
|
|
|
|
|
|
||||
|
Afficheur en façade |
|
|
|
|
|
|
|
|
Télécommande RR-D92 |
|
|
|
|
|
|
||||
|
Anzeigemöglichkeiten im Display |
|
|
|
|
|
|
|
|
Fernbedienung RR-D92 |
|
|
|
|
|
|
||||
|
Panel de Visualización |
|
|
|
|
|
|
|
|
Mando a Distancia RR-D92 |
|
|
|
|
|
|
||||
|
Het informatiescherm |
|
|
|
|
|
|
|
|
De RR-D92 afstandsbediening |
|
|
|
|
OPN/CLS |
|
||||
|
|
|
|
|
|
|
|
|
|
|
|
|
|
18 |
|
|
|
|
|
17 |
|
|
|
|
|
|
|
|
|
|
|
|
|
|
|
|
|
|
|
|
|
|
|
|
|
|
|
|
|
|
|
|
|
|
|
19 |
|
|
|
|
|
20 |
|
|
|
|
|
|
|
|
|
|
|
|
|
|
21 |
|
|
|
|
|
22 |
|
|
|
|
INTRO |
|
|
|
|
|
|
|
|
|
|
TIME |
|
|
|
DISC |
|
|
1 |
|
|
|
|
|
|
|
|
|
|
|
23 |
|
|
|
|
|
|
|
|
|
|
PROGRAM |
|
|
|
|
|
|
|
|
|
|
|
|
|
|
24 |
||
|
|
|
|
|
1 |
2 |
3 |
4 |
|
|
|
|
|
|
|
|
|
|||
|
2 |
|
|
RANDOM |
|
|
|
|
|
|
|
|
|
|
|
|||||
|
|
|
|
|
|
|
|
25 |
1 |
2 |
3 |
4 |
5 |
|
||||||
|
3 |
DISC |
TRACK |
MIN |
SEC |
5 |
6 |
7 |
8 |
|
|
|
|
|
DISC |
|
|
|
||
|
|
|
|
|
|
|
|
|
|
|
|
|||||||||
|
4 |
|
|
|
|
|
|
|
|
|
|
|
|
|
|
|
|
|
|
|
|
|
|
|
|
|
9 10 11 12 |
|
|
|
|
|
|
|
|
|
|
||||
|
5 |
|
|
|
|
|
13 14 15 16 |
|
|
|
|
1 |
2 |
3 |
|
REPEAT |
27 |
|||
|
|
|
|
|
|
|
|
|
|
|
|
|
|
|
||||||
|
|
|
|
|
|
|
|
|
|
|
|
|
|
|
|
|
|
|
|
|
|
|
|
|
|
|
|
|
|
|
|
|
|
|
|
4 |
5 |
6 |
|
RANDOM |
28 |
|
|
|
|
|
|
|
|
|
|
|
|
|
|
26 |
|
|
|
|
|
|
|
|
|
|
|
|
|
|
|
|
|
|
|
|
7 |
8 |
9 |
|
SCAN |
29 |
|
|
|
|
|
|
|
|
|
|
|
|
|
|
|
|
|
|
|
|
|
|
|
|
|
|
|
|
|
|
|
|
|
|
|
|
|
0 |
|
>10 |
REVIEW PROG |
30 |
|
|
|
|
|
|
|
|
|
|
|
|
|
|
|
|
|
|
|
|
|
|
|
|
|
|
|
|
|
|
|
|
|
|
|
|
|
|
|
|
|
|
31 |
|
|
|
|
|
|
|
|
|
|
|
|
|
|
|
|
|
|
RR-D92 |
|
|
3

CD MULTI-DISC CHANGER RCC-955
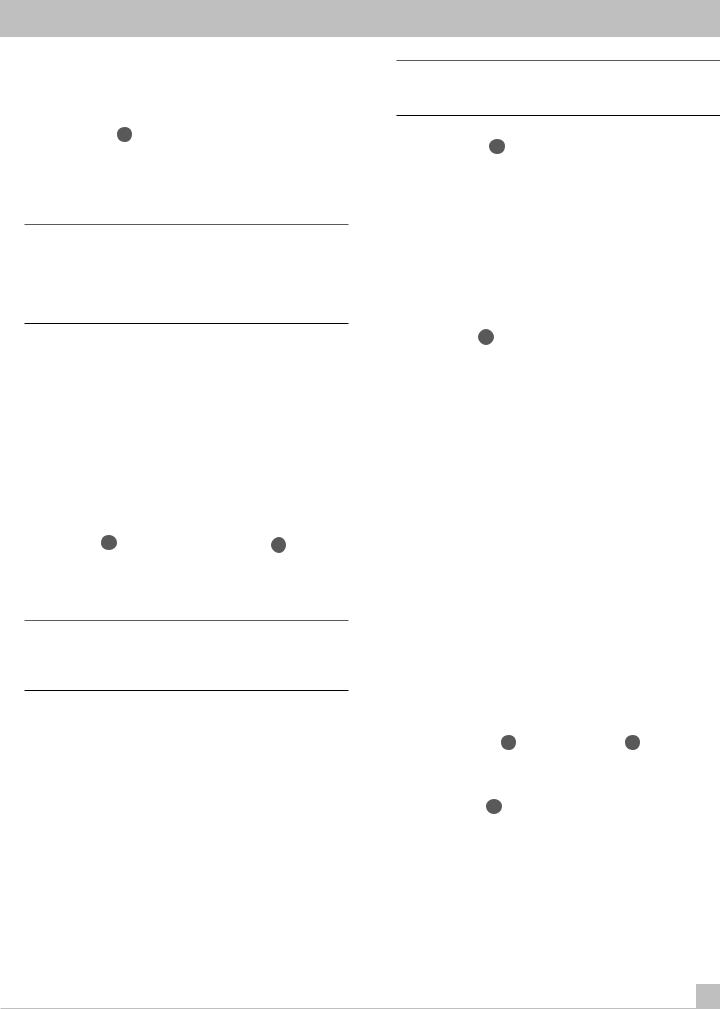
Figure 5: Audio Signal Connection
Branchement du signal audio
Audiosignalanschluß
Conexiones de Señal
De audioverbinding
ROTEL RA-985BX
CD |
IN |
|
|
|
|
|
|
|
|
|
TAPE 1 |
|
|
|
|
|
|
|
|
TUNER |
OUT |
|
CASSETTE |
|
|
RIGHT |
LEFT |
RIGHT |
LEFT |
|
REMOTE |
|
|
||||||
|
|
|
|
|
|
SPEAKERS A |
|
|
SPEAKERS B |
AUX 1 |
IN |
PRE |
MAIN |
|
|
|
|
|
|
|
TAPE 2 |
OUT |
IN |
IN |
OUT |
OUT OUT |
|
|
|
|
|
|
REMOTE SENSOR EXTENSION |
|
|
|
|||
AUX 2 |
OUT |
|
LEFT |
|
|
SPEAKER IMPEDANCE |
|||
|
|
|
|
|
|
||||
|
|
|
|
|
|
|
|||
|
|
|
|
|
|
|
|
|
A OR B – 4 OHMS MIN. |
RIGHT LEFT |
|
|
RIGHT |
|
|
|
|
INTEGRATED AMPLIFIER |
A AND B – 8 OHMS MIN. |
|
|
|
|
|
|
MODEL NO. RA-985 |
|
||
|
VAR. |
|
|
|
|
|
CAUTION |
||
|
|
|
|
|
|
POWER CONSUMPTION: 400W |
|||
|
OUT |
|
|
WARNING: TO REDUCE THE RISK |
|||||
|
(ZONE 2) |
|
|
|
|
RISK OF ELECTRIC SHOCK |
|||
|
|
|
|
OF FIRE OR ELECTRICAL SHOCK, DO |
|
|
DO NOT OPEN |
||
RIGHT |
LEFT |
|
|
NOT EXPOSE THIS EQUIPMENT TO |
|
ROTEL ELECTRONICS CO., LTD. |
|
||
|
|
|
RAIN OR MOISTURE |
|
|
||||
POWER
SWITCHED 400W MAX
SERIAL NO.
ANALOG OUT
L
R
ROTEL RCC-955
EXT. REMOTE DIGITAL OUT
IN
CAUTION |
PRODUCT COMPLIES WITH DHHS |
|
21 CFR 1040.10 AND 1040.11 |
||
RISK OF ELECTRIC SHOCK |
||
CD MULTIDISC CHANGER |
||
DO NOT OPEN! |
||
AVIS:RISQUE DE CHOC ÈLECTRIQUE-NE PAS OUVRIR |
MODEL NO. RCC-955 |
|
POWER CONSUMPTION-15W |
, HDCD®, High Definition Compatible Digital® and Pacific Microsonics™ |
WARNING: TO REDUCE THE RISK |
|
|
|
|
CLASS 1 |
are either registered trademarks or trademarks of Pacific Microsonics, Inc. in the |
OF FIRE OR ELECTRICAL SHOCK, |
|
|
|
|
|
United States and/or other countries. HDCD system manufactured under license |
DO NOT EXPOSE THIS EQUIPMENT |
|
|
|
|
LASER PRODUCT |
from Pacific Microsonics, Inc. This product is covered by one or more of the |
|
|
|
|
LASER KLASS 1 |
|
|
|
|
|
|||
following: In the USA: 5,479,168, 5,638,074, 5,640,161, 5,808,574, 5,838,274, |
TO RAIN OR MOISTURE |
|
||||
5,854,600, 5,872,531, and in Australia 669114. Other patents pending.
SERIAL No:
Figure 6: Digital Output Connection
Branchement de la sortie numérique |
|
Anschluß eines externen D/A-Wandlers |
|
Conexión de la Salida Digital |
|
De digitale verbinding |
ROTEL RCC-955 |
|
ANALOG OUT
L
R
AUDIO OUTPUTS
LEFT
EXT. REMOTE DIGITAL OUT
IN
CAUTION |
PRODUCT COMPLIES WITH DHHS |
|
21 CFR 1040.10 AND 1040.11 |
||
RISK OF ELECTRIC SHOCK |
||
CD MULTIDISC CHANGER |
||
DO NOT OPEN! |
||
AVIS:RISQUE DE CHOC ÈLECTRIQUE-NE PAS OUVRIR |
MODEL NO. RCC-955 |
|
POWER CONSUMPTION-15W |
, HDCD®, High Definition Compatible Digital® and Pacific Microsonics™ |
WARNING: TO REDUCE THE RISK |
|
|
|
|
|
|
|
|
CLASS 1 |
|
|
are either registered trademarks or trademarks of Pacific Microsonics, Inc. in the |
OF FIRE OR ELECTRICAL SHOCK, |
|
|
|
|
|
|
|
|
|
||
United States and/or other countries. HDCD system manufactured under license |
DO NOT EXPOSE THIS EQUIPMENT |
|
|
|
|
|
|
LASER PRODUCT |
|
|
||
from Pacific Microsonics, Inc. This product is covered by one or more of the |
|
|
|
|
|
|
LASER KLASS 1 |
|
||||
|
|
|
|
|
|
|
||||||
following: In the USA: 5,479,168, 5,638,074, 5,640,161, 5,808,574, 5,838,274, |
TO RAIN OR MOISTURE |
|
|
|
|
|
|
|
|
|
|
|
5,854,600, 5,872,531, and in Australia 669114. Other patents pending. |
|
|
|
|
|
|
|
|
|
|
|
|
|
|
SERIAL No: |
|
|||||||||
|
|
|
|
|
|
|
|
|
|
|
|
|
|
|
|
|
|
|
|
|
|
|
|
|
|
|
|
|
|
|
|
|
|
|
|
|
|
|
|
D/A CONVERTER |
|
CONVERTISSEUR N/A |
|
D/A-WANDLER |
DIGITAL IN |
CONVERTIDOR D/A |
RIGHT
4
Contents (circled numbers refer to illustration)
About Rotel _____________________________________________ 5
Getting Started _________________________________________ |
5 |
||||||||
About HDCD® 12 |
|
|
|
|
|
||||
A Few Precautions |
|
|
|
|
6 |
||||
Placement |
|
|
|
|
|
|
|
6 |
|
Cables |
|
|
|
|
|
|
|
|
6 |
Handling Compact Discs _________________________________ |
6 |
||||||||
AC Power and Control ___________________________________ |
7 |
||||||||
AC Power Input 16 |
|
|
|
|
7 |
||||
Power Switch 1 |
and Power Indicator 2 |
7 |
|||||||
Output Connections _____________________________________ |
7 |
||||||||
Analog Outputs 13 |
|
|
|
|
7 |
||||
Digital Output 15 |
|
|
|
|
7 |
||||
Remote Control _________________________________________ |
7 |
||||||||
Remote Sensor |
3 |
|
|
|
|
|
7 |
||
External Remote Input 14 |
8 |
||||||||
Remote Control Batteries |
8 |
||||||||
Loading Discs ___________________________________________ |
8 |
||||||||
Disc Tray |
5 |
and Open/Close Buttons 6 and 17 |
8 |
||||||
Disc Button 11 and |
22 |
|
|
8 |
|||||
Selecting a Disc to Play __________________________________ |
8 |
||||||||
Disc 1-5 Buttons |
25 (remote only) |
8 |
|||||||
Playing Discs ____________________________________________ |
8 |
||||||||
Play Buttons |
7 |
and |
19 |
|
8 |
||||
Pause Button |
9 |
20 |
|
|
|
|
9 |
||
Stop Button |
8 |
24 |
|
|
|
|
9 |
||
Track Skip Buttons 10 |
18 |
|
9 |
||||||
Track Selection Buttons |
|
26 (remote only) |
9 |
||||||
Search Buttons |
21 (remote only) |
9 |
|||||||
Display Panel |
4 |
and |
|
– |
|
|
___________________________ |
9 |
|
Time Button |
23 (remote only) __________________________ 10 |
||||||||
Each/Remain Mode |
|
|
|
|
10 |
||||
Total/Remain Mode |
|
|
|
|
10 |
||||
Repeat Play Button |
27 (remote only) ____________________ 10 |
|
Repeat 1 |
Track |
10 |
Repeat 1 |
Disc |
10 |
Repeat All Discs |
10 |
|
Random Play Button 28 (remote only) __________________ 10 Intro Scan Button 29 (remote only) _____________________ 11 Programmed Disc Play __________________________________ 11
Program Button 30 |
11 |
Track Programming |
11 |
Adding Tracks to a Program |
12 |
Review Button 31 |
12 |
Playing Programmed Tracks _____________________________ 12 Troubleshooting ________________________________________ 13
Display Is Not Lit |
13 |
Fuse Replacement |
13 |
Disc Does Not Play |
13 |
No Sound |
13 |
Sound Skips |
13 |
Hum |
13 |
Specifications __________________________________________ 13
English
About Rotel
A family whose passionate interest in music led them to manufacture high fidelity components of uncompromising quality founded Rotel over 30 years ago. Through the years that passion has remained undiminished and the family goal of providing exceptional value for audiophiles and music lovers, regardless of their budget, is shared by all Rotel employees.
The engineers work as a close team, listening to, and fine tuning each new product until it reaches their exacting musical standards. They are free to choose components from around the world in order to make that product the best they can. You are likely to find capacitors from the United Kingdom and Germany, semi conductors from Japan or the United States, while toroidal power transformers are manufactured in Rotel’s own factory.
Rotel’s reputation for excellence has been earned through hundreds of good reviews and awards from the most respected reviewers in the industry, who listen to music every day. Their comments keep the company true to its goal – the pursuit of equipment that is musical, reliable and affordable.
All of us at Rotel thank you for buying this product and hope it will bring you many hours of enjoyment.
Getting Started
Thank you for purchasing the Rotel RCC-955 CD Multi-Disc Changer. When used in a high-quality music audio system, it will provide years of musical enjoyment.
The RCC-955 is a full featured, high performance component. It is the ideal choice for those who want the convenience of a CD changer, but who will not accept compromised sound quality. The RCC-955 features high precision 8-times oversampling digital filters. In addition it incorporates HDCD circuitry. (See the following section.)
Ease of operation has not been forgotten. While one disc is playing you can change any of the other four. Full remote control, 32 track programming, and track scanning are provided.
The highest quality components, such as metal film resistors and polystyrene or polypropylene capacitors are used in important signal paths. All aspects of this design have been examined with the final goal being faithful reproduction of music.
The RCC-955 is easy to install and use. If you have experience with other stereo systems, you shouldn’t find anything perplexing. Simply connect it to the associated components and enjoy.
 , HDCD®, High Definition Compatible Digital® and Pacific Microsonics™ are either registered trademarks or trademarks of Pacific Microsonics, Inc. in the United States and/or other countries. HDCD system manufactured under license from Pacific Microsonics, Inc. This product is covered by one or more of the following: In the USA: 5,479,168, 5,638,074, 5,640,161, 5,808,574, 5,838,274, 5,854,600, 5,872,531, and in Australia 669114. Other patents pending.
5
CD MULTI-DISC CHANGER RCC-955
About HDCD® 12
HDCD discs are encoded with a high density data stream. During playback this high density data stream is decoded to a conventional digital signal. This HDCD encode/decode system greatly reduces the errors that are normally generated during the analog-to-digital, and then digital-to-analog, conversions. The HDCD system is automatically activated, and the HDCD Indicator 12 lights, whenever an HDCD disc is played.
A Few Precautions
Please read this manual carefully. It provides information on how to incorporate the RCC-955 into your system as well as information that will help you get optimum sound performance. Please contact your authorized Rotel dealer for answers to any questions you might have. In addition, all of us at Rotel welcome your questions and comments.
NOTE: There are 2 screws that hold the disc drawer securely in place during shipment. The screws have red plastic handles that make them easy to identify and remove. Gently turn the RCC-955 on its side and turn the screws counterclockwise to remove them. If the screws are not removed the disc drawer will not open.
If you neglected to remove the screws before attempting to use the RCC-955, turn the unit off and unplug it from the wall outlet. Then remove the screws as described above.
Keep the screws in a safe place because they must be replaced
when the RCC-955 is moved. Before the
RCC-955 is moved, remove all the CDs from
the disc tray and close the disc drawer. Wait until the display shows “0 00 00:0” then turn off the power switch and unplug the power cord from the wall outlet. Turn the unit on its side and reinstall the screws.
Save the RCC-955 shipping carton and all enclosed packing material for future use. Shipping or moving the RCC-955 in anything other than the original packing material may result in severe damage to your amplifier.
The RCC-955 is designed to play compact discs bearing the identification logo shown here. Other types of disc must not be used.
Before moving the RCC-955, remove all discs from the unit. This will prevent possible damage should the discs shift out of their normal positions inside the unit.
Keep the disc tray closed except when loading or unloading discs. This helps keep dust away from the sensitive laser pick up.
Fill out and send in the owner’s registration card packed with the RCC-955. Also be sure to keep the original sales receipt. It is your best record of the date of purchase, which you will need in the event warranty service is ever required.
Placement
Like all audio components that handle low-level signals, the RCC955 can be affected by its environment. To minimize the chance the RCC-955 will pick up hum or interference, do not place it on top of an amplifier or any other device that has a large power transformer. Keep the RCC-955 away from devices that have motors for the same reason. Do not place the RCC-955 where it will be exposed to direct sunlight. Finally do not use the RCC-955 where the temperature will be above 95°F/35°C or below 41°F/5°C. If the RCC-955 is moved from a cold environment to a warm one, condensation can form on the optical components, which will prevent proper operation. Do not use the RCC-955 for at least 30 minutes after it is moved from a cold environment.
We recommend installing the RCC-955 in furniture designed to house audio components. Such furniture is designed to reduce or suppress vibration which can adversely affect sound quality. Ask your authorized Rotel dealer for advice about component furniture and proper installation of audio components.
Cables
Be sure to keep the power cords, digital signal cables and regular audio signal cables in your installation away from each other. This will minimize the chance of the regular audio signal cables picking up noise or interference from the power cords or digital cables. Using only high quality, shielded cables will also help to prevent noise or interference from degrading the sound quality of your system. If you have any questions see your authorized Rotel dealer for advice about the best cable to use with your system.
Handling Compact Discs
Handle CDs carefully. Hold them by their edges, as shown here, and avoid touching the playing surface.
Fingerprints and dust should be carefully wiped off the disc’s signal surface
(glossy surface) with a soft cloth. Wipe in a
straight motion from the inside to the outside of the disc.
Never use chemicals, such as record cleaning sprays, anti-static sprays or fluids, benzine or thinner to clean compact discs. These chemicals will damage the disc’s plastic surface.
Keep discs in their storage cases when not in use to protect them from dust and scratches. Do not expose compact discs to direct sunlight, high humidity or high temperatures for extended periods of time.
6
AC Power and Control
AC Power Input 16
Your RCC-955 is configured at the factory for the proper AC voltage in the country where you purchased it (either 115 volts or 230/ 240 volts. The AC line configuration is noted on a decal on the back panel.
Note: Should you move your CD player to another country, it may be possible to re-configure it for use on a different line voltage. Do not attempt to perform this conversion yourself. Opening the enclosure of the RCC-955 exposes you to dangerous voltages. Consult a qualified service person or the Rotel factory service department for information.
The RCC-955 should be plugged directly into a 2-pin polarized wall outlet or into the switched outlet on another component in your audio system. Do not use an extension cord.
Be sure the power switch on the front panel of the RCC-955 is turned off (in the "out" position). Then plug the power cord into an AC power outlet.
If you are going to be away from home for an extended period of time such as a month-long vacation, it is a sensible precaution to unplug your CD player (as well as other audio and video components) while you are away.
Power Switch 1 and Power Indicator 2
The Power Switch is located on the left side of the front panel. Push the switch button in to turn on the RCC-955. To turn the RCC-955 off, push the button again to return it to the "out" position.
Note: If you are using a switched outlet to turn on and off your CD player, you should leave the power switch in the "on" position. When AC power is applied to the unit, it will power up in fully active mode.
When the Power Switch is turned on the disc in position 1 in the tray is selected. The Disc and Track Displays illuminate and show Disc 1/ Track 1. The Time Indicator also illuminates.
Output Connections
The RCC-955 gives you a choice of analog or digital output signals. The analog output signal from the built-in Digital to Analog converter is used with conventional analog audio components. The digital output, which provides an unprocessed digital data signal, is used with outboard D/A converters or digital processors.
English
Note: To prevent loud noises that neither you nor your speakers will appreciate, make sure all the system components are turned off when you make any signal connections.
Analog Outputs 13
[See Figure 5 for wiring illustration]
A pair of standard RCA jacks supplies a conventional unbalanced analog output signal from the RCC-955 to the source inputs of an audio preamplifier, integrated amplifier, or receiver. RCA connections are found on virtually all components. Select high quality audio interconnect cables. Connect the left channel output of the RCC-955 to the left channel source input on the preamplifier or other component. Connect the right output of the RCC-955 to the right channel source input on the preamplifier or other component.
Digital Output 15
[See Figure 6 for connection illustration]
If you are using the RCC-955 as a disc transport with an outboard D/A converter or other digital processor, you need an unprocessed digital data stream from the RCC-955, taken before the builtin D/A converter. This signal is supplied by the back-panel coaxial digital output jack. Using a standard 75 ohm coax cable, connect the digital output jack to the digital input connector on the outboard D/A converter.
Remote Control
The RCC-955 is supplied with an RR-D92 remote control. When using the RR-D92 the emitter on the front of the control must be pointed at the RCC-955 front panel. The basic disc play functions are controlled by the button located near the front of the RR-D92. There is a cover over the lower portion of the RR-D92 that slides down to reveal buttons that control secondary functions, such as programming, disc scanning and direct disc selection.
The RR-D92 duplicates the basic disc play control functions of the front panel control buttons. When a disc play control is on both the front panel and the remote control, both control identifiers are shown in the related instruction text. For example, to play a disc you can press either 7 on the front panel or 19 on the remote control. There are some functions, such as programmed track play functions, that are operated exclusively by the RR-D92.
Remote Sensor 3
The Remote Sensor picks up the infrared signals from the remote control. Do not cover or block the sensor. It must be unobstructed or the remote control will not work properly. The operation of the Remote Sensor can also be affected if it is exposed to bright light, particularly sunlight. Certain types of lighting, such as halogen lights, that emit a fair amount of infrared light, can also interfere with proper operation. In addition remote control functions may not work reliably if the batteries in the RR-D92 are weak.
7
CD MULTI-DISC CHANGER RCC-955
External Remote Input 14 |
Disc Skip Buttons 11 and 22 |
This connector is designed to be used in conjunction with Xantech™ brand Video Link™ IR signal pick ups (sold separately by custom system installers). This feature enables you to operate the RCC-955 with the hand held remote control even when it is installed where is not visible from your listening location. Contact your authorized Rotel dealer for more information.
Video Link and Xantech are Trademarks of Xantech Corporation.
Remote Control Batteries
The supplied batteries must be installed before the remote control can be used. Slide the secondary control cover down until it stops. Then gently press the small triangular symbol on the cover and slide the cover down to expose the battery well. Install the batteries with the terminals as shown in the illustration in the battery well. Test the control for proper operation, then slide the cover back into place. When the batteries become weak the remote control won’t operate the RCC-955 consistently. Installing fresh batteries should eliminate the problem.
Note: Remove the batteries from the remote control if it will not be used for a long period of time. Do not leave run down batteries in the remote control. Exhausted batteries can leak corrosive chemicals which will damage the unit.
The Disc Skip buttons have two functions. One is to turn the Disc Carousel when you are loading discs, as described in the previous section.
Note: Do not turn the carousel by hand; use the Disc Skip button. Do not touch the carousel while it is turning.
The other function of the Disc Skip button is to select a disc to be played. The next higher numbered disc is selected each time the Disc Skip button is pressed. If disc 5 is selected, pressing the Disc Skip button selects disc 1.
Pressing the Disc Skip button when a disc is not playing selects the next disc. If the Disc Skip button is pressed when a disc is playing, the RCC-955 stops playing the current disc, selects the next disc, and begins playing track 1 of that disc.
Selecting a Disc to Play
In addition to the Disc buttons described above, the remote control may also be used to select discs.
Loading Discs
Disc Tray 5 and Open/Close Buttons 6 and 17
Press the Open/Close button on either the front panel or the remote control to open the Disc Tray. Place discs in the numbered recesses in the Disc Carousel with the label sides up. Be sure the discs are centered in the recesses in the Disc Carousel. Both standard 12cm disc and 8 cm disc may be loaded. There is a separate recessed area in the carousel for 8cm discs. When the Disc Tray is open discs can be loaded into the three disc positions at the front of the tray. To load discs into the remaining positions press the Disc Skip button 11 to rotate the carousel. Press the Open/Close button again to close the Disc Tray when you are done loading discs.
Note: Do not push the Disc Tray in manually. Doing so could cause damage. Use the Open/Close buttons. Do not touch the Disc Carousel while it is turning or attempt to turn it by hand, as this also could cause damage. Use the Disc Skip buttons and let the Disc Carousel come to a stop before loading or removing discs.
You can also load discs into the RCC-955 while a disc is playing. Press the Open/Close button to open the Disc Tray. Three of the four disc positions will be available for disc loading. To access the remaining position press the Disc Skip button. The disc tray will turn to allow access to the remaining disc position. Press the Open/Close button again to close the Disc Tray when you are done loading discs.
8
Disc 1-5 Buttons 25 (remote only)
Press the button that corresponds to the disc you want to select. Pressing one of the Disc 1-5 buttons when a disc is not playing simply selects the corresponding disc. If one of the Disc 1-5 button is pressed when a disc is playing, the RCC-955 stops playing the current disc, selects the corresponding disc, and begins playing track 1 of the disc.
Playing Discs
Play Buttons 7 and 19
Press the Play Button to play the disc indicated in the Disc Display. The disc will begin playing with Track 1, unless another track has been selected before the Play button is pressed.
Unless one of the Repeat Play functions has been selected:
•After the last track on discs 1 through 4 is played, the next disc is selected and play continues with track 1 of the disc.
•At the end of disc 5 disc play stops.
See the Repeat Play section for more information.

Pause Button 9 20
Press the Pause Button to temporarily stop playing the disc. Press the Pause Button again, or the Play Button, to resume playing the disc at the same track and time.
Stop Button 8 24
Press the Stop Button to stop playing the disc. The disc will remain selected but the track selection will go back to track 1.
Track Skip Buttons 10 18
When a disc is not playing:
•Press the
 button to select the next track on the disc. Press and hold the
 button to advance more than one track on the disc.
•Press the  button to select the previous track on the disc. Press and hold the
  button to go back more than one track on the disc.
When a disc is playing:
•Press the
 button to skip the rest of track being played and begin playing at the beginning of the next track on the disc. Press and hold the
 button to advance more than one track on the disc.
•Press the  button to return to the beginning of the track being played. Press and hold the
  button to go back more than one track on the disc.
Track Selection Buttons 26 (remote only)
To select a specific track on a disc, press the corresponding Track Selection buttons. The selected track immediately begins playing. To select tracks higher than number 10 use the “>10” button. For example, to select track 17, press the “>10” button then the “7” button. Note: When the RCC-955 is in Programmed Play mode, the Track Selection buttons are used to select tracks to be added to the program. See the Programmed Disc Play section.
Search Buttons 21 (remote only)
Press and hold the or
or buttons to quickly search a disc in the forward or reverse direction. For the first five seconds the search speed will be approximately four times normal playing speed. After three seconds the search speed will increase to approximately 20 times normal playing speed. The sound volume is reduced while the search function is being used. The search function may be used when disc play has been temporarily stopped with the Pause function, however no sound is heard. The Search function will not go past the beginning or end of the selected disc.
English
Display Panel 4
The Disc Indicators  shows the positions in the Disc Tray that have discs in them.
The Play Indicator  is lit whenever a disc is playing.
The Pause Indicator  is lit when disc play has been temporarily stopped with the Pause button.
The Disc Selection Indicator  typically shows the number of the disc currently selected. If the Remaining Disc Playing Time display option has been selected the Disc Selection Indicator changes to a “–”. See the Time Display section.
The Track Indicator  shows either the track that is selected, the total number of tracks on the disc, or the number of tracks that remain on the disc. See the Time Button section.
One of the Repeat Play Mode Indicators  will light if one of the repeat play options has been selected. See the Repeat Play Button section for more information.
The Random Play Indicator  is lit when one of the random play options is being used. See the Random Play section.
The Program Play Indicator  lights whenever the track programming function is activated. See the Programed Play Section.
The Intro Scan Indicator  is lit when the Intro Scan feature is activated. See the Intro Scan section.
The Remaining Time Indicator  lights when one of the alternative time display functions is activated. See the Time Display Section.
The Time Display  shows either the total playing time of the disc that is selected, the amount of time the current track has been playing, the remaining playing time of the current track, or the remaining time of the disc that is playing. See the Time Button section.
Track Calendar Display  shows the total number of tracks on the disc that is playing and the track that is currently playing. If the selected disc has more than 16 tracks the Additional Track Indicator
 is lit.
When a disc is selected, the Track Calendar Display shows the total number of tracks on the disc. The number of the track that is playing flashes. After a track is played the number for that track is turned off. If there are more than 16 tracks on the disc after track 16 is played the indicator flashes. The Track Indicator shows number of the track being played, or the number of tracks remaining, depending on the Time Display mode selected.
When programmed tracks are played, only the number(s) of the programmed track(s) are illuminated. The number of the track that is playing flashes, and is turned off after the track is played. See the Programmed Play section.
9
CD MULTI-DISC CHANGER RCC-955
Time Display Button 23 (remote only)
When a disc is selected, but not playing, the Time Display shows the total playing time of the disc and the number of tracks on the disc. When a disc is playing, the Time Display shows the track number and the amount of time the track has been playing. Press the Time Display button to change the Time/Track Display mode.
Each/Remain Mode
Press the Time button once to select the Each/Remain mode. The Remaining Time Indicator lights. The Track Indicator shows the track being played. The Time Display shows the amount of time remaining on the track that is playing.
Total/Remain Mode
Press the Time button again to select the Total/Remain mode. The Remaining Time Indicator remains lit. The Track Indicator shows the number of tracks remaining to be played. The Disc Display changes from the number of the disc that is playing to a “–”. The Time Display shows the amount of time remaining on the disc.
Pressing the Time button when the Total/Remain mode is selected changes the Time/Track Display back to the Normal Display mode. The Time/Track Display also reverts to the normal display mode when disc play is stopped and started again.
Repeat Play Button 27 (remote only)
Normally discs 1 through 5 play in sequence and play stops at the end of disc 5. Press the Repeat Play button to select the Repeat 1 Track mode. Press it again to select the Repeat 1 Disc mode.
Press it again to select the Repeat All Disc mode. Press it once more to return to normal disc play mode. Repeat Play functions may be turned on or off at any time, even when a disc is playing.
Repeat 1 Disc
When the Repeat 1 Disc function is selected the “Repeat”, “1” and “Disc” indicators in the display light. If the Repeat 1 Disc option is selected when a disc is not playing, the disc that is selected when the play button is pressed begins playing track 1. After the last track on the disc, play continues, starting with track 1 of the disc. If the Repeat 1 Disc option is selected while a track is playing, that track continues to play. After the last track on the disc, play continues, starting with track 1 of the disc.
The Track Skip buttons function normally when the Repeat 1 Track option is selected. If a new track is selected with the Track Skip buttons, it is repeated until the Repeat Playing option is turned off. The Search buttons function normally when the Repeat 1 Track option is selected. You can search forward to the next track, and backward to the previous track. The new track is then repeated.
If the Programed Play feature is being used the Repeat 1 Track feature cannot be selected.
Repeat All Discs
When the Repeat All Discs option is selected the “Repeat All Disc” indicators in the display are lit. All the tracks on all the discs are played in sequence, beginning with the track that is selected or playing. After the last track on disc 5 is played, track 1 of disc 1 is played. All the discs continue to play in sequence until the Repeat All Discs function is turned off.
The Disc Skip and Disc Search feature work normally when the Repeat All Discs function is turned on.
If the Programmed Play feature is being used, the programmed tracks are played in sequence. When the last programmed track is played, play continues with the first programmed track. See the Programmed Play section for more information.
The Track Skip and Search functions work normally when the Repeat All Discs feature is being used.
Repeat 1 Track
When the Repeat 1 Track function is selected the “Repeat” and “1” indicators in the display light. If the Repeat 1 Track option is selected when a disc is not playing, the track that is selected when the play button is pressed is repeated. If the Repeat 1 Track option is selected while a track is playing, that track continues to play and is then repeated.
The Track Skip buttons function normally when the Repeat 1 Track option is selected. If a new track is selected with the Track Skip buttons, it is repeated until the Repeat Playing option is turned off. The Search buttons function normally when the Repeat 1 Track option is selected. You can search forward to the next track, and backward to the previous track. The new track is then repeated.
If the Programed Play feature is being used the Repeat 1 Track feature cannot be selected.
10
Random Play Button 28 (remote only)
The Random Play feature randomly selects tracks to be played. Press the Random button to turn the feature on. Press it again to turn Random Play off. When the Random Play is active the Random Indicator  in the display is illuminated.
If Random Play is turned on when a disc is not playing, a track is randomly selected when the play button is pushed. If a disc is playing when Random Play is turned on, another track is randomly selected immediately and begins playing.
The Random Play feature can be set to select only tracks from a single disc. While a disc is not playing, press the Random Play button 29 , then select the number of the disc to select tracks from with the disc select buttons 25 . When you press the play button tracks are randomly selected from the selected disc.
If the Track Skip Forward button 
 is pressed when a disc is playing and Random Play is turned on, another track is immediately randomly selected. If the Track Skip Back button
  is pressed when a disc is playing and Random Play is turned on, the same track begins playing from the beginning.
The Search Forward button functions normally when Random Play is turned on. If you search forward to the end of a track another track is randomly selected. The Search Reverse button
 will allow you to search back to the beginning of the track that is playing.
Random Play can be used in conjunction with Programmed Play. If Random Play is turned on after a set of tracks has been programed, the programmed tracks are played in random order. Note: In order to use these two together the Random Play must be turned on after tracks have been programmed. If Random Play is turned on the Programmed Play feature cannot be selected.
If the Repeat 1 Track or Repeat 1 Disc feature is on, it is deactivated when Random Play is turned on. The Random Play and Repeat All Discs features may be used together.
Intro Scan Button 29 (remote only)
The Intro Scan feature lets you listen to a short section of the beginning of musical tracks. Press the Scan button to turn on the Intro Scan feature. Press the Scan button again, or the Stop button, to turn Intro Scan off. When the Intro Scan feature is active the Intro indicator  in the display is lit.
If Programmed Play is not being used, the first 10 seconds of each track on each loaded disc is played in sequence, beginning with the currently selected track. After the first 10 seconds of the last track on disc 5 is played, Intro Scan playing stops. If Programmed Play is being used, the first 10 seconds of each programmed track is played, beginning with the currently selected programmed track. After the first 10 seconds of the last programmed track is played, Intro Scan playing stops.
If Intro Scan is turned on when a disc is not playing, scanning begins with the track that is selected. If a disc is playing when Intro Scan is turned on, the RCC-955 skips to the next track, plays the first 10 seconds of that track, and each of the following tracks. There is one exception - if Intro Scan is turned while the first 10 seconds of a track is playing. In that instance the remainder of the first 10 seconds of that track is played. The RCC-955 then skips to the beginning of the next track and continues scanning.
English
The Intro Scan feature is interactive with Random Play, Programmed Play and Repeat Play. Such combined functions will rarely be used. For example, if both Intro Scan and Repeat Play/All are turned on, the first ten seconds of each disc is played continually in sequence. If both Intro Scan and Random Play are turned on, the first ten seconds of randomly selected tracks are played. If Intro Scan and Programmed Play are active, the first ten seconds of each programmed track are played in sequence. If Repeat Playing/All is also active the first ten seconds of each programmed track are played in sequence continually. Other combinations of functions are possible, but again are unlikely to be used.
Programmed Disc Play
Up to 32 tracks, on any of the loaded discs, can be in selected for playback. After a group of tracks have been programmed, they are played back in the programmed order. All programming and programmed play functions are done with the remote control.
Program Button 30
The Program Button is used to turn the Programmed Play feature on and off. When Programmed Play is turned on the Program Play Indicator  in the display is lit.
Once a group of tracks have been programmed, only those tracks may be played until the Programmed Play feature is turned off. Press the Program Button to turn off Programmed Play, clear the programmed tracks and return to normal play mode. Programmed tracks are also cleared when the Disc Tray is opened and when the power is turned off.
Track Programming
Programming While a Disc is Playing
Press the Program Play button 30 , the Program Indicator  in the display lights. The track that is playing when the Program Button is pressed becomes the first programmed selection. The Time display
  briefly displays “P-01” indicating the track is now programed selection 1. If the second track you want to add to the program list is on the same disc, use the Track Selection buttons 26 to select the next track. If the second track you want to add to the program list is on a different disc, use the Disc Selection buttons 25 to select the next disc. The Track and Time displays change to indicate another selection is being made. The Time display
  briefly displays “P-02” indicating the track is now programed selection 2. Continue selecting new discs (if necessary) and tracks until you have programmed all the tracks you want. Then press the Play button to begin playing the programmed tracks.
11

CD MULTI-DISC CHANGER RCC-955
Review Button 31
Programming Example
While Disc 4 / Track 7 is playing . . .
Press |
Action |
Program Button
Track Button 3
Disc Button 2, then Track Button 6 Track buttons >10 then 1
Disc Button 5, then Track Button 9 Track Button 7
Track Button 4
Disc Button 1, then Track Buttons >10 then 2 Track Button 10
Disc 4 / Track 7 becomes selection 1 Disc 4 / Track 3 becomes selection 2 Disc 2 / Track 6 becomes selection 3 Disc 2 / Track 11 becomes selection 4 Disc 5 / Track 9 becomes selection 5 Disc 5 / Track 7 becomes selection 6 Disc 5 / Track 4 becomes selection 7 Disc 1 / Track 12 becomes selection 8 Disc 1 / Track 10 becomes selection 9
Programming While a Disc is Not Playing
Press the Program Play button 30 , the Program Indicator  in the display will light. If the track you want to select first is on the disc that is already selected simply press the Track Selection button(s) 26 to select the first track. The Time display
  will briefly change to display “P-01” indicating the track is now programmed selection 1. If the track you want to program first is on a different disc from one selected use the Disc Selection buttons 25 to select a different disc, then select the track with the Track Selections buttons. If the second track you want to add to the program list is on the same disc simply use the Track Selection buttons to select the next track. If the second track you want to add to the program list is on a different disc use the Disc Selection buttons to select the next disc. The Track and Time displays will change to indicate another selection is being made. The Time display
  will briefly change to display “P-02” indicating the track is now programed selection 2. Continue selecting new discs (if necessary) and tracks until you have programmed all the tracks you want.
Programming Example
While disc 3 is selected but not playing . . .
Press Action
Program Button
Track Button 3
Track Button 7
Disc Button 4, then Track Buttons >10 then 4 Disc Button 5, then Track Button 9
Track buttons >10 then 2
Disc Button 1, then Track Button 8 Disc Button 2, then Track Button 4 Track Button 1
Program Mode is activated
Disc 3 / Track 3 becomes selection 1 Disc 3 / Track 7 becomes selection 2 Disc 4 / Track 14 becomes selection 3 Disc 5 / Track 9 becomes selection 4 Disc 5 / Track 12 becomes selection 5 Disc 1 / Track 8 becomes selection 6 Disc 2 / Track 4 becomes selection 7 Disc 2 / Track 1 becomes selection 8
Adding Tracks to a Program
You can add track selections to the programmed list at any time, even after you’ve begun playing programed selections. If the track you want to add is on the disc that is playing, just select the new track with the Track Selection buttons. Or use the Disc Selection buttons and the Track Selection buttons to program new tracks to add tracks from another disc to the program.
12
Press the Review button to review the programmed tracks. Each time the button is pressed the next disc/track selection, and the program position number, is displayed. This function can be used at any time – when programming, while playing programmed tracks or while programmed tracks are not playing. If you review the programmed tracks while programming or playing programmed tracks, the display temporarily changes to show the programmed selections and then returns to normal mode.
Playing Programmed Tracks
Once a group of tracks has been programmed press the Play button to begin playing the tracks, starting with programmed selection 1. The selected tracks will play in sequence until the last selected track is over. Then disc play stops.
When programmed tracks are playing, the Track Calendar  in the display shows only the numbers of the programmed tracks. The number of the track that is playing flashes.
The Pause button functions normally when playing programmed tracks. If you press the stop button while playing programmed tracks, play resumes with programmed selection 1 when the play button is pressed again.
The Track Skip buttons function normally when playing programmed tracks. Press the 
 button to skip to the next programmed track. Press the
 button to return to the beginning of the track that is playing. Press the
 again to go back to the previous programmed track. The track skip function will not go past the first or last programmed track unless the Repeat play function is turned on.
The Search Buttons also function when playing programmed tracks. Pressing the  button searches forward. If you search to the end of the track the next programmed track is played. If you search to the end of the last programmed track play stops unless the Repeat function is turned on. Pressing the
  button searches backwards, but the search will not go beyond the beginning of the track that is playing.
The Repeat All Disc function works when programmed tracks are playing. The other Repeat functions cannot be selected. When the Repeat function is turned on the first programmed track begins playing after the last programmed track has been played. Similarly, the first programmed track begins playing if you press the 
 when the last programmed track is playing or if you press the
  until you reach the end of the last programmed track.

Troubleshooting
Most difficulties in audio systems are the result of incorrect connections, or improper control settings. If you encounter problems, isolate the area of the difficulty, check the control settings, determine the cause of the fault and make the necessary changes. If you experience problems with the RCC-955, refer to the suggestions for the following conditions:
Display Is Not Lit
The Disc, Track and Time indicators in the display should be lit whenever the power switch of the RCC-955 is pushed in. If the display does not light, test the power outlet with another electrical device, such as a lamp. Be sure the power outlet being used is not controlled by a switch that has been turned off.
Fuse Replacement
If another electrical device works when plugged into the power outlet, but the RCC-955 display will not light when the power switch is pushed in, it indicates that the internal power fuse may have blown. If you believe this has happened, contact your authorized Rotel dealer to get the fuse replaced.
Disc Does Not Play
If a disc does not begin playing when the Play button is pressed, open the disc tray and be sure the disc is loaded with the label side up. If a disc is properly loaded inspect the playing side of the disc for contamination or damage. If the disc is dirty, clean it as described in the Handling Compact Discs section. If a disc is damaged it should be replaced.
No Sound
Check the input selector on the amplifier to be sure it is properly set. Check the tape monitor switches to be sure they are properly set. Check other signal sources to be sure the amplifier is operating properly. Finally check the audio cables between the RCC-955 and the amplifier to be sure they are properly connected.
English
Sound Skips
If the sound from the RCC-955 skips or jumps around, the disc may be defective or dirty. If the disc is clean, try another disc. If a problem persists it could be caused by vibrations reaching the RCC-955. Sound vibrations, especially from a subwoofer, can interfere with the laser reading a disc surface. Move the RCC-955 to a more stable surface, or to a location farther away from the speakers.
Hum
Hum is caused by electrical interference from other devices. It is most often picked up by the audio signal cables. Use high-quality cables. Low quality cables often have inadequate shielding. Check to be sure the cables are solidly connected to both the RCC-955 and the amplifier. Try moving the cables to a position farther away from other electrical components, especially power amplifiers which have large power transformers. Other devices that commonly cause interference are fluorescent lights and light dimmer controls.
Specifications
Frequency Response (+0.5dB, –3.0dB) |
20-20,000 Hz |
Signal to Noise Ratio |
96 dB |
Dynamic Range |
93 dB |
Channel Separation |
90 dB @ 1kHz |
Total Harmonic Distortion + Noise |
0.008% @ 1kHz |
Maximum Audio Line Output |
2 Volts |
Digital Output Level (coax) |
0.5 Volt, Peak to Peak |
Digital Output Impedance |
75 Ohms |
Power Requirements |
|
USA Version |
115 Volts, 60 Hz; |
European Version |
230 Volts, 50 Hz |
Power Consumption |
15 Watts |
Dimensions (W x H x D) |
440 x 125 x 395 mm |
|
175/16 x 415/16 x 151/2 inches |
Weight (net) |
5.7 kg, 12.6 lb. |
All specifications are accurate at the time of printing.
Rotel reserves the right to make improvements without notice.
13
CHANGEUR MULTIDISQUES CD RCC-955
ATTENTION :
Il n’y a à l’intérieur aucune pièce susceptible d’être modifiée par
l’utilisateur. Adressez-vous impérativement à une personne Sommaire qualifiée.
ATTENTION :
Prenez garde à ce qu’aucun objet ou liquide ne tombe à l’intérieur de l’appareil par ses orifices de ventilation ; Si l’appareil est exposé à l’humidité ou si un objet tombe à l’intérieur, couper immédiatement l’alimentation secteur de tous les appareils. Débrancher l’appareil des autres maillons, et adressez-vous immédiatement et uniquement à une personne qualifiée et agréée.
Lisez les instructions - Tous les conseils de sécurité et d’installation doivent être lus avant de faire fonctionner l’appareil. Conservez soigneusement ce livret - Vous devez pouvoir le consulter à nouveau pour de futures références.
Respectez tous les conseils - Tous les conseils de sécurité doivent être soigneusement respectés. Suivez les instructions - Respectez les procédures d’installation et de fonctionnement indiquées dans ce manuel.
Entretien - L’appareil doit être nettoyé uniquement avec un chiffon sec ou un aspirateur.
Ventilation - L’appareil doit être placé de telle manière que sa propre ventilation puisse fonctionner. Par exemple, il ne doit pas être posé sur un fauteuil, un canapé, une couverture ou tout autre surface susceptible de boucher ses ouïes d’aération ; ou placé dans un meuble empêchant la bonne circulation d’air autour des orifices d’aération.
Chaleur - Cet appareil doit être placé loin de toute source de chaleur, tels que radiateurs, chaudières, bouches de chaleur ou d’autres appareils (y compris amplificateurs de puissance) produisant de la chaleur.
Cet appareil doit être branché sur une prise d’alimentation secteur, d’une tension et d’un type conformes à ceux qui sont indiqués sur la face arrière de l’appareil.
Brancher l’appareil uniquement grâce au cordon secteur fourni, ou à un modèle équivalent. Ne pas tenter de modifier ou changer la prise. Notamment, ne pas tenter de supprimer la prise de terre si celle-ci est présente. Ne pas utiliser de cordon rallonge.
Prendre garde à ce que ce cordon d’alimentation ne soit pas pincé, écrasé ou détérioré sur tout son trajet, à ce qu’il ne soit pas mis en contact avec une source de chaleur. Vérifier soigneusement la bonne qualité des contacts, à l’arrière de l’appareil comme dans la prise murale.
Si l’appareil ne doit pas être utilisé pendant une longue période, la prise secteur sera débranchée.
Service après vente - L’appareil doit être immédiatement éteint, débranché puis retourné au service après-vente agréé dans les cas suivants :
•Un objet est tombé, ou du liquide a coulé à l’intérieur de l’appareil.
•L’appareil a été exposé à la pluie.
•L’appareil ne fonctionne pas normalement, ou ses performances sont anormalement limitées.
•L’appareil est tombé, ou le coffret est endommagé.
Placer l’appareil sur une surface plane, solide et rigide. Ne jamais placer l’appareil sur une surface ou un support mobile pouvant basculer.
(Les numéros cerclés correspondent aux illustrations)
Au sujet de Rotel _______________________________________ 15 Démarrage _____________________________________________ 15
Au sujet du HDCD® 12 |
15 |
Quelques précautions |
15 |
Positionnement |
16 |
Câbles |
16 |
Manipulation des disques compacts _____________________ 16
Alimentation électrique et mise en service _______________ |
16 |
Prise d’alimentation secteur 16 |
16 |
Interrupteur de mise sous tension 1 |
|
et indicateur Power 2 |
17 |
Branchements en sortie _________________________________ 17
Sorties analogiques 13 |
17 |
Sortie numérique 15 |
17 |
Télécommande _________________________________________ 17 |
|
Capteur de télécommande 3 |
17 |
Prise pour télécommande externe 14 |
17 |
Piles de la télécommande |
17 |
Chargement des disques ________________________________ 18
Tiroir des disques |
5 |
et touches d’ouverture/fermeture |
|
« Open/Close » ( 6 |
et |
17 ) |
18 |
Touches Disc Skip ( 11 et 22 ) |
18 |
||
Sélectionner un disque en lecture _______________________ |
18 |
||
Touches Disc 1-5 25 (télécommande uniquement) |
18 |
||
Lecture des disques ____________________________________ 18
Touches de lecture ( 7 et 19 ) |
|
18 |
||
Touche Pause ( 9 |
et 20 ) |
|
18 |
|
Touche Stop ( |
8 |
et 24 ) |
|
18 |
Touches d’accès par plage « Track Skip » ( 10 et 18 ) |
18 |
|||
Touches de sélection de plage « Track Selection » 26 |
19 |
|||
Touches de recherche « Search 21 |
19 |
|||
Afficheur en façade |
4 |
_________________________________ |
19 |
|
Touche des durées |
23 __________________________________ 20 |
|||
Mode Plage/Temps restant « Each/Remain Mode » |
20 |
|||
Mode Total/Temps restant « Total/Remain Mode » |
20 |
|||
Touche de répétition de lecture 27 ______________________ |
20 |
|||
Répétition d’une plage « Repeat 1 Track » |
20 |
|||
Répétition d’un disque « Repeat 1 Disc » |
20 |
|||
Répétition de tous les disques « Repeat All Discs » |
20 |
|||
Touche de lecture en mode aléatoire |
28 _________________ 21 |
|||
Balayage des introductions de plages |
29 ________________ 21 |
|||
Programmation de la lecture ____________________________ 21
Touche de programmation « Program » 30 |
21 |
Programmation des plages |
22 |
Programmation alors qu’un disque n’est pas en lecture 22 |
|
Ajouter des morceaux à un programme existant |
22 |
Touche de vérification 31 |
22 |
Lire les plages programmées ____________________________ 22 Problèmes de fonctionnement __________________________ 23
L’afficheur ne s’allume pas |
23 |
Remplacement du fusible |
23 |
Refus de lecture d’un disque |
23 |
Pas de son |
23 |
Sautes de son |
23 |
Bruit et ronflement |
23 |
Spécifications __________________________________________ 23
14

Au sujet de Rotel
C’est une famille de passionnés de musique qui a fondé Rotel, il y a maintenant plus de trente ans. Pendant toutes ces années, leur passion ne s’est jamais émoussée et tous les membres de la famille se sont toujours battus pour fabriquer des appareils présentant un exceptionnel rapport musicalité-prix, suivis en cela par tous les employés.
Les ingénieurs travaillent toujours en équipe réduite, écoutant et peaufinant soigneusement chaque appareil pour qu’il corresponde parfaitement à leurs standards musicaux. Ils sont libres de choisir n’importe quels composants dans le monde entier, uniquement en fonction de leur qualité. C’est ainsi que vous trouvez dans les appareils Rotel des condensateurs britanniques ou allemands, des transistors japonais ou américains, tandis que tous les transformateurs toriques sont directement fabriqués dans une usine Rotel.
L’excellente réputation musicale des appareils Rotel a été saluée par la plupart des magazines spécialisés ; ils ont reçu d’innombrables récompenses, et sont choisis par de nombreux journalistes-critiques du monde entier, parmi les plus célèbres, ceux qui écoutent de la musique quotidiennement. Leurs commentaires restent immuables : Rotel propose toujours des maillons à la fois musicaux, fiables et abordables.
Mais plus que tout, Rotel vous remercie pour l’achat de cet appareil, et souhaite qu’il vous apporte de nombreuses heures de plaisir musical.
Démarrage
Nous vous remercions pour l’acquisition de ce changeur multidisques CD Rotel RCC-955. En tant que maillon d’un système haute-fidélité de très haute qualité, il vous apportera des années de plaisir musical.
Le RCC-955 est un changeur multidisques CD complet, de très hautes performances. Il représente le choix idéal pour ceux qui veulent bénéficier des avantages d’un lecteur-changeur de CD sans pour autant sacrifier la qualité sonore. Il intègre un filtre numérique à suréchantillonnage 8 fois, ainsi que le circuit spécifique HDCD (voir le paragraphe suivant)
La facilité d’utilisation a été un de nos soucis principaux : vous pouvez changer n’importe lequel des quatre disques en attente pendant la lecture du cinquième. Télécommande totale, programmation jusqu’à 32 morceaux différents, et balayage des débuts de chaque plage sont prévus.
Des composants de très haute qualité, comme des résistances à film métallique et des condensateurs au polypropylène ou polystyrène sont utilisés sur tout le trajet du signal. Tous ces aspects ont été soigneusement examinés dans un seul but : le respect de la musique.
Français
L’installation du RCC-955 est aussi simple que son utilisation. Si vous êtes déjà habitué à une autre installation hi-fi, vous ne rencontrerez aucun problème. Il suffit de brancher les maillons complémentaires et d’écouter !
Au sujet du HDCD® 12
Les disques de type HDCD sont codés avec un flux numérique haute densité. Durant la lecture, ce flux numérique haute densité est décodé pour redevenir un signal numérique conventionnel. Ce principe de gravure haute densité réduit énormément les risques d’erreurs généralement constatées pendant les étapes de conversion tant analogique/numérique que numérique/analogique. Le circuit HDCD est automatiquement activé. Le voyant HDCD (12) s’allume dès qu’un disque codé HDCD est détecté.
Quelques précautions
Veuillez lire très soigneusement ce manuel d’utilisation. Il vous indique tout ce qu’il faut savoir pour intégrer parfaitement ce changeur multidisques CD dans votre chaîne, et comment en tirer les performances optimales. Si vous vous posez ensuite encore des questions, veuillez contacter votre revendeur agréé Rotel, qui se fera un plaisir d’y répondre.
NOTE : Sous l’appareil se trouvent deux vis de blocage de la mécanique de lecture, pendant le transport. Ces deux vis sont munies d’oreilles en plastique rouge, qui leur permettent d’être identifiées et dévissées facilement. Posez doucement le RCC-955 sur le côté, et dévissez ces deux vis dans le sens inverse des aiguilles d’une montre. Tant que les deux vis ne sont pas ôtées, le tiroir ne peut pas s’ouvrir.
Si vous avez oublié d’enlever ces deux vis avant la mise en service, éteignez le RCC955, débranchez sa prise d’alimentation murale et procédez comme indiqué précédemment.
Conservez soigneusement les
deux vis en lieu sûr. Vous devrez les
remettre en place si vous désirez trans-
porter le RCC-955. Avant tout déplacement de l’appareil, ôtez tous les disques présents dans le tiroir, fermez celui-ci. Toujours attendre que l’afficheur indique « 0 00 00 :0 » avant d’éteindre l’appareil. Débranchez la prise secteur, reposez doucement le RCC-955 sur le côté, et revissez les deux vis.
 et le nom HDCD®, High Definition Compatible Digital® et Pacific Microsonics™ sont des marques déposées ou la marque de Pacific Microsonics, Inc., pour les États-Unis comme le monde entier. Le système HDCD est fabriqué sous licence de Pacific Microsonics, Inc. Ce système est couvert par les brevets suivants : 5,479,168, 5,638,074, 5,640,161, 5,808,574, 5,838,274, 5,854,600, 5,872,531 aux États-Unis, et 669 114 en Australie. Autres brevets en cours.
15
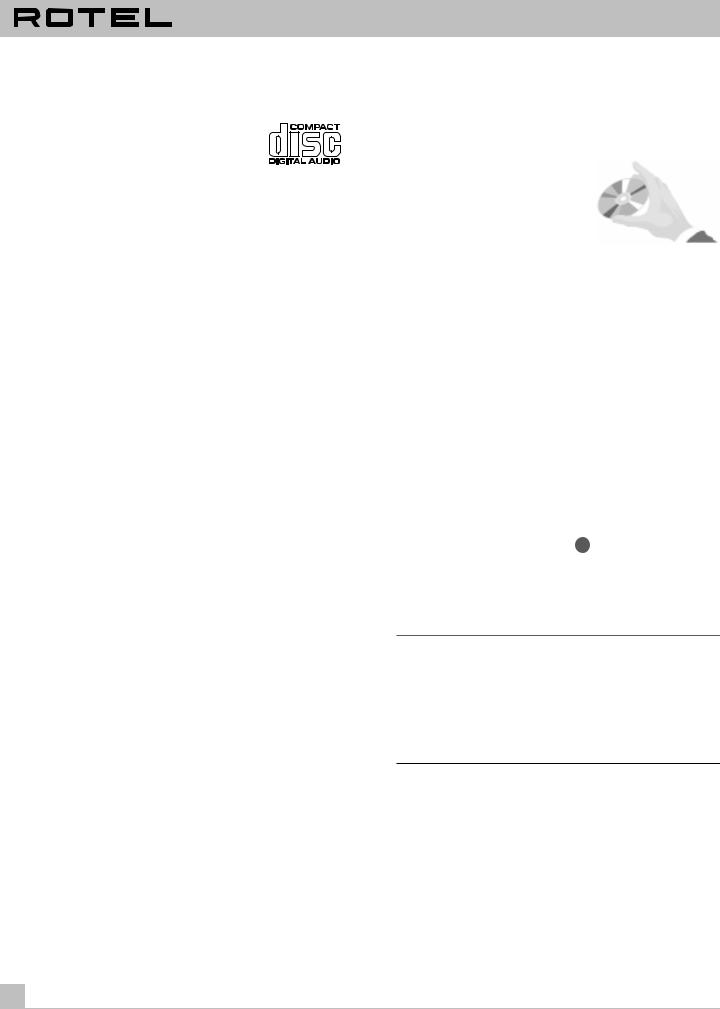
CHANGEUR MULTIDISQUES CD RCC-955
Conservez le carton d’emballage et tous ses composants. Il constitue le meilleur moyen pour transporter l’appareil dans le futur, sans risque de détérioration.
Le RCC-955 est conçu pour lire les CD audio repérés par le logo ci-contre d’autres types de disques ne doivent pas être utilisés.
Avant de déplacer le RCC-955, toujours enlever tous les disques présents dans son tiroir, pour éviter toute détérioration possible de ces derniers.
Toujours laisser le tiroir fermé, sauf pendant les étapes de chargement et déchargement des disques. Cela évite l’introduction de poussière, pouvant ensuite nuire à la qualité de la lecture.
Conservez la facture d’achat et renvoyez le bon d’enregistrement fourni avec l’appareil. Vous avez ainsi la preuve de la date d’achat, qui vous sera utile dans le cas où il serait nécessaire de faire jouer la garantie.
Positionnement
Comme tous les appareils traitant des signaux de faible tension et intensité, le RCC-955 est relativement sensible à son environnement proche. Évitez de le poser sur l’amplificateur de puissance, ce qui pourrait générer une sensibilité aux interférences émises par ce dernier. Ne l’exposez pas aux rayons directs du soleil. Évitez de l’utiliser à une température supérieure à 35 °C, ou inférieure à 5 °C. Si l’appareil est rapidement déplacé d’un environnement très froid vers un environnement normalement chauffé, de la condensation peut se former sur sa lentille optique. Si cela se produit, attendez au moins une trentaine de minutes avant de commencer la lecture.
Nous vous recommandons d’installer le RCC-955 dans un meuble spécialement destiné aux appareils hi-fi. De tels meubles adaptés réduisent ou suppriment également les vibrations, ce qui améliore la qualité sonore de tous les maillons de la chaîne. Pour de plus amples renseignements sur ce type de meuble et sur l’installation correcte des divers éléments de la chaîne haute-fidélité, veuillezvous adresser à votre revendeur agréé Rotel.
Câbles
Pendant l’installation, prenez un soin particulier aux trajets respectifs des câbles d’alimentation secteur, câbles de modulation analogique et câbles de signal numérique, afin d’éviter toute interférence entre eux. N’utilisez que des câbles de haute qualité, soigneusement blindés afin d’éviter toute dégradation du signal entre les maillons. Votre revendeur agréé Rotel est en mesure de vous apporter toute l’information nécessaire concernant le choix de câbles de liaison de qualité.
Manipulation des disques compacts
Manipulez les disques CD avec précaution. Tenez les uniquement par leur tranche, en évitant de toucher la surface gravée.
Les traces de doigts et la poussière peuvent être délicatement supprimées de la surface gravée (côté brillant) en utilisant un chiffon très doux. Procédez par mouvements successifs, toujours en
ligne droite, du centre vers le bord du disque.
N’utilisez jamais de produit chimique, y compris ceux prévus pour le nettoyage des disques vinyle, les produits antistatiques, tout aérosol, et encore moins les liquides à base de benzène, diluant, etc. Ces produits endommageront définitivement le Compact Disc.
Conservez les disques CD dans leur boîtier de protection, afin de les protéger de la poussière et des rayures. Ne jamais les exposer à la lumière directe du soleil, à une trop grande humidité ou à des températures trop élevées pendant de longues périodes.
Alimentation électrique et mise en service
Prise d’alimentation secteur 16
Le changeur multidisques CD RCC-955 est configuré en usine, sa tension correcte étant indiquée sur sa face arrière (115 ou
230 volts, 50 ou 60 Hz). Ne pas respecter cette tension entraîne la destruction de l’appareil et annule la garantie.
Note : si vous devez déménager dans un autre pays, il est possible de modifier la tension d’alimentation de votre appareil. Cette modification est exclusivement réalisée en usine : demandez conseil à un revendeur agréé Rotel. Il n’y a pas de pièces susceptibles d’être modifiées ou de commandes à l’intérieur du coffret. Ne pas enlever son capot : vous risqueriez l’électrocution. Cela peut également endommager les circuits internes, et annule la garantie.
Le RCC-955 doit être branché dans une prise murale deux broches. Nous vous déconseillons d’utiliser un câble rallonge.
Avant le branchement, vérifiez que le bouton de mise sous tension en face avant est bien en position « Out »
Si vous quittez votre domicile pendant une longue période (un mois ou plus), débranchez la prise d’alimentation secteur (de même que celles des autres maillons audio et vidéo).
16
Interrupteur de mise sous tension 1 et indicateur Power 2
L’interrupteur de mise sous tension se trouve à gauche de la face avant. Lorsque l’appareil est effectivement sous tension, la diode Power s’allume. Une seconde pression sur cet interrupteur éteint l’appareil.
Note : si vous utilisez une prise de renvoi secteur (en face arrière d’un autre appareil) pour alimenter le RCC-955, vous devez laisser le bouton de mise sous tension de ce dernier toujours sur « On ». la mise sous tension effective se fera alors par l’appareil qui alimente le RCC-955.
Lors de la mise sous tension, c’est le disque placé en position 1 dans le tiroir qui est automatiquement sélectionné. Les afficheurs Disc et Track (plage) s’allument, indiquant « Disc1/Track1 ». l’indicateur de temps « Time Indicator » s’illumine également.
Branchements en sortie
Le RCC-955 vous laisse le choix entre une sortie analogique stéréophonique traditionnelle, et une sortie numérique. La sortie analogique utilise un convertisseur numérique/analogique intégré dans le RCC-955, permettant le branchement direct sur n’importe quel préamplificateur ou amplificateur intégré. La sortie numérique délivre un signal numérique non traité, destiné à être utilisé avec un convertisseur numérique/analogique ou un processeur externe.
Note : pour éviter tout bruit parasite susceptible d’endommager les enceintes acoustiques, toujours éteindre le système avant d’effectuer des branchements sur celui-ci.
Sorties analogiques 13
[Voir la figure 5 pour la position des différentes prises]
Une paire de prises Cinch-RCA asymétriques traditionnelles fournit le signal stéréo pour les entrées correspondantes repérées « CD » d’un préamplificateur, amplificateur intégré ou ampli-tuner. Choisissez des câbles de liaison de la meilleure qualité possible. Respectez bien le branchement : canal gauche sur canal gauche (couleur noire ou blanche), et canal droit sur canal droit (couleur rouge).
Sortie numérique 15
[Voir la figure 6 pour la position des différentes prises]
Si vous désirez utiliser le RCC-955 uniquement comme une platine de transport et de lecture de l’information numérique gravée sur les CD, vous avez besoin d’une sortie numérique, n’utilisant pas le convertisseur numérique-analogique intégré dans l’appareil. Ce signal est donc fourni en face arrière de l’appareil. Il est au standard coaxial, nécessitant un câble de liaison 75 ohms pour la liaison avec l’entrée numérique d’un convertisseur externe.
Français
Télécommande
Le RCC-955 est livré d’origine avec la télécommande RR-D92. la face avant de celle-ci doit être pointée vers la façade du RCC-955 pour la transmission correcte des informations de commande. Les fonctions de base de la lecture sont regroupées sur les touches placées en haut de la télécommande RR-D92. Un couvercle pivotant révèle les fonctions secondaires, accessibles dans la partie basse de la télécommande, telles que la programmation, l’accès direct à un disque, le balayage des morceaux, etc.
La RR-D92 reproduit toutes les fonctions également accessibles en face avant du changeur RCC-955. C’est d’ailleurs pourquoi, dans ce manuel, vous trouvez parfois deux chiffres se référant à la même commande, un pour la face avant, l’autre pour la télécommande. Par exemple, pour lire un disque, vous pouvez presser la touche 7 de la face avant ou la touche 19 sur la télécommande. Certaines fonctions ne sont toutefois accessibles qu’à partir de la télécommande RR-D92.
Capteur de télécommande 3
Le capteur de télécommande reçoit toutes les informations infrarouges envoyées par la télécommande. Il ne doit pas être obstrué, sous peine d’un mauvais fonctionnement de la télécommande. Le bon fonctionnement de la télécommande peut également être affecté par une lumière trop vive (rayons du soleil atteignant directement le capteur), ou certaines lampes artificielles (lampes halogènes). En cas de fonctionnement erratique, vérifiez également que les piles de la télécommande ne sont pas épuisées.
Prise pour télécommande externe 14
Cette prise est prévue pour être utilisée avec des systèmes de télécommande externes tels que les modèles Xantech™ de Video Link™, systèmes ajoutant d’autres possibilités de télécommande infrarouge, et permettant aussi d’utiliser des récepteurs externes utiles si le RCC-955 est encastré dans un meuble aveugle. (Systèmes disponibles en option).
Video Link et Xantech sont des marques déposées de Xantech Corporation.
Piles de la télécommande
Les piles fournies doivent être installées avant d’utiliser la télécommande. Faites glisser le couvercle de la seconde partie de la télécommande jusqu’à son point d’arrêt. Puis appuyez sur le symbole triangulaire gravé pour continuer le retrait de ce couvercle et faire apparaître le logement des piles. Disposez celles-ci comme indiqué dans le logement (respectez la polarité +/-) et refermer le couvercle. Lorsque les piles commencent à être usées, le fonctionnement de la télécommande devient erratique.
Note : enlevez les piles si vous n’utilisez pas la télécommande pendant une longue période de temps. Ne laissez pas des piles usées dans la télécommande : elles peuvent dégager des produits chimiques détruisant définitivement la télécommande.
17
 Loading...