


Owner’s Manual
Manuel d’utilisation
Bedienungsanleitung
Manuale di Istruzioni
Manual de Instrucciones
Gebruiksaanwijzing
RMB-1066
Six-Channel Power Amplifier
Amplificateur de Puissance Six Canaux
Sechskanal-Endstufe
Amplificatore di Potenza a Sei Canali
Etapa de Potencia de Seis Canales
Zes Kanaals Eindversterker
SIX CHANNEL
POWER AMPLIFIER
RB-1066
BRIDGED MONO
A B C
PROTECTION
A B C
POWER
- A LEVEL |
- B LEVEL |
- C LEVEL |
CH |
CH |
CH |
RMB-1066 Six Channel Power Amplifier
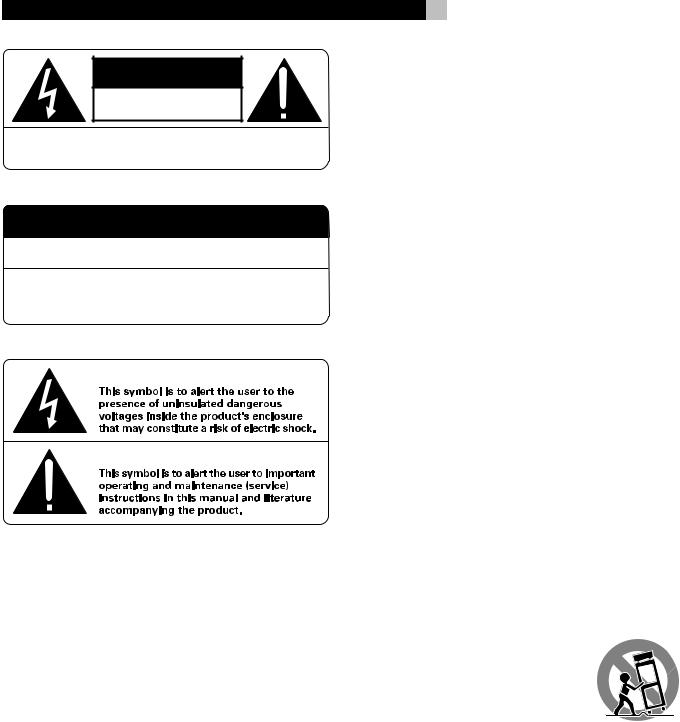
CAUTION
RISK OF ELECTRIC SHOCK
DO NOT OPEN
CAUTION: TO REDUCE THE RISK OF ELECTRIC SHOCK, DO NOT REMOVE COVER. NO USER-SERVICEABLE PARTS INSIDE REFER SERVICING TO QUALIFIED SERVICE PERSONNEL.
APPLICABLE FOR USA, CANADA OR WHERE APPROVED FOR THE USAGE
CAUTION: TO PREVENT ELECTRIC SHOCK, MATCH WIDE BLADE OF PLUG TO WIDE SLOT. INSERT FULLY.
ATTENTION: POUR EVITER LES CHOCS ELECTRIQUES, INTRODUIRE LA LAME LA PLUS LARGE DE LA FICHE DANS LA BORNE CORRESPONDANTE DE LA PRISE ET POUSSER JUSQU AU FOND.
2
WARNING: There are no user serviceable parts inside. Refer all servicing to qualified service personnel.
WARNING: To reduce the risk of fire or electric shock, do not expose the unit to moisture or water. Do not allow foreign objects to get into the enclosure. If the unit is exposed to moisture, or a foreign object gets into the enclosure, immediately disconnect the power cord from the wall. Take the unit to a qualified service person for inspection and necessary repairs.
Read all the instructions before connecting or operating the component. Keep this manual so you can refer to these safety instructions.
Heed all warnings and safety information in these instructions and on the product itself. Follow all operating instructions.
Clean the enclosure only with a dry cloth or a vacuum cleaner.
You must allow 10 cm or 4 inches of unobstructed clearance around the unit. Do not place the unit on a bed, sofa, rug, or similar surface that could block the ventilation slots. If the component is placed in a bookcase or cabinet, there must be ventilation of the cabinet to allow proper cooling.
Keep the component away from radiators, heat registers, stoves, or any other appliance that produces heat.
The unit must be connected to a power supply only of the type and voltage specified on the rear panel of the unit.
Connect the component to the power outlet only with the supplied power supply cable or an exact equivalent. Do not modify the supplied cable in any way. Do not attempt to defeat grounding and/or polarization provisions. Do not use extension cords.
Do not route the power cord where it will be crushed, pinched, bent at severe angles, exposed to heat, or damaged in any way. Pay particular attention to the power cord at the plug and where it exits the back of the unit.
The power cord should be unplugged from the wall outlet if the unit is to be left unused for a long period of time.
Immediately stop using the component and have it inspected and/or serviced by a qualified service agency if:
•The power supply cord or plug has been damaged.
•Objects have fallen or liquid has been spilled into the unit.
•The unit has been exposed to rain.
•The unit shows signs of improper operation
•The unit has been dropped or damaged in any way
Place the unit on a fixed, level surface strong enough to support its weight. Do not place it on a moveable cart that could tip over.
3 |
English |
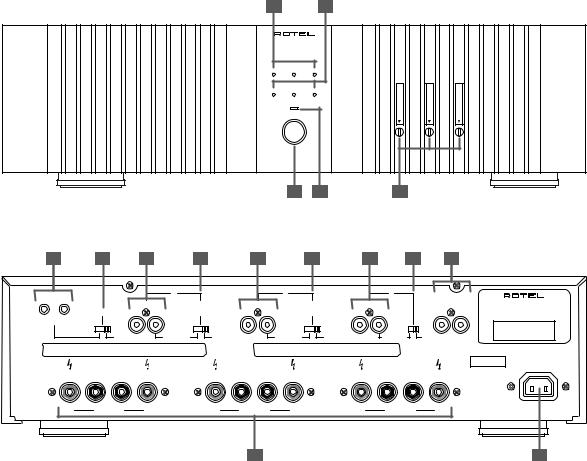
Figure 1: Controls and Connections
Commandes et branchements
Bedienelemente und Anschlüsse
Controlli e collegamenti
Controles y Conexiones
Bedieningsorganen en aansluitingen
|
SIX CHANNEL |
|
|
|
POWER AMPLIFIER |
|
|
||
|
RB-1066 |
|
|
|
|
BRIDGED MONO |
|
|
|
A |
B |
C |
|
|
|
PROTECTION |
|
|
|
A |
B |
C |
|
|
|
POWER |
- A LEVEL |
- B LEVEL |
- C LEVEL |
|
CH |
CH |
CH |
|
|
|
|||
1 2
|
|
|
|
C |
OUT |
IN |
|
INPUT |
|
|
|
|
|
|
|
SIGNAL SENSE |
R |
L |
LINK |
12V TRIG. |
|
|
|
|
|
OFF |
|
|
BRIDGED |
WARNING: TO REDUCE THE RISK OF FIRE OR ELECTRICAL SHOCK, DO NOT EXPOSE THIS EQIPMENT TO RAIN OR MOISTURE.
|
SPEAKERS |
|
|
+ RIGHT – |
– |
LEFT + |
|
– |
BRIDGED |
|
+ |
|
|
|
B |
|
A |
|
SIGNAL OUTPUT |
|
|
|
|
|
|
|
|
|
|
SIX CHANNEL AMPLIFIER |
|||
|
|
INPUT |
|
INPUT |
|
|
LINK |
|
||
|
R |
L |
LINK |
R |
L |
|
R |
L |
MODEL NO. RMB-1066 |
|
|
|
POWER CONSUMPTION: 700W |
||||||||
|
|
|
|
|
|
|
|
|
||
STEREO |
|
|
BRIDGED |
STEREO |
BRIDGED |
|
STEREO |
|
|
|
|
|
SPEAKER IMPEDANCE |
STEREO 4 OHMS MINIMUM |
|
|
|
|
|
||
|
|
BRIDGED 8 OHMS MINIMUM |
|
|
|
|
|
|||
|
|
|
|
|
|
|
|
|
||
SPEAKERS |
|
|
SPEAKERS |
|
|
SERIAL NO. |
~ |
|||
+ RIGHT – |
|
– |
LEFT + |
+ RIGHT – |
– |
LEFT + |
|
|
||
– |
BRIDGED |
+ |
– |
BRIDGED |
+ |
|
|
RP-388 |
||
12
RMB-1066 Six Channel Power Amplifier |
4 |
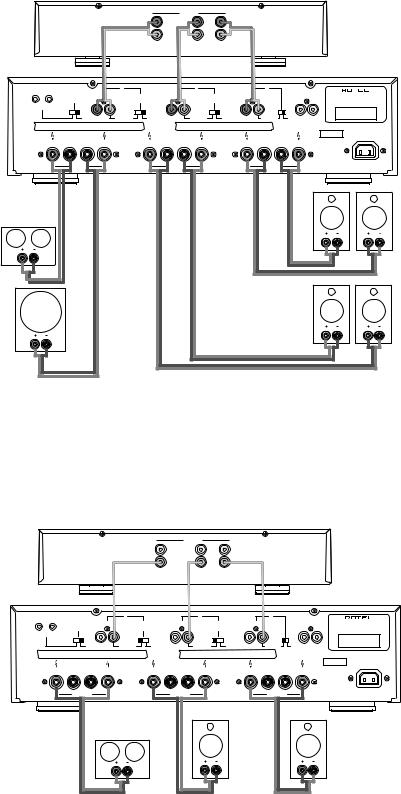
Figure 2: Stereo Connections
Branchements stéréo
Anschlußdiagramm bei Stereobetrieb
Collegamenti stereo
Conexiones para Funcionamiento en Modo Estereofónico
Het aansluiten als een zes kanalen eindversterker
OUTPUTS
CENTER |
RIGHT |
|
|
|
|
|
SUB |
|
LEFT |
|
|
|
|
|
|
|
|
|
|
|
|
|
|
REAR |
FRONT |
|
|
|
|
|
|
|
|
|
|
C |
|
|
B |
|
|
|
A |
SIGNAL OUTPUT |
|
|
OUT |
IN |
|
|
|
|
|
|
|
|
|
|
SIX CHANNEL AMPLIFIER |
||
|
|
|
INPUT |
|
|
INPUT |
|
|
|
INPUT |
|
LINK |
|
|
|
SIGNAL SENSE |
R |
L |
LINK |
R |
L |
|
LINK |
R |
L |
|
R |
L |
MODEL NO. RMB-1066 |
|
|
|
POWER CONSUMPTION: 700W |
|||||||||||
|
|
|
|
|
|
|
|
|
|
|
|
|
|
|
12V TRIG. |
|
|
|
|
|
|
|
|
|
|
|
|
|
|
|
OFF |
|
|
BRIDGED |
STEREO |
|
BRIDGED |
STEREO |
|
|
BRIDGED |
STEREO |
|
|
WARNING: TO REDUCE THE RISK OF FIRE OR ELECTRICAL SHOCK, DO NOT EXPOSE THIS EQIPMENT TO RAIN OR MOISTURE.
|
SPEAKERS |
|
|
|
+ RIGHT – |
– |
LEFT |
+ |
|
– |
BRIDGED |
|
|
+ |
SPEAKER IMPEDANCE |
STEREO 4 OHMS MINIMUM |
|
BRIDGED 8 OHMS MINIMUM |
||
|
SPEAKERS |
|
|
SPEAKERS |
|
|
SERIAL NO. |
~ |
||
+ RIGHT – |
– |
LEFT |
+ |
+ RIGHT – |
– |
LEFT |
+ |
|
|
– |
BRIDGED |
|
+ |
– |
BRIDGED |
|
+ |
|
RP-388 |
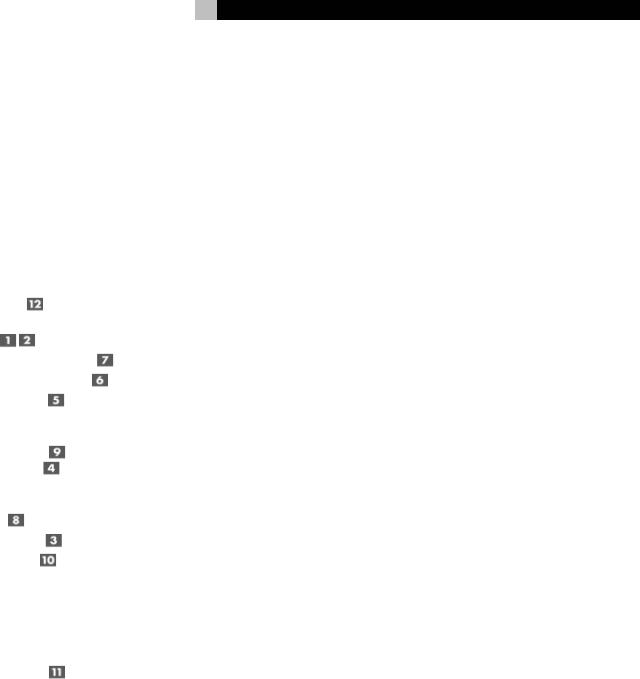
Figure 3: Bridged Connections
Branchements en mode ponté (bridgé) Anschlußdiagramm bei Brückenschaltung Collegamenti a ponte
Conexiones para Funcionamiento en Modo Puenteado
Het aansluiten als een drie kanalen gebrugde eindversterker
OUTPUTS
CENTER |
RIGHT |
SUB |
LEFT |
REAR |
FRONT |
|
|
|
|
C |
|
|
B |
|
OUT |
IN |
|
INPUT |
|
|
|
INPUT |
|
|
|
|
|
|
|
|
||
|
SIGNAL SENSE |
R |
L |
|
LINK |
R |
L |
LINK |
12V TRIG. |
|
|
|
|
|
|
|
|
|
OFF |
|
|
BRIDGED |
STEREO |
|
BRIDGED |
STEREO |
|
A |
SIGNAL OUTPUT |
|
|
|
|
SIX CHANNEL AMPLIFIER |
||
|
INPUT |
LINK |
|
|
R |
L |
R |
L |
MODEL NO. RMB-1066 |
POWER CONSUMPTION: 700W |
||||
|
BRIDGED |
STEREO |
|
|
WARNING: TO REDUCE THE RISK OF FIRE OR ELECTRICAL SHOCK, DO NOT EXPOSE THIS EQIPMENT TO RAIN OR MOISTURE.
SPEAKERS
+ RIGHT – – LEFT +
|
SPEAKER IMPEDANCE |
STEREO 4 OHMS MINIMUM |
|
|
|
|
BRIDGED 8 OHMS MINIMUM |
|
|
|
|
SPEAKERS |
SPEAKERS |
SERIAL NO. |
~ |
||
+ RIGHT – |
– LEFT + |
+ RIGHT – |
– LEFT + |
|
|
– BRIDGED + – BRIDGED + – BRIDGED +
RP-388
Contents |
|
Figure 1: Controls and Connections |
3 |
Figure 2: Stereo Connections |
4 |
Figure 3: Bridged Connections |
4 |
About Rotel .......................................... |
5 |
Getting Started ..................................... |
5 |
Operating Features |
5 |
A Few Precautions |
5 |
Placement |
5 |
AC Power and Control ........................... |
6 |
AC Power Input |
6 |
Power Switch and |
|
Indicator |
6 |
Auto Turn On/Off Mode Selector |
6 |
+12V Trigger Input and Output |
6 |
Protection Indicators |
6 |
Stereo/Bridged Mono Mode Selection .... |
7 |
Input Select Switches |
|
Bridged Mono LEDs |
7 |
Signal Connections ................................. |
7 |
RCA Inputs |
7 |
Input Level Controls |
7 |
Signal Output Link |
7 |
Speakers ............................................... |
7 |
Speaker Selection |
7 |
Speaker Wire Selection |
7 |
Polarity and Phasing |
8 |
Speaker Connections |
8 |
Troubleshooting ..................................... |
8 |
Front Panel Power Indicator Is Not Lit |
8 |
No Sound |
8 |
Protection Indicator Is Lit |
8 |
Specifications ........................................ |
9 |
5
About Rotel
A family whose passionate interest in music led them to manufacture high fidelity components of uncompromising quality founded Rotel over 40 years ago. Over the years that passion has remained undiminished and the goal of providing exceptional value for audiophiles and music lovers regardless of their budget, is shared by all Rotel employees.
The engineers work as a close team, listening to, and fine tuning each new product until it reaches their exacting musical standards. They are free to choose components from around the world in order to make that product the best they can. You are likely to find capacitors from the United Kingdom and Germany, semiconductors from Japan or the United States, and toroidal power transformers manu-factured in Rotel’s own factory.
Rotel’s reputation for excellence has been earned through hundreds of good reviews and awards from the most respected reviewers in the industry, who listen to music every day. Their comments keep the company true to its goal – the pursuit of equipment that is musi cal, reliable and affordable.
All of us at Rotel thank you for buying this product and hope it will bring you many hours of enjoyment.
Getting Started
Thank you for purchasing the Rotel RMB-1066 Six-Channel Power Amplifier. When used in a high-quality music or home theater system, your Rotel amplifier will provide years of musical enjoyment.
The RMB-1066 is a sophisticated six-channel power amplifier. Discrete output devices, a massive power supply with toroidal transformer, premium components, and Rotel’s Balanced Design ensure superb sound quality. High current capability allows the RMB1066 to drive difficult speaker loads with ease.
English
Operating Features
•Three pair of amplifier channels, any of which can be bridged for mono operation (back panel switchable). Possible configurations: 6, 5, 4, or 3 channel operation.
•User selectable power on/off configuration: manual, automatic signal sensing, or controlled by remote 12 volt trigger signal.
•Front panel input level controls.
•Front panel LEDs indicate Bridged Mono mode for each pair of amplifier channels.
•Protection circuitr y with front panel indicators.
•Signal link output to pass-through the input signal to another component.
A Few Precautions
Please read this manual carefully. In addition to installation and operating instructions, it provides information on various RMB-1066 system configurations. Please contact your authorized Rotel dealer for answers to any questions you might have. In addition, all of us at Rotel welcome your questions and comments.
Save the RMB-1066 shipping carton and packing material for future use. Shipping or moving the RMB-1066 in anything other than the original packing material may result in severe damage to your amplifier.
Be sure to keep the original sales receipt. It is your best record of the date of purchase, which you will need in the event warranty service is ever required.
Placement
The RMB-1066 generates heat as part of its normal operation. The heat sinks and ventilation openings in the amplifier are designed to dissipate this heat. The ventilation slots in the top cover must be unobstructed. There should be 10 cm (4 inches) of clearance around the chassis, and reasonable airflow through the installation location, to prevent the amplifier from overheating. Likewise, remember the weight of the amplifier when you select an installation location. Make sure that the shelf or cabinet can support its weight.

RMB-1066 Six Channel Power Amplifier |
6 |
AC Power and Control
AC Power Input 
The RMB-1066 is supplied with the proper AC power cord. Use only this cord or an exact equivalent. Do not use an extension cord. A heavy duty multi-tap power outlet strip may be used, but only if it is rated to handle the current demand of the RMB-1066.
Be sure the Power Switch on the front panel of the RMB-1066 is turned off. Then, plug one end of the cord into the AC power connector  on the back panel of the amplifier. Plug the other end into an appropriate AC outlet.
Your RMB-1066 is configured at the factory for the proper AC line voltage in the country where you purchased it (USA: 115 volts/60 Hz , Europe: 230 volts/50 Hz). The AC line configuration is noted on a label on the back panel.
NOTE: Should you move your RMB-1066 to another country, it is possible to configure your amplifier for use on a different line voltage. Do not attempt to perform this conversion yourself. Opening the enclosure of the RMB-1066 exposes you to dangerous voltages. Consult a qualified technician or the Rotel factory service department for information.
If you are going to be away from home for an extended period of time, it is a sensible precaution to unplug your amplifier.
Auto Turn On/Off Mode
Selector 
The RMB-1066 provides three options for manual or automatic power on/off operation. These modes are selectable using a threeposition slide switch on the back panel:
•With the switch in the OFF position, the amplifier is turned on or off manually using the front panel power switch. Use this mode if you are using a switched AC outlet to control power to the amplifier.
•With the switch in the SIGNAL SENSING position, the amplifier turns on automatically when a signal is sensed at the inputs. The amplifier will go into standby mode after five minutes with no signal. The front panel power switch overrides this function. It must be ON for the signal sensing to work. Turning the switch OFF cuts power to the amplifier, regardless of whether or not a signal is present.
•With the switch in the +12V TRIG. position, the amplifier is turned on automatically when a 12 volt trigger signal is applied to the 3.5mm Jack to the left of the switch. The amplifier will go into standby mode after 5 minutes with no signal if the +12 volt signal is not present. The front panel POWER SWITCH overrides this function. It must be ON for the +12V trigger to work. Turning the switch OFF cuts power to the amplifier, regardless of whether or not a trigger signal is present.
Power Switch and
Indicator 

The Power Switch is located on the front panel. To turn the amplifier on (or to activate either of the optional automatic power-on modes), push the switch in. The LED indicator above the switch will light, indicating that the amplifier is turned on. To turn the amplifier off, push the button again and return it to the out position.
+12V Trigger Input
and Output 
The jack labeled IN is for connecting the 3.5mm Plug/Cable carrying a +12 volt trigger signal to turn the amplifier on and off. To use this feature the adjacent slide switch must be placed to the left position (see previous section). This input accepts any control signal (AC or DC) ranging from 3 volts to 30 volts.
The jack labeled OUT is for connecting another 3.5mm plug/cable to provide a 12V trigger signal to other components. The 12V output signal is available whenever a +12 volt trigger signal is applied to the IN connector.
Protection Indicators 
Thermal and protection circuits protect the amplifier against potential damage in the event of extreme or faulty operating conditions. Unlike many designs, the RMB-1066’s protection circuit is independent of the audio signal and has no impact on sonic performance. Instead, the protection circuit monitors the temperature of the output devices and shuts down the amplifier if safe limits are exceeded.
In addition, the RMB-1066 includes overcurrent protection which operates only when load impedances drop too low. This protection is independent for each of the three pair of channels with separate front panel PROTECTION LEDS for each.
Should a faulty condition arise, the amplifier will stop playing and one or more of the PROTECTION LEDS on the front panel will light.
If this happens, turn the amplifier off, let it cool down for several minutes, and attempt to identify and correct the problem. When you turn the amplifier back on, the protection circuit will automatically reset and the PROTECTION LEDS should go out.
In most cases, the protection circuitry activates because of a fault condition such as shorted speaker wires, or inadequate ventilation leading to an overheating condition. In very rare cases, highly reactive or extremely low impedance speaker loads could cause the protection circuit to engage.

Stereo/Bridged Mono
Mode Selection
It is useful to think of the RMB-1066 as three stereo amplifiers in a single chassis. Each of the three pair of amplifier channels can be operated in Stereo or Bridged Mono mode.
•Stereo mode: Conventional 2-channel stereo operation for a pair of amplifier channels. Minimum speaker load: 4 ohms.
•Bridged Mono mode: Bridged Mono mode more than doubles the power into a single speaker. Minimum speaker load: 8 ohms.
The two modes are selected by three rear panel switches, one for each pair of channels. Stereo or Bridged Mono configuration is independent for each pair of channels. You can configure some pairs of channels in Stereo mode and others in Bridged Mono mode.
Input Select Switches 
Bridged Mono LEDs 
A rear panel switch adjacent to the inputs selects Stereo mode or Bridged Mono mode for each of the three pair of amplifier channels.
For Stereo mode: Slide the switch associated with the desired pair of amplifier channels to the right, use both LEFT and RIGHT input connectors, and connect one speaker to each pair of speaker connectors.
NOTE: For groups “B” and/or “C”, you can also place the INPUT SELECT switch in the center LINK position for Stereo mode. This routes the input signals from the “A” group to the inputs for that pair of amplifier channels.
For Bridged Mono mode: Slide the switch to the left, use only the LEFT INPUT connection, and connect only one speaker to the two outer speaker connectors. The BRIDGED MONO LED will light to indicate Bridged Mono mode.
7
Signal Connections
The RMB-1066 provides standard conventional input connections — unbalanced RCA type connections as found on nearly all audio equipment.
There is also a pair of SIGNAL OUTPUT LINK connections for passing the input signal connected to the “A” pair of channels on to another audio component. Additionally, the input signal to the “A” pair of channels can be automatically linked to the inputs for the “B” and/or “C” channels, so that a separate input signal cable is not required for those channels, for example in large systems where the RMB-1066 is being used to drive multiple pairs of speakers in stereo mode.
RCA Inputs 
See Figures 2 and 3
There are two RCA inputs for each of the three pair of amplifier channels. These RCA inputs accept audio signals from preamplifiers or surround sound processors. Use high quality audio interconnect cables for best performance.
NOTE: You can link the inputs for group “A” to groups “B” and/or “C” by placing the INPUT SELECT switch in the center LINK position. No input connection is required for that group. Placing the switch in this position leaves that pair of channels in Stereo mode.
For Bridged Mono operation, use only the LEFT INPUT for that pair of amplifier channels. Connect one output channel of your preamp to the LEFT INPUT on the RMB-1066. Make sure that the INPUT SELECT SWITCH selector switch is in the BRIDGED position.
Input Level Controls 
Three controls on the front panel, one for each pair of amplifier channels, provide input level adjustments. These allow you to adjust the gain of the amplifiers to match other components in an elaborate system.
Use a small flat blade screwdriver to turn the control clockwise to increase gain. Turn the control counterclockwise to reduce gain.
English
Signal Output Link 
This pair of RCA connections can be used to pass unprocessed input signals to another audio component, for example to “daisychain” an additional amplifier to drive a second set of speakers.
The input signals connected to the “A” inputs are always available at SIGNAL OUTPUT LINK connections. These input signals can also be linked to the “B” and/or “C” inputs by playing the INPUT SELECT switch associated with that pair of inputs in the LINK position.
Speakers
The RMB-1066 has three groups of speaker connectors, one for each pair of amplifier channels. These can be used to connect two loudspeakers in Stereo mode, or to connect one loudspeaker in Bridged Mono mode.
Speaker Selection
The nominal impedance of the loudspeaker(s) connected to the RMB-1066 in the various operating modes should be:
•Stereo mode: minimum 4 ohms
•Bridged Mono mode: minimum 8 ohms When driving multiple pairs of speakers connected in parallel to a single amplifier channel, the effective impedance the amplifier sees is cut in half. For example, when driving two 8 ohm speakers, the amplifier sees a 4 ohm load. When driving multiple speakers in parallel, select speakers with a nominal impedance of 8 ohms or higher.
Speaker Wire Selection
Use insulated two-conductor stranded wire to connect the RMB-1066 to the speakers. The size and quality of the wire can have an audible effect on the performance of the system. Standard speaker wire will work, but can result in lower output or diminished bass response, particularly over longer distances. In general, heavier wire will improve the sound. For best performance, you may want to consider special high-quality speaker cables. Your authorized Rotel dealer can help in the selection of appropriate cables for your system.

RMB-1066 Six Channel Power Amplifier |
8 |
Polarity and Phasing
The polarity – the positive/negative orientation of the connections – for every speaker and amplifier connection must be consistent so all the speakers will be in phase. If the polarity of one connection is mistakenly reversed, bass output will be very weak and stereo imaging degraded. All wire is marked so you can identify the two conductors. There may be ribs or a stripe on the insulation of one conductor. The wire may have clear insulation with different color conductors (copper and silver). There may be polarity indications printed on the insulation. Identify the positive and negative conductors and be consistent with every speaker and amplifier connection.
Speaker Connections 
See Figures 2 & 3
The RMB-1066 has two pair of color coded connections for each group of amplifier channels. Labels above the connectors show the proper connections for connecting speakers in Stereo mode. Labels below show the proper connections for Bridged Mono mode.
These speaker connectors accept bare wire, connector lugs, or “banana” type connectors (except in the European Community countries where their use is not permitted).
Route the wires from the RMB-1066 to the speakers. Give yourself enough slack so you can move the components to allow access to the speaker connectors.
If you are using banana plugs, connect them to the wires and then plug into the backs of the speaker connectors. The collars of the speaker connectors should be screwed in all the way (clockwise).
If you are using terminal lugs, connect them to the wires. If you are attaching bare wires directly to the speaker connectors, separate the wire conductors and strip back the insulation from the end of each conductor. Be careful not to cut into the wire strands. Unscrew (turn counterclockwise) the speaker connector collar. Place the connector lug around the shaft, or insert the bundled wire into the hole in the shaft. Turn the collars clockwise to clamp the connector lug or wire firmly in place.
NOTE: Be sure there are no loose wire strands that could touch adjacent wires or connectors.
In Stereo mode: Connect the left speaker to the pair of speaker connectors labeled LEFT. Connect the right speaker to the speaker connectors labeled RIGHT. Follow the labels printed above the connectors, observe correct polarity, and make sure the INPUT SELECT switch for that pair of amplifier channels is set to the STEREO position. (See Figure 2)
In Bridged Mono mode: Connect each speaker to the POSITIVE terminals of the LEFT and RIGHT speaker connections on the back of the RMB-1066. There are BRIDGED + and
– labels printed below each group of speaker terminals to assist in maintaining proper polarity.
Connect the positive terminal of the speaker to the speaker connector labeled LEFT + or BRIDGED +. Connect the negative terminal of the speaker to the speaker connector labeled RIGHT + or BRIDGED –. Observe correct polarity, and make sure the INPUT SELECT switch is set to the BRIDGED position. (See Figure 3)
Troubleshooting
Most difficulties in audio systems are the result of poor or wrong connections, or improper control settings. If you encounter problems, isolate the area of the difficulty, check the control settings, determine the cause of the fault and make the necessary changes. If you are unable to get sound from the RMB-1066, refer to the suggestions for the following conditions:
Front Panel Power Indicator
Is Not Lit
No main power to the RMB-1066. Check AC power connections at the amplifier and the AC outlet. Check the front panel power switch. Make sure that it is set to the ON position. If using signal sensing auto power-on, make sure that a signal is present at the inputs. If using 12V trigger power-on, make sure that a trigger signal is present at rear panel screw terminals.
No Sound
If the amp is getting AC power, but is producing no sound, check the PROTECTION INDICATORS on the front panel. If lit, see below. If not, check all of your connections and control settings on associated components. Make sure that your input connections and speaker connections match your selected stereo/mono configuration.
Protection Indicator Is Lit
The front panel PROTECTION INDICATORS light when the RMB-1066 protection circuits have shut off the amplifier. Typically, this occurs only when the ventilation openings are blocked, when there is faulty speaker wiring, or after a period of extreme use. Turn off the system and wait for the amp to cool. Then push the front panel power switch in and out to reset the protection devices. If the problem is not corrected or reoccurs, there is a problem with the system or the amplifier itself.
9 |
English |
Specifications
Continuous Power Output Stereo Mode |
60 watts/ch into 8 ohms |
(20-20 kHz, < 0.03% THD) |
|
Continuous Power Output Bridged Mono Mode |
150 watts/ch into 8 ohms |
(20-20 kHz, < 0.1% THD) |
|
Total Harmonic Distortion |
< 0.03% |
(20Hz-20kHz, 8 ohms) |
|
Intermodulation Distortion |
< 0.03% |
(60 Hz : 7 kHz, 4:1) |
|
Frequency Response (± 1 dB) |
15Hz–100kHz |
Damping Factor (20-20,000 Hz, 8 ohms) |
150 |
Speaker Impedance (combined load) |
|
Stereo mode: |
4 ohms minimum |
Bridged Mono mode: |
8 ohms minimum |
Signal to Noise Ratio (IHF A network) |
116 dB |
Input Impedance |
22 k ohms |
Input Sensitivity |
1.5 volt |
Auto Turn On Threshold Level (if activated) |
10 mV input signal |
Auto Turn Off Delay Time (if activated) |
5 minutes with no signal |
Power Requirements |
|
USA: |
115 Volts, 60 Hz |
Europe: |
230 Volts, 50 Hz |
Power Consumption |
700 Watts |
Dimensions (W x H x D) |
430 x 121 x 435 mm |
|
1615/16 x 43/4 x 171/8 in |
Weight (net) |
13.5 kg, 29.75 lb. |
All specifications are accurate at the time of printing. |
|
Rotel reserves the right to make improvements without notice. |
|
RMB-1066 Amplificateur de Puissance Six Canaux
ATTENTION : Il n’y a à l’intérieur aucune pièce susceptible d’être modifiée par l’utilisateur. Adressezvous impérativement à une personne qualifiée.
ATTENTION :Prenez garde à ce qu’aucun objet ou liquide ne tombe à l’intérieur de l’appareil par ses orifices de ventilation ; Si l’appareil est exposé à l’humidité ou si un objet tombe à l’intérieur, couper immédiatement l’alimentation secteur de tous les appareils. Débrancher l’appareil des autres maillons, et adressez-vous immédiatement et uniquement à une personne qualifiée et agréée.
Tous les conseils de sécurité et d’installation doivent être lus avant de faire fonctionner l’appareil. Conservez soigneusement ce livret — Vous devez pouvoir le consulter à nouveau pour de futures références.
Tous les conseils de sécurité doivent être soigneusement respectés. Suivez les instructions — Respectez les procédures d’installation et de fonctionnement indiquées dans ce manuel.
L’appareil doit être nettoyé uniquement avec un chiffon sec ou un aspirateur.
L’appareil doit être placé de telle manière que sa propre ventilation puisse fonctionner. Laissez un espace d’au moins 10 cl tout autour de son coffret. Il ne doit pas être posé sur un fauteuil, un canapé, une couverture ou toute autre surface susceptible de boucher ses ouïes d’aération ; ou placé dans un meuble empêchant la bonne circulation d’air autour des orifices d’aération.
Cet appareil doit être placé loin de toute source de chaleur, tels que radiateurs, chaudières, bouches de chaleur ou d’autres appareils produisant de la chaleur.
Cet appareil doit être branché sur une prise d’alimentation secteur, d’une tension et d’un type conformes à ceux qui sont indiqués sur la face arrière de l’appareil.
Brancher l’appareil uniquement grâce au cordon secteur fourni, ou à un modèle équivalent. Ne pas tenter de modifier ou changer la prise. Notamment, ne pas tenter de supprimer la prise de terre si celle-ci est présente. Ne pas utiliser de cordon rallonge.
Prendre garde à ce que ce cordon d’alimentation ne soit pas pincé, écrasé ou détérioré sur tout son trajet, à ce qu’il ne soit pas mis en contact avec une source de chaleur. Vérifier soigneusement la bonne qualité des contacts, à l’arrière de l’appareil comme dans la prise murale.
Si l’appareil ne doit pas être utilisé pendant une longue période, la prise secteur sera débranchée.
Service après vente — L’appareil doit être immédiatement éteint, débranché puis éventuellement retourné au service après-vente agréé dans les cas suivants :
•Le cordon secteur ou la prise ont été endommagés.
•Un objet est tombé, ou du liquide a coulé à l’intérieur de l’appareil.
•L’appareil a été exposé à la pluie.
•L’appareil ne fonctionne pas normalement, ou ses performances sont anormalement limitées.
•L’appareil est tombé, ou le coffret est endommagé.
Placer l’appareil sur une surface plane, solide et rigide. Ne jamais placer l’appareil sur une surface ou un support mobile pouvant basculer.
10
Sommaire |
|
Figure 1: Commandes et branchements |
3 |
Figure 2: Branchements stéréo |
4 |
Figure 3: Branchements en mode ponté (bridgé) 4 |
|
Au sujet de Rotel ................................. |
11 |
Pour démarrer ..................................... |
11 |
Caractéristiques de fonctionnement |
11 |
Quelques précautions ........................... |
11 |
Installation |
11 |
Alimentation secteur et mise |
|
sous tension ........................................ |
11 |
Prise d’alimentation secteur |
11 |
Interrupteur de mise sous tension |
|
et indicateur |
12 |
Sélecteur de mode de mise sous |
|
tension ON/OFF |
12 |
Entrée et sortie Trigger 12 volts |
12 |
Indicateurs de protection |
12 |
Sélection de mode de fonctionnement |
|
Stéréo/Ponté (bridgé) ......................... |
12 |
Commutateurs de sélection d’entrée |
|
Diodes d’indication de mode |
|
ponté (bridgé) |
12 |
Branchements des signaux en entrée .... |
13 |
Entrées RCA |
13 |
Contrôles du niveau d’entrée |
13 |
Renvoi de signal de sortie |
13 |
Enceintes acoustiques .......................... |
13 |
Choix des enceintes |
13 |
Choix de la section du câble d’enceintes |
14 |
Polarité et mise en phase |
14 |
Branchement des enceintes |
14 |
Problèmes de fonctionnement ............... |
14 |
L’indicateur Power de mise sous tension |
|
ne s’allume pas |
14 |
Pas de son |
14 |
Diode de protection allumée |
14 |
Spécifications ...................................... |
15 |
Au sujet de Rotel
C’est une famille de passionnés de musique qui a fondé Rotel, il y a maintenant plus de quarante ans. Pendant toutes ces années, leur passion ne s’est jamais émoussée et tous les membres de la famille se sont toujours battus pour fabriquer des appareils présentant un exceptionnel rapport musicalité-prix, suivis en cela par tous les employés.
Les ingénieurs travaillent toujours en équipe réduite, écoutant et peaufinant soigneusement chaque appareil pour qu’il corresponde parfaitement à leurs standards musicaux. Ils sont libres de choisir n’importe quels composants dans le monde entier, uniquement en fonction de leur qualité. C’est ainsi que vous trouvez dans les appareils Rotel des condensateurs britanniques ou allemands, des transistors japonais ou américains, tandis que tous les transformateurs toriques sont directement fabriqués dans une usine Rotel.
L’excellente réputation musicale des appareils Rotel a été saluée par la plupart des magazines spécialisés ; ils ont reçu d’innombrables récompenses, et sont choisis par de nombreux journalistes critiques du monde entier, parmi les plus célèbres, ceux qui écoutent de la musique quotidiennement. Leurs commentaires restent immuables : Rotel propose toujours des maillons à la fois musicaux, fiables et abordables.
Mais plus que tout, Rotel vous remercie pour l’achat de cet appareil, et souhaite qu’il vous apporte de nombreuses heures de plaisir musical.
Pour démarrer
Merci d’avoir acheté cet amplificateur de puissance six canaux Rotel RMB-1066. Il a été spécialement conçu pour contribuer à des heures et des heures de plaisir musical, que vous l’utilisiez dans une chaîne haute fidélité ou au sein d’un système Home Cinema.
11
Le RMB-1066 est un amplificateur de puissance six canaux particulièrement sophistiqué. Des composants de sortie indépendants de type discrets, une très grosse alimentation équipée de transformateurs toriques et de composants de premier choix, ainsi que le principe de conception Rotel “ Balanced Design ” garantissent des performances sonores remarquables. Sa très haute capacité en courant permet au RMB-1066 d’alimenter les enceintes acoustiques les plus difficiles.
Caractéristiques de fonctionnement
• Trois paires de canaux d’amplification, chaque paire pouvant être pontée (bridgée) en monophonie (sélecteur en face arrière).
Configurations ainsi rendues possibles : 6, 5, 4 ou trois canaux simultanément.
• Configuration de mise sous tension “ on/ off ” sélectionnée par l’utilisateur : manuelle, automatique, par réception d’un signal à
l’entrée, ou contrôlée par l’envoi d’une Alimentation secteur et tension de commutation “ trigger ” 12 volts.
mise sous tension
Prise d’alimentation secteur 
Le RMB-1066 est livré avec son propre câble d’alimentation secteur. N’utilisez que ce câble, ou sont équivalent exactement semblable. N’utilisez pas de câble rallonge. Une prise ou barrette multiple peut être utilisée, mais uniquement si elle est capable de supporter l’ampérage demandé par le RMB-1066.
Assurez-vous que l’interrupteur de mise sous tension Power Switch, en face avant, est bien en position “ éteint ” (OFF). Branchez alors le cordon secteur en face arrière sur la prise repérée POWER CONNECTOR  , puis l’autre extrémité dans la prise murale d’alimentation.
Votre RMB-1066 a été configuré en usine pour la tension d’alimentation secteur du pays pour lequel il est prévu (115 volts/60 Hz ou 230 volts/50 Hz). Cette valeur est indiquée sur une étiquette, en face arrière.

RMB-1066 Amplificateur de Puissance Six Canaux |
12 |
NOTE :si vous devez déménager dans un autre pays, il est possible de modifier l’alimentation du RMB-1066. Ne tentez pas d’effectuer cette transformation vousmême. Elle nécessite une intervention interne présentant des risques d’électrocution si certaines précautions ne sont pas respectées Consultez directement un revendeur agréé Rotel pour connaître la procédure à suivre.
Si vous vous absentez pendant une longue période (un mois ou plus), nous vous conseillons de débrancher la prise murale d’alimentation.
Interrupteur de mise sous tension et indicateur 

L’interrupteur de mise sous tension power Switch se trouve sur la face avant. Il suffit d’appuyer dessus pour mettre l’amplificateur sous tension (ou pour rendre actives une des options de mise en marche automatique). La diode placée juste au-dessus s’allume alors. Une nouvelle pression sur l’interrupteur éteint l’appareil.
Sélecteur de mode de mise sous tension ON/OFF 
Cet amplificateur vous propose trois options différentes pour sa mise sous tension, manuelle ou automatique. Ces options sont choisies à partir d’un sélecteur à trois positions, placé en face arrière de l’appareil :
•Avec le sélecteur en position repérée
“ OFF ”, l’amplificateur est mis sous ou hors tension manuellement, via sa touche Power en face avant. Vous utiliserez aussi ce mode si le câble secteur de l’amplificateur est branché sur une prise commutée, déclenchée déjà par un autre maillon.
•Lorsque le sélecteur est placé sur sa position repérée “ SIGNAL SENSING ” (capteur de signal), l’amplificateur s’allume automatiquement lorsqu’il détecte un signal sur tout ou partie de ses entrées modulation. Il se remet en mode de veille Standby si aucun signal n’est détecté au bout de cinq minutes. L’interrupteur Power de la face avant doit être déjà pressé (mode ON) pour que cette détection de signal fonctionne. Sinon, l’amplificateur reste éteint en présence ou non d’un signal sur ses entrées.
• Lorsque le sélecteur est placé sur la posi- |
Dans la plupart des cas, la mise en service |
|
tion repérée “ + |
12V TRIG. ”, l’amplificateur |
de la protection est due à un court-circuit dans |
s’allume automatiquement lorsqu’une ten- |
les câbles des enceintes acoustiques, ou à |
|
sion de 12 volts est envoyée sur sa prise |
cause d’un mauvais respect de la ventilation |
|
jack 3,5 mm placée à gauche du sélecteur. |
correcte de l’amplificateur. Dans de très rares |
|
Il se remet en mode de veille Standby dès |
cas, la charge à très faible impédance ou très |
|
que cette tension disparaît sur la prise. |
réactive de certaines enceintes acoustiques |
|
L’interrupteur Power en face avant est placé |
peut entraîner la mise en service de la pro- |
|
avant ce sélecteur |
: il doit être pressé pour |
tection. |
que la commutation TRIGGER 12 V soit effective et efficace. Couper l’alimentation avec cet interrupteur éteint l’amplificateur, qu’il y ait ou non une tension de 12 volts sur la prise TRIGGER.
Entrée et sortie Trigger 12 volts
La prise jack 3,5 mm r epérée IN est prévue pour transporter la tension de 12 volts nécessaire au fonctionnement de la commutation TRIGGER que nous venons de décrire. Pour être efficace, le sélecteur doit être sur sa position la plus à gauche (voir paragraphe précédent). Cette entrée accepte en fait une tension continue ou alternative, d’une valeur comprise entre 3 et 30 volts.
La prise repérée OUT permet de brancher une autre prise jack 3,5 mm pour renvoyer la
tension de commutation 12 |
volts vers un au- |
tre appareil. La tension 12 |
volts n’est toutefois |
présente que si la prise IN est réellement alimentée par une telle tension.
Indicateurs de protection 
Le RMB-1066 possède des circuits de protection électrique et thermique internes, qui le protègent contre tout dommage éventuel dû à des conditions de fonctionnement anormales ou extrêmes. Contrairement à la majorité des autres amplificateurs de puissance, ce circuit est totalement indépendant du trajet du signal audio, et n’a donc aucune influence sur les performances musicales. Ce circuit contrôle aussi en permanence la température des étages de sortie, et coupe automatiquement l’amplificateur si celle-ci dépasse une valeur normale.
De plus, le RMB-1066 intègre une protection contre les surcharges qui se met en service si l’impédance de charge en sortie devient trop basse. Cette protection est indépendante pour chaque paire de canaux, d’où la présence de plusieurs diodes en façade, repérées PROTECTION.
• Mode stéréo : fonctionnement traditionnel sur deux canaux d’amplification. Impédance minimum de chaque enceinte acoustique : 4 ohms.
• Mode mono ponté (bridgé) : ce mode ponté présente l’avantage de doubler la puissance fournie, mais ce sur un seul canal monophonique. Impédance minimum de chaque enceinte acoustique : 8 ohms.
Le mode de fonctionnement désiré, pour chaque paire de canaux, est sélectionné sur la face arrière par des commutateurs. N’oubliez pas que le fonctionnement en monophonie est indépendant pour chaque paire de canaux. Vous pouvez donc configurer certaines paires en stéréo, et d’autres en mono.
Commutateurs de sélection d’entrée  Diodes d’indication de mode ponté (bridgé)
Un sélecteur, placé près des entrées signal correspondantes, permet de choisir entre le mode de fonctionnement monophonique et le mode de fonctionnement stéréophonique pour chacune des trois paires d’entrées.
 Loading...