


Owner’s Manual Manuel de l’utilisateur Bedienungsanleitung Manual de Instrucciones Manuale di istruzioni Gebruiksaanwijzing Instruktionsbok
Инструкция пользователя
RT-12
Digital Gateway Passerelle Numérique
Digital Gateway/Multimedialer Tuner Portal Digital
Digital Gateway
Digitale Internetradio en FM/DAB-tuner Digital Gateway
Цифровой шлюз
|
RT-12 DIGITAL GATEWAY |
2 |
This symbol means that this unit is double insulated. An earth connection is not required.
RT-12
-
DAB
Rotel products are designed to comply with international directives on the Restriction of Hazardous Substances (RoHS) in electrical and electronic equipment and the disposal of Waste Electrical and Electronic Equipment (WEEE). The crossed wheelie bin symbol indicates compliance and that the products must be appropriately recycled or processed in accordance with these directives.
English |
|
3 |
Notice
The rear mini USB connection should be handled by authorized persons only.
FCC Information
This equipment has been tested and found to comply with the limits for a Class B digital device, pursuant to Part 15 of the FCC Rules. These limits are designed to provide reasonable protection against harmful interference in a residential installation. This equipment generates, uses and can radiate radio frequency energy and, if not installed and used in accordance with the instruction, may cause harmful interference to radio communications.
However, there is no guarantee that interference will not occur in a particular installation. If this equipment does cause harmful interference to radio or television reception, which can be determined by turning the equipment off and on, the user is encouraged to try to correct the interference by one or more of the following measures:
•Reorient or relocate the receiving antenna.(TV, radio, etc.)
•Increase the separation between the equipment and receiver
•Connect the equipment to an outlet on circuit different from that to which the receiver is connected.
•Consult the dealer or an experienced radio/TV technician for additional help.
Caution
This device complies with part 15 of the FCC Rules. Operation is subject to the following to conditions:
(1) This device may not cause harmful interference, and (2) this device must accept any interference received, including interference that may cause undesired operation.
NOTE TO CATV SYSTEM INSTALLER: Call the CATV system or antenna installer’s attention to Article 820-40 of the NEC. This provides guidelines for proper grounding and, in particular , specifies that the cable ground shall be connected to the grounding system of the building, as close to the point of cable entry as practical. See installation diagram.
NOTE: This equipment has been tested and found to comply with the limits for a Class B digital device, pursuant to Part 15 of the FCC Rules. These limits are designed to provide reasonable protection against interference in a residential installation. This equipment generates and can radiate radio frequency energy and, if not installed and used in accordance with the instructions, may cause interference to radio or TV communications. There is no guarantee that interference will not occur in a particular installation. If this equipment does cause interference to radio or television reception, which can be determined by turning the equipment off and on, try to correct the interference by one or more of the following measures:
•Reorient or relocate the receiving antenna.
•Increase the separation between the unit and the television tuner.
•Connect the unit to an AC power outlet on a different electrical circuit.
•Consult your authorized Rotel retailer for assistance.
Important Safety Instructions
WARNING: There are no user serviceable parts inside. Refer all servicing to qualified service personnel.
WARNING: To reduce the risk of fire or electric shock, do not expose the unit to moisture or water. Do not expose the unit to dripping or splashing. Do not place objects filled with liquids, such as vases, on the unit. Do not allow foreign objects to get into the enclosure. If the unit is exposed to moisture, or a foreign object gets into the enclosure, immediately disconnect the power cord from the wall. Take the unit to a qualified service person for inspection and necessary repairs.
Read all the instructions before connecting or operating the component. Keep this manual so you can refer to these safety instructions.
Heed all warnings and safety information in these instructions and on the product itself. Follow all operating instructions.
Clean the enclosure only with a dry cloth or a vacuum cleaner. Do not use this unit near water.
You must allow a minimum 10 cm or 4 inches of unobstructed clearance around the unit.
Do not place the unit on a bed, sofa, rug, or similar surface that could block the ventilation openings. If the unit is placed in a bookcase or cabinet, there must be ventilation of the cabinet to allow proper cooling.
Keep the component away from radiators, heat registers, stoves, or any other appliance that produces heat.
WARNING: The rear panel power
cord connector is the mains power
disconnect device. The apparatus must
be located in an open area that allows
access to the cord connector.
The unit must be connected to a power supply only of the type and voltage specified on the
rear panel. (USA: 120 V/60Hz, EC: 230V/50Hz)
Connect the component to the power outlet only with the supplied power supply cable or an exact equivalent. Do not modify the supplied cable. A polarized plug has two blades, with one wider than the other. A grounding plug has two blades plus a third grounding prong. These are provided for your safety. Do not defeat grounding and/or polarization safety provisions. If the supplied plug does not fit your outlet, please consult an electrician for replacement of the obsolete outlet. Do not use extension cords.
The main plug of the power cord set is a disconnect device of the apparatus. In order to completely disconnect the apparatus from the supply mains, the main plug of the power cord set should be unplugged from the mains (AC) outlet. The stand-by LED indicator will not be lit up to show the power cord is unplugged. The disconnect device shall remain readily operable.
Do not route the power cord where it will be crushed, pinched, bent, exposed to heat, or damaged in any way. Pay particular attention to the power cord at the plug and where the cord exits the back of the unit.
The power cord should be unplugged from the wall outlet during a lightning storm or if the unit is to be left unused for a long period of time.
Use only accessories specified by the manufacturer.
Use only with a cart, stand, rack, bracket or shelf system recommended by Rotel. Use
caution when moving the unit in a stand or rack to avoid injury from a tip-over.
Immediately stop using the component and have it inspected and/or serviced by a qualified service agency if:
•The power supply cord or plug has been damaged
•Objects have fallen or liquid has been spilled into the unit
•The unit has been exposed to rain
•The unit shows signs of improper operation
•The unit has been dropped or damaged in any way
The batteries in remote control shall not be exposed to excessive heat such as sunshine, fire or the like.
4
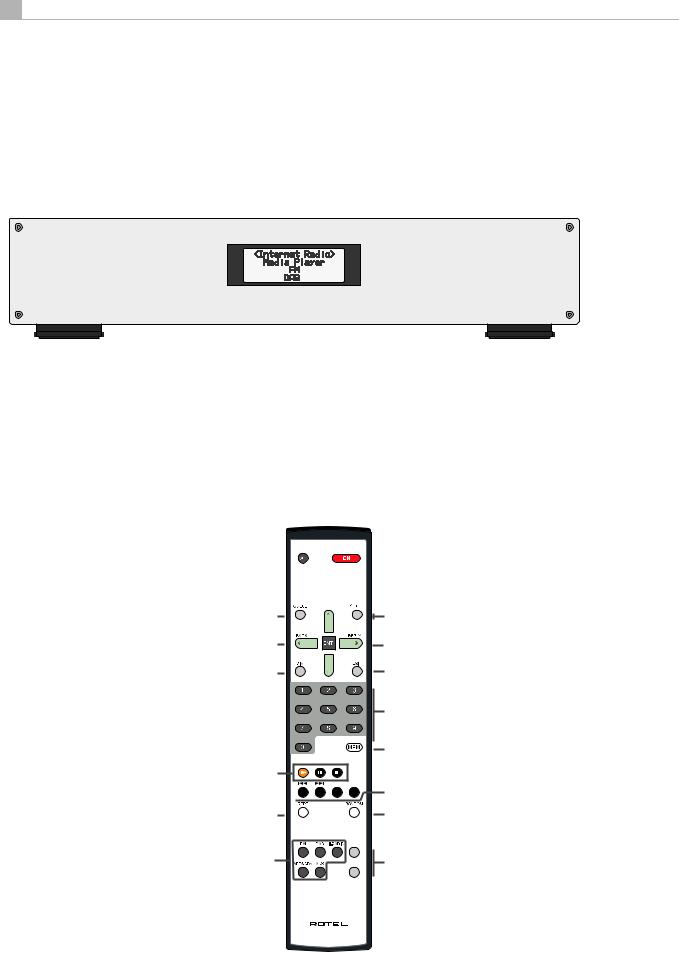
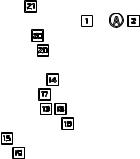
Figure 1: Controls and Connections
Commandes et Branchements
Bedienelemente und Anschlüsse
Controles y Conexiones
Controlli e connessioni
De bedieningsorganen, de aansluitingen en de afstandsbediening
Kontroller och anslutningar
Органы управления и разъемы
1 |
2 |
|
5 |
8 |
9 0 - |
||
|
RT-12 |
|
|
|
|
|
|
|
1 |
2 |
3 |
|
QUEUE |
BACK |
REPLY |
|
POWER |
|
|
|
|
|
|
|
4 |
5 |
6 |
|
PLAY |
STOP |
PAUSE |
|
7 |
8 |
9 |
|
SKIP - |
|
SKIP + |
0 MEMORY
NETWORK AUX FM DAB i-RADIO
PUSH SELECT
3 4 |
6 |
Q |
7 |
= |
W E R T Y U I O
 A
A
B |
TUNE+ |
C |
|
||
D |
ENT |
E |
|
|
|
F |
TUNE- |
G |
|
|
H |
|
|
I |
J |
- PRESET + |
|
|
K |
|
L |
|
M |
|
RDS |
|
N |
MONO |
O |
RR-T97
English |
|
5 |
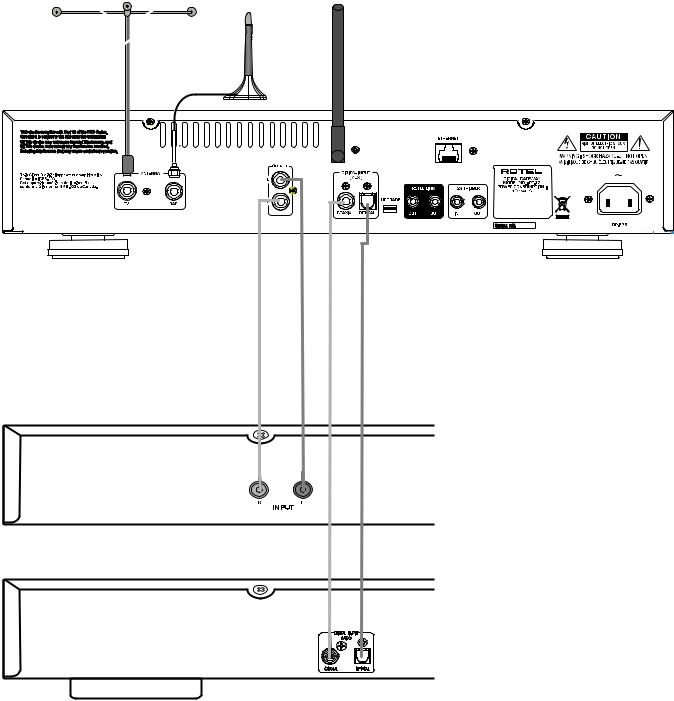
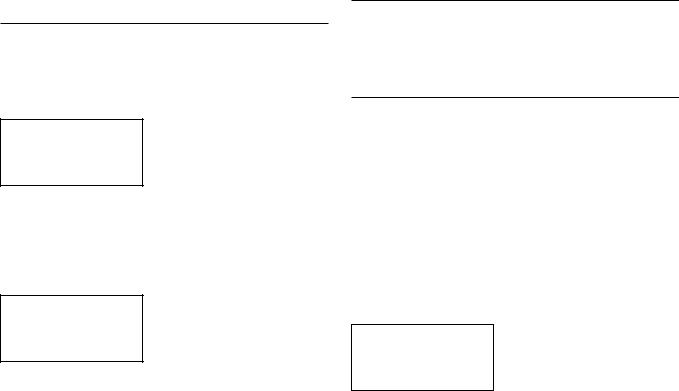
Figure 2: Hook-up Illustration
Principaux Branchements
Anschlussdiagramm
Ilustración de las Conexiones
Schema di collegamento
De inen uitgangsaansluitingen
Inkoppling
Схема подключения
PRE AMPLIFIER
DIGITAL AUDIO DEVICE

|
RT-12 DIGITAL GATEWAY |
6 |
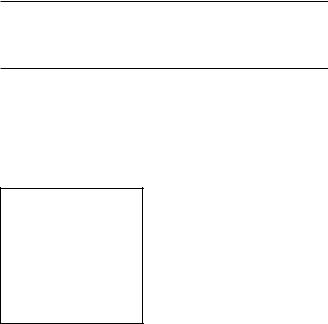
Figure 3: Rotel-Link Hook up (Black) and 12V Trigger (Gray)
Connexions Rotel-Link (Noir) et Trigger 12 V (Gris)
Anschlussdiagramm für Rotel-Link (schwarz) und 12V-Trigger (grau)
Conexión del Rotel-Link (Negro) y el Disparador de Señal de 12V (Gris)
Collegamenti Rotel Link (Nero) e Trigger 12V (Grigio)
De doorverbindingen (zwart). De +12V. triggeraansluitingen (grijs)
Rotel-Link-anslutning (svart) och 12 V-anslutning för styrsignal (grå)
Подключение интерфейса Rotel-Link (черный) и 12-В триггерного сигнала – Trigger (серый)
Digital Gateway RT-12
Ampli er RA-12
CD Player RCD-12
English |
|
7 |
Important Notes
When making connections be sure to:
4Turn off all the components in the system before hooking up any components, including loudspeakers.
4Turn off all components in the system before changing any of the connections to the system.
It is also recommended that you:
4 Turn the volume control of the amplifier all the way down before the amplifier is turned on or off.
Remarques importantes
Pendant les branchements, assurez-vous que :
4Tous les maillons sont éteints avant leur branchement, quels qu’ils soient, y compris les enceintes acoustiques.
4Éteignez tous les maillons avant de modifier quoi que ce soit au niveau de leurs branchements, quels qu’ils soient.
Il est également recommandé de :
4 Toujours baissez le niveau sonore via le contrôle de volume, avant d’allumer ou d’éteindre l’amplificateur.
Wichtige Hinweise
Achten Sie beim Herstellen der Verbindungen auf Folgendes:
4Schalten Sie alle Komponenten im System ab, bevor Sie Geräte (einschließlich Lautsprecher) anschließen.
4Schalten Sie alle Komponenten im System ab, bevor Sie Anschlüsse im System verändern.
Ferner empfehlen wir, dass
4 Sie die Lautstärke herunterdrehen, bevor Sie den Verstärker ein- oder abschalten.
Notas Importantes
Cuando realice las conexiones, asegúrese de que:
4Desactiva todos los componentes del equipo, cajas acústicas incluidas, antes de conectar cualquier nuevo componente en el mismo.
4Desactiva todos los componentes del equipo antes de cambiar cualquier conexión del mismo.
También le recomendamos que:
4 Reduzca el nivel de volumen de su amplificador a cero antes de activarlo o desactivarlo.
Note importanti
Quando si effettuano i collegamenti, assicurarsi di:
4Spegnere tutti i componenti del sistema prima di collegare qualsiasi componente, inclusi i diffusori.
4Spegnere tutti i componenti del sistema prima di modificare qualsiasi connessione dell’impianto.
Si raccomanda inoltre di:
4 Portare il volume a zero prima di accendere o spegnere l’amplificatore.
Héél belangrijk:
Bij het maken van de verbindingen:
4Zorg dat de gehele installatie uitstaat, als nog niet alle verbindingen gemaakt zijn.
4Zorg dat de gehele installatie ook uitstaat, als u verbindingen gaat wijzigen.
Wij raden u ook aan om
4 de volumeregelaar van de (voor)versterker geheel dicht te draaien (volkomen naar links) wanneer u uw eindversterker aanof uitzet.
Viktigt
Tänk på följande när du gör anslutningar:
4Stäng av alla apparater i anläggningen innan du ansluter nya komponenter eller högtalare.
4Stäng av alla apparater i anläggningen innan du ändrar någon anslutning.
Vi rekommenderar också att du:
4 Vrider ner volymen helt och hållet innan förstärkaren slås på eller av.
Важные замечания
Перед подсоединением обязательно:
4Отключите все компоненты в системе перед подсоединением любых компонентов, включая акустические системы.
4Отключите все компоненты в системе перед изменением любых соединений в системе.
Также рекомендуем вам:
4 Уменьшить громкость усилителя до минимума перед включением и выключением.
|
RT-12 DIGITAL GATEWAY |
8 |
Contents
Important Safety Instructions. . . . . . . . . . . . . . . . . . . . |
3 |
|
Figure 1: Controls and Connections |
4 |
|
Figure 2: |
Hook-up Illustration |
5 |
Figure 3: |
Rotel-Link Hook up (Black) and 12V Trigger (Gray) |
6 |
About Rotel. . . . . . . . . . . . . . . . . . . . . . . . . . |
. 8 |
|
Overview – the Rotel internet radio tuners/digital gateway products.. . . . . 9
DAB and FM radio |
9 |
||
Internet radio |
9 |
||
Network access |
9 |
||
The Rotelradio website – managing your stations |
9 |
||
Playback from network servers |
9 |
||
Getting Started. . . . . . . . . . . . . . . . . . . . . . . . . 10 |
|||
Features |
10 |
||
A Few Precautions |
10 |
||
Placement |
10 |
||
AC Power and Control . . . . . . . . . . . . . . . . . . . . . . |
10 |
||
AC Power Input o |
10 |
||
Power Switch and Indicator Light |
1 |
A2 |
10 |
12V Trigger Input i |
10 |
||
12V Trigger Output i |
10 |
||
Connection Overview. . . . . . . . . . . . . . . . . . . . . . . 10 |
|||
DAB/FM Broadcasting w |
10 |
||
DIGITAL INPUT-AUX t |
11 |
||
Network Connection qr |
11 |
||
UPGRADE USB mini socket y |
11 |
||
OUTPUT e |
11 |
||
ROTEL LINK u |
11 |
||
Internet Radio. . . . . . . . . . . . . . . . . . . . . . . . . |
11 |
||
What you need before starting |
11 |
||
First Time Connection To The Network |
11 |
||
Selecting A Radio Station |
12 |
||
Internet Radio Station Playing |
12 |
||
Storing a radio station in a preset |
12 |
||
Playing a preset radio station |
12 |
||
Media Player. . . . . . . . . . . . . . . . . . . . . . . . . . |
13 |
||
UPnP Servers |
13 |
||
Clear Queue |
13 |
||
Playback Mode |
14 |
||
FM RADIO. . . . . . . . . . . . . . . . . . . . . . . . . . . |
14 |
||
FM Radio Station Playing |
14 |
||
Storing a radio station in a preset |
14 |
||
Playing a preset radio station |
14 |
||
FM Settings Menu |
14 |
||
RDS Button O |
15 |
||
MONO Button O |
15 |
||
DAB RADIO. . . . . . . . . . . . . . . . . . . . . . . . . . |
15 |
||
DAB Radio Station Playing |
15 |
||
Storing a DAB station in a preset |
15 |
||
Playing a preset DAB station |
15 |
||
DAB Settings Menu |
15 |
||
Scan for Networks |
16 |
||
Wired/Wireless |
16 |
||
Configure “My Stuff”. . . . . . . . . . . . . . . . . . . . . . . . . . . . . . . . . . . . . . . . . . . . |
16 |
||
Configure “My Stations”. . . . . . . . . . . . . . . . . . . . . |
17 |
||
Configure “My Streams”. . . . . . . . . . . . . . . . . . . . . |
17 |
||
Remote Unit Advanced Buttons. . . . . . . . . . . . . . . . . . . |
17 |
||
Troubleshooting. . . . . . . . . . . . . . . . . . . . . . . . . 18 |
|||
Specifications . . . . . . . . . . . . . . . . . . . . . . . . . |
18 |
||
About Rotel
Our story began over 50 years ago. Over the decades, we have received hundreds of awards for our products and satisfied hundreds of thousands of people who take their entertainment seriouslylike you!
Rotel was founded by a family whose passionate interest in music led them to manufacture high-fidelity components of uncompromising quality. Through the years, that passion has remained undiminished and the family goal of providing exceptional value for audiophiles and music lovers, regardless of their budget, is shared by all Rotel employees.
Rotel’s engineers work as a close team, listening to, and fine tuning, each new product until it reaches their exacting musical standards. They are free to choose components from around the world in order to make that product the best they can. You are likely to find capacitors from the United Kingdom and Germany, semiconductors from Japan or the United States, while toroidal power transformers are manufactured in Rotel’s own factory.
We all have concerns about our environment. And, as more and more electronics are produced and later discarded, it is especially important for a manufacturer to do all it can to engineer products that have a minimum negative impact on landfill sites and water tables.
At Rotel, we are proud to do our part. We have reduced the lead content in our electronics by using special RoHS solder, while our new Class D (not digital) amplifiers are up to five times more efficient than our legacy designs and still deliver power and performance. These products run cool, give minimum wasted energy, are good for the environment and give better sound too.
Finally, we have printed this brochure on recycled paper stock.
While we understand that these are small first steps, they are still important ones. And we continue to pursue new methods and materials for a cleaner and greener manufacturing process.
All of us at Rotel thank you for buying this product. We are sure it will bring you many years of enjoyment.

English |
|
9 |
Overview – the Rotel internet radio tuners/ digital gateway products.
This Rotel product brings together conventional radio reception facilities for FM and DAB+, plus from the world of computers the ability to access literally thousands of radio stations available on the internet. In addition to this, this new range of Rotel tuners/digital gateways offers the facility to interface with your music files stored on a network server.
Note: The internet radio and network server features will not operate without a local area network.
These notes expand on the detailed instructions later in this manual.
DAB and FM radio
This is the most conventional part of the product and if you have previous experience of tuning, memorizing and selecting radio stations from the present DAB+ and FM radio services you will be familiar with the way the tuner is operated to receive these services. All of this is explained under the relevant sections. Keep in mind to select the antenna (aerial) input socket to use, find this option in the set-up menu. This does not obviate the need to install correctly designed antenna (aerials) to maximise reception on FM and DAB+ services.
Internet radio
Using internet radio requires the use of two additional services – access to the internet via a computer network and once this works a feed via one of the internet-based services which allows access to internet radio stations. This latter requirement is built into the tuner; we will deal with access to your network first.
Network access
The installation of computer networks are beyond the scope of these notes, so we assume that you have a working LAN or Wi-Fi network in your home.
At start-up, the unit looks for Wi-Fi networks, and once the search has been completed you will find one or more listed networks listed in the display to choose from. You need to select the network name which applies to your installation. This will have been assigned when your network was installed and is often pre-allocated by the router central to your network.
The next requirement is to enable your tuner to ‘log-on’ to your network and you allow this by entering the wireless ‘WEP key’ (or WPA, WPA2 key) appropriate to your network. It is likely that you will have used the key code when setting up a computer to log onto your network and it is often contained in the instructions for your router. This is a first-time only setting, so just carefully scroll though the alpha-numeric characters selecting the correct upper or lower case characters to create your WEP key. When completed, scroll through to and select END or press the REPLY key on the front panel or remote, to complete the process.
You can use the UP and DOWN keys of the remote to help you enter this information. Do not confuse the letter ‘O’ with the numeral ‘0’.
When successfully logged on to your network, the tuner will automatically log in to the website where you to be able to select the area of the world that interests you and choose radio stations by country, genre and name.
Registering the radio at www.rotelradio.com will allow you to search for and save internet radio stations, as well as set up other music services when available for your region.
The Rotelradio website – managing your stations
Managing the thousands of radio stations available via the internet would be impossible without being able to organise and manage stations to suit your particular needs. Rotel have provided an easy way to accomplish this by means of a dedicated website where you can pre-select stations.
The URL for this site is http://rotelradio.com.
Like many websites you will need to register a user name and password in order to create an account on the site. Before you can do so, you will need to register the product on the site and there is a special registration key in the Rotel which you will need to copy to the website registration form. This registration key will be found under the settings>register menu. You need to be connected to the internet to access this one time only key.
After registration, the website will show the radio serial number of your Rotel unit. This is different from the serial number of your Rotel unit. The radio serial number can be found in the menu of the Rotel unit under Settings --> Version.
Note that to update the display of the Rotel to indicate your choices, you will need to power-cycle and re-select ‘internet radio’. Your new list of ‘My Stuff’ will be updated automatically.
Playback from network servers
Music playback from computers configured as music servers provides another opportunity to link replay via the Rotel unit and thus make use of the audiophile decoding stages designed into these products.
As with internet radio, a prerequisite is a working network, plus the music server connected to it. A server will have been configured to share files and two methods of achieving this with appropriate software are shown under ‘Media Player’ section later in this manual.

|
RT-12 DIGITAL GATEWAY |
10 |
Getting Started
Thank you for purchasing the Rotel Digital Gateway. When used in a high-quality music or home theater system, your Rotel Digital Gateway will provide years of musical enjoyment.
Features
•Wireless or wired connection to access internet radio and premium stations.
•Access UPnP PCs and music with ‘Media Player’ Mode.
•Listen to DAB+, FM broadcasting station.
•Serve as the gateway for the Rotel-Link feature to control other components in the system.
A Few Precautions
Please read this manual carefully. In addition to basic installation and operating instructions, it provides valuable information on various system configurations as well as general information that will help you get the optimum performance from your system. Please contact your authorized Rotel dealer for answers to any questions you might have. In addition, all of us at Rotel welcome your questions and comments
Save the shipping carton and all enclosed packing material for future use. Shipping or moving the unit in anything other than the original packing material may result in severe damage to your unit and void the warranty.
Fill out and send in the owner’s registration card packed with the unit. Also be sure to keep the original sales receipt. It is your best record of the date of purchase, which you will need in the event warranty service is ever required.
Placement
Place the unit on a solid, level surface away from sunlight, heat, moisture, or vibration.
Don’t stack other components or objects on top of the unit. Don’t let any liquid fall into the unit.
Note the weight and size of the unit. If placing the unit on a shelf, cabinet or rack, make sure the full weight of the unit can be supported.
The unit generates heat during normal operation. Do not block ventilation openings. Allow a minimum of 10 cm or 4 inches of unobstructed space around the unit. If installed in a cabinet, make sure that there is adequate ventilation.
AC Power and Control
AC Power Input o
Your unit is configured at the factory for the proper AC line voltage in the country where you purchased it (USA: 120 volts/60 Hz, Europe: 230 volts/50 Hz). The AC line configuration is noted on a label on the back panel.
The unit is supplied with the proper AC power cord. Use only this cord or an exact equivalent. Do not modify the supplied cord. Do not use an extension cord.
Be sure the power switch on the front panel is turned off. Then, plug one end of the cord into the AC power connector on the back panel of the unit. Plug the other end into an appropriate AC outlet.
If you are going to be away from home for an extended period of time, it is a sensible precaution to unplug your digital gateway.
Note: Some products are intended for sale in more than one country and as such are included with more than one AC cord. Please use only the one appropriate for your country/region.
Power Switch and Indicator Light 1


 A2
A2
The power switch is located on the left side of the front panel. To turn the unit ON (or to activate the automatic power-on modes), push the switch in.
The indicator light above the switch will light, indicating that the unit is turned on. To turn the unit off, push the button again and return it to the out position.
12V Trigger Input i
An input jack for connecting the wires carrying a +12 volt trigger signal from a Rotel preamp or surround sound processor to turn the unit on and off.
The TRIGGER INPUT accepts any control signal (AC or DC) ranging from 3 volts to 30 volts. Use a cable with mono 3.5 mm mini-plugs on both ends. The +12V DC signal appears at the “tip” connector.
12V Trigger Output i
The 12V TRIG jack labeled OUT is used to pass the remote turn-on signal to another Rotel unit. Any 12V Trigger signal at the INPUT jack will be passed through to the OUT jack.
Connection Overview
Before continuing further to other sections in the manual, please make sure all the cable connections are made properly. Refer to figure 2.
DAB/FM Broadcasting w
Please use the supplied indoor antenna to connect the DAB and FM connector on the rear panel. To receive the best FM signal, make sure there is enough room for the T-shaped indoor antenna to fully extend. Eyelets at both ends of the T allow tacking the antenna to a wall if desired. Experiment with different positions to maximize reception.
English |
|
|
|
11 |
|
DIGITAL INPUT-AUX t |
Internet Radio |
|
The unit can receive digital music signal from other sources and convert |
What you need before starting |
|
them to analog signals then output to a pre-amplifier or processor connected |
||
through OUTPUT ejacks. There are two connector on the AUX Digital |
Before you can use your Internet radio, you need the following: |
|
Input area on the rear panel, labeled with coaxial and optical. Connect |
|
|
the coaxial or optical output of your source to the coaxial or optical |
• A broadband Internet connection. |
|
input of the unit. |
|
|
Network Connection qr |
• Access point to internet through wired or wireless LAN. |
|
|
|
|
This unit can connect to a wired or wireless network. If using a wired network, connect your internet cable to the socket marked ETHERNET q. If using a wireless network, please connect the WiFi antenna (supplied) to the connector marked WiFi r.
UPGRADE USB mini socket y
The software of this unit can be updated through this socket, if upgrades become necessary.
With wireless LAN connection, internet radio should work within 100 metres of the wireless access point, subject to the router/Wi-Fi gateway being placed in the optimum area for your location. The user can confirm the WiFi Strength under the settings menu. (Settings-->WiFi Strength)
Make sure that your LAN is connected properly and is able to access the internet. To access internet radio stations an internet connection is required.
OUTPUT e
The unit outputs a stereo analog signal. Use the supplied audio cable to connect it with input jacks of your pre-amplifier or processor. Be careful and make sure that connections correspond to each other. Right channel output must be connected to right channel of preamplifier’s or processor’s right channel and vice versa.
ROTEL LINK u
These 2 Rotel Link Out connections can be made with the stereo 3.5 mm cable (supplied) to a Rotel integrated amplifier and CD player. These connections link the Digital Gateway, Amplifier and CD player into one IP controllable system via the Rotel Remote application. See Figure 3.
First Time Connection To The Network
When you turn on the unit for the first time, it starts by searching for LAN connections. If both wired and wireless connections are present, the wired connection will be the default, unless a “wireless only” selection was made in the setup menu. The following example illustrates a wireless connection.
... ...Starting |
|
SCANNING NETWORK.. ... |
|
|
|
|
|
|
After a few seconds, it will start to scan for networks.
If no wireless network is found, it will display no network found.
NO NETWORK FOUND
When the unit finds your network, it will display the ESSID for the access point on the screen – this is a name that is allocated to the access point by the person who set up the network – for example:
< MY NETWORK >
It is possible, and in some locations highly likely, that your unit will find more than one wireless access point if using wireless connection, in which case you can choose which one you want to connect to. Turn the knob on the panel to see the ESSID for each access point the radio has found.
If the screen displays “Enter WEP key” or “Enter WPA key” then the network is using one of the encryption systems, Wired Equivalent Privacy (WEP) or Wi-Fi Protected Access (WPA). Please obtain the access code from the person who set up your wireless network, or check the user manual of your router for this information. Input the code into the Rotel unit to gain access to the wireless LAN.
Note: If you would like to use a static IP address, or if the unit can not automatically get an IP address, then please see the ‘Network config’ section under the ‘Settings’ section at the end of the manual.
|
RT-12 DIGITAL GATEWAY |
12 |
Selecting A Radio Station
Once a network is found and the network connections made, The toplevel menu will be displayed, please select “Internet Radio”, the display will show as
< |
Internet Radio |
> |
|
< |
Location |
> |
|
My Stuff |
|
|
|
Genre |
|
|
Media Player |
|
|
|
Search |
|
|
Setting |
|
|
|
|
|
|
|
|
|
|
|
|
Now you can select internet radio stations to listen to by turning and pushing the PUSH-SELECT knob = on the front panel or using the navigation keys on the remote control.
<LOCATION> enables you to choose radio stations provided in the specific area and countries:
|
Africa |
|
|
< |
XXX1 LIVE RADIO |
> |
< |
America |
> |
|
|
XXX2 LIVE RADIO |
|
|
Asia |
|
|
|
XXX3 LIVE RADIO |
|
|
Caribbean |
|
|
|
XXX4 LIVE RADIO |
|
|
|
|
|
|||
1. Turn the PUSH-SELECT knob |
|
= until the display shows the area and |
||||
country you want to search in, then press on the knob. |
|
|||||
2.Turn the knob until the display highlights the desired station. Push knob to select.
3.Wait until the unit connects to that station.
<GENRE> enables you to choose radio stations according to their content, for example Classic Rock, Sport, News, etc.
|
80S |
|
|
|
XXX1 LIVE RADIO |
|
< |
90S |
> |
|
< |
XXX2 LIVE RADIO |
> |
|
Adult |
|
|
|
XXX3 LIVE RADIO |
|
|
Adult contemporary |
|
|
|
XXX4 LIVE RADIO |
|
|
|
|
|
|
|
|
1.Turn the PUSH-SELECT knob =until the display highlights the type of content desired, then press the knob to select.
2.Turn the knob to highlight the station desired, then press knob to select.
3.Wait until the radio connects to that station.
<SEARCH> enables you to search for a specified type of radio with a short keyword.
Station Name |
|
xxx ART |
xx Radio1 |
END <> A BCDEFGHIJKLNO |
|
x ARTxx |
xx Radio2 |
ART |
|
ARTxxxx xx Radio3 |
|
|
|
|
|
|
|
|
|
Note: Internet Radio stations and other music services can be easily set up at www.rotelradio.com
Internet Radio Station Playing
After connecting to a station, the display will display station name, type of audio file and bit rate.
BBC RADIO |
|
BBC RADIO |
BUFFERING xx% |
|
|
|
|
xxx kbPs WMA XX:XX |
|
|
|
Storing a radio station in a preset
While a radio station is playing, hold down the memory button 4I, then press the number preset to assign from numeric pad 3H, the display will show
BBC RADIO |
|
Assign to Preset |
xxx kbit WMA |
|
# |
M Preset # |
|
|
|
|
|
Store this current radio station into the preset number, and you can store up to 30 preset radio stations for Internet Radio.
Playing a preset radio station
While a radio station is playing, you can switch to other preset stations as below:
1.From the numeric pad 3H, press the number button of the preset number for desired station. Or.
2.Press QUEUE 9Bbutton to call out preset number and corresponding station, turn the knob to choose the station, then press the knob to select it. The display will show as
01preset radio 1
02preset radio 2
>03 preset radio 3
04preset radio 4
Press QUEUE button again to exit the queue menu and back to playing status.
Note: You can review stored radio stations by using the Queue feature. This will help you avoid accidently overwriting a preset.
1.Turn the PUSH-SELECT knob =until the display moves to the character to input, then press the knob to select.
2.Repeat step 1 to input the complete keyword. Select “END” to confirm the keyword or push the REPLY -E key.
3.Press the knob to enable searching. The display will show stations which match the keyword.
4.Turn the knob to highlight the desired station, press knob to select and connect to that station.

English |
|
13 |
Media Player
The Media Player feature allows you to play audio files (AAC, AIFF, AU, FLAC, MP3,WAV and WMA (except lossless)) and playlists (M3U) created by your computer’s Media Player, such as Window Media Player 11 or 12. It has been verified to work on Windows 2000, Windows XP, Windows Vista and Windows 7.
Note: File sharing may need to be enabled on your computer, and not all Media Players will allow sharing of music files. Please refer to your computer’s manual for instructions.
UPnP Servers
Setting up UPnP Server in PC
1. Use Windows Media Player 11(or 12 if you use Windows 7)to setup the PC as an UPnP Sever, click the ‘Library’ tab from Windows Media Player 11 and select ‘Media Sharing’ to open the ‘Media Sharing’ window to set the option.
2. Your PC will now prompt you that a device has attempted to connect to your UPnP server. Please click Allow button.
Note: As of this writing, Windows Media Player 11 does not support AAC decoding used by Apple as the default selection in iTunes. We recommend that you change the default import setting to WAV, AIFF, or MP3 formats for maximum compatibility across many devices.
You can set Windows Media Player to mirror your iTunes folders. Windows Media Player 12 (for Windows 7) does support AAC.
3. Go into ‘Media Player’ menu, and select ‘UPnP Servers’ sub menu by turning and pressing the PUSH-SELECT knob =. The unit will scan for all available UPnP servers. It will display ‘[Empty]’ if no UPnP servers are found.
|
Internet Radio |
|
|
< UPnP Servers |
> |
|
My Stuff |
|
|
Playback Mode |
|
< |
Media Player |
> |
|
Queue |
|
|
Settings |
|
|
|
|
|
|
|
|
|
|
Play media fles using UPnP Server.
1.After a successful scan, select your UPnP server by rotating the knob if there is more than one UPnP server, highlight, then press the knob to select the desired server.
2.RT-12 will list the options or folders available. This varies depending on the setup of your music server, and version of software you are using. It will typically show Music, Playlists options and [Search] as per examples below. Enter “Music”, and it will show the different options to find your tracks, sorted by Artists, Albums, Genre etc..
< |
Music |
> |
|
<All music |
> |
|
Playlists |
|
|
All Artists |
|
|
[Search] |
|
|
Album Artists |
|
|
|
|
|
Genre |
|
|
|
|
|
|
|
3. Once the desired track is found, push the knob to select. The selected track will be displayed on the menu as the unit attempts to connect to the music server. Before play starts, the track title, type of file, bit rate will be shown. When play starts, elapsed time will be displayed instead of file type.
“Track Title” |
|
“Track Title” |
317kbps WMA |
|
01:12 317kpbs |
07:49 |
|
07:49 |
|
|
|
4. You can select more tracks or folders while the current track is still playing by going to the desired track and pressing the ENT button on the remote or the PUSH-SELECT knob =for 5 seconds. The selected track(s) will be added to QUEUE and will be played in the order selected. Push QUEUE 9B button to call up the tracks waiting to be played.
Clear Queue
You can clear QUEUE by pressing the QUEUE button and selecting [Clear Queue] or by going into QUEUE menu from the Media Player submenu.
|
UPnP Servers |
|
|
< [Clear Queue] > |
|
Playback Mode |
|
|
|
< |
Queue |
> |
|
|
|
|
|
|
|
You can also clear individual tracks in QUEUE by selecting the track and press STOP 8J button for 5 seconds.

|
RT-12 DIGITAL GATEWAY |
14 |
Playback Mode
|
UPnP Servers |
|
|
< |
Repeat |
* > |
< |
Playback Mode |
> |
|
|
Shuffle |
|
|
Queue |
|
|
|
|
|
|
|
|
|
|
|
|
Turn the knob to select sub-menu ‘Media Player’ -->‘Playback Mode’, there are 2 sub-menus, “Repeat” and “Shuffle”. Select either Repeat, Shuffle or both. A mark will indicate the selection made
REPEAT: Tracks are played one after another and will start from the first track again when the last track is finished.
SHUFFLE: Plays tracks in random.
Note: If both REPEAT and SHUFFLE are on, The unit will first play the list in random, after all tracks are played one time, it will continue to play the list in random until STOP is pressed
Note: Using shuffle feature with large music libraries may not be possible or may take an excessively long time. We recommend that you create shorter playlists in Windows Media Player and then shuffle these.
FM RADIO
Before listening to FM radio, make sure that the FM antenna have been properly connected.
FM Radio Station Playing
1. Select FM Button from the source buttons 6N. The display will show as below
95.25MHz [No RadioText]
2.Turn the PUSH-SELECT knob = to change the frequency of radio station. Turning it up or down one step at a time changes the frequency one step. Turning it faster and the unit will scan for stations.
3.Use the UP/DOWN keys on the remote to manually search for FM stations.
4.Press and hold the UP/DOWN keys on the remote to auto scan for FM stations.
Storing a radio station in a preset
While a radio station is playing, push the memory button 4I, then press the number of preset assigned from numeric pad 3H, the display will show preset saved. Up to 30 preset FM radio stations may be stored.
Playing a preset radio station
When a radio station is playing, you can switch to a preset station in one of the following ways.
1.From the numeric pad 3H, press preset number of the desired station.
2.Press SKIP +/- 7 button on the front panel or PRESET +/- K to call out preset numbers and corresponding station. Turn the knob to choose the desired station, then press the knob to select it. Press FM 6Nbutton again to exit the preset menu and back to playing status.
3.Press the FM 6N button. This toggles between the following 3 selections
1.Display FM station currently tuned to.
2.Display Preset Menu.
3.Display FM settings Menu
Toggle to the Preset Menu and scroll through all the presets with the PUSH-SELECT = knob. Press the PUSH-SELECT = key to select.
From the remote, use the +/- PRESET K keys to select a PRESET and press the ENT key to select.
FM Settings Menu
Press the FM 6N button and toggle to the FM settings Menu. There are 3 sub-menu under FM setting
1.Scan Settings - Select between ALL STATION or Strong Stations Only.
2.Audio Settings - Allow Stereo or Forced Mono
3.System - Select Factory default and shows the current software.
To make changes in the FM settings menu, turn the knob = on the front panel or the UP/DOWN keys on the remote. To make a change press the knob = on the front panel. From the remote control, press the ENT key.
RDS Broadcast Reception
This Rotel unit is equipped with RDS (Radio Data Systems) reception capabilities. The RDS broadcast system provide additional functionality to FM radio reception by transmitting encoded information along with the radio signal. This signal is decoded by an RDS receiver and can provide a range of informational features including:
1.A display of the station’s identifying name (e.g. BBC1)
2.A display of the station’s program content (e.g. ROCK or NEWS).
3.Traffic information broadcasts.
4.A scrolling text display for announcements or information.
5.Current time and date.
RDS broadcasting has been widely available in many European markets for years. There are a large number of RDS stations and most users will be familiar with the features and operation.

English |
|
15 |
Note: The RDS features are entirely dependent on the broadcaster sending properly encoded signals. Thus, they will only be available in markets where RDS is currently implemented and where stations are broadcasting these data signals.
Storing a DAB station in a preset
While a DAB station is playing, hold down the memory button 4I, then press the number of preset assigned from numeric pad 3H. Up to 30 preset DAB radio stations may be stored.
RDS Button O
The RDS button on the remote control can step through the various displays. Press the RDS button on the remote to step through the following displays.
1.Radio Text
2.PTY, or the type of content.
3.Name of station.
4.Stereo or Mono station.
5.Current time.
6.Today’s date.
MONO Button O
The MONO button on the remote control changes the FM mode from stereo reception to mono reception. In stereo mode, a stereo signal will be heard if the station is broadcasting a stereo signal and there is sufficient signal strength.
Note: Switching to mono mode can be a useful way to improve the reception of weak or distant FM signals. Less signal strength is required for clean mono reception than for stereo reception.
DAB RADIO
Make sure that your local area can receive Digital Audio Broadcast (DAB) broadcasting signal.
Press the DAB 6 button on the front of the panel, or remote N.
DAB channels are categorized into ensembles, which are also known as multiplexes. Each multiplex provides a number of stations and each service contains a primary service that can contain secondary services. DAB technology allow broadcasters to transmit additional data along with the audio, which can include other audio channels, text and even images and computer data in the future.
DAB Radio Station Playing
1. Select DAB Button from the front panel and the unit will scan for available stations. After scanning you will see the following menu.
DAB <Station list>
Playing a preset DAB station
When a DAB station is playing, you can switch to a preset station in one of the following ways.
1.From the numeric pad 3H, press preset number of the desired station.
2.Press SKIP +/- 7 button on the front panel or PRESET +/- K on the remote to call out preset numbers and corresponding station. Turn the knob to choose the desired station, then press the knob to select, or press the ENT key on the remote.
DAB Settings Menu
Press the DAB 6N on the front panel or remote to toggle to the DAB settings Menu. There are 6 sub-menus. Turn the knob on the front panel or use the UP/DOWN keys on the remote to go through each sub-menu.
1.<Station List>, shows station list.
2.<Full Scan> Start a full range scan by pressing the ENT key.
3.<Manual Scan> Press ENT and select stations manually by using the Up/Down keys.
4.<DRC> Dynamic Range Control Select between “off”, “high” and “low”. Press ENT and select Up/Down keys to change.
5.<Prune> Select between “Yes” or “No”. The Prune setting allows you to remove stations that are not active or can not be received.
6.<System>, Select the Factory Default and show Software Version.
Push the PUSH-SELECT knob = to see available stations.
|
RT-12 DIGITAL GATEWAY |
16 |
NETWORK SETTINGS
Network Confg
This section covers the setup procedue for wired or wireless LAN in more detail.
Push the Network 6N button to enter the main menu as shown below.
< |
Internet Radio |
> |
|
|
My Stuff |
|
|
|
Media Player |
|
|
|
Settings |
|
|
|
|
|
|
|
|
|
|
Note: If you are unable to return to the above menu automatically after entering Network mode, push the BACK 0D button to get to the above menu.
Scan for Networks
From the main menu, select the Settings option then select Network Config. Then select Scan for Networks option.(only available in wireless setup)
. Once the network is found, the display will show the network ID. Turn the knob to select, push to confirm.
< Scan for networks > Enter network name View Config
Edit Config
Enter network name ( only for wireless connection)
If the unit can not find any networks, the network ESSID can be entered manually .
Use the knob to keep selecting letters of the device name by turning and pressing, and select “END” word to confirm the name
Network Name
< END <> A BCDEFGHIJK >
NAME1
View Confg
Show current network configuration details. Turn the knob to see next/ previous page of “Mode”-->”ESSID”-->”MAC Address”--> “IP Address” -->”Netmask”-->”Gateway”-->”DNS Servers”. Display as below:
|
|
|
|
|
|
|
< |
Mode |
> |
|
< |
ESSID |
> |
|
Auto DHCP |
|
|
|
XXXXXX |
|
|
|
|
|
|
|
|
|
|
|
|
|
|
|
Edit Confg
This menu can be used to edit the current network configuration. This menu is useful for entering a static IP address. Select this function with the knob and enter the static IP address, MAC address, DNS of the selected network.
To enter the value, press knob, then rotate the knob to adjust the value up or down. Press again to enter the value and move on to the next field. Continue until all information has been entered.
Signal Warning ( only for wireless connection)
Select YES or NO to enable or disable warning of low Wi-Fi signal.
Wired/Wireless
Select Auto (defaults to wired if both are connected), Wired only, or Wireless only.
Version
This menu displays software and hardware information of the unit.
Upgrade Firmware
Use this option to download new firmware for the internet radio. If new firmware is available, there will be a prompt to download.
Note: At this stage, you can press the BACK button to cancel the firmware upgrade. A firmware upgrade may take several minutes, do not switch off the power to the unit or put it into standby until the operation is complete, otherwise, the unit may become permanently damaged. Upgrading can take 15 to 60 mins, depending on the speed of your internet connection.
Register
This will display a key that can be used to register the unit on the Rotel Radio Customer portal: www.rotelradio.com
Set Time/Date
Set you local time and date. Push knob to start entering value, rotate knob to change value. Press again to confirm value entered and move on to the next field.
UPnP
Use this setting to set any UPnP device name. This is the name that your music server will pickup in Media Player mode. Use the knob to keep selecting letters of the device name by turning and pressing, and select “END” word to confirm the name, or simply press the REPLY key.
DEVICE NAME
< END <> A BCDEFGHIJ >
DEVICE
WiFi Strength
Shows a percentage to indicate the WiFi strength.
Confgure “My Stuff”
Register an account on http://rotelradio.com website
A personalized menu “My Stuff” can be setup in the top level menu.
Open the website, http://rotelradio.com, from your internet browser. Please enter the registration key, this can be found in ‘Settings > Register’ menu. Enter this registration key into the website and follow the instructions to setup an user name and password. Remember the user name and password, you will need this to access the site.
English |
|
17 |
After logging into your account, you will be able to edit your information for ‘My Stations’, ‘My Streams’, ‘My Podcast’ and ‘My Radios’.
Follow the instructions on the website to personalize your menu.
Confgure “My Stations”
There are an enormous choice of stations that are available in the database from the website. Please follow instructions on the website to search for stations. When search results are displayed, there will be a link to ‘Add to my stations’, Click on this and the station selected will be added to My Stations. A new top level menu ‘My Stuff’ will appear on the display, with a sub-menu ‘My Stations’.
After the initial registration, you can add to ‘My stations’ while connected to a radio station by pressing the REPLY key. The display will ask if you want to add selection to ‘My stations’ press the push select knob to add selection.
Confgure “My Streams”
While logged into your website account, you can add your own internet radio streams to the ‘My Streams’ section which will be listed under ‘My Account’.
Click on ‘My Streams’, a prompt will appear to enter the station’s name and its media stream URL. The media stream URL should be a link to the website’s actual audio stream. .
Note: ‘My Stuff’ menu and stations under ‘My Stations’,’My Streams’ will appear after the unit has updated the stations list. Please power OFF then ON and enter ‘Internet Radio’ from the top level menu for the unit to update the stations list.
Remote Unit Advanced Buttons
Setup menu
To enter the setup menu, press the SETUP Cbutton on the remote control and you will see the following display:
< 1 POWER OPTION |
> |
2DIMMER
3FACTORY DEFAULT
4VERSION
5ANTENNA SELECT
6SIPORT UPGRADE
7DISPLAY CONTRAST
8EXIT
1.POWER OPTION, select between NORMAL or QUICK. In NORMAL mode, the network connection is turned OFF when the unit is in STANDBY. This consumes less power in STANDBY mode. Setting this to QUICK leaves the network connection active during STANDBY mode. Use QUICK mode if you are controlling the unit using the IP Remote control through
the Rotel Link u sockets.
2.DIMMER controls the brightness of the front panel display, it can be dimmed with seven steps. You can access this control directly with the DIM button on the remote control.
3.FACTORY DEFAULT sets the unit into the original state as when it left the factory. Presets and network configurations will be lost, and sets the remote code to 1 (see below).
4.VERSION shows this unit’s software version.
5.ANTENNA SELECT choose AUTO(default), FM or DAB antenna.
6.SIPORT UPGRADE is used to upgrade the software that controls the FM and DAB features of this unit. This should not be used by the end user.
7.DISPLAY CONTRAST can be used to adjust the contrast on the front panel display. Step through the vaious steps with the LEFT/RIGHT buttons on the remote and find the one that best suits you.
8.EXIT, exits the setup menu. Or push the SETUP C button on the remote at anytime to EXIT.
Second Amplifer Code
The factory setting is remote code 1. If you find that the remote is conflicting with other Rotel amplifiers, you can change to remote code 2 with the following steps:
1.While pointing the remote at the unit, press on the remote control ‘FM’ N, release, then immediately press ‘2’Hand continue to press the ‘2’ key for 5 seconds. The unit will show ‘Audio Custom Code 1--> 2’. The unit is now changed to Audio remote code 2.
2.You must now change the remote to output code 2. To do this ,press ‘FM’ N and ‘2’H at the same time, then release both keys.
3.Repeat the above procedure and press ‘1’ key instead of ‘2’ to change the unit back to Code 1.
Second CD Code
The factory setting is CD code 1, but the transport buttons J(play, stop pause) used in Network mode may conflict with other Rotel CD players in your system. You can change the CD codes by following the steps below.
1.While pointing the remote at the unit, press on the remote control ‘NETWORK’ N, release, then immediately press ‘2’Hand continue to press the ‘2’ key for 5 seconds. The unit will show ‘CD Custom Code 1--> 2’. The unit is now changed to CD remote code 2.
2.You must now change the remote to output code 2. To do this ,press ‘NETWORK’ N and ‘2’H at the same time, then release both keys.
3.Repeat the above procedure and press ‘1’ key instead of ‘2’ to change the unit back to Code 1.
|
RT-12 DIGITAL GATEWAY |
18 |
Troubleshooting
Most difficulties in audio systems are the result of incorrect connections, or improper control settings. If you encounter problems, isolate the area of the difficulty, check the control settings, determine the cause of the fault and make the necessary changes. If you are unable to get sound, refer to the suggestions for the following conditions:
Power Indicator Is Not Lit
The power Indicator should be lit whenever the unit is plugged into the wall power outlet and is pushed in. If it does not light, test the power outlet with another electrical device, such as a lamp. Be sure the power outlet being used is not controlled by a switch that has been turned off.
Network Does Not Work
If you have trouble connecting to your wireless network, check your network setting carefully, these steps may help to resolve the problem.
1.Confirm that a Wi-Fi network works, ie, PC can access the Internet using the same network.
2.Check that a DHCP server is available, or that you have configured a static IP address on the unit. Please refer to Network Config section.
3.Check that your network’s firewall is not blocking any outgoing ports.
4.Do a hard power off (unplug the AC mains) and let the unit restart the network scanning cycle.
5.If using Wi-Fi connection, make sure the placement of your unit allows it to receive the Wi-Fi signal.
No Sound
1.Check the cables between the output and the pre-amplifier inputs, be sure they are connected properly. Refer to Fig. 2.
2.Music played from Internet Radio stations are affected by the speed of your internet connection. If you find that music is cutting out regularly, contact your internet service provider.
3.Make sure the station you selected is operating at the current hour. The station can be broadcasting from a different time zone.
4.Make sure you select the correct type of internet connection either wired or wireless.
Specifcations
FM Tuner
Usable Sensitivity |
22.2dBf |
50dB Quieting Sensitivity |
27.2dBf(mono) |
Signal to Noise Ration (at 65 dBf) |
63 dBf (mono) |
|
60 dBf (stereo) |
Harmonic Distortion (at 65 dBf) |
0.2% (mono) |
|
0.3% (stereo) |
Frequency Response |
10 Hz-15kHz, ±3dB |
Stereo Separation |
|
(100Hz/1kHz/10kHz) |
40dB/45dB/35dB |
Output level |
1.0V |
Antenna Input |
75 ohms unbalanced |
DAB Tuner
Sensitivity |
-80dBm |
Tuning Range |
Band III |
|
(174-240MHz) |
Audio Data Rate |
224Kbps (Max) |
Frequency Response |
20 - 20KHz +/- 1.0dB |
Analog Output |
2.1V at 0dBFS |
Antenna Input |
75 ohms F connector |
General |
|
Network connection |
802.11b/g |
Security |
WEP, WPA1 (TKIP) |
|
WPA2 (TKIP) |
File formats (UPnP Music Server) |
AAC, MP3, |
|
WMA (except lossless) |
|
OGG vorbis, WAV, AIFF,FLAC, |
|
and AU. |
Power Consumption |
16 watts |
Standby Power Consumption(normal mode) |
0.5 watts |
Power Requirements (AC) |
120V, 60Hz(USA) |
|
230V, 50Hz(Europe) |
Weight |
5.1 kgs (11.24 lbs) |
Dimensions (W x H x D) |
430 x 93 x 330 mm |
|
(17 x 35/8 x 13 in) |
Front panel height |
80 mm, 31/8 |
All specifications are accurate at the time of printing.
Rotel reserves the right to make improvements without notice
Rotel and the Rotel Hifi logo are registered trademarks of The Rotel Co., Ltd. Tokyo, Japan.
English |
|
19 |
Glossary
Bit rate – Speed of data transfer – how many bits of information are sent each second.
Buffering – data downloading and being assembled before playback.
Codec – [Coder/Decoder] software capable of encoding and/or decoding a digital data stream or signal.
Data Encryption – the encryption of data for security purposes. For wireless networks this is normally WEP and WPA.
DHCP [Dynamic Host Control Protocol] – A protocol for assigning IP addresses to devices on a network.
DNS Server – A remote server that provides the translation of web addresses into the corresponding numeric IP addresses.
ESSID – [Extended Service Set Identifier] The ESSID is a unique identifier for your wireless network.
Ethernet – Network technology for local area networks. Cat5 cable carries information between computers at a rate of 10/100/1000 megabits per second.
File format – The type of file e.g. a music file in the format of .mp3.
File Server – A computer or device that provides workstations on a network with controlled access to shared files.
Firmware – embedded software in a device that provides the devices with operational instructions.
Gateway –The access point from LAN to WAN.
Internet – a computer network consisting of a worldwide network of computer networks.
IP Address – is a numerical label that is assigned to devices in a computer network.
ISP – Internet service provide.
Kbps – Short for kilobits per second, a measure of data transfer speed.
LAN – [Local Area Network] a local computer network for communication between computers.
MAC – [Media Access Control] is a unique identifier assigned to network adapters or network interface cards by the manufacturer for identifcation.
Modem – [Modulator/Demodulator] device used to connect computers by a telephone line.
Network – A system of interconnected electronic components or computers.
Network adapter – A hardware device, installed inside computers that connect computer devices together to create a network.
Podcast – An audio file delivered via an RSS feed over the Internet to a subscriber.
Router – A device that joins multiple networks or computers together.
RSS feed – [Really Simply Syndication feed] used to publish content on the web which people can then subscribe to and receive updates.
Server – A computer that provides client computers with access to files and printers as shared resources on a computer network.
Subnet mask – A method of splitting IP networks into subgroups.
UPnP – [Universal Plug and Play] a method of auto configuration used in devices such as PCs, peripherals, wireless devices and intelligent appliances.
URL – [Uniform Resource Locator] the format of the address for a particular page of a website.
USB – [Universal Serial Bus] Connection commonly used with computer peripherals.
WAN – [Wide Area Network] computer network that spans a wider area than a local area network e.g. the Internet.
WEP – [Wired Equivalent Privacy] a wireless security protocol to prevent access to the network by “intruders” using similar wireless LAN equipment and capture of wireless LAN traffic through eavesdropping.
WPA – [WiFi Protected Access] a wireless security protocol that replaced the weaker WEP.
WiFi – [Wireless Fidelity] – a radio frequency standard that is used to connect devices, such as computers and iPods, together using a wireless connection.
|
RT-12 Passerelle Numérique |
20 |
ATTENTION :
RISQUE D’ÉLECTROCUTION.
NE PAS OUVRIR
ATTENTION : POUR RÉDUIRE LE RISQUE D’ÉLECTROCUTION, NE PAS RETIRER LE CAPOT. IL N’Y A À L’INTÉRIEUR AUCUNE PIÈCE SUSCEPTIBLE D'ÊTRE MODIFIÉE PAR L’UTILISATEUR. EN CAS DE PROBLÈME, ADRESSEZ-VOUS À UN RÉPARATEUR AGRÉÉ.
L’éclair dans un triangle équilatéral indique la présence interne de tensions électriques élevées susceptibles de présenter des risques graves d’électrocution.
Le point d’exclamation dans un triangle équilatéral indique à l’utilisateur la présence de conseils et d’informations importantes dans le manuel d’utilisation accompagnant l’appareil. Leur lecture est impérative.
Tous les appareils Rotel sont conçus en totale conformité avec les directives internationales concernant les restrictions d’utilisation de substances dangereuses (RoHS) pour l’environnement, dans les équipements électriques et électroniques, ainsi que pour le recyclage des matériaux utilisés (WEEE, pour Waste Electrical and Electronic Equipment). Le symbole du conteneur à ordures barré par une croix indique la compatibilité avec ces directives, et le fait que les appareils peuvent être correctement recyclés ou traités dans le respect total de ces normes.
Ce symbole signifie que cet appareil bénéficie d’une double isolation électrique. Le branchement d’une mise à la masse ou à la terre n’est pas nécessaire.
RT-12
-
DAB
Français |
|
21 |
Remarque
La prise arrière mini-USB ne concerne que des techniciens agréés uniquement.
Information FCC
Cet appareil a été testé afn de vérifer sa conformité avec les normes minima des appareils numériques de classe B, suivant l’article 15 des normes FCC. Ces normes garantissent une protection suffsante contre les interférences, dans le cadre d’une utilisation domestique. Cet appareil génère, utilise et peut rayonner des fréquences radio et peut, s’il n’est pas utilisé selon les conseils prodigués dans ce manuel d’utilisation, causer des interférences avec les communications radio.
Il n’y a cependant aucune garantie que ces interférences n’interviennent dans certaines installations. Si vous notez la présence de parasites sur la radio ou la télévision (détectées par la mise sous et hors tension de l’appareil), vous pouvez essayer d’éliminer ces interférences en essayant une des procédures suivantes :
Remarques importantes concernant la sécurité
ATTENTION : Il n’y a à l’intérieur aucune pièce susceptible d’être modifiée par l’utilisateur. Adressezvous impérativement à une personne qualifiée.
ATTENTION : Pour réduire tout risque d’électrisation ou d’incendie, ne pas exposer l’appareil à une source humide, ou à tout type de risque d’éclaboussure ou de renversement de liquide. Ne pas poser dessus d’objet contenant un liquide, comme un verre, un vase, etc. Prenez garde à ce qu’aucun objet ou liquide ne tombe à l’intérieur de l’appareil par ses orifices de ventilation. Si l’appareil est exposé à l’humidité ou si un objet tombe à l’intérieur, débranchez-le immédiatement de son alimentation secteur, et adressez-vous immédiatement et uniquement à une personne qualifiée et agréée.
Tous les conseils de sécurité et d’installation doivent être lus avant de faire fonctionner l’appareil. Conservez soigneusement ce livret pour le consulter à nouveau pour de futures références.
Tous les conseils de sécurité doivent être soigneusement respectés. Suivez les instructions. Respectez les procédures d’installation et de fonctionnement indiquées dans ce manuel.
L’appareil doit être nettoyé uniquement avec un chiffon sec ou un aspirateur.
•Réorientez ou déplacez l’antenne de réception (TV, radio, etc.)
•Augmentez l’éloignement physique entre le récepteur en cause et l’appareil.
•Branchez les autres maillons sur une prise secteur différente de celle sur laquelle est branché le récepteur.
•Consultez votre revendeur, ou un technicien spécialiste de ces questions de réception radio/TV.
Attention
Cet appareil répond aux normes de l’article 15 de la FCC sous les conditions suivantes : 1) Cet appareil ne doit pas causer d’interférence très sensible. 2) Cet appareil doit pouvoir accepter n’importe quelle interférence externe, y compris celles dues à une utilisation fortuite.
NOTE AUX INSTALLATEURS D’UNE ANTENNE CATV : L’installation d’un système CATV doit être faite par un technicien qualifé, selon les normes de l’article 820-40 de la NEC. La mise à la terre, notamment, doit être correctement effectuée, reliée au système de mise à la terre de l’immeuble, le plus près possible du point d’entrée du câble correspondant. Voir le schéma d’installation page précédente.
NOTE : Cet appareil a été testé afn de vérifer sa conformité avec les normes minima des appareils numériques de classe B, suivant l’article 15 des normes FCC. Ces normes garantissent une protection suffsante contre les interférences, dans le cadre d’une utilisation domestique. Cet appareil génère, utilise et peut rayonner des fréquences radio et peut, s’il n’est pas utilisé selon les conseils prodigués dans ce manuel d’utilisation, causer des interférences avec les communications radio. Il n’y a cependant aucune garantie que ces interférences n’interviennent dans certaines installations. Si vous notez la présence de parasites sur la radio ou la télévision (détectées par la mise sous et hors tension de l’appareil), vous pouvez essayer d’éliminer ces interférences en essayant une des procédures suivantes :
•Orientez convenablement ou changer l’emplacement de l’antenne de réception.
•Éloignez le plus possible l’appareil de votre récepteur de télévision.
•Utilisez une prise secteur murale indépendante pour l’appareil de réception.
•N’hésitez pas à contacter votre revendeur agréé Rotel si le problème persiste.
Ne pas utiliser cet appareil près d’un point d’eau.
L’appareil doit être placé de telle manière que sa propre ventilation puisse fonctionner, c’est-à-dire avec un espace libre d’une dizaine de centimètres minimum autour de lui.
Il ne doit pas être posé sur un fauteuil, un canapé, une couverture ou toute autre surface susceptible de boucher ses ouïes d’aération ; ou placé dans un meuble empêchant la bonne circulation d’air autour des orifices d’aération.
Cet appareil doit être placé loin de toute source de chaleur, tels que radiateurs, chaudières, bouches de chaleur ou d’autres appareils
produisant de la chaleur.
ATTENTION : La prise secteur
en face arrière constitue le moyen
principal pour connecter/déconnecter
l’appareil de son alimentation secteur. L’appareil doit donc être installé de telle manière que ce câble d’alimentation soit accessible
en permanence.
Cet appareil doit être branché sur une prise d’alimentation secteur, d’une tension et d’un type conformes à ceux qui sont indiqués sur la face
arrière de l’appareil (USA : 120 V/60 Hz, CE : 230 V/50 Hz)
Brancher l’appareil uniquement grâce au cordon secteur fourni, ou à un modèle équivalent. Ne pas tenter de modifier ou changer la prise. Notamment, ne pas tenter de supprimer la prise de terre (troisième broche de la prise) si celle-ci est présente. Si la prise n’est pas conforme à celles utilisées dans votre installation électrique, consultez un électricien agréé. Ne pas utiliser de cordon rallonge.
La prise d’alimentation secteur constitue le moyen radical de déconnexion de l’appareil. Elle doit donc rester en permanence accessible, car sa déconnexion constitue la seule assurance que l’appareil n’est plus alimenté par le secteur. La diode LED de mise en veille Standby ne s’allume plus lorsque le cordon d’alimentation est débranché.
Prendre garde à ce que ce cordon d’alimentation ne soit pas pincé, écrasé ou détérioré sur tout son trajet, et à ce qu’il ne soit pas mis en contact avec une source de chaleur. Vérifiez soigneusement la bonne qualité des contacts, à l’arrière de l’appareil comme dans la prise murale.
Débranchez le câble d’alimentation en cas d’orage, ou si l’appareil ne doit pas être utilisé pendant une longue période.
Cet appareil doit être connecté à une prise murale pourvue d’une liaison protégée avec mise à la terre.
N’utilisez que des accessoires préconisés par le constructeur.
N’utilisez que des meubles, supports, systèmes de transport recommandés par Rotel. Procédez toujours avec la plus extrême précaution lorsque vous déplacez l’appareil,
afin d’éviter tout risque de blessure.
L’appareil doit être immédiatement éteint, débranché puis retourné au service après-vente agréé dans les cas suivants :
•Le câble d’alimentation secteur ou sa prise est endommagé.
•Un objet est tombé, ou du liquide a coulé à l’intérieur de l’appareil.
•L’appareil a été exposé à la pluie.
•L’appareil ne fonctionne manifestement pas normalement.
•L’appareil est tombé, ou le coffret est endommagé.
Les piles de la télécommande ne doivent pas être exposées à une température excessive, comme l’exposition directe au soleil, au feu ou équivalent.

|
RT-12 Passerelle Numérique |
22 |
Sommaire
Figure 1: Commandes et Branchements |
|
4 |
||
Figure 2: Principaux Branchements |
|
5 |
||
Figure 3: Connexions Rotel-Link (Noir) et Trigger 12 V (Gris) |
|
6 |
||
Remarques importantes |
|
7 |
||
Remarques importantes concernant la sécurité . . . . . . . . . . . . . |
|
21 |
||
A propos de Rotel . . . . . . . . . . . . . . . . . . . . . . . |
. |
22 |
||
Vue d’ensemble – les produits radio internet/passerelles numériques Rotel . . |
. 23 |
|||
DAB et Radio FM |
|
23 |
||
Radio Internet |
|
23 |
||
Accès réseau |
|
23 |
||
Le site Internet RotelRadio : la gestion de vos stations de radio |
|
23 |
||
Lecture à partir de serveurs réseau |
|
23 |
||
Mise en route . . . . . . . . . . . . . . . . . . . . . . . . . |
|
24 |
||
Alimentation secteur et commandes. . . . . . . . . . . . . . . . . |
. 24 |
|||
Prise secteur o |
|
24 |
||
Interrupteur de mise sous tension/veille Standby et indicateur Power |
|
A2 |
|
|
1 |
|
24 |
||
Entrée TRIGGER 12 V i |
|
24 |
||
Sortie TRIGGER 12 V i |
|
24 |
||
Vue générale de la connectique . . . . . . . . . . . . . . . . . . . . . . . . . . . . . . . . . . . . . |
25 |
|||
Réception radio DAB/FM w |
|
25 |
||
ENTRÉE NUMÉRIQUE – AUX t |
|
25 |
||
Connexion réseau qr |
|
25 |
||
Prise Mini-USB pour MISE A JOUR y |
|
25 |
||
SORTIE e |
|
25 |
||
ROTEL LINK u |
|
25 |
||
Radio Internet. . . . . . . . . . . . . . . . . . . . . . . . . |
|
25 |
||
De quoi avez-vous besoin avant de commencer ? |
|
25 |
||
Première Connexion au Réseau |
|
25 |
||
Sélectionner une station de radio |
|
26 |
||
Lecture d’une station de radio Internet |
|
26 |
||
Mémorisation d’une station de radio dans une préselection |
|
26 |
||
Lecture d’une station de radio présélectionnée |
|
26 |
||
MEDIA PLAYER . . . . . . . . . . . . . . . . . . . . . . . . . 27 |
||||
Serveurs UPnP |
|
27 |
||
Confguration d’un serveur UPnP sur le PC |
|
27 |
||
Lecture de fchiers médias via un serveur UPnP |
|
27 |
||
Effacement de la liste de lecture |
|
28 |
||
Modes de lecture |
|
28 |
||
RADIO FM. . . . . . . . . . . . . . . . . . . . . . . . . . |
. |
28 |
||
Lecture de stations de radio FM |
|
28 |
||
Sauvegarder une station de radio dans une présélection |
|
28 |
||
Ecoute d’une station de radio présélectionnée |
|
28 |
||
Menu des Paramètres FM |
|
28 |
||
Réception radio RDS. . . . . . . . . . . . . . . . . . . . . . . |
|
29 |
||
Touche RDS O |
|
29 |
||
Touche MONO O |
|
29 |
||
RADIO DAB. . . . . . . . . . . . . . . . . . . . . . . . . . |
|
29 |
||
Lecture d’une station de radio DAB |
|
29 |
||
Sauvegarder une station DAB dans une présélection |
|
29 |
||
Ecoute d’une station de radio présélectionnée |
|
29 |
||
Menu des Paramètres DAB |
|
29 |
||
Recherche de réseaux |
|
30 |
||
Wired/Wireless |
|
30 |
||
Configurer “My Stuff” . . . . . . . . . . . . . . . . . . . . . |
. |
31 |
||
Configurer “Mes stations” . . . . . . . . . . . . . . . . . . . . |
|
31 |
||
Configurer “My Streams” . . . . . . . . . . . . . . . . . . . . |
. 31 |
|||
Touches avancées de la télécommande . . . . . . . . . . . . . . . . |
|
31 |
||
Problèmes de fonctionnement. . . . . . . . . . . . . . . . . . . |
. 32 |
|||
Spécifications. . . . . . . . . . . . . . . . . . . . . . . . . |
. |
34 |
||
A propos de Rotel
Notre histoire commence il y a environ 50 ans. Depuis, au fil des années, nous avons reçu des centaines de prix et de récompenses, et satisfait des centaines de milliers de personnes – comme vous !
Rotel a été fondée par une famille passionnée de musique, qui a décidé de fabriquer des maillons Haute Fidélité sans compromis aucun. Depuis sa création, cette passion est restée intacte, et cette famille s’est fixée comme objectif de proposer à tous les audiophiles et mélomanes les meilleurs appareils possibles, quel que soit leur budget. Une volonté partagée par tous les employés de Rotel.
Les ingénieurs Rotel travaillent comme une équipe très soudée, écoutant, peaufinant chaque nouveau modèle jusqu’à ce qu’il atteigne exactement leurs standards – très élevés – de musicalité. Ils sont libres de choisir des composants en provenance du monde entier, afin de concevoir le meilleur produit possible. C’est ainsi que vous trouverez dans nos appareils des condensateurs d’origine britannique ou allemande, des transistors japonais ou américains, tandis que les transformateurs toriques sont toujours fabriqués dans nos propres usines Rotel.
Nous sommes tous concernés par la qualité de l’environnement. Et, comme de plus en plus de produits électroniques sont fabriqués puis éliminés quelques années plus tard, il est désormais essentiel qu’un constructeur fabrique tous ses produits en veillant à ce qu’ils aient un impact minimum sur la Terre et les nappes phréatiques.
Chez Rotel, nous sommes très fiers d’apporter notre pierre à ce nouvel édifice. Nous avons réduit la teneur en plomb de nos électroniques, en utilisant notamment une soudure spéciale ROHS, tandis que notre nouvelle gamme d’amplificateurs fonctionnant en classe D (non numérique) présente un rendement cinq fois supérieur aux générations conventionnelles précédentes, délivrant pourtant encore plus de puissance, avec une qualité encore supérieure. Ces appareils ne chauffent pas, dépensent beaucoup moins d’énergie, sont donc très bons pour l’environnement tout en étant encore plus musicaux.
En plus, nous imprimons tous nos catalogues et manuels sur papier recyclé.
Ce ne sont certes que de petites étapes. Mais ne sont-ce pas justement les plus importantes ? Nous continuons activement la recherche et la mise au point de nouvelles méthodes, et l’utilisation de nouveaux matériaux pour aboutir à un processus de fabrication général plus écologique et plus propre.
Tous les membres de l’équipe Rotel vous remercient pour l’achat de cet appareil. Nous sommes persuadés qu’il vous offrira de nombreuses années d’intense plaisir musical.

Français |
|
23 |
Vue d’ensemble – les produits radio internet/passerelles numériques Rotel
Cet appareil Rotel dispose à la fois des possibilités traditionnelles de réception FM et DAB+ et, venue du monde informatique, de la possibilité d’accéder à des milliers de stations de radio, disponibles sur Internet. En outre, cette nouvelle gamme de tuners/passerelles numériques Rotel peut également lire et exploiter le contenu de vos lecteurs audio personnels (iPod et lecteurs MP3) ainsi que vos fichiers musicaux stockés sur un serveur réseau.
Remarque : les fonctions radio Internet et serveur réseau ne fonctionneront pas sans une connexion à un réseau local.
DAB et Radio FM
C’est la partie la plus conventionnelle du produit, et si vous avez l’habitude de rechercher, mémoriser et sélectionner des stations de radio à partir des services radio DAB+ et FM, vous n’aurez pas de difficultés avec la façon dont ce tuner utilise ces fonctions. Tout cela est expliqué dans les sections de démarrage rapide correspondantes. Gardez en mémoire de bien sélectionner l’antenne (aérienne) comme entrée à utiliser, vous trouverez cette option dans le menu de configuration. Vous devrez aussi installer et orienter correctement l’antenne dédiée pour optimiser la réception des services DAB+ et FM.
Radio Internet
L’utilisation des radios Internet nécessite deux services supplémentaires : un accès Internet via un réseau informatique et, quand cela fonctionne, la connexion à un site Internet qui permet à l’accès à des stations de radios Internet. Cette dernière fonctionnalité étant intégrée dans le tuner, nous allons donc traiter en premier de l’accès à votre réseau.
Accès réseau
L’installation d’un réseau informatique d’ordinateurs dépasse le cadre de ce manuel, par conséquent nous allons supposer que vous disposez déjà d’un réseau Wi-fi fonctionnel chez vous. Si vous utilisez un réseau filaire, référez vous à la section « Configuration Réseau » à l’onglet « Réglages généraux » Les liaisons filaires constituent les liaisons Ethernet les plus fiables. Des adaptateurs Ethernet par courant porteur sont également disponibles auprès de fournisseurs tiers si le passage d’un câble Ethernet s’avère impossible.
A la mise sous tension, l’appareil recherche tous les réseaux Wi-fi qui sont à sa portée et, une fois qu’il aura terminé sa recherche, vous verrez alors s’afficher les noms (SSID) d’un ou de plusieurs réseaux sur la face avant. Vous devrez sélectionner le nom du réseau correspondant à votre propre installation. Ce nom a été en général attribué une fois pour toutes quand votre réseau a été installé et est souvent déterminé par le routeur principal de votre réseau informatique personnel.
Vous devrez ensuite autoriser votre tuner à accéder à votre réseau en saisissant la clé WEP (ou WPA, ou WPA2) de votre réseau Wi-fi, exactement comme quand vous voulez y accéder avec un ordinateur. Cette clé se situe généralement au niveau du paramétrage de votre routeur. Vous n’aurez à rentrer qu’une seule fois cette suite de caractères alphanumériques, faites juste très attention à bien respecter la casse (majuscules ou minuscules) de votre clé WEP. Quand vous avez terminé, faites la défiler jusqu’au bout et sélectionnez END ou appuyez simplement sur la touche REPLY pour terminer la procédure.
Vous pouvez utiliser les touches Suivante ou Précédente de l’appareil pour vous aider à rentrer ces informations. Ne confondez pas la lettre « O » avec le chiffre « 0 ».
Une fois que vous serez connecté avec succès au réseau, le tuner va automatiquement se connecter au site Internet à partir duquel vous pourrez choisir la partie du monde qui vous intéresse et sélectionner des stations de radios par pays, par genre et par nom.
En vous enregistrant sur www.rotelradio.com vous pourrez alors rechercher et sauvegarder vos radios Internet préférées, et accéder à d’autres services musicaux disponibles dans votre région.
Le site Internet RotelRadio : la gestion de vos stations de radio
La gestion de milliers de stations de radio disponibles sur Internet serait quasi impossible sans un outil vous permettant d’organiser et de gérer ces stations en fonction de vos besoins. Pour ce faire, Rotel a mis en place un moyen très simple grâce à un site Internet dédié à partir duquel vous pourrez présélectionner vos stations de radios favorites.
L’adresse de ce site est : http://rotelradio.com
Comme sur de nombreux sites web, vous devrez tout d’abord enregistrer un nom d’utilisateur (login) et un mot de passe (password) afin de créer un compte sur le site. Avant de pouvoir le faire, vous devez enregistrer votre produit sur le site. Il existe une clé d’enregistrement spéciale dans votre appareil Rotel que vous aurez besoin de copier dans le formulaire d’inscription du site. Cette clé d’enregistrement se trouve dans le menu Settings > Register Menu (Paramètres -> Menu Enregistrement). Vous devez être connecté à Internet pour accéder à cette clé unique.
Après cette inscription, le site Web affichera le numéro de série radio de votre appareil Rotel. Celui-ci est différent du numéro de série. Le numéro de série radio peut être trouvé dans le menu de votre appareil Rotel au niveau de Settings -> Version (Paramètres -> Version).
Notez que pour mettre à jour l’affichage de votre appareil Rotel indiquant vos choix, vous aurez besoin de l’éteindre puis de le rallumer puis de sélectionnez « Internet radio ». Votre nouvelle liste dénommée “My Stuff” sera alors mise à jour automatiquement.
Lecture à partir de serveurs réseau
La diffusion de musique à partir d’ordinateurs configurés en tant que serveurs musicaux est une occasion supplémentaire d’utiliser les fonctions avancées de votre appareil Rotel et de faire notamment usage des circuits de décodage audiophiles intégrés à votre appareil
Comme pour les radios Internet, il est nécessaire de disposer d’un réseau informatique ainsi que d’un serveur musical correctement implémenté et configuré. Reportez vous aux instructions indiquées dans la rubrique « Media Player Quick Start» un peu plus loin dans ce manuel.
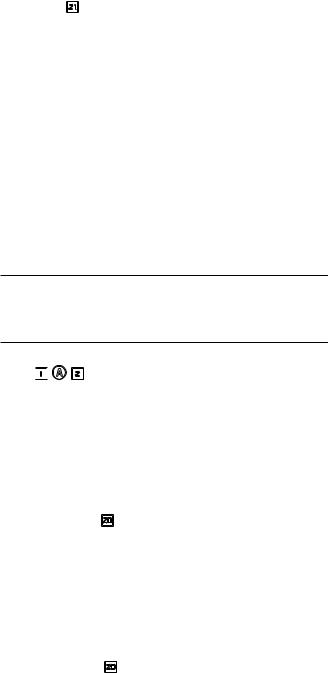
|
RT-12 Passerelle Numérique |
24 |
Mise en route
Merci d’avoir acheté cette Passerelle Numérique Rotel. Associée à un ensemble audio de qualité ou au sein d’un système de home-cinéma, votre Passerelle Numérique Rotel vous offrira de nombreuses années de plaisir musical.
Caractéristiques
•Connexion filaire ou sans fil offrant l’accès aux radios Internet et aux services premium.
•Accès via UPnP au(x) PC(s) et à leurs bibliothèques musicales en mode « Média Player ».
•Écoute des stations de radio FM et DAB+.
•Utilisation comme passerelle et pilotage des autres éléments du système grâce à la fonction Rotel-Link.
Quelques précautions préalables
Merci de lire soigneusement ce manuel. En plus de fournir des éléments de base sur l’installation du produit, et les consignes d’utilisation, il vous donne des renseignements utiles sur les diverses configurations possibles ainsi que des informations plus générales qui vous aideront à obtenir le meilleur de votre système. N’hésitez pas à contacter votre revendeur agréé Rotel pour obtenir les réponses à toutes les questions que vous pourriez vous poser. En outre, nous sommes toujours heureux chez Rotel de recevoir vos remarques et commentaires. Conservez soigneusement le carton et tous les éléments servant à l’emballage pour un usage futur éventuel. En effet, expédier ou déménager l’appareil dans quoique ce soit d’autre que son carton d’origine peut avoir pour conséquence d’endommager gravement votre appareil et annulerait la garantie.
Remplissez et renvoyez la carte d’enregistrement du propriétaire qui est jointe à votre produit et conservez en lieu sûr la facture originale. Elle constitue votre meilleure preuve de date d’achat au cas où vous auriez besoin de faire appliquer la garantie constructeur.
Installation
Installez l’appareil sur une surface rigide et plane, éloignée des rayons directs du soleil, de toute source de chaleur, d’humidité ou de vibrations.
Ne posez pas sur l’appareil d’autres maillons ou objets. Ne laissez aucun liquide pénétrer à l’intérieur de son châssis.
Prenez en compte le poids et les dimensions de l’appareil si vous le disposez sur une étagère, un meuble ou dans un rack, et vérifiez que ceux ci sont bien en mesure de supporter son poids.
L’appareil génère de la chaleur pendant son fonctionnement normal. Ne bloquez donc pas ses ouïes de refroidissement. Il doit y avoir environ 10 cm de dégagement tout autour pour permettre le bon fonctionnement de sa ventilation, et une bonne circulation d’air autour du meuble qui le supporte.
Alimentation secteur et commandes
Prise secteur o
Votre appareil est configuré en usine pour fonctionner avec la tension secteur en vigueur dans le pays où vous l’avez acheté (États-Unis : 120 volts/60 Hz ou Communauté Européenne : 230 volts/50 Hz). La configuration est inscrite sur une étiquette à l’arrière de votre appareil.
L’appareil est fourni avec son câble d’alimentation secteur. Utilisez uniquement ce câble ou son équivalent exact. Ne modifiez pas le câble fourni. N’utilisez pas de rallonge.
Assurez-vous que l’interrupteur de mise sous tension est bien sur « off ». Puis, branchez une extrémité du câble dans le connecteur d’alimentation situé à l’arrière de l’appareil. Branchez l’autre extrémité dans une prise secteur appropriée.
Si vous prévoyez de vous absenter pendant une période de temps assez longue, c’est une bonne précaution de débrancher votre passerelle numérique.
Remarque : Certains produits sont destinés à être commercialisés dans plusieurs pays et sont par conséquent fournis avec plusieurs cordons secteur. Choisissez bien le câble secteur qui correspond à votre pays de résidence.
Interrupteur de mise sous tension/veille Standby et indicateur Power 1


 A2
A2
L’interrupteur de mise sous tension se trouve sur la partie gauche de la façade avant. Pour mettre l’appareil sur ON (ou pour activer les modes automatiques de mise sous tension), appuyez sur ce bouton.
La diode indicatrice de mise sous tension va s’allumer, signifiant que l’appareil est désormais en marche. Pour repasser l’appareil sur off, appuyez de nouveau sur le bouton pour le laisser revenir sur la position off.
Entrée TRIGGER 12 V i
Une entrée de type jack permet de connecter un câble transportant un signal « trigger» + 12 V issu d’un préampli Rotel ou d’un processeur surround, et qui permet de mettre l’appareil sous tension à distance.
L’entrée TRIGGER accepte tous types de signaux (AC ou DC) dans une gamme allant de 3 volts à 30 volts. Utilisez un câble équipé de prises mini-jack 3.5 mm à chaque extrémité. Le signal +12 V doit être présent à la « pointe » du connecteur.
Sortie TRIGGER 12 V i
La prise jack repérée 12 V TRIG « OUT » permet de faire passer le signal de commande à distance vers un autre appareil Rotel. Autrement dit, le signal Trigger 12 V présent à l’entrée INPUT est systématiquement dirigé vers la sortie jack TRIGGER OUT.
Français |
|
25 |
Vue générale de la connectique
Avant de continuer plus avant dans les autres sections de ce manuel, assurez-vous que toutes les connexions sont réalisées correctement. Référez-vous à la Figure 2.
Réception radio DAB/FM w
Veillez utiliser l’antenne interne qui est fournie et reliez là aux entrées DAB et FM du panneau arrière. Pour bénéficier d’une réception optimale des signaux FM, assurez vous de disposer de suffisamment de place pour pouvoir déployer complètement l’antenne en T. Les œillets situés à chaque extrémité du T vous permettront de fixer l’antenne au mur si nécessaire. Essayez diverses positions pour optimiser la réception.
ENTRÉE NUMÉRIQUE – AUX t
L’appareil peut recevoir les signaux audio numériques issus de diverses sources pour les convertir en signaux analogiques et les diriger vers un préamplificateur ou un processeur relié aux prises libellées OUTPUT. Il y a deux prises numériques auxiliaires (AUX Digital Input) au niveau du panneau arrière : une entrée coaxiale et une entrée optique. Reliez la sortie numérique optique ou coaxiale de votre source aux entrées correspondantes de l’appareil.
Connexion réseau qr
Votre appareil peut être relié à un réseau informatique filaire ou sans fil. Dans le cas d’un réseau filaire, branchez un câble réseau de type RJ-45 à la prise dénommée ETHERNET q. Si vous utilisez un réseau Wi-fi, reliez l’antenne Wi-Fi (fournie) au connecteur marqué WiFi r.
Radio Internet
De quoi avez-vous besoin avant de commencer ?
Pour pouvoir profiter des radios sur Internet, vous devez d’abord vérifier que vous disposez :
•d’une connexion Internet haut-débit
•d’un point d’accès Internet au travers d’une connexion réseau (LAN) filaire ou sans fil.
Si vous utilisez une connexion LAN sans fil, les radios Internet pourront être reçues dans un rayon de 100 mètres autour du point d’accès sans fil, cela en fonction de la position de votre routeur Wi-fi au sein de votre habitation. Vous pouvez vérifier la puissance et le niveau du signal Wi-fi en allant dans le menu Paramètres (Settings -> Wifi Strenght).
Assurez-vous que votre réseau LAN est correctement configuré et qu’il est bien relié à Internet. Pour pouvoir accéder aux radios Internet, une connexion Internet opérationnelle est indispensable.
Première Connexion au Réseau
Lorsque vous mettez sous tension l’appareil pour la première fois, celui ci va rechercher des connexions réseau. Si, il existe à la fois des connexions de type filaire et sans fil, ce sera la connexion filaire qui sera choisie par défaut, sauf si le choix « Wireless Only (sans fil uniquement) » a été sélectionné dans le menu de configuration. L’exemple suivant illustre une connexion sans fil :
Prise Mini-USB pour MISE A JOUR y
Le logiciel interne de votre appareil peut être mise à jour par cette prise, si cela est nécessaire.
SORTIE e
Votre appareil restitue un signal analogique stéréo. Utilisez le câble audio fourni pour le relier aux entrées correspondantes de votre préamplificateur ou processeur surround. Prenez garde à bien faire correspondre les branchements : le canal de sortie droit doit être relié au canal droit du préamplificateur ou du processeur, respectivement le canal de sortie gauche au canal gauche.
ROTEL LINK u
Les connexions libellées Rotel Link Out vers un amplificateur intégré Rotel et un lecteur de CD Out seront réalisées avec un câble stéréo 3.5 mm (fourni). Ces branchements permettent de d’interconnecter la Passerelle Numérique, l’Amplificateur et le lecteur de CD afin d’en faire un système unique contrôlable par IP via l’application Rotel Remote. Voir Figure 3.
... ...Starting |
|
SCANNING NETWORK.. ... |
|
|
|
|
|
|
Après quelques secondes, l’appareil va rechercher des réseaux sans fil.
Si aucun réseau sans fil n’est à portée, l’appareil va afficher « pas de réseau disponible »
NO NETWORK FOUND
Dès lors que l’appareil a détecté un réseau, il va afficher le nom (ESSID) du point d’accès sur l’écran. Il s’agit du nom dédié au point d’accès sans fil et choisi par la personne qui configuré le réseau. Par exemple :
< MY NETWORK >
Il est possible, et dans certains cas c’est très probable, que votre appareil détecte plus d’un point d’accès sans fil lorsque vous utilisez une connexion sans fil, dans ce cas vous devrez choisir celle que vous souhaitez utiliser pour vous connecter. Tourner le bouton sur la face avant pour afficher l’ESSID (nom du réseau sans fil) de chaque point d’accès que l’appareil a trouvé.
Si l’écran affiche “Enter WEP key” ( Entrez la clé WEP) ou “Enter WPA key” (Entrer la clé WPA), cela signifie que votre réseau utilise l’un de
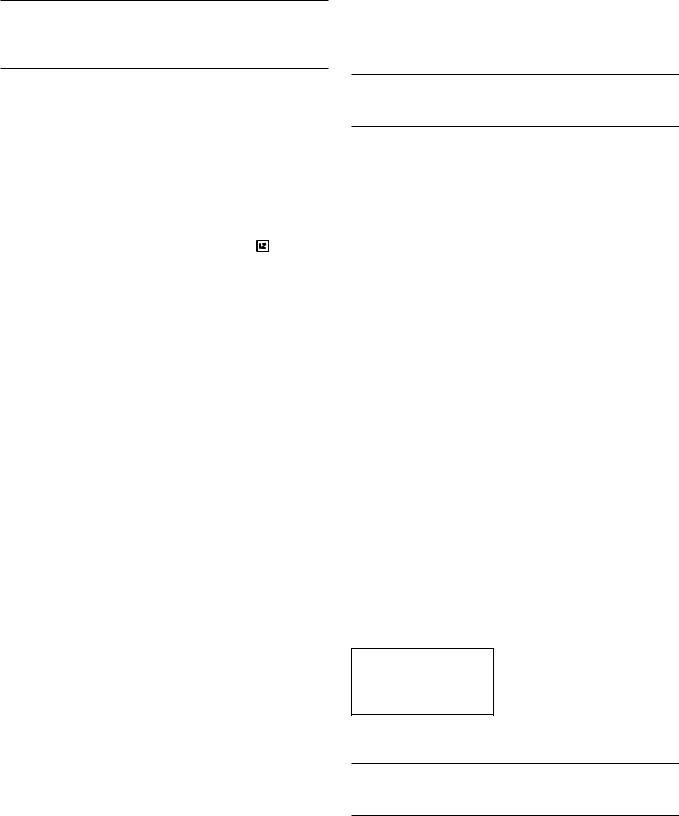
|
RT-12 Passerelle Numérique |
26 |
ces systèmes de protection : Wired Equivalent Privacy (WEP) ou Wi-Fi Protected Access (WPA). Demandez le code d’accès à la personne qui a mis en place le réseau sans fil, ou regardez dans le manuel de votre routeur pour trouver cette information. Entrez ce code dans l’appareil pour accéder au réseau sans fil.
Remarque : Si vous souhaitez utiliser une adresse IP statique, ou si votre appareil ne parvient pas à obtenir automatiquement une adresse IP, reportez vous au paragraphe “Network Config » (configuration réseau) dans la section « Settings »(« Paramètres ») à la fin de ce manuel.
Sélectionner une station de radio
Lorsque le réseau a été trouvé et que les connexions réseau sont effectuées, le menu principal s’affiche. Choisissez « Internet Radio » et l’écran affichera les options suivantes :
< |
Internet Radio |
> |
|
< |
Location |
> |
|
My Stuff |
|
|
|
Genre |
|
|
Media Player |
|
|
|
Search |
|
|
Setting |
|
|
|
|
|
|
|
|
|
|
|
|
Vous pouvez désormais choisir et sélectionner une station de radio Internet en tournant et en appuyant sur le bouton PUSH-SELECT =du panneau avant ou en utilisant les touches de navigation de la télécommande.
L’item <LOCATION> vous permet de choisir des stations de radio qui sont proposées par certaines régions ou pays spécifiques.
|
Africa |
|
|
< |
XXX1 LIVE RADIO |
> |
< |
America |
> |
|
|
XXX2 LIVE RADIO |
|
|
Asia |
|
|
|
XXX3 LIVE RADIO |
|
|
Caribbean |
|
|
|
XXX4 LIVE RADIO |
|
|
|
|
|
|
|
|
1.Tourner le bouton PUSH-SELECT = jusqu’à ce que l’écran affiche la région ou le pays recherché, puis appuyez sur le bouton.
2.Tournez le bouton pour mettre en surbrillance la station souhaitée. Appuyez sur le bouton pour la sélectionner.
3.Attendez que l’appareil se connecte à la station désirée.
L’item <GENRE> vous permet de choisir des stations de radio selon leur contenu, comme par exemple Classic Rock, Sport, News, etc …
|
80S |
|
|
|
XXX1 LIVE RADIO |
|
< |
90S |
> |
|
< |
XXX2 LIVE RADIO |
> |
|
Adult |
|
|
|
XXX3 LIVE RADIO |
|
|
Adult contemporary |
|
|
|
XXX4 LIVE RADIO |
|
|
|
|
|
|
|
|
1.Tourner le bouton PUSH-SELECT =jusqu’à ce que l’écran affiche le type de contenu désiré, puis appuyez sur le bouton pour le sélectionner.
2.Tournez le bouton pour mettre en surbrillance la station souhaitée. Appuyez sur le bouton pour la sélectionner.
3.Attendez que l’appareil se connecte à la station désirée.
L’item <SEARCH> vous permet de rechercher une station de radio par mot-clés.
Station Name |
|
xxx ART |
xx Radio1 |
END <> A BCDEFGHIJKLNO |
|
x ARTxx |
xx Radio2 |
ART |
|
ARTxxxx xx Radio3 |
|
|
|
|
|
|
|
|
|
1.Tourner le bouton PUSH-SELECT = jusqu’à ce que l’écran affiche le caractère à entrer, puis appuyez sur le bouton pour le sélectionner.
2.Répétez les étapes jusqu’à ce que vous ayez saisi le mot clé complet. Appuyez sur « END » pour confirmer le mot-clé ou appuyez sur la touche REPLY -E.
3.Appuyez sur le bouton pour lancer la recherche. L’écran va alors afficher les stations qui correspondent avec le mot-clé.
4.Tournez le bouton pour mettre en surbrillance la station souhaitée. Appuyez sur le bouton pour la sélectionner et attendez que l’appareil se connecte à la station.
Remarque : Les stations de radio Internet ainsi que les autres services musicaux peuvent aussi être configurées facilement en allant sur le site web www.rotelradio.com
Lecture d’une station de radio Internet
Une fois connecté à la station de radio, l’écran va afficher le nom de la station, le type de format audio, et le débit en kbits par seconde.
BBC RADIO |
|
BBC RADIO |
BUFFERING xx% |
|
|
|
|
xxx kbPs WMA XX:XX |
|
|
|
Mémorisation d’une station de radio dans une préselection
Pendant la lecture d’une station de radio, appuyez sur le bouton mémoire 4I puis sur le numéro de présélection choisi sur le pavé numérique 3H, l’écran va alors afficher :
BBC RADIO |
|
Assign to Preset |
xxx kbit WMA |
|
# |
M Preset # |
|
|
|
|
|
Vous pouvez de cette façon mémoriser la station de radio courante avec ce numéro de présélection. Jusqu’à 30 stations de radio Internet peuvent ainsi être mémorisées.
Lecture d’une station de radio présélectionnée
Pendant la lecture d’une station de radio, vous pouvez basculer sur d’autres stations de radio de la façon suivante :
1.A partir du pavé numérique 3H, appuyez sur le bouton de la station désirée. Ou
2.Appuyez sur la touche QUEUE 9B pour rappeler le numéro de la présélection et la station correspondante, puis tournez le bouton pour choisir la station désirée, et enfin appuyez sur le bouton pour la sélectionner. L’affichage devient comme suit :
01preset radio 1
02preset radio 2
>03 preset radio 3
04preset radio 4
Appuyez sur le bouton QUEUE de nouveau pour sortir du menu liste et pour revenir à l’affichage normal.
Remarque : vous pouvez à tout moment consulter la liste des stations mémorisées à l’aide de la fonction « Queue ». Cela vous évitera d’effacer accidentellement une station présélectionnée.
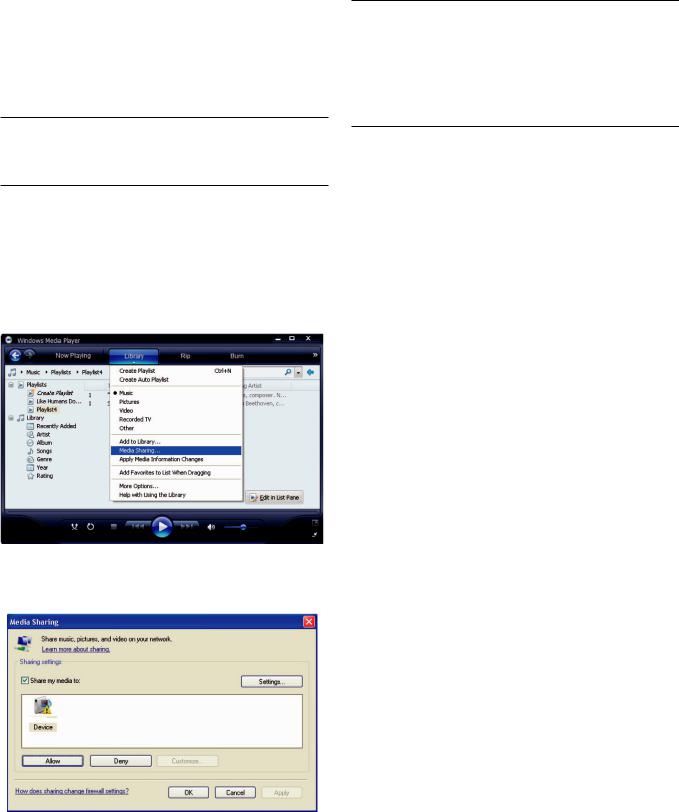
Français |
|
27 |
MEDIA PLAYER
La fonction Media Player vous permet de lire des fichiers audio (AAC, AIFF, AU, FLAC, MP3, WAV et WMA (sauf sans perte) et des listes de lecture (M3U) crée par l’application Media Player de votre ordinateur, notamment par Windows Media Player 11 ou 12. Cette fonction a été testée avec Windows 2000, Windows XP, Windows Vista et Windows 7.
Remarque : le partage de fichiers doit être activé sur votre ordinateur, toutes les applications de type Media Player ne permettent pas le partage de fichiers musicaux. Reportez vous au manuel d’instructions de votre ordinateur pour plus d’informations.
Serveurs UPnP
Confguration d’un serveur UPnP sur le PC
1. Lancez Windows Media Player 11 (ou 12 si vous utilisez Windows 7) pour configurez votre PC comme serveur UPnP, puis cliquez sur l’onglet
«Library (Bibliothèque) » de Windows Media Player 11 et sélectionnez
«Media Sharing (Partage de contenu) » pour ouvrir la fenêtre Media Sharing et activer la fonction.
Remarque : Au moment où nous rédigeons ce manuel, Windows Media Player 11 ne prend pas en charge le codage AAC utilisé par défaut par Apple dans iTunes. Par conséquent, nous vous conseillons de modifier le format d’importation par défaut et de choisir WAV, AIFF ou MP3 pour une compatibilité maximale avec tous les périphériques. Vous pouvez configurer Windows Media Player pour qu’il utilise vos répertoires iTunes. Notez enfin que Windows Media Player 12 (pour Windows 7) prend bien en charge le format AAC.
3. Allez dans le menu « Media Player » et sélectionnez le sous-menu « Serveurs UPnP » en tournant et en appuyant sur le bouton PUSH-SELECT =. L’appareil va alors rechercher tous les serveurs UPnP disponibles. Si l’affichage indique « [Empty] » (vide), cela signifie qu’aucun serveur UPnP n’a été trouvé.
|
Internet Radio |
|
|
< UPnP Servers |
> |
|
My Stuff |
|
|
Playback Mode |
|
< |
Media Player |
> |
|
Queue |
|
|
Settings |
|
|
|
|
|
|
|
|
|
|
Lecture de fchiers médias via un serveur UPnP
1.Si au moins un serveur UPnP a été trouvé, choisissez celui que vous souhaitez utiliser en tournant le bouton et mettez-le en surbrillance, puis appuyez sur le bouton pour le sélectionner.
2.Le RT-12 va alors afficher la liste des options ou des répertoires disponibles, selon la façon dont a été configuré le serveur musical, ainsi que la version du logiciel en cours. Typiquement, vous verrez apparaître les choix Music, Playlists ( listes de lecture) ainsi qu’un item [Search] selon l’exemple ci-dessous, ainsi les diverses options permettant de rechercher un morceau : par Artistes (Artists), Albums, Genre, etc…
< |
Music |
> |
|
<All music |
> |
|
Playlists |
|
|
All Artists |
|
|
[Search] |
|
|
Album Artists |
|
|
|
|
|
Genre |
|
|
|
|
|
|
|
2. Votre PC va alors vous indiquer qu’un périphérique essaye de se connecter au serveur UPnP. Cliquez sur le bouton « Allow (Autoriser) ».
3. Une fois que vous avez trouvé le morceau ou la piste recherchés, appuyez sur le bouton pour la sélectionner. La piste en question sera affichée sur l’écran de l’appareil lors de la connexion au serveur. Juste avant la lecture, vous pourrez notamment visualiser le titre du morceau, la nature du fichier, et le débit en kbits/sec. Lorsque la lecture commence, l’afficheur indique le temps restant à la place de la nature du fichier.
“Track Title” |
|
“Track Title” |
317kbps WMA |
|
01:12 317kpbs |
07:49 |
|
07:49 |
|
|
|
4. Vous pouvez sélectionner des pistes supplémentaires ou d’autres répertoires pendant la lecture en vous plaçant sur la piste choisie et en appuyant sur le bouton ENT de la télécommande ou en pressant le bouton PUSH-SELECT = pendant au moins 5 secondes. Le ou les pistes sélectionnées seront ajoutées à la liste QUEUE et seront lues dans l’ordre choisi. Appuyez sur le bouton QUEUE 9Bpour rappeler les pistes en attente d’être lues.
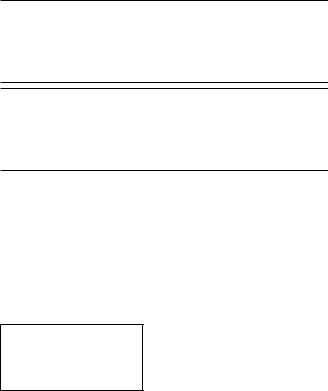
|
RT-12 Passerelle Numérique |
28 |
Effacement de la liste de lecture
Vous pouvez effacer la liste de lecture QUEUE en appuyant sur le bouton QUEUE et en choisissant [Clear Queue] ou en allant dans le menu QUEUE à partir du sous menu du Media Player.
|
UPnP Servers |
|
|
< |
[Clear Queue] > |
|
Playback Mode |
|
|
|
|
< |
Queue |
> |
|
|
|
|
|
|
|
|
|
Vous pouvez également effacer individuellement une piste de la liste QUEUE en sélectionnant la piste à supprimer et en appuyant sur le bouton STOP 8J pendant 5 secondes.
Modes de lecture
|
UPnP Servers |
|
|
< |
Repeat |
* > |
< |
Playback Mode |
> |
|
|
Shuffle |
|
|
Queue |
|
|
|
|
|
|
|
|
|
|
|
|
Tournez le bouton pour entrer dans le sous-menu « Media Player -> Playback Mode ». Il existe deux items intitulés « Repeat » et « Shuffle ».
REPEAT : Les pistes sont lues dans l’ordre et l’une après l’autre, et la lecture reprend à la première piste quand la dernière a été lue.
SHUFFLE : Les pistes sont lues dans un ordre aléatoire
Remarque : Si les modes REPEAT et SHUFFLE sont activés, l’appareil va lire la liste de pistes dans un ordre aléatoire, et une fois que toutes les pistes ont été lues au moins une fois, il va reprendre la lecture de la liste dans un ordre aléatoire et cela jusqu’à ce que la touche STOP soit pressée.
Remarque : L’utilisation de la fonction « Shuffle » avec de grosses bibliothèques musicales peut ne pas être possible ou nécessiter un temps très long. Nous vous conseillons de créer des listes de lecture plus courtes à l’aide de Windows Media Player puis de les lire avec la fonction Shuffle.
RADIO FM
Avant d’écouter une station de radio FM, assurez-vous que l’antenne FM a été branchée correctement.
Lecture de stations de radio FM
1. Choisissez le bouton FM parmi les boutons de sources 6N. L’affichage va indiquer le message suivant :
95.25MHz [No RadioText]
2. Tournez le bouton PUSH-SELECT = pour changer la fréquence des stations de radio. Si vous tournez le bouton vers la gauche ou vers la droite d’un pas, la fréquence va également changer d’un pas. Si vous tournez le bouton plus rapidement l’appareil va alors rechercher les stations.
3.Servez vous des touches UP/DOWN de la télécommande pour rechercher manuellement les stations FM.
4.Maintenez appuyées les touches UP/DOWN sur la télécommande pour rechercher automatiquement les stations FM.
Sauvegarder une station de radio dans une présélection
Lors de l’écoute d’une station de radio, appuyez sur la touche « memory » 4Iet choisissez un numéro de présélection à partir du pavé numérique 3H. L’afficheur va alors indiquer le numéro de la station présélectionnée. Jusqu’à 30 stations de radio FM peuvent ainsi être mémorisées.
Ecoute d’une station de radio présélectionnée
Lors de l’écoute d’une station de radio, vous pouvez basculer vers l’une ou l’autre d’une station mémorisée en utilisation l’une des deux méthodes suivantes.
1.A partir du pavé numérique 3H, saisissez le numéro de la station désirée.
2.Appuyez sur le touche SKIP +/- 7du panneau avant ou sur la touche PRESET +/- K pour rappeler un numéro de la présélection et la station correspondante. Tournez le bouton pour choisir la station désirée, puis appuyez sur le bouton pour la sélectionner. Appuyez sur la touche FM 6N de nouveau pour sortir du menu de présélection et pour revenir
en mode d’écoute.
3. Appuyez successivement sur la touche FM 6N pour basculer entre les 3 modes suivants :
1.Affichage de la station FM en cours d’écoute
2.Affichage du menu de présélection
3.Affichage du menu de paramétrage FM
Sélectionnez le mode des présélections et naviguez parmi les présélections à l’aide du bouton PUSH-SELECT =. Appuyez sur le bouton PUSH-SELECT = pour choisir une présélection.
A l’aide de la télécommande, utilisez les touches PRESET +/- K pour choisir une présélection et appuyez sur le touche ENT pour confirmer cette présélection.
Menu des Paramètres FM
Appuyez sur la touche FM 6N et sélectionnez le menu FM Settings (Paramètres FM). Il existe trois sous-menus auquel vous pouvez accéder à partir du menu des Paramètres FM :
1.Recherche des stations – Choisissez entre ALL STATION (Toutes les stations) ou Strong Stations (seulement les stations disposant d’un signal élevé).
2.Paramètres audio. Choisissez entre Stéréo ou Mono forcé.
3.Système – Choisissez “Réglages usine par défaut” ( Factory default) pour afficher la version courante du logiciel interne
Pour effectuer des changements dans le menu des Paramètres FM, tournez le bouton = du panneau avant ou utilisez les touches UP/
Français |
|
29 |
DOWN de la télécommande. Pour confirmer une modification, pressez sur le bouton =de la face avant. Ou, avec la télécommande, appuyez sur la touche ENT.
Réception radio RDS
Cet appareil Rotel est équipé d’une fonction de réception RDS (Radio Data System). Le système d’émission RDS ajoute un certain nombre de fonctionnalités supplémentaires à la réception radio FM en véhiculant des méta-données encodées dans le signal radio. Ce signal est ensuite décodé par le récepteur RDS et permet d’obtenir des informations utiles, comme notamment :
1.L’affichage du nom qui permet l’identification de la station de radio (par exemple BBC1)
2.L’affichage du type de contenu proposé par la station de radio (par exemple ROCK ou NEWS).
3.Des informations concernant l’état du trafic routier
4.Un affichage défilant de texte (titre, annonces, informations diverses).
5.L’heure courante, ainsi que la date.
La radiodiffusion RDS existe dans de nombreux pays européens depuis plusieurs années. Un grand nombre de stations disposent de la fonction RDS, par conséquent la plupart des utilisateurs sont déjà familiers du contenu et des fonctionnalités qui sont associés.
Remarque : Les informations diffusées par le système RDS dépendent entièrement de la façon dont ils ont été encodés par la station de radio. Autrement dit, elles ne seront disponibles uniquement dans les pays où le RDS a été mis en application et où les stations diffusent ces métadonnées.
Touche RDS O
La touche RDS de la télécommande permet séquentiellement de changer l’affichage des informations RDS. Appuyez successivement sur la touche RDS de la télécommande pour afficher les informations suivantes :
1.Texte lié au contenu musical actuellement diffusé
2.PTY, ou nature du contenu.
3.Nom de la station.
4.Station en stéréo ou en mono.
5.Heure actuelle.
6.Date du jour
Touche MONO O
La touche MONO de la télécommande permet de faire basculer la réception FM stéréo en mode mono. En mode stéréo, un signal stéréo ne sera entendu que si la station émet un signal stéréo, et que si le signal est suffisamment puissant.
Remarque : Passer en mode mono peut s’avérer utile pour améliorer la qualité de réception d’un signal FM faible ou éloigné. En effet, la réception d’un signal mono clair nécessite une puissance moindre que la réception d’un signal stéréo.
RADIO DAB
Assurez-vous que les signaux Digital Audio Broadcast (DAB) puissent être reçus sur votre lieu de résidence.
Appuyez sur la touche DAB 6 du panneau avant, ou sur la touche N de la télécommande.
Les canaux DAB sont catégorisés en « ensembles » que l‘on appelle aussi « multiplexes ». Chaque multiplexe contient un certain nombre de stations et de services, et chaque service est constitué d’un service primaire qui peut aussi contenir des services secondaires. La technologie DAB offre aux fournisseurs de programmes la possibilité de transmettre des données additionnelles avec le flux audio, comme par exemple des canaux audio supplémentaires, du texte, voire des images ou des données informatiques dans le futur.
Lecture d’une station de radio DAB
1. Appuyez sur le bouton DAB sur le panneau avant parmi les boutons de sources 6N. L’affichage va indiquer le message suivant :
DAB <Station list>
2. Tournez le bouton PUSH-SELECT = pour visualiser les stations disponibles.
Sauvegarder une station DAB dans une présélection
Lors de l’écoute d’une station DAB, appuyez sur la touche « memory » 4I et choisissez un numéro de présélection à partir du pavé numérique 3H. Jusqu’à 30 stations de radio DAB peuvent ainsi être mémorisées.
Ecoute d’une station de radio présélectionnée
Lors de l’écoute d’une station de radio, vous pouvez basculer vers l’une ou l’autre d’une station mémorisée en utilisation l’un des deux méthodes suivantes.
1. A partir du pavé numérique 3H, saisissez le numéro de la station désirée.
2 . Appuyez sur le touche SKIP +/- 7du panneau avant ou sur la touche PRESET +/- K pour rappeler un numéro de la présélection et la station correspondante. Tournez le bouton pour choisir la station désirée, puis appuyez sur le bouton pour la sélectionner, ou sur la touche ENT de la télécommande.
Menu des Paramètres DAB
Appuyez sur le bouton DAB 6Ndu panneau avant ou de la télécommande pour accéder au menu des Paramètres DAB. Il y a six sous-menus. Tournez le bouton du panneau avant ou servez vous des touches UP/DOWN de la télécommande pour explorer chacun des sous-menus.
|
RT-12 Passerelle Numérique |
30 |
1.< Station List> ; affiche la liste des stations
2.< Full Scan ; effectue un balayage complet des stations en appuyant sur la touche ENT.
3.< Manual Scan> ; Appuyez sur ENT et choisissez les stations manuellement en utilisant les touches Up/Down
4.<DRC> : Gestion de la gamme dynamique. Choisissez entre “off”, “high” et “low”. Utilisez les touches Up/down et appuyez sur ENT pour valider.
5.<Prune>; Choisissez entre “Yes” ou “No”. La fonction Prune vous permet d’éliminer les stations qui ne sont pas actives ou qui ne peuvent pas être reçues.
6.<System>; Sélectionnez le choix Factory Default pour afficher la version courante du logiciel (Software Version)
PARAMETRAGES RESEAU
Confguration du réseau
Ce paragraphe traite en détail à la fois de la configuration d’un réseau filaire LAN ou d’un réseau sans fil.
Appuyez sur le bouton Network (Réseau) 6Npour entrer dans le menu principal comme indiqué ci dessous :
< |
Internet Radio |
> |
|
|
My Stuff |
|
|
|
Media Player |
|
|
|
Settings |
|
|
|
|
|
|
|
|
|
|
Remarque : Si vous parvenez pas à revenir automatiquement dans le menu ci-dessus après être entré dans le mode Network, appuyez sur bouton BACK 0D pour retourner dans le menu.
Recherche de réseaux
A partir du menu principal, choisissez l’option Settings (Paramètres) puis l’item Network Config (Configuration Réseau). Puis, sélectionnez l’option Scan Network (recherche réseaux). Si un réseau a été détecté, l’afficheur va alors indiquer son nom (Network ID). Tournez le bouton pour le sélectionner, et appuyez pour confirmer.
< Scan for networks > Enter network name View Config
Edit Config
Saisie du nom réseau (uniquement pour les connections sans fil)
Au cas où l’appareil ne parvient pas à trouver de réseau, le « nom réseau » (SSID) peut être saisi manuellement.
Utilisez le bouton pour sélectionner les lettres composant le nom réseau, et choisissez le mot « END » pour confirmer.
Network Name
< END <> A BCDEFGHIJK >
NAME1
Voir la confguration
Vous pouvez visualiser la configuration réseau en détail. Tournez le bouton pour afficher les pages suivantes et précédentes comme suit : “Mode” –>”ESSID”-->”MAC Address”–> “IP Address” -->”Netmask”–>”Gateway” –>”DNS Servers”
|
|
|
|
|
|
|
< |
Mode |
> |
|
< |
ESSID |
> |
|
Auto DHCP |
|
|
|
XXXXXX |
|
|
|
|
|
|
|
|
|
|
|
|
|
|
|
Editer la confguration réseau
Ce menu vous permet de modifier la configuration réseau courante. Il sera notamment utile pour saisir une adresse IP statique. Sélectionnez cette fonction en tournant le bouton, et entrez dans les sous-menus Adresse IP, adresse MAC et DNS du réseau.
Pour saisir une valeur, appuyez sur le bouton, puis tournez le bouton pour ajuster la valeur vers le haut ou vers le bas. Appuyez sur le bouton de nouveau pour confirmer la valeur saisie et pour passer au champ suivant. Continuez jusqu’à ce que toutes les informations nécessaires aient été saisies.
Avertissement Signal (uniquement pour les connections sans fil) Choisissez YES or NO pour activer ou pour désactiver l’avertissement d’un signal Wi-fi faible.
Wired/Wireless
Choisissez Auto (par défaut, la connexion filaire sera sélectionnée si les deux sont connectées), Wired (Filaire) uniquement, ou Wireless (Sans Fil) uniquement.
Version
Ce menu affiche des informations concernant les versions logicielles et matérielles de l’appareil
Mise à jour logicielle
Utilisez cette option pour télécharger une nouvelle version logicielle pour les radios Internet. Si une nouvelle version est disponible, elle apparaitra comme prête à être téléchargée.
Remarque : À ce niveau, vous pouvez appuyer sur le bouton BACK pour annuler la mise à jour logicielle. Une mise à jour logicielle peut prendre plusieurs minutes. Ne pas couper l’alimentation, ni mettre l’appareil en veille jusqu’à ce que la procédure soit complètement achevée, ou sinon l’appareil peut être définitivement endommagé. La mise à jour peut nécessiter de 15 à 60 minutes selon la vitesse de votre connexion Internet.
Enregistrement
Cet item affiche la clef qui doit être utilisée pour enregistrer l’appareil sur le portail de connexion Radio Costumer Rotel : www.rotelradio.com
 Loading...