


 Loading...
Owner’s manual
Manuel d’utilisation
Bedienungsanleitung
Manuale di istruzioni
Manual de instrucciones
Gebruiksaanwijzing
Bruksanvisning
RT-02
AM/FM Stereo Tuner
Tuner Stéréophonique AM/FM
AM/FM-Stereo-Tuner
Sintonizzatore Stereo AM/FM
Sintonizador Estereofónico de AM/FM
Middengolf/FM Stereo Afstemeenheid
AM/FM Stereo Radio
RT-02 |
|
|
|
|
|
|
|
|
|
|
|
|
|
1 |
2 |
3 |
4 |
5 |
|
POWER |
RBDS |
RDS RT |
TP TA AF STEREO TUNED |
AUTO MEMORY PRESET |
|
|
|
|
|
FM |
|
|
|
6 |
7 |
8 |
9 |
0 |
TUNING |
AM |
|
|
|
|
|
|
|
|
|
|
|
|
|
|
AUTO |
TUNE/ |
PRESET |
|
|
|
|
|
|
MEMORY TUNING |
PRESET |
SCAN |
BAND |
|
|

RT-02 AM/FM Stereo Tuner |
2 |
CAUTION
RISK OF ELECTRIC SHOCK
DO NOT OPEN
CAUTION: TO REDUCE THE RISK OF ELECTRIC SHOCK, DO NOT REMOVE COVER. NO USER-SERVICEABLE PARTS INSIDE REFER SERVICING TO QUALIFIED SERVICE PERSONNEL.
APPLICABLE FOR USA, CANADA OR WHERE APPROVED FOR THE USAGE
CAUTION: TO PREVENT ELECTRIC SHOCK, MATCH WIDE BLADE OF PLUG TO WIDE SLOT. INSERT FULLY.
ATTENTION: POUR EVITER LES CHOCS ELECTRIQUES, INTRODUIRE LA LAME LA PLUS LARGE DE LA FICHE DANS LA BORNE CORRESPONDANTE DE LA PRISE ET POUSSER JUSQU AU FOND.
Important Safety Instructions
WARNING: There are no user serviceable parts inside. Refer all servicing to qualified service personnel.
WARNING: To reduce the risk of fire or electric shock, do not expose the unit to moisture or water. Do not allow foreign objects to get into the enclosure. If the unit is exposed to moisture, or a foreign object gets into the enclosure, immediately disconnect the power cord from the wall. Take the unit to a qualified service person for inspection and necessary repairs.
Read all the instructions before connecting or operating the component. Keep this manual so you can refer to these safety instructions.
Heed all warnings and safety information in these instructions and on the product itself. Follow all operating instructions.
Clean the enclosure only with a dry cloth or a vacuum cleaner.
You must allow 10 cm or 4 inches of unobstructed clearance around the unit. Do not place the unit on a bed, sofa, rug, or similar surface that could block the ventilation slots. If the component is placed in a bookcase or cabinet, there must be ventilation of the cabinet to allow proper cooling.
Keep the component away from radiators, heat registers, stoves, or any other appliance that produces heat.
The unit must be connected to a power supply only of the type and voltage specified on the rear panel of the unit.
Connect the component to the power outlet only with the supplied power supply cable or an exact equivalent. Do not modify the supplied cable in any way. Do not attempt to defeat grounding and/or polarization provisions. Do not use extension cords.
Do not route the power cord where it will be crushed, pinched, bent at severe angles, exposed to heat, or damaged in any way. The power cord should be unplugged from the wall outlet if the unit is to be left unused for a long period of time.
Immediately stop using the component and have it inspected and/or serviced by a qualified service agency if:
•The power supply cord or plug has been damaged.
•Objects have fallen or liquid has been spilled into the unit.
•The unit has been exposed to rain.
•The unit shows signs of improper operation
•The unit has been dropped or damaged in any way
Place the unit on a fixed, level surface strong enough to support its weight. Do not place it on a moveable cart that could tip over.
NOTE TO CATV SYSTEM INSTALLER: Call the CATV system or antenna installer’s attention to Article 820-40 of the NEC. This provides guidelines for proper grounding and, in particular, specifies that the cable ground shall be connected to the grounding system of the building, as close to the point of cable entry as practical. See installation diagram.
NOTE: This equipment has been tested and found to comply with the limits for a Class B digital device, pursuant to Part 15 of the FCC Rules. These limits are designed to provide reasonable protection against interference in a residential installation. This equipment generates and can radiate radio frequency energy and, if not installed and used in accordance with the instructions, may cause interference to radio or TV communications. There is no guarantee that interference will not occur in a particular installation. If this equipment does cause interference to radio or television reception, which can determined by turning the equipment off and on, try to correct the interference by one or more of the following measures:
•Reorient or relocate the receiving antenna.
•Increase the separation between the unit and the television tuner.
•Connect the unit to an AC power outlet on a different electrical circuit.
•Consult your authorized Rotel retailer for assistance.
3
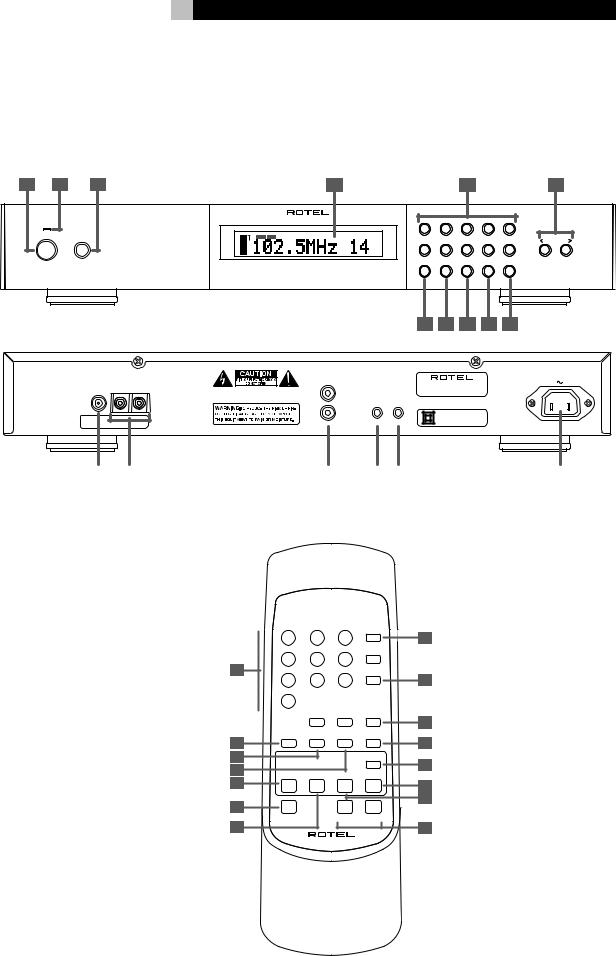
Figure 1: Controls and Connections
Commandes et Branchements
Bedienelemente und Anschlüsse
Controlli e collegamenti
Controles y Conexiones
De bedieningsorganen en aansluitingen
Funktioner och anslutningar
1 |
2 |
3 |
|
4 |
|
5 |
|
|
|
RT-02 |
|
|
|
|
|
|
|
|
|
|
|
1 |
2 |
3 |
4 |
5 |
|
POWER |
|
RBDS RDS RT TP TA AF STEREO TUNED |
AUTO MEMORY PRESET |
|
|
|
|
|
|
FM |
|
6 |
7 |
8 |
9 |
0 |
|
|
AM |
|
|
|
|
|
|
|
|
|
|
|
AUTO |
TUNE/ |
PRESET |
|
|
|
|
|
MEMORY TUNING |
PRESET |
SCAN |
BAND |
|
ANTENNA
FM |
AM |
G |
DESIGN CERTIFIED TO COMPLY WITH F.C.C. RULES, PART 15, SUBPART C.
|
|
7 |
8 |
9 |
10 |
11 |
|
OUTPUT |
|
|
|
|
|
|
|
|
AM/FM STEREO TUNER |
|
|
|
WARNING: SHOCK HAZARD – DO NOT OPEN |
|
|
MODEL NO. RT-02 |
|
|
|
LEFT |
|
POWER CONSUMPTION : 10W |
|
|
||
AVIS: RISQUE DE CHOC ELECTRIQUE – NE PAS OUVRIR |
|
|
|
|||
|
12V TRIG. |
EXT. |
|
|
|
|
|
|
REMOTE |
|
|
|
|
|
RIGHT |
|
DOUBLE INSULATION |
|
||
|
IN |
IN |
When servicing use only |
|
|
|
|
identical replacement parts |
|
||||
English
6
TUNING
12 |
|
13 |
|
14 |
|
15 |
|
16 |
|
17 |
Figure 2: RR-T92 Remote Control Télécommande RR-T92 Fernbedienung RR-T92 Controllo a distanza RR-T92 Mando a Distancia RR-T92 De RR-T92 Afstandsbediening RR-T92 Fjärrkontroll
|
1 |
2 |
3 |
DIMMER |
|
|
|
|
|
H |
|
|
4 |
5 |
6 |
FM IF |
|
|
|
|
|
NARROW |
|
A |
7 |
8 |
9 |
FM |
|
MONO |
|||||
|
|
|
|
I |
|
|
0 |
|
|
|
|
|
|
ANT |
ANT |
AUTO |
|
|
|
AB |
ATT |
TUNING |
|
|
|
|
|
J |
|
|
|
FREQUENCY |
PRESET |
TUNE |
|
B |
MEMORY |
DIRECT |
SCAN |
/PRESET |
|
|
|
|
K |
||
C |
|
|
|
DISPLAY |
|
D |
|
|
|
L |
|
PTY |
AF |
TP |
TA |
||
E |
|||||
|
|
|
M |
||
F |
|
|
|
N |
|
|
|
|
|
||
|
BAND |
|
< TUN/PRESET > |
||
G |
|
|
|
O |
|
RR-T92
RT-02 AM/FM Stereo Tuner |
4 |
Figure 3: Hook-up Illustration
Schéma de branchement type
Anschlußdiagramm
Schema di collegamento
Ejemplo de Conexionado
Het aansluitingsschema
Anslutningsbeskrivning
ANTENNA
FM |
AM |
G |
DESIGN CERTIFIED TO COMPLY WITH F.C.C. RULES, PART 15, SUBPART C.
Rotel RT-02
|
OUTPUT |
|
|
|
|
AM/FM STEREO TUNER |
|
WARNING: SHOCK HAZARD – DO NOT OPEN |
|
MODEL NO. RT-02 |
|
LEFT |
POWER CONSUMPTION : 10W |
||
AVIS: RISQUE DE CHOC ELECTRIQUE – NE PAS OUVRIR |
|||
EXT. |
|||
|
12V TRIG. |
||
|
|
REMOTE |
RIGHT |
|
DOUBLE INSULATION |
IN |
IN |
When servicing use only |
identical replacement parts |
Amplifier

Contents |
|
|
Boxed numbers refer to RT-02 illustration. |
|
|
Boxed letters refer to RR-T92 illustration. |
|
|
Figure 1: Controls and Connections |
3 |
|
Figure 2: RR-T92 Remote Control |
3 |
|
Figure 3: Hook-up Illustration |
4 |
|
About Rotel ............................................ |
|
5 |
Getting Started |
...................................... |
5 |
Key Features |
|
5 |
Unpacking |
|
5 |
Placement |
|
5 |
Rear Panel Connections ........................... |
6 |
|
RCA Outputs |
|
6 |
AM Loop Antenna |
|
6 |
FM Antenna |
|
6 |
AC Input |
|
6 |
12V TRIGGER Connection |
6 |
|
EXT REMOTE IN Jack |
6 |
|
Basic Operating Controls ......................... |
6 |
|
Power Button |
and Power LED |
6 |
Remote Sensor |
|
6 |
Front Panel Display |
7 |
|
DIMMER Button |
|
7 |
MEMORY Button |
|
7 |
Setting Country Mode |
7 |
|
Basic Tuning Controls .............................. |
7 |
|
BAND Button |
|
7 |
TUNING Controls |
|
7 |
NUMERIC Buttons: |
|
|
Station Presets |
|
8 |
FREQUENCY DIRECT Button: |
|
|
Direct Access Tuning |
8 |
|
Auto Tuning Button |
8 |
|
TUNE/PRESET Button |
8 |
|
PRESET SCAN Button |
8 |
|
FM MONO Button |
|
8 |
RDS and RBDS Broadcast Reception ......... |
9 |
|
DISPLAY Button |
|
9 |
PTY Button |
|
9 |
TP Button |
|
9 |
TA Button |
|
10 |
AF Button |
|
10 |
Specifications ....................................... |
|
10 |
5
About Rotel
A family whose passionate interest in music led them to manufacture high fidelity components of uncompromising quality founded Rotel over 40 years ago. Through the years that passion has remained undiminished and the family goal of providing exceptional value for audiophiles and music lovers regardless of their budget, is shared by all Rotel employees.
The engineers work as a close team, listening to, and fine tuning each new product until it reaches their exacting musical standards. They are free to choose components from around the world in order to make that product the best they can. You are likely to find capacitors from the United Kingdom and Germany, semi conductors from Japan or the United States, while toroidal power transformers are manufactured in Rotel’s own factory.
Rotel’s reputation for excellence has been earned through hundreds of good reviews and awards from the most respected reviewers in the industry, who listen to music every day. Their comments keep the company true to its goal – the pursuit of equipment that is musical, reliable and affordable.
All of us at Rotel, thank you for buying this product and hope it will bring you many hours of enjoyment.
Getting Started
Thank you for purchasing the RT-02 AM/FM Stereo Tuner. Rotel’s Balanced Design Concept combines advanced circuit board layout, comprehensive parts evaluation, and extensive listening tests for superior sound and long term reliability. The Rotel RT-02 will provide years of listening enjoyment.
English
Key Features
•AM and FM tuning capabilities
•User-friendly Fluorescent Display
•30 Station Presets for memorizing your favorite stations
•Manual frequency and preset tuning, autosearch tuning, preset scanning, and frequency direct tuning.
•RDS (Radio Data System) capability for Europe and RBDS (Radio Broadcast Data Service) capability for the USA.
•Stereo/mono switching
•12 volt trigger connections for remote turn on/off by Rotel preamplifiers and surround processors.
•Full-function wireless remote control
Unpacking
Remove the unit from its packing. Look for the handheld remote control and other accessories. Install the supplied batteries in the remote control. Save the packing and box as it will protect the RT-02 if you move or need to return it for maintenance.
Placement
Place the RT-02 on a solid, dry, level surface away from direct sunlight, excessive heat, high humidity, or strong vibrations.
The RT-02 can generate some heat during normal operation. If installed in a cabinet, make sure that there is adequate ventilation. Make sure there is enough room behind the RT-02 for easy hookup. Place the unit close to the other components in your audio/video system and, if possible, place it on its own shelf. This will make initial cable routing, hookup, and any subsequent system changes easier. It also minimizes potential interference or heat buildup from other components.
Don’t stack heavy objects on top of the RT-02. Do not expose the unit to moisture; this could damage the circuitry and cause a safety hazard.

RT-02 AM/FM Stereo Tuner
Rear Panel Connections
The RT-02 provides rear panel connections for audio line level output, an FM antenna, an AM antenna, a 12V Trigger, a remote IR sensor, and AC power input.
NOTE: Do not plug any system component into an AC source until system hookup is complete and you are confident that all component-to- component connections have been properly made.
RCA Outputs 
Line level RCA audio outputs send a fixed-level stereo signal from the RT-02 to your preamplifier, system controller, or integrated amplifier. Use a standard RCA audio cable to connect the LEFT OUTPUT jack to the left channel tuner input on your system controller and the RIGHT OUTPUT jack to the right channel tuner input on your system controller.
AM Loop Antenna 
The RT-02 includes a loop antenna to receive AM radio signals. Remove this antenna from the box and locate it near the RT-02.
Connect the 300 ohm twin-conductor wire from the loop antenna to the pair of screw terminals labeled AM LOOP, attaching one wire to each terminal. It does not matter which wire attaches to which terminal, but make sure that the connections are solid and that the two wires do not touch.
You may need to rotate or otherwise reorient the antenna to find the best position.
NOTE: To use an outdoor antenna, connect its 300 ohm twin-conductor wire to the G and AM terminals in place of the loop antenna, only after a professional contractor has installed the antenna system in accordance with local electrical codes.
FM Antenna 
The RT-02 is supplied with a T-shaped indoor FM antenna. Remove this antenna from the box and connect its attached coax F-type plug to the FM antenna connector on the RT-02. For best reception, unfold the T-shaped antenna. Eyelets at both ends of the T allow tacking the antenna to a wall, if desired. Experiment with positioning for best reception.
6
NOTE: To use an outdoor antenna, connect its 75 ohm coax lead wire to the FM connector in place of the indoor wire antenna, only after a professional contractor has installed the antenna system in accordance with local electrical codes. In the USA, you will need to use the supplied F-type converter to connect the 75 ohm coax cable to the antenna input.
AC Input 
Your RT-02 is configured at the factory for the proper AC line voltage in the country where you purchased it (115 volts AC at 60Hz in the USA and 230 volts AC at 50Hz in Europe). The AC line configuration is noted on a decal on the back of your unit. Make sure that your unit is configured properly for your AC line voltage.
Plug the supplied cord into the AC INPUT receptacle on the back of the unit. Once all other rear panel connections are completed, plug the power cord into an AC wall outlet or switched AC outlet on another system component.
12V TRIGGER Connection 
The RT-02 can be activated by a 12 volt trigger signal from a Rotel preamplifier.
The trigger input accepts any control signal (AC or DC) ranging from 3 volts to 30 volts. When a cable is connected to the input and a trigger signal is present, the tuner is activated. When the trigger signal is interrupted, the tuner goes into standby mode. The front panel indicator light remains lit, but the display goes dark and the unit will not operate.
NOTE: When using the 12V Trigger feature, leave the POWER button in the ON position.
EXT REMOTE IN Jack 
This 3.5mm mini-jack receives command codes from industry-standard infrared receivers (Xantech, etc.) via hard-wired connections. This feature could prove useful when the unit is installed in a cabinet and the front-panel sensor is blocked. Consult your authorized Rotel dealer for information on these external repeaters and the proper wiring of a jack to fit the mini-jack receptacle.
Basic Operating Controls
The following explanations will help you get familiar with the features and controls. When a function is available on both the front panel and the remote, a number (see front panel illustration) and a letter (see remote control illustration) are shown in the instructions. For example, to change from the AM to FM band, you can either press the front panel button or use the button on the remote. When only one identifier appears, that control is available only on the front panel or the remote, but not both.
NOTE: Controls used for tuning the AM/FM receiver are described in the next sections of this manual.
Power Button  and
and
Power LED 
The POWER button is located on the front panel of the RT-02 and is not duplicated on the remote control. Push the button IN to turn the unit on. The LED above the switch and the front panel display will light up. Push the button again (returning it to the OUT position), to turn the unit off.
NOTE: If you are using a switched outlet on another component to power the RT-02 or if you are using the 12 volt trigger feature, leave the POWER switch in the ON position.
Remote Sensor 
This front panel sensor receives infrared signals from the remote control. Make sure you do not accidentally block this sensor with cables or accessories.

Front Panel Display 
The large fluorescent display in the center portion of the RT-02 provides status information used in operating the AM/FM receiver (such as station frequency display, band, preset memory, RDS information, etc.).
DIMMER Button 
Available only on the remote control, this button selects three display brightness settings: NORMAL, DIM, or OFF. When the display is OFF, pressing any button or control will return it to the NORMAL mode. Press the button to cycle through the three settings.
NOTE: When the tuner is turned off and back on, the display reverts to its normal setting.
MEMORY Button 

The MEMORY button is used to confirm and memorize various settings in the setup and operation of the RT-02, including tuner station presets. Its use is described in detail in the relevant sections below.
Setting Country Mode
The RT-02 has two default modes, one for the USA and one for Europe. These configure the unit for differences in local markets, including FM tuning intervals, AM tuning intervals, and differences in the European RDS and United States RBDS standards. Your unit has been factory configured to the correct default mode for the country in which it was purchased.
To switch to the USA default mode, press and hold the POWER, MEMORY, and 9 buttons for 5 seconds. The word LOADING will appear in the DISPLAY and the unit will power up in the USA configuration.
To switch to the European default mode, press and hold the POWER, MEMORY, and 0 buttons for more than 5 seconds. The word LOADING will appear in the DISPLAY and the unit will power up in the European configuration.
7
Basic Tuning Controls
The RT-02 features a digital synthesized AM/ FM tuner with RDS or RBDS capability and 30 station presets. The unit offers a wide range of tuning options. Here is an overview of the tuning options (more detailed information is provided in subsequent sections of this manual):
•Manual frequency tuning lets you tune up or down to the next station frequency. Set the TUNE/PRESET mode to TUNE. Turn off AUTO TUNING. Use the TUNING controls to tune up or down.
•Direct frequency tuning lets you enter the desired station frequency digits. Press the FREQUENCY DIRECT button on the remote and enter the digits using the NUMERIC buttons.
•Automatic frequency search tuning lets you search up or down to find the next receivable broadcast signal. Set the TUNE/ PRESET mode to TUNE. Turn on AUTO TUNING. Use the TUNING controls to search up or down.
•Memory station preset tuning lets you directly enter the number of a memorized station preset number. Enter the number of the memorized preset using the NUMERIC buttons.
•Preset scan tuning lets you scan up/ down through the memorized station presets. Press the PRESET SCAN button to begin scanning.
•RDS (Europe) or RBDS (USA) tuning provides a range of special tuning and search features based on data codes encoded with the broadcast signal. See the RDS section of this manual for detailed information.
NOTE: Three buttons on the remote (ANT A/B, FM IF NARROW, and ANN ATT) are not used with the RT-02 tuner.
BAND Button 

The BAND button selects whether the tuner will receive AM or FM broadcast signals. Press the button to toggle back and forth between AM and FM. A corresponding indicator will light at the left portion of the front panel DISPLAY to confirm your choice. The currently tuned station frequency will be shown.
English
TUNING Controls 
A pair of buttons, labeled < TUNING > on the front panel and < TUN/PRESET > on the remote, serve as the main tuning controls for the RT-02. You can use either the front panel or remote buttons; their function is identical.
These controls provides different tuning functions, depending on the mode of operation:
In the FREQUENCY TUNING mode with AUTO TUNING off, press a TUNING button to manually jump to the next frequency, regardless of whether or not a station is broad-casting on that frequency. [See the TUNE/PRE-SET button and AUTO TUNING button sections for details on changing the tuning modes.]
In the FREQUENCY TUNING mode with AUTO TUNING on, press a TUNING button to start auto tuning. The tuner begins automatically scanning up or down through the frequencies until the next receivable signal is detected. If this is not the desired station, repeat the automatic tuning procedure to find the next station. Weak stations will be skipped during auto tuning. If no receivable signal is detected, the tuner will revert to the last previously tuned station. [See the TUNE/PRESET button and AUTO TUNING button sections for details on changing the tuning modes.]
In the PRESET TUNING mode, press a TUNING button to advance to the next memorized station preset. [See the TUNE/PRESET button section for details on changing the tuning modes.]
In the RDS PTY search mode, press a TUNING button to select the desired program type from the scrolling list in the display. See the section on RDS tuning for more details. [See the RDS PTY button section for details.]
NOTE: Several indicators in the front panel display assist tuning. A large display shows the tuned frequency and increases or decreases during tuning. A signal strength indicator shows the strength of the incoming signal. A TUNED indicator lights when a sufficiently strong signal is received. A ST indicator lights when a stereo FM signal is received. In addition, indicators show the currently selected tuning mode.

RT-02 AM/FM Stereo Tuner
NUMERIC Buttons:
Station Presets 

The RT-02 can store up to 30 station presets for recall at any time using the NUMERIC keypad. These station presets can be used for any combination of AM stations and FM stations.
The RT-02 is delivered from the factory with a set of generic station presets that may or may not match any available stations in your area.
To memorize a new station preset:
1.Tune to the desired station, AM or FM.
2.Press the MEMORY button on the front panel. A MEMORY indicator will flash in the front panel display.
3.While the MEMORY indicator is flashing, press the number of the preset where you wish to store the station frequency. For example, to memorize the station as preset 3, press the 3 button. To memorize preset 15, press the 1 button followed by the 5 button.
4.A previously stored frequency is erased from memory when a new frequency is memorized for the same preset number.
To tune to a previously memorized station preset, press the preset number using the NUMERIC buttons. For example, to tune to preset 3, press the 3 button. To tune to preset 30, press the 3 button and then press the 0 button within 5 seconds.
NOTE: The NUMERIC buttons can also be used for FREQUENCY DIRECT tuning.
FREQUENCY DIRECT Button:
Direct Access Tuning 
Remote Only
If you know the exact frequency of the desired station, you may tune it directly using the FREQUENCY DIRECT button (remote only) and the NUMERIC buttons.
1.Press the FREQUENCY DIRECT button to change the NUMERIC buttons from station preset to direct access mode. The station frequency in the front panel display will change to a series of bars, representing the digits of a station frequency, with the first bar blinking.
8
2.Enter the first digit of the station frequency using the NUMERIC buttons. The digit will appear in the frequency display and the next bar will flash. Enter the remaining digits of the frequency. When all of the digits have been entered, the tuner will automatically tune to the displayed station frequency.
NOTE: On the USA version only, pressing 1 in the FM mode will enter 10 as the digit in the frequency display. On the European version, it is necessary to press 1 and then 0 to enter 10. For US FM stations, press only one digit following the decimal point as shown in the first example following. For European FM stations, press two digits after the decimal point as shown in the second example.
EXAMPLES: |
|
(USA FM) 87.50MHz |
Press 8>7>5 |
(Europe FM) 87.50MHz |
Press 8>7>5>0 |
(USA AM) 1610kHz |
Press 1>6>1 |
(Europe AM) 1611kHz |
Press 1>6>1>1 |
If no frequency is entered within 5 seconds, the tuner will cancel FREQUENCY DIRECT tuning mode and revert to the last previously tuned station.
Auto Tuning Button 

The AUTO TUNING button toggles between the frequency search tuning feature and manual frequency tuning. When using the TUNING controls on the front panel or remote in AUTO TUNING mode, the tuner will begin automatically scanning up or down through the frequencies until the next receivable broadcast signal is detected. If this is not the desired station, use the TUNING controls again to find the next station. Weak stations will be skipped during auto tuning. If no receivable signal is detected, the tuner will revert to the previously tuned station.
To toggle between FREQUENCY TUNING mode and AUTO TUNING mode, press the AUTO TUNING button. An AUTO indicator will appear in the display.
NOTE: AUTO TUNING mode is disengaged when the TUNE/PRESET button is set to PRESET tuning mode. See the following section.
TUNE/PRESET Button 

The TUNE/PRESET button toggles between FREQUENCY TUNING mode (the TUNING controls advance to the next station frequency) and PRESET TUNING mode (the TUNING controls advance to the next memorized station preset). To toggle between the two modes, press the TUNE/PRESET button. A PRESET indicator in the front panel DISPLAY will light when the PRESET mode is active.
NOTE: AUTO TUNING mode is disengaged when the TUNE/PRESET button is set to PRESET tuning mode.
PRESET SCAN Button 

This button activates a preset scanning feature. When you press the button, the tuner will automatically scan through all memorized station presets, playing each for five seconds before moving to the next. To stop the station scanning on the desired station preset, press the button again.
NOTE: If a PRESET station is currently tuned when the PRESET SCAN button is pressed, scanning will start with the next higher preset number and continue through all preset stations, stopping on the initial preset. If a PRESET station is not currently tuned when the button is pressed, scanning will start from PRESET 1 and continue to PRESET 30.
FM MONO Button 
Remote Only
The FM MONO button changes the FM mode from stereo reception to mono reception. In stereo mode, a stereo signal will be heard if the station is broadcasting a stereo signal and there is sufficient signal strength. A stereo indicator will light in the front panel display. In mono mode, a mono signal will be heard even if the station is broadcasting a stereo signal.
NOTE: Switching to mono mode can be a useful way to improve the reception of weak or distant FM signals. Less signal strength is required for clean mono reception than for stereo reception.

RDS and RBDS
Broadcast Reception
The Rotel RT-02 is equipped with RDS (Radio Data Systems) reception capabilities for Europe and RBDS (Radio Broadcast Data Service) capabilities for the United States. These broadcast systems provide additional functionality to FM radio reception by transmitting encoded information along with the radio signal. This signal is decoded by an RDS or RBDS receiver and can provide a range of informational features including:
1.a display of the station’s identifying name (e.g. BBC1)
2.a display of the station’s program content (e.g. ROCK or NEWS)
3.traffic information broadcasts
4.a scrolling text display for announcements or information
In addition, RDS provides several advanced search features including:
1.the ability to search for a station with the desired program content (PTY)
2.the ability to search for traffic information (TP)
3.the ability to automatically search stations broadcasting special traffic announcements (TA).
RDS broadcasting has been widely available in many European markets for years. There are a large number of RDS stations and most users will be familiar with the features and operation. In the USA, implementation of the RBDS system is more recent. Fewer stations are currently broadcasting RBDS signals and the features may be less familiar to many users. Consult your authorized Rotel dealer for more information on RDS or RBDS broadcasting in your market.
NOTE: The RDS and RBDS features are entirely dependent on the broadcaster sending properly encoded signals. Thus, they will only be available in markets where RDS or RBDS is currently implemented and where stations are broadcasting these data signals. If there are no RDS or RBDS stations, the RT-02 will function as a standard radio receiver.
9
NOTE: RDS and RBDS services are only available on FM broadcasts. The features and buttons described below are only operational in FM mode.
DISPLAY Button 
Remote Only
There are five display options when the currently tuned station is broadcasting RDS information and the RDS indicator in the front panel display is lit. Press the DISPLAY button to step sequentially through the five available display options:
1.Standard FREQUENCY display.
2.PROGRAM SERVICE name. This is typically the station’s call letters, such as BBC1). If the current station is not broadcasting an RDS signal, the display will show a blinking PS indication.
3.PROGRAM TYPE. This is a description of the station’s content from a standardized list of program types in each market (for example: NEWS, CURRENT AFFAIRS, INFO, SPORT, EDUCATION, DRAMA, CULTURE, SCIENCE, VARIED, POP, ROCK, EASY LISTENING, LIGHT CLASSICAL, SERIOUS CLASSICAL, OTHER MUSIC, WEATHER, FINANCE, CHILDREN, SOCIAL AFFAIRS, RELIGION, PHONE IN, TRAVEL, LEISURE, JAZZ, COUNTRY, NATIONAL MUSIC, OLDIES, FOLK, and DOCUMENTARY). If the current station is not broadcasting an RDS signal, the display will show a blinking PT indication.
4.CLOCK TIME. A time and date display broadcast by the station. If the current station is not broadcasting an RDS signal, the display will show a blinking CT indication.
5.RADIO TEXT. Additional scrolling text messages broadcast by the station. If the current station is not broadcasting an RDS signal, the display will show a blinking RT indication.
English
PTY Button 
Remote Only
The PTY search function permits you to scan available signals for RDS stations broadcasting a particular type of program content.
1.Press the PTY button. The current RDS program content type will appear in the display.
2.If desired, change to a different PROGRAM TYPE using the TUNING controls to scroll through the list.
3.Press the PTY button a second time within 5 seconds. The tuner will attempt to find an RDS station broadcasting the selected type of program. If the button is not pressed within 5 seconds after selecting a program type, the PTY function will be cancelled.
4.If no station is located for the desired content type, the tuner will return to the last previously tuned station.
5.Cancel the PTY function by pressing any button (except DIMMER or FM MONO).
TP Button 
Remote Only
Searches for an RDS station broadcasting traffic information programming:
1.Press the TP button. The tuner will attempt to find an RDS station broadcasting the traffic programming.
2.If no station is located, the tuner will return to the last previously tuned station.
3.Cancel the TP function by pressing any button (except DIMMER or FM MONO).
TA Button 
Remote Only
Searches for an RDS station broadcasting special traffic announcements:
1.Press the TA button. The tuner will attempt to find an RDS station broadcasting traffic announcements.
2.If no station is located, the tuner will return to the last previously tuned station.
3.Cancel the TA function by pressing any button (except DIMMER or FM MONO).

RT-02 AM/FM Stereo Tuner
AF Button 
Remote Only
In some cases, an RDS station is part of a network of stations broadcasting the same programming (for example, BBC1 programming in the UK may be available at several different frequencies). Stations broadcasting this programming may transmit an RDS data signal providing the tuner with a list of alternate frequencies where this programming is available. If this data list is transmitted, an AF indicator will appear in the DISPLAY.
The AF button is used to scan the alternate frequencies to find a stronger signal. The button is only functional when the AF indicator is lit.
1.Press the AF button. The tuner will scan each of the alternate frequencies for the same programming in the stored list and tune to the strongest signal.
2.If no station is located, the tuner will return to the last previously tuned station.
3.If the signal strength of the new station is weaker, the tuner will revert to the previously tuned station.
4.Cancel the AF function by pressing any button (except DIMMER or FM MONO).
10
Specifications
FM Tuner
Usable Sensitivity: |
14.2 dBf |
50dB Quieting Sensitivity: |
20.2 dBf (mono) |
|
45.3 dBf (stereo) |
Signal to Noise Ratio (at 65 dBf): |
73 dBf (mono) |
|
70 dBf (stereo) |
Harmonic Distortion (at 65 dBf): |
0.2% (mono) |
|
0.3% (stereo) |
Frequency Response: |
10 Hz-15 kHz, ±3 dB |
Capture Ratio: |
2.0 dB |
Alternate Channel Selectivity: |
47 dB (±400 kHz) |
Spurious Response Ratio: |
90 dB |
Image Rejection Ratio: |
80 dB |
IF Rejection Ratio: |
80 dB |
AM Suppression Ratio: |
55 dB |
Stereo Separation (100Hz/1 kHz/10 kHz): |
40 dB/45 dB/35 dB |
Output level: |
1V |
Antenna Input: |
75 ohms unbalanced |
AM Tuner
Usable Sensitivity: |
500 V/m |
Selectivity: |
25 dB |
Harmonic Distortion: |
0.5% |
Image Rejection Ratio: |
45 dB |
Signal to Noise Ratio: |
40 dB |
Output level: |
500 mV |
Antenna Input: |
Loop Antenna |
General
Power Consumption: |
10 watts |
|
Power Requirements (AC): |
115 volts, 60 |
Hz (USA version) |
|
230 volts, 50 |
Hz (European version) |
Weight: |
3.9 Kg/8.6 lb. |
|
Dimensions (W x H x D): |
435 x 72 x 319 mm |
|
|
171/8" x 2 7/8" x 109/16" |
|
Panel Height |
60 mm / 23/8" |
|
All specifications are accurate at the time of printing.
Rotel reserves the right to make improvements without notice.
Rotel and the Rotel HiFi logo are registered trademarks of The Rotel Co, Ltd., Tokyo, Japan.
Explication des symboles graphiques
L’éclair dans un triangle équilatéral indique la présence interne de tensions électriques élevées susceptibles de présenter des risques graves d’électrocution.
ATTENTION : POUR RÉDUIRE LE RISQUE D’ÉLECTROCUTION, NE PAS RETIRER LE CAPOT. IL N’Y A À L’INTÉRIEUR AUCUNE PIÈCE SUSCEPTIBLE D’ÊTRE MODIFIÉE PAR L’UTILISATEUR. EN CAS DE PROBLÈME, ADRESSEZ-VOUS À UN RÉPARATEUR AGRÉÉ.
Le point d’exclamation dans un triangle équilatéral indique à l’utilisateur la présence de conseils et d’informations importantes dans le manuel d’utilisation accompagnant l’appareil. Leur lecture est impérative.
ATTENTION: Il n’y a à l’intérieur aucune pièce susceptible d’être modifiée par l’utilisateur. Adressez-vous impérativement à une personne qualifiée.
ATTENTION: Prenez garde à ce qu’aucun objet ou liquide ne tombe à l’intérieur de l’appareil par ses orifices de ventilation ; Si l’appareil est exposé à l’humidité ou si un objet tombe à l’intérieur, couper immédiatement l’alimentation secteur de tous les appareils. Débrancher l’appareil des autres maillons, et adressez-vous immédiatement et uniquement à une personne qualifiée et agréée.
Lisez les instructions: Tous les conseils de sécurité et d’installation doivent être lus avant de faire fonctionner l’appareil. Conservez soigneusement ce livret - Vous devez pouvoir le consulter à nouveau pour de futures références.
Respectez tous les conseils: Tous les conseils de sécurité doivent être soigneusement respectés. Suivez les instructions - Respectez les procédures d’installation et de fonctionnement indiquées dans ce manuel.
Entretien: L’appareil doit être nettoyé uniquement selon les recommandations de son constructeur.
Ventilation: L’appareil doit être placé de telle manière que sa propre ventilation puisse fonctionner. Par exemple, il ne doit pas être posé sur un fauteuil, un canapé, une couverture ou toute autre surface susceptible de boucher ses ouïes d’aération ; ou placé dans un meuble empêchant la bonne circulation d’air autour des orifices d’aération.
Chaleur: Cet appareil doit être placé loin de toute source de chaleur, tels que radiateurs, chaudières, bouches de chaleur ou d’autres appareils (y compris amplificateurs de puissance) produisant de la chaleur.
Cet appareil doit être branché sur une prise d’alimentation secteur, d’une tension et d’un type conformes à ceux qui sont indiqués sur la face arrière de l’appareil.
11
Brancher l’appareil uniquement grâce au cordon secteur fourni, ou à un modèle équivalent. Ne pas tenter de modifier ou changer la prise. Notamment, ne pas tenter de supprimer la prise de terre si celle-ci est présente. Ne pas utiliser de cordon rallonge.
Prendre garde à ce que ce cordon d’alimentation ne soit pas pincé, écrasé ou détérioré sur tout son trajet, à ce qu’il ne soit pas mis en contact avec une source de chaleur. Vérifier soigneusement la bonne qualité des contacts, à l’arrière de l’appareil comme dans la prise murale.
Si l’appareil ne doit pas être utilisé pendant une longue période, la prise secteur sera débranchée.
Service après vente: L’appareil doit être immédiatement éteint, débranché puis éventuellement retourné au service après-vente agréé dans les cas suivants:
•Le cordon secteur ou la prise ont été endommagés.
•Un objet est tombé, ou du liquide a coulé à l’intérieur de l’appareil.
•L’appareil a été exposé à la pluie.
•L’appareil ne fonctionne pas normalement, ou ses performances sont anormalement limitées.
•L’appareil est tombé, ou le coffret est endommagé.
Placer l’appareil sur une surface plane, solide et rigide. Ne jamais placer l’appareil sur une surface ou un support mobile pouvant basculer.
Français
Sommaire
Les numéros encadrés renvoient à l’illustration du RT-02. Les chiffres encadrés renvoient à l’illustration de la télécommande RR-T92.
Figure 1: Commandes et Branchements |
3 |
Figure 2: Télécommande RR-T92 |
3 |
Figure 3: Schéma de branchement type |
4 |
Au sujet de Rotel .................................. |
12 |
Démarrage ........................................... |
12 |
Caractéristiques |
12 |
Déballage |
12 |
Installation |
12 |
Branchements en face arrière ................. |
12 |
Prises RCA |
12 |
Antenne cadre AM |
12 |
Antenne FM |
13 |
Prise d’alimentation secteur |
13 |
Prise de commutation 12 V TRIGGER |
13 |
Prise d’entrée télécommande |
|
EXT REMOTE IN |
13 |
Commandes de base .............................. |
13 |
Bouton de mise sous tension POWER |
13 |
Capteur de télécommande |
13 |
Afficheur de la face avant |
13 |
Touche d’atténuation afficheur DIMMER |
13 |
Touche de mémorisation MEMORY |
13 |
Réglages mode régional |
13 |
Commandes de fonctionnement du tuner .. |
14 |
Touche de gamme BAND |
14 |
Commande d’accord TUNING |
14 |
Clavier numérique: |
|
Présélection des stations |
14 |
Touche de recherche par fréquence |
|
FREQUENCY DIRECT: Accord par accès direct |
15 |
Touche d’accord automatique |
|
AUTO TUNING |
15 |
Touche d’accord/présélection |
|
TUNE/PRESET |
15 |
Touche de balayage des stations |
|
PRESET SCAN |
15 |
Touche de réception mono FM MONO |
15 |
Réception de type RDS .......................... |
16 |
Touche d’afficheur DISPLAY |
16 |
Touche PTY |
16 |
Touche TP |
16 |
Touche TA |
16 |
Touche AF |
17 |
Spécifications ....................................... |
17 |

RT-02 Tuner Stéréophonique AM/FM |
12 |
Au sujet de Rotel
C’est une famille de passionnés de musique qui a fondé Rotel, il y a quarante ans. Pendant toutes ces années, leur passion ne s’est jamais émoussée et tous les membres de la famille se sont toujours battus pour fabriquer des appareils présentant un exceptionnel rapport musicalité-prix, suivis en cela par tous les employés.
Les ingénieurs travaillent toujours en équipe réduite, écoutant et peaufinant soigneusement chaque appareil pour qu’il corresponde parfaitement à leurs standards musicaux. Ils sont libres de choisir n’importe quels composants dans le monde entier, uniquement en fonction de leur qualité. C’est ainsi que vous trouvez dans les appareils Rotel des condensateurs britanniques ou allemands, des transistors japonais ou américains, tandis que tous les transformateurs toriques sont directement fabriqués dans une usine Rotel.
L’excellente réputation musicale des appareils Rotel a été saluée par la plupart des magazines spécialisées ; ils ont reçu d’innombrables récompenses, et sont choisis par de nombreux journalistes critiques du monde entier, parmi les plus célèbres, ceux qui écoutent de la musique quotidiennement. Leurs commentaires restent immuables: Rotel propose toujours des maillons à la fois musicaux, fiables et abordables.
Mais plus que tout, Rotel vous remercie pour l’achat de cet appareil, et souhaite qu’il vous apporte de nombreuses heures de plaisir musical.
Démarrage
Nous vous remercions pour l’achat de ce tuner stéréo AM/FM Rotel RT-02. La philosophie de Rotel baptisée «Balance design concept» associe un schéma original, un choix très soigneux des composants, et de très nombreux tests d’écoute pour une qualité sonore parfaite et une fiabilité exceptionnelles. Le tuner RT-02 vous garantit des années et des années de plaisir musical.
Caractéristiques
•Réception des gammes AM et FM
•Afficheur fluorescent très complet
•30 stations présélectionnées
•Recherche manuelle ou par présélections, recherche automatique, balayage des stations présélectionnées, et recherche pas entrée directe de la fréquence.
•Fonctions RDS (Radio data system) pour l’Europe
•Commutation stéréo/mono
•Prises de commutation 12 volts trigger pour la mise sous tension automatique d’autres maillons de la chaîne (préamplificateur, processeur Surround, etc.)
•Télécommande complète de toutes les fonctions.
Déballage
Sortez soigneusement l’appareil de son emballage. N’oubliez pas la télécommande et les autres accessoires. Installez les piles fournies dans la télécommande. Conserver l’emballage est la meilleure solution pour protéger le RT-02 lors de tout transport ultérieur.
Installation
Poser le RT-02 sur une surface rigide, plate, et sèche, loin de tout rayon direct du soleil, de la chaleur excessive, d’une humidité trop élevée, ou de fortes vibrations.
Le RT-02 peut générer de la chaleur durant son fonctionnement normal. S’il est installé dans un coffret ou un meuble, vérifiez qu’il dispose d’une ventilation correcte.
Vérifiez qu’il y a assez d’espace derrière le RT-02 pour ses branchements. Placez cet appareil le plus près possible des autres maillons du système, et, si possible, sur sa propre étagère. Cela facilitera les branchements, le trajet des câbles de liaison, et toute modification ultérieure dans l’installation. Cela minimisera aussi les éventuelles interférences d’un maillon sur l’autre.
Ne posez pas d’objet lourd sur le dessus du RT-02. N’exposez pas cet appareil à l’humidité, car cela pourrait endommager ses circuits internes.
Branchements en face arrière
Le RT-02 dispose en face à arrière des prises suivantes: sortie niveau Ligne, une antenne FM, une antenne AM, une prise de commutation 12 V TRIGGER, une prise pour récepteur de télécommande IR, et une prise d’alimentation secteur.
NOTE: ne reliez aucun maillon du système dans les prises secteur tant que tous les branchements ne sont pas terminés. Assurezvous que tous les branchements de maillon à maillon ont bien été effectués.
Prises RCA 
Une paire de prises type RCA envoie un signal stéréo de niveau fixe depuis le RT-02 vers votre préamplificateur, ou votre amplificateur intégré. Les sorties respectivement repérées LEFT (gauche) et RIGHT (droite) doivent être branchées dans les entrées correspondantes repérées TUNER sur le préamplificateur ou l’amplificateur intégré.
Antenne cadre AM 
Le RT-02 est livré avec une antenne cadre permettant de recevoir les signaux AM (stations émises en modulation d’amplitude). Placez cette antenne près du RT-02.
Branchez le câble deux conducteurs 300 ohms dans les deux bornes à vis repérées AM LOOP (boucle AM), un câble à chaque borne. Le sens de branchement des deux conducteurs n’a pas d’importance ; vérifiez simplement que le serrage est correct et que les deux câbles ne se touchent pas.
Vous devez orienter l’antenne afin d’obtenir la réception la plus correcte possible.
NOTE: on peut brancher une antenne AM extérieure en utilisant les deux bornes repérées «AM» et «G», à la place de l’antenne cadre. Seul un installateur agréé peut installer une antenne AM extérieure, répondant aux normes électriques en vigueur.

Antenne FM 
Le RT-02 est livré avec une antenne FM intérieure en forme de “T”. Branchez sa prise F sur la prise du tuner. Les deux oeillets aux extrémités de l’antenne sont prévus pour la fixer le long d’un mur. Effectuez divers essais d’orientation correcte avant de la fixer définitivement.
NOTE: pour utiliser une antenne extérieure, branchez-la sur la prise 75 ohms, via un câble adéquat. Seul un installateur agréé sera en mesure de vous fournir un équipement d’excellente qualité dans ce domaine: consultez votre revendeur Rotel à ce sujet.
Prise d’alimentation secteur 
Votre RT-02 est réglé en usine pour s’adapter aux caractéristiques de votre alimentation secteur, c’est-à-dire 240 volts 50 Hz, en Europe. Ce réglage figure sur une étiquette, en face arrière de l’appareil. Vérifiez qu’il est conforme à votre installation avant de brancher l’appareil sur le secteur.
Utilisez le câble secteur fourni. Branchez-le d’abord dans la prise à l’arrière du RT-02, puis dans la prise murale. N’effectuez ce branchement que lorsque toutes les connexions entre maillons ont bien été effectuées.
Prise de commutation 12 V TRIGGER 
Le RT-02 peut être mis sous tension grâce à un signal 12 volts envoyé par un préamplificateur Rotel.
La commutation peut se faire en pratique avec une tension comprise entre 3 et 30 volts, en courant continu ou alternatif. Lorsqu’un câble est branché sur cette entrée et qu’une tension apparaît à ses bornes, le tuner s’allume. Si cette tension disparaît, le tuner se met en mode de veille Standby. L’indicateur de la face avant reste allumé, mais l’afficheur du tuner s’éteint et l’appareil ne fonctionne pas.
NOTE: Si vous utilisez cette fonction 12 V TRIGGER, laissez la touche POWER enfoncée (position ON).
13
Prise d’entrée télécommande EXT REMOTE IN 
Cette prise jack 3,5 mm reçoit les codes de commande infrarouge normalisés (Xantech, etc.) via une liaison par câble. Cette caractéristique est utilise si l’appareil, encastré dans un meuble, n’a pas son récepteur infrarouge visible de l’extérieur. Consultez votre revendeur agréé Rotel pour connaître les accessoires optionnels nécessaires à l’utilisation de cette prise.
Commandes de base
Les paragraphes suivants vont vous permettre de vous familiariser avec les fonctions et commandes principales de votre nouveau tuner. Les nombres cerclés renvoient aux illustrations, au début de ce manuel d’utilisation.
La plupart des fonctions sont accessibles, soit sur la face avant de l’appareil, soit sur la télécommande livrée avec. Lorsqu’apparaissent respectivement un chiffre et une lettre cerclés, ils renvoient respectivement à la face avant et à la télécommande. Par exemple, pour passer de la bande AM à la bande FM, vous pouvez soir presser la touche de la face avant, soit presser la touche de la télécommande. Si seul un numéro ou une lettre apparaît, c’est que la fonction correspondante n’est accessible que via la façade, ou au contraire la télécommande.
NOTE: Les commandes concernant la recherche des stations sont expliquées dans le paragraphe suivant.
Bouton de mise sous tension POWER 

La touche POWER ne se trouve que sur la face avant du tuner. Pressez la touche repérée IN pour mettre le tuner sous tension. Une seconde pression sur cette même touche coupe l’alimentation.
NOTE: Si vous utilisez la prise de renvoi d’un autre maillon pour alimenter le RT-02, ou si vous utilisez la commutation 12 V TRIGGER, laissez toujours la touche POWER sur ON.
Capteur de télécommande 
Ce capteur en face avant reçoit les informations en provenance de la télécommande. Vérifiez qu’il ne soit pas inopinément obstrué (câbles, accessoires, etc.)
Français
Afficheur de la face avant 
Ce grand afficheur fluorescent au centre de la façade du RT-02 donne toutes les informations souhaitables sur la réception d’une station de radio (fréquence, gamme, numéro de présélection, information RDS, etc.)
Touche d’atténuation afficheur DIMMER 
Disponible uniquement à partir de la télécommande, cette fonction permet de réduire la luminosité de l’afficheur de la face avant. Chaque pression sur cette touche fait passer d’une luminosité normale (NORMAL) à une luminosité réduite (DIM) puis à l’extinction de l’affichage (OFF), et ainsi de suite.
NOTE: Après chaque extinction puis réallumage du tuner, la luminosité redevient en position normale.
Touche de mémorisation MEMORY 

La touche repérée MEMORY est utilisée pour confirmer la mémorisation de différents réglages et fonctions du RT-02, et notamment la présélection des stations. Son fonctionnement est expliqué plus loin en détail.
Réglages mode régional
Le RT-02 possède deux modes de fonctionnement par défaut: un pour les ÉtatsUnis, l’autre pour l’Europe. Cela concerne les gammes de fréquences AM et FM, les pas de recherche en fréquence, les différences entre les fonctions RDS en Europe et RBDS aux ÉtatsUnis. Le tuner que vous possédez a normalement été configuré en usine pour la région qui vous concerne.
Pour passer en mode «USA», appuyez et maintenez la pression simultanément sur les touches POWER, MEMORY et le chiffre «9» pendant au moins 5 secondes. Le mot LOADING apparaît dans l’afficheur, et l’appareil démarre en mode «USA».
Pour passer en mode «Europe», appuyez et maintenez la pression simultanément sur les touches POWER, MEMORY et le chiffre «0» pendant au moins 5 secondes. Le mot LOADING apparaît dans l’afficheur, et l’appareil démarre en mode «Europe».

RT-02 Tuner Stéréophonique AM/FM |
14 |
Commandes de fonctionnement du tuner
Le RT-02 intègre un tuner à synthèse numérique, doté des fonctions RDS et RBDS, avec présélection possible de 30 stations différentes. Cet appareil offre également une grande latitude quant à la recherche des stations. Voici un aperçu général de ces fonctions, expliquées dans les paragraphes qui suivent:
•Accord en fréquence manuel.
Il permet de «monter» et «descendre» les fréquences pour rechercher les stations disponibles. (Mode TUNE/PRESET sur TUNE, AUTO TUNING hors service et recherche par les touches TUNING).
•Accord direct par fréquence d’émission. Ce type d’accord consiste
àentrer directement dans le tuner les chiffres correspondants à la fréquence d’accord de la station voulue. (Touche FREQUENCY DIRECT sur la télécommande, puis entrée de la fréquence via le clavier numérique).
•Recherche automatique d’accord.
Les fréquences sont balayées automatiquement, et la recherche s’arrête
àchaque fois qu’elle rencontre un signal suffisamment fort à l’antenne. (Mode TUNE/PRESET sur TUNE, AUTO TUNING en service, puis touches TUNING).
•Sélection directe d’une station après mémorisation de celle-ci dans la banque des stations présélectionnées. (Les touches du clavier numérique permettent d’entrer directement le numéro de présélection de la station voulue).
•Balayage de toutes les stations mises en mémoire. (La touche PRESET SCAN permet d’écouter brièvement toutes les stations préalablement mises en mémoire).
•Recherche via les fonctions RDS (Europe) et RBDS (USA). Ces fonctions fournissent un grand nombre d’indications sur les stations effectivement reçues. Voir plus loin la section RDS.
NOTE: Trois touches de la télécommande (ANT A/B, FM IF NARROW et ANN ANT) ne sont d’aucune utilité avec le tuner RT-02.
Touche de gamme BAND 

La touche BAND permet de sélectionner la gamme d’ondes reçue: AM (Petites Ondes) ou FM (Modulation de fréquence). Un indicateur correspondant s’allume dans l’afficheur, à gauche; la dernière station sélectionnée dans chaque gamme d’ondes est automatiquement choisie.
Commande d’accord
TUNING 

Une paire de touches, repérées <TUNING> sur la face avant, et <TUN/PRESET> sur la télécommande représentent le moyen principal de recherche des stations et d’accord sur celles-ci du RT-02. Vous pouvez utiliser au choix ces deux groupes de touches: leur fonction est identique.
Ces commandes jouent un rôle différent suivant le mode de recherche de station préalablement choisi:
En mode de recherche manuel (AUTO TUNING OFF), une pression sur les touches permet de modifier la fréquence, et de s’arrêter sur n’importe quelle valeur même si celle-ci ne correspond pas effectivement à une émission radio.
En mode de recherche automatique (AUTO TUNING ON), une pression sur une touche TUNING démarre automatiquement la recherche. La gamme de fréquence est balayée, et l’examen des fréquences s’arrête dès qu’une station émise est captée. Les stations émettant un signal trop faible sont volontairement ignorées durant cette recherche automatique. Si aucune nouvelle station n’est détectée, le tuner revient sur la station précédemment choisie. [Voir les paragraphes consacrés aux touches TUNE/ PRESET et AUTO TUNING].
Dans le mode Présélection PRESET TUNING, chaque pression sur une touche sélectionne la station précédente ou suivante, dans l’ordre des présélections (numéros choisis). En mode de recherche RDS PTY, une pression sur une des deux touches entraîne la sélection d’un type de programmes, suivant une liste déroulante dans l’afficheur [Voir le paragraphe concernant la fonction RDS PTY].
NOTE: Plusieurs indicateurs, sur l’afficheur, vous assistent en permanence pendant les opérations de recherche d’une station. La fréquence est toujours affichée de manière claire et précise. Un indicateur «TUNED» confirme la bonne réception d’une station. L’indicateur «ST» s’allume si la station reçue émet en stéréophonie. Enfin, des indicateurs renseignent en permanence sur le mode de recherche et d’accord sélectionné.
Clavier numérique: Présélection des stations 

Le RT-02 peut mettre en mémoire jusqu’à trente stations différentes, que l’on rappelle ensuite via le clavier numérique, en tapant simplement leur numéro de mise en mémoire. Ces mémorisations concernent indifféremment des stations émises en AM ou en FM.
Normalement, le RT-02 est livré en sortie d’usine avec un certains nombres de stations déjà mémorisées, mais celles-ci ne correspondent évidemment pas forcément à vos goûts (ou à vos fréquences en fonction de la situation géographique). Pour mémoriser une station, procéder comme suit:
1.Choisissez la gamme d’ondes désirée, AM ou FM, et trouvez la station voulue.
2.Appuyez sur la touche MEMORY de la face avant: une indication «MEMORY» se met
àclignoter dans l’afficheur.
3.Pendant que cet indicateur MEMORY clignote, appuyez sur le numéro de présélection que vous désirez attribuer à la station en question. Par exemple, pour mémoriser la station dans la banque de mémoire n° 3, appuyez sur la touche «3». Pour la mémoriser sous le numéro 15, appuyez successivement sur les touches «1» puis «5».
4.Une station préalablement mise en mémoire sous ce même numéro sera alors automatiquement effacée, laissant place
àla nouvelle.
Pour choisir une station préalablement mise en mémoire sous un numéro de mémorisation, appuyez simplement sur les touches correspondantes du clavier numérique: «3» pour la station n° 3, «1» et «5» pour la station n° 15. Pour la station mise en mémoire sous le numéro 30, appuyez sur la touche «3» puis la touche «0».

NOTE: Le clavier numérique est également utilisé pour entrer la fréquence exacte d’émission d’une station, lors de l’accord par entrée directe de la fréquence.
Touche de recherche par fréquence FREQUENCY DIRECT: Accord par accès direct 
Si vous connaissez la fréquence exacte de réception d’une station, vous pouvez entrer directement cette valeur (uniquement à partir de la télécommande), en utilisant successivement la touche repérée «FREQUENCY DIRECT» puis les touches du clavier numérique.
1.Appuyez sur la touche FREQUENCY DIRECT afin de faire passer les touches chiffrées du clavier numérique du mode de sélection des stations préréglées au mode d’accord par entrée directe de la fréquence de réception. L’affichage de la fréquence, en face avant se transforme en une suite de tirets, le premier clignotant.
2.Entrez le premier chiffre correspondant à la fréquence de réception. Il apparaît sur l’afficheur, tandis que le second tiret clignote. Entrez ainsi tous les chiffres composant la valeur de la fréquence de réception. Lorsque tous les chiffres ont été entrés, la station est automatiquement reçue par le tuner.
NOTE: sur la version européenne du RT-02, on presse successivement les touches «1» et «0» pour entrer la valeur 10, alors que dans la version américaine, une pression sur «1» suffit. De même, la version européenne nécessite d’entrer deux chiffres après la virgule, là où la version américaine ne nécessite qu’un seul chiffre.
EXEMPLES:
(USA FM) 87,50 MHz: Appuyez sur 8 > 7 > 5
(Europe FM) 87,50 MHz: Appuyez sur 8 > 7 > 5 > 0
(USA, AM) 1610 kHz: Appuyez sur 1 > 6 > 1
(Europe, AM) 1611 kHz: Appuyez sur 1 > 6 > 1 > 1
Si aucune fréquence n’est entrée dans les cinq secondes suivant la dernière pression d’une touche, le tuner annule automatiquement le principe d’entrée directe de la fréquence.
15
Touche d’accord automatique AUTO TUNING 

La touche AUTO TUNING permet de choisir entre le mode de recherche directe par affichage de la fréquence et le mode de recherche manuel. En mode AUTO TUNING, chaque impulsion sur le bouton rotatif de la face avant ou une des touches de la télécommande fait automatiquement défiler la fréquence de réception des stations. Dès que le tuner rencontre une station, il s’arrête sur celle-ci. Une nouvelle impulsion sur le bouton ou pression sur une des touches relance la recherche. Les stations d’un niveau de réception trop faible sont automatiquement ignorées. Si aucune station n’est détectée, le tuner revient automatiquement à la fréquence de départ du balayage.
Pour passer du mode de recherche par fréquence FREQUENCY TUNING MODE au mode de recherche automatique, appuyez sur la touche AUTO TUNING. L’indication «AUTO» apparaît dans l’afficheur.
NOTE: Le mode AUTO TUNING est désengagé lorsque la touche TUNE/PRESET est placé en mode de recherche PRESET. Voir les paragraphes suivants.
Touche d’accord/présélection TUNE/PRESET 

La touche TUNE/PRESET permet de passer du mode de recherche par fréquence FREQUENCY TUNING (recherche et avance jusqu’à la station captée suivante) au mode de recherche PRESET TUNING (passage d’une station préalablement présélectionnée à la stations présélectionnée suivante). Pour passer d’un mode à l’autre, simplement presser la touche TUNE/PRESET. Lorsque le mode PRESET est choisi, l’indication «PRESET» apparaît dans l’afficheur.
NOTE: Le mode AUTO TUNING est automatiquement désengagé lorsque la touche TUNE/PRESET est utilisée en position PRESET.
Français
Touche de balayage des stations PRESET SCAN 

Ces touches activent la fonction de balayage automatique de chacune des stations présélectionnées. Lorsque vous pressez cette touche, le tuner commence automatiquement à vous faire écouter, successivement et pendant cinq secondes, chacune des stations précédemment mémorisées. Pour arrêter ce balayage sur la station en cours d’audition, appuyez simplement une seconde fois sur la touche.
NOTE: Si une station présélectionnée est en écoute au moment où l’on utilise la fonction PRESET SCAN, la première station suivante écoutée sera celle dont le numéro de mise en mémoire est immédiatement supérieur à la station que l’on écoutait. Si on n’écoutait pas une station présélectionnée, le balayage commence sur la station n° 1 et se termine avec la station n° 30.
Touche de réception mono FM MONO 
Cette touche permet de forcer la réception d’une station stéréophonique en monophonie. C’est souvent une solution nécessaire lorsque la force du signal présente à l’antenne est trop faible. En stéréo, un indicateur correspondant s’allume dans l’afficheur.
NOTE: On utilisera systématiquement la touche Mono lorsque la réception FM est entachée de souffle ou de perturbations parasites diverses. En effet, un signal moins fort suffit généralement pour une bonne reproduction mono alors qu’il faut un signal fort pour une bonne réception en stéréo.

RT-02 Tuner Stéréophonique AM/FM |
16 |
Réception de type RDS
Le Rotel RT-02 est équipé des fonctions RDS, ou Radio Data System (fonctions RBDS pour les États-Unis). Le principe du RDS consiste à transmettre en plus du message sonore normal des informations codées qui ajoutent des fonctions et possibilités au tuner. Les principales fonctions ajoutées sont les suivantes:
1.Affichage en clair du nom de la station reçue (par exemple, «Classique»)
2 Affichage du type de programme écouté (News pour infos, Rock, etc.)
3.Commutation automatique sur les informations routières
4.Texte défilant donnant diverses indications (morceau de musique émis, etc.)
De plus, le RDS permet d’accéder à d’autres fonctions pratiques:
1.Recherche de stations ne concernant qu’un type de programme (mode PTY, très peu répandu en France)
2.Recherche automatique des informations routières (mode TP)
3.Recherche automatique des stations diffusant régulièrement les informations routières (mode TGA)
Les fonctions RDS sont désormais utilisées par la majorité des stations FM émettant en Europe. Pour information, le mode RBDS américain, semblable dans son principe, est plus récent et moins répandu.
NOTE: Les fonctions RDS sont dépendantes de chaque station écoutée. Si celles-ci ne semblent pas accessibles, n’incriminez pas votre tuner ! Il fonctionnera alors comme un tuner traditionnel.
NOTE: Les fonctions RDS ne sont accessibles que sur la bande FM. Les fonctions décrites ci-dessous ne fonctionnent donc que sur cette bande de fréquences.
Touche d’afficheur DISPLAY 
Il y a cinq options d’affichage réservées au mode de réception d’une station RDS. L’accès à ces modes d’affichage se fait de manière séquentielle, en pressant une ou plusieurs fois la touche repérée DISPLAY. Ces options sont les suivantes:
1.Affichage standard de la fréquence
2.Affichage du nom de la station PS (en entier ou en abrégé, selon le choix de la station radio elle-même).
3.Affichage du type de programme PTY (très peu répandu en France, cette fonction permet de classer les stations suivant le type de programme émis.) Par exemple, les catégories sont Musique Classique, Jazz, Rock, Pop, Informations, Sport, Culture, Météo, Religion, Voyage, etc.) Si la station n’émet pas le signal RDS correspondant, l’indication PT clignote dans l’afficheur.
4.Heure (Clock Time). La date et l’heure sont affichées. Si la station n’émet pas le signal RDS correspondant, l’indication CT clignote dans l’afficheur.
5.Radio Text. Des messages écrits sont diffusés sur l’afficheur du tuner (fonction peu usitée en France).Si la station n’émet pas le signal RDS correspondant, l’indication RT clignote dans l’afficheur.
Touche PTY 
La fonction de recherche PTY permet de ne sélectionner que les stations diffusant un certain type de message. (Fonction pratiquement pas utilisée en France).
1.Appuyez sur la touche PTY. Le contenu correspondant au type de programme apparaît sur l’afficheur.
2.Pour choisir un autre type de programme, utilisez les commandes TUNING.
3.Appuyez une seconde fois sur la touche PTY dans les cinq secondes, et le tuner ne recherchera que les stations diffusant le type de programme sélectionné. Si vous n’appuyez pas dans les cinq secondes, la fonction PTY est annulée.
4.Si aucune station ne correspond au type de programme sélectionné, le tuner revient sur la station précédemment sélectionnée.
5.Annulez la fonction PTY en pressant n’importe quelle touche (sauf les touches DIMMER et FM MONO, qui n’ont pas d’effet d’annulation).
Touche TP 
Cette touche permet de rechercher les stations de radio émettant des informations routières régulières.
1.Pressez la touche TP. Le tuner cherche une station émettant des informations routières.
2.Si aucune station n’est trouvée, le tuner revient sur la station précédemment écoutée.
3.Annulez la fonction TP en pressant n’importe quelle touche (sauf les touches DIMMER et FM MONO, qui n’ont pas d’effet d’annulation).
Touche TA 
Cette touche permet de rechercher les stations de radio émettant des informations routières spéciales
1.Pressez la touche TA. Le tuner cherche une station émettant des informations routières.
2.Si aucune station n’est trouvée, le tuner revient sur la station précédemment écoutée.
3.Annulez la fonction TA en pressant n’importe quelle touche (sauf les touches DIMMER et FM MONO, qui n’ont pas d’effet d’annulation).
Touche AF 
Dans certains cas, une station RDS est une station émettant sur plusieurs fréquences différentes afin de couvrir, avec le même programme, une zone géographique étendue. (C’est le cas des stations de radio France, et de RTL, Europe 1, etc.) ces stations envoient alors au tuner, en permanence, une liste de fréquences «alternatives» permettant de capter le même programme. Si c’est le cas, l’indication «AF» apparaît dans l’afficheur.
La touche AF est utilisée pour essayer ces diverses stations afin de trouver le signal émis le plus fort. Cette fonction est activée en permanence si l’indicateur AF est allumé.
1.Pressez la touche AF. Le tuner recherche alors toutes les fréquences «alternatives» stockées dans une liste, et s’accorde sur le signal à l’antenne correspondant le plus fort.
2.Si aucune station n’est trouvée, le tuner revient sur la station précédemment écoutée.
3.Si le signal trouvé devient trop faible, le tuner retourne à la fréquence précédente.
4.Annulez la fonction AF en pressant n’importe quelle touche (sauf les touches DIMMER et FM MONO, qui n’ont pas d’effet d’annulation).
17 |
Français |
Spécifications
Tuner FM
Sensibilité utile: |
14,2 dBf |
Sensibilité pour S/B = 50 dB: |
20,2 dBf (mono) |
|
45,3 dBf (stéréo) |
Rapport signal/bruit (à 65 dBf): |
73 dBf (mono) |
|
70 dBf (stéréo) |
Réponse en fréquence: |
10 Hz-15 kHz, ± 3 dB |
Distorsion harmonique (à 65 dBf): |
0,2 % (mono) |
|
0,3 % (stéréo) |
Rapport de capture: |
2 dB |
Sélectivité: |
47 dB (± 400 kHz) |
Réjection fantôme: |
90 dB |
Réjection image: |
80 dB |
Réjection FI: |
80 dB |
Réjection AM: |
55 dB |
Séparation des canaux (100 Hz/1 kHz/10 kHz): 40/45/35 dB |
|
Niveau de sortie: |
1 volt |
Entrée antenne: |
75 ohms asymétrique |
Tuner AM
Sensibilité utile: |
500 V/m |
Sélectivité: |
25 dB |
Distorsion harmonique: |
0,5 % |
Réjection image: |
45 dB |
Rapport signal/bruit: |
40 dB |
Niveau de sortie: |
500 mV |
Entrée antenne: |
Antenne cadre |
Divers
Consommation électrique: |
10 watts |
Alimentation secteur: |
115 volts, 60 Hz (USA); |
|
230 volts, 50 Hz (Europe) |
Poids: |
3,9 kg |
Dimensions (L x H x P): |
435 x 72 x 319 mm |
Hauteur de la façade (pour montage en rack) |
60 mm |
Toutes ces spécifications sont garanties exactes au moment de l’impression. Rotel se réserve le droit d’effectuer toutes les améliorations souhaitables sans préavis.
Rotel et le logo Rotel HiFi sont des marques déposées de The Rotel Co, Ltd, Tokyo, Japon.
Loading...