


Owner’s Manual
Manuel de l’utilisateur
Bedienungsanleitung
Manuale di Istruzioni
Manual de Instrucciones
Gebruiksaanwijzing
RC-1090
Stereo Control Amplifier
Préamplificateur Stéréo
Stereo-Vorverstärker
Preamplificatore Stereo
Preamplificador Estereofónico
Stereo Voorversterker
STEREO CONTROL AMPLIFIER RC-1090
RECORDING LISTENING
VOLUME
PHONO |
CD |
TUNER |
DVD |
AUX 1 |
AUX 2 |
LISTENING |
|
/VIDEO |
TAPE 1 |
TAPE 2 |
|||||
STANDBY PHONES |
|
|
|
|
|
|
|
PHONO |
CD |
TUNER |
DVD |
AUX 1 |
AUX 2 |
RECORDING |
|
/VIDEO |
TAPE 1 |
OFF |
|||||
RC-1090 Stereo Control Amplifier
CAUTION
RISK OF ELECTRIC SHOCK
DO NOT OPEN
CAUTION: TO REDUCE THE RISK OF ELECTRIC SHOCK, DO NOT REMOVE COVER. NO USER-SERVICEABLE PARTS INSIDE REFER SERVICING TO QUALIFIED SERVICE PERSONNEL.
APPLICABLE FOR USA, CANADA OR WHERE APPROVED FOR THE USAGE
CAUTION: TO PREVENT ELECTRIC SHOCK, MATCH WIDE BLADE OF PLUG TO WIDE SLOT. INSERT FULLY.
ATTENTION: POUR EVITER LES CHOCS ELECTRIQUES, INTRODUIRE LA LAME LA PLUS LARGE DE LA FICHE DANS LA BORNE CORRESPONDANTE DE LA PRISE ET POUSSER JUSQU AU FOND.
2
WARNING: There are no user serviceable parts inside. Refer all servicing to qualified service personnel.
WARNING: To reduce the risk of fire or electric shock, do not expose the unit to moisture or water. Do not allow foreign objects to get into the enclosure. If the unit is exposed to moisture, or a foreign object gets into the enclosure, immediately disconnect the power cord from the wall. Take the unit to a qualified service person for inspection and necessary repairs.
Read all the instructions before connecting or operating the component. Keep this manual so you can refer to these safety instructions.
Heed all warnings and safety information in these instructions and on the product itself. Follow all operating instructions.
Clean the enclosure only with a dry cloth or a vacuum cleaner.
You must allow 10 cm or 4 inches of unobstructed clearance around the unit. Do not place the unit on a bed, sofa, rug, or similar surface that could block the ventilation slots. If the component is placed in a bookcase or cabinet, there must be ventilation of the cabinet to allow proper cooling.
Keep the component away from radiators, heat registers, stoves, or any other appliance that produces heat.
The unit must be connected to a power supply only of the type and voltage specified on the rear panel of the unit.
Connect the component to the power outlet only with the supplied power supply cable or an exact equivalent. Do not modify the supplied cable in any way. Do not attempt to defeat grounding and/or polarization provisions. Do not use extension cords.
Do not route the power cord where it will be crushed, pinched, bent at severe angles, exposed to heat, or damaged in any way. Pay particular attention to the power cord at the plug and where it exits the back of the unit.
The power cord should be unplugged from the wall outlet if the unit is to be left unused for a long period of time.
Immediately stop using the component and have it inspected and/or serviced by a qualified service agency if:
•The power supply cord or plug has been damaged.
•Objects have fallen or liquid has been spilled into the unit.
•The unit has been exposed to rain.
•The unit shows signs of improper operation
•The unit has been dropped or damaged in any way
Place the unit on a fixed, level surface strong enough to support its weight. Do not place it on a moveable cart that could tip over.

3 |
English |
Figure 1: Controls and Connections
Commandes et branchements
Bedienelemente und Anschlüsse
Controlli e collegamenti
Controles y Conexiones
De bedieningsorganen en aansluitingen
8 |
|
9 |
STEREO CONTROL AMPLIFIER RC-1090 |
|
LISTENING |
RECORDING |
VOLUME
|
|
|
|
DVD |
|
|
LISTENING |
|
|
PHONO |
CD |
TUNER |
/VIDEO |
AUX 1 |
AUX 2 |
TAPE 1 |
TAPE 2 |
STANDBY |
PHONES |
|
|
|
|
|
|
|
|
|
|
|
DVD |
|
|
RECORDING |
|
|
PHONO |
CD |
TUNER |
/VIDEO |
AUX 1 |
AUX 2 |
TAPE 1 |
OFF |
1 |
|
2 |
|
3 |
|
4 |
|
5 |
|
6 |
|
7 |
18 |
19 |
20 |
21 |
22 |
BALANCED CD IN |
|
BALANCED OUTPUTS |
|
EXT REM |
|
|
IN |
||
|
|
|
|
BALANCED CD |
BALANCED |
||
ON |
OFF |
ON |
OFF |
23 |
IR OUT
1 2
|
24 |
25 |
12V TRIGGER OUT |
COMPUTER I/O |
|
1 |
2 |
|
|
R |
|
L |
R |
L |
|
|
PHONO |
CD |
TUNER DVD/VIDEO AUX 1 AUX 2 |
TAPE 1 |
TAPE 2 |
OUTPUTS |
MM |
|
|
|
|
|
|
MC |
LEFT |
|
|
|
|
LEFT |
|
|
RIGHT |
|
|
|
|
RIGHT |
|
|
|
|
|
IN |
OUT |
IN |
OUT |
1 |
SWITCHED 400W MAX |
|
|
|
|
2 |
|
|||||
10 |
11 |
12 |
13 |
|
14 |
|
15 |
16 |
17 |
Figure 2: RR-969 Remote Control Télécommande RR-969 Fernbedienung RR-969 Comando a distanza RR-969 Mando a Distancia RR-969 A De afstandsbediening RR-969
AUD |
TV |
SAT |
VCR |
DVD |
B |
|
CD |
TUN |
AV 1 |
AV 2 |
AV 3 |
||
|
||||||
1 |
2 |
3 |
POWER |
C |
||
4 |
5 |
6 |
|
|
|
|
|
|
|
CH |
VOL |
D |
|
7 |
8 |
9 |
|
|
||
|
|
|
INPUT |
|
I |
|
+10 |
0 |
X |
BAND |
MUTE |
E |
|
PLAY |
GUIDE |
UP |
MENU |
F |
||
|
|
C |
M |
|||
|
|
|
|
OSD |
G |
|
TRACK |
|
|
|
|
||
|
|
- |
ENT |
+ |
H |
|
PAUSE |
STOP |
|
|
PREV CH |
||
|
|
|
|
|||
DWN
TV/VCR |
|
|
|
|
PIP |
SWAP |
POS |
ANT |
MODE |
CD |
TUN |
PH |
TAPE1 |
TAPE2 |
V1 |
V2 |
V3 |
V4 |
V5 |
INPUT1 |
INPUT2 |
INPUT3 |
TV/VCR |
RECORD |
FM |
DIRECT |
|
|
FM |
MONO |
|
|
NARROW |
|
FILTER |
EXT IN |
ZONE |
PRESET |
SUR + |
SHIFT |
PTY |
TA |
TP |
DISPLAY |
TUNER |
|
|
|
|
MACRO |
TIME/ALM |
/ CLONE |
EDIT |
LEARN |
|
CLEAR |
LANG |
PRELOAD |
RESET |
|
|
PAGE 1/2 |
|
|
J
K
L
M
S R
RC-1090 Stereo Control Amplifier |
4 |
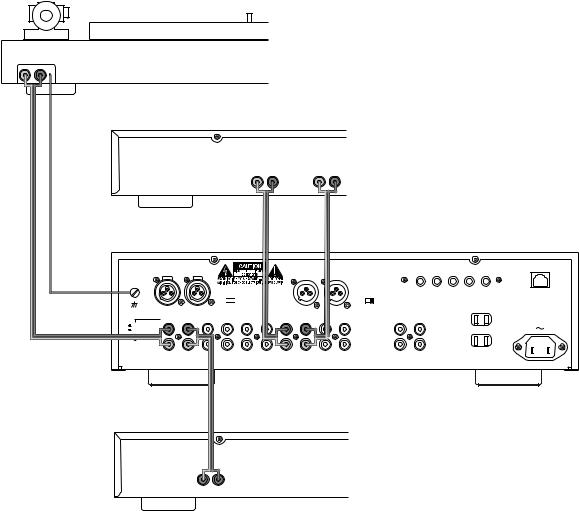
Figure 3: Phono and Line Inputs; Recorder Input/Output Entrées Phono et Ligne ; Entrée/sortie Enregistreur
Phonound Hochpegeleingänge; Tape-Ein- und –Ausgänge Ingressi phono e di linea Ingresso/uscite del registratore Entradas de Fono y Línea; Entrada/Salida para Grabación
De platenspeleringang en lijningangen; opnameapparaat inen uitgang
PH0NO
R |
L |
GND |
OUTPUT |
|
R |
L |
BALANCED CD IN
BALANCED CD
ON 


 OFF
OFF
R L
|
PHONO |
CD |
TUNER DVD/VIDEO AUX 1 |
AUX 2 |
MM |
|
|
|
|
MC |
LEFT |
|
|
|
|
RIGHT |
|
|
|
|
RECORDER |
|
|
|
|
|
|
|
||
|
|
INPUT |
|
|
|
|
|
|
|
|
|
R |
|
L |
|
|
|
|
|
|
|
|
|
|
|
|
|
|
|
|
|
ROTEL RC-1090 |
|
|
|
|
|
EXT REM |
|
IR OUT |
12V TRIGGER OUT |
COMPUTER I/O |
|
|
BALANCED OUTPUTS |
|
IN |
1 |
2 |
1 |
2 |
|
||
|
|
|
|
|
|
|||||
|
|
|
BALANCED |
|
|
|
|
|
|
|
|
|
|
ON |
OFF |
|
|
|
|
|
|
|
R |
|
L |
|
|
|
|
|
|
|
|
TAPE 1 |
|
TAPE 2 |
OUTPUTS |
|
|
|
|
|
|
|
|
|
|
LEFT |
|
|
|
|
|
|
|
|
|
|
RIGHT |
|
|
|
|
|
|
IN |
OUT |
IN |
OUT |
1 |
2 |
|
|
SWITCHED 400W MAX |
|
|
|
|
|
|
|
||||||
CD PLAYER
R L
OUTPUT
5 |
English |
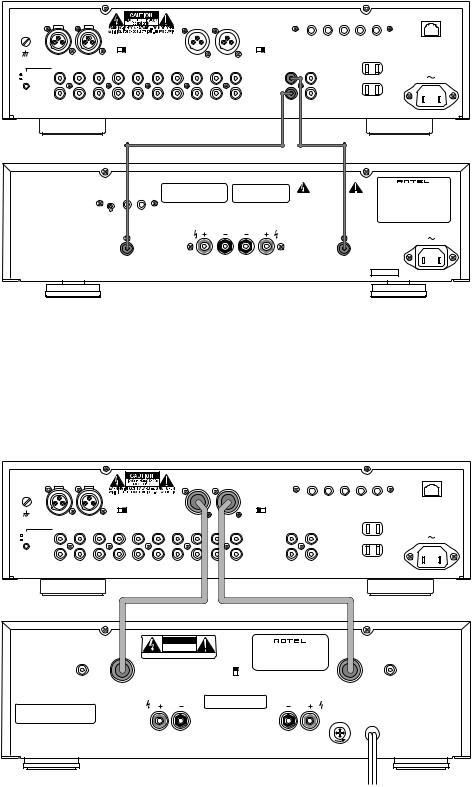
Figure 4: RCA Cable Connections
Sorties via câble RCA
Cinch-Anschlüsse
Collegamenti del Cavo RCA
Conexiones No Balanceadas (RCA)
De cinch uitgangen
ROTEL RC-1090
|
|
|
|
|
EXT REM |
IR OUT |
|
12V TRIGGER OUT |
COMPUTER I/O |
|
BALANCED CD IN |
|
BALANCED OUTPUTS |
IN |
1 |
2 |
1 |
2 |
|
||
|
BALANCED CD |
|
BALANCED |
|
|
|
|
|
||
|
ON |
OFF |
|
ON |
OFF |
|
|
|
|
|
R |
L |
|
R |
L |
|
|
|
|
|
|
|
PHONO |
CD |
TUNER DVD/VIDEO AUX 1 AUX 2 |
TAPE 1 |
|
TAPE 2 |
MM |
|
|
|
|
|
|
MC |
LEFT |
|
|
|
|
|
|
RIGHT |
|
|
|
|
|
|
|
|
IN |
OUT |
IN |
OUT |
OUTPUTS |
|
LEFT |
|
RIGHT |
|
1 |
SWITCHED 400W MAX |
2 |
|
12V TRIGGER
ON IN OUT
OFF
RIGHT INPUT
WARNING:TO REDUCE THE RISK OF FIRE OR ELECTRICAL SHOCK, DO NOT EXPOSE THIS EQUIPMENT TO RAIN OR MOISTURE.
RIGHT
SPEAKER IMPEDANCE
STEREO 4 OHMS MINIMUM
BRIDGED 8 OHMS MINIMUM
SPEAKERS
LEFT
|
|
|
|
|
ROTEL RB-1070 |
|
|
|
|
|
|
|
|
|
CAUTION |
|
|
|
|
|
|
RISK OF ELECTRIC SHOCK |
|
|
POWER AMPLIFIER |
||
|
DO NOT OPEN |
|
|
MODEL NO. RB-1070 |
||
WARNING: WARNING SHOCK HAZARD |
– DO NOT OPEN |
POWER CONSUMPTION: 400W |
||||
AVIS: RISQUE DE CHOC ELECTRIQUE–NE |
PAS OUVRIR |
|
|
|
||
|
LEFT |
INPUT |
|
|
|
|
|
|
|
|
|||
SERIAL NO.
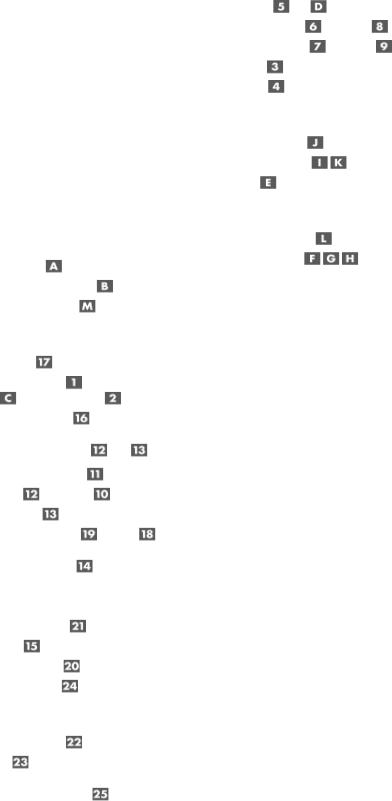
Figure 5: XLR Cable Connections
Sorties via câble XLR
XLR-Anschlüsse
Collegamenti del cavo XLR
Conexiones Balanceadas (XLR)
De XLR uitgangen
ROTEL RC-1090
|
|
|
|
|
|
|
|
|
EXT REM |
|
IR OUT |
12V TRIGGER OUT |
COMPUTER I/O |
|
|
BALANCED CD IN |
|
|
BALANCED OUTPUTS |
|
IN |
1 |
2 |
1 |
2 |
|
|||
|
|
|
|
|
|
|
|
|
|
|||||
|
|
|
BALANCED CD |
|
|
BALANCED |
|
|
|
|
|
|
||
|
|
|
ON |
OFF |
|
|
ON |
OFF |
|
|
|
|
|
|
|
R |
L |
|
|
R |
|
L |
|
|
|
|
|
|
|
|
PHONO |
CD |
TUNER DVD/VIDEO AUX 1 AUX 2 |
TAPE 1 |
|
TAPE 2 |
OUTPUTS |
|
|
|
|
|
||
MM |
|
|
|
|
|
|
|
|
|
|
|
|
|
|
MC |
LEFT |
|
|
|
|
|
|
LEFT |
|
|
|
|
|
|
|
RIGHT |
|
|
|
|
|
|
RIGHT |
|
|
|
|
|
|
|
|
|
|
IN |
OUT |
IN |
OUT |
1 |
2 |
|
|
SWITCHED 400W MAX |
|
|
|
|
|
|
|
|
|
|
|
||||||
ROTEL RB-991
RIGHT INPUT |
CAUTION |
|
POWER AMPLIFIER |
LEFT INPUT |
|
BALANCED |
RISK OF ELECTRIC SHOCK |
|
BALANCED |
||
DO NOT OPEN |
|
MODEL NO. RB-991 |
|||
UNBALANCED |
AVIS: RISQUE DE CHOC ELECTRIQUE–NE PAS OUVRIR |
POWER CONSUMPTION: 550W |
UNBALANCED |
||
RB-991 |
|||||
|
|
||||
|
|
BALANCED |
|
||
|
|
UNBALANCED |
|
|
|
|
RIGHT SPEAKER |
SPEAKER IMPEDANCE |
LEFT SPEAKER |
|
|
WARNING: |
|
4 OHMS MINIMUM |
|
|
|
|
|
|
AC FUSE |
||
OR ELECTRICAL SHOCK, DO NOT EXPOSE |
|
|
|
||
THIS EQUIPMENT TO RAIN OR MOISTURE. |
|
|
|
10 A AGC |
|
|
|
|
|
||
|
|
|
|
FUSE |
|
RC-1090 Stereo Control Amplifier |
6 |
Contents |
|
|
|
|
|
Figure 1: Controls and Connections |
3 |
||||
Figure 2: RR-969 Remote Control |
3 |
||||
Figure 3: Phono and Line Inputs; |
|
||||
Recorder Input/Output |
4 |
||||
Figure 4: RCA Cable Connections |
5 |
||||
Figure 5: XLR Cable Connections |
5 |
||||
About Rotel .......................................... |
|
|
|
6 |
|
Getting Started ..................................... |
|
|
6 |
||
A Few Precautions |
|
|
7 |
||
Placement |
|
|
|
|
7 |
Cables |
|
|
|
|
7 |
RR-969 Remote Control ........................ |
|
7 |
|||
Using the RR-969 |
|
|
7 |
||
Controlling Other Components |
|
7 |
|||
Programming the RR-969 |
|
|
7 |
||
AC Power and Control ........................... |
|
|
7 |
||
AC Power Input |
|
|
|
7 |
|
Power/Standby Switch |
, Remote Power |
|
|||
Button |
and Power Indicator |
8 |
|||
Auxiliary Power Outputs |
|
|
8 |
||
Input Signal Connections |
and ...... |
8 |
|||
Phono Input Selector Switch |
|
|
8 |
||
Phono Input |
and Ground |
Connection |
8 |
||
Line Level Inputs |
|
|
|
8 |
|
Balanced CD Selector Switch |
|
and Input |
8 |
||
Recorder Connections |
....................... |
|
9 |
||
Output Connections ............................... |
|
|
9 |
||
Balanced Output Switch |
|
|
9 |
||
RCA Outputs |
|
|
|
9 |
|
Balanced XLR Outputs |
|
|
9 |
||
12 Volt Trigger Outlet |
|
|
9 |
||
IR Inputs and Outputs ............................ |
|
|
9 |
||
External Remote Input |
|
|
9 |
||
IR Output |
|
|
|
|
9 |
Audio Controls .................................... |
|
|
10 |
Volume Controls |
and |
|
10 |
Listening Selector Buttons |
and Display |
10 |
|
Recording Selector Buttons |
and Display |
10 |
|
Phones Output |
|
|
10 |
Remote Sensor |
|
|
10 |
Remote Control Functions .................... |
10 |
||
Selecting Listening Input |
|
10 |
|
Selecting Recording Input |
|
10 |
|
Mute Button |
|
|
10 |
FL Display Control |
............................... |
|
10 |
Turning FL Display On/Off |
|
10 |
|
Customizing FL Display |
|
10 |
|
Clearing FL Display Customization |
11 |
||
Troubleshooting ................................... |
|
|
11 |
Standby Power Indicator Is Not Lit |
11 |
||
Fuse Replacement |
|
|
11 |
No Sound |
|
|
11 |
Specifications ...................................... |
|
|
11 |
About Rotel
A family whose passionate interest in music led them to manufacture high fidelity components of uncompromising quality founded Rotel 40 years ago. Over the years that passion has remained undiminished and the goal of providing exceptional value for audiophiles and music lovers regardless of their budget, is shared by all Rotel employees.
The engineers work as a close team, listening to, and fine tuning each new product until it reaches their exacting musical standards. They are free to choose components from around the world in order to make that product the best they can. You are likely to find capacitors from the United Kingdom and Germany, semi-conductors from Japan or the United States, and toroidal power transformers manufactured in Rotel’s own factory.
Rotel’s reputation for excellence has been earned through hundreds of good reviews and awards from the most respected reviewers in the industry, who listen to music every day. Their comments keep the company true to its goal – the pursuit of equipment that is musical, reliable and affordable.
All of us at Rotel thank you for buying this product and hope it will bring you many hours of enjoyment.
Getting Started
Thank you for purchasing the Rotel RC-1090 Stereo Control Amplifier. When used in a highquality music audio system, it will provide years of musical enjoyment.
The RC-1090 is a full featured, high performance preamplifier. All aspects of the design have been optimized to retain the full dynamic range and subtle nuances of your music. The RC-1090 has a highly regulated power supply incorporating a Rotel custom-designed toroidal power transformer and custom-made slit foil capacitors. This low impedance power supply has ample power reserves, which enables the RC-1090 to easily reproduce the most demanding audio signals. This type of design is more expensive to manufacture, but it is better for the music.
Computer I/O Connector .................. |
9 |

The RC-1090 has both XLR (balanced) and RCA cable main output and CD input connections. The printed circuit boards (PCB) are designed with Symmetrical Circuit Traces. This insures that the precise timing of the music is maintained and faithfully recreated. The RC-1090 circuitry uses metal film resistors and polystyrene or polypropylene capacitors in important signal paths. All aspects of this design have been examined with the final goal being faithful reproduction of music.
The RC-1090 has a superb phono preamp stage, derived from Rotel’s finest phono preamplifier, the RHQ 10. The preamp stage can be used with either a moving magnet (MM) or a moving coil (MC) phono cartridge. This shows our commitment to phono sound quality and our interest in the recreation of fine music.
The RC-1090 is straightforward in its installation and operation. If you have experience with other stereo systems, you shouldn’t find anything perplexing. Simply plug in the associated components and enjoy.
A Few Precautions
Please read this manual carefully. It provides complete information on how to incorporate the RC-1090 into your system as well as general information that will help you get optimum sound performance. Please contact your authorized Rotel dealer for answers to any questions you might have. In addition, all of us at Rotel welcome your questions and comments.
Save the RC-1090 shipping carton and all enclosed packing material for future use. Shipping or moving the RC-1090 in anything other than the original packing material may result in severe damage to your amplifier.
Fill out and send in the owner’s registration card packed with the RC-1090. Also be sure to keep the original sales receipt. It is your best record of the date of purchase, which you will need in the event warranty service is ever required.
7
Placement
Like all audio components that handle lowlevel signals, the RC-1090 can be affected by its environment. Do not stack the RC-1090 on top of a power amplifier. This will minimize chance it will pick up hum or interference. We recommend installing the RC-1090 in furniture designed to house audio components. Such furniture is designed to reduce or suppress vibration which can adversely affect sound quality. Ask your authorized Rotel dealer for advice about component furniture and proper installation of audio components.
Cables
Be sure to keep the power cords, digital signal cables and regular audio signal cables in your installation away from each other. This will minimize the chance of the regular audio signal cables picking up noise or interference from the power cords or digital cables. Using only high quality, shielded cables will also help to prevent noise or interference from degrading the sound quality of your system. If you have any questions see your authorized Rotel dealer for advice about the best cable to use with your system
RR-969 Remote Control
The RC-1090 includes a full-function learning remote control that can operate up to nine other components, in addition to the RC-1090.
A separate manual, included with the remote, gives detailed instrctions on programming and using the RR-969 to replace all of the remote controls in your system. To avoid duplication, we provide only basic information about using the RR-969 to operate the RC-1090.
Most of the RR-969 functions duplicate the front panel controls. In this manual the remote control functions are covered in the same section as the front panel control operation. Numbers in gray boxes such as  indicate items on the front and rear panel control and connection illustrations. See Figure 1 on page 3. Letters in gray boxes such as
  indicate items on the RR-969 illustration. See Figure 2 on page 3.
English
Using the RR-969 
To operate the RC-1090 with the remote, activate the AUDIO mode, if necessary, by pressing the AUD button  . The AUDIO mode will remaine selected until another DEVICE button is pressed.
Controlling Other
Components 
To control other components with the RR-969, press the appropriate Device Selection button. See the RR-969 manual for more information.
Programming the RR-969 
The RR-969 is pre-programmed to operate the RC-1090. Should the AUDIO mode of the RR-969 not operate the RC-1090, the programming may have been changed. To restore the original programming, press the recessed Preload button  on the remote with the tip of a ball point pen.
NOTE: Pushing the PRELOAD button will erase all custom programming and learned commands, restoring the RR-969 to its factory settings.
AC Power and Control
AC Power Input 
Connect the supplied power cord to the AC Input receptacle on the rear panel. Do not connect the power cord to the power outlet until all the audio input and output connections have been made.
It is usually best to plug the RC-1090 directly into a 2-pin polarized wall outlet. Avoid the use of extension cords. A heavy duty multitap power outlet strip may be used if it (and the wall outlet) is rated to handle the current demanded by the components connected to it.
Your RC-1090 is configured at the factory for the proper AC line voltage in the country where you purchased it (either 115 volts AC or 230 volts AC with a line frequency of either 50 Hz or 60 Hz). The AC line configuration is noted on a decal on the left side.

RC-1090 Stereo Control Amplifier
NOTE: Should you move your RC-1090 amplifier to another country, it is possible to reconfigure your amplifier for use on a different line voltage. Do not attempt to perform this conversion yourself. Opening the enclosure of the RC-1090 exposes you to dangerous voltages. Consult a qualified service person or the Rotel factory service department for information.
If you are going to be away from home for an extended period of time such as a monthlong vacation, it is a sensible precaution to unplug your amplifier (as well as other audio and video components) while you are away.
Power/Standby Switch  ,
,
Remote Power Button  and
and
Power Indicator 
The Power/Standby switch  is located on the left side of the front panel. When it is pressed the RC-1090 is turned on and the front panel displays and indicators are illuminated. The Power button
  on the RR-969 does the same thing. Pressing the Standby switch or remote Power button again returns the RC-1090 in “standby” mode and the function indicators are turned off. The Power Indicator light
  above the Standby button is always illuminated when the RC-1090 is connected to a “live” AC outlet.
NOTE: The RC-1090 will be turned on and in the normal operating mode as soon as it is connected to the AC outlet. Be sure to set the Volume control to the minimum (full counterclockwise) position before connecting the power cord.
8
Auxiliary Power Outputs 
(North American version only.)
The RC-1090 has two switched outlets on the back panel. Power is available from these outlets when the RC-1090 is turned on. Power to these outlets is turned off when the RC-1090 is in Standby mode. These outlets can provide up to a total of 400 watts. They are appropriate for supplying power to signal sources, such as CD players, tuners, or tape decks. They should not be used for power amplifiers. Connecting components that will draw more than 400 watts to these outputs could damage the Standby switch in the RC-1090.
NOTE: Do not connect the power cord for a power amplifier to the auxiliary power outlets on the RC-1090. Power amplifiers often draw more power than these outlets can provide.
Input Signal Connections  and
and 
[See Figure 3.]
The RC-1090 has conventional RCA-type connectors for all inputs. In addition their is a set of balanced XLR type inputs for the CD input for use with high performance CD players that have balanced outputs.
NOTE: To prevent loud noises that neither you nor your speakers will appreciate, make sure the system is turned off when you make any signal connections.
Phono Input Selector Switch 
The Phono input is for a moving magnet (MM) or moving coil (MC) phono cartridge only and is incompatible with line level components. Set the Phono Input Selector Switch as appropriate for the phono cartridge you are using. Leave the switch button in the out position for a moving magnet cartridge; push the switch in for a moving coil cartridge.
Some high output moving coil cartridges are designed to operate in the moving magnet position. If you are in doubt about the correct setting, check the instruction manual for your phono cartridge for information regarding its output voltage and the expected input impedance. The Phono input has 47 kOhms input impedance and 2.5 mV sensitivity in the MM position and 100 Ohms input impedance and 0.25 mV sensitivity in the MC position. If you still have questions about the proper setting of the phono input selector switch, consult your authorized Rotel dealer.
Phono Input  and
and
Ground  Connection
Plug the cable from the turntable into the appropriate left and right phono inputs. If the turntable has a “ground” wire connect it to the screw terminal to the left of the Phono inputs. It will help prevent hum and noise.
Line Level Inputs 
The CD, Video, Tuner, and Aux inputs of the RC-1090 are “line level” inputs. These are for connecting components such as CD players, Hi Fi or NICAM Stereo video cassette recorders, tuners for audio or video, Laser Disc players or the analog output from a CD ROM drive.
The Left and Right channels are clearly labeled and should be connected to the corresponding channels of the source component. The Left RCA connectors are white, the Right connectors are red. Use high quality RCA cables for connecting input source components to the RC-1090. Ask your authorized Rotel dealer for advice about cables.
Balanced CD Selector
Switch  and Input
If your CD player has balanced XLR-type outputs, connect them to the Balanced CD Inputs  . The Balanced CD Selector Switch
  must be set to “On”.
NOTE: Use only one set of the CD inputs and set the Selector Switch as appropriate.

Recorder Connections 
The Tape 1 and Tape 2 inputs and outputs can be connected to any record/playback device that accepts standard line level analog input and output signals. Typically that will be a conventional tape recorder.
When connecting a recorder to the RC-1090, remember that the outputs of the recorder must be connected to the tape inputs of the RC-1090. Similarly the tape outputs of the RC-1090 must be connected to the inputs of the recorder. As with other sources be sure to connect the Left and Right channels of each device to the proper channels on the associated components. Use high quality connecting cables to prevent loss of sound quality.
Output Connections
NOTE: The RC-1090 has both RCA and XLR type output connectors. The two sets of outputs must not be used at the same time.
Balanced Output Switch 
When the RCA outputs are used the Balanced Output switch must be set to the Off position. Set the switch in the On position when using the XLR Balanced outputs.
RCA Outputs 
[See Figure 4 for RCA output connection illustration.]
Most power amplifiers have RCA-type input connectors. With such amplifiers the Balanced Outputs switch  must be set to the Off position. Then connect a set of cables between the outputs of the RC-1090 and the inputs of the amplifier. As always, use high quality cables and be sure to connect the Left and Right channel outputs of the RC-1090 to the correct channels of the amplifier.
NOTE: There are two sets of RCA outputs on the RC-1090. The second set of outputs may be used in custom system configurations to drive a second power amplifier or to supply a signal to a special signal processor.
9 |
English |
Balanced XLR Outputs 
[See Figure 5 for Balanced XLR output connection illustration.]
The XLR type outputs of the RC-1090 are “balanced” outputs. These provide the advantage of allowing the power amplifier to be placed a great distance from the RC-1090 without causing loss of sound quality or picking up noise over the long cable run. Of course the associated power amplifier must have balanced XLRtype inputs in order to use this feature.
When using the XLR outputs the Balanced Output switch  must be set to the On position. Then simply connect a cable with XLR connectors to the RC-1090 outputs and power amplifier inputs. Be sure to connect the Left and Right channel outputs of the RC-1090 to the correct channels of the amplifier. If you have questions about the proper type of cable to use, consult your authorized Rotel dealer.
12 Volt Trigger Outlet 
Some audio components can be turned on automatically when they receive a 12V turn on “signal”. The 12V Trigger Outputs of RC-1090 provides the required signal. Connect the compatible components to the RC-1090 with a conventional 1/8” miniplug cable. When the RC-1090 is in Standby mode, the trigger signal is interupted, so the components controlled by it are turned off.
IR Inputs and Outputs
External Remote Input 
This 3.5 mm mini-jack (labeled EXT REM IN) receives command codes from an industrystandard infrared receivers (Xantech, etc.) located in the main listening room. This feature is useful when the unit is installed in a cabinet and the front-panel sensor is blocked. Consult your authorized Rotel dealer for information on external receivers and the proper wiring of a jack to fit the mini-jack receptacle.
NOTE: The IR signals from the EXTERNAL REMOTE IN jack can be relayed to source components using external IR emitters or hardwired connections from the IR OUT jacks.
IR Output 
The IR OUT 1 & 2 jacks send IR signals received at the EXTERNAL REM IN jack to an infrared emitter placed in front of a source component or to Rotel CD players, cassette decks, or tuners with a compatible rear panel IR connector.
This output is used to allow IR signals to pass along IR signals from a remote control when the sensors on the source components are blocked by installation in a cabinet.
See your authorized Rotel dealer for information on IR repeater systems.
NOTE: The EXT REM IN jack located next to the these jacks is for use with an external IR sensor duplicating the front panel IR sensor and located in the primary zone.
Computer I/O Connector 
The RC-1090 can be operated from a personal computer running audio system control software from third-party developers. This control is accomplished by sending the operating codes normally sent by the RR-969 remote control over a hard-wired network connection from the computer.
The COMPUTER I/O input provides the necessary connection on the back panel. It accepts standard RJ-45 8-pin modular plugs, such as those commonly used in 10-BaseT UTP Ethernet cabling.
For additional information on the connections, software, and operating codes for computer control of the RC-1090, contact your authorized Rotel dealer.

RC-1090 Stereo Control Amplifier
Audio Controls
Volume Controls  and
and 
The front panel Volume control  increases or decreases the volume in both channels at the same time. Turn it clockwise to increase the volume or counterclockwise to decrease the volume. On the RR-969 remote Volume Button
  , press the ▲ to increase volume or ▼ to decrease volume.
Listening Selector Buttons 
and Display 
Press one of the Listening Selector Buttons  to select the input signals that goes to the main outputs and to the power amplifier – or, more simply, which source is heard. The source selected is shown in the front panel FL Display
  .
.
Recording Selector Buttons 
and Display 
Press one of the Recording Selector Buttons  to select the input signal that goes to the record outputs. The source selected is shown in the front panel FL Display
  . When you are not recording, press the Off button. This minimizes the chance of interference from other components in the system.
Having a separate Recording and Listening selector adds a significant degree of flexibility in how you can use the RC-1090. For example by selecting CD with the Record Selector and selecting Tuner with the Listening Selector you can record a CD onto a tape while listening to the tuner.
If you wish to duplicate (“dub”) a recording from one recorder to another, the source unit must be connected to Tape 1 in/outputs. Press the Tape 1 Recording Selector button. Connect the unit recording the signal to the Tape 2 in/outputs.
Phones Output 
The Phones output allows you to connect headphones for private listening. This output accommodates standard stereo phone (1/4”) plugs. If your headphones have another type of plug, such as a 1/8” mini-plug, you will
10
need an adapter plug. Contact your authorized Rotel dealer, to get the correct adapter plug. Note: Plugging in a set of headphones does not cut off the signal to the outputs. The power amplifier will continue to receive a signal and the speakers will continue to play.
Remote Sensor 
The Remote Sensor is located to the right of the Phones jack on the front panel. It picks up the infra-red signals from the remote control. Do not cover or block the sensor. It must be clear of obstructions or the remote control will not work properly. The operation of the Remote Sensor can also be affected if it is exposed to bright light, particularly sun light. In addition remote control functions may not work reliably if the batteries in the RR-969 are weak.
Remote Control Functions
Selecting Listening Input 
To select listening sources press:
Source |
Button |
Phono |
PH |
CD |
CD |
Tuner |
TUN |
DVD/Video |
V1 |
Aux 1 |
V4 |
Aux 2 |
V5 |
Tape 1 |
TAPE 1 |
Tape 2 |
TAPE 2 |
Selecting Recording Input 

To select the Recording Input press the Zone button  , then press the button for the source you want. Refer to the table in the previous paragraph. (Tape 2 cannot be selected as a Recording Input.)
After you have selected a Recording Input the Source Selection buttons revert to the Listening Input selection function. To turn the Recording Selection off, press the Zone button, then press the Shift button  .
.
Mute Button 
Press the Mute button to temporarily reduce the volume of the system. Press the button again to return the volume to its original level.
FL Display Control
Turning FL Display On/Off
To turn the front panel FL Display on or off, press the Display  button on the RR-969. When the display is set to off, the Listening Selector Display and Recording Selector Display will light for 5 seconds when a new source is selected.
Customizing FL Display 


You can program the RC-1090 to display custom names, up to 5 characters long, in the Listening and Recording Selection Displays. For example, if the Aux 1 input was connected to a Digital Satelite Dish, you could program it to RC-1090 to display “DSS” when the Aux 1 input is selected.
Example:
1Select Aux 1 as the listening input so AUX
1 appears in the display. Press and hold the Menu/OSD  button until the characters in the display change to blinking solid blocks.
2Use the RR-969 τ/υ buttons  to scroll through the character set. (See page 3 of the RR-969 manual for a listing of the char-
acter set.) When the character you want is displayed, press Enter  to confirm it and go to the next character.
3Repeat the previous step to select the remaining characters. After the last character is selected and confirmed the new name is saved automatically.
Once the Listening input display is customized, the new name also appears when that input is selected as the Recording input. (The exception is the Tape 2 input since it cannot be selected as the recording source.)
When an input that has a customized name is selected, the original input name is displayed for 2 seconds, before the customized name is displayed.
Clearing FL Display
Customization
To clear all customized displays, turn the RC-1090 on. Then press the Listening Selector Phono button together with the Recording Selector Off button. This will return all displays to their original settings.
Troubleshooting
Most difficulties in audio systems are the result of incorrect connections, or improper control settings. If you encounter problems, isolate the area of the difficulty, check the control settings, determine the cause of the fault and make the necessary changes. If you are unable to get sound from the RC-1090, refer to the suggestions for the following conditions:
11
Standby Power Indicator Is
Not Lit
The Standby Power Indicator should be lit whenever the RC-1090 is plugged into the wall power outlet. If it does not light, test the power outlet with another electrical device, such as a lamp. Be sure the power outlet being used is not controlled by a switch that has been turned off.
Fuse Replacement
If another electrical device works when plugged into the power outlet, and the Standby Indicator still will not light when the RC-1090 is plugged into the wall outlet, it indicates that the internal power fuse may have blown. If you believe this has happened, contact your authorized Rotel dealer to get the fuse replaced.
English
No Sound
Check the signal source to see if it is functioning properly. Make sure the cables from the signal source to the RC-1090 inputs are connected properly. Be sure the Listening Selector is set to the proper input. Check the power amplifier for power and proper operation. Check all the wiring between the RC-1090 and the power amplifier, and the power amplifier and speakers.
Specifications
Total Harmonic Distortion (20Hz-20kHz) |
< 0.004% |
Intermodulation Distortion (60 Hz : 7 kHz, 4:1) |
< 0.004% at 1V output |
Input Sensitivity / Impedance |
|
Phono - MC |
250 V / 100 ohms |
Phono - MM |
2.5 mV / 47 kOhms |
Line Level |
150 mV / 18 kOhms |
Phono Overload (MC/MM) |
16 mV / 160 mV |
Output Sensitivity / Impedance |
1 V/ 100 Ohms |
Frequency Response |
|
Phono Input |
20Hz-20kHz, ± 0.2dB |
Line Level Input |
4Hz-100kHz, ± 0.5dB |
Signal to Noise Ratio (IHF “A” weighted) |
|
Phono - MC/MM |
70 dB/75 dB |
Line Level |
100 dB |
Power Requirements |
|
USA Version |
115 Volts, 60 Hz |
European Version |
230 Volt, 50 Hz |
Power Consumption |
13 Watts |
Dimensions (W x H x D) |
430 x 125 x 345 mm |
|
1615/16 x 415/16 x 1319/32” |
Weight (net) |
7.8 kg, 17.2 lbs. |
All specifications are accurate at the time of printing. |
|
Rotel reserves the right to make improvements without notice. |
|

RC-1090 Préamplificateur Stéréo
ATTENTION : Il n’y a à l’intérieur aucune pièce susceptible d’être modifiée par l’utilisateur. Adressezvous impérativement à une personne qualifiée.
ATTENTION : Prenez garde à ce qu’aucun objet ou liquide ne tombe à l’intérieur de l’appareil par ses orifices de ventilation ; Si l’appareil est exposé à l’humidité ou si un objet tombe à l’intérieur, couper immédiatement l’alimentation secteur de tous les appareils. Débrancher l’appareil des autres maillons, et adressez-vous immédiatement et uniquement à une personne qualifiée et agréée.
Tous les conseils de sécurité et d’installation doivent être lus avant de faire fonctionner l’appareil. Conservez soigneusement ce livret — Vous devez pouvoir le consulter à nouveau pour de futures références.
Tous les conseils de sécurité doivent être soigneusement respectés. Suivez les instructions. Respectez les procédures d’installation et de fonctionnement indiquées dans ce manuel.
L’appareil doit être nettoyé uniquement avec un chiffon sec ou un aspirateur.
L’appareil doit être placé de telle manière que sa propre ventilation puisse fonctionner, avec un espace minimum de 10 cm autour de lui. Par exemple, il ne doit pas être posé sur un fauteuil, un canapé, une couverture ou tout autre surface susceptible de boucher ses ouïes d’aération ; ou placé dans un meuble empêchant la bonne circulation d’air autour des orifices d’aération.
Cet appareil doit être placé loin de toute source de chaleur, tels que radiateurs, chaudières, bouches de chaleur ou d’autres appareils (y compris amplificateurs de puissance) produisant de la chaleur.
Cet appareil doit être branché sur une prise d’alimentation secteur, d’une tension et d’un type conformes à ceux qui sont indiqués sur la face arrière de l’appareil. En Europe, 230 V/ 50 Hz.
Brancher l’appareil uniquement grâce au cordon secteur fourni, ou à un modèle équivalent. Ne pas tenter de modifier ou changer la prise. Notamment, ne pas tenter de supprimer la prise de terre si celle-ci est présente. Ne pas utiliser de cor- don-rallonge. L’appareil doit être branché sur une prise murale deux broches.
Prendre garde à ce que ce cordon d’alimentation ne soit pas pincé, écrasé ou détérioré sur tout son trajet, à ce qu’il ne soit pas mis en contact avec une source de chaleur. Vérifier soigneusement la bonne qualité des contacts, à l’arrière de l’appareil comme dans la prise murale.
Si l’appareil ne doit pas être utilisé pendant une longue période, la prise secteur sera débranchée.
L’appareil doit être immédiatement éteint, débranché puis retourné au service après-vente agréé dans les cas suivants :
•Le câble d’alimentation secteur est endommagé.
•Un objet est tombé, ou du liquide a coulé à l’intérieur de l’appareil.
•L’appareil a été exposé à la pluie.
•L’appareil ne fonctionne pas normalement.
•L’appareil est tombé, ou le coffret est endommagé.
12
Sommaire
Figure 1: Commandes et branchements |
3 |
Entrées et sorties IR (infrarouge) ......... |
16 |
|||
Figure 2: Télécommande RR-969 |
3 |
Entrée télécommande externe |
16 |
|||
Figure 3: Entrées Phono et Ligne ; |
4 |
Sortie IR |
|
|
16 |
|
Entrée/sortie Enregistreur |
|
|
|
|
||
Figure 4: Sorties via câble RCA |
5 |
Prise ordinateur I/O |
...................... |
16 |
||
Figure 5: Sorties via câble XLR |
5 |
Commandes audio |
|
16 |
||
Au sujet de Rotel |
13 |
|
||||
Contrôle de volume |
et |
16 |
||||
|
|
|||||
Démarrage |
13 |
Touches de sélection de la source en lecture |
|
|||
LISTENING |
et afficheur |
16 |
||||
|
|
|||||
Quelques précautions |
13 |
Touches de sélection de la source en |
|
|||
Installation |
13 |
enregistrement RECORDING |
|
|||
Câbles |
13 |
et afficheur |
|
|
17 |
|
Prise casque |
|
|
17 |
|||
|
|
|
|
|||
Télécommande RR-969 ........................ |
14 |
Capteur IR (infrarouge) |
|
17 |
||
Utilisation de la télécommande
RR-969 
Contrôle des autres maillons 
Programmation de la RR-969 
Alimentation électrique et mise
en service ...........................................
Prise d’alimentation secteur 
Interrupteur de mise sous tension  , touche Power de la télécommande
  et indicateur Power
Prises de renvoi secteur 
14 |
Fonctions télécommandées ................... 17 |
||
14 |
Sélection de l’entrée écoutée |
17 |
|
14 |
Sélection de l’entrée enregistrée |
17 |
|
|
Touche Silence MUTE |
17 |
|
14 |
Afficheur fluorescent FL ....................... 17 |
||
|
|||
14 |
Mise en/hors service de l’afficheur FL |
17 |
|
|
|||
|
Personnalisation de |
|
|
14 |
l’afficheur FL |
17 |
|
Effacement de la personnalisation |
|
||
14 |
|
||
de l’afficheur FL |
17 |
||
|
|||
Branchements des signaux en |
|
||
entrée |
et |
................................. |
15 |
Sélecteur de l’entrée Phono |
15 |
||
Entrée Phono |
et prise de masse |
15 |
|
Entrées niveau Ligne |
15 |
||
Sélecteur d’entrée CD symétrique |
|
||
et entrée |
|
|
15 |
Branchements de l’enregistreur ...... |
15 |
||
Branchements en sortie ........................ |
15 |
||
Sélecteur de sortie symétrique |
15 |
||
Sorties RCA |
|
|
15 |
Sorties symétriques XLR |
16 |
||
Prise de commutation TRIGGER 12 V |
16 |
||
Problèmes de fonctionnement ............... |
18 |
La diode Power ne s’allume pas |
18 |
Remplacement du fusible |
18 |
Pas de son |
18 |
Spécifications ...................................... |
18 |
Au sujet de Rotel
C’est une famille de passionnés de musique qui a fondé Rotel, il y a quarante ans. Pendant toutes ces années, leur passion ne s’est jamais émoussée et tous les membres de la famille se sont toujours battus pour fabriquer des appareils présentant un exceptionnel rapport musicalité-prix, suivis en cela par tous les employés.
Les ingénieurs travaillent toujours en équipe réduite, écoutant et peaufinant soigneusement chaque appareil pour qu’il corresponde parfaitement à leurs standards musicaux. Ils sont libres de choisir n’importe quels composants dans le monde entier, uniquement en fonction de leur qualité. C’est ainsi que vous trouvez dans les appareils Rotel des condensateurs britanniques ou allemands, des transistors japonais ou américains, tandis que tous les transformateurs toriques sont directement fabriqués dans une usine Rotel.
L’excellente réputation musicale des appareils Rotel a été saluée par la plupart des magazines spécialisés ; ils ont reçu d’innombrables récompenses, et sont choisis par de nombreux journalistes critiques du monde entier, parmi les plus célèbres, ceux qui écoutent de la musique quotidiennement. Leurs commentaires restent immuables : Rotel propose toujours des maillons à la fois musicaux, fiables et abordables.
Mais plus que tout, Rotel vous remercie pour l’achat de cet appareil, et souhaite qu’il vous apporte de nombreuses heures de plaisir musical.
13 |
Français |
Démarrage
Nous vous remercions pour votre acquisition de ce préamplificateur stéréo Rotel RC-1090. En tant que maillon d’un système haute-fidélité de très haute qualité, il vous apportera des années de plaisir musical.
Le RC-1090 est un préamplificateur complet, de très hautes performances, conçu pour reproduire toute la dynamique et les plus subtiles nuances de votre musique préférée. L’intégralité de sa conception a reposé sur le respect total de la dynamique et des plus infimes nuances de la musique. Il possède une alimentation parfaitement régulée, utilisant un transformateur torique spécialement conçu par Rotel, tout comme les condensateurs de type
« slit-foil ». Cette alimentation à faible impédance possède une très grande réserve d’énergie qui lui permet de faire face aux signaux audio les plus exigeants. Ce type de conception est plus coûteux à fabriquer, mais est incontestablement meilleur pour la musique.
Le RC-1090 offre une entrée CD et des sorties à la fois aux standards asymétrique RCA et symétrique XLR. Les circuits imprimés (PCB) sont conçus avec des trajets du signal parfaitement symétriques « Symmetrical Circuit Traces ». Cela garantit un respect total des composantes temporelles de la musique, là où des pistes électriques de longueur différente pour les deux canaux détruisent cette homogénéité temporelle. Le RC-1090 utilise des résistances à couche métallique et les condensateurs au polystyrène ou polypropylène sont spécialement choisis, sur le trajet du signal audio, pour leur respect de la musique. Le câblage interne est également réduit au minimum afin d’obtenir la meilleure qualité sonore possible.
Le RC-1090 possède également un étage préamplificateur Phono, dérivé directement de l’étage Phono indépendant le plus sophistiqué de Rotel, le RHQ 10. Il peut être indifféremment utilisé avec une cellule à aimant mobile (MM) ou bobines mobiles (MC). Cela prouve tout l’intérêt que nous portons encore à cette source, et notre intérêt pour la reproduction réellement fidèle de la musique.
L’installation du RC-1090 est aussi simple que son utilisation. Si vous êtes déjà habitué à une autre installation hi-fi, vous ne rencontrerez aucun problème. Il suffit de brancher les maillons complémentaires et d’écouter !
Quelques précautions
Veuillez lire très soigneusement ce manuel d’utilisation. Il vous indique tout ce qu’il faut savoir pour intégrer parfaitement ce préamplificateur dans votre chaîne, et comment en tirer les performances optimales. Si vous vous posez ensuite encore des questions, veuillez contacter votre revendeur agréé Rotel, qui se fera un plaisir d’y répondre.
Déballez soigneusement le RC-1090, la télécommande et les accessoires. Conservez le carton d’emballage et tous ses composants. Il constitue le meilleur moyen pour transporter l’appareil dans le futur, sans risque de détérioration.
Conservez soigneusement la facture d’achat. Vous avez ainsi la preuve de la date d’achat, qui vous sera utile dans le cas où il serait nécessaire de faire jouer la garantie.
Installation
Comme tous les appareils traitant des signaux de faible tension et intensité, le RC-1090 est relativement sensible à son environnement proche. Évitez de le poser sur l’amplificateur de puissance, ce qui pourrait générer une sensibilité aux interférences émises par ce dernier. Nous vous recommandons d’installer le RC-1090 dans un meuble spécialement destiné aux appareils hi-fi. De tels meubles adaptés réduisent ou suppriment également les vibrations, ce qui améliore la qualité sonore de tous les maillons de la chaîne. Pour de plus amples renseignements sur ce type de meuble et sur l’installation correcte des divers éléments de la chaîne haute-fidélité, veuillez-vous adresser à votre revendeur agréé Rotel.
Câbles
Pendant l’installation, prenez un soin particulier aux trajets respectifs des câbles d’alimentation secteur, câbles de modulation analogique et câbles de signal numérique, afin d’éviter toute interférence entre eux. N’utilisez que des câbles de haute qualité, soigneusement blindés afin d’éviter toute dégradation du signal entre les maillons. Votre revendeur agréé Rotel est en mesure de vous apporter toute l’information nécessaire concernant le choix de câbles de liaison de qualité.

RC-1090 Préamplificateur Stéréo |
14 |
Télécommande RR-969
Le RC-1090 est livré avec une télécommande référence RR-969. Celle-ci vous permet de commander la majeure partie des fonctions du RC-1090 depuis votre place d’écoute favorite. Télécommande universelle, elle peut aussi commander jusqu’à neuf autres maillons.
Le principe de programmation de la télécommande fait l’objet d’une notice d’utilisation séparée. Le chapitre ici développé ne concerne que le pilotage de l’ampli-tuner RC-1090 par la télécommande RR-969.
De nombreuses fonctions de la télécommande dupliquent celles disponibles en face avant de l’appareil. Les touches correspondantes sont alors indiquées dans le même paragraphe. Reportez-vous aux explications données pour celles-ci quant au rôle de ces diverses touches. Les fonctions accessibles via la face avant sont repérées par des chiffres encadrés de gris.
Voir Figure 1 page 3. Les fonctions accessibles via la télécommande sont repérées par des lettres cerclées de gris. Voir Figure 2 page 3.
Utilisation de la télécommande RR-969 
Pour faire fonctionner le RC-1090 à partir de la télécommande, vérifiez bien que le mode AUDIO (touche repérée AUD  ) sur celleci est bien pressée. Le mode AUDIO est alors actif, tant qu’aucune autre touche de sélection d’appareil DEVICE n’est pressée.
Contrôle des autres maillons 
Pour télécommander les autres maillons, pressez la touche Device appropriée. Voir le mode d’emploi de la RR-969 pour de plus amples informations.
Programmation de la RR-969 
La RR-969 est préprogrammée en usine pour piloter le RC-1090. Si, même en position AUDIO, la télécommande ne fonctionne pas, il est possible que cette programmation ait été modifiée par inadvertance. Dans ces conditions, pressez la touche repérée PRELOAD  avec la pointe d’un stylo.
NOTE :une pression sur la touche PRELOAD a aussi pour effet d’effacer toutes les commandes apprises et mises en mémoire ; la RR-969 revient
Alimentation électrique et mise en service
Prise d’alimentation secteur 
Branchez le cordon secteur dans sa prise normalisée, en face arrière. Évitez d’utiliser des câbles rallonges. Ne pas brancher le câble secteur avant d’avoir effectué tous les branchements audio, entrées et sorties.
Branchez de préférence directement le câble d’alimentation secteur dans une prise murale deux broches. Un bloc multiprises peut être utilisé uniquement s’il est de qualité supérieure et capable de supporter suffisamment de courant pour tous les appareils branchés.
Le préamplificateur RC-1090 est configuré en usine, sa tension correcte étant indiquée sur sa face arrière (115 ou 230 volts, 50 ou 60 Hz). Ne pas respecter cette tension entraîne la destruction de l’appareil et annule la garantie.
NOTE :si vous devez déménager dans un autre pays, il est possible de modifier la tension d’alimentation de votre appareil. Cette modification est exclusivement réalisée en usine : demandez conseil à un revendeur agréé Rotel. Il n’y a pas de pièces susceptibles d’être modifiées ou de commandes à l’intérieur du coffret. Ne pas enlever son capot : vous risqueriez l’électrocution. Cela peut également endommager les circuits internes, et annule la garantie.
Si vous quittez votre domicile pendant une longue période (un mois ou plus), débranchez la prise d’alimentation secteur (de même que celles des autres maillons audio et vidéo).
Interrupteur de mise sous tension  , touche Power de la télécommande
  et indicateur Power
La diode Power/Standby  est situé sur la partie gauche de la façade. Lorsque cette touche est pressée, l’afficheur de la face avant et les diodes s’allument. La touche Power
  de la télécommande produit le même effet. Une nouvelle pression sur la touche POWER replace l’appareil en mode de veille Standby, et les diodes s’éteignent. L’indicateur Power
  sous le bouton Standby reste toujours allumé dès que le RC-1090 est branché sur le secteur.
NOTE :Dès son branchement sur le secteur, le RC-1090 est activé et prêt à fonctionner. Assurez-vous de placez le contrôle de volume au minimum avant de brancher le cordon secteur.
Prises de renvoi secteur 
(appareils Nord-américains uniquement)
Les récentes normes électriques européennes CE interdisent, sur les appareils commercialisés en France (et en Europe), la présence et l’usage de ces prises. Si vous possédez une version possédant ces prises, ne dépassez jamais une consommation totale de 400 watts maximum, sous peine de détériorer définitivement l’interrupteur Standby du RC-1090.
entièrement à ses réglages de sortie d’usine.
 Loading...