


Owner’s Manual Manuel d’utilisation Bedienungsanleitung Manuale di Istruzioni Manual de Instrucciones Gebruiksaanwijzing Instruktionsbok
!"#$%&'(!) *+,-.+/0$1,)
RB-06
Stereo Power Amplifier
Amplificateur De Puissance Stéréo
Stereo-Endstufe Amplificatore di Potenza
Etapa de Potencia Estereofónica Stereo Eindversterker Stereoslutsteg
!"#$#% &'()("#)* +%,-%'"(
RB-06 Stereo Power Amplifier
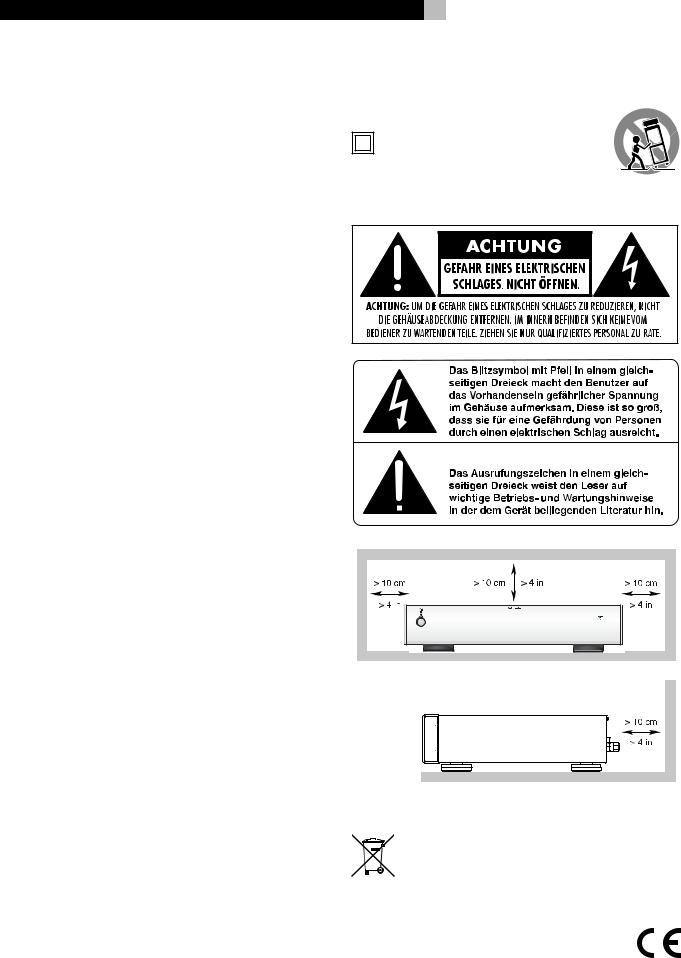
Important Safety Instructions
WARNING: There are no user serviceable parts inside. Refer all servicing to qualified service personnel.
WARNING: To reduce the risk of fire or electric shock, be sure that the apparatus shall not be exposed to dripping or splashing and that no objects filled with liquids, such as vases, shall be placed on the apparatus.
Do not allow foreign objects to get into the enclosure. If the unit is exposed to moisture, or a foreign object gets into the enclosure, immediately disconnect the power cord from the wall. Take the unit to a qualified service person for inspection and necessary repairs.
Read all the instructions before connecting or operating the component. Keep this manual so you can refer to these safety instructions.
Heed all warnings and safety information in these instructions and on the product itself. Follow all operating instructions.
Clean the enclosure only with a dry cloth or a vacuum cleaner.
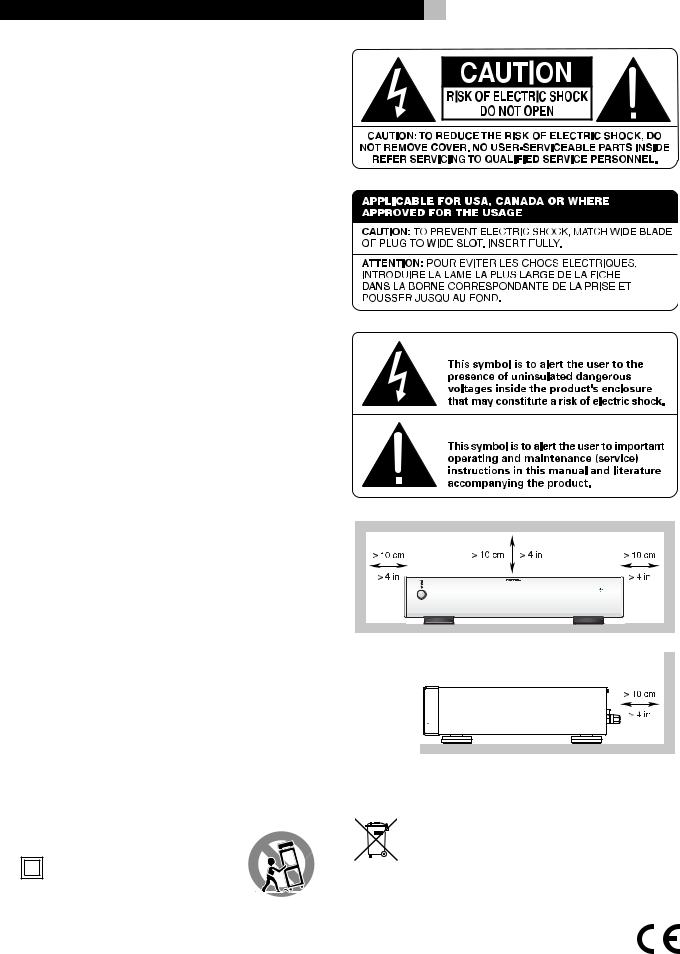
You must allow 10 cm or 4 inches of unobstructed clearance around the unit. Do not place the unit on a bed, sofa, rug, or similar surface that could block the ventilation slots. If the component is placed in a bookcase or cabinet, there must be ventilation of the cabinet to allow proper cooling.
Keep the component away from radiators, heat registers, stoves, or any other appliance that produces heat.
The unit must be connected to a power supply only of the type and voltage specified on the rear panel of the unit.
Connect the component to the power outlet only with the supplied power supply cable or an exact equivalent. Do not modify the supplied cable in any way. Do not attempt to defeat grounding and/or polarization provisions. Do not use extension cords.
Do not route the power cord where it will be crushed, pinched, bent at severe angles, exposed to heat, or damaged in any way. Pay particular attention to the power cord at the plug and where it exits the back of the unit.
The power cord should be unplugged from the wall outlet if the unit is to be left unused for a long period of time.
Immediately stop using the component and have it inspected and/or serviced by a qualified service agency if:
•The power supply cord or plug has been damaged.
•Objects have fallen or liquid has been spilled into the unit.
•The unit has been exposed to rain.
•The unit shows signs of improper operation
•The unit has been dropped or damaged in any way
Please use Class 2 Wiring when connecting the speaker terminals of the unit to ensure proper insulation and minimize the risk of electrical shock.
Place the unit on a fixed, level surface strong enough to support its weight. Do not place it on a moveable cart that could tip over.
This symbol means that this unit is double insulated. An earth connection is not required.
2
Rotel products are designed to comply with international directives on the Restriction of Hazardous Substances (RoHS) in electrical and electronic equipment and the disposal of Waste Electrical and Electronic Equipment (WEEE). The crossed wheelie bin symbol indicates compliance and that the products must be appropriately recycled or processed in accordance with these directives.
3 |
English |
Figure 1: Controls and Connections Commandes et branchements Bedienelemente und Anschlüsse Pannello frontale e posteriore Controles y Conexiones
De bedieningsorganen en de aansluitingen
Funktioner och anslutningar
.$/0-1 &2$03)#-(4 ( $056#+1
1 2 3 |
4 |
5 67 |
8 |
9 |
6 |
0 |
RB-06 Stereo Power Amplifier |
4 |
Figure 2: Stereo Connections Branchements stéréo
Anschlussdiagramm bei Stereobetrieb Schema dei collegamenti stereo
Conexiones de Entrada y de Salida para Funcionamiento en Modo Estereofónico De cinchen luidsprekerverbindingen
Stereoanslutningar
7%8'%#8(-#-(# ('"%9-(:%3 '(/-0)0 ( 0:&'"(9#':(; '('"#+
Figure 3: Bridged Mono Connections – Inputs and Speakers
Branchements en monophonie – Entrée et enceinte Position des cavaliers Anschlussdiagramm bei Brückenschaltung – Eingänge und Lautsprecher Schema dei collegamenti mono a ponte – Ingressi e diffusori Conexiones de Entrada y de Salida para Funcionamiento en
Modo Monofónico Puenteado
Gebrugde mono aansluitingen/voorversterker/plaats van de doorverbindingen/
Anslutningar – bryggkopplat läge
<%'"%3%# 3:)=9#-(# 3 $#>(+# +%-% – 2%8:)=9#-(# 3;%8-%/% '(/-0)0 ( :%)%-%:
Jumper Locations
Emplacement des Cavaliers
Jumper-Positionen
Posizione dei Jumper
Ubicacion de los Puentes
Locatie van de doorverbindingen
Omkopplarnas placering
?0'2%)%>#-(# 2#$#+19#:

Contents
Important Safety Instructions |
............................... |
|
2 |
||||
Figure 1: Controls and Connections |
3 |
||||||
Figure 2: Stereo Connections |
|
|
4 |
||||
Figure 3: Bridged Mono Connections |
|
||||||
|
– Inputs and Speakers |
4 |
|||||
About Rotel ............................................ |
|
|
|
|
5 |
||
Getting Started....................................... |
|
|
|
5 |
|||
A Few Precautions |
|
|
|
5 |
|||
Placement |
|
|
|
|
6 |
||
Cables |
|
|
|
|
|
6 |
|
AC Power and Control ............................. |
|
|
6 |
||||
AC Power Input |
0 |
|
|
|
6 |
||
|
|
|
|
||||
Power Switch and |
|
|
|
|
|||
Indicator |
12 |
|
|
5 |
6 |
||
|
|
|
|
||||
Trigger ON/OFF Mode Selector |
6 |
||||||
|
|||||||
12V Trigger Input 7 and Output 8 |
6 |
||||||
Input Signal Connection 6..................... |
6 |
||||||
Speaker Connection ................................. |
|
|
|
7 |
|||
Speaker Selection |
|
|
|
7 |
|||
Speaker Wire Selection |
|
|
|
7 |
|||
Polarity and Phasing |
|
|
|
7 |
|||
Stereo Speaker Connection 9 |
7 |
||||||
Bridged Mono Operation |
4 |
7 |
|||||
|
................... |
||||||
Resetting Jumpers |
|
|
|
7 |
|||
Input Connection |
|
|
|
7 |
|||
Bridged Speaker Connection |
|
|
7 |
||||
Protection Indicator |
3 |
|
|
8 |
|||
.......................... |
|
|
|||||
Troubleshooting |
|
|
|
8 |
|||
Front Panel Power Indicator Is Not Lit |
8 |
||||||
Fuse Replacement |
|
|
|
8 |
|||
No Sound |
|
|
|
|
8 |
||
Specifications |
......................................... |
|
|
|
8 |
||
5
About Rotel
A family whose passionate interest in music led them to manufacture high fidelity components of uncompromising quality founded Rotel over 40 years ago. Through the years that passion has remained undiminished and the family goal of providing exceptional value for audiophiles and music lovers regardless of their budget, is shared by all Rotel employees.
The engineers work as a close team, listening to, and fine tuning each new product until it reaches their exacting musical standards. They are free to choose components from around the world in order to make that product the best they can. You are likely to find capacitors from the United Kingdom and Germany, semiconductors from Japan or the United States, while toroidal power transformers are manufactured in Rotel’s own factory.
Rotel’s reputation for excellence has been earned through hundreds of good reviews and awards from the most respected reviewers in the industry, who listen to music every day. Their comments keep the company true to its goal - the pursuit of equipment that is musical, reliable and affordable.
All of us at Rotel, thank you for buying this product and hope it will bring you many hours of enjoyment.
Getting Started
Thank you for purchasing the Rotel RB-06 Stereo Power Amplifier. When used in a high-quality music audio system, it will provide years of musical enjoyment.
The RB-06 is a full featured, high performance component. All aspects of the design have been optimized to retain the full dynamic range and subtle nuances of your music. The RB-06 has a highly regulated power supply incorporating a Rotel custom-designed toroidal power transformer. This low impedance power supply has ample power reserves, which enables the RB-06 to easily reproduce the most demanding audio signals. This type of design is more expensive to manufacture, but it is better for the music.
English
T h e p r i n t e d c i r c u i t b o a r d s ( P C B ) a r e designed with Symmetrical Circuit Traces. This insures that the precise timing of the music is maintained and faithfully recreated. The RB-06 circuitry uses metal film resistors and polystyrene or polypropylene capacitors in important signal paths. All aspects of this design have been examined to ensure the most faithful music reproduction.
The main functions of the RB-06 are easy to install and use. If you have experience with other stereo systems, you shouldn’t find anything perplexing. Simply plug in the associated components and enjoy.
A Few Precautions
WARNING: To avoid potential damage to your system, turn off ALL the components in the system when connecting or disconnecting the loudspeakers or any associated components. Do not turn the system components back on until you are sure all the connections are correct and secure. Pay particular attention to the speaker wires. There must be no loose strands that could contact the other speaker wires, or the chassis of the amplifier.
Please read this manual carefully. It provides information on how to incorporate the RB-06 into your system as well as information that will help you get optimum sound performance. Please contact your authorized Rotel dealer for answers to any questions you might have. In addition, all of us at Rotel welcome your questions and comments.
Save the RB-06 shipping carton and all enclosed packing material for future use. Shipping or moving the RB-06 in anything other than the original packing material may result in severe damage to your amplifier.
Fill out and send in the owner’s registration card packed with the RB-06. Also be sure to keep the original sales receipt. It is your best record of the date of purchase, which you will need in the event warranty service is ever required.

RB-06 Stereo Power Amplifier
Placement
Like all audio components that handle lowlevel signals, the RB-06 can be affected by its environment. Avoid placing the RB-06 on top of other components. Also avoid routing audio signal cables near power cords. This will minimize the chance it will pick up hum or interference.
The RB-06 generates heat as part of its normal operation. The heat sinks and ventilation openings in the amplifier are designed to dissipate this heat. The ventilation slots in the top cover must be open. There should be 10 cm (4 inches) of clearance around the chassis, and reasonable airflow through the installation location, to prevent the amplifier from overheating.
Remember the weight of the amplifier when you select an installation location. Make sure that the shelf or cabinet can support it. We recommend installing the RB-06 in furniture designed to house audio components. Such furniture is designed to reduce or suppress vibration which can adversely affect sound quality. Ask your authorized Rotel dealer for advice about component furniture and proper installation of audio components.
Cables
Be sure to keep the power cords, digital signal cables and regular audio signal cables in your installation away from each other. This will minimize the chance of the regular audio signal cables picking up noise or interference from the power cords or digital cables. Using only high quality, shielded cables will also help to prevent noise or interference from degrading the sound quality of your system. If you have any questions see your authorized Rotel dealer for advice about the best cable to use with your system.
6
AC Power and Control
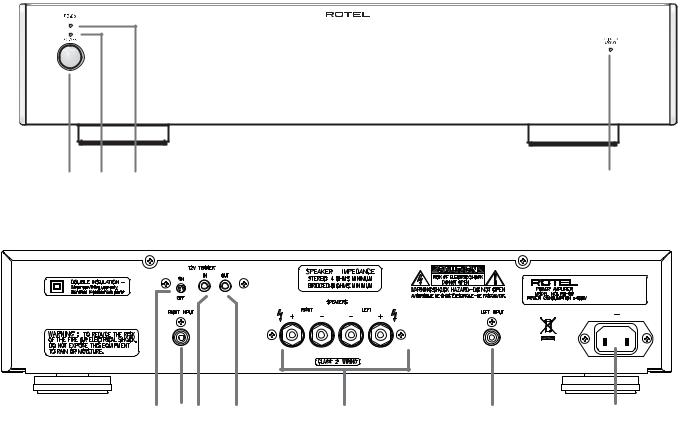
AC Power Input 0
The RB-06 is supplied with the proper AC power cord. Use only this cord or an exact equivalent. Do not use an extension cord. A heavy duty multi-tap power outlet strip may be used, but only if it is rated to handle the current demand of the RB-06.
Be sure the Power Switch on the front panel of the RB-06 is turned off. Then, plug one end of the cord into the AC power connector 0 on the back panel of the amplifier. Plug the other end into an appropriate AC outlet.
Your RB-06 is configured at the factory for the proper AC line voltage in the country where you purchased it (USA: 115 volts/60 Hz , Europe: 120 volts/60 Hz). The AC line configuration is noted on a label on the back panel.
NOTE: Should you move your RB-06 to another country, it is possible to configure your amplifier for use on a different line voltage.
Do not attempt to perform this conversion yourself. Opening the enclosure of the RB06 exposes you to dangerous voltages. Consult a qualified technician or the Rotel factory service department for information.
If you are going to be away from home for an extended period of time, it is a sensible precaution to unplug your amplifier.
Power Switch and Indicator 12
The Power Switch is located on the front panel. To turn the amplifier on (or to activate either of the optional automatic power-on modes), push the switch in. The LED indicator above the switch will light, indicating that the amplifier is turned on. To turn the amplifier off, push the button again and return it to the out position.
Trigger ON/OFF
Mode Selector 5
The amplifier provides the option for manual or automatic power on/off operation. These modes are selectable using a toggle switch on the back panel.
With the switch in the 12V TRIGGER ON position, the amplifier is turned on automatically when a 12V trigger signal is present at the 3.5 mm Jack of TRIGGER IN on the rear panel. The amplifier will go into standby mode if the 12V signal is not present. The front panel POWER SWITCH overrides this function. It must be ON for the 12V trigger to work. Turning the switch OFF cuts power to the amplifier, regardless of whether or not a trigger signal is present.
12V Trigger Input 7 and Output 8
The jack labeled IN is for connecting the 3.5mm Plug/Cable carrying a 12V trigger signal to turn the amplifier on and off. To use this feature the toggle switch must be set to the ON position. This input accepts any control signal (AC or DC) ranging from 3 volts to 30 volts.
The jack labeled OUT is for connecting another 3.5mm plug/cable to provide a 12V trigger signal to other components. The 12V output signal is available whenever a 12V trigger signal is applied to the IN connector.
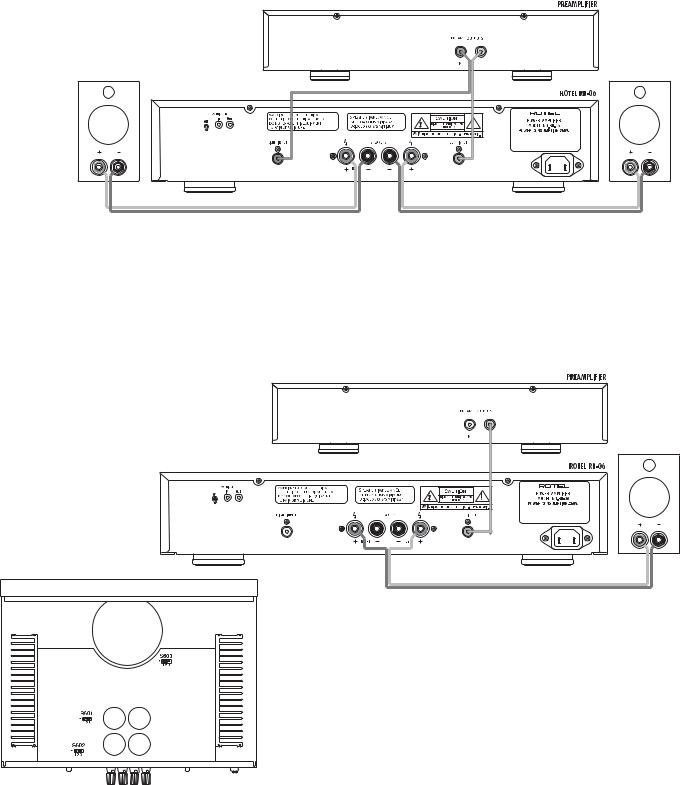
Input Signal Connection 6
[See Figure 2 for normal stereo wiring illustration.]
The RB-06 has conventional RCA type input connectors, the type found on nearly all audio equipment.
Note: To prevent loud noises that neither you nor your speakers will appreciate, make sure the amplifier is turned off when you make any signal connections.
Select a high quality pair of audio interconnect cables. Connect the left channel output of your preamp to the left channel input on the RB-06. Connect the right channel output of your preamp to the right channel input.

Speaker Connection
Speaker Selection
We recommend using loudspeakers with a nominal impedance of 4 ohms or higher with the RB-06. You should exercise some caution in driving multiple pairs of speakers in parallel configuration, because the effective impedance the amplifier sees is cut in half. For example, when driving two pair of 8 ohm speakers, the amplifier sees a 4 ohm load. When driving multiple speakers in parallel, it is recommended that you select speakers with a nominal impedance of 8 ohms or higher. Speaker impedance ratings are less than precise. In practice, very few loudspeakers will present any problems for the RB-06. See your authorized Rotel dealer if you have any questions.
Speaker Wire Selection
Use insulated two-conductor stranded wire to connect the RB-06 to the speakers. The size and quality of the wire can have an audible effect on the performance of the system. Standard speaker wire will work, but can result in lower output or diminished bass response, particularly over longer distances. In general, heavier wire will improve the sound. For best performance, you may want to consider special high-quality speaker cables. Your authorized Rotel dealer can help in the selection of appropriate cables for your system.
Polarity and Phasing
The polarity — the positive/negative orientation of the connections — for every speaker and amplifier connection must be consistent so all the speakers will be in phase. If the polarity of one connection is mistakenly reversed, bass output will be very weak and stereo imaging degraded. All wire is marked so you can identify the two conductors. There may be ribs or a stripe on the insulation of one conductor. The wire may have clear insulation with different color conductors (copper and silver). There may be polarity indications printed on the insulation. Identify the positive and negative conductors and be consistent with every speaker and amplifier connection.
7
Stereo Speaker Connection 9
The RB-06 has two pairs of color coded binding posts on the back panel. These connectors accept bare wire, connector lugs, or dual banana type connectors (except in the European Community countries where their use is not permitted).
Route the wire from the RB-06 to the speakers. Give yourself enough slack so you can move the components enough to allow access to the speaker connectors.
If you are using dual banana plugs, connect them to the wires and then plug into the backs of the binding posts. The hexagonal thumbscrews of the binding posts should be screwed in all the way (clockwise).
If you are using terminal lugs, connect them to the wires. If you are attaching bare wires directly to the binding posts, separate the wire conductors and strip back the insulation from the end of each conductor. Be careful not to cut into the wire strands. Unscrew (turn counterclockwise) the binding post hexagonal thumbscrews. Place the connector lug or wire around the binding post shaft. Turn the hexagonal thumbscrews clockwise to clamp the connector lug or wire firmly in place.
Note: Be sure there are no loose wire strands that could touch adjacent wires or connectors.
Bridged Mono Operation 4
[ S e e F i g u r e 3 f o r b r i d g e d o p e r a - tion j u m p e r s e t t i n g a n d c o n n e c t i o n illustration.]
The two channels of the RB-06 can be “bridged”. In this configuration the single channel produces a massive 180 watts! This feature allows you to increase the overall power output of your system by bridging the RB-06 and adding a second bridged RB-06. Or the RB-06 is bridged to drive a monophonic subwoofer. Note however that when the RB-06 is bridged the speaker connected to it must have an impedance of 8 ohms or more.
In order to use the RB-06 in bridged mode, three “jumper” connectors inside the amplifier must be moved from one set of pins to another. This task should be done by a qualified
English
technician. See your authorized Rotel dealer. In addition the RB-06 is connected to the other components in a different way. When the RB-06 is setup for bridged operation the Bridged Mono indicator light 4on the front panel will light.
Resetting Jumpers
Before opening the RB-06 cabinet to reset the jumpers, the power cord must be unplugged from the wall. DO NOT OPEN THE CABINET OF THE RB-06 BEFORE THE POWER CORD HAS BEEN UNPLUGGED FROM THE WALL. FAILURE TO DO SO WILL EXPOSE YOU TO HAZARDOUS VOLTAGES.
After the power cord has been unplugged, remove the screws that hold the cabinet cover in place and slide the cover off the amplifier. Locate the three jumper pin blocks labeled S 601, S 602 and S 603. The factory standard (stereo) position of the jumpers is on pins 1 and 2 of each block. There is a * mark on the circuit board next to this position. To convert the RB-06 to bridged mono move all three jumpers so they are on pins 2 and 3 of each jumper pin block. Replace the cover of the cabinet. Do not plug the
RB-06 power cord back into the wall outlet until the cabinet cover has been replaced.
Input Connection
When using the RB-06 in bridged mono mode, connect the cable from the preamplifier output to the left input. No connection is made to the right input.
Bridged Speaker Connection
When using the RB-06 in bridged mono mode, the wire to the speakers is connected to the positive terminals of the left and right channels. Connect the wire that goes to the positive terminal of the speaker to the positive terminal of the left channel of the RB-06. Connect the wire that goes to the negative terminal of the speaker to the positive terminal of the right channel of the RB-06. No connections are made to the negative terminals of the RB-06.

RB-06 Stereo Power Amplifier
Protection Indicator3
The RB-06 has both thermal and over-current protection circuitry that protects the amplifier against damage in the event of extreme or faulty operating conditions. The protection circuits are independent of the audio signal and have no impact on sonic performance. Instead, the protection circuits monitor the temperature of the output devices and shut down the amplifier if temperatures exceed safe limits.
Most likely, you will never see this protection circuitry in action. However, should a faulty condition arise, the amplifier will stop playing and the LED indicator on the front panel will light up.
If this happens, turn the amplifier off. Let it cool down for several minutes, and attempt to identify and correct the problem that caused the protection circuitry to engage. When you turn the amplifier back on, the protection circuit will automatically reset and the indicator LED should go out.
In most cases, the protection circuitry activates because of a fault condition such as shorted speaker wires, or inadequate ventilation leading to an overheating condition. In very rare cases, highly reactive or extremely low impedance speaker loads could cause the protection circuit to engage.
If the protection circuitry triggers repeatedly and you are unable to isolate and correct the faulty condition, contact your authorized Rotel dealer for assistance in troubleshooting.
8
Troubleshooting
Most difficulties in audio systems are the result of poor or wrong connections, or improper control settings. If you encounter problems, isolate the area of the difficulty, check the control settings, determine the cause of the fault and make the necessary changes. If you are unable to get sound from the RB-06, refer to the suggestions for the following conditions:
Front Panel Power Indicator Is
Not Lit
No main power to the RB-06. Check the front panel power switch. Make sure that it is set to the on position. Check AC power connections at the amplifier and the AC outlet.
Specifications
Continuous Power Output (20-20 kHz, < 0.03%, 8 ohms)
Fuse Replacement
If everything checks out correctly and you still cannot get the amplifier to turn on, the internal power fuse may have blown. If you believe this has happened, contact your authorized Rotel dealer for information on where to take your amplifier to get the fuse replaced.
No Sound
I f t h e a m p i s g e t t i n g A C p o w e r, b u t is producing no sound, check all of your connections and control settings on associated components.
70 watts/ch
Bridged Mono Power Output |
180 watts |
|
(20-20 kHz, < 0.1%, 4 ohms) |
(200 watts at 1kHz) |
|
Total Harmonic Distortion (20Hz-20kHz, 8 ohms) |
< 0.03% |
|
Intermodulation Distortion (60 Hz : 7 kHz, 4:1) |
< 0.03% |
|
Frequency Response ( ±1dB) |
10Hz-100kHz |
|
Damping Factor (20-20,000 Hz, 8 ohms) |
500 |
|
Speaker Impedance (Normal mode) |
4 ohms minimum |
|
Signal to Noise Ratio (IHF A network) |
116 dB |
|
Input Impedance/Sensitivity |
33 k Ohms/1.0 volt |
|
Power Requirements |
|
|
USA Version |
120 |
Volts, 60 Hz |
European Version |
230 |
Volts, 50 Hz |
Power Consumption |
250 |
Watts |
Dimensions (W x H x D) |
437 x 72 x 342 mm |
|
Panel Height |
80 mm / 2 5/32” |
|
Weight (net) |
7.5 kg, 16.54 lb. |
|
All specifications are accurate at the time of printing. |
|
|
Rotel reserves the right to make improvements without notice. |
|
|
9
Instructions importantes concernant la sécurité
ATTENTION : Il n’y a à l’intérieur aucune pièce susceptible d’être modifiée par l’utilisateur. Adressez-vous impérativement à une personne qualifiée.
ATTENTION : Pour réduire tout risque d’électrisation ou d’incendie, ne pas exposer l’appareil à une source humide, ou à tout type de risque d’éclaboussure ou de renversement de liquide. Ne pas poser dessus d’objet contenant un liquide, comme un verre, un vase, etc.
Prenez garde à ce qu’aucun objet ou liquide ne tombe à l’intérieur de l’appareil par ses orifices de ventilation. Si l’appareil est exposé à l’humidité ou si un objet tombe à l’intérieur, débranchez-le immédiatement de son alimentation secteur, et adressez-vous immédiatement et uniquement à une personne qualifiée et agréée.
Tous les conseils de sécurité et d’installation doivent être lus avant de faire fonctionner l’appareil. Conservez soigneusement ce livret pour le consulter à nouveau pour de futures références.
Tous les conseils de sécurité doivent être soigneusement respectés.
Suivez les instructions. Respectez les procédures d’installation et de fonctionnement indiquées dans ce manuel.
L’appareil doit être nettoyé uniquement avec un chiffon sec ou un aspirateur.
L’appareil doit être placé de telle manière que sa propreventilation puisse fonctionner, c’est-à-dire avec un espacelibre d’une dizaine de centimètres minimum autour de lui. Il ne doit pas être posé sur un fauteuil, un canapé, une couverture ou toute autre surface susceptible de boucher ses ouïes d’aération ; ou placé dans un meuble empêchant la bonne circulation d’air autour des orifices d’aération.
Cet appareil doit être branché sur une prise d’alimentation secteur, d’une tension et d’un type conformes à ceux qui sont indiqués sur la face arrière de l’appareil.
Brancher l’appareil uniquement grâce au cordon secteur fourni, ou à un modèle équivalent. Ne pas tenter de modifier ou changer la prise. Notamment, ne pas tenter de supprimer la prise de terre (troisième broche de la prise) si celle-ci est présente. Si la prise n’est pas conforme à celles utilisées dans votre installation électrique, consultez un électricien agréé. Ne pas utiliser de cordon rallonge.
Prendre garde à ce que ce cordon d’alimentation ne soit pas pincé, écrasé ou détérioré sur tout son trajet, à ce qu’il ne soit pas mis en contact avec une source de chaleur. Vérifiez soigneusement la bonne qualité des contacts, à l’arrière de l’appareil comme dans la prise murale.
La prise d’alimentation secteur constitue le moyen radical de déconnexion de l’appareil. Elle doit donc rester en permanence accessible.
L’appareil doit être immédiatement éteint, débranché puis retourné au service après-vente agréé dans les cas suivants :
•Le câble d’alimentation secteur ou sa prise est endommagé..
•Un objet est tombé, ou du liquide a coulé à l’intérieur de l’appareil.
•L’appareil a été exposé à la pluie.
•L’appareil ne fonctionne manifestement pas normalement.
•L’appareil est tombé, ou le coffret est endommagé.
Utilisez un câble de type Classe 2 pour la liaison avec les enceintes acoustiques, afin de garantir une installation correcte et de minimiser les risques d’électrocution.
Français
Utilisez uniquement un support, meuble, rack, étagère suffisamment solide pour supporter le poids de l’appareil. N’utilisez pas de meuble mobile ou risquant de se renverser.
Ce symbole signifie que cet appareil bénéficie d’une double isolation électrique. Sa prise d’alimentation n’a pas besoin d’être reliée à la terre ou à une masse
particulière..
Tous les appareils Rotel sont conçus en totale conformité avec les directives internationales concernant les restrictions d’utilisation de substances dangereuses (RoHS)
pour l’environnement, dans les équipements électriques et électroniques, ainsi que pour le recyclage des matériaux utilisés (WEEE, pour Waste Electrical and Electronic Equipment). Le symbole du conteneur à ordures barré par une croix indique la compatibilité avec ces directives, et le fait que les appareils peuvent être correctement recyclés
ou traités dans le respect total de ces normes.
.

RB-06 Amplificateur De Puissance Stéréo |
10 |
Sommaire |
|
Figure 1: Commandes et branchements |
3 |
Figure 2: Branchement des entrées |
|
et des enceintes en stéréo |
4 |
Figure 3: Branchements des entrées et des |
|
enceintes en ponté mode mono |
4 |
Au sujet de Rotel .................................. |
10 |
Pour démarrer ...................................... |
10 |
Quelques précautions |
10 |
Disposition |
11 |
Câbles |
11 |
Alimentation secteur et mise |
|
sous tension ......................................... |
11 |
Prise d’alimentation secteur 0 |
11 |
Interrupteur de mise sous tension et |
|
indicateur 12 |
11 |
Activation/désactivation du système |
|
automatique de commutation (trigger) 5 |
11 |
Entrée et sortie gâchette 12 V |
|
(trigger input/output) 78 |
11 |
Prises d’entrée 6............................... |
12 |
Raccordement des enceintes................... |
12 |
Choix des enceintes |
11 |
Choix des câbles d’enceintes |
12 |
Polarité et mise en phase |
12 |
Raccordement des enceintes en |
|
mode stéréo 9 |
12 |
Utilisation de l’appareil en |
|
mode ponté 4..................................... |
12 |
Au sujet de Rotel
C’est une famille de passionnés de musique qui a fondé Rotel, il y a maintenant plus de 40 ans. Pendant toutes ces années, leur passion ne s’est jamais émoussée et tous les membres de la famille se sont toujours battus pour fabriquer des appareils présentant un exceptionnel rapport musicalité-prix, suivis en cela par tous les employés.
Les ingénieurs travaillent toujours en équipe réduite, écoutant et peaufinant soigneusement chaque appareil pour qu’il corresponde parfaitement à leurs standards musicaux. Ils sont libres de choisir n’importe quels composants dans le monde entier, uniquement en fonction de leur qualité. C’est ainsi que vous trouvez dans les appareils Rotel des condensateurs britanniques ou allemands, des transistors japonais ou américains, tandis que tous les transformateurs toriques sont directement fabriqués dans une usine Rotel.
L’excellente réputation musicale des appareils Rotel a été saluée par la plupart des magazines spécialisés ; ils ont reçu d’innombrables récompenses, et sont choisis par de nombreux journalistes critiques du monde entier, parmi les plus célèbres, ceux qui écoutent de la musique
quotidiennement. Leurs commentaires restent immuables : Rotel propose toujours des maillons à la fois musicaux, fiables et abordables.
Remise en place des cavaliers |
13 |
Mais plus que tout, Rotel vous remercie pour |
|
Raccordement des câbles d’entrée |
13 |
||
l’achat de cet appareil, et souhaite qu’il vous |
|||
Raccordement des enceintes en mode ponté |
13 |
apporte de nombreuses heures de plaisir |
|
Indicateurs de protection 3 |
13 |
musical. |
|
Mais plus que tout, Rotel vous remercie pour |
|||
Dépannage ........................................... |
13 |
||
Le témoin d’alimentation sur le devant de l’appareil |
l’achat de cet appareil, et souhaite qu’il vous |
||
apporte de nombreuses heures de plaisir |
|||
ne s’allume pas |
13 |
||
musical. |
|||
Remplacement du fusible |
13 |
||
|
|||
Absence de son |
13 |
|
|
Spécifications........................................ |
13 |
|
|
Pour démarrer
Merci d’avoir acheté cet amplificateur de puissance stéréo Rotel RB-06. Il a été spécialement conçu pour vous fournir des heures et des heures de plaisir musical au cœur d’une chaîne haute-fidélité de très haute qualité.
Le RB-06 est un amplificateur très complet, de très hautes performances. Les différents aspects de sa conception ont été réalisés de manière à reproduire toute la dynamique comme les plus subtiles nuances de la musique. Le RB-06 est entre autres équipé d’une alimentation entièrement régulée, utilisant un transformateur torique spécialement fabriqué pour Rotel et des condensateurs « slit-foil » également uniques en leur genre. La faible impédance de cette alimentation assure une énorme réserve de puissance, capable de faire face aux exigences les plus élevées. Cette conception est évidemment plus coûteuse, mais elle est essentielle pour le respect de la musique.
Les circuits imprimés possèdent des pistes parfaitement symétriques. Elles préservent ainsi parfaitement l’intégrité « temporelle » de la musique. Les composants utilisés sont par exemple des résistances à film métallique et des condensateurs au polystyrène ou polypropylène sur tous les points critiques du trajet du signal. Les plus infimes détails ont été analysés avec soin, afin que rien ne vienne détruire l’exceptionnelle musicalité de cet amplificateur.
Les principales fonctions du RB-06 sont faciles à comprendre et à utiliser. Elles ne diffèrent en rien de celles d’une chaîne haute-fidé- lité traditionnelle. Branchez simplement les sources et écoutez!
Quelques précautions
ATTENTION : afin d’éviter tout dommage à l’appareil, éteignez TOUS les maillons du système avant de procéder au moindre branchement d’un câble. Ne remettez pas les appareils sous tension sans avoir vérifié que tous les branchements ont été correctement effectués. Vérifiez notamment les câbles des enceintes acoustiques : il ne doit pas y avoir de brins susceptibles de créer des courts-circuits d’une prise à l’autre, ou sur le boîtier de l’amplificateur.
Veuillez lire ce manuel d’utilisation très soigneusement. Il vous donne toutes les informations nécessaires aux branchements et fonctionnement du RB-06. Si vous vous posez encore des questions, n’hésitez pas à contacter immédiatement votre revendeur agréé Rotel.
Conservez soigneusement l’emballage du RB-06. Il constitue le meilleur et le plus sûr moyen pour le transport futur de votre nouvel appareil, afin d’éviter tout dommage sérieux à celui-ci.
R e m p l i s s e z e t e n v o y e z l e c o u p o n d’enregistrement fourni dans l’emballage du RB-06. Conservez la facture de votre appareil : c’est la meilleure preuve de votre propriété et de la date réelle d’achat. Elle sera nécessaire pour mettre éventuellement en jeu la garantie.
Disposition
Comme tous les appareils traitant des signaux relativement faibles, le RB -06 est sensible à son environnement immédiat. Évitez de le placer sur d’autres maillons. Éloignez les câbles de modulation sonore des câbles d’alimentation secteur. Vous éviterez ainsi l’apparition éventuelle de ronflements parasites.
Le RB-06 dégage de la chaleur pendant son fonctionnement, ce qui est normal. Les radiateurs et les ouvertures pratiquées dans son capot sont conçus pour dissiper cette chaleur. Ne posez donc pas d’autres maillons (ou objets) sur lui. Ne bloquez pas ses ouïes supérieures de refroidissement. Il doit y avoir environ 10 cm de dégagement au-dessus de lui pour permettre le bon fonctionnement de sa ventilation.
N’oubliez pas non plus, lors de son installation, qu’il s’agit d’un appareil relativement lourd. L’étagère ou le support utilisés doivent être suffisamment robustes et rigides : dans ce domaine, le sens commun s’applique. Nous vous recommandons d’ailleurs, à ce sujet, d’acquérir un de ces meubles spécialement conçus pour les chaînes haute-fidélité. Votre revendeur vous donnera toutes les informations nécessaires à ce sujet.
11
Câbles
Vérifiez que les câbles d’alimentation secteur d’une part, les câbles de modulation analogique d’autre part, et enfin les câbles transportant un signal numérique soient bien éloignés les uns des autres. Cela pour éviter toute interférence susceptible de générer des bruits parasites. N’utiliser que des câbles de très bonne qualité, soigneusement blindés. Votre revendeur agréé Rotel est en mesure de vous donner tous les conseils nécessaires quant au choix de câbles de bonne qualité.
Alimentation secteur et mise sous tension
Prise d’alimentation secteur 0
Le RB-06 est livré avec son propre cordon d’alimentation. N’utilisez que celui-ci, ou un modèle exactement semblable. N’utilisez pas de câble rallonge. Une prise multiple pourra éventuellement être utilisée, mais seulement si elle possède la capacité en courant (ampères) demandée par le RB-06 et les autres appareils branchés dessus.
Assurez-vous que l’interrupteur en face avant du RB-06 est bien dans la position éteint. Puis branchez une des extrémités du câble secteur dans la prise de la face arrière 0, et l’autre dans une prise d’alimentation murale adaptée.
Votre RB-06 a été configuré en usine pour la tension d’alimentation secteur du pays pour lequel il est prévu (USA : 115 volts/60 Hz, Europe : 230 volts/50 Hz). Cette valeur est indiquée sur une étiquette, en face arrière.
NOTE : si vous devez déménager dans un autre pays, il est possible de modifier l’alimentation du RB-06. Ne tentez pas d’effectuer cette transformation vous-même. Elle nécessite une intervention interne présentant des risques d’électrocution si
certaines précautions ne sont pas respectées. Consultez directement un revendeur agréé Rotel pour connaître la procédure à suivre.
Si vous vous absentez pendant une longue période (un mois ou plus), nous vous conseillons de débrancher la prise murale d’alimentation.
Français
Interrupteur de mise sous tension et indicateur 12
Pressez la touche en face avant pour mettre le RB-06 en service. La diode corresponde s’allume simultanément. Une seconde pression (position relâchée) sur cette même touche éteint le RB-06.
Sélecteur de mode de commutation Trigger ON/OFF 5
Le RB-06 vous propose sa mise sous tension automatique en utilisant le système de commutation par présence de tension continue 12 volts dit « 12 V Trigger ». Le sélecteur en face arrière repéré « Turn On/Off Mode Selector » permet de choisir la méthode d’allumage de l’amplificateur.
Lorsque le sélecteur est placé sur la position repérée « 12V TRIGGER ON », l’amplificateur s’allume automatiquement lorsqu’une tension de 12 volts est envoyée sur sa prise jack 3,5 mm située sur sa face arrière. Il se remet en mode de veille Standby dès que cette tension disparaît sur la prise. L’interrupteur POWER SWITCH en face avant est placé avant ce sélecteur : il doit être pressé (ON) pour que la commutation TRIGGER 12 V soit effective et efficace. Couper l’alimentation avec cet interrupteur (OFF) éteint l’amplificateur, qu’il y ait ou non une tension de 12 volts sur la prise Trigger IN.
Entrée 7 et sortie 8 commutation Trigger 12 V
La prise jack 3,5 mm repérée IN est prévue pour transporter la tension de 12 volts nécessaire au fonctionnement de la commutation TRIGGER que nous venons de décrire, la tension étant envoyée par un processeur Surround ou préamplificateur Rotel. Pour être efficace, le sélecteur contigu doit être sur sa position repérée « ON » (voir le paragraphe précédent). Cette entrée accepte en fait une tension continue ou alternative, d’une valeur comprise entre 3 et 30 volts.
La prise jack 3,5 mm repérée OUT permet de brancher une autre prise jack 3,5 mm pour renvoyer la tension de commutation 12 volts vers un autre appareil. La tension 12 volts n’est toutefois présente que si la prise IN est réellement alimentée par une telle tension.
\

RB-06 Amplificateur De Puissance Stéréo |
12 |
Branchement des signaux en entrée 6
[VoirFigure2pourlesbranchementsclassiques, en utilisation stéréophonique]
Le RB-06 est équipé de prises conventionnelles de type RCA, celles utilisées sur la majorité des maillons audio complémentaires.
Note: pour éviter tout bruit parasite susceptible d’endommager les enceintes acoustiques, assurez-vous que tout le système est éteint avant d’effectuer le moindre branchement.
N’utilisez que des câbles d’excellente qualité pour relier les sources au RB-06. Branchez la sortie du canal gauche de votre préamplificateur sur l’entrée du canal gauche du RB-06. Procédez de même pour le canal droit.
Branchement des enceintes acoustiques
Choix des enceintes
Nous vous recommandons d’utiliser des enceintes acoustiques d’une impédance nominale de 4 ohms ou plus. Si deux paires sont branchées en parallèle, l’impédance résultante est divisée par deux. Par exemple, si vous branchez deux paires d’enceintes d’impédance nominale 8 ohms, l’amplificateur voit une impédance de charge de seulement 4 ohms. Dans ce cas, les enceintes utilisées doivent donc avoir une impédance de 8 ohms ou plus. L’impédance des enceintes est souvent indiquée de manière relativement peu précise. En pratique, seules quelques rares modèles d’enceintes risquent de présenter des problèmes pour le RB-06. Consultez votre revendeur agréé Rotel pour de plus amples informations à ce sujet.
Choix de la section du câble d’enceintes
Utilisez du câble deux conducteurs isolé pour relier le RB-06 aux enceintes. La taille et la qualité du câble peuvent avoir de l’influence sur les performances musicales. Un câble standard fonctionnera, mais il peut présenter des limitations quant à la dynamique réellement reproduite ou à la qualité du grave, surtout sur de grandes longueurs. En général, un câble de plus fort diamètre entraîne une amélioration du son. Pour des performances optimales, penchez-vous sur l’offre en terme de câbles de très haute qualité. Votre revendeur agréé Rotel est en mesure de vous renseigner efficacement à ce sujet.
Polarité et mise en phase
La polarité – autrement dit l’orientation correcte du « + » et du « - » pour chaque branchement entre le RB-06 et les enceintes acoustiques doit être respectée pour toutes les enceintes, afin que celles-ci soient toutes en phase. Si la phase d’une seule enceinte est inversée, il en résultera un manque de grave sensible et une dégradation importante de l’image stéréophonique. Tous les câbles sont repérés afin que vous puissiez identifier clairement leurs deux conducteurs. Soit les câbles sont différents (un cuivré, un argenté), soit la gaine est de couleur différente (filet de couleur), soit elle est gravée. Assurez-vous que vous repérez bien le conducteur repéré pour toutes les liaisons, et que vous respectez parfaitement la phase sur toutes les enceintes acoustiques, par rapport à l’entrée.
Branchement des enceintes en stéréo 9
Le RB-06 possède des prises rouges et noires repérées qui acceptent indifféremment du câble nu, des cosses ou fourches spéciales, ou encore des fiches banane (sauf en Europe, où les nouvelles normes CE l’interdisent).
Tirez le câble depuis le RB-06 vers les enceintes acoustiques. Prévoyez suffisamment de longueur pour qu’il ne subisse aucune contrainte sur toute sa longueur et que vous puissiez déplacer les éléments sans qu’il soit tendu (accès aux prises de l’amplificateur).
Si vous utilisez des fiches banane, branchezles d’abord sur les câbles, puis insérez-les à l’arrière des bornes de branchement de l’amplificateur. Le corps hexagonal de cha-
cune des prises doit alors être vissé à fond (dans le sens des aiguilles d’une montre).
Si vous utilisez des fourches, insérez-les à fond dans le logement offert par les prises et serrez fermement. Si vous utilisez du fil nu, dénudez tous les câbles sur une longueur suffisante, et torsadez les brins de chaque conducteur de telle manière qu’aucun brin ne puisse venir en contact avec un autre d’un autre conducteur (court-circuit). Suivant la taille des torsades, insérez-les dans les trous centraux des prises ou entourez-le autour des axes de celles-ci (sens des aiguilles d’une montre). Dans tous les cas, serrez fermement à la main les bornes vissantes hexagonales.
Note: Vérifiez bien qu’il n’y ait aucun brin qui vienne en contact avec des brins ou la prise adjacente.
Fonctionnement en mode mono (mise en pont) 4
[Voir la Figure 3 pour l’illustration de la position des cavaliers à modifier, et le branchement correspondant]
Les deux canaux du RB-06 peuvent être « mis en pont » (mode bridgé, en anglais). Dans cette configuration, on obtient un seul canal, mais dont la puissance atteint 180 watts ! Cette caractéristique permet donc d’augmenter la puissance disponible de votre installation, à condition d’utiliser un second amplificateur utilisé dans le même mode monophonique pour la seconde enceinte. Un RB-06 mis en pont peut également alimenter un unique caisson de grave. Notez que dans ce mode de fonctionnement monophonique, l’unique enceinte branchée doit impérativement présenter une impédance minimum de 8 ohms.
Afin d’utiliser le RB-06 en mode monophonique, trois « cavaliers » situés à l’intérieur de l’amplificateur doivent être déplacés d’un jeu de broches à un autre. Cette modification ne doit être effectuée que par un technicien qualifié agréé. Consultez impérativement votre revendeur agréé Rotel. De plus, les branchements par rapport aux autres maillons sont alors différents par rapport au fonctionnement stéréophonique normal. Lorsque le RB-06 est configuré en mode monophonique, la diode « Bridged Mono » 4 s’allume sur la façade.
RB-06 Stereo-Endstufe
Wichtige Sicherheitshinweise
Vorsicht: Im Innern des Gerätes befinden sich keine vom Bediener zu wartenden Teile. Alle Serviceund Wartungsarbeiten müssen von qualifiziertem Fachpersonal durchgeführt werden.
Vorsicht: Dieses Gerät darf nur in trockenen Räumen betrieben werden. Zum Schutz vor Feuer oder einem elektrischen Schlag dürfen keine Flüssigkeiten in das Gerät gelangen. Stellen Sie keine mit Flüssigkeit gefüllten Vasen auf das Gerät..
Das Eindringen von Gegenständen in das Gehäuse ist zu vermeiden. Sollte dieser Fall trotzdem einmal eintreten, trennen Sie das Gerät sofort vom Netz. Lassen Sie es von einem Fachmann prüfen und die notwendigen Reparaturarbeiten durchführen.
Bitte lesen Sie sich die Bedienungsanleitung vor Gebrauch des Gerätes genau durch. Sie enthält wichtige Sicherheitsvorschriften, die unbedingt zu beachten sind! Bewahren Sie die Bedienungsanleitung so auf, dass sie jederzeit zugänglich ist.
Alle Warnhinweise in dieser Bedienungsanleitung und auf dem Gerät müssen genau beachtet werden. Dadurch können Personenund Sachschäden vermieden werden. Außer den in der Bedienungsanleitung beschriebenen Handgriffen sind vom Bediener keine Arbeiten am Gerät vorzunehmen.
Reinigen Sie das Gehäuse nur mit einem weichen, trockenen Tuch oder einem Staubsauger.
Bitte stellen Sie sicher, dass um das Gerät ein Freiraum von 10 cm gewährleistet ist Stellen Sie das Gerät weder auf ein Bett, Sofa, Teppich oder ähnliche Oberflächen, um die Ventilationsöffnungen nicht zu verdecken. Das Gerät sollte nur dann in einem Regal oder in einem Schrank untergebracht werden, wenn eine ausreichende Luftzirkulation gewährleistet ist.
Stellen Sie das Gerät nicht in die Nähe von Wärmequellen (Heizkörper, Wärmespeicher, Öfen oder sonstige wärmeerzeugende Geräte).
Bevor Sie das Gerät in Betrieb nehmen, prüfen Sie, ob die Betriebsspannung mit der örtlichen Netzspannung übereinstimmt. Die Betriebsspannung ist an der Rückseite des Gerätes angegeben.
Schließen Sie das Gerät nur mit dem dazugehörigen zweipoligen Netzkabel an die Wandsteckdose an. Modifizieren Sie das Netzkabel auf keinen Fall. Versuchen Sie nicht, die Erdungsund/oder Polarisationsvorschriften zu umgehen. Das Netzkabel sollte an eine zweipolige Wandsteckdose angeschlossen werden. Verwenden Sie keine Verlängerungskabel.
Netzkabel sind so zu verlegen, dass sie nicht beschädigt werden können (z.B. durch Trittbelastung, Möbelstücke oder Erwärmung). Besondere Vorsicht ist dabei an den Steckern, Verteilern und den Anschlussstellen des Gerätes geboten.
Sollten Sie das Gerät für eine längere Zeit nicht in Betrieb nehmen, ziehen Sie den Netzstecker aus der Steckdose.
Dieses Gerät sollte, wie andere Elektrogeräte auch, nicht unbeaufsichtigt betrieben werden.
Ist das Gerät z.B. während des Transportes über längere Zeit Kälte ausgesetzt worden, so warten Sie mit der Inbetriebnahme, bis es sich auf Raumtemperatur er wärmt hat und das Kondenswasser verdunstet ist.
Schalten Sie das Gerät sofort aus und ziehen Sie geschultes Fachpersonal zu Rate, wenn:
•das Netzkabel oder der Stecker beschädigt sind,
•Gegenstände bzw. Flüssigkeit in das Gerät gelangt sind,
•das Gerät Regen ausgesetzt war,
•das Gerät nicht ordnungsgemäß funktioniert bzw. eine deutliche Leistungsminderung aufweist,
•das Gerät hingefallen ist bzw. beschädigt wurde.
Verwenden Sie gemäß Class 2 isolierte Lautsprecherkabel, um eine ordnungsgemäße Installation zu gewährleisten und die Gefahr eines elektrischen Schlages zu minimieren.
13
Stellen Sie das Gerät waagerecht auf eine feste, ebene Unterlage. Es sollte weder auf beweglichen Unterlagen noch Wagen oder fahrbaren Untergestellen transportiert werden
Dieses Symbol bedeutet, dass das Gerät doppelt isoliert ist. Es muss daher nicht geerdet werden.
Rotel-Produkte entsprechen den internationalen Richtlinien über die Beschränkung der Verwendung bestimmter gefährlicher Stoffe in Elektround Elektronikgeräten (Restriction of Hazardous Substances (kurz RoHS genannt)) und über Elektround Elektronik-Altgeräte (Waste Electrical and Electronic Equipment (WEEE)). Die durchgestrichene Mülltonne steht für deren Einhaltung und besagt, dass die Produkte ordnungsgemäß recycelt oder diesen Richtlinien entsprechend entsorgt werden müssen.
 Loading...