


CD RECEIVER
RADIO CD
CD PLAYER
DEH-1250MPG
DEH-1250MP
Owner’s Manual
Manual de instrucciones
Manual do proprietário
(B) Português Español English
|
|
|
|
|
|
|
|
|
|
|
|
|
|
|
|
|
|
ES_Owner_5L-1.indd |
1 |
|
2009/06/02 |
11:32:32 |
|
|
|
|
|
|
|
||||||
|
|
|
|
|
|
|
|
|

Black plate (2,1)
Section
01  Before You Start
Thank you for purchasing this PIONEER product.
To ensure proper use, please read through this manual before using this product. It is especially important that you read and observe WARNINGs and CAUTIONs in this manual.
Please keep the manual in a safe and accessible place for future reference. 
About this unit
 CAUTION
!Do not allow this unit to come into contact with liquids. Electrical shock could result. Also, damage to this unit, smoke, and overheating could result from contact with liquids.
!“CLASS 1 LASER PRODUCT”
This product contains a laser diode of higher class than 1. To ensure continued safety, do not remove any covers or attempt to gain access to the inside of the product. Refer all servicing to qualified personnel.
!Always keep the volume low enough to hear outside sounds.
!Avoid exposure to moisture.
!If the battery is disconnected or discharged, any preset memory will be erased.
!Should this unit fail to operate properly, please
contact your dealer or nearest authorized PIONEER Service Station.
2 |
En |
<QRD3040-A/N>2

 Operating this unit
Head unit
|
|
|
|
Black plate (3,1) |
|
|
|
|
|
|
|
|
|
|
|
|
|
|
|
|
|
|
|
|
|
|
|
|
|
|
|
|
|
|
|
|
Section |
||
|
|
|
|
|
02 |
|
|
|
|
|
|
|
English |
||
|
|
4 |
RPT |
Repeat play is turned on. |
|||
|
|
|
|
||||
|
|
|
|
|
|
|
|
|
5 |
LOUD |
Loudness is on. |
|
|
|
|
|
|
|
|
|
|
|
|
|
|
6 |
5 (stereo) |
The selected frequency is being |
|
|
|
|
broadcasted in stereo. |
|
|
|
|||
|
|
|
|
|
|
|
|
|
|
|
|
|
|
|
|
|
|
7 |
LOC |
Local seek tuning is on. |
|
|
|
|
|
|
|
|
|
|
|
|
Button |
|
Button |
1 |
F (function) |
8 |
Detach |
|
|
|
|
2 |
EQ/LOUD |
9 |
AUX input jack (3.5 |
mm stereo jack) |
|||
|
|
|
|
3 |
SRC/OFF |
a |
CLOCK |
|
|
|
|
4 |
1 to 6 |
b |
DISP/SCRL |
|
|
|
|
5 |
Disc loading slot |
c a/b/c/d |
|
|
|
|
|
6 |
h (eject) |
d |
BAND/ESC |
|
|
|
|
7 |
A (audio) |
|
|
|
|
|
|
Display indication
1 2
|
|
|
|
|
|
|
|
|
|
|
|
|
|
|
|
|
|
|
|
|
|
|
|
|
|
|
|
|
|
|
|
|
|
|
|
|
|
|
|
|
|
|
|
|
|
|
|
|
|
|
|
|
|
|
|
|
|
|
|
|
|
|
|
|
3 |
|
4 |
5 |
6 7 |
|
|||||||||
|
|
|
|
|
|
|
|
|
|
|
|
|
|
|
|
|
Indicator |
State |
|
|
|
|
|
|
|
|
|||||
|
Main dis- |
! |
|
Tuner: band and frequency |
|||||||||||
|
! |
|
Built-in CD player: elapsed |
||||||||||||
1 |
play sec- |
|
|||||||||||||
|
|
playback time and text infor- |
|||||||||||||
|
tion |
|
|
||||||||||||
|
|
|
mation |
|
|
|
|
|
|
|
|
||||
|
|
|
|
|
|
|
|
|
|
|
|
|
|
||
|
|
|
|
|
|
|
|
|
|
|
|
|
|
||
|
Preset |
! The track number or preset |
|||||||||||||
|
|
|
number. |
|
|
|
|
|
|
|
|
||||
2 |
number/ |
! If a track number 100 or more |
|||||||||||||
track num- |
|
|
is selected, d on the left of |
||||||||||||
|
ber |
|
|
the track number indicator |
|||||||||||
|
|
|
|
|
|
||||||||||
|
|
|
|
|
|
will light. |
|
|
|
|
|
|
|
|
|
|
|
|
|
|
|
|
|
|
|
|
|
|
|
||
3 |
MP3/ |
The type of the currently playing |
|||||||||||||
|
WMA |
disc. |
|
|
|
|
|
|
|
|
|||||
Remote control
Operation is the same as when using the buttons on the head unit. See the explanation of the head unit about the operation of each button with the exception of ATT, which is explained below.
e
d

 f
f
c
1 |
7 |
g |
b |
h
|
Part |
State |
|
e |
VOLUME |
Press to increase or decrease vo- |
|
|
(+/-) |
lume. |
|
f |
ATT |
Press to mute. Press again to un- |
|
mute. |
|||
|
|
||
|
|
|
Press to cycle through all the
g SRC(source) available sources. Press and hold to turn the source off.
h e (pause) |
Press to pause or resume. |
|
|
En |
3 |
<QRD3040-A/N>3
Black plate (4,1)
Section
02  Operating this unit
Use and care of the remote |
! When disposing of used batteries, comply |
|
control |
with governmental regulations or environmen- |
|
tal public institutions’ rules that apply in your |
||
|
country/area. |
|
Using the remote control |
||
|
||
1 Point the remote control in the direction of the |
|
|
front panel to operate. |
Basic Operations |
|
When using for the first time, pull out the film |
||
protruding from the tray. |
Important |
|
|
||
Replacing the battery |
||
|
||
1 Slide the tray out on the back of the remote con- |
! Handle gently when removing or attaching |
|
trol. |
the front panel. |
|
2 Insert the battery with the plus (+) and minus (–) |
||
! Avoid subjecting the front panel to excessive |
||
poles aligned properly. |
||
shock. |
||
|
||
|
! Keep the front panel out of direct sunlight and |
|
|
high temperatures. |
|
|
! Remove any cables and devices attached to |
|
|
this unit before detaching the front panel to |
|
|
avoid damage to the device or vehicle interior. |
|
|
|
Important
!Do not store the remote control in high temperatures or direct sunlight.
!The remote control may not function properly in direct sunlight.
!Do not let the remote control fall onto the floor, where it may become jammed under the brake or accelerator pedal.
 WARNING
!Keep the battery out of the reach of children. Should the battery be swallowed, consult a doctor immediately.
!Batteries (battery pack or batteries installed) must not be exposed to excessive heat such as sunshine, fire or the like.
 CAUTION
!Use one CR2025 (3 V) lithium battery.
!Remove the battery if the remote control is not used for a month or longer.
!There is a danger of explosion if the battery is incorrectly replaced. Replace only with the same or equivalent type.
!Do not handle the battery with metallic tools.
!Do not store the battery with metallic objects.
!If the battery leaks, wipe the remote control completely clean and install a new battery.
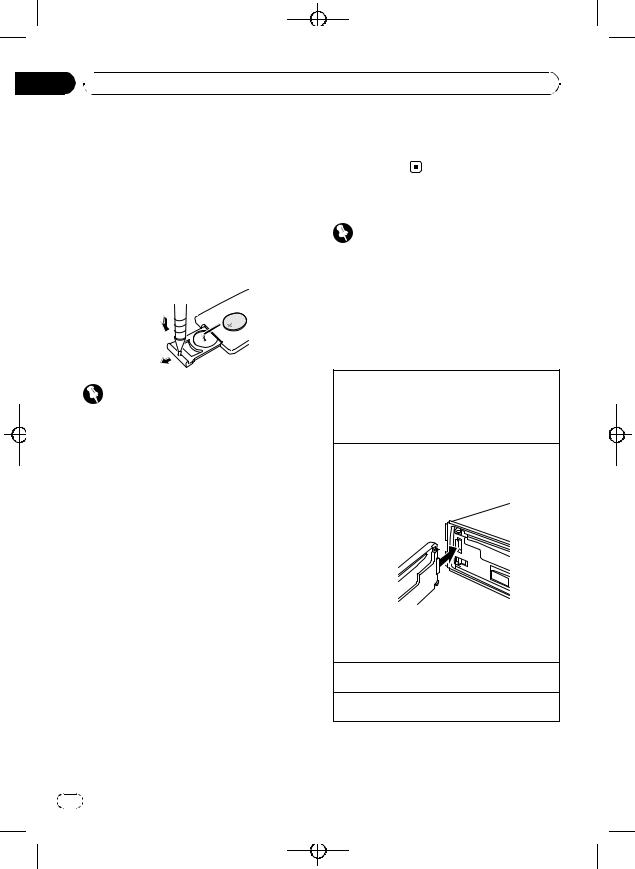
Removing the front panel to protect your unit from theft
1Press detach to release the front panel.
2Grab the front panel and remove.
3Put the front panel into the provided protective case for safe keeping.
Re-attaching the front panel
1Slide the front panel to the left until it clicks. Front panel and the head unit are connected on the left side. Make sure that the front panel has been properly connected to the head unit.
2Press the right side of the front panel until it is firmly seated.
If you can’t attach the front panel to the head unit successfully, try again. However, forcing the front panel into place may result in damage.
Turning the unit on
1 Press SRC/OFF to turn the unit on.
Turning the unit off
1 Press SRC/OFF and hold until the unit turns off.
4 |
En |
<QRD3040-A/N>4

|
Black plate (5,1) |
|
Section |
Operating this unit |
02 |
Selecting a source
1Press SRC/OFF to cycle between:
TUNER (tuner)—CD (built-in CD player)—AUX (AUX)
Adjusting the volume
1 Turn SRC/OFF to adjust volume.
 Note
Note
When this unit’s blue/white lead is connected to the vehicle’s auto-antenna relay control terminal, the vehicle’s antenna extends when this unit’s source is turned on. To retract the antenna, turn the source off.
Menu operations identical for function settings/audio adjustments/initial settings
Returning to the ordinary display
Canceling the initial setting menu
1Press BAND/ESC.
You can also cancel initial settings by holding down SRC/OFF until the unit turns off.
Tuner
Basic Operations
 Important
If you are using this unit in North, Central or South America, reset the AM tuning step (refer to
AM (AM tuning step) on page 8).
Selecting a band
1Press BAND/ESC until the desired band (F1, F2, F3 for FM or AM) is displayed.
Manual tuning (step by step) 1 Press c or d.
Seeking
1Press and hold c or d, and then release.
You can cancel seek tuning by briefly pressing c or d.
While pressing and holding c or d, you can skip stations. Seek tuning starts as soon as you release c or d.
sets. |
English |
Storing and recalling stations |
|
You can easily store up to six stations as pre- |
|
% When you find a station that you want |
|
to store in memory, press one of the preset |
|
tuning buttons (1 to 6) and hold until the |
|
preset number stops flashing. |
|
Stored radio station frequency can be recalled |
|
by pressing the preset tuning button. |
|
# Press a or b to recall radio station frequen- |
|
cies. |
|
Function settings |
|
% Press F (function) to select the function. |
|
After selecting, perform the following proce- |
|
dures to set the function. |
|
LOCAL (local seek tuning)
Local seek tuning lets you tune in only those radio stations with sufficiently strong signals for good reception.
1Press a or b to turn local seek tuning on or off.
2Press c or d to set the sensitivity.
FM: LOCAL 1—LOCAL 2—LOCAL 3—LOCAL 4 AM: LOCAL 1—LOCAL 2
Larger setting number is higher level. The highest level setting allows reception of only the strongest stations, while lower settings let you receive progressively weaker stations.
BSM (best stations memory)
BSM (best stations memory) automatically stores the six strongest stations in the order of their signal strength.
Storing broadcast frequencies with BSM may replace broadcast frequencies you have saved using 1 to 6.
1Press a to turn BSM on.
The six strongest broadcast frequencies are stored in the order of their signal strength. To cancel the storage process, press b.
En |
5 |
<QRD3040-A/N>5

|
|
|
Section |
|
|
|
|
|
|
Black plate (6,1) |
|
|
|
|
|
|
|
|
|
|
|||
|
|
|
|
|
|
|
|
|
|||
|
|
|
|
|
|
|
|
|
|
|
|
|
|
|
|
|
|
|
|
|
|
|
|
|
02 |
|
|
|
|
|
|
||||
|
|
Operating this unit |
|
|
|
|
|||||
|
|
|
|
|
|
|
|
|
|
|
|
|
|
|
|
CD |
|
! When playing back VBR (variable bit rate)-re- |
|||||
|
|
|
|
Basic Operations |
|
|
corded MP3 files, VBR is displayed instead of |
||||
|
|
|
|
|
|
bit rate value. |
|||||
|
|
|
|
|
|
|
|
|
|
|
|
|
|
|
|
Playing a CD/CD-R/CD-RW |
|
|
Function settings |
||||
|
|
|
|
1 Insert the disc, label side up, into the disc loading |
|
|
|||||
|
|
|
|
|
slot. |
|
|
% Press F (function) to select the function. |
|||
|
|
|
|
1 If a disc has already been inserted, press SRC/ |
|
|
|||||
|
|
|
|
|
OFF to select the built-in CD player. |
|
|
After selecting, perform the following proce- |
|||
|
|
|
|
|
|
|
|
|
dures to set the function. |
||
|
|
|
|
Ejecting a CD/CD-R/CD-RW |
|
|
|||||
|
|
|
|
|
|
|
|
|
|||
|
|
|
|
1 Press h. |
|
|
|
|
|
||
|
|
|
|
|
|
RPT (repeat play) |
|||||
|
|
|
|
|
|
|
|
|
|||
|
|
|
|
Selecting a folder |
|
|
|||||
|
|
|
|
|
|
1 Press c or d to select the repeat range. |
|||||
|
|
|
|
1 Press a or b. |
|
|
|||||
|
|
|
|
|
|
|
|
|
|
DSC – Repeat all tracks |
|
|
|
|
|
Selecting a track |
|
|
|
||||
|
|
|
|
|
|
|
TRK – Repeat the current track |
||||
|
|
|
|
1 Press c or d. |
|
|
|
||||
|
|
|
|
|
|
|
FLD – Repeat the current folder |
||||
|
|
|
|
|
|
|
|
|
|
||
|
|
|
|
Fast forwarding or reversing |
|
|
|
|
|
||
|
|
|
|
|
|
RDM (random play) |
|||||
|
|
|
|
1 Press and hold c or d. |
|
|
|||||
|
|
|
|
|
|
1 Press a or b to turn random play on or off. |
|||||
|
|
|
|
|
|
|
|
|
|||
|
|
|
|
Switching between compressed audio and CD-DA |
|
|
|||||
|
|
|
|
|
|
|
When random play is on, RDM appears in the dis- |
||||
|
|
|
|
1 Press BAND/ESC. |
|
|
|
||||
|
|
|
|
|
|
|
play. |
||||
|
|
|
|
|
|
|
|
|
|
||
|
|
|
|
|
|
|
|
|
|
||
|
|
|
|
|
Note |
|
|
If you turn random play on during folder repeat, |
|||
|
|
|
|
|
|
|
FRDM appears in the display. |
||||
|
|
|
|
|
|
|
|
|
|
||
|
|
|
|
When playing compressed audio, there is no |
|
|
|
|
|||
|
|
|
|
|
SCAN (scan play) |
||||||
|
|
|
|
sound during fast forward or reverse. |
|
||||||
|
|
|
|
|
|
|
|
||||
Displaying text information
Selecting the desired text information
1Press DISP/SCRL.
CD TEXT discs: Play time—disc title—disc artist name—track title—track artist name WMA/MP3: Play time—folder name—file name
—track title—artist name—album title—com- ment—bit rate
WAV: Play time—folder name—file name—sam- pling frequency
Scrolling the text information to the left 1 Press and hold DISP/SCRL.
 Notes
Notes
!Incompatible text stored with the audio file may not be displayed or may be displayed incorrectly.
!Depending on the version of iTunes used to write MP3 files onto a disc, comment information may be incorrectly displayed.
!When playing back VBR (variable bit rate)-re- corded WMA files, the average bit rate value is displayed.
Scan play searches for a song within the selected repeat range.
1Press a to turn scan play on.
If you turn scan play on during FLD, FSCN appears in the display.
2When you find the desired track press b to turn scan play off.
If the display has automatically returned to the playback display, select SCAN again by pressing F (function).
After scanning of a disc (folder) is finished, normal playback of the tracks begins.
PAUSE (pause)
1 Press a or b to pause or resume.
COMP OFF (compression and BMX)
Using the COMP (compression) and BMX functions let you adjust the sound playback quality of this unit. 1 Press a or b to select your favorite setting.
COMP OFF—COMP 1—COMP 2—COMP OFF— BMX 1—BMX 2
6 |
En |
<QRD3040-A/N>6

|
Black plate (7,1) |
|
Section |
Operating this unit |
02 |
FF/REV (fast forward/reverse)
You can switch the search method between fast forward/reverse and searching every 10 tracks. Selecting ROUGH enables you to search every 10 tracks.
1Press d to select ROUGH. FF/REV – Fast forward and reverse
ROUGH – Searching every 10 tracks To select FF/REV, press c.
2Press BAND/ESC to return to the playback display.
3Press and hold c or d to search every 10 tracks on a disc (folder).
If the rest of track number is less than 10, press and hold c or d recalls the first (last) one.
Audio Adjustments
Audio Adjustments
% Press A (audio) to select the audio function.
After selecting, perform the following procedures to set the audio function.
FAD (fader/balance adjustment)
You can change the fader/balance setting.
1Press a or b to adjust front/rear speaker balance. Adjustment range (front/rear): FAD F15 to FAD R15
FAD 0 is the proper setting when only two speakers are used.
2Press c or d to adjust left/right speaker balance. Adjustment range (left/right): BAL L15 to BAL R15
BASS/MID/TREBLE (equalizer adjustment)
You can adjust the bass/mid/treble level.
!Adjusted equalizer curve settings are stored in
CUSTOM.
1Press a or b to adjust the level. Adjustment range: +6 to -6
LOUD (loudness)
Loudness compensates for deficiencies in the lowand high-frequency ranges at low volume.
1Press a or b to turn loudness on or off.
2Press c or d to select the desired setting. LOW (low)—HI (high)
|
English |
|
SLA (source level adjustment) |
||
|
||
SLA (Source level adjustment) lets you adjust the vo- |
|
|
lume level of each source to prevent radical changes |
|
|
in volume when switching between sources. |
|
!Settings are based on the FM volume level, which remains unchanged.
Before adjusting source levels, compare the FM volume level with the level of the source you wish to adjust.
!The AM volume level can also be adjusted with source level adjustments.
1Press a or b to adjust the source volume. Adjustment range: SLA +4 to SLA –4
 Note
Note
You can also turn loudness on or off by pressing and holding EQ/LOUD.
Using the equalizer
% Press EQ/LOUD to select the equalizer. DYNAMIC—VOCAL—NATURAL—CUSTOM
—FLAT—POWERFUL
!CUSTOM allows you to create a customized setting.
!When FLAT is selected no adjustments are made to the sound.
Other Functions
Adjusting initial settings
1Press SRC/OFF and hold until the unit turns off.
2Press SRC/OFF and hold until the clock appears in the display.
3Press F (function) to select the initial setting.
After selecting, perform the following procedures to set the initial setting.
Setting the clock
1Press c or d to select the segment of the clock display you wish to set.
Hour—Minute
2Press a or b to put a clock right.
FM (FM tuning step)
En |
7 |
<QRD3040-A/N>7

Black plate (8,1)
Section
02  Operating this unit
The FM tuning step employed by seek tuning can be switched between 100 kHz, the preset step, and 50 kHz.
!If seek tuning is performed in 50 kHz steps, stations may be tuned in imprecisely. Tune in the stations with manual tuning or use seek tuning
again.
1Press c or d to select the FM tuning step. 50 (50 kHz)—100 (100 kHz)
AM (AM tuning step)
The AM tuning step can be switched between 9 kHz, the preset step, and 10 kHz. When using the tuner in North, Central or South America, reset the tuning step from 9 kHz (531 kHz to 1 602 kHz allowable) to 10 kHz (530 kHz to 1 640 kHz allowable).
1Press c or d to select the AM tuning step. 10 (10 kHz)—9 (9 kHz)
AUX (auxiliary input)
Activate this setting when using auxiliary device connected to this unit.
1 Press a or b to turn auxiliary setting on or off.
Turning the clock display on or off
% Press CLOCK to turn the clock display on or off.
Each press of CLOCK turns the clock display on or off.
# The clock display disappears temporarily when you perform other operations, but the clock display appears again after 25 seconds.
Using the AUX source
1Insert the stereo mini plug into the AUX input jack.
2Press SRC/OFF to select AUX as the source.
8 |
En |
<QRD3040-A/N>8
|
Black plate (9,1) |
|
Section |
Connections |
03 |
 WARNING
!Use speakers over 50 W (output value) and between 4 W to 8 W (impedance value). Do not use 1 W to 3 W speakers for this unit.
!The black cable is ground. When installing this unit or power amp (sold separately), make sure to connect the ground wire first. Ensure that the ground wire is properly connected to metal parts of the car’s body. The ground wire of the power amp and the one of this unit or any other device must be connected to the car separately with different screws. If the screw for the ground wire loosens or falls out, it could result in fire, generation of smoke or malfunction.
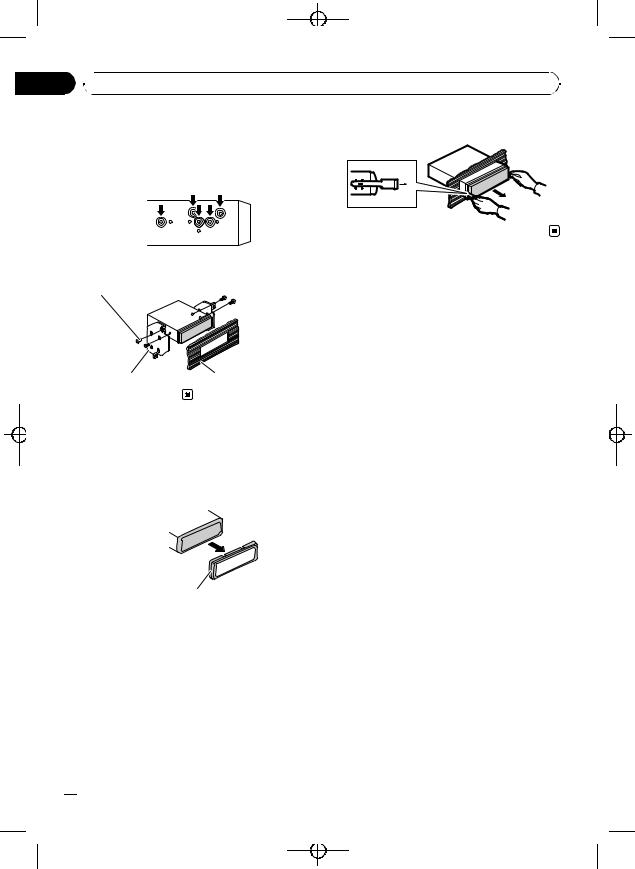
Ground wire |
POWER AMP |
||
|
|
|
|
|
|
|
|
Other devices |
Metal parts of car’s body |
|
(Another electronic |
||
|
||
device in the car) |
|
 Important
!When installing this unit in a vehicle without an ACC (accessory) position on the ignition switch, failure to connect the red cable to the terminal that detects operation of the ignition key may result in battery drain.
F |
ON |
||
F |
|
|
|
O |
|
|
S |
|
|
|
T |
|
|
R |
A |
|
T |
|
|
wiring that comes into contact with metal parts to protect the wiring.
—Place all cables away from moving parts, such as the gear shift and seat rails.
—Place all cables away from hot places, such as near the heater outlet.
—Do not connect the yellow cable to the battery by passing it through the hole to the engine compartment.
—Cover any disconnected cable connectors with insulating tape.
—Do not shorten any cables.
—Never cut the insulation of the power cable of this unit in order to share the power with other devices. The current capacity of the cable is limited.
—Use a fuse of the rating prescribed.
—Never wire the negative speaker cable directly to ground.
—Never band together negative cables of multiple speakers.
!When this unit is on, control signals are sent through the blue/white cable. Connect this cable to the system remote control of an external power amp or the vehicle’s auto-antenna relay control terminal (max. 300 mA 12 V DC). If the vehicle is equipped with a glass antenna, connect it to the antenna booster power supply terminal.
!Never connect the blue/white cable to the power terminal of an external power amp. Also, never connect it to the power terminal of the auto antenna. Doing so may result in battery drain or a malfunction.
English
ACC position |
No ACC position |
!Use this unit with a 12-volt battery and negative grounding only. Failure to do so may result in a fire or malfunction.
!To prevent a short-circuit, overheating or malfunction, be sure to follow the directions below.
—Disconnect the negative terminal of the battery before installation.
—Secure the wiring with cable clamps or adhesive tape. Wrap adhesive tape around
En  9
9
<QRD3040-A/N>9

Black plate (10,1)
Section
03 Connections Connection diagram
|
Power amp |
This product |
(sold separately) |
|
Connect with RCA cables |
|
(sold separately) |
Rear output |
|
Antenna jack |
Fuse (10 A) |
Yellow
Connect to the constant 12 V supply terminal.
Red
Connect to terminal controlled by ignition switch (12 V DC).
Black (chassis ground) Connect to a clean, paint-free metal location.
System remote control
Blue/white
Connect to system control terminal of the power amp or auto-antenna relay control terminal (max. 300 mA 12 V DC).
With a 2 speaker system, do not connect anything to the speaker leads that are not connected to speakers.
White |
Gray |
|
|
Front speaker |
Front speaker |
|
|
White/black |
Gray/black |
Left |
Right |
Green |
Violet |
|
|
Rear speaker |
Rear speaker |
|
|
Green/black |
Violet/black |
|
|
Rear speaker |
Rear speaker |
|
|
Perform these connections when using the optional amplifier.
 10
10 En
En
<QRD3040-A/N>10
|
Black plate (11,1) |
|
Section |
Installation |
04 |
 Important
!Check all connections and systems before final installation.
!Do not use unauthorized parts as this may cause malfunctions.
!Consult your dealer if installation requires drilling of holes or other modifications to the vehicle.
!Do not install this unit where :
—it may interfere with operation of the vehicle.
—it may cause injury to a passenger as a result of a sudden stop.
!The semiconductor laser will be damaged if it overheats. Install this unit away from hot places such as near the heater outlet.
!Optimum performance is obtained when the unit is installed at an angle of less than 60°.
DIN Front-mount
1Insert the mounting sleeve into the dashboard.
For installation in shallow spaces, use the supplied mounting sleeve. If there is enough space, use the mounting sleeve that came with the vehicle.
2Secure the mounting sleeve by using a screwdriver to bend the metal tabs (90°) into place.
Dashboard
English
Mounting sleeve
!To ensure proper heat dispersal when using this unit, make sure you leave ample space behind the rear panel and wrap any loose cables so they are not blocking the vents when installing the unit.
DIN front/rear mount
This unit can be properly installed either from “Front” (conventional DIN front-mount) or “Rear” (DIN rear-mount installation, utilizing threaded screw holes on the sides of unit chassis). For details, refer to the following installation methods.
!Use commercially available parts when installing.
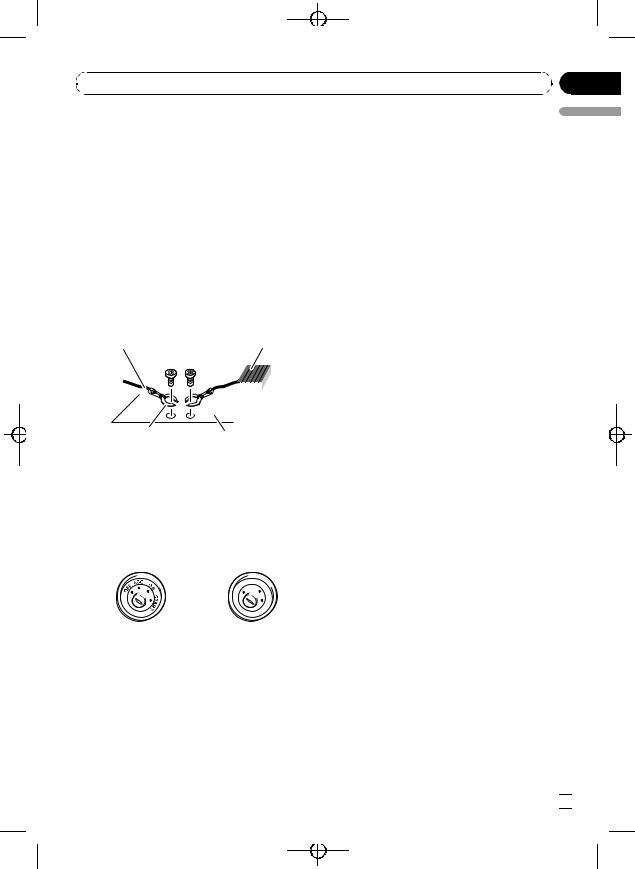
3 Install the unit as illustrated.
 Nut
Nut
Firewall or metal support
Metal strap
Screw
Screw (M4 8)
# Make sure that the unit is installed securely in place. An unstable installation may cause skipping or other malfunctions.
En  11
11
<QRD3040-A/N>11
Black plate (12,1)
Section
04  Installation
DIN Rear-mount
1 Determine the appropriate position where the holes on the bracket and the side of the unit match.
3 Pull the unit out of the dashboard.
2 Tighten two screws on each side.
Truss screw (5 mm × 8 mm)
Mounting bracket |
Dashboard or console |
Removing the unit
1 Extend top and bottom of the trim ring outwards to remove the trim ring. (When reattaching the trim ring, point the side with the groove down.)
Trim ring
!Releasing the front panel allows easier access to the trim ring.
2 Insert the supplied extraction keys into both sides of the unit until they click into place.
 12
12 En
En
<QRD3040-A/N>12

Black plate (13,1)
Appendix
 Additional Information
Troubleshooting
|
Symptom |
Cause |
Action (See) |
|
|
|
|
The display |
You did not per- |
Perform operation |
|
automatically |
form any opera- |
again. |
|
returns to the |
tion within about |
|
|
ordinary dis- |
30 seconds. |
|
|
play. |
|
|
|
|
|
|
|
The repeat play |
Depending on |
Select the repeat |
|
range changes |
the repeat play |
play range again. |
|
unexpectedly. |
range, the se- |
|
|
|
|
lected range may |
|
|
|
change when se- |
|
|
|
lecting another |
|
|
|
folder or track, or |
|
|
|
when fast for- |
|
|
|
warding/rever- |
|
|
|
sing. |
|
|
|
|
|
NO XXXX ap- |
No text informa- |
Switch the display |
|
pears when a |
tion embedded |
or play another |
|
display is chan- |
|
track/file. |
|
ged (e.g., NO T- |
|
|
|
TTL). |
|
|
|
|
Unsupported CD |
Replace disc. |
ERROR-22, 23 |
format |
|
|
|
|
FRMTREAD |
There is some- |
Wait until the mes- |
|
times a delay be- |
sage disappears |
|
tween the start of |
and you hear |
|
playback and |
sound. |
|
when you start to |
|
|
hear any sound |
|
|
|
|
NO AUDIO |
The inserted disc |
Replace disc. |
|
does not contain |
|
|
any playable files |
|
|
|
|
PROTECT |
All the files on |
Replace disc. |
|
the inserted disc |
|
|
are embedded |
|
|
with DRM |
|
|
|
|
SKIPPED |
The inserted disc |
Replace disc. |
|
contains DRM |
|
|
protected WMA |
|
|
files |
|
|
|
|
English
The unit is mal- |
You are using a |
Move electrical de- |
functioning. |
device, such as a |
vices that may be |
There is inter- |
cell phone, that |
causing the inter- |
ference. |
transmits electro- |
ference away from |
|
magnetic waves |
the unit. |
|
near the unit. |
|
|
|
|
Handling guideline
Discs and player
Use only discs featuring either of following two logos.
Error messages
When you contact your dealer or your nearest Pioneer Service Center, be sure to note the error message.
|
Message |
Cause |
Action |
|
|
|
|
ERROR-11, 12, |
Dirty disc |
Clean disc. |
|
17, 30 |
|
|
|
|
|
|
|
ERROR-11, 12, |
Scratched disc |
Replace disc. |
|
17, 30 |
|
|
|
|
|
|
|
ERROR-10, 11, |
Electrical or me- |
Turn the ignition |
|
12, 15, 17, 30, |
chanical |
switch OFF and |
|
A0 |
|
back ON, or switch |
|
|
|
|
to a different |
|
|
|
source, then back |
|
|
|
to the CD player. |
|
|
|
|
ERROR-15 |
The inserted disc |
Replace disc. |
|
|
|
is blank |
|
|
|
|
|
Use 12-cm or 8-cm CD. Do not use an adapter when playing 8-cm CDs.
Use only conventional, fully circular discs. Do not use shaped discs.
Do not insert anything other than a CD into the CD loading slot.
Do not use cracked, chipped, warped, or otherwise damaged discs as they may damage the player.
Unfinalized CD-R/CD-RW disc playback is not possible.
En  13
13
<QRD3040-A/N>13

Black plate (14,1)
Appendix


 Additional Information
Do not touch the recorded surface of the discs.
Store discs in their cases when not in use.
Avoid leaving discs in excessively hot environments including under direct sunlight.
Do not attach labels, write on or apply chemicals to the surface of the discs.
Bit rate: 48 kbps to 320 kbps (CBR), 48 kbps to 384 kbps (VBR)
Sampling frequency: 32 kHz to 48 kHz
Windows Media Audio Professional, Lossless, Voice:
No
To clean a CD, wipe the disc with a soft cloth outward from the center.
Condensation may temporarily impair the player’s performance. Leave it to adjust to the warmer temperature for about one hour. Also, wipe any damp discs with a soft cloth.
Playback of discs may not be possible because of disc characteristics, disc format, recorded application, playback environment, storage conditions, and so on.
Road shocks may interrupt disc playback.
Read the precautions for discs before using them.
DualDiscs
DualDiscs are two-sided discs that have a recordable CD for audio on one side and a recordable DVD for video on the other.
Since the CD side of DualDiscs is not physically compatible with the general CD standard, it may not be possible to play the CD side with this unit.
Frequent loading and ejecting of a DualDisc may result in scratches on the disc. Serious scratches can lead to playback problems on this unit. In some cases, a DualDisc may become stuck in the disc loading slot and will not eject. To prevent this, we recommend you refrain from using DualDisc with this unit. Please refer to the information from the disc manufacturer for more detailed information about DualDiscs.
Compressed audio compatibility
WMA
Compatible format: WMA encoded by Windows Media Player
File extension: .wma
MP3
File extension: .mp3
Bit rate: 8 kbps to 320 kbps
Sampling frequency: 16 kHz to 48 kHz (32, 44.1, 48 kHz for emphasis)
Compatible ID3 tag version: 1.0, 1.1, 2.2, 2.3, 2.4 (ID3 tag Version 2.x is given priority over Version 1.x.)
M3u playlist: No
MP3i (MP3 interactive), mp3 PRO: No
WAV
Compatible format: Linear PCM (LPCM), MS ADPCM
File extension: .wav
Quantization bits: 8 and 16 (LPCM), 4 (MS ADPCM)
Sampling frequency: 16 kHz to 48 kHz (LPCM), 22.05 kHz and 44.1 kHz (MS ADPCM)
Disc
Playable folder hierarchy: up to eight tiers (A practical hierarchy is less than two tiers.)
Playable folders: up to 99
Playable files: up to 999
File system: ISO 9660 Level 1 and 2, Romeo, Joliet
Multi-session playback: Yes
Packet write data transfer: No
Regardless of the length of blank section between the songs of the original recording, compressed audio discs play with a short pause between songs.
 14
14 En
En
<QRD3040-A/N>14
Black plate (15,1)
Appendix
 Additional Information
Supplemental information
Only the first 32 characters can be displayed as a file name (including the file extension) or a folder name.
This unit may not operate correctly depending on the application used to encode WMA files.
There may be a slight delay when starting playback of audio files embedded with image data.
Sequence of audio files
The user cannot assign folder numbers and specify playback sequences with this unit.
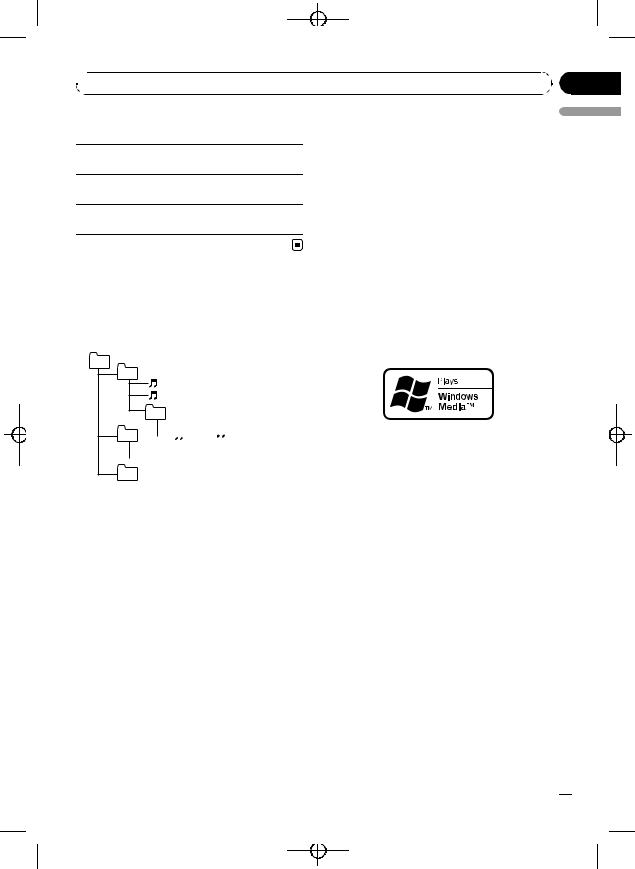
Example of a hierarchy
01
02 |
|
|
03 |


04 


05
Level 1 Level 2 Level 3 Level 4
 : Folder

 : Compressed audio file
01 to 05: Folder number
1 to 6: Playback sequence
Disc
!Folder selection sequence or other operation may differ depending on the encoding or writing software.
!Folder hierarchy is allowed up to eight tiers. However, a practical hierarchy of folder is less than two tiers.
!Up to 99 folders on a disc can be played back.
MP3
Supply of this product only conveys a license for private, non-commercial use and does not convey a license nor imply any right to use this product in any commercial (i.e. revenuegenerating) real time broadcasting (terrestrial, satellite, cable and/or any other media), broadcasting/streaming via internet, intranets and/ or other networks or in other electronic content distribution systems, such as pay-audio or audio-on-demand applications. An independent license for such use is required. For details, please visit http://www.mp3licensing.com.
WMA
The Windows Mediaä logo printed on the box indicates that this unit can play back WMA data.
Windows Media and the Windows logo are trademarks or registered trademarks of Microsoft Corporation in the United States and/or other countries.
English
Copyright and trademark
iTunes
Apple and iTunes are trademarks of Apple Inc., registered in the U.S. and other countries.
En  15
15
<QRD3040-A/N>15
Black plate (16,1)
Appendix


 Additional Information
Specifications |
Usable sensitivity |
11 dBf (0.7 µV/75 W, mono, |
|
|
|
||
|
|
|
S/N: 30 dB) |
General |
|
Signal-to-noise ratio ............... |
72 dB (IEC-A network) |
Rated power source ............... |
14.4 V DC |
AM tuner |
|
|
(allowable voltage range: |
|
|
|
12.0 V to 14.4 V DC) |
Frequency range ...................... |
531 kHz to 1 602 kHz (9 kHz) |
Grounding system ................... |
Negative type |
|
530 kHz to 1 640 kHz (10 |
Maximum current consumption |
|
kHz) |
|
..................................................... |
10.0 A |
Usable sensitivity ..................... |
25 µV (S/N: 20 dB) |
Dimensions (W × H × D): |
|
Signal-to-noise ratio ............... |
62 dB (IEC-A network) |
DIN |
|
Infrared remote control |
|
Chassis ..................... |
178 mm × 50 mm × 162 |
||
|
mm |
Wavelength ................................. |
940 nm ±50 nm |
Nose ........................... |
188 mm × 58 mm × 15 mm |
Output ........................................... |
typ; 12 mw/sr per Infrared |
D |
|
|
LED |
Chassis ..................... |
178 mm × 50 mm × 162 |
|
|
|
mm |
Note |
|
Nose ........................... |
170 mm × 48 mm × 15 mm |
Specifications and the design are subject to mod- |
|
Weight .......................................... |
1.3 kg |
||
Audio |
|
ifications without notice. |
|
|
|
|
|
Maximum power output ....... |
50 W × 4 |
|
|
Continuous power output ... |
22 W × 4 (50 Hz to 15 000 |
|
|
|
Hz, 5 % THD, 4 W load, both |
|
|
|
channels driven) |
|
|
Load impedance ...................... |
4 W (4 W to 8 W allowable) |
|
|
Preout maximum output level |
|
|
|
..................................................... |
2.0 V |
|
|
Tone controls: |
|
|
|
Bass |
|
|
|
Frequency ................ |
100 Hz |
|
|
Gain ............................ |
±12 dB |
|
|
Mid |
|
|
|
Frequency ................ |
1 kHz |
|
|
Gain ............................ |
±12 dB |
|
|
Treble |
|
|
|
Frequency ................ |
10 kHz |
|
|
Gain ............................ |
±12 dB |
|
|
CD player |
|
|
|
System .......................................... |
Compact disc audio system |
|
|
Usable discs .............................. |
Compact disc |
|
|
Signal-to-noise ratio ............... |
94 dB (1 kHz) (IEC-A net- |
|
|
|
work) |
|
|
Number of channels .............. |
2 (stereo) |
|
|
WMA decoding format ......... |
Ver. 7, 7.1, 8, 9, 10, 11 (2ch |
|
|
|
audio) |
|
|
|
(Windows Media Player) |
|
|
MP3 decoding format ........... |
MPEG-1 & 2 Audio Layer 3 |
|
|
WAV signal format .................. |
Linear PCM & MS ADPCM |
|
|
FM tuner |
|
|
|
Frequency range ...................... |
87.5 MHz to 108.0 MHz |
|
|
 16
16 En
En
<QRD3040-A/N>16

 Antes de comenzar
Gracias por haber adquirido este producto PIONEER.
Lea con detenimiento este manual antes de utilizar el producto por primera vez para que pueda darle el mejor uso posible. Es muy importante que lea y observe las ADVERTENCIAS y PRECAUCIONES de este manual.
Una vez leído, guarde el manual en un lugar seguro y a mano para que pueda consultarlo en el futuro. 
Acerca de esta unidad
 PRECAUCIÓN
!No permita que esta unidad entre en contacto con líquidos, ya que puede producir una descarga eléctrica. Además, el contacto con líquidos puede causar daños en la unidad, humo y recalentamiento.
!Mantenga siempre el volumen lo suficientemente bajo como para que pueda escuchar los sonidos que provienen del exterior.
!Evite la exposición a la humedad.
!Si se desconecta o se descarga la batería, cualquier memoria preajustada se borrará.
!En caso de que esta unidad no funcione correctamente, póngase en contacto con su
concesionario o con el centro de servicio PIONEER autorizado más cercano.
Black plate (17,1)
Sección
01
Español
Es  17
17
<QRD3040-A/N>17

Black plate (18,1)
Sección
02  Utilización de esta unidad
Unidad principal
Indicador Estado
Sección
1principal de la pantalla
!Sintonizador: banda y frecuencia
!Reproductor de CD incorporado: tiempo de reproducción transcurrido e información de texto
|
Botón |
|
Botón |
1 |
F (función) |
8 |
Soltar |
|
|
|
|
|
|
|
Conector de entra- |
2 |
EQ/LOUD |
9 |
da AUX (conector |
|
|
|
estéreo de 3,5 mm) |
|
|
|
|
3 |
SRC/OFF |
a |
CLOCK |
|
|
|
|
4 |
1 a 6 |
b |
DISP/SCRL |
|
|
|
|
5 |
Ranura de carga de |
c a/b/c/d |
|
discos |
|||
|
|
|
|
6 |
h (expulsar) |
d |
BAND/ESC |
|
|
|
|
7 |
A (audio) |
|
|
|
|
|
|
|
Númeo de |
! El número de pista o de pre- |
|
|
sintonía. |
||
2 |
presinto- |
! Si se selecciona un número |
|
nía/núme- |
de pista 100 o superior, d se |
||
|
ro de pista |
iluminará a la izquierda del in- |
|
|
|
||
|
|
dicador de número de pista. |
|
|
|
|
|
3 |
MP3/ |
El tipo de disco que se está repro- |
|
|
WMA |
duciendo actualmente. |
|
4 |
RPT |
La repetición de reproducción |
|
está activada. |
|||
|
|
||
|
|
|
|
5 |
LOUD |
Sonoridad activada. |
|
|
|
|
|
6 |
5 (esté- |
La frecuencia seleccionada se |
|
|
reo) |
está transmitiendo en estéreo. |
|
7 |
LOC |
Sintonización por búsqueda local |
|
activada. |
|||
|
|
||
|
|
|
Indicaciones de pantalla
1 2
3 |
4 |
5 |
6 7 |
18 Es
Mando a distancia
Las funciones se utilizan de la misma manera que al usar los botones de la unidad principal. Consulte la explicación de la unidad principal acerca del uso de cada botón, con excepción de ATT, que se explica a continuación.
e
d

 f
f
c
1 |
7 |
g |
b |
h
<QRD3040-A/N>18

|
Black plate (19,1) |
|
Sección |
Utilización de esta unidad |
02 |
|
Parte |
Estado |
e |
VOLUME |
Pulse para aumentar o disminuir |
|
(+/-) |
el volumen. |
|
|
Pulse para silenciar. Pulse de |
f |
ATT |
nuevo para desactivar el silencia- |
|
|
miento. |
|
|
|
|
|
Pulse este botón para visualizar |
g |
SRC (fuen- |
todas las fuentes disponibles. |
|
te) |
Manténgalo pulsado para apagar |
|
|
la fuente. |
|
|
|
h |
e (pausa) |
Pulse para pausar o reanudar. |
|
|
|
Uso y cuidado del mando a distancia
Uso del mando a distancia
1Apunte el mando a distancia hacia la carátula para que funcione la unidad.
Al utilizar el mando a distancia por primera vez, extraiga la película que sobresale de la bandeja.
Reemplazo de la batería
1Deslice y extraiga la bandeja de la parte posterior del mando a distancia.
2Inserte la pila con los polos positivo (+) y negativo (–) en la dirección correcta.
 Importante
!No guarde el mando a distancia en lugares expuestos a altas temperaturas o a la luz solar directa.
!Es posible que el mando a distancia no funcione correctamente si lo expone a la luz solar directa.
!No deje caer el mando a distancia al suelo, ya que puede quedar atascado debajo del freno o del acelerador.
 ADVERTENCIA
!Mantenga la pila fuera del alcance de los niños. En caso de ingestión accidental de ésta, consulte a un médico de inmediato.
!Las pilas o baterías no deben exponerse a altas temperaturas ni fuentes de calor como el sol, fuego, etc.
 PRECAUCIÓN
!Utilice una sola batería de litio CR2025 (3 V).
!Extraiga la pila si no piensa utilizar el mando a distancia durante un mes o más tiempo.
!Si la pila se sustituye de forma incorrecta existe cierto riesgo de explosión. Reemplácela sólo por una del mismo tipo o equivalente.
!No manipule la pila con herramientas metálicas.
!No guarde la pila junto a objetos metálicos.
!En el caso de que se produzcan fugas de la pila, limpie completamente el mando a distancia e instale una pila nueva.
!Para desechar las pilas usadas, cumpla con los reglamentos gubernamentales o las nor-
mas ambientales pertinentes de las instituciones públicas aplicables en su país/zona.
Funciones básicas
 Importante
!Proceda con cuidado al retirar o colocar el panel frontal.
!Evite someter la carátula a impactos excesivos.
!Mantenga la carátula fuera del alcance de la luz solar directa y no la exponga a temperaturas elevadas.
!Extraiga cualquier cable o dispositivo conectado a esta unidad antes de extraer el panel delantero para evitar que el dispositivo o el interior del vehículo sufran daños.
Español
Es  19
19
<QRD3040-A/N>19

Black plate (20,1)
Sección
02  Utilización de esta unidad
Extracción del panel delantero para proteger la unidad contra robo
1Pulse el botón de soltar para liberar el panel delantero.
2Sujete la carátula y extráigala.
3Coloque el panel frontal en la funda protectora provista para guardarlo de manera segura.
Colocación del panel frontal
1Deslice la carátula hacia la izquierda hasta que oiga un chasquido.
El panel delantero y la unidad principal están conectados por el lado izquierdo. Asegúrese de que el panel delantero está conectado correctamente a la unidad principal.
2Pulse el lado derecho de la carátula hasta que se asiente firmemente.
Si no puede volver a colocar el panel frontal a la unidad principal, inténtelo de nuevo. Sin embargo, si intenta forzar el panel delantero para fijarlo, puede que éste resulte dañado.
Encendido de la unidad
1 Pulse SRC/OFF para encender la unidad.
Apagado de la unidad
1Mantenga pulsado SRC/OFF hasta que se apague la unidad.
Selección de una fuente
1Pulse SRC/OFF para desplazarse entre: TUNER (sintonizador)—CD (reproductor de CD incorporado)—AUX (AUX)
Ajuste del volumen
1 Haga girar SRC/OFF para ajustar el volumen.
 Nota
Nota
Si el cable azul/blanco de esta unidad está conectado al terminal de control del relé de la antena automática del vehículo, la antena se extiende cuando se enciende el equipo. Para retraer la antena, apague la fuente.
Las operaciones del menú son idénticas para los ajustes de función/ajustes de audio/ajustes iniciales
Para volver a la visualización normal
Para cancelar el menú de ajustes iniciales
1Pulse BAND/ESC.
También se pueden cancelar los ajustes iniciales presionando SRC/OFF hasta que se apague la unidad.
Sintonizador
Funciones básicas
 Importante
Si se utiliza esta unidad en América del Norte, América Central o América del Sur, se deberá restablecer el paso de sintonía de AM (consulte AM
(paso de sintonización de AM) en la página 24).
Selección de una banda
1Presione BAND/ESC hasta que se visualice la banda deseada (F1, F2, F3 para FM o AM).
Sintonización manual (paso a paso) 1 Pulse c o d.
Búsqueda
1Mantenga pulsado c o d y luego suéltelo.
Se puede cancelar la sintonización por búsqueda pulsando brevemente c o d.
Al mantener pulsado c o d se pueden saltar las emisoras. La sintonización por búsqueda comienza inmediatamente después de que suelte c o d.
Almacenamiento y recuperación de emisoras
Se pueden almacenar con facilidad hasta seis emisoras presintonizadas.
 20
20 Es
Es
<QRD3040-A/N>20
Black plate (21,1)
 Utilización de esta unidad
% Cuando encuentre la emisora que |
|
CD |
desea almacenar en la memoria, pulse uno |
|
Funciones básicas |
de los botones de ajuste de presintonías (1 |
|
|
a 6) y manténgalo pulsado hasta que el nú- |
|
Reproducción de un CD/CD-R/CD-RW |
|
||
mero de presintonía deje de destellar. |
|
|
|
1 Inserte el disco en la ranura de carga de discos |
|
Una frecuencia de emisora de radio almace- |
|
|
|
con el lado de la etiqueta hacia arriba. |
|
nada se puede recuperar pulsando el botón de |
|
|
|
1 Si ya se ha insertado un disco, pulse SRC/OFF |
|
ajuste de presintonías. |
|
para seleccionar el reproductor de CD incorpora- |
# Presione a o b para recuperar las frecuen- |
|
do. |
cias de las emisoras de radio. |
|
Expulsión de un CD/CD-R/CD-RW |
|
|
|
|
|
1 Pulse h. |
Ajustes de funciones |
|
Selección de una carpeta |
% Pulse F (función) para seleccionar la |
|
1 Pulse a o b. |
|
Selección de una pista |
|
función. |
|
|
|
1 Pulse c o d. |
|
Una vez seleccionada, siga los siguientes |
|
|
|
Avance rápido o retroceso |
|
pasos para ajustar la función: |
|
|
|
|
1 Mantenga pulsado c o d. |
LOCAL (sintonización por búsqueda local) |
|
Cambio entre audio comprimido y CD-DA |
La sintonización por búsqueda local le permite sinto- |
|
1 Pulse BAND/ESC. |
nizar sólo las emisoras de radio con señales lo sufi- |
|
Nota |
cientemente intensas como para asegurar una buena |
|
|
recepción. |
|
Al reproducir audio comprimido, no hay sonido |
1 Presione a o b para activar o desactivar la sinto- |
|
|
|
durante el avance rápido o el retroceso. |
|
nización por búsqueda local. |
|
|
2 Presione c o d para ajustar la sensibilidad. |
|
|
FM: LOCAL 1—LOCAL 2—LOCAL 3—LOCAL 4 |
|
Visualización de información |
AM: LOCAL 1—LOCAL 2 |
|
|
El ajuste de número mayor se corresponde con el |
|
de texto |
nivel superior. El ajuste de nivel superior sólo per- |
|
|
|
|
|
mite recibir las emisoras con las señales más in- |
|
Selección de la información de texto deseada |
|
||
tensas, mientras que los ajustes más bajos |
|
|
|
1 Pulse DISP/SCRL. |
|
permiten recibir de manera progresiva las emiso- |
|
|
|
Discos CD TEXT: tiempo de reproducción—títu- |
|
ras con las señales más débiles. |
|
|
|
lo del disco—nombre del artista del disco—título |
|
|
|
|
BSM (memoria de las mejores emisoras) |
|
de la pista—nombre del artista de la pista |
BSM (memoria de las mejores emisoras) guarda |
|
WMA/MP3: Tiempo de reproducción—nombre |
|
de la carpeta—nombre del archivo—título de la |
|
automáticamente las seis emisoras más fuertes |
|
|
|
pista—nombre del artista—título del álbum—co- |
|
según el orden de intensidad de la señal. |
|
|
|
mentarios—velocidad de grabación |
|
Al almacenar frecuencias con la función BSM, se |
|
|
|
WAV: Tiempo de reproducción—nombre de la |
|
pueden reemplazar las frecuencias que se almacena- |
|
|
|
carpeta—nombre del archivo—frecuencia de |
|
ron con las teclas 1 a 6. |
|
|
|
muestreo |
|
1 Presione a para activar la función BSM. |
|
|
|
|
|
Las seis frecuencias de las emisoras de mayor in- |
|
Desplazamiento de la información de texto a la iz- |
tensidad se almacenarán en orden según la inten- |
|
quierda |
sidad de las señales. |
|
1 Mantenga pulsado DISP/SCRL. |
Para cancelar el proceso de almacenamiento, pre- |
|
|
|
|
|
sione b. |
|
|
|
|
|
Es
<QRD3040-A/N>21
Sección
02
Español
 21
21

Black plate (22,1)
Sección
02  Utilización de esta unidad
 Notas
Notas
!Puede que los textos almacenados incompatibles con el archivo de audio se muestren de manera correcta o incorrecta.
!Según sea la versión de iTunes utilizada para grabar archivos MP3 en un disco, es posible que la información de los comentarios no se muestre correctamente.
!Al reproducir ficheros WMA grabados como VBR (velocidad de grabación variable), se visualizará el valor promedio de la velocidad de grabación.
!Al reproducir archivos MP3 grabados con VBR (velocidad de grabación variable), aparece VBR en lugar del valor de velocidad de grabación.
Ajustes de funciones
% Pulse F (función) para seleccionar la función.
Una vez seleccionada, siga los siguientes pasos para ajustar la función:
RPT (repetición de reproducción)
1Presione c o d para seleccionar la gama de repetición.
DSC – Repite todas las pistas TRK – Repite la pista actual FLD – Repite la carpeta actual
RDM (reproducción aleatoria)
1Presione a o b para activar o desactivar la reproducción aleatoria.
Cuando la repetición aleatoria está activada, en el display aparece RDM.
Si activa la reproducción aleatoria durante la repetición de carpeta, FRDM aparece en el display.
SCAN (reproducción con exploración)
La reproducción con exploración busca una canción dentro de la gama de repetición seleccionada.
1Presione a para activar la reproducción con exploración.
Si activa la reproducción con exploración durante FLD, en el display aparece FSCN.
2Cuando encuentre la pista deseada, presione b para desactivar la reproducción con exploración. Si la pantalla vuelve automáticamente a la visualización de reproducción, seleccione de nuevo SCAN pulsando F (función).
Una vez finalizada la exploración de un disco (carpeta), comenzará la reproducción normal de las pistas.
PAUSE (pausa)
1 Pulse a o b para pausar o reanudar.
COMP OFF (compresión y BMX)
El uso de las funciones COMP (compresión) y BMX le permiten ajustar la calidad de reproducción de sonido de este reproductor.
1 Presione a o b para seleccionar el ajuste favorito.
COMP OFF—COMP 1—COMP 2—COMP OFF— BMX 1—BMX 2
FF/REV (avance rápido/retroceso)
Se puede cambiar el método de búsqueda entre las opciones de avance rápido/retroceso y búsqueda cada 10 pistas. Seleccionar ROUGH le permite realizar la búsqueda cada 10 pistas.
1Presione d para seleccionar ROUGH. FF/REV – Avance rápido y retroceso rápido ROUGH– Búsqueda cada 10 pistas
Para seleccionar FF/REV, presione c.
2Pulse BAND/ESC para volver a la pantalla de reproducción.
3Presione c o d y mantenga presionado para buscar una pista cada 10 pistas en un disco (carpeta).
Si el número de pistas restantes es inferior a 10, presione c o d y mantenga presionado para recuperar la primera (última).
 22
22 Es
Es
<QRD3040-A/N>22

Black plate (23,1)
 Utilización de esta unidad
Ajustes de audio |
Nota |
Ajustes de audio
% Pulse A (audio) para seleccionar la función de audio.
Una vez seleccionada, siga los siguientes pasos para ajustar la función de audio:
FAD (ajuste del fader/balance)
Puede cambiar el ajuste de fader/balance.
1Pulse a o b para ajustar el balance entre los altavoces delanteros y traseros.
Gama de ajuste (delanteros/traseros): FAD F15 a
FAD R15
FAD 0 es el ajuste apropiado cuando se usan sólo dos altavoces.
2Pulse c o d para ajustar el balance entre los altavoces izquierdos y derechos.
Gama de ajuste (izquierda/derecha): BAL L15 a
BAL R15
BASS/MID/TREBLE (ajuste de ecualizador)
Se puede ajustar el nivel de graves/medios/agudos.
!Los ajustes de la curva de ecualización configura-
dos se almacenan en CUSTOM.
1Pulse a o b para ajustar el nivel. Gama de ajuste: +6 a -6
LOUD (sonoridad)
La sonoridad compensa las deficiencias en las gamas de frecuencias bajas y altas cuando se escucha a un volumen bajo.
1Pulse a o b para activar o desactivar la sonoridad.
2Pulse c o d para seleccionar el ajuste deseado. LOW (bajo)—HI (alto)
SLA (ajuste del nivel de fuente)
SLA (ajuste del nivel de fuente) le permite ajustar el nivel de volumen de cada fuente para evitar cambios radicales en el volumen cuando se cambia entre las fuentes.
!Los ajustes se basan en el nivel de volumen de FM, que se mantiene inalterado.
Antes de ajustar los niveles de la fuente, compare el nivel de volumen de FM con el de la fuente que desea ajustar.
!El nivel del volumen de AM también se puede re-
gular con el ajuste del nivel de fuente.
1Pulse a o b para ajustar el volumen de la fuente. Gama de ajuste: SLA +4 a SLA –4
También se puede activar o desactivar la sonoridad presionando EQ/LOUD.
Uso del ecualizador
% Pulse EQ/LOUD para seleccionar el ecualizador. DYNAMIC—VOCAL—NATURAL—CUSTOM
—FLAT—POWERFUL
!CUSTOM le permite crear un ajuste personalizado.
!Cuando se selecciona FLAT no se hacen ajustes al sonido.
Otras funciones
Configuración de los ajustes iniciales
1Mantenga pulsado SRC/OFF hasta que se apague la unidad.
2Presione SRC/OFF y mantenga presionado hasta que el reloj aparezca en el display.
3Pulse F (función) para seleccionar la configuración inicial.
Una vez seleccionada, siga los siguientes pasos para configurar el ajuste inicial:
Ajuste del reloj
1Presione c o d para seleccionar el segmento de la visualización del reloj que desea ajustar. Hora—Minuto
2Presione a o b para poner el reloj en hora.
FM (paso de sintonización de FM)
Es
<QRD3040-A/N>23
Sección
02
Español
 23
23

Black plate (24,1)
Sección
02  Utilización de esta unidad
El paso de sintonía de FM que utiliza la sintonización por búsqueda se puede cambiar entre 100 kHz, el paso predefinido, y 50 kHz.
!Si la sintonización por búsqueda se realiza en
pasos de 50 kHz, es posible que las emisoras se sintonicen de manera imprecisa. En ese caso, sintonícelas manualmente o vuelva a utilizar la función de sintonización por búsqueda.
1Pulse c o d para seleccionar el paso de sintonía de FM.
50 (50 kHz)—100 (100 kHz)
AM (paso de sintonización de AM)
El paso de sintonía de AM se puede cambiar entre 9 kHz, el paso predefinido, y 10 kHz. Si se utiliza el sintonizador en América del Norte, América Central o América del Sur, se deberá cambiar el paso de sintonía de 9 kHz (531 a 1 602 kHz permisibles) a 10 kHz (530 a 1 640 kHz permisibles).
1Presione c o d para seleccionar el paso de sintonía de AM.
10 (10 kHz)—9 (9 kHz)
AUX (entrada auxiliar)
Active este ajuste si utiliza un dispositivo auxiliar conectado a esta unidad.
1Pulse a o b para activar o desactivar el ajuste auxiliar.
Activación y desactivación de la visualización del reloj
% Pulse CLOCK para activar o desactivar la visualización del reloj.
Cada vez que se presiona CLOCK, se activa o desactiva la visualización del reloj.
# La visualización del reloj desaparece momentáneamente cuando se utilizan otras funciones, pero vuelve a aparecer después de 25 segundos.
Uso de la fuente AUX
1Inserte el miniconector estéreo en el conector de entrada AUX.
2Pulse SRC/OFF para seleccionar AUX como la fuente.
 24
24 Es
Es
<QRD3040-A/N>24
 Loading...