


 Loading...
Instruction Manual
DJ Controller
DDJ-FLX6
pioneerdj.com/support/
rekordbox.com
serato.com
For FAQ and other support information for this product, visit the websites above.

How to read this manual
Thank you for choosing this Pioneer DJ product.
Be sure to read this manual, the “Quick Start Guide” and the “Precautions for use” which are included with this product. These documents include important information that you should understand before using the unit. In particular, be sure to read the IMPORTANT SAFETY INSTRUCTIONS.
•In this manual, the names of buttons, knobs, and terminals that appear on the product, and the names of buttons, menus, etc. in the software on your PC/Mac or mobile device, are indicated within square brackets ([ ]). (e.g. [File], [CUE] button)
•Please note that the software screens and their specifications, as well as the external appearance and specifications of the hardware, are subject to change without notice.
•Please note that depending on the operating system version, web browser settings, etc. operation may differ from the ways described in this manual.
•Please note that the language on the screens of the software described in this manual may differ from the language on your screen.
2 En

Contents |
|
How to read this manual ............................................................... |
2 |
Before you start......................................................................... |
5 |
What’s in the box .......................................................................... |
5 |
User guides................................................................................... |
5 |
DJ software................................................................................... |
6 |
Part names and functions ........................................................ |
8 |
Top panel...................................................................................... |
8 |
Browser section ............................................................................ |
9 |
Deck section ............................................................................... |
12 |
Mixer section............................................................................... |
21 |
Effects section ............................................................................ |
23 |
Rear panel .................................................................................. |
25 |
Front panel.................................................................................. |
26 |
Connections............................................................................. |
27 |
Connection examples ................................................................. |
28 |
rekordbox................................................................................. |
31 |
Installing rekordbox..................................................................... |
31 |
Basic use .................................................................................... |
34 |
Advanced use ............................................................................. |
40 |
Changing the settings in rekordbox ............................................ |
68 |
Serato DJ Pro........................................................................... |
70 |
Installing Serato DJ Pro .............................................................. |
70 |
Activating FX Pack and Pitch ’n Time DJ ................................... |
73 |
Basic use .................................................................................... |
75 |
Advanced use ............................................................................. |
82 |
3 En
Changing the settings........................................................... |
104 |
Launching Utilities mode........................................................... |
104 |
Utilities mode settings............................................................... |
105 |
Additional information.......................................................... |
108 |
Troubleshooting ........................................................................ |
108 |
Specifications............................................................................ |
116 |
Using the unit as a controller for other DJ applications ............ |
118 |
Trademarks and registered trademarks.................................... |
119 |
Cautions on copyrights ............................................................. |
120 |
4 En

Before you start
What’s in the box
•USB cable
•Warranty (for some regions)1
•Quick Start Guide
•Precautions for use
•Serato Pitch’n Time DJ voucher2
•Serato FX Pack voucher2
1 Only products in Europe.
Products in North America and Japan include warranty information in the “Precautions for use.”
2The voucher codes needed to activate functions can’t be reissued. Keep them in a safe place to be sure you don’t lose them.
User guides
rekordbox Introduction, Instruction Manual
Refer to the “rekordbox Introduction” to find out how to set up rekordbox, and see the “rekordbox Instruction Manual” to find out how to use rekordbox.
rekordbox.com/manual
Serato DJ Pro software manual
Visit the Serato DJ Pro website. serato.com/dj/pro/downloads
5 En

Before you start
DJ software
rekordbox
•rekordbox is a complete DJ application you can use to manage your music and perform.
•Even if you don’t have a paid subscription plan, you can use Performance mode by connecting this unit to your PC/Mac with rekordbox installed. This is called Hardware Unlock.
•You’ll find details of the functions available via Hardware Unlock on the rekordbox website.
rekordbox.com
•The rekordbox software is not included with the unit. Download the software from the URL below.
rekordbox.com
•For information on the latest system requirements, compatibility, and supported operating systems of rekordbox, check [System requirements] under [Support] at rekordbox.com.
•Operation isn’t guaranteed on all PC/Mac models, even if the system requirements are met.
•Depending on power-saving settings and other conditions of the PC/ Mac, the CPU and hard disk may not provide sufficient processing capabilities. For laptops in particular, make sure the PC/Mac is in the best condition to provide constant high-level performance when using rekordbox (for example by keeping the AC power connected).
•To use the internet, you need a separate contract with an internet service provider, which you may have to pay for.
•Operating system support always assumes you’re using the latest point release for that version.
6 En

Before you start
Serato DJ Pro
Serato DJ Pro is DJ software from Serato Limited.
This unit unlocks the software, which you can download from the Serato website.
serato.com/dj/pro/downloads
•For information on the latest system requirements, compatibility, and supported operating systems of Serato DJ Pro, visit the website below.
serato.com/dj/pro/downloads
•Operation isn’t guaranteed on all PC/Mac models, even if the system requirements are met.
•Depending on power-saving settings and other conditions of the PC/ Mac, the CPU and hard disk may not provide sufficient processing capabilities. For laptops in particular, make sure the PC/Mac is in the best condition to provide constant high-level performance when using Serato DJ Pro (for example by keeping the AC power connected).
7 En

Part names and functions
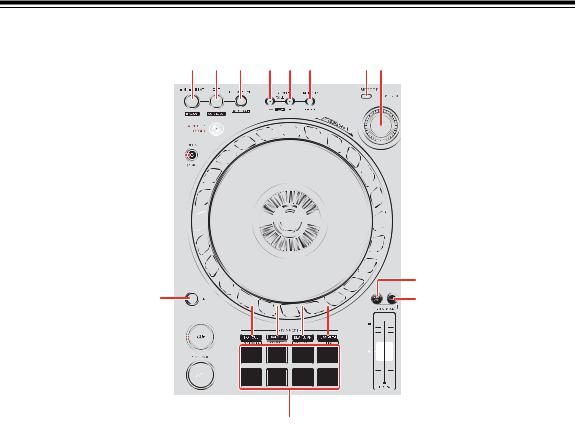
Top panel
2 |
1 |
3 |
|
|
2 |
|||
|
|
|
|
|
|
|
|
|
3 4
1 Browser section
Selects tracks and loads them to the decks.
2 Deck sections
Control each deck. There are knobs and buttons on the left side to control deck 1 and deck 3, and on the right side to control deck 2 and deck 4.
3 Mixer section
Controls the level adjustment for each channel, track mixing, etc.
4 Effects section
Controls the effect units.
8 En

Part names and functions
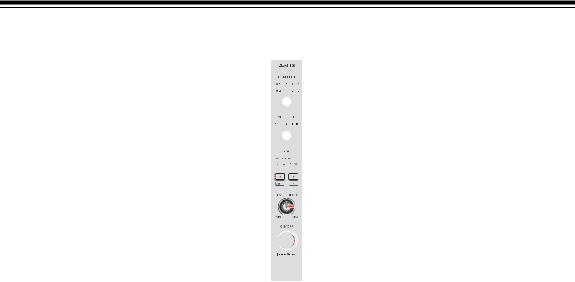
Browser section
1 2 3 4 5
1 LOAD buttons
Press:
Load the selected track to the respective deck.
Press twice:
Load the track from the deck that isn’t playing onto the deck that is playing. If you do this while the track is playing, it plays from the same position (Instant Doubles).
[SHIFT] + press:
Sort the track list in the library as follows, depending on the [LOAD] button you press:
Deck 1: Sorts by BPM.
Deck 2: Sorts by track title/song. Deck 3: Sorts by keys.
Deck 4: Sorts by artist names.
2  (back) button
(rekordbox)
Press:
Moves the cursor between the tree view and track list each time you press the button.
•If the playlist palette is displayed, you can also move the cursor to the playlist.
•The tree view, track list, and playlist palette are displayed in the browse section of rekordbox. For details on each, read the “rekordbox Instruction Manual”.
9 En
Part names and functions
[SHIFT] + press:
Displays/hides the playlist palette.
(Serato DJ Pro) Press:
Moves the cursor between the library and [crates] panel each time you press the button.
[SHIFT] + press:
Changes the screen layout of Serato DJ Pro.
3 Rotary selector
(rekordbox)
Turn:
Moves the cursor in rekordbox.
[SHIFT] + turn:
Enlarges or shrinks the enlarged waveform in rekordbox. Turn to the right to enlarge, or the left to shrink it.
Press:
Moves the cursor between the tree view and track list each time you press the button. If the cursor is pointed to a folder, the folder opens.
•If the playlist palette is displayed, you can also move the cursor to the playlist.
•The tree view, track list, and playlist palette are displayed in the browse section of rekordbox. For details on each, read the “rekordbox Instruction Manual”.
[SHIFT] + press:
Moves the cursor between the tree view and track list each time you press the button. If the cursor is pointed to a folder, the folder closes.
10 En
Part names and functions
(Serato DJ Pro) Turn:
Moves the cursor up or down in the library or in the [crates] panel.
Press:
Moves the cursor between the library and [crates] panel each time you press the button.
4 VIEW button
(rekordbox)
Press:
Shrinks the deck display and enlarges the browse area. Press the button again to return to the original display status.
Press for at least a second:
Registers or deletes the selected track to/from [Tag List].
[SHIFT] + press:
Moves the cursor into [Related Tracks] in the tree view.
(Serato DJ Pro) Press:
Changes the screen layout of Serato DJ Pro.
5 DECK4/SAMPLER selector switch
Selects whether channel 4 plays the sampler sound or the sound from deck 4.
11 En
Part names and functions
Deck section
1 |
2 |
3 |
4 |
5 |
6 |
7 8 |
22
21
20


|
|
|
|
|
9 |
19 |
12 |
13 |
14 |
15 |
10 |
18


 11
11
17

16
1 IN/4BEAT button
Press:
Sets the loop in point.
Press (during loop playback):
Adjusts the loop in point using the jog wheel.
Press for at least a second:
Starts Auto Beat Loop of 4 beats.
2 OUT button
Press:
Sets the loop out point, and loop playback begins.
12 En
Part names and functions
Press (during loop playback):
Adjusts loop out point using the jog wheel.
3 RELOOP/EXIT button
Press:
Playback returns to the previously set loop in point and loop playback resumes.
Press (during loop playback):
Cancels loop playback.
(rekordbox)
[SHIFT] + press:
Switches the active/non-active status of the loop. (Active Loop)
•During playback, the loop nearest the playback position is set to active.
•When you call up the loop, the loop is set to active or non-active.
(Serato DJ Pro)
[SHIFT] + press:
Switches the active/non-active status of the loop.
4 CUE/LOOP CALL button
(rekordbox)
Press:
Selects and calls up the cue point or loop point.
Press (during loop playback): Halves the loop playback length.
• When paused at the loop in point, the loop playback length isn’t changed.
(Serato DJ Pro) Press:
Selects the loop slot.
Press (during loop playback):
Halves the loop playback length.
13 En
Part names and functions
5 CUE/LOOP CALL button
(rekordbox)
Press:
Selects and calls up the cue point or loop point.
Press (during loop playback): Doubles the loop playback length.
• When paused at the loop in point, the loop playback length isn’t changed.
(Serato DJ Pro) Press:
Selects the loop slot.
Press (during loop playback):
Doubles the loop playback length.
6 CUE/LOOP MEMORY button
(rekordbox)
Press:
Saves a cue or loop.
[SHIFT] + press: Deletes a cue or loop.
(Serato DJ Pro) Press:
Locks the loop slot.
[SHIFT] + press: Deletes the loop slot.
14 En
Part names and functions
7 MERGE FX select button
Press:
Changes the Merge FX type, cycling through types in the following order: Merge FX1, 2, 3, 4.
[SHIFT] + press:
Changes the Merge FX type, cycling through types in the reverse order.
8 MERGE FX knob
(rekordbox)
Press:
Turns the selected Merge FX on/off.
[SHIFT] + press: Cancels Merge FX.
Turn:
The effect of the selected Merge FX changes.
[SHIFT] + turn:
Adjusts the volume of sample sound/oscillator sound of Merge FX.
(Serato DJ Pro) Press:
Turns on the selected Merge FX.
Press while the selected Merge FX is turned on: The effect changes.
To turn off the selected Merge FX, see “Using Merge FX” (page 97).
Turn:
The effect of the selected Merge FX changes.
15 En
Part names and functions
9 BEAT SYNC button
(rekordbox)
Press:
Automatically synchronizes the tempo (BPM) and beatgrid with the deck set as the master.
Press (during Beat Sync):
Cancels Beat Sync.
(Serato DJ Pro) Press:
The tempo (BPM) and beatgrid of multiple decks are automatically synchronized.
[SHIFT] + press: Cancels Sync mode.
10 MASTER button
(rekordbox)
Press:
Sets the relevant deck as the master.
[SHIFT] + press:
Switches the range of the [TEMPO] slider each time the button is pressed while holding the [SHIFT] button.
Switch between [±6%] [±10%] [±16%] [WIDE] [±6%].
(Serato DJ Pro) Press:
Cancels Sync mode.
16 En
Part names and functions
[SHIFT] + press:
Switches the range of the [TEMPO] slider each time the button is pressed while holding the [SHIFT] button.
Switch between [±6%] [±10%] [±16%] [±100%] [±6%].
11 TEMPO slider
Adjusts the playing speed of the track.
12 HOT CUE mode button
Press:
Enters Hot Cue mode.
Read more: Using Hot Cues (page 42)(page 84)
(rekordbox)
[SHIFT] + press: Enters Keyboard mode.
Read more: Using Keyboard mode (page 48)
(Serato DJ Pro)
[SHIFT] + press: Enters Cue Loop mode.
Read more: Using Cue Loop (page 87)
13 PAD FX mode button
(rekordbox)
Press:
Enters Pad FX mode.
Read more: Using Pad FX (page 50)
[SHIFT] + press: Enters Key Shift mode.
Read more: Using Key Shift (page 52)
17 En
Part names and functions
(Serato DJ Pro) Press:
Enters Roll mode.
[SHIFT] + press:
Enters Saved Loop mode.
14 BEAT JUMP mode button
(rekordbox)
Press:
Enters Beat Jump mode.
Read more: Using Beat Jump (page 44)
[SHIFT] + press: Enters Beat Loop mode.
Read more: Using Beat Loop (page 44)
(Serato DJ Pro) Press:
Enters Auto Loop mode.
Read more: Using Auto Loop (page 86)
[SHIFT] + press:
Enters Slicer Loop mode.
15 SAMPLER mode button
Press:
Enters Sampler mode.
Read more: Using Sampler (page 46)(page 86)
(rekordbox)
[SHIFT] + press:
Enters Sample Scratch mode.
Read more: Using Sample Scratch (page 53)
18 En
Part names and functions
(Serato DJ Pro)
[SHIFT] + press:
Enters Scratch Bank mode.
Read more: Using Scratch Bank mode (page 92)
16 Performance Pads
Press:
You can use Performance Pads to trigger various features.
Read more: Using the Performance Pads (page 42)(page 84)
17 PLAY/PAUSE button
Press:
Plays/pauses a track.
(Serato DJ Pro)
[SHIFT] + press:
Returns to the temporary cue point and playback starts. (Stutter)
18 CUE button
Press:
Sets, calls up, and plays a cue point.
•Press the button when the track is paused to set the cue point.
•Press the button when the track is playing to return to the cue point and pause. (Back Cue)
•Press the button and hold it after the track returns to the cue point and playback will continue until you release the button. (Cue Point Sampler)
[SHIFT] + press:
Returns the playback position to the beginning of the track.
19 SHIFT button
Press another button while holding the [SHIFT] button to use a different feature assigned to the button.
19 En
Part names and functions
20 Jog wheel
Turn the top when Vinyl mode is on: Scratches the track.
Turn the outer section or turn the top when Vinyl mode is off: Bends the pitch (Pitch Bend – slows down or speeds up the track).
(rekordbox)
[SHIFT] + turn the top:
Fast-forward or fast-reverse the track with extra speed.
(Serato DJ Pro) [SHIFT] + turn the top:
The playback position skips in sync with the beat. (Skip mode)
•Skip mode can’t be used with tracks that have no beatgrid set. For details on setting beatgrids, see the Serato DJ Pro software manual.
•To use Skip mode, open the [SETUP] menu in Serato DJ Pro > [SYNC PREFERENCES] and select [Smart Sync].
21 DECK SELECT button
Press:
Switches the deck to be used.
[SHIFT] + press:
Turns Dual Deck mode on/off.
22 JOG CUTTER button
Press:
Turns Jog Cutter mode on/off.
[SHIFT] + press:
Turns Vinyl mode on/off.
20 En
Part names and functions
Mixer section
2 3 4


 1
1
5  6
6 


 7
7

 8
8
 9
9
10
1 TRIM knobs
Adjust the volume of each channel’s sound.
2 Headphone CUE button (master)
Press:
Plays the master sound through your headphones.
3 MASTER LEVEL knob
Adjusts the volume of the master output sound.
4 BOOTH LEVEL knob
Adjusts the volume of the sound output from the [BOOTH] terminal.
5 Channel level indicators
Indicate the volume of the sound of the respective channels before it passes through the channel faders.
21 En
Part names and functions
6 EQ (HI, MID, LOW) knobs
Boost or reduce the relevant frequency for the selected channel.
7 FILTER knobs
Turn on the filter effect for each channel.
When a knob is set to the center position, the sound is unchanged.
Turn counterclockwise:
Gradually decreases the low-pass filter’s cutoff frequency.
Turn clockwise:
Gradually increases the high-pass filter’s cut-off frequency.
8 Headphone CUE buttons (channel)
Press:
Play the sound of the relevant channel through your headphones.
[SHIFT] + press:
Hold the [SHIFT] button and tap the headphone [CUE] button to set the tempo of the respective deck in time with your tapping. (Tapping function)
9 Channel faders
Adjust the volume of the sound for each channel.
10 Crossfader
Adjusts the sound balance between the left and right channels depending on the crossfader curve setting.
22 En
Part names and functions
Effects section
1
2
3
 4
4
 5
5
 6
6
1 BEAT FX SELECT button
Press:
Changes the Beat FX slot each time the button is pressed.
[SHIFT] + press:
Changes the Beat FX slot in the reverse order each time the button is pressed.
2 BEAT FX CH SELECT button
Press:
Changes the channel each time the button is pressed.
[SHIFT] + press:
Changes the channel in the reverse order each time the button is pressed.
3 BEAT button
Press:
Decreases the beat fraction for synchronizing the Beat FX sound each time the button is pressed.
23 En
Part names and functions
[SHIFT] + press:
Sets the Beat FX Tempo mode to BPM Auto mode. The track’s BPM is used as the basis for the Beat FX tempo.
4 BEAT button
Press:
Increases the beat fraction for synchronizing the Beat FX sound each time the button is pressed.
[SHIFT] + press:
Sets the Beat FX Tempo mode to BPM Tap mode. The BPM used as the basis for Beat FX is set in time with your tapping of the button.
5 BEAT FX LEVEL/DEPTH knob
Adjusts the parameter of Beat FX.
6 BEAT FX ON/OFF button
Press:
Turns Beat FX on/off.
(rekordbox)
[SHIFT] + press:
Turns Release FX on/off.
24 En

Part names and functions
Rear panel
1 |
2 |
3 |
4 |
5 |
6 |
1 MASTER output terminals (RCA pin jack type)
Connection for a powered speaker, a power amplifier, etc.
• Compatible with RCA pin jack-type unbalanced outputs.
2 BOOTH output terminals (RCA pin jack type)
Connection for a powered speaker, a power amplifier, etc.
• Compatible with RCA pin jack-type unbalanced outputs.
3 MIC ATT. (Attenuator) knob
Adjusts the volume of input sound from the [MIC] input terminal.
•Depending on the microphone, the gain of microphone sound differs. Use this knob to adjust the volume for your microphone before using it. While DJing, use the [MIC LEVEL] knob on the front panel to adjust the microphone volume.
4 MIC input terminal (1/4" TRS Jack)
Connection for a microphone.
• Only a phone plug (1/4") can be used.
5 USB port
Connection for a PC/Mac.
•Be sure to use the supplied USB cable.
•A USB hub can’t be used with the unit.
•If your PC/Mac has only a USB Type-C port, you’ll need to use a USB Type-
C male to USB Type-A female cable.
6 Kensington security slot
Connection for a cable lock for security.
25 En
Part names and functions
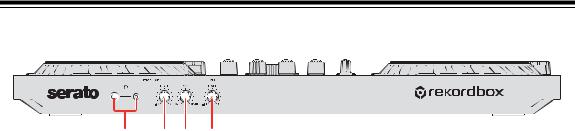
Front panel
1 2 3 4
1 PHONES output terminals
Connection for your headphones.
Stereo phone plugs (1/4") and stereo mini phone plugs (ø 3.5 mm) can be used with the unit.
•Only use headphones with 32 Ω or more impedance. Headphones with impedance lower than 32 Ω won’t work with the unit.
2 HEADPHONES LEVEL knob
Adjusts the level of the headphones sound.
3 HEADPHONES MIX knob
Adjusts the monitor volume balance between sounds from the channels which have the headphone [CUE] button pressed, and the master channel.
4 MIC LEVEL knob
Adjusts the level of sound input to the [MIC] input terminal.
26 En

Connections
•Disconnect the USB cable before connecting different devices or changing connections.
Refer to the instruction manuals for devices to be connected.
•Power is supplied via USB bus power. You can use the unit with a single connection to your PC/Mac.
•Be sure to use the supplied USB cable.
•A USB hub can’t be used with the unit.
•This unit can’t be used with USB bus power in the following situations:
–The power supply capacity of the USB port on your PC/Mac is too low.
–Your PC/Mac is connected with other devices.
–Impedance of the connected headphones is lower than 32 Ω.
–The [PHONES] output terminal is connected with a mono jack.
27 En
Connections
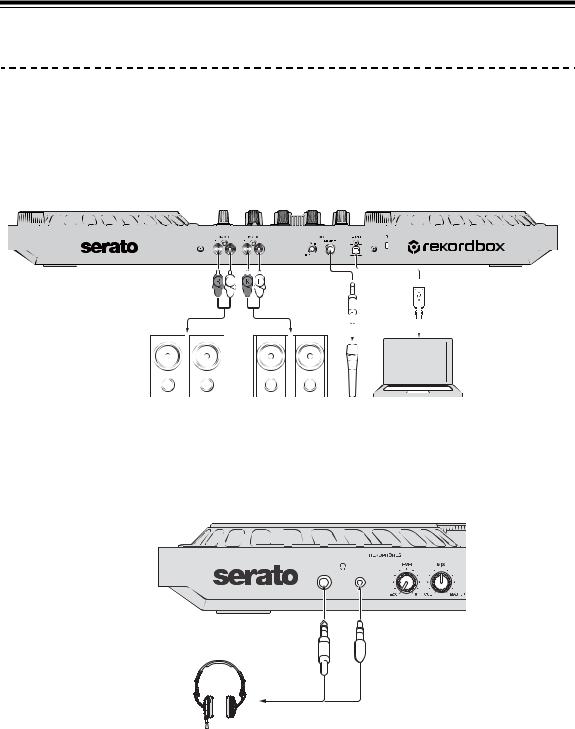
Connection examples
Connecting input terminals
Rear panel
(1) & (2) Powered speakers, power amplifier, etc.,
(3) Microphone, (4) PC/Mac
|
|
|
|
|
|
|
|
|
|
|
|
|
|
|
|
|
|
|
|
|
|
|
|
|
|
|
|
|
|
|
|
|
|
|
|
|
|
|
|
|
|
|
|
|
|
|
|
|
|
|
|
|
|
|
|
|
|
|
|
|
|
|
|
|
|
|
|
|
|
|
|
|
|
|
|
|
|
|
|
|
|
|
|
|
|
|
|
|
|
|
(1) |
|
(2) |
(3) |
(4) |
||||||||
Front panel
(1) Headphones
(1)
28 En
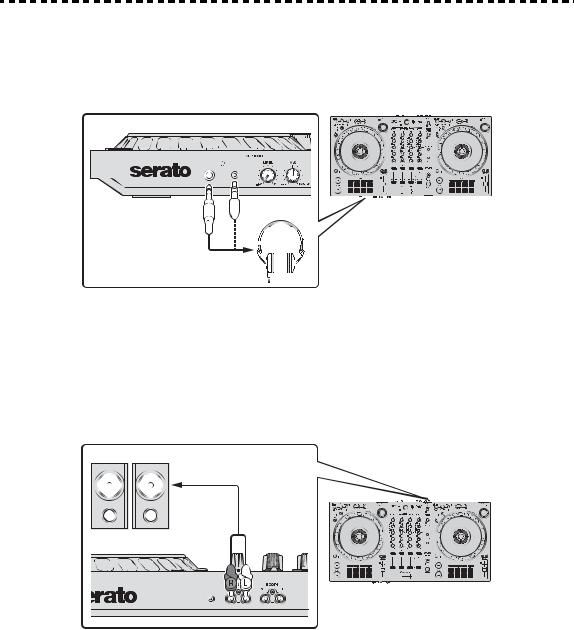
Connections
Connecting
1Connect your headphones to one of the [PHONES] output terminals.
•Only connect headphones with 32 Ω or more impedance. Headphones with impedance lower than 32 Ω won’t work with the unit.
2Connect powered speakers, a power amplifier, etc. to the [MASTER] output terminals.
•To output the sound from the [BOOTH] output terminals, connect speakers or other devices to the [BOOTH] output terminals.
29 En

Connections
3 Connect the unit to your PC/Mac via a USB cable.
4Turn on your PC/Mac.
5Turn on the devices connected to the terminals (powered speakers, microphone, etc.).
30 En
Loading...