


DEH-1200MP

Owner’s Manual
Mode d’emploi
Manual de instrucciones
CD RECEIVER
AUTORADIO CD
RADIO CD
DEH-1200MP
English Français Español
Thank you for purchasing this PIONEER
product.
To ensure proper use, please read through this
manual before using this product. It is espe-
cially important that you read and observe
WARNINGs and CAUTIONs in this manual.
Please keep the manual in a safe and accessible
place for future reference.
This device complies with part 15 of the FCC
Rules. Operation is subject to the following
two conditions:
(1) This device may not cause harmful interfer-
ence, and (2) this device must accept any inter-
ference received, including interference that
may cause undesired operation.
Information to User
Alteration or modifications carried out without
appropriate authorization may invalidate the
user’s right to operate the equipment.
For Canadian model
This Class B digital apparatus complies with
Canadian ICES-003.
About this unit
The tuner frequencies on this unit are allo-
cated for use in North America. Use in other
areas may result in poor reception.
WARNING
Handling the cord on this product or cords asso-
ciated with accessories sold with the product will
expose you to chemicals listed on proposition 65
known to the State of California and other govern-
mental entities to cause cancer and birth defect
or other reproductive harm. Wash hands after
handling.
CAUTION:
USE OF CONTROL OR ADJUSTMENT OR
PERFORMANCE OF PROCEDURES
OTHER THAN THOSE SPECIFIED HEREIN
MAY RESULT IN HAZARDOUS RADIATION
EXPOSURE.
CAUTION:
THE USE OF OPTICAL INSTRUMENTS
WITH THIS PRODUCT WILL INCREASE
EYE HAZARD.
CAUTION
! Do not allow this unit to come into contact
with liquids. Electrical shock could result.
Also, damage to this unit, smoke, and over-
heating could result from contact with liquids.
! Always keep the volume low enough to hear
outside sounds.
! Avoid exposure to moisture.
! If the battery is disconnected or discharged,
any preset memory will be erased.
Important (Serial number)
The serial number is located on the bottom of
this unit. For your own security and convenience,
be sure to record this number on the enclosed
warranty card.
Before You Start
En
2
Section
01

After-sales service for
Pioneer products
Please contact the dealer or distributor from
where you purchased this unit for after-sales
service (including warranty conditions) or any
other information. In case the necessary infor-
mation is not available, please contact the
companies listed below:
Please do not ship your unit to the companies
at the addresses listed below for repair without
advance contact.
U.S.A.
Pioneer Electronics (USA) Inc.
CUSTOMER SUPPORT DIVISION
P.O. Box 1760
Long Beach, CA 90801-1760
800-421-1404
CANADA
Pioneer Electronics of Canada, Inc.
CUSTOMER SATISFACTION DEPARTMENT
300 Allstate Parkway
Markham, Ontario L3R 0P2
1-877-283-5901
905-479-4411
For warranty information please see the Lim-
ited Warranty sheet included with this unit.
In case of trouble
Should this unit fail to operate properly, please
contact your dealer or nearest authorized
PIONEER Service Station.
Visit our website
http://www.pioneerelectronics.com
! Learn about product updates (such as firm-
ware updates) for your product.
! Register your product to receive notices
about product updates and to safeguard
purchase details in our files in the event of
loss or theft.
! Access owner's manuals, spare parts infor-
mation, service information, and much
more.
Before You Start
En
3
English
Section
01
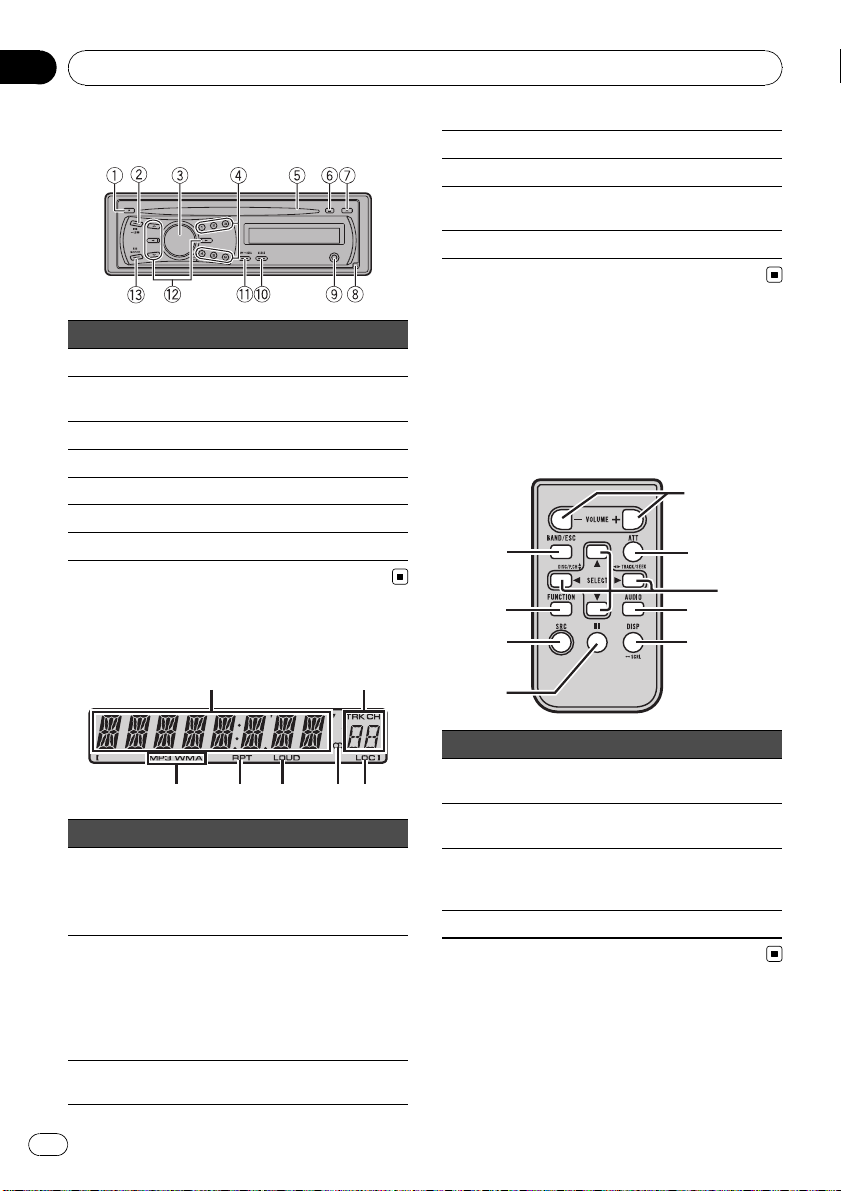
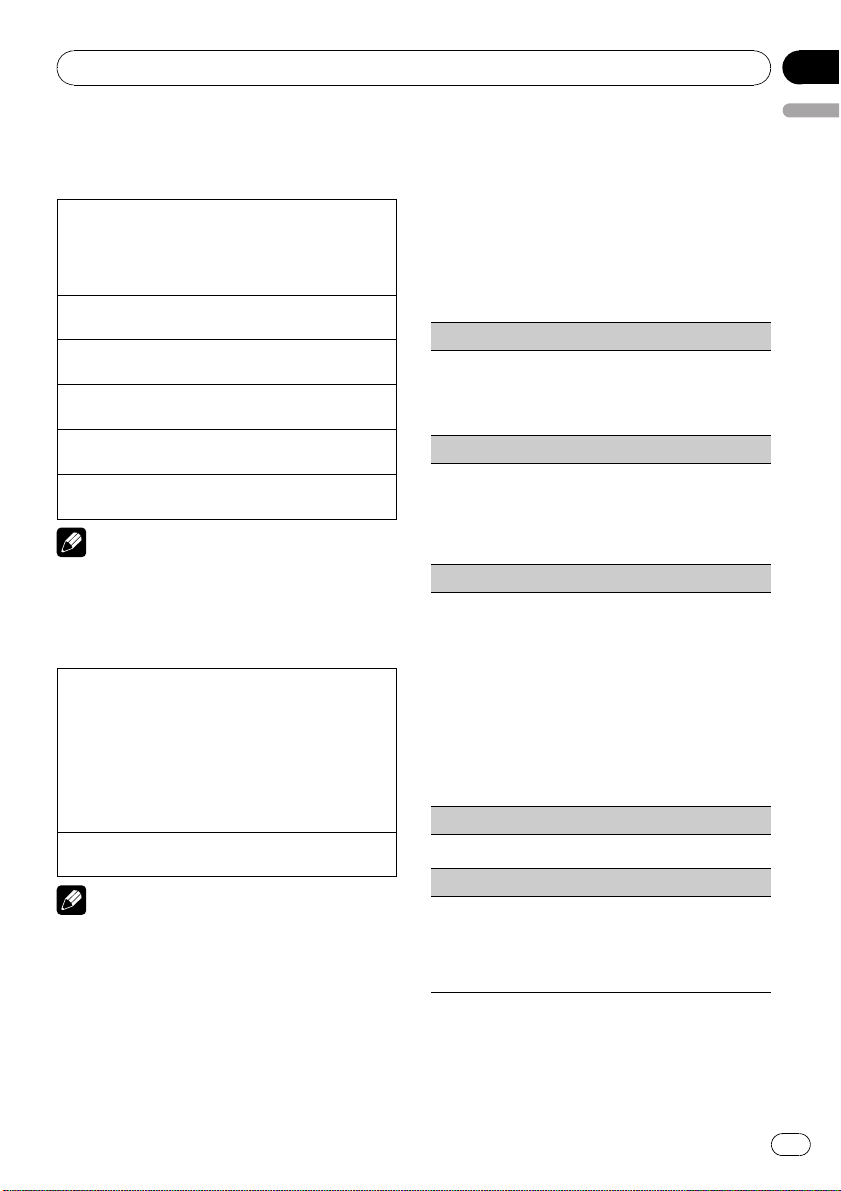
Head unit
Button Button
1 F (function) 8 Detach
2 EQ/LOUD 9
AUX input jack (3.5
mm stereo jack)
3 SRC/OFF a CLOCK
4 1 to 6 b DISP/SCRL
5 Disc loading slot c a/b/c/d
6 h (eject) d BAND/ESC
7 A (audio)
Display indication
3
2
1
4 5 6 7
Indicator State
1
Main dis-
play sec-
tion
! Tuner: band and frequency
! Built-in CD player: elapsed
playback time and text infor-
mation
2
Preset
number/
track num-
ber
! The track number or preset
number.
! If a track number 100 or more
is selected, d on the left of
the track number indicator
will light.
3
MP3/
WMA
The type of the currently playing
disc.
4 RPT Repeat play is turned on.
5 LOUD Loudness is on.
6 5 (stereo)
The selected frequency is being
broadcasted in stereo.
7 LOC Local seek tuning is on.
Remote control
Operation is the same as when using the but-
tons on the head unit. See the explanation of
the head unit about the operation of each but-
ton with the exception of ATT, which is ex-
plained below.
f
7
g
1
h
b
d
e
c
Part State
e
VOLUME
(+/-)
Press to increase or decrease vo-
lume.
f ATT
Press to mute. Press again to un-
mute.
g
SRC
(source)
Press to cycle through all the
available sources. Press and hold
to turn the source off.
h e (pause) Press to pause or resume.
Operating this unit
En
4
Section
02
Use and care of the remote
control
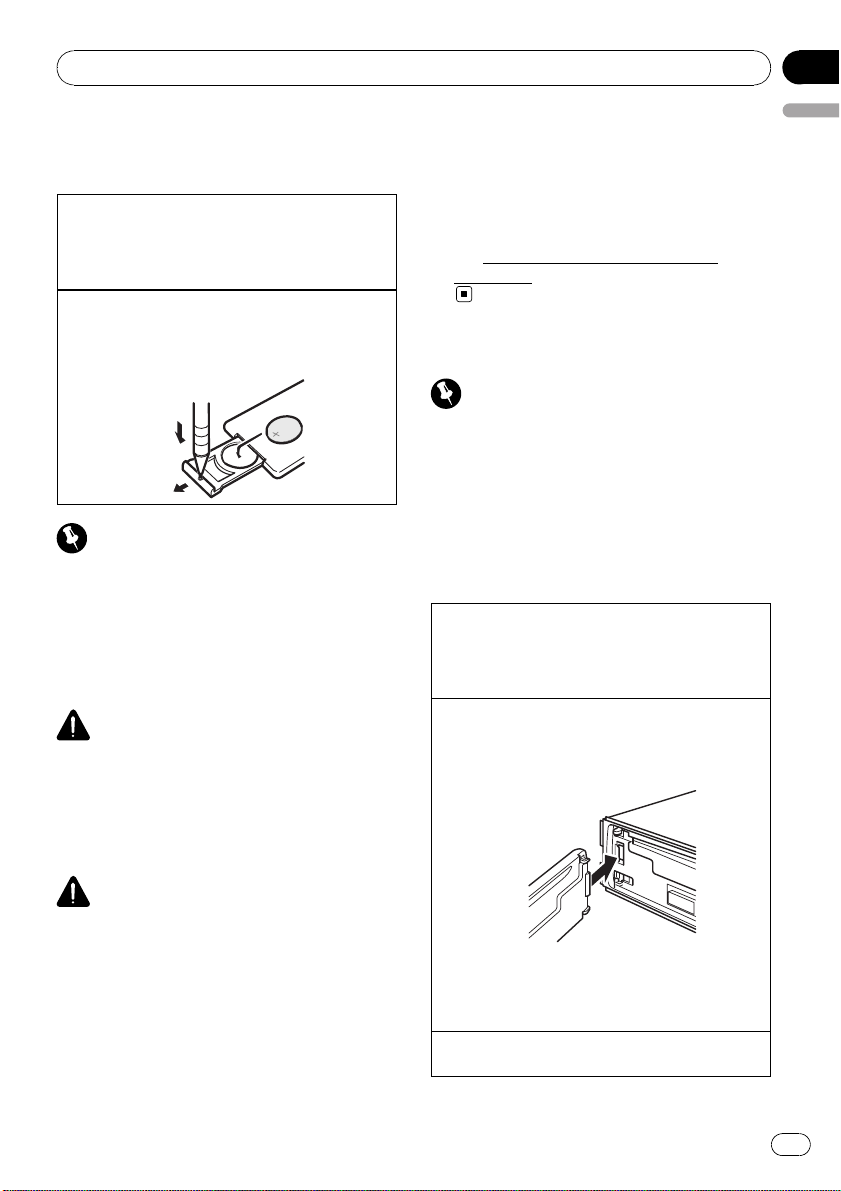
Using the remote control
1 Point the remote control in the direction of the
front panel to operate.
When using for the first time, pull out the film
protruding from the tray.
Replacing the battery
1 Slide the tray out on the back of the remote con-
trol.
2 Insert the battery with the plus (+) and minus (–)
poles aligned properly.
Important
! Do not store the remote control in high tem-
peratures or direct sunlight.
! The remote control may not function properly
in direct sunlight.
! Do not let the remote control fall onto the
floor, where it may become jammed under the
brake or accelerator pedal.
WARNING
! Keep the battery out of the reach of children.
Should the battery be swallowed, consult a
doctor immediately.
! Batteries (batter y pack or batteries installed)
must not be exposed to excessive heat such
as sunshine, fire or the like.
CAUTION
! Use one CR2025 (3 V) lithium battery.
! Remove the battery if the remote control is not
used for a month or longer.
! There is a danger of explosion if the battery is
incorrectly replaced. Replace only with the
same or equivalent type.
! Do not handle the battery with metallic tools.
! Do not store the battery with metallic objects.
! If the battery leaks, wipe the remote control
completely clean and install a new battery.
! When disposing of used batteries, comply
with governmental regulations or environmen-
tal public institutions’ rules that apply in your
country/area.
! “Perchlorate Material – special handling may
apply.
See
www.dtsc.ca.gov/hazardouswaste/
perchlorate. (Applicable to California, U.S.A.)”
Basic Operations
Important
! Handle gently when removing or attaching
the front panel.
! Avoid subjecting the front panel to excessive
shock.
! Keep the front panel out of direct sunlight and
high temperatures.
! Remove any cables and devices attached to
this unit before detaching the front panel to
avoid damage to the device or vehicle interior.
Removing the front panel to protect your unit from
theft
1 Press the detach button to release the front
panel.
2 Grab the front panel and remove.
Re-attaching the front panel
1 Slide the front panel to the left until it clicks.
Front panel and the head unit are connected on
the left side. Make sure that the front panel has
been properly connected to the head unit.
2 Press the right side of the front panel until it is
firmly seated.
If you can’t attach the front panel to the head unit
successfully, try again. However, forcing the front
panel into place may result in damage.
Turning the unit on
1 Press SRC/OFF to turn the unit on.
Operating this unit
En
5
English
Section
02
Turning the unit off
1 Press SRC/OFF and hold until the unit turns off.
Selecting a source
1 Press SRC/OFF to cycle between:
TUNER (tuner)—CD (built-in CD player)—AUX
(AUX)
Adjusting the volume
1 Tur n SRC/OFF to adjust volume.
Note
When this unit’s blue/white lead is connected to
the vehicle’s auto-antenna relay control terminal,
the vehicle’s antenna extends when this unit’s
source is turned on. To retract the antenna, turn
the source off.
Menu operations identical
for function settings/audio
adjustments/initial settings
Returning to the ordinary display
Canceling the initial setting menu
! Press BAND/ESC.
You can also cancel initial settings by holding
down SRC/OFF until the unit turns off.
Tuner
Basic Operations
Selecting a band
1 Press BAND/ESC until the desired band (F1, F2,
F3 for FM or AM) is displayed.
Manual tuning (step by step)
1 Press c or d.
Seeking
1 Press and hold c or d, and then release.
You can cancel seek tuning by briefly pressing c
or d.
While pressing and holding c or d, you can skip
stations. Seek tuning starts as soon as you re-
lease c or d.
Storing and recalling stations
You can easily store up to six stations as pre-
sets.
% When you find a station that you want
to store in memory, press one of the preset
tuning buttons (1 to 6) and hold until the
preset number stops flashing.
Stored radio station frequency can be recalled
by pressing the preset tuning button.
# Press a or b to recall radio station frequen-
cies.
Function settings
% Press F (function) to select the function.
After selecting, perform the following proce-
dures to set the function.
LOCAL (local seek tuning)
Local seek tuning lets you tune in only those radio sta-
tions with sufficiently strong signals for good recep-
tion.
1 Press a or b to turn local seek tuning on or off.
2 Press c or d to set the sensitivity.
FM: LOCAL 1—LOCAL 2—LOCAL 3—LOCAL 4
AM: LOCAL 1—LOCAL 2
Larger setting number is higher level. The highest
level setting allows reception of only the strongest
stations, while lower settings let you receive pro-
gressively weaker stations.
BSM (best stations memory)
BSM (best stations memory) automatically stores the
six strongest stations in the order of their signal
strength.
Storing broadcast frequencies with BSM may replace
broadcast frequencies you have saved using 1 to 6.
1 Press a to turn BSM on.
The six strongest broadcast frequencies are
stored in the order of their signal strength.
To cancel the storage process, press b.
Operating this unit
En
6
Section
02
CD
Basic Operations
Playing a CD/CD-R/CD-RW
1 Insert the disc, label side up, into the disc loading
slot.
1 If a disc has already been inserted, press SRC/
OFF to select the built-in CD player.
Ejecting a CD/CD-R/CD-RW
1 Press h.
Selecting a folder
1 Press a or b.
Selecting a track
1 Press c or d.
Fast forwarding or reversing
1 Press and hold c or d.
Switching between compressed audio and CD-DA
1 Press BAND/ESC.
Note
When playing compressed audio, there is no
sound during fast forward or reverse.
Displaying text information
Selecting the desired text information
1 Press DISP/SCRL.
CD TEXT discs: Play time—disc title—disc ar-
tist name—track title—track artist name
WMA/MP3: Play time—folder name—file name
—track title—artist name—album title—com-
ment—bit rate
WAV: Play time—folder name—file name—sam-
pling frequency
Scrolling the text information to the left
1 Press and hold DISP/SCRL.
Notes
! Incompatible text stored with the audio file
may not be displayed or may be displayed in-
correctly.
! Depending on the version of iTunes used to
write MP3 files onto a disc, comment informa-
tion may be incorrectly displayed.
! When playing back VBR (variable bit rate)-re-
corded WMA files, the average bit rate value is
displayed.
! When playing back VBR (variable bit rate)-re-
corded MP3 files, VBR is displayed instead of
bit rate value.
Function settings
% Press F (function) to select the function.
After selecting, perform the following proce-
dures to set the function.
RPT (repeat play)
1 Press c or d to select the repeat range.
DSC – Repeat all tracks
TRK – Repeat the current track
FLD – Repeat the current folder
RDM (random play)
1 Press a or b to turn random play on or off.
When random play is on, RDM appears in the dis-
play.
If you turn random play on during folder repeat,
FRDM appears in the display.
SCAN (scan play)
Scan play searches for a song within the selected re-
peat range.
1 Press a to turn scan play on.
If you turn scan play on during FLD, FSCN ap-
pears in the display.
2 When you find the desired track press b to turn
scan play off.
If the display has automatically returned to the
playback display, select SCAN again by pressing F
(function).
After scanning of a disc (folder) is finished, nor-
mal playback of the tracks begins.
PAUSE (pause)
1 Press a or b to pause or resume.
COMP OFF (compression and BMX)
Using the COMP (compression) and BMX functions
let you adjust the sound playback quality of this unit.
1 Press a or b to select your favorite setting.
COMP OFF—COMP 1—COMP 2—COMP OFF —
BMX 1—BMX 2
Operating this unit
En
7
English
Section
02
FF/REV (fast forward/reverse)
You can switch the search method between fast for-
ward/reverse and searching every 10 tracks. Selecting
ROUGH enables you to search every 10 tracks.
1 Press d to select ROUGH.
FF/REV – Fast forward and reverse
ROUGH – Searching every 10 tracks
To select FF/REV, press c.
2 Press BAND/ESC to return to the playback dis-
play.
3 Press and hold c or d to search every 10 tracks
on a disc (folder).
If the rest of track number is less than 10, press
and hold c or d recalls the first (last) one.
Audio Adjustments
Audio Adjustments
% Press A (audio) to select the audio func-
tion.
After selecting, perform the following proce-
dures to set the audio function.
FAD (fader/balance adjustment)
You can change the fader/balance setting.
1 Press a or b to adjust front/rear speaker balance.
Adjustment range (front/rear): FAD F15 to FAD
R15
FAD 0 is the proper setting when only two speak-
ers are used.
2 Press c or d to adjust left/right speaker balance.
Adjustment range (left/right): BAL L15 to BAL
R15
BASS/MID/TREBLE (equalizer adjustment)
You can adjust the bass/mid/treble level.
! Adjusted equalizer curve settings are stored in
CUSTOM.
1 Press a or b to adjust the level.
Adjustment range: +6 to -6
LOUD (loudness)
Loudness compensates for deficiencies in the low-
and high-frequency ranges at low volume.
1 Press a or b to turn loudness on or off.
2 Press c or d to select the desired setting.
LOW (low)—HI (high)
SLA (source level adjustment)
SLA (Source level adjustment) lets you adjust the vo-
lume level of each source to prevent radical changes
in volume when switching between sources.
! Settings are based on the FM volume level, which
remains unchanged.
Before adjusting source levels, compare the FM
volume level with the level of the source you wish
to adjust.
! The AM volume level can also be adjusted with
source level adjustments.
1 Press a or b to adjust the source volume.
Adjustment range: SLA +4 to SLA –4
Note
You can also turn loudness on or off by pressing
and holding EQ/LOUD.
Using the equalizer
% Press EQ/LOUD to select the equalizer.
DYNAMIC—VOCAL—NATURAL—CUSTOM
—FLAT—POWERFUL
! CUSTOM allows you to create a customized
setting.
! When FLAT is selected no adjustments are
made to the sound.
Other Functions
Adjusting initial settings
1 Press SRC/OFF and hold until the unit
turns off.
2 Press SRC/OFF and hold until the clock
appears in the display.
3 Press F (function) to select the initial
setting.
After selecting, perform the following proce-
dures to set the initial setting.
Setting the clock
1 Press c or d to select the segment of the clock
display you wish to set.
Hour—Minute
2 Press a or b to put a clock right.
Operating this unit
En
8
Section
02

AUX (auxiliary input)
Activate this setting when using auxiliary device con-
nected to this unit.
1 Press a or b to turn auxiliary setting on or off.
Turning the clock display on or off
% Press CLOCK to turn the clock display
on or off.
Each press of CLOCK turns the clock display
on or off.
# The clock display disappears temporarily
when you perform other operations, but the clock
display appears again after 25 seconds.
Using the AUX source
1 Insert the stereo mini plug into the
AUX input jack.
2 Press SRC/OFF to select AUX as the
source.
Operating this unit
En
9
English
Section
02
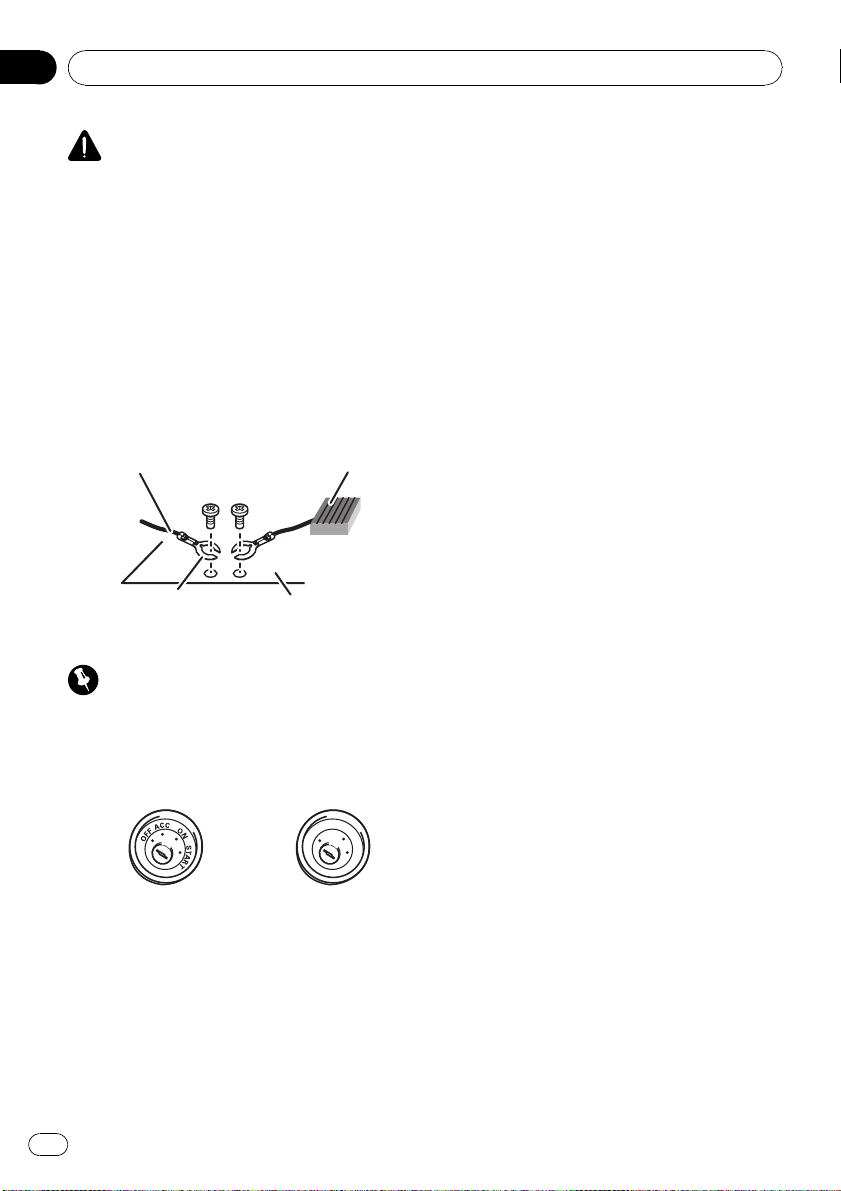
WARNING
! Use speakers over 50 W (output value) and be-
tween 4 W to 8 W (impedance value). Do not
use 1 W to 3 W speakers for this unit.
! The black cable is ground. When installing
this unit or power amp (sold separately), make
sure to connect the ground wire first. Ensure
that the ground wire is properly connected to
metal parts of the car’s body. The ground wire
of the power amp and the one of this unit or
any other device must be connected to the car
separately with different screws. If the screw
for the ground wire loosens or falls out, it
could result in fire, generation of smoke or
malfunction.
Ground wire
Metal parts of car’s body
Other devices
(Another electronic
device in the car)
POWER AMP
Important
! When installing this unit in a vehicle without
an ACC (accessory) position on the ignition
switch, failure to connect the red cable to the
terminal that detects operation of the ignition
key may result in battery drain.
O
N
S
T
A
R
T
O
F
F
ACC position No ACC position
! Use this unit with a 12-volt battery and nega-
tive grounding only. Failure to do so may result
in a fire or malfunction.
! To prevent a short-circuit, overheating or mal-
function, be sure to follow the directions
below.
— Disconnect the negative terminal of the
battery before installation.
— Secure the wiring with cable clamps or ad-
hesive tape. Wrap adhesive tape around
wiring that comes into contact with metal
parts to protect the wiring.
— Place all cables away from moving parts,
such as the gear shift and seat rails.
— Place all cables away from hot places,
such as near the heater outlet.
— Do not connect the yellow cable to the bat-
tery by passing it through the hole to the
engine compartment.
— Cover any disconnected cable connectors
with insulating tape.
— Do not shorten any cables.
— Never cut the insulation of the power cable
of this unit in order to share the power
with other devices. The current capacity of
the cable is limited.
— Use a fuse of the rating prescribed.
— Never wire the negative speaker cable di-
rectly to ground.
— Never band together negative cables of
multiple speakers.
! When this unit is on, control signals are sent
through the blue/white cable. Connect this
cable to the system remote control of an exter-
nal power amp or the vehicle’s auto-antenna
relay control terminal (max. 300 mA 12 V DC).
If the vehicle is equipped with a glass anten-
na, connect it to the antenna booster power
supply terminal.
! Never connect the blue/white cable to the
power terminal of an external power amp.
Also, never connect it to the power terminal of
the auto antenna. Doing so may result in bat-
tery drain or a malfunction.
Connections
En
10
Section
03
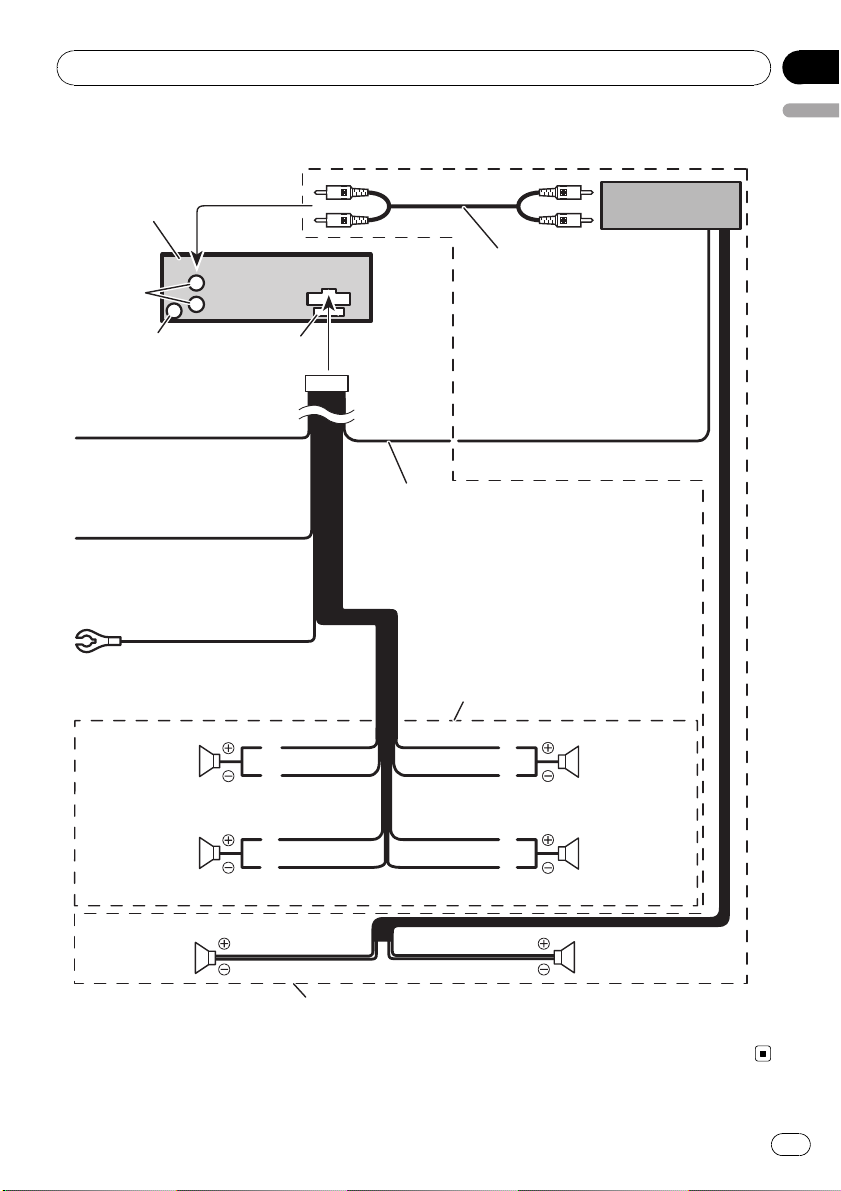
Connection diagram
Connect with RCA cables
(sold separately)
Rear output
This product
Antenna jack
Fuse (10 A)
Blue/white
Connect to system control terminal of the
power amp or auto-antenna relay control
terminal (max. 300 mA 12 V DC).
Yellow
Connect to the constant 12 V
supply terminal.
Red
Connect to terminal controlled
by ignition switch (12 V DC).
Black (chassis ground)
Connect to a clean, paint-free
metal location.
Power amp
(sold separately)
System remote control
Left Right
Perform these connections when using
the optional amplifier.
Rear speaker Rear speaker
White/black
Violet/black
Violet
With a 2 speaker system, do not connect
anything to the speaker leads that are not
connected to speakers.
Front speaker Front speaker
White
Gray/black
Gray
Green/black
Green
Rear speaker Rear speaker
Connections
En
11
English
Section
03
Important
! Check all connections and systems before
final installation.
! Do not use unauthorized parts as this may
cause malfunctions.
! Consult your dealer if installation requires dril-
ling of holes or other modifications to the vehi-
cle.
! Do not install this unit where :
— it may interfere with operation of the vehi-
cle.
— it may cause injury to a passenger as a re-
sult of a sudden stop.
! The semiconductor laser will be damaged if it
overheats. Install this unit away from hot
places such as near the heater outlet.
! Optimum per formance is obtained when the
unit is installed at an angle of less than 60°.
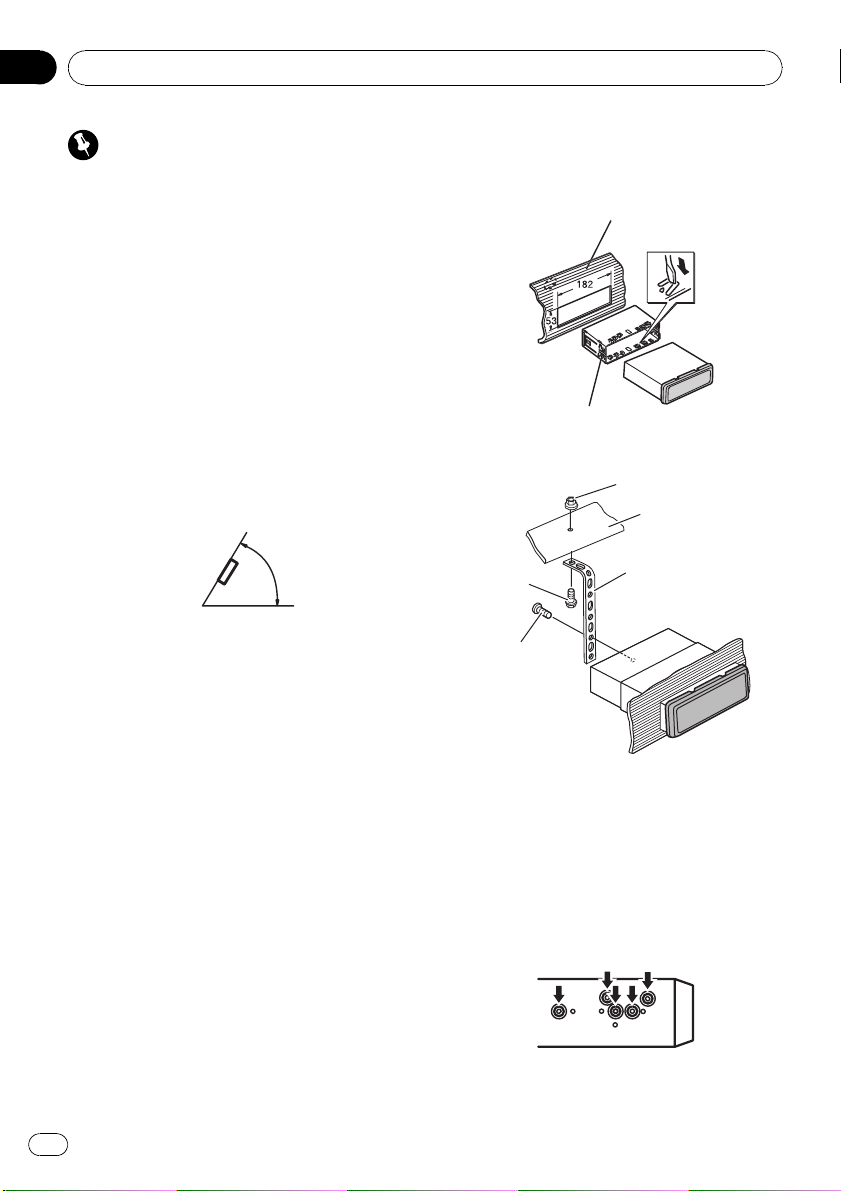
60°
DIN front/rear mount
This unit can be properly installed either from
“Front” (conventional DIN front-mount) or
“Rear” (DIN rear-mount installation, utilizing
threaded screw holes on the sides of unit
chassis). For details, refer to the following in-
stallation methods.
! Use commercially available parts when in-
stalling.
DIN Front-mount
1 Insert the mounting sleeve into the
dashboard.
For installation in shallow spaces, use the sup-
plied mounting sleeve. If there is enough
space, use the mounting sleeve that came
with the vehicle.
2 Secure the mounting sleeve by using a
screwdriver to bend the metal tabs (90°)
into place.
Dashboard
Mounting sleeve
3 Install the unit as illustrated.
Screw (M48)
Screw
Metal strap
Nut
Firewall or
metal support
# Make sure that the unit is installed securely in
place. An unstable installation may cause skip-
ping or other malfunctions.
DIN Rear-mount
1 Determine the appropriate position
where the holes on the bracket and the
side of the unit match.
Installation
En
12
Section
04
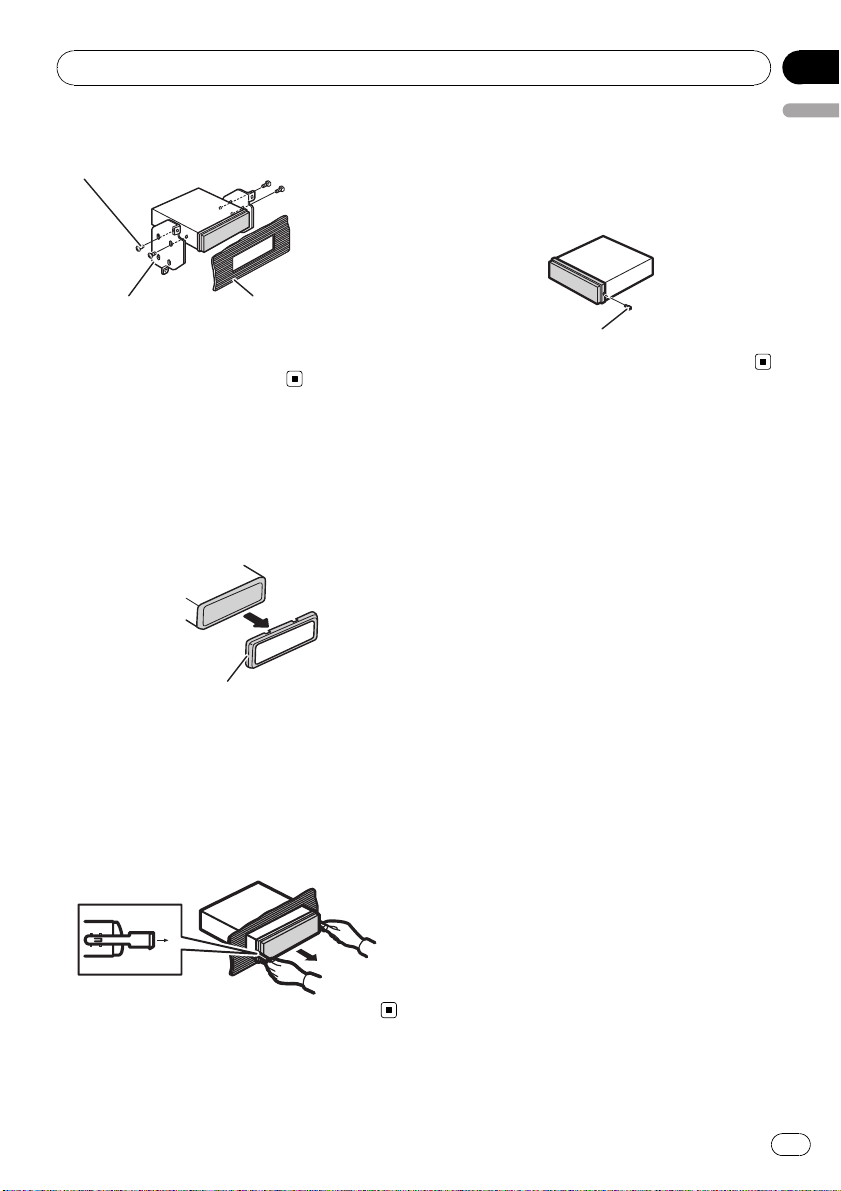
2 Tighten two screws on each side.
Screw
Mounting bracket Dashboard or console
! Use either truss (5 mm × 8 mm) or flush
surface (5 mm × 9 mm) screws, depending
on the bracket screw holes.
Removing the unit
1 Extend top and bottom of the trim ring
outwards to remove the trim ring. (When
reattaching the trim ring, point the side
with the groove down.)
Trim ring
! Releasing the front panel allows easier ac-
cess to the trim ring.
2 Insert the supplied extraction keys into
both sides of the unit until they click into
place.
3 Pull the unit out of the dashboard.
Fastening the front panel
If you do not plan to detach the front panel,
the front panel can be fastened with the sup-
plied screw.
Screw
Installation
En
13
English
Section
04

Troubleshooting
Symptom Cause Action (See)
The display
automatically
returns to the
ordinary dis-
play.
You did not per-
form any opera-
tion within about
30 seconds.
Perform operation
again.
The repeat play
range changes
unexpectedly.
Depending on
the repeat play
range, the se-
lected range may
change when se-
lecting another
folder or track, or
when fast for-
warding/rever-
sing.
Select the repeat
play range again.
NO XXXX ap-
pears when a
display is chan-
ged (e.g., NO T-
TTL).
No text informa-
tion embedded
Switch the display
or play another
track/file.
The unit is mal-
functioning.
There is inter-
ference.
You are using a
device, such as a
cell phone, that
transmits electro-
magnetic waves
near the unit.
Move electrical de-
vices that may be
causing the inter-
ference away from
the unit.
Error messages
When you contact your dealer or your nearest
Pioneer Service Center, be sure to note the
error message.
Message Cause Action
ERROR-11, 12,
17, 30
Dirty disc Clean disc.
ERROR-11, 12,
17, 30
Scratched disc Replace disc.
ERROR-10, 11,
12, 15, 17, 30,
A0
Electrical or me-
chanical
Turn the ignition
switch OFF and
back ON, or switch
to a different
source, then back
to the CD player.
ERROR-15 The inserted disc
is blank
Replace disc.
ERROR-22, 23
Unsupported CD
format
Replace disc.
FRMTREAD There is some-
times a delay be-
tween the start of
playback and
when you start to
hear any sound
Wait until the mes-
sage disappears
and you hear
sound.
NO AUDIO The inserted disc
does not contain
any playable files
Replace disc.
PROTECT All the files on
the inserted disc
are embedded
with DRM
Replace disc.
SKIPPED The inserted disc
contains DRM
protected WMA
files
Replace disc.
Handling guideline
Discs and player
Use only discs featuring either of following two logos.
Use 12-cm or 8-cm CD. Do not use an adapter when
playing 8-cm CDs.
Use only conventional, fully circular discs. Do not use
shaped discs.
Do not insert anything other than a CD into the CD
loading slot.
Do not use cracked, chipped, warped, or otherwise
damaged discs as they may damage the player.
Unfinalized CD-R/CD-RW disc playback is not possi-
ble.
Additional Information
En
14
Appendix
Do not touch the recorded surface of the discs.
Store discs in their cases when not in use.
Avoid leaving discs in excessively hot environments
including under direct sunlight.
Do not attach labels, write on or apply chemicals to
the surface of the discs.
To clean a CD, wipe the disc with a soft cloth outward
from the center.
Condensation may temporarily impair the player’s
performance. Leave it to adjust to the warmer tem-
perature for about one hour. Also, wipe any damp
discs with a soft cloth.
Playback of discs may not be possible because of
disc characteristics, disc format, recorded applica-
tion, playback environment, storage conditions, and
so on.
Road shocks may interrupt disc playback.
Read the precautions for discs before using them.
DualDiscs
DualDiscs are two-sided discs that have a recordable
CD for audio on one side and a recordable DVD for
video on the other.
Since the CD side of DualDiscs is not physically com-
patible with the general CD standard, it may not be
possible to play the CD side with this unit.
Frequent loading and ejecting of a DualDisc may re-
sult in scratches on the disc. Serious scratches can
lead to playback problems on this unit. In some
cases, a DualDisc may become stuck in the disc load-
ing slot and will not eject. To prevent this, we recom-
mend you refrain from using DualDisc with this unit.
Please refer to the information from the disc manu-
facturer for more detailed information about Dual-
Discs.
Compressed audio
compatibility
WMA
Compatible format: WMA encoded by Windows
Media Player
File extension: .wma
Bit rate: 48 kbps to 320 kbps (CBR), 48 kbps to 384
kbps (VBR)
Sampling frequency: 32 kHz to 48 kHz
Windows Media Audio Professional, Lossless, Voice:
No
MP3
File extension: .mp3
Bit rate: 8 kbps to 320 kbps
Sampling frequency: 16 kHz to 48 kHz (32, 44.1, 48
kHz for emphasis)
Compatible ID3 tag version: 1.0, 1.1, 2.2, 2.3, 2.4 (ID3
tag Version 2.x is given priority over Version 1.x.)
M3u playlist: No
MP3i (MP3 interactive), mp3 PRO: No
WAV
Compatible format: Linear PCM (LPCM), MS ADPCM
File extension: .wav
Quantization bits: 8 and 16 (LPCM), 4 (MS ADPCM)
Sampling frequency: 16 kHz to 48 kHz (LPCM), 22.05
kHz and 44.1 kHz (MS ADPCM)
Disc
Playable folder hierarchy: up to eight tiers (A practical
hierarchy is less than two tiers.)
Playable folders: up to 99
Playable files: up to 999
File system: ISO 9660 Level 1 and 2, Romeo, Joliet
Multi-session playback: Yes
Packet write data transfer: No
Regardless of the length of blank section between the
songs of the original recording, compressed audio
discs play with a short pause between songs.
Additional Information
En
15
English
Appendix
Supplemental information
Only the first 32 characters can be displayed as a file
name (including the file extension) or a folder name.
This unit may not operate correctly depending on the
application used to encode WMA files.
There may be a slight delay when starting playback of
audio files embedded with image data.
Sequence of audio files
The user cannot assign folder numbers and
specify playback sequences with this unit.
Example of a hierarchy
Level 1 Level 2 Level 3 Level 4
01
02
03
04
05
: Folder
: Compressed
audio file
01 to 05: Folder
number
1 to 6: Playback
sequence
Disc
! Folder selection sequence or other opera-
tion may differ depending on the encoding
or writing software.
! Folder hierarchy is allowed up to eight tiers.
However, a practical hierarchy of folder is
less than two tiers.
! Up to 99 folders on a disc can be played
back.
Copyright and trademark
iTunes
Apple and iTunes are trademarks of Apple
Inc., registered in the U.S. and other coun-
tries.
MP3
Supply of this product only conveys a license
for private, non-commercial use and does not
convey a license nor imply any right to use
this product in any commercial (i.e. revenue-
generating) real time broadcasting (terrestrial,
satellite, cable and/or any other media), broad-
casting/streaming via internet, intranets and/
or other networks or in other electronic con-
tent distribution systems, such as pay-audio or
audio-on-demand applications. An indepen-
dent license for such use is required. For de-
tails, please visit
http://www.mp3licensing.com.
WMA
The Windows Mediaä logo printed on the box
indicates that this unit can play back WMA
data.
Windows Media and the Windows logo are tra-
demarks or registered trademarks of Microsoft
Corporation in the United States and/or other
countries.
Additional Information
En
16
Appendix
 Loading...