Panasonic SA-DM3 User Manual
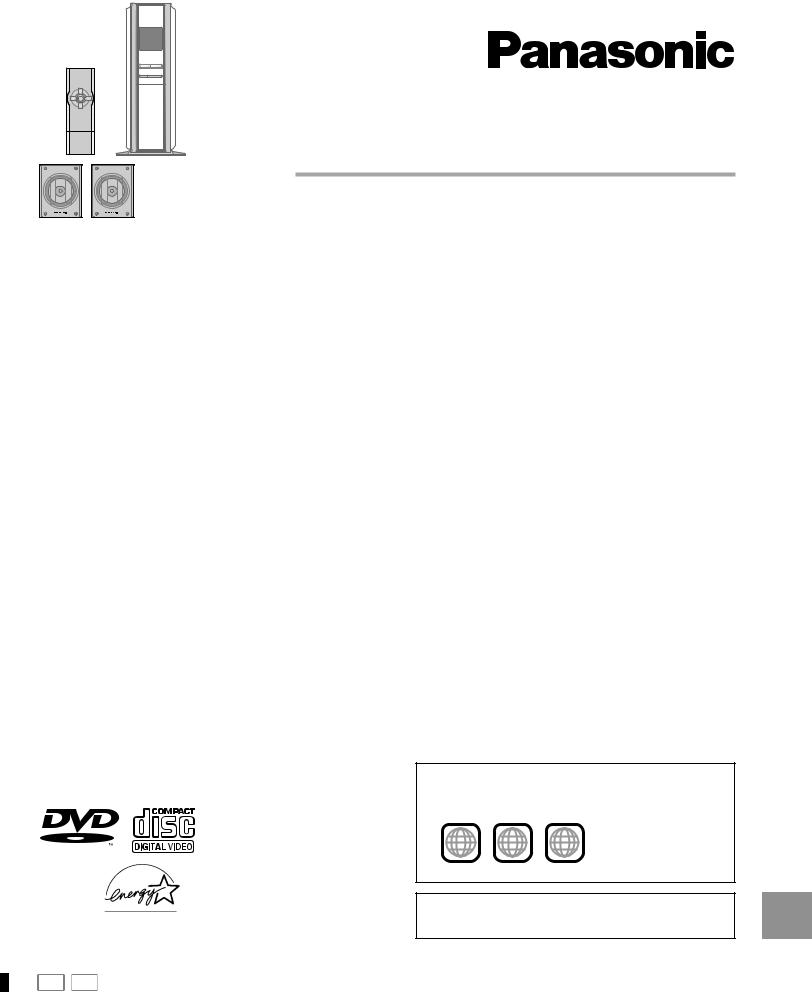
DVD Home Theater Sound System
Operating Instructions
Model No. SC-DM3
Before connecting, operating or adjusting this product, please read these instructions completely.
Please keep this manual for future reference.
AUDIO/VIDEO
As an ENERGY STAR® Partner, Panasonic has determined that this product meets the ENERGY
STAR® guidelines for energy efficiency.
P PC
The region number of this unit is “1”.
You can play DVD-Video marked “1”, “ALL”, or with a region number including “1”.
Example:
1 ALL |
12 |
4 |
|
|
See page 4 for details.
[For\U.S.A.\only]
The warranty can be found on page 34.
RQT6220-2P
Dear customer
Thank you for purchasing this product.
For optimum performance and safety, please read these instructions carefully.
Operations in these instructions are described mainly with the remote control, but you can do the operations on the main unit if the controls are the same.
System |
SC-DM3 |
|
|
Main unit |
SA-DM3 |
|
|
Front and center speakers |
SB-FDM3 |
|
|
Surround speakers |
SB-RDM3 |
|
|
Subwoofer |
SB-WDM3 |
|
|
Getting started
2
CAUTION!
THIS PRODUCT UTILIZES A LASER.
USE OF CONTROLS OR ADJUSTMENTS OR PERFORMANCE OF PROCEDURES OTHER THAN THOSE SPECIFIED HEREIN MAY RESULT IN HAZARDOUS RADIATION EXPOSURE.
DO NOT OPEN COVERS AND DO NOT REPAIR YOURSELF. REFER SERVICING TO QUALIFIED PERSONNEL.
WARNING:
TO REDUCE THE RISK OF FIRE, ELECTRIC SHOCK OR PRODUCT DAMAGE, DO NOT EXPOSE THIS APPARATUS TO RAIN, MOISTURE, DRIPPING OR SPLASHING AND THAT NO OBJECTS FILLED WITH LIQUIDS, SUCH AS VASES, SHALL BE PLACED ON THE APPARATUS.
CAUTION:
TO PREVENT ELECTRIC SHOCK MATCH WIDE BLADE OF PLUG TO WIDE SLOT, FULLY INSERT.
CAUTION!
DO NOT INSTALL, OR PLACE THIS UNIT, IN A BOOKCASE, BUILT-IN CABINET OR IN ANOTHER CONFINED SPACE. ENSURE THE UNIT IS WELL VENTILATED. TO PREVENT RISK OF ELECTRIC SHOCK OR FIRE HAZARD DUE TO OVERHEATING, ENSURE THAT CURTAINS AND ANY OTHER MATERIALS DO NOT OBSTRUCT THE VENTILATION VENTS.
CAUTION
RISK OF ELECTRIC SHOCK
DO NOT OPEN
CAUTION: TO REDUCE THE RISK OF ELECTRIC SHOCK, DO NOT REMOVE SCREWS. NO USER-SERVICEABLE PARTS INSIDE.
REFER SERVICING TO QUALIFIED SERVICE PERSONNEL.
The lightning flash with arrowhead symbol, within an equilateral triangle, is intended to alert the user to the presence of uninsulated “dangerous voltage” within the product’s enclosure that may be of sufficient magnitude to constitute a risk of electric shock to persons.
The exclamation point within an equilateral triangle is intended to alert the user to the presence of important operating and maintenance (servicing) instructions in the literature accompanying the appliance.
DANGER - VISIBLE AND INVISIBLE LASER RADIATION WHEN OPEN.
|
AVOID DIRECT EXPOSURE TO BEAM. |
(FDA 21 CFR) |
CAUTION - VISIBLE AND INVISIBLE LASER RADIATION WHEN OPEN. |
||
|
AVOID EXPOSURE TO BEAM. |
(IEC60825-1) |
ATTENTIONRAYONNEMENT LASER VISIBLE ET INVISIBLE EN CAS D’OUVERTURE. |
||
|
EXPOSITION DANGEREUSE AU FAISCEAU. |
|
ADVARSELSYNLIG OG USYNLIG LASERSTRÅ LING VED Å BNING. |
||
|
UNDGÅ UDSÆ TTELSE FOR STRÅ LING. |
|
VARO! |
- AVATTAESSA OLET ALTTIINA NÄ KYVÄÄ |
JA NÄ KYMÄ TÖ N |
|
LASERSÄ TEILYLLE. Ä LÄ KATSO SÄ TEESEEN. |
|
VARNING - SYNLIG OCH OSYNLIG LASERSTRÅ LNING NÄ R DENNA DEL Ä R Ö PPNAD. BETRAKTA EJ STRÅ LEN.
ADVARSEL - SYNLIG OG USYNLIG LASERSTRÅ LING NÅ R DEKSEL Å PNES.
UNNGÅ EKSPONERING FOR STRÅ LEN.
VORSICHT - SICHTBARE UND UNSICHTBARE LASERSTRAHLUNG, WENN ABDECKUNG
GEÖ FFNET. NICHT DEM STRAHL AUSSETZEN.
-


-
RQLS0233 (Inside of product)
THE FOLLOWING APPLIES ONLY IN THE U.S.A.:
CAUTION:
This equipment has been tested and found to comply with the limits for a Class B digital device, pursuant to Part 15 of the
FCC Rules.
These limits are designed to provide reasonable protection against harmful interference in a residential installation. This equipment generates, uses and can radiate radio frequency energy and, if not installed and used in accordance with the instructions, may cause harmful interference to radio communications. However, there is no guarantee that interference will not occur in a particular installation. If this equipment does cause harmful interference to radio or television reception, which can be determined by turning the equipment off and on, the user is encouraged to try to correct the interference by one or more of the following measures:
≥Reorient or relocate the receiving antenna.
≥Increase the separation between the equipment and receiver.
≥Connect the equipment into an outlet on a circuit different from that to which the receiver is connected.
≥Consult the dealer or an experienced radio/TV technician for help.
Any unauthorized changes or modifications to this equipment would void the user’s authority to operate this device.
This device complies with Part 15 of the FCC Rules. Operation is subject to the following two conditions: (1) This device may not cause harmful interference, and (2) this device must accept any interference received, including interference that may cause undesired operation.
Notice:
This product has parts that contains a small amount of mercury. It also contains lead in some components. Disposal of these materials may be regulated in your community due to environmental considerations.
For disposal or recycling information please contact your local authorities, or the Electronics Industries Alliance: <http://www.eiae.org.>
RQT6220
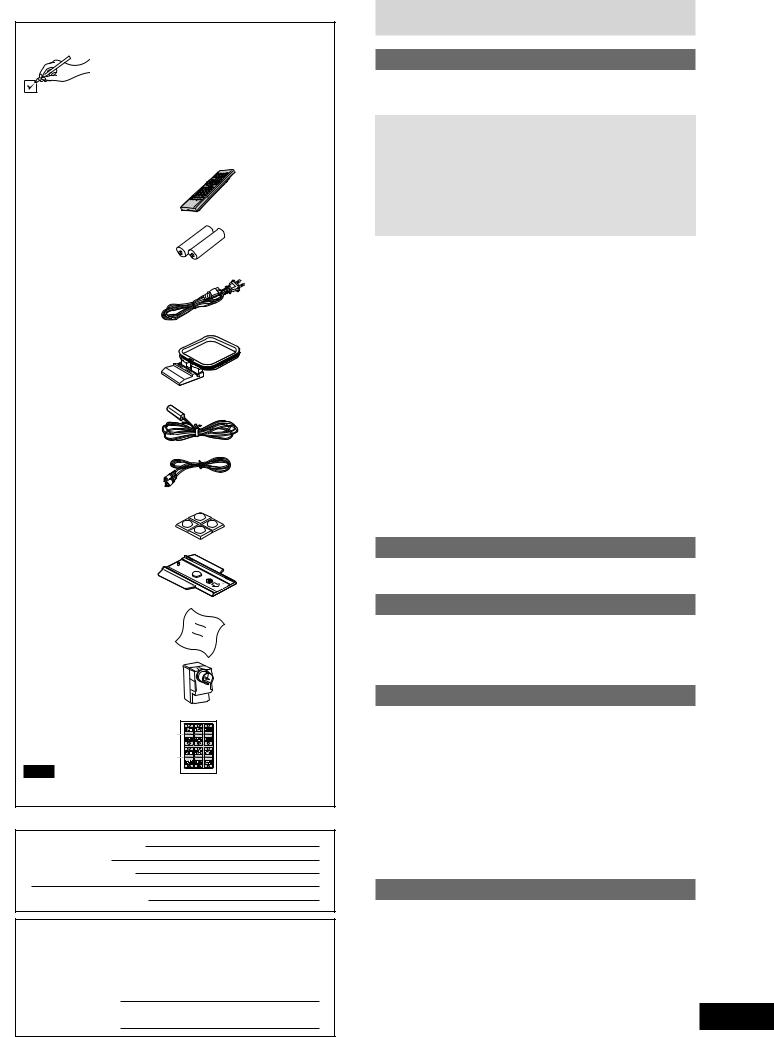
Accessories
Please check and identify the supplied accessories. Use numbers indicated in parentheses when asking for replacement parts.
(Only for U.S.A.)
To order accessories contact 1-800-332-5368 or web site (http://www.panasonic.com). (Only for Canada)
To order accessories, call the dealer from whom you have made your purchase.
∏ 1 Remote control
(N2QAJB000055)
∏ 2 Batteries
for remote control
∏ 1 AC power supply cord
(RJA0065-1D)
∏ 1 AM loop antenna
(N1DAAAA00001)
∏1 FM indoor antenna
(N1EAYY000002)
∏1 Video cable
(RJL1P016B15A)
∏ 1 Sheet of feet (4 feet) for main unit (RFA0631A-K)
∏ 1 Stand
for main unit (RYK1173-H)
∏ 1 Cleaning cloth for main unit (RFE0088-1)
∏1 Antenna plug
(K2RC021B0001)
∏1 Sheet of speaker-cord stickers
Note
The included AC power supply cord is for use with this unit only.
Do not use it with other equipment.
User memo:
DATE OF PURCHASE
DEALER NAME
DEALER ADDRESS
TELEPHONE NUMBER
The model number and serial number of this product can be found on either the back or the bottom of the unit.
Please note them in the space provided below and keep for future reference.
MODEL NUMBER
SERIAL NUMBER
Table of contents
Getting started
Accessories . . . . . . . . . . . . . . . . . . . . . . . . . . . . . . 13 IMPORTANT SAFETY INSTRUCTIONS . . . . . . . . 4 Disc information . . . . . . . . . . . . . . . . . . . . . . . . . . 4
Simple setup
. . . . . . . . . . . . . . . . . . . . . . . . . . . .STEP 1 Setup |
5 |
|
|
STEP 2 Locating . . . . . . . . . . . . . . . . . . . . . . . . . . |
5 |
|
|
STEP 3 Speakers . . . . . . . . . . . . . . . . . . . . . . . . . |
6 |
|
|
|
|||
STEP 4 Television . . . . . . . . . . . . . . . . . . . . . . . . |
7 |
|
started |
STEP 5 Antennas and AC power supply cord |
8 |
|
|
|
|
||
STEP 6 The remote control . . . . . . . . . . . . . . . . . |
9 |
|
|
STEP 7 Selecting TV screen type . . . . . . . . . . . . |
9 |
|
Getting |
Disc operations |
10 |
|
|
Control reference guide . . . . . . . . . . . . . . . . . . . . |
|
|
|
|
|
|
|
Discs— Basic play . . . . . . . . . . . . . . . . . . . . . . . . . 11
Playing MP3 . . . . . . . . . . . . . . . . . . . . . . . . . . . . . . . . . . . . . . 12 Resume function . . . . . . . . . . . . . . . . . . . . . . . . . . . . . . . . . . . 12 Skipping chapters or tracks . . . . . . . . . . . . . . . . . . . . . . . . . . . 13 Fast forward and rewind—SEARCH . . . . . . . . . . . . . . . . . . . . 13 Slow-motion play . . . . . . . . . . . . . . . . . . . . . . . . . . . . . . . . . . . 13 Frame-by-frame viewing . . . . . . . . . . . . . . . . . . . . . . . . . . . . . 13
Starting play from a selected track or title . . . . . . . . . . . . . . . . 13 Cinema/Dialogue Enhancer . . . . . . . . . . . . . . . . . . . . . . . . . . 13
Changing soundtracks, subtitle languages
and angles . . . . . . . . . . . . . . . . . . . . . . . . . . . . . 14 Discs— Convenient functions . . . . . . . . . . . . . . . 15
A-B repeat play/Repeat play . . . . . . . . . . . . . . . . . . . . . . . . . . 15 All group play/Program play . . . . . . . . . . . . . . . . . . . . . . . . . . 16 Random play . . . . . . . . . . . . . . . . . . . . . . . . . . . . . . . . . . . . . . 17 Selecting groups to play . . . . . . . . . . . . . . . . . . . . . . . . . . . . . 17 Selecting still pictures—Page Skip . . . . . . . . . . . . . . . . . . . . . 17
Using On-Screen Menu Icons . . . . . . . . . . . . . . . 18
Common procedures/Shuttle screen . . . . . . . . . . . . . . . . . . . . 18 Disc information/Unit information . . . . . . . . . . . . . . . . . . . . . . 19
Radio operations
The radio: manual tuning . . . . . . . . . . . . . . . . . . . 20 The radio: preset tuning . . . . . . . . . . . . . . . . . . . . 21
Sound quality/sound field operations
Sound field . . . . . . . . . . . . . . . . . . . . . . . . . . . . . . . 22
DOLBY DIGITAL and DTS/DOLBY PRO LOGIC . . . . . . . . . . . 23 SUPER SURROUND . . . . . . . . . . . . . . . . . . . . . . . . . . . . . . . 24 Changing sound field and quality . . . . . . . . . . . . . . . . . . . . . . 24 Adjusting the bass . . . . . . . . . . . . . . . . . . . . . . . . . . . . . . . . . . 24
Other functions
Convenient functions . . . . . . . . . . . . . . . . . . . . . . 25
Muting the volume . . . . . . . . . . . . . . . . . . . . . . . . . . . . . . . . . . 25 Turning the display’s light off . . . . . . . . . . . . . . . . . . . . . . . . . . 25 Adjusting the display’s contrast . . . . . . . . . . . . . . . . . . . . . . . . 25 Operating a television . . . . . . . . . . . . . . . . . . . . . . . . . . . . . . . 25 The sleep timer . . . . . . . . . . . . . . . . . . . . . . . . . . . . . . . . . . . . 25 Using headphones . . . . . . . . . . . . . . . . . . . . . . . . . . . . . . . . . 25
Changing settings . . . . . . . . . . . . . . . . . . . . . . . . . 26
Common procedures . . . . . . . . . . . . . . . . . . . . . . . . . . . . . . . . 27 Entering a password (Ratings)/Changing the delay time . . . . 28 Language code list . . . . . . . . . . . . . . . . . . . . . . . . . . . . . . . . . 28
Optional audio/video equipment connections . . 29 Optional antenna connections . . . . . . . . . . . . . . . 29
Reference
Troubleshooting guide . . . . . . . . . . . . . . . . . . . . . 30 Maintenance . . . . . . . . . . . . . . . . . . . . . . . . . . . . . 31 Glossary . . . . . . . . . . . . . . . . . . . . . . . . . . . . . . . . . 32 Disc handling . . . . . . . . . . . . . . . . . . . . . . . . . . . . . 32 Specifications . . . . . . . . . . . . . . . . . . . . . . . . . . . . 33 Limited Warranty (U.S.A.) . . . . . . . . . . . . . . . . . . . 34 Product Service . . . . . . . . . . . . . . . . . . . . . . . . . . . 35
3
RQT6220
Getting started
4
IMPORTANT SAFETY INSTRUCTIONS
Read these operating instructions carefully before using the unit. Follow the safety instructions on the unit and the applicable safety instructions listed below. Keep these operating instructions handy for future reference.
1)Read these instructions.
2)Keep these instructions.
3)Heed all warnings.
4)Follow all instructions.
5)Do not use this apparatus near water.
6)Clean only with dry cloth.
7)Do not block any ventilation openings. Install in accordance with the manufacturer’s instructions.
8)Do not install near any heat sources such as radiators, heat registers, stoves, or other apparatus (including amplifiers) that produce heat.
9)Do not defeat the safety purpose of the polarized or ground- ing-type plug. A polarized plug has two blades with one wider than the other. A grounding-type plug has two blades and a third grounding prong. The wide blade or the third prong are provided for your safety. If the provided plug does not fit into your outlet, consult an electrician for replacement of the obsolete outlet.
10)Protect the power cord from being walked on or pinched particularly at plugs, convenience receptacles, and the point where they exit from the apparatus.
Disc information
11)Only use attachments/accessories specified by the manufacturer.
12)Use only with the cart, stand, tripod, bracket, or table specified by the manufacturer, or sold with the apparatus. When a cart is used, use caution when moving the cart/apparatus combination to avoid injury from tip-over.
13)Unplug this apparatus during lightning storms or when unused for long periods of time.
14)Refer all servicing to qualified service personnel. Servicing is required when the apparatus has been damaged in any way, such as power-supply cord or plug is damaged, liquid has been spilled or objects have fallen into the apparatus, the apparatus has been exposed to rain or moisture, does not operate normally, or has been dropped.
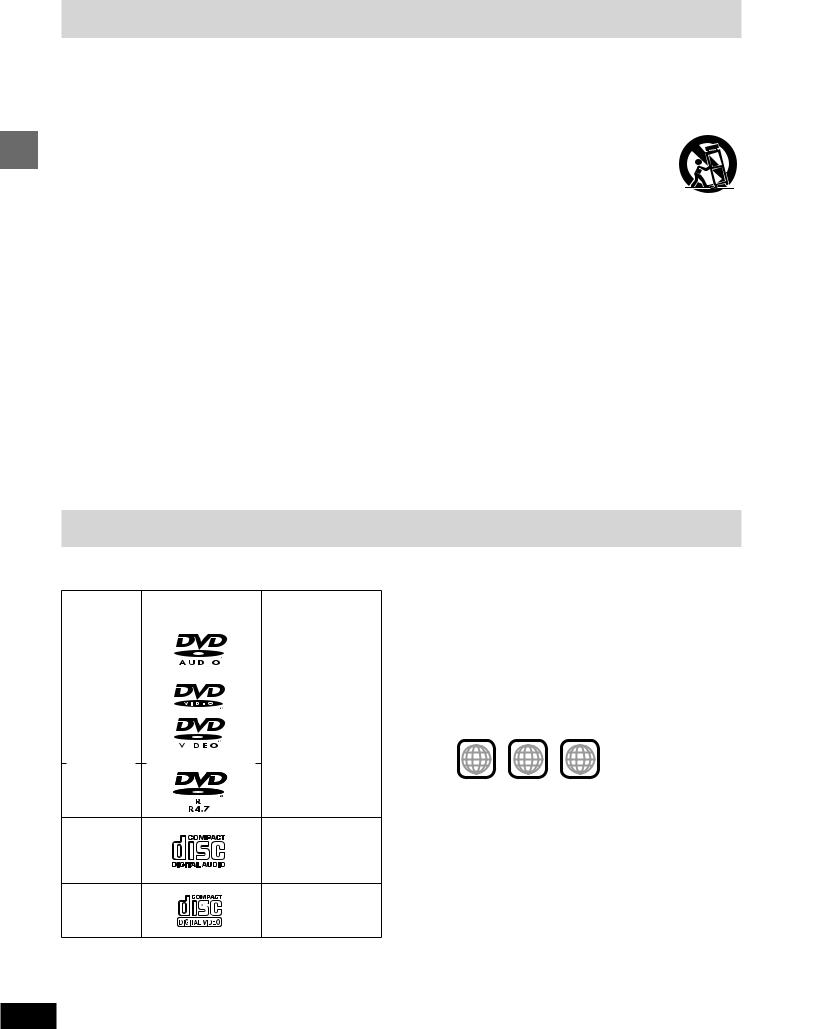
∫ Discs that can be played
Disc type |
Logo |
|
|
|
|
|
|
|
|
|
|
|
Indication used in |
||||||||||||||||||
|
|
|
|
|
|
|
|
|
|
|
|
|
|
|
|
|
|
|
|
|
|
|
|
|
|
|
|
|
|
|
instructions |
|
|
|
|
|
|
|
|
|
|
|
|
|
|
|
|
|
|
|
|
|
|
|
|
|
|
|
|
|
|
|
|
DVD-Audio |
|
|
|
|
|
|
|
|
|
|
|
|
|
|
|
|
|
|
|
[DVD-A] |
|||||||||||
|
|
|
|
|
|
|
|
|
|
|
|
|
|
|
|
|
|
|
|
|
|
|
|
|
|
|
|
|
|
|
|
|
|
|
|
|
|
|
|
|
|
|
|
|
|
|
|
|
|
|
|
|
|
|
|
|
|
|
|
|
|
|
|
|
|
|
|
|
|
|
|
|
|
|
|
|
|
|
|
|
|
|
|
|
|
|
|
|
|
|
|
|
|
|
|
DVD-Video |
|
|
|
|
|
|
|
|
|
|
|
|
|
|
|
|
|
|
|
[DVD-V] |
|||||||||||
|
|
|
|
|
|
|
|
|
|
|
|
|
|
|
|
|
|
|
|
|
|
|
|
|
|
|
|
|
|
|
|
|
|
|
|
|
|
|
|
|
|
|
|
|
|
|
|
|
|
|
|
|
|
|
|
|
|
|
|
|
|
|
|
|
|
|
|
|
|
|
|
|
|
|
|
|
|
|
|
|
|
|
|
|
|
|
|
|
|
|
|
|
|
|
|
DVD-R |
|
Audio CD |
[CD] |
|
(Including CD-R/RW |
|
and discs recorded |
|
with MP3) |
Video CD |
[VCD] |
∫ Discs that cannot be played
PAL discs (the audio on DVD-Audio can be played), DVD-ROM, DVD-RAM, CD-ROM, CDV, CD-G, iRW, DVD-RW, CVD, SVCD,
SACD, Divx Video Discs and Photo CD.
∫ Region Management Information
(DVD-Video only)
This unit responds to the Region Management Information recorded on DVD-Video. This unit’s region number is “ 1” . You cannot play the disc if the region number on the DVD-Video does not correspond to the region number on the unit.
You can play discs with labels containing the region number “ 1” and “ ALL” . Read the disc’s instructions carefully.
e.g. |
12 |
|
1 ALL |
4 |
|
|
|
∫ Playing DVDs and Video CDs
The producer of these discs can control how they are played so you may not always be able to control play as described in these operating instructions. Read the disc’s instructions carefully.
∫ CD-R and CD-RW discs
This unit can play CD-DA (digital audio) and video CD format audio CD-R and CD-RW that have been finalized (a process that enables CD-R/CD-RW players to play audio CD-R and CD-RW) upon completion of recording.
It may not be able to play some CD-R or CD-RW due to the condition of the recording.
∫ DVD-R discs
Panasonic DVD-R recorded and finalized on a Panasonic DVD video recorder are played as DVD-Video on this unit.
It may not be possible to play these discs in all cases due to the type of disc or condition of the recording.
RQT6220
Simple setup
STEP1 Setup
Stand |
Sheet of feet |
This unit can be setup standing or lying down.
Prepare the unit as follows according to the setup you choose. Turn the unit off before changing the setup.
Standing
Attach the stand to the unit.
1 Slot the stand onto the base of the unit with the thinner end to the front.
Hole
Hole for screw
Projection
Front
Screw
2 Fix the stand in place with the screw.
Flat-headed |
screwdriver |
Lying down
Attach the feet to the base of the unit (left side when standing).
Do not set up the unit upside down as this can cause malfunction.
Logo to the left
/
Attach the feet inside the guides.
The display changes automatically to suit the setup you choose.
After setup, turn the unit on and check that the display is correct. If you set the unit up incorrectly, “SETTING ERROR/CHANGE
SETTING” flashes on the unit’s display.
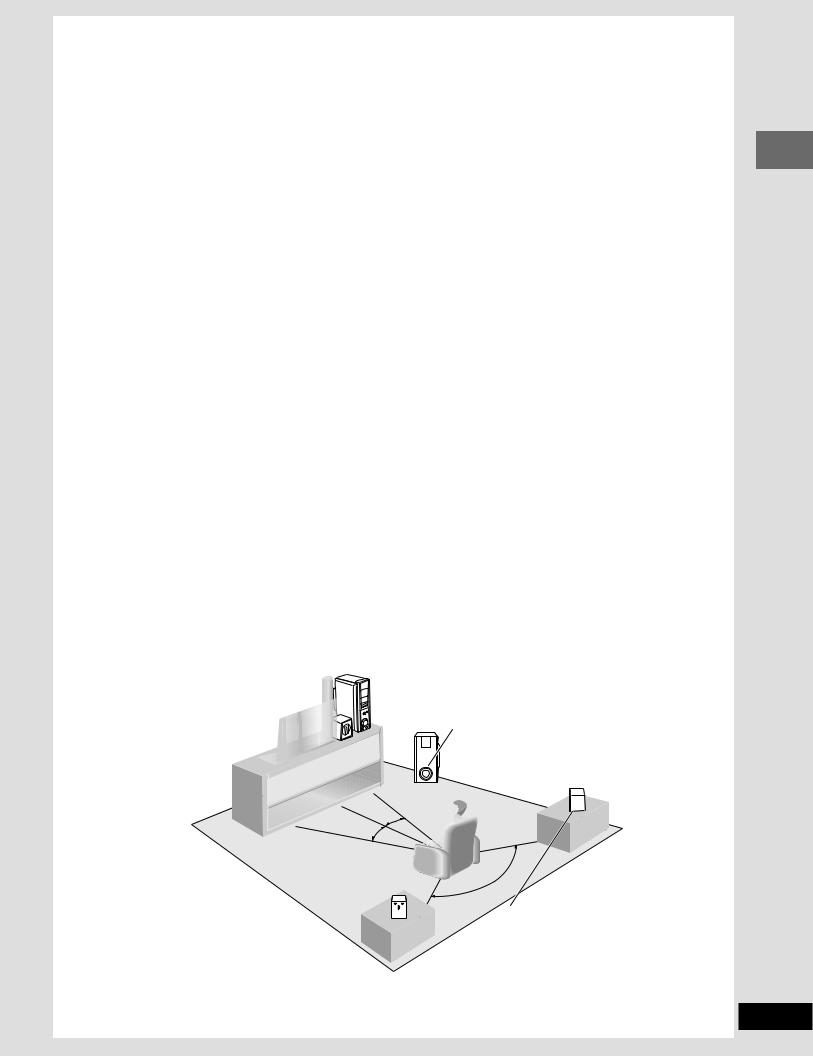
STEP2 Locating
≥Use only supplied speakers
Using other speakers can damage the unit and sound quality will be negatively affected.
≥Set the speakers up on an even surface to prevent them from falling. Take proper precautions to prevent the speakers from falling if you cannot set them up on an even surface.
≥Place the front, center, and surround speakers at approximately the same distance from the seating position. The angles in the diagram are approximate.
≥Use the speakers with the short cords (SB-FDM3) for the front and center, and the ones with the long cords (SB-RDM3) for the surround
speakers.
Center speaker (5) SB-FDM3 

≥You can also put this speaker directly under the television.
≥Do not place the center speaker on the main unit as sound quality will
be affected.
≥Vibration caused by the center speaker can disrupt the picture if it is placed directly on the television. Put the center speaker on a rack or shelf.
Front speakers [Left (1)/Right (2)]
SB-FDM3
Main unit
Note
Keep your speakers at least 10 mm (13/32q) away from the system for proper ventilation.
Leave 30-mm (13⁄16q) clearance at the rear of the unit.
Subwoofer (6) SB-WDM3
Place near the television, on the floor or a sturdy shelf so that it won’t cause vibration.
≥A woofer unit is located on the side of the subwoofer.
Leave 10-cm (4q) clearance for it to be effective.
˚ 30
˚ 30
120˚

 Surround speakers [Left (3)/Right (4)]
SB-RDM3
Place either side of the seating position, or slightly to the rear, about 1 meter (3 feet) higher than ear level.
Positioning for best effect
How you set up your speakers can affect the bass and the sound field. Note the following points. ≥Place speakers on flat secure bases.
≥Placing speakers too close to floors, walls, and corners can result in excessive bass. Cover walls and windows with thick curtain.
Simple setup
5
RQT6220
STEP3 Speakers
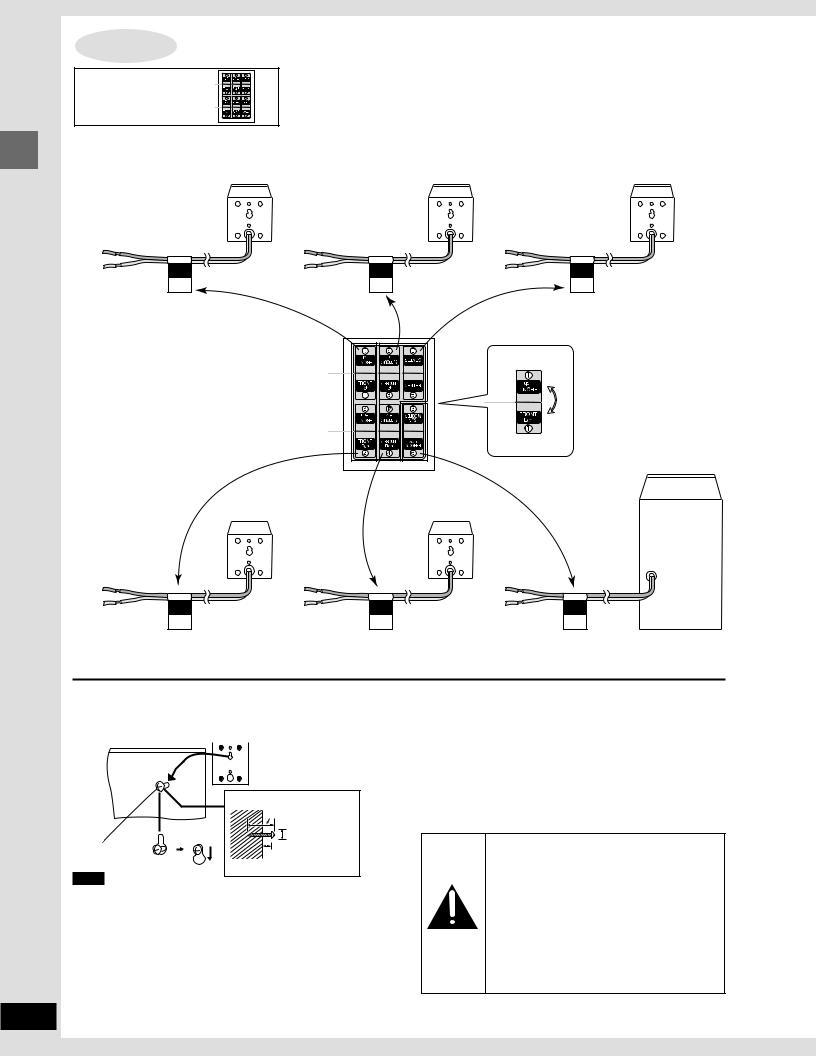
Sheet of speakercord stickers
1 Attaching the stickers to the speaker cords
Attach the speaker-cord stickers to make connection easier. |
|
|
1 Front (L) |
3 Surround (L) |
5 Center |
Simple setup
FRONT |
SURROUND |
CENTER |
|
Lch |
Lch |
||
|
|||
1 |
3 |
5 |
e.g. 1 Front (L)
6 Subwoofer
2 Front (R) |
4 Surround (R) |
||||
|
|
|
|
|
|
FRONT |
SURROUND |
SUB |
Rch |
Rch |
WOOFER |
2 |
4 |
6 |
Attaching to a wall
Front and surround speakers can be attached to a wall.
Set the speaker onto screw and slide through bracket to lock into position. 
|
30–35 mm |
|
(13⁄16q–13⁄8q) |
|
7.5–9.5 mm |
Screw |
(19⁄64q–3⁄8q) |
|
|
(not included) |
7–9 mm |
Note |
(9⁄32q–23⁄64q) |
|
The wall or pillar on which the speakers are to be attached should be capable of supporting 5 kg (11 Ib.) per screw.
If irregular coloring occurs on your television
These speakers are designed to be used close to a television, but the picture may be affected with some televisions and setup combinations.
If this occurs, turn the television off for about 30 minutes.
The television’s demagnetizing function should correct the problem. If it persists, move the speakers further away from the
6 television.
Notes on speaker use
≥You can damage your speakers and shorten their useful life if you play sound at high levels over extended periods.
≥Reduce the volume in the following cases to avoid damage. –When playing distorted sound.
–When the speakers are receiving howling from a microphone or record player, noise from FM broadcasts, or continuous signals from an oscillator, test disc, or electronic instrument.
–When adjusting the sound quality. –When turning the unit on or off.
Caution
≥Use the speakers only with the recommended system. Failure to do so may lead to damage to the amplifier and/or the speakers, and may result in the risk of fire. Consult a qualified service person if damage has occurred or if you experience a sudden change in performance.
≥Do not attempt to attach these speakers to walls using methods other than those described in this manual.
RQT6220
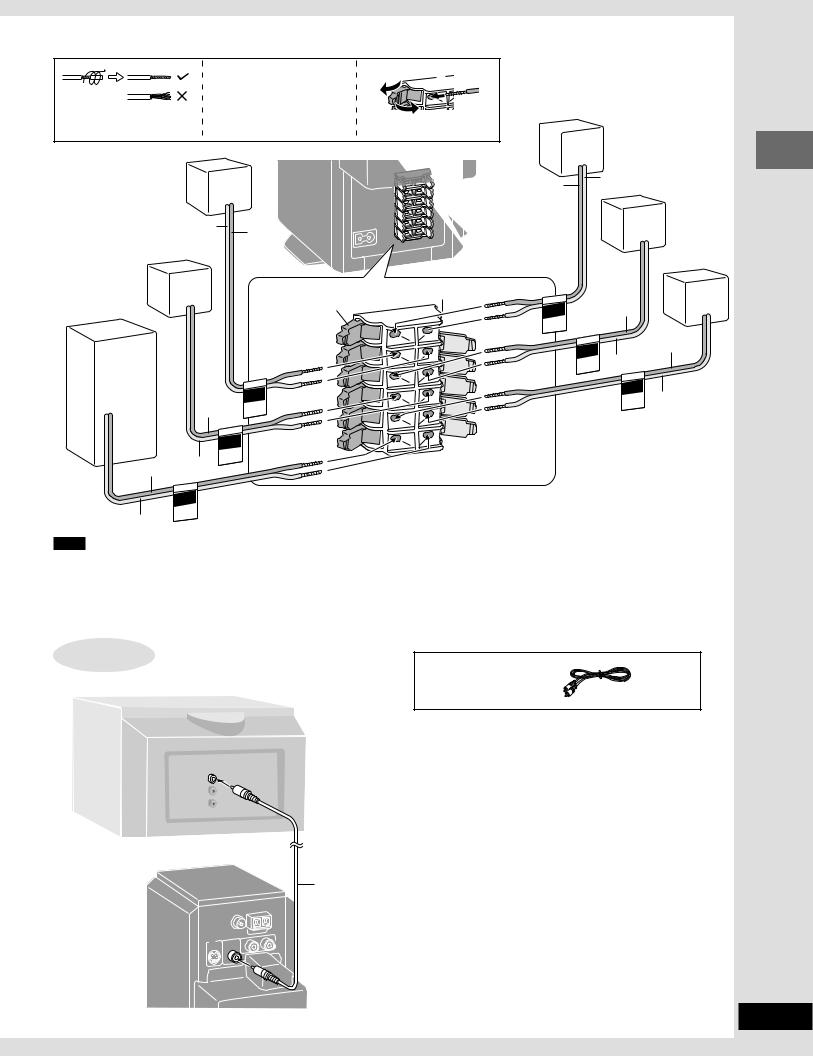
2 Connecting: Connect in numeric order, top to bottom.
Copper Red (i) terminals
Silver Gray (j) terminals
2 Front (R)
|
Silver |
Copper |
|
|
|
|
|
|
|
4 Surround (R) |
|
|
|
|
6 Subwoofer |
|
|
|
Red |
|
|
|
FRONT |
|
|
|
FRONT |
SUR |
- |
|
|
Rch |
ROUND |
|
|
Copper |
2 |
||
|
|
|
||
|
|
|
|
|
|
SURROUND |
|
CENTER |
|
|
|
SUB |
- |
|
|
Rch |
|
||
|
4 |
|
|
|
|
|
WOOFER |
||
Copper |
Silver |
|
||
|
|
|
||
|
|
|
|
|
|
SUB |
|
|
|
|
WOOFER |
|
|
|
|
6 |
|
|
|
Silver
Note
≥Never short-circuit positive (i) and negative (j) speaker wires. ≥Be sure to connect only positive (copper) wires to positive (i) terminals and negative (silver) wires to negative (j) terminals.
Incorrect connection can damage the speakers.
1 2
3
Gray

 L
L
R
L
R
+-
1 Front (L)
Copper |
Silver |
|
3 Surround (L) |
||
|
5 Center
Lch |
Copper |
|
FRONT |
|
|
1 |
|
|
SURROUND |
|
Copper |
Lch |
Silver |
|
3 |
|
|
|
CENTER |
|
|
5 |
Silver |
≥After you have completed setup and connection, wind the excess cord and keep together with string.
STEP4 Television
|
Video cable |
|
Television |
|
(not included) |
|
≥You can connect through the S-VIDEO OUT terminal if your |
|
television has an S-VIDEO terminal ( page 29). |
VIDEO |
≥Connect directly to your television. |
IN |
Do not connect the unit through a video cassette recorder, be- |
|
|
|
cause the picture may not be played correctly due to the copy |
|
guard. |
Simple setup
Video cable
(included)
VIDEO
OUT
7
RQT6220
Simple setup
8
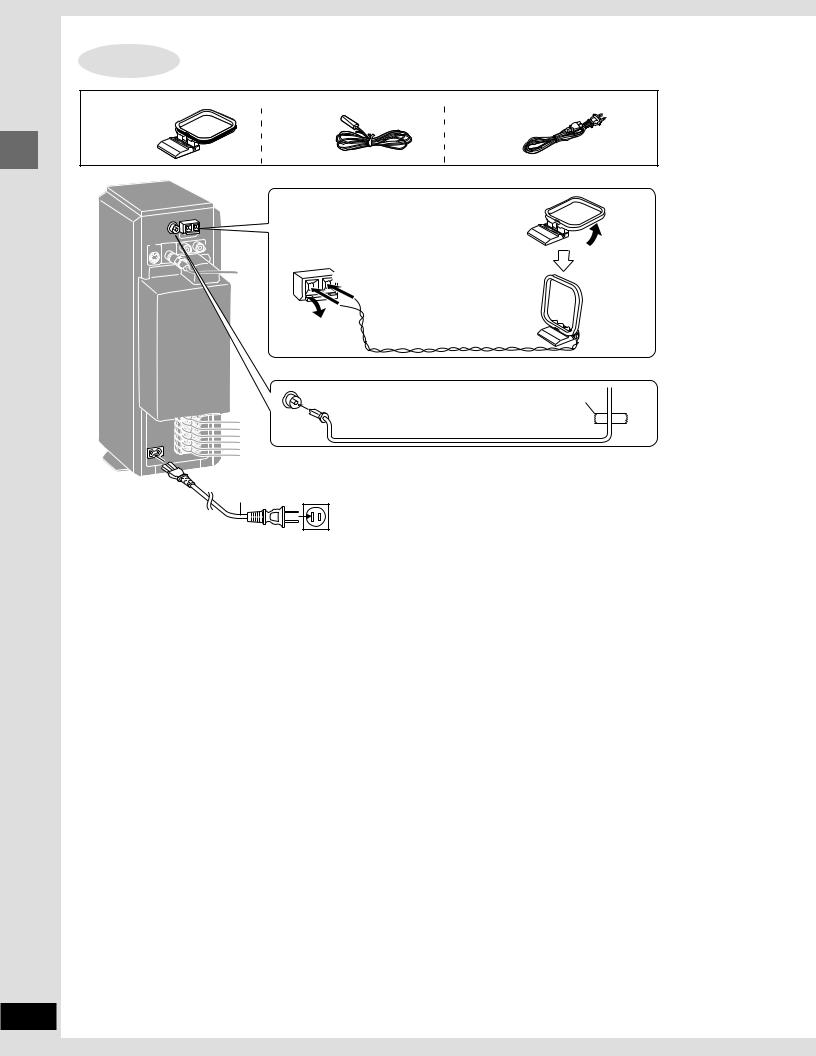
STEP5 Antennas and AC power supply cord
AM loop antenna |
|
FM indoor antenna |
|
AC power supply cord |
|
|
AM loop antenna
Stand the antenna up on its base.
2Keep loose antenna cord away
from other wires and cords.
1
FM indoor antenna Adhesive tape Fix the other end of the anten-
na where reception is best.
AC power supply cord
(included)
To household AC outlet (AC 120 V, 60 Hz)
Conserving power
The unit consumes power (approx. 0.5 W) even when it is turned off with
[Í]. To save power when the unit is not to be used for a long time, unplug it from the household AC outlet. Remember to reset the radio stations and any other memory items before using the unit again.
For your reference
Information you enter into the unit’s memory remains intact for up to a week after the AC power supply cord is disconnected.
Auto Power Off
The unit switches itself off after 30 minutes in the stop mode when the source is DVD/CD.
RQT6220
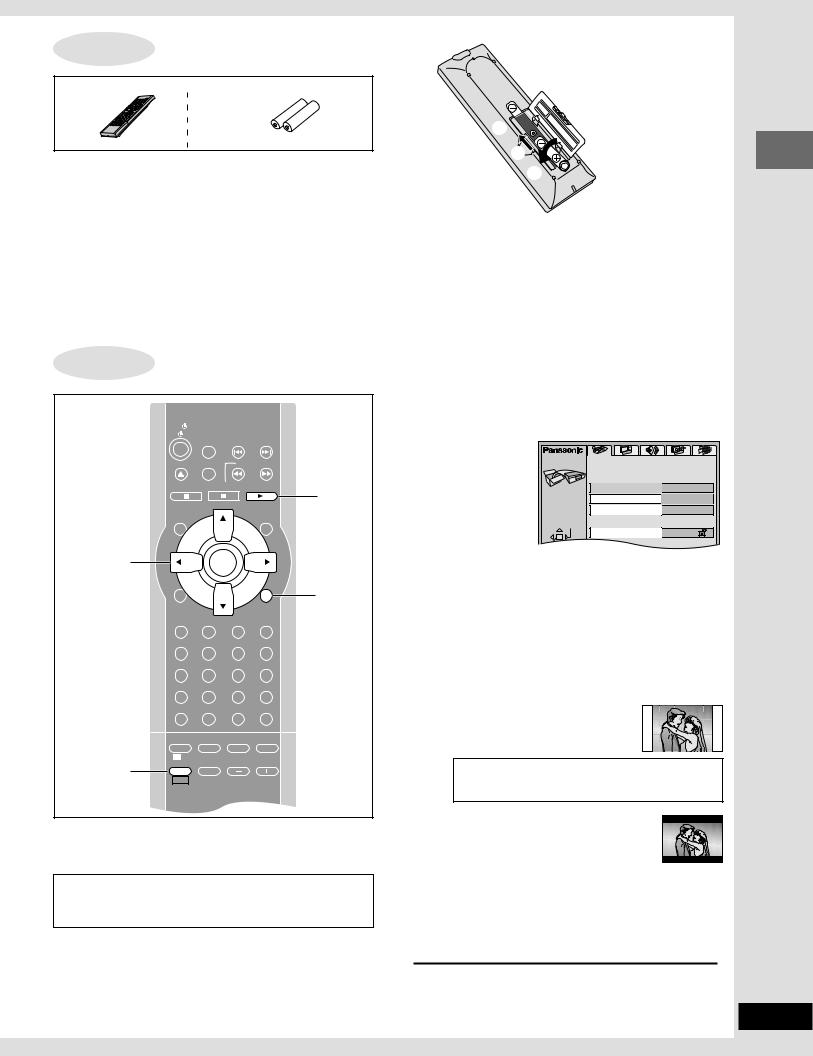
STEP6 The remote control
Remote control |
|
Batteries |
∫ Batteries
Do not;
≥mix old and new batteries.
≥use different types at the same time. ≥heat or expose to flame.
≥take apart or short circuit.
≥attempt to recharge alkaline or manganese batteries. ≥use batteries if the covering has been peeled off.
Mishandling of batteries can cause electrolyte leakage which can damage items the fluid contacts and may cause a fire.
Remove if the remote control is not going to be used for a long period of time. Store in a cool, dark place.
R6, AA, UM-3
1 2
2 
3 
≥Insert so the poles (iand j) match those in the remote control. ≥Do not use rechargeable type batteries.
∫ Use
Aim at the sensor, avoiding obstacles, at a maximum range of
7 m (23 feet) directly in front of the unit.
STEP7 Selecting TV screen type |
|
|
|||
|
|
|
2 Press [SHIFT] r [ACTION] to show |
||
TV |
TV/VIDEO |
XTV CH W |
the menus. |
|
|
|
TUNER/AUX |
X SKIP W |
|
|
|
|
P.MEMORY |
SLOW/SEARCH |
ACTION |
Disc |
|
STOP |
PAUSE |
DVD/CD |
1 |
Audio |
English |
|
|
|
Subtitle |
Automatic |
|
TOP MENU |
|
MENU |
|
Menus |
English |
|
|
|
|
||
|
|
|
SELECT |
Ratings |
Level 8 |
TEST |
|
CH |
|
||
|
|
|
|
||
|
|
SELECT |
|
|
|
3·4·5 |
|
ENTER |
|
|
3 Press [2, 1] to select the “ Video” |
|
|
LIGHT |
|
|
ACTION |
2·6 |
|
|
GUI DISPLAY |
|
|
RETURN |
tab. |
|
|
|
|
|
4 Press [3, 4] to select “ TV Aspect” |
||
|
SUBTITLE |
AUDIO |
PAGE |
GROUP |
|
|
|
ANGLE |
SLEEP |
|
|||
|
|
|
|
|
|
|
|
PROGRAM |
|
|
|
|
and press [ENTER]. |
|
|
1 |
2 |
3 |
|
5 Press [3, 4] to select the item and |
|
RANDOM |
|
|
|
|
|
|
|
4 |
5 |
6 |
|
|
|
REPEAT |
|
|
|
|
press [ENTER]. |
|
|
7 |
8 |
9 |
|
|
|
A-B REPEAT |
CANCEL |
0 |
S10 |
|
≥4:3 Pan&Scan (Factory preset) |
|
|
|
|
Select if you have a regular television |
||
|
|
|
|
|
|
|
|
S.SRND |
EQ |
CINEMA |
D.ENH |
|
and to view 16:9 software in the pan |
|
PL SUBWOOFER FM MODE |
MIX 2CH |
|
and scan style. |
||
2·6 |
|
|
||||
|
LEVEL |
|
|
|
16:9 software prohibited from being shown in the pan |
|
|
|
|
|
|
||
SHIFT |
MUTING |
VOLUME |
|
and scan style will appear in the letterbox style de- |
||
|
|
|
|
|
|
spite the setting here. |
|
|
|
|
|
|
≥4:3 Letterbox |
Remote control only |
|
|
|
|
|
Select if you have a regular television and |
|
|
|
|
|
to view 16:9 software in the letterbox style. |
|
Change the setting to suit your television. |
|
|
||||
|
|
≥16:9 |
||||
|
|
|
|
|
|
|
The menu language is set to English, but you can change it |
Select if you have a widescreen (16:9) television. |
|||||
Use the television’s screen modes to change the way the |
||||||
to French or Spanish ( page 26, Display—Menu Language). |
picture is shown. |
|||||
English is used in the examples. |
|
|
|
6 Press [SHIFT] r [ACTION] to end |
||
|
|
|
|
|
|
|
Preparation |
|
|
|
|
|
the settings. |
Turn on the television and select the appropriate video input on the |
|
|||||
television to suit the connections for the unit.
1 |
|
To return to the previous screen |
Press [1 DVD/CD] to turn on the unit. |
Press [RETURN]. |
|
|
The unit comes on automatically and “DVD/CD” is selected as the source.
Simple setup
9
RQT6220
|
Control reference guide |
|
||||
|
1 |
|
|
|
|
|
|
2 |
TV |
|
|
|
|
|
|
TV/VIDEO |
XTV CH W |
|
||
|
|
|
|
|||
|
3 |
|
TUNER/AUX |
X SKIP W |
C |
|
|
|
|
|
|
||
|
4 |
|
P.MEMORY |
SLOW/SEARCH |
D |
|
|
|
|
|
|
||
|
5 |
STOP |
PAUSE |
DVD/CD |
E |
|
started |
|
|
|
|
||
|
TOP MENU |
|
MENU |
F |
||
|
|
|
||||
|
6 |
|
|
|
|
G |
|
|
TEST |
|
|
CH |
|
Getting |
|
|
|
|
SELECT |
|
8 |
|
ENTER |
|
H |
||
|
7 |
|
|
|
||
|
|
LIGHT |
|
|
ACTION |
|
|
9 |
GUI DISPLAY |
|
RETURN |
I |
|
|
SUBTITLE |
AUDIO |
PAGE |
GROUP |
||
|
: |
ANGLE |
SLEEP |
J |
||
|
|
|
|
|
||
|
; |
PROGRAM |
|
|
|
|
|
|
1 |
2 |
3 |
|
|
|
< |
RANDOM |
|
|
|
|
|
|
4 |
5 |
6 |
K |
|
|
|
REPEAT |
|
|
|
|
|
= |
|
|
|
|
|
|
|
7 |
8 |
9 |
|
|
|
> |
A-B REPEAT CANCEL |
|
|
|
|
|
|
|
0 |
S10 |
L |
|
|
|
S.SRND |
EQ |
CINEMA |
D.ENH |
|
|
? |
M |
||||
|
PL |
SUBWOOFER FM MODE |
MIX 2CH |
|||
|
@ |
N |
||||
|
|
LEVEL |
|
|
||
|
A |
SHIFT |
MUTING |
VOLUME |
O |
|
|
|
|||||
|
B |
|
|
|
|
|
|
|
|
|
|
|
U |
|
P |
|
|
|
|
|
|
|
|
PL |
D |
|
|
|
Q |
|
TUNER/AUX |
DVD/CD |
|
|
|
|
|
|
|
||
|
5 |
|
|
|
|
E |
|
|
|
|
|
|
|
|
|
|
/ |
/ |
|
V |
|
|
|
|
|
|
|
|
|
|
POWER OPEN/CLOSE |
|
||
|
|
|
/I |
|
|
|
|
R |
|
|
|
|
4 |
|
|
|
|
|
|
|
|
|
|
VOLUME |
|
|
|
|
|
DOWN |
UP |
|
|
|
|
S |
|
|
|
|
|
|
|
|
PHONES |
|
|
|
|
T |
|
|
|
|
W |
10
|
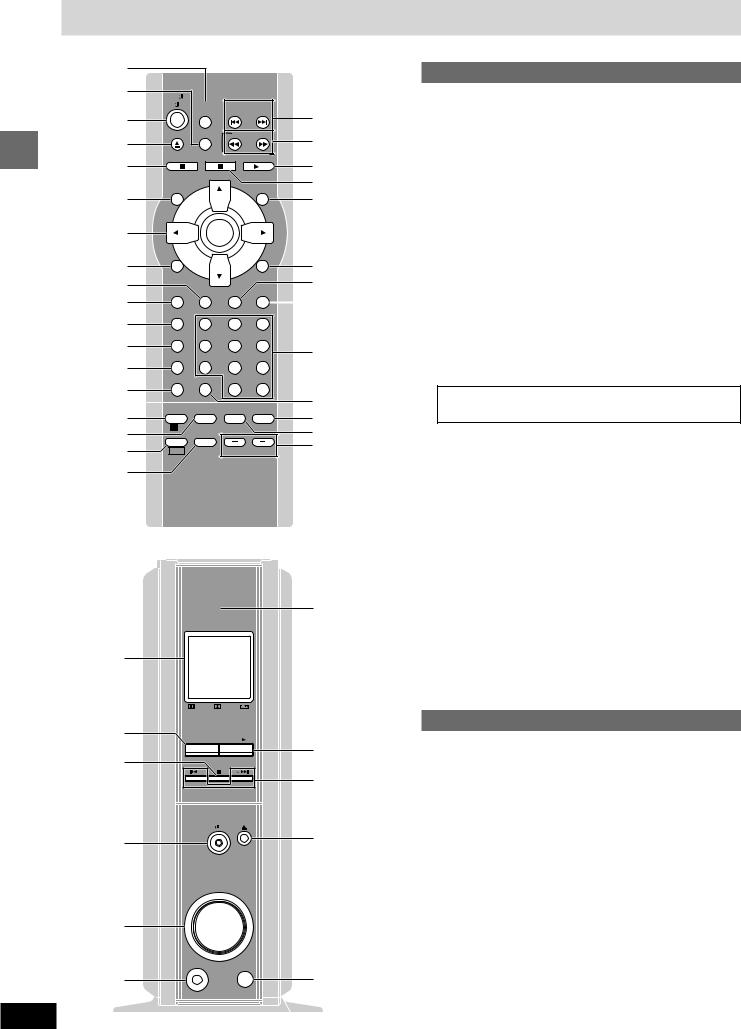
Remote control |
|
1 |
Tuner/Aux r TV/Video button |
|
|
[TUNER/AUX, TV/VIDEO] . . . . . . . . . . . . . . . . . . . . . . . |
20, 25 |
|
Pressing [TUNER/AUX] also turns the unit on. |
|
2 |
Position memory button [P.MEMORY] . . . . . . . . . . . . |
. . . 12 |
3 |
Power r TV power button [Í, TV Í] . . . . . . . . . . . . . |
11, 25 |
4 |
Open/close button [<] . . . . . . . . . . . . . . . . . . . . . . . . . . |
. . 11 |
5 |
Stop button [∫ STOP] . . . . . . . . . . . . . . . . . . . . . . . . . . . |
. . 11 |
6 |
Top menu r Test button [TOP MENU, TEST] . . . . . . . |
12, 23 |
7 |
Cursor buttons [3, 4, 2, 1]/Enter button [ENTER] . . |
. . 9 |
8 |
GUI display r Light button |
|
|
[GUI DISPLAY, LIGHT] . . . . . . . . . . . . . . . . . . . . . . . . . |
18, 25 |
9 |
Audio button [AUDIO] . . . . . . . . . . . . . . . . . . . . . . . . . . . |
. . 14 |
: Subtitle button [SUBTITLE] . . . . . . . . . . . . . . . . . . . . . . |
. . 14 |
|
; Program button [PROGRAM] . . . . . . . . . . . . . . . . . . . . |
16, 21 |
|
< Random button [RANDOM] . . . . . . . . . . . . . . . . . . . . . . |
. . 17 |
|
= Repeat button [REPEAT] . . . . . . . . . . . . . . . . . . . . . . . . |
. . 15 |
|
> A-B repeat button [A-B REPEAT] . . . . . . . . . . . . . . . . . . |
. . 15 |
|
? Super surround r Î Pro Logic button |
|
|
|
[S.SRND, ÎPL] . . . . . . . . . . . . . . . . . . . . . . . . . . . . . . . |
23, 24 |
@ Equalizer r Subwoofer level button |
|
|
|
[EQ, SUBWOOFER LEVEL] . . . . . . . . . . . . . . . . . . . . . . . |
. . 24 |
A Shift button [SHIFT] |
|
|
To use functions labeled in orange:
While pressing [SHIFT], press the corresponding button.
B Muting button [MUTING] . . . . . . . . . . . . . . . . . . . . . |
. . . . . . 25 |
C Skip, preset channel r TV channel buttons |
|
[: 9, X SKIP W, X TV CH W] . . . . . . . . . . . . . |
13, 21, 25 |
D Slow/search, tuning buttons |
|
[6, 5 SLOW/SEARCH] . . . . . . . . . . . . . . . . . . . |
. . . 13, 20 |
E Disc play button [1 DVD/CD] . . . . . . . . . . . . . . . . . |
. . . . . . . 9 |
Pressing [1DVD/CD] also turns the unit on. |
|
F Pause button [; PAUSE] . . . . . . . . . . . . . . . . . . . . |
. . . . . . 11 |
G Menu r Channel select button |
|
[MENU, CH SELECT] . . . . . . . . . . . . . . . . . . . . . . . . . |
. . . 12, 23 |
H Return r ACTION menu button [RETURN, ACTION] . . 9, 27 |
|
I Angle r Page button [ANGLE, PAGE] . . . . . . . . . |
. . . 14, 17 |
J Sleep r Group button [SLEEP, GROUP] . . . . . . . . |
. . . 17, 25 |
K Numbered buttons [1–9, 0, S10] . . . . . . . . . . . . . . |
. . . . . . 12 |
L Cancel button [CANCEL] . . . . . . . . . . . . . . . . . . . . |
. . . . . . 16 |
M Dialogue enhancer r Mix 2ch button |
|
[D.ENH, MIX 2CH] . . . . . . . . . . . . . . . . . . . . . . . . . . . |
. . . 13, 23 |
N Cinema r FM mode button [CINEMA, FM MODE] |
. . . 13, 20 |
O Volume buttons [s, r, VOLUME] . . . . . . . . . . . . . . . |
. . 11, 20 |
Main unit
Buttons 4, 5 and E function the same as the controls on the remote control.
P |
Display |
|
Q |
Tuner/Aux button [TUNER/AUX] . . . . . . . . . . . . . . . . . . . . |
20 |
RStandby/on switch [POWER Í/I]
Press to switch the unit from on to standby mode or vice versa.
In standby mode, the unit is still consuming a small amount of power.
Standby/on indicator
When the unit is connected to the AC mains supply, this indicator lights red in standby mode and lights green when the unit is
turned on.
S Volume control [VOLUME, DOWN, UP] . . . . . . . . . . . . 11, 20 T Headphone jack [PHONES] . . . . . . . . . . . . . . . . . . . . . . . . 25 U Disc compartment . . . . . . . . . . . . . . . . . . . . . . . . . . . . . . . . 11 V Skip, preset channel buttons [:/X, W/9] . . . . . . 13, 21 W Remote control signal sensor
RQT6220
Discs— Basic play
|
|
|
|
|
|
|
[DVD-A] [DVD-V] [CD] [VCD] |
|
|
||
|
|
|
|
|
|
|
Preparation |
|
|
|
|
|
|
|
|
|
|
|
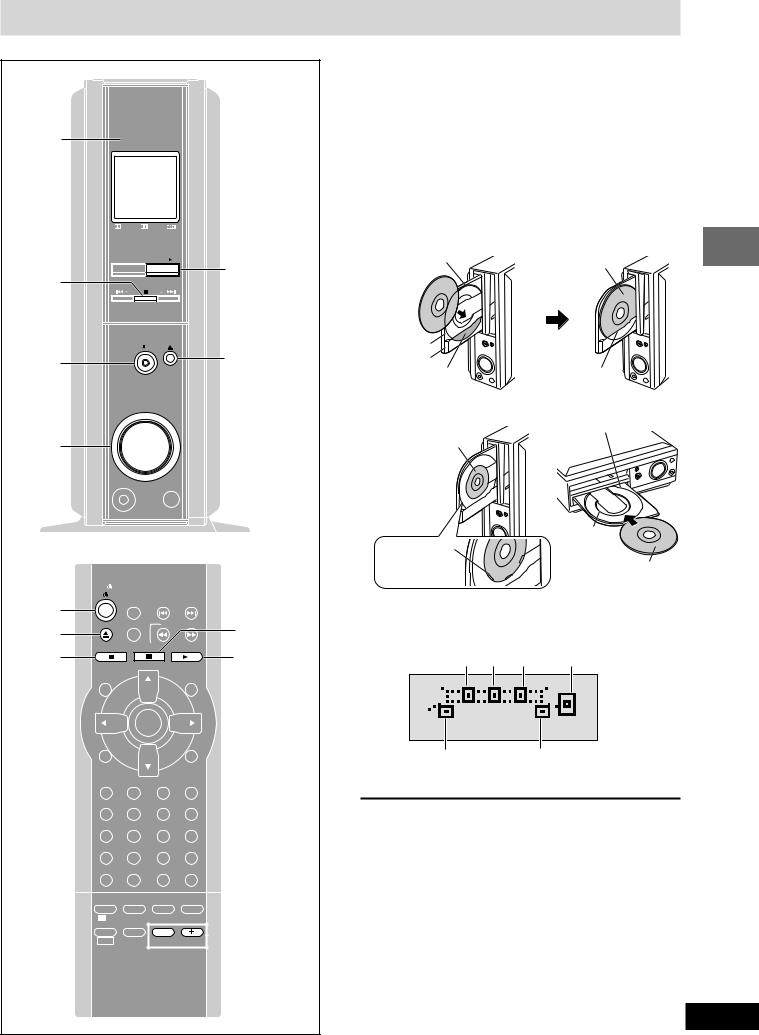
≥Turn on the television and select the appropriate video input on the |
||||
|
|
|
|
|
|
|
television to suit the connections for the unit. |
|
|||
2 |
|
|
|
|
|
|
≥Press [POWER Í/I] to turn on the unit. |
|
|
||
|
|
|
|
|
|
1 Press [DVD/CD 1] to select “ DVD/CD” |
|||||
|
|
|
|
|
|
|
|||||
|
|
|
|
|
|
|
|
as the source. |
|
|
|
|
|
|
|
|
|
|
2 Press [< OPEN/CLOSE] to open the |
||||
|
|
|
|
|
|
|
|
disc tray and place the disc. |
|
||
|
PL |
D |
|
|
|
|
|
|
|
|
|
|
|
|
|
|
|
|
|
Standing [12 cm (5q) disc] |
Label to |
|
|
|
|
|
|
|
|
1·3 |
|
12 cm (5q) |
|
|
|
|
TUNER/AUX |
DVD/CD |
|
|
|
the right |
|
||||
|
|
|
|
|
|
|
disc guide |
|
|
||
|
|
|
|
|
|
|
|
|
|
||
|
|
|
|
|
|
|
|
|
|
|
|
∫ |
|
|
|
|
|
|
|
|
|
|
|
|
|
/ |
|
/ |
|
|
|
|
|
|
|
|
|
|
/I |
OPEN/CLOSE |
|
|
Disc tray |
|
|
|
|
|
|
POWER |
2 |
|
|
|
|
|
|||
POWER |
|
|
|
|
|
|
Sub tray |
|
|
|
|
Í/I |
|
|
|
|
|
|
|
Insert into the |
|
||
|
|
|
|
|
|
|
|
|
pocket. |
|
|
|
|
VOLUME |
|
|
|
|
Standing [8 cm (3q) disc] |
Lying down |
|||
|
DOWN |
|
|
UP |
|
|
|
|
12 cm (5q) disc guide |
||
|
|
|
|
|
|
|
|
Label to |
|||
4 |
|
|
|
|
|
|
|
|
|
|
|
|
|
|
|
|
|
|
the right |
|
|
|
|
|
|
|
|
|
|
|
|
|
|
|
|
|
PHONES |
|
|
|
|
|
|
|
|
|
|
|
|
|
|
|
|
|
|
|
|
8 cm (3q) |
|
|
|
|
|
|
|
|
|
Insert inside the |
|
disc guide |
|
|
|
|
|
|
|
|
|
|
Insert inside |
|
|
|
|
|
|
|
|
|
|
guides. |
|
Label up. |
|
|
|
|
|
|
|
|
|
|
the guides. |
||
|
|
|
|
|
|
|
|
|
|
||
|
TV |
TV/VIDEO |
|
XTV CH W |
|
|
|
|
|
|
|
|
|
|
|
|
|
|
|
|
|||
Í |
TUNER/AUX |
X SKIP W |
|
|
Press [< OPEN/CLOSE] again to close and start play. |
||||||
|
|
|
|
|
; PAUSE |
3 If play doesn’t start after step 2 |
|
|
|||
2 |
P.MEMORY |
SLOW/SEARCH |
|
|
|||||||
|
|
|
|
|
|
||||||
STOP |
PAUSE |
DVD/CD |
1·3 |
|
Press [DVD/CD 1]. |
|
|
||||
∫ STOP |
|
|
|
|
|
|
Front (L) |
Center Front (R) |
Subwoofer |
|
|
|
TOP MENU |
|
|
|
MENU |
|
|
|
|
|
|
|
TEST |
|
|
|
CH |
|
|
|
|
|
|
|
|
|
|
|
SELECT |
|
|
|
|
|
|
|
|
ENTER |
|
|
|
|
|
|
|
||
|
LIGHT |
|
|
|
ACTION |
|
|
Surround (L) |
Surround (R) |
|
|
|
|
|
|
|
|
|
|
|
|
||
|
GUI DISPLAY |
|
|
|
RETURN |
|
4 |
Adjust the volume. |
|
|
|
|
|
|
|
PAGE |
GROUP |
|
|
|
|||
|
SUBTITLE |
AUDIO |
|
ANGLE |
SLEEP |
|
|
|
|||
|
|
|
|
|
|
|
|
||||
|
PROGRAM |
|
|
|
|
|
∫ When “ D.MIX” is flashing ( page 23) |
|
|||
|
|
1 |
|
2 |
3 |
|
|
||||
|
RANDOM |
|
|
|
|
|
∫ One touch play |
|
|
|
|
|
|
4 |
|
5 |
6 |
|
|
|
|
||
|
REPEAT |
7 |
|
8 |
9 |
|
When a disc is loaded and the unit is off, press [DVD/CD 1]. |
||||
|
A-B REPEAT |
|
|
The unit comes on and starts play. |
|
|
|||||
|
CANCEL |
|
|
|
|
|
|
|
|
|
|
|
|
|
|
0 |
S10 |
|
∫ To stop play |
|
|
|
|
|
S.SRND |
EQ |
|
CINEMA |
D.ENH |
|
Press [∫] ( page 12, Resume function). |
|
|
||
|
|
|
|
|
|
|
|
||||
PL |
SUBWOOFER FM MODE MIX 2CH |
|
|
∫ To pause play |
|||
|
LEVEL |
|
|
|
|
|
Press [;] during play. |
|
|
|
|
|
|
|
|
SHIFT |
MUTING |
|
|
VOLUME |
4 |
Press [DVD/CD 1] to restart play. |
|
|
|
|
|
|
|||
|
|
|
|
|
|||
∫ Auto standby
The unit switches to standby mode after about 30 minutes in the stop mode. Note that it may be switched to standby earlier by the sleep timer ( page 25).
Disc operations
11
RQT6220
Discs— Basic play
|
TV |
TV/VIDEO |
XTV CH W |
:, 9 |
||
|
|
|||||
|
|
TUNER/AUX |
X SKIP W |
! SKIP " |
||
P.MEMORY |
|
|
|
|
||
|
P.MEMORY |
SLOW/SEARCH |
6, 5 |
|||
|
|
|
|
|
||
∫ STOP |
STOP |
PAUSE |
DVD/CD |
SLOW/ |
||
SEARCH |
||||||
|
|
|
|
|||
; PAUSE |
TOP MENU |
|
MENU |
1DVD/CD |
||
TOP MENU |
TEST |
|
|
CH |
MENU |
|
|
|
|
|
|||
|
|
|
|
SELECT |
|
|
3, 4, 2, 1 |
|
ENTER |
|
|
||
ENTER |
LIGHT |
|
|
ACTION |
|
|
|
|
|
RETURN |
|||
|
|
|
|
RETURN |
||
operations |
GUI DISPLAY |
|
|
|||
SUBTITLE |
AUDIO |
PAGE |
GROUP |
|
||
|
ANGLE |
SLEEP |
|
|||
|
PROGRAM |
|
|
|
||
|
|
1 |
2 |
3 |
|
|
|
RANDOM |
|
|
|
|
|
Disc |
|
4 |
5 |
6 |
Numbered |
|
REPEAT |
|
|
|
|||
|
|
|
buttons |
|||
|
|
7 |
8 |
9 |
||
|
A-B REPEAT CANCEL |
|
|
|
||
|
|
|
0 |
S10 |
|
|
|
S.SRND |
EQ |
CINEMA |
D.ENH |
D.ENH |
|
|
PL |
SUBWOOFER FM MODE |
MIX 2CH |
|||
CINEMA |
|
|||||
|
LEVEL |
|
|
|
||
|
|
|
|
|
||
Note
≥If “ $” appears on the television
The operation is prohibited by the unit or disc.
≥The disc continues to rotate while the menu is displayed even after you finish playing an item. Press [∫] when you finish to preserve the unit’s motor and your television screen.
≥Volume may be lower when playing DVDs than when playing other discs or during television broadcasts.If you turn the volume up, be sure to reduce the volume again before playing other sources so that a sudden increase in output does not occur.
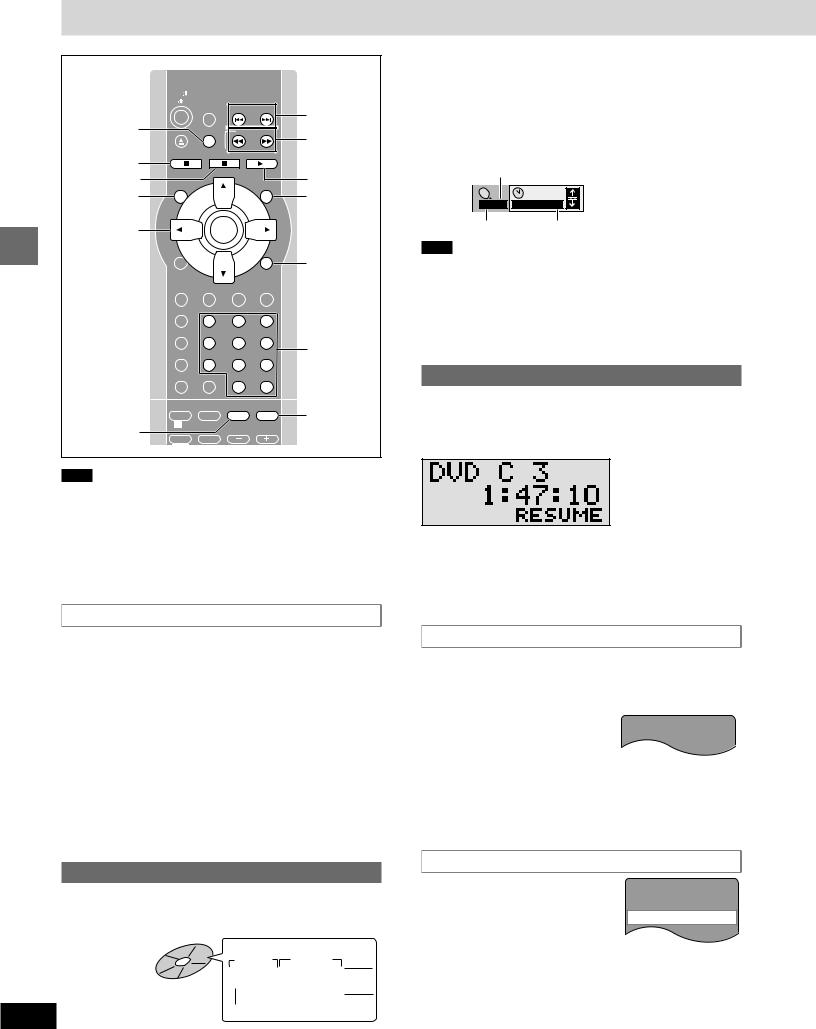
When a menu appears on the television
[DVD-A] [DVD-V] [VCD]
Remote control only
Press the numbered buttons to select an item.
To select a 2-digit number
Example: To select item 23, press [S10] [2] [3].
≥When playing DVDs, you can also use [3, 4, 2, 1] to select items. Press [ENTER] to confirm your selection.
Play of the selected item now begins.
Other buttons used to operate menus
Read the disc’s instructions for further details about operation. [9]: Shows the next menu.
[:]: Shows the previous menu.
[RETURN]: Shows the menu screen. [VCD]
[TOP MENU]: Shows the first menu screen. [DVD-A] [DVD-V]
[MENU]: Shows the menu screen. [DVD-V]
Playing MP3
[CD]
Discs recorded using MP3 differ to CDs in the following ways. ≥Structure of the disc (example)
|
Title |
|
|
|
|
|
||
(Folder) |
|
Title |
||||||
|
|
|
|
|
|
|
|
|
1 |
2 |
3 |
4 |
5 |
6 |
7 |
8 |
9 |
|
|
|
|
|
|
|
|
|
12 |
Chapter (File) |
|
|
RQT6220 |
|
≥Starting play from a selected chapter
Press the numbered buttons and press [ENTER].
Example: Chapter 23: [2] [3] [ENTER] (Pressing [S10] is unnecessary.)
≥Repeat play
You can use chapter repeat or title repeat ( page 15).
≥Program play, random play
You cannot use program play or random play.
≥The information displayed in the On-Screen Menu Icons
Total number of chapters
C |
|
|
1/ |
59 |
0 : 00 : 01 |
Chapter playing Elapsed playing time (cannot be changed)
Note
≥If you play an MP3 track that includes still picture data, it will take some time before the music itself starts playing and the elapsed time will not be displayed during this time. Even after the track starts, the correct play time will not be displayed.
≥This unit is not compatible with ID3 tags.
≥This unit is not compatible with files with a sampling rate of 32 kHz.
Refer to the glossary on page 32 for more information about MP3.
Resume function
[DVD-A] [DVD-V] [CD] [VCD]
(When the elapsed play time is displayed)
“RESUME” lights on the display when the unit has recorded the position at which you stopped play.
Press [1 DVD/CD] to start play from that position.
(When playing DVD-Video Chapter Preview below)
≥The position is cleared when you: —Turn the unit off.
—Open the disc tray or select another source.
≥Press [∫] to clear the position.
Position Memory function
[DVD-V] [CD] [VCD]
(When the elapsed play time is displayed)
Remote control only
During play |
|
Press [P.MEMORY] to |
|
Position memorized |
|
memorize a position. |
|
This position is saved even if you turn
source. When you turn the unit on or reselect “DVD/CD”, “RESUME” lights on the display. Press [1 DVD/CD] to start play from the memorized position. The position is cleared.
(When playing DVD-Video Chapter Preview below) ≥The position is cleared when you open the disc tray.
Chapter Preview
[DVD-V]
The following message appears
immediately after you press [1 DVD/CD]. Press PLAY to Preview Chapters
Press [1 DVD/CD] while the message is
ning portions of each chapter up to the current one are played.
Full play resumes from the point where you pressed [∫] or
[P.MEMORY].
(This feature works only within a title.)
If you do not press [1 DVD/CD], the message disappears and play starts from where you pressed [∫] or [P.MEMORY].
 Loading...