


Video Cassette Recorder Line Recording
Model No.
NV-SJ50AM
Operating Instructions
Contents
Precautions |
3 |
|
|
Connections |
4 |
|
|
Tuning the TV to your |
|
VCR (Line Recording) |
4 |
|
|
Menu Setting |
5 |
|
|
Playback |
6 |
|
|
Play-Off Timer |
8 |
|
|
Recording and Editing |
9 |
|
|
Other Functions |
12 |
|
|
Before Requesting Service |
14 |
|
|
Specifications |
15 |
|
|
|
|
|
|
|
|
|
Before attempting to connect, operate or adjust |
||||
|
this product, please read these instructions |
||||
VQT9788 |
completely. |
||||
|
|
|
|
|
|
As this equipment gets hot during use, operate it in a well ventilated place; do not install this equipment in a confined space such as a book case or similar unit.
WARNING:
To reduce the risk of fire, electric shock or product damage, do not expose this equipment to rain, moisture, dripping or splashing and ensure that no objects filled with liquids, such as vases, shall be placed on the equipment.
IMPORTANT
Your attention is drawn to the fact that recording of pre-recorded tapes or discs or other published or broadcast material may infringe copyright laws.
On Colour system
This unit is designed to play back programmes based on the PAL (B/G and D/K) and SECAM (B/ G and D/K) colour systems.
•Tapes recorded with the French SECAM colour system can be played back on this unit but the picture displayed will be black and white.
FOR YOUR SAFETY
DO NOT REMOVE OUTER COVER.
To prevent electric shock, do not remove cover. No user serviceable parts inside. Refer servicing to qualified service personnel.
Longrun Head System
This longrun head system enables approximately 8,000 hours of recording/playback with high quality images. Newly developed head cylinder with narrower head windows and tapered cylinder design effectively protects heads from dust and prevents head cloging. Plus, “Alumina” Head Cleaner further enhanced cleaning efficiency.
•Based on in-house tests with Panasonic video cassettes. Actual head life may vary according to conditions of use, tape type, temperature, humidity, etc.
Infrared Remote Control
Power Source for the Remote Control
The remote control is powered by 2 UM3 or R6 size batteries. The life of the batteries is about one year, although this depends on the frequency of use.
Precautions for Battery Replacement
•Load the new batteries with their polarity (+ and -) aligned correctly.
•Do not apply heat to the batteries, or an internal short-circuit may occur.
•If you do not intend to use the remote control for a long period of time, remove the batteries and store them in a cool and dry place.
•Remove spent batteries immediately and dispose of them.
•Do not use an old and a new battery together, and never use an alkaline battery with a manganese battery.
•Do not use rechargeable batteries.
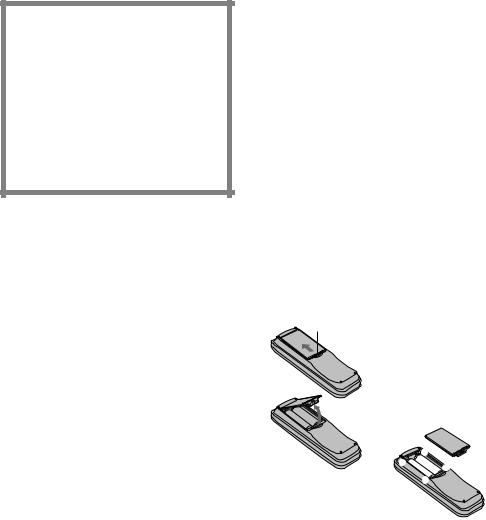
Opening the cover
A
1 While pressing the indentation A in the direction indicated by the arrow...
2 Lift the cover up.
|
+ |
- |
- |
|
|
|
+ |
Loading the batteries
2
Precautions
Please read these precautions before you operate this VCR (Line Recording).
Avoid:
•Humidity and dust.
•Extreme heat such as direct sunlight.
•Magnets or electromagnetic objects.
•Touching internal parts of the VCR (Line Recording).
•Water or some other liquid.
•Lightning. Disconnect the aerial plug from the VCR (Line Recording) during lightning storms.
•Anything heavy on the VCR (Line Recording).
•Connecting or handling the equipment with wet hands.
•Using a cell phone near the VCR (Line Recording) because doing so may cause noise to adversely affect the picture and sound.
Do:
•Wipe the VCR (Line Recording) with a clean and dry cloth.
•Install the VCR (Line Recording) in a horizontal position.
•Keep the VCR (Line Recording), TV and other equipment switched off until you have finished all connections.
Condensation may form in the following cases:
•The VCR (Line Recording) is brought from cold surroundings into a well-heated room.
•The VCR (Line Recording) is suddenly brought from cool surroundings, such as an air-conditioned room or car, to a place which is hot and humid.
Note:
•In any of the above-mentioned conditions, do not operate the VCR (Line Recording) for at least 1 hour. This VCR (Line Recording) is not equipped with a dew sensor.
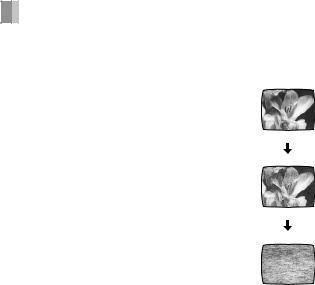
Dirt on the Video Heads
If the video heads get dirty, pictures will not be recorded or played back clearly.
(See the following conditions.)
Normal picture
Small amount of dirt
Large amount of dirt
If this happens, clean the video heads with a commercially available cleaning cassette.
If the problem still persists after performing the above, contact qualified service personnel to request assistance.
3
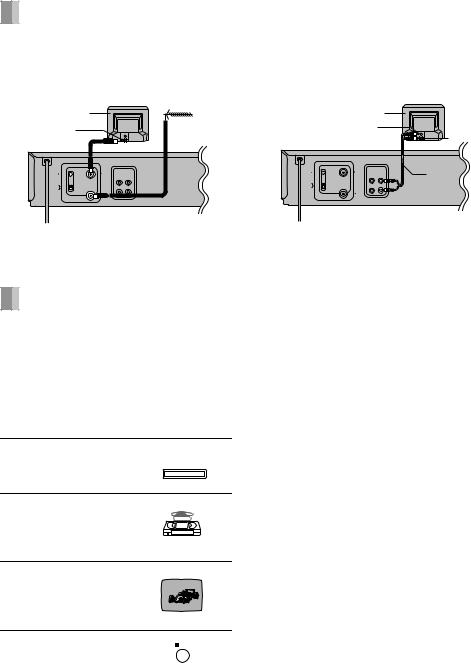
Connections
A: Basic Connections
(1) |
(3) |
|
|
(2) |
A-1 |
A-2 |
|
CH ADJ. |
RF OUT |
VIDEO
B.G.H
RF
D.K.K1
AUDIO
RF IN
IN OUT
A-3
(1)TV Set (Not Supplied)
(2)Aerial Connector
(3)Aerial (Not Supplied)
B:Connection to a TV using the Audio/Video Input Socket
(1)
(2)
(3)
B-1
CH ADJ. |
RF OUT |
(4) |
B.G.H
RF
D.K.K1
RF IN
IN OUT
B-2
(1)TV Set (Not Supplied)
(2)VIDEO IN
(3)AUDIO IN
(4)AV Cable (Not Supplied)
Tuning the TV to your VCR (Line Recording)
It is possible to view the video picture on your TV in the same way that you watch TV broadcasts.
If you have connected the VCR (Line Recording) to the TV through the Audio/Video Input Sockets, then you do not need to follow the procedure below.
Operations
1 Turn on the TV and
POWER Í/ I
VCR (Line Recording).
2 Insert a recorded video cassette tape.
•To start playback, see page 6.
3 Select the TV channel on which the playback picture is viewed.
• UHF channel E38
4 Stop playback. |
STOP |
|
|
The playback picture is transmitted on channel E38 of the broadcasting channels. If you are encountering interference from another broadcast on the video channel, you may readjust to a free channel by using [CH ADJ.] screw. Note that if [CH ADJ.] screw is used, then you will have to re-tune your TV to the playback picture following steps 2–4.
RF SELECT
Use [RF SELECT] to select the colour TV system used by the TV to be connected.
B.G.H: PAL B.G.H./SECAM B.G. D.K.K1: PAL D/SECAM D.K.K1
POWER Í/I Button
Press to switch the VCR (Line Recording) from on to the standby mode or vice versa. In the standby mode, the VCR (Line Recording) is still connected to the mains. When the VCR (Line Recording) is turned off, the [STANDBY] indicator (on the front panel) is lit. When the VCR (Line Recording) is turned on, the [120] indicator (on the front panel) is lit.
4
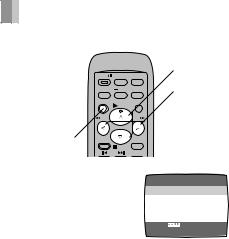
Menu Setting
|
POWER |
PICTURE |
SPEED |
2 |
|
|
SEARCH |
TRACKING/V-LOCK |
3 |
|
|
|
MENU |
|
RESET |
|
|
|
PLAY |
|
|
||
|
|
|
|
|
|
|
REW |
|
FF |
|
|
1,4 |
JET REW |
STOP |
DISPLAY |
|
|
|
|
|
|
|
|
|
INDEX |
OSD |
|
|
|
LANGUAGE |
|
|
|
MENU |
|
1 Press [MENU]. |
|
|
|
LANGUAGE |
|
|
|
|
[¡ENGLISH WO dF «] |
||
2 Select [LANGUAGE]. |
|
|
TAPE SELECT |
[AUTO] |
|
|
|
SYSTEM |
[AUTO] |
||
|
|
NTSC INPUT SELECT |
[AUTO] |
||
|
|
NTSC PB SELECT |
[onPALTV] |
||
3 Select one of the two |
|
|
|||
|
|
SELECT: |
END :MENU |
||
|
|
|
|
||
languages displayed: English and Arabic.
4Press [MENU] to make the on screen display disappear.
TAPE SELECT
Select the corresponding video cassette tape length to display the approximate remaining tape time.
1Press [MENU].
2Select [TAPE SELECT].
3Select the corresponding video cassette tape length.[AUTO]:
The VCR automatically distinguishes E30, -60, -90, -120, -150, -180, and -240 tapes.
[E195]:
For E195 tape [E260]:
For E260 tape [E300]:
For E300 tape
•The remaining tape time may not be displayed correctly depending on the tape used.
4Press [MENU] to make the on screen display disappear.
SYSTEM
1Press [MENU].
2Select [SYSTEM].
3Select [AUTO], [PAL], [MESECAM], [NTSC] or [B/W].
[AUTO]:
Allows PAL, MESECAM or NTSC signals to be distinguished automatically.
Normally set at this position. If the picture lacks colour when [AUTO] is set, set to [PAL], [MESECAM] or [NTSC].
[PAL]:
Use when recording or playback in the PAL system.
[MESECAM]:
Use when recording or playback in the MESECAM system.
[NTSC]:
Use when recording or playback in the NTSC system.
[B/W]:
Use when recording or playback in the black and white.
4Press [MENU] to make the on screen display disappear.
NTSC INPUT SELECT
1Press [MENU].
2Select [NTSC INPUT SELECT].
3Select [AUTO], [4.43] or [3.58]. [AUTO]:
Allows NTSC 4.43 or 3.58 signals to be distinguished automatically.
[4.43]:
Use when recording NTSC 4.43 signals. [3.58]:
Use when recording NTSC 3.58 signals.
4Press [MENU] to make the on screen display disappear.
NTSC PB SELECT
1Press [MENU].
2Select [NTSC PB SELECT].
3Select [on PAL TV], [4.43] or [3.58]. [on PAL TV]:
Use when playing back a tape recorded in the NTSC system on PAL TV.
[4.43]:
Use when playing back a tape recorded in the NTSC system in 4.43 mode.
[3.58]:
Use when playing back a tape recorded in the NTSC system in 3.58 mode.
4Press [MENU] to make the on screen display disappear.
5
 Loading...