


Owner's Manual

Contents
Introduction .................................... |
2 |
In brief ............................................ |
6 |
Keys, doors and windows ............ |
21 |
Seats, restraints ........................... |
44 |
Storage ........................................ |
68 |
Instruments and controls ............. |
78 |
Lighting ...................................... |
113 |
Climate control ........................... |
123 |
Driving and operating ................. |
134 |
Vehicle care ............................... |
201 |
Service and maintenance .......... |
240 |
Technical data ........................... |
246 |
Customer information ................ |
259 |
Index .......................................... |
270 |
2Introduction
Introduction

Introduction 3
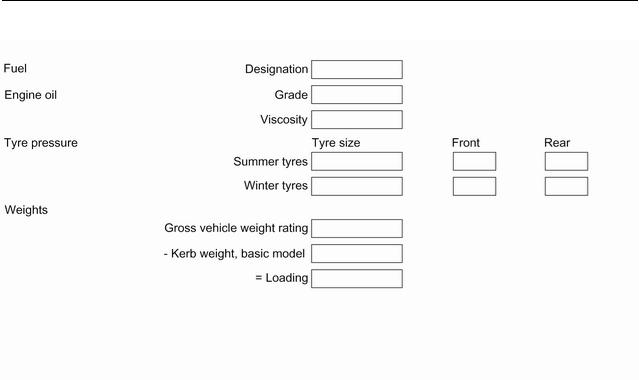
Vehicle specific data
Please enter your vehicle's data on the previous page to keep it easily accessible.
Please refer to the sections "Service and maintenance", "Technical data", the vehicle’s identification plate and national registration documents.
Introduction
Your vehicle is a designed combination of advanced technology, safety, environmental friendliness and economy.
This Owner's Manual provides you with all the necessary information to enable you to drive your vehicle safely and efficiently.
Make sure your passengers are aware of the possible risk of accident and injury which may result from improper use of the vehicle.
You must always comply with the specific laws and regulations of the country that you are in. These laws may differ from the information in this Owner's Manual.
Disregarding the description given in this manual may affect your warranty.
When this Owner's Manual refers to a workshop visit, we recommend your Opel Service Partner.
All Opel Service Partners provide first-class service at reasonable prices. Experienced mechanics trained by Opel work according to specific Opel instructions.
The customer literature pack should always be kept ready to hand in the vehicle.
Using this manual
●Thismanualdescribesalloptions and features available for this model. Certain descriptions, including those for display and menu functions, may not apply to your vehicle due to model variant, country specifications, special equipment or accessories.
●The"Inbrief"sectionwillgiveyou an initial overview.
●The table of contents at the beginning of this manual and within each section shows where the information is located.
●The index will enable you to search for specific information.
●ThisOwner'sManualdepictslefthand drive vehicles. Operation is similar for right-hand drive vehicles.
●The Owner's Manual uses the engine identifier code. The corresponding sales designation and engineering code can be found in the section "Technical data".
●Directional data, e.g. left or right, or front or back, always relate to the direction of travel.
●Displays may not support your specific language.
●Display messages and interior labelling are written in bold letters.

4Introduction
Danger, Warnings and
Cautions
9 Danger
Text marked 9 Danger provides information on risk of fatal injury. Disregarding this information may endanger life.
9 Warning
Text marked 9 Warning provides information on risk of accident or injury. Disregarding this information may lead to injury.
Caution
Text marked Caution provides informationonpossibledamageto the vehicle. Disregarding this information may lead to vehicle damage.
Symbols
Page references are indicated with 3. 3 means "see page".
Page references and index entries refer to the indented headings given in the section table of content.
We wish you many hours of pleasurable driving.
Your Opel Team

Introduction 5

6In brief
In brief
Initial drive information
Vehicle unlocking
Press cto unlock the vehicle. Open the doors by pulling the handles.
Press P to unlock the tailgate only.
Tailgate
After unlocking, press the tailgate button and open the tailgate.
Radio remote control 3 22. Central locking system 3 24. Electronic key system 3 23. Load compartment 3 30.
In brief |
7 |
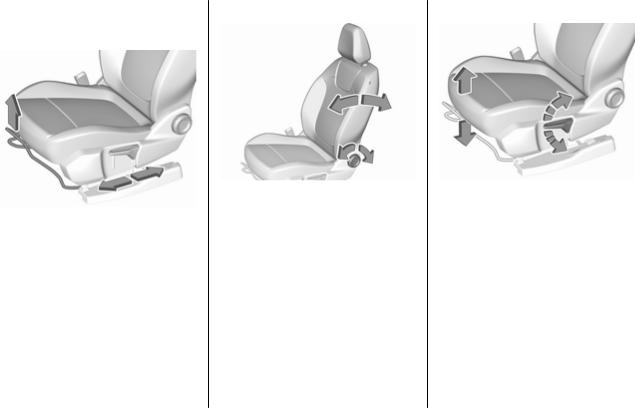
Seat adjustment
Longitudinal adjustment
Pull handle, slide seat, release handle.Trytomovetheseatbackand forth to ensure that the seat is locked in place.
Seat position 3 45.
Manual seat adjustment 3 46.
Backrests inclination
Turn handwheel. Do not lean on backrest when adjusting.
Seat position 3 45.
Manual seat adjustment 3 46.
Seat height
Lever pumping motion
up |
: |
seat higher |
down |
: |
seat lower |
Seat position 3 45.
Manual seat adjustment 3 46.
8In brief
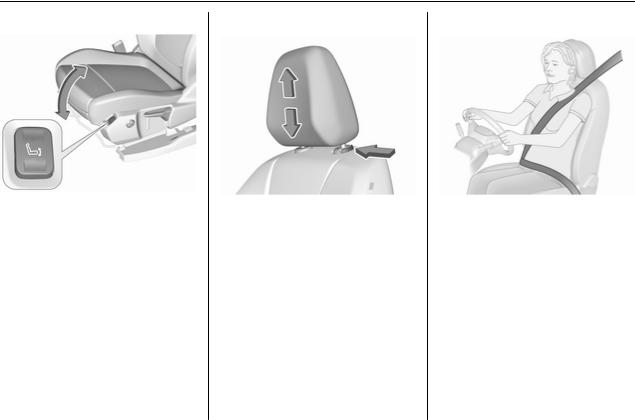
Seat inclination
Press switch
top |
: |
front end higher |
bottom |
: |
front end lower |
Seat position 3 45.
Manual seat adjustment 3 46.
Head restraint adjustment |
Seat belt |
Press release button, adjust height, |
Pullouttheseatbeltandfasteninbelt |
engage. |
buckle. The seat belt must not be |
Head restraints 3 44. |
twisted and must fit close against the |
|
body. The backrest must not be tilted |
|
back too far (maximum approx. 25°). |
|
To unfasten belt, press red button on |
|
belt buckle. |
|
Seat position 3 45. |
|
Seat belts 3 51. |
|
Airbag system 3 54. |
In brief |
9 |
Mirror adjustment
Interior mirror
To adjust the mirror, move the mirror housing in the desired direction.
Manual anti-dazzle interior mirror 3 39.
Automatic anti-dazzle interior mirror 3 39.
Exterior mirrors
Select the relevant exterior mirror by pushing the mirror button to the left or right. Adjust respective mirror by the four-way control.
Convex mirrors 3 37. Electric adjustment 3 37. Folding mirrors 3 38. Heated mirrors 3 38.
Steering wheel adjustment
Unlock lever, adjust steering wheel, then engage lever and ensure it is fully locked. Do not adjust steering wheelunlessvehicleisstationaryand steering wheel lock has been released.
Seat position 3 45. Ignition positions 3 135.
10 |
In brief |
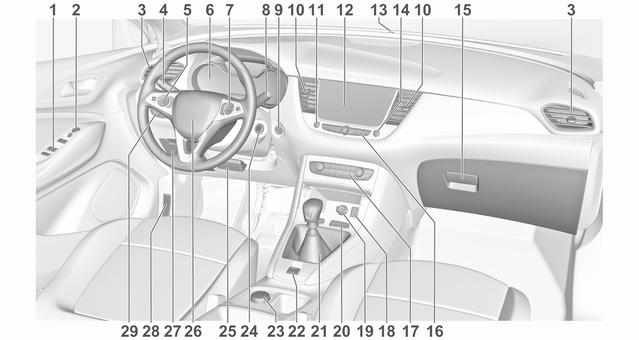
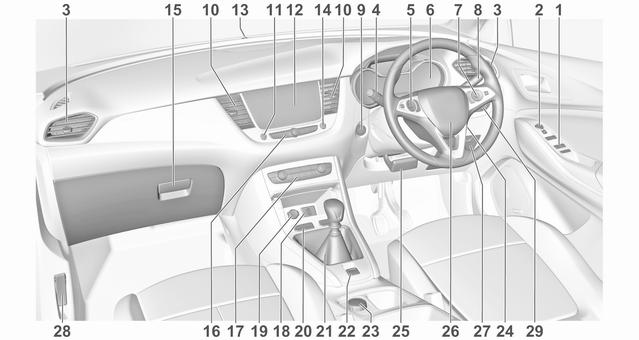
Instrument panel overview

In brief |
11 |
1 |
Power windows |
40 |
|
13 |
Anti-theft alarm system |
|
|
|
|||||
2 |
Exterior mirrors ..................... |
37 |
|
|
status LED ........................... |
35 |
3 |
Side air vents ...................... |
131 |
|
14 |
Central locking system .......... |
24 |
4 |
Turn lights, headlight |
|
|
15 |
Glovebox .............................. |
68 |
|
flash, low / high beam, |
|
|
16 |
Controls for Info Display |
|
|
high beam assist ................. |
118 |
|
|
operation ............................. |
102 |
|
Exit lighting ......................... |
122 |
|
17 |
Climate control system ........ |
124 |
|
Parking lights ...................... |
119 |
|
18 |
USB charging port ................ |
84 |
|
Buttons for Driver |
|
|
19 |
Power outlet .......................... |
84 |
|
|
|
20 |
Parking assist / Advanced |
|
|
|
Information Centre .............. |
100 |
|
175 |
||
5 |
Cruise control |
157 |
|
|
parking assist ..................... |
|
|
|
Lane departure warning |
188 |
|||
|
Speed limiter |
160 |
|
|
||
|
|
|
Eco button for stop-start |
|
||
|
Heated steering wheel |
79 |
|
|
|
|
|
|
|
system ................................. |
139 |
||
6 |
Instruments ........................... |
90 |
|
|
Electronic Stability Control |
|
|
|
|
|
|
|
|
|
Driver Information Centre .... |
100 |
|
|
and Traction Control ........... |
154 |
7 |
Infotainment controls |
|
|
|
Sport mode ......................... |
157 |
8 |
Windscreen wiper and |
|
|
21 |
Manual transmission .......... |
150 |
|
washer, rear wiper and |
|
|
|
Automatic transmission |
147 |
|
washer ................................. |
80 |
|
|
||
9 |
Power button ....................... |
136 |
|
22 |
Electric parking brake ......... |
151 |
10 |
Centre air vents .................. |
131 |
|
23 |
Selective ride control .......... |
155 |
11 |
Hazard warning flashers .... |
118 |
|
24 |
Ignition switch ..................... |
135 |
12 |
Info Display ........................ |
102 |
|
25 |
Steering wheel adjustment . |
. 79 |
|
|
|
|
|
|
|
26 |
Horn ..................................... |
80 |
27 |
Storage ................................. |
68 |
28 |
Bonnet release lever .......... |
203 |
29 |
Light switch ........................ |
113 |
|
Headlight range |
|
|
adjustment ......................... |
115 |
|
Front / rear fog lights .......... |
119 |
|
Instrument illumination ....... |
120 |
12 |
In brief |
In brief |
13 |
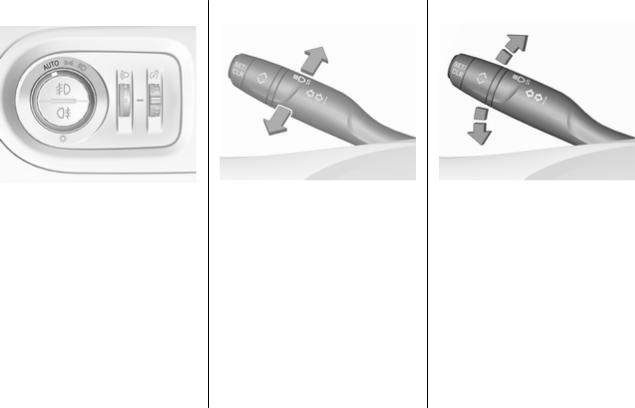
Exterior lighting
AUTO : automatic light control switches automatically between daytime running light and headlight
8 : sidelights
9 : headlights Automatic light control 3 114.
Fog lights
Press button in light switch: > : front fog lights
ø : rear fog light
Headlight flash and high beam |
Turn lights |
pull stalk |
: headlight flash |
stalk up : right turn light |
push stalk |
: high beam |
stalk down : left turn light |
High beam 3 114. |
Turn lights 3 118. |
|
High beam assist 3 115. |
Parking lights 3 119. |
|
Headlight flash 3 114. |
|
|
LED headlights 3 115. |
|
|
14 In brief
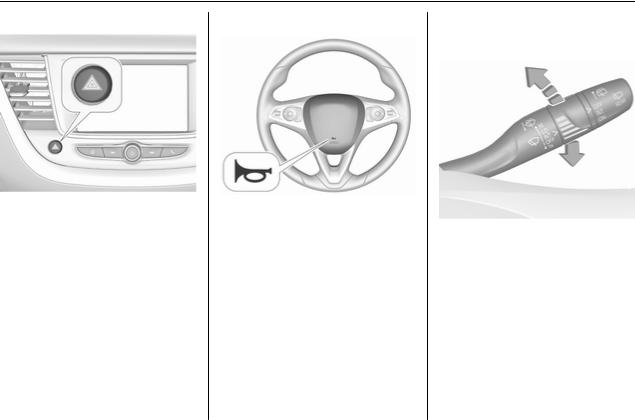
Hazard warning flashers |
Horn |
Washer and wiper systems |
|
|
Windscreen wiper |
Operated by pressing ¨. |
Press j. |
|
Hazard warning flashers 3 118. |
HI |
: fast |
|
||
|
LO |
: slow |
|
INT |
: interval wiping |
or
AUTO : automatic wiping with rain sensor
OFF : off
For single wipe when the wiper is off, press stalk down to position 1x.
Windscreen wiper 3 80.
In brief |
15 |
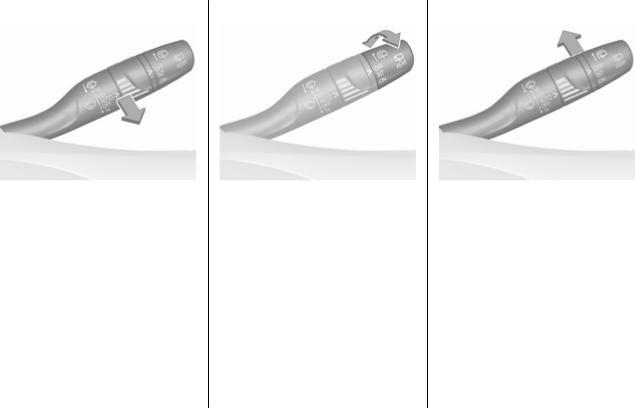
Windscreen washer
Pull stalk.
Windscreen washer system 3 80. Washer fluid 3 206.
Wiper blade replacement 3 208.
Rear window wiper
Turn outer cap to activate the rear window wiper:
OFF |
: off |
INT |
: intermittent operation |
ON |
: continuous operation |
Rear window washer
Push stalk.
Washer fluid is sprayed on the rear window and the wiper wipes a few times.
Rear window wiper / washer 3 82.

16 |
In brief |
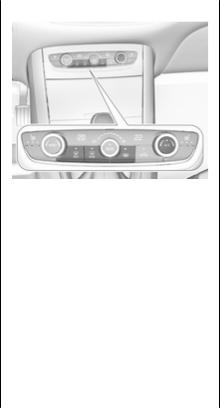
Climate control
Heated rear window
Heating and ventilation system, air conditioning system
The heating is operated by pressing b.
Electronic climate control system
The heating is operated by pressing b.
Heated rear window 3 41.
Heated exterior mirrors
Pressing b also activates the heated exterior mirrors.
Heated exterior mirrors 3 38.
Demisting and defrosting the windows
Heating and ventilation system, air conditioning system
●press à, the air distribution is directed towards the windscreen
●set temperature controller £ to warmest level
●switch on air conditioning A/C, if required
●set fan speed Z to highest level
●switch on heated rear window b
In brief |
17 |
●switch on heated windscreen ,
●open side air vents as required and direct them towards the door windows
Heating and ventilation system 3 123.
Air conditioning system 3 124. Heated windscreen 3 42.
Electronic climate control system |
Electronic climate control system |
|
3 127. |
●press à, the LED in the button illuminates to indicate activation
●temperature and air distribution are set automatically and the fan runs at high speed
●switch on air conditioning by pressing A/C, if required
●switch on heated rear window b
●switch on heated windscreen ,
●to return to previous mode, press à again
●to return to automatic mode, press AUTO

18 |
In brief |
Transmission
Manual transmission
To engage reverse on 6-speed transmission, depress the clutch pedal, pull the ring under the selector lever and move the selector lever quite to the left and front.
Manual transmission 3 150.
Automatic transmission
P : park position R : reverse
N : neutral mode D : automatic mode M : manual mode < : upshift
] : downshift
Automatic transmission 3 147.
Starting off
Check before starting off
●tyre pressure 3 221 and condition 3 257
●engine oil level and fluid levels 3 204
●all windows, mirrors, exterior lighting and number plates are free from dirt, snow and ice and are operational
●proper position of mirrors 3 37, seats 3 45 and seat belts
3 52
●brake function at low speed, particularly if the brakes are wet
In brief |
19 |
Starting the engine
Ignition switch
●turn key to position 1
●move the steering wheel slightly toreleasethesteeringwheellock
●manual transmission: operate clutch and brake pedal
●automatic transmission: operate brake pedal and move selector lever to P or N
●do not operate accelerator pedal
●turn key to position 2 and release after engine has been started
Diesel engine starts after control indicator !for preheating extinguishes.
Starting the engine 3 138.
Start power button
●manual transmission: operate clutch and brake pedal
●automatic transmission: operate brake pedal and move selector lever to P or N
●do not operate accelerator pedal
●press Start/Stop button
●release button after starting procedure begins
20 |
In brief |
Stop-start system
If the vehicle is at a low speed or at a standstill and certain conditions are fulfilled, an Autostop is activated.
An Autostop is indicated by control indicator D.
Manual transmission: to restart the engine, depress the clutch pedal again. Control indicator D
extinguishes.
Automatic transmission: to restart the engine, release the brake pedal. Control indicator D extinguishes.
Stop-start system 3 139.
Parking
9Warning
●Do not park the vehicle on an easily ignitable surface. The high temperature of the exhaustsystemcouldignitethe surface.
●Always apply the parking brake.
●If the vehicle is on a level surface or uphill slope, engage first gear or set the selector lever to position P. On an uphill slope, turn the front wheels away from the kerb.
If the vehicle is on a downhill slope, engage reverse gear or settheselectorlevertoposition P. Turn the front wheels towards the kerb.
●Close the windows.
●Switch off the engine.
●Remove the ignition key from the ignition switch or switch off ignition on vehicles with power
button. Turn the steering wheel until the steering wheel lock is felt to engage.
●Lock the vehicle with eon the radio remote control.
Activate the anti-theft alarm system 3 35.
●The engine cooling fans may run after the engine has been switched off 3 203.
Caution
After running at high engine speeds or with high engine loads, operate the engine briefly at a low load or run in neutral for
approx. 30 seconds before switching off, in order to protect the turbocharger.
Keys, locks 3 21.
Laying-up the vehicle for a long period of time 3 202.

Keys, doors and windows |
21 |
Keys, doors and |
|
windows |
|
Keys, locks ................................... |
21 |
Keys .......................................... |
21 |
Radio remote control ................. |
22 |
Electronic key system ................ |
23 |
Central locking system .............. |
24 |
Automatic locking ...................... |
28 |
Child locks ................................. |
29 |
Doors ........................................... |
30 |
Load compartment .................... |
30 |
Vehicle security ............................ |
35 |
Anti-theft locking system ........... |
35 |
Anti-theft alarm system .............. |
35 |
Immobiliser ................................ |
37 |
Exterior mirrors ............................ |
37 |
Convex shape ........................... |
37 |
Electric adjustment .................... |
37 |
Folding mirrors .......................... |
38 |
Heated mirrors ........................... |
38 |
Interior mirrors ............................. |
39 |
Manual anti-dazzle .................... |
39 |
Automatic anti-dazzle ................ |
39 |
Windows ...................................... |
39 |
Windscreen ............................... |
39 |
Power windows ......................... |
40 |
Heated rear window .................. |
41 |
Heated windscreen .................... |
42 |
Sun visors .................................. |
42 |
Roller blinds ............................... |
42 |
Roof ............................................. |
43 |
Glass panel ............................... |
43 |
Keys, locks
Keys
Caution
Donotattachheavyorbulkyitems to the ignition key.
Replacement keys
The key number is specified on a detachable tag.
The key number must be quoted when ordering replacement keys as it is a component of the immobiliser system.
Locks 3 236. Central locking 3 24.
Starting the engine 3 138. Radio remote control 3 22. Electronic key 3 23.
The code number of the adapter for the locking wheel nuts is specified on a card. It must be quoted when ordering a replacement adapter.
Wheel changing 3 228.
22 Keys, doors and windows
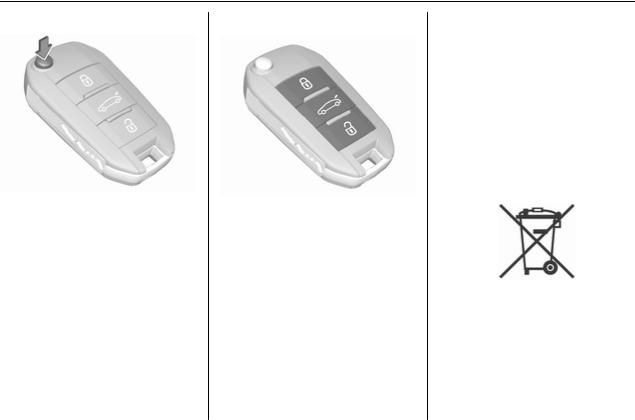
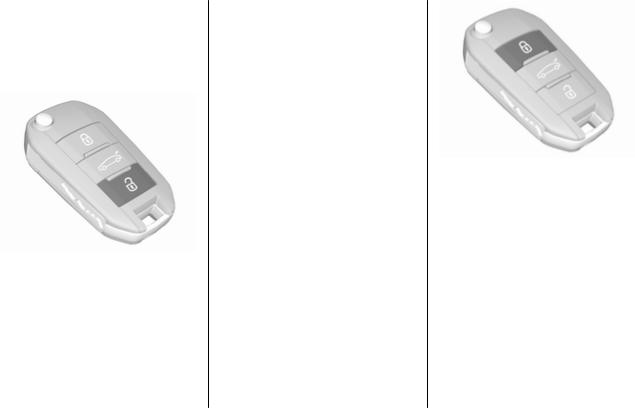
Key with foldaway key section
Press button to extend. To fold the key, first press the button.
Radio remote control
Enables operation of the following functions via the use of the remote control buttons:
●central locking system 3 24
●anti-theft locking system 3 35
●anti-theft alarm system 3 35
●tailgate unlocking and opening
●power windows 3 40
●mirrors folding 3 38
The remote control has a range of up to 100 m, but may also be much less due to external influences. The hazard warning flashers confirm operation.
Handle with care, protect from moisture and high temperatures and avoid unnecessary operation.
Replacing battery in radio remote control
Replace the battery as soon as the range reduces.
Batteries do not belong in household waste. They must be disposed of at an appropriate recycling collection point.
Keys, doors and windows |
23 |
1.Remove the back cover from the remote control.
2.Extract the flat battery from its location.
3.Replace battery with a battery of the same type. Pay attention to the installation position.
4.Clip the back cover in place.
Fault
If the central locking system cannot be operated with the radio remote control, the cause may be one of the following:
●Fault in radio remote control.
●Electronic key is out of reception range.
●The battery voltage is too low.
●Overload of the central locking system by operating at frequent intervals, the power supply is interrupted for a short time.
●Interference from higher-power radio waves from other sources.
Manual unlocking 3 24.
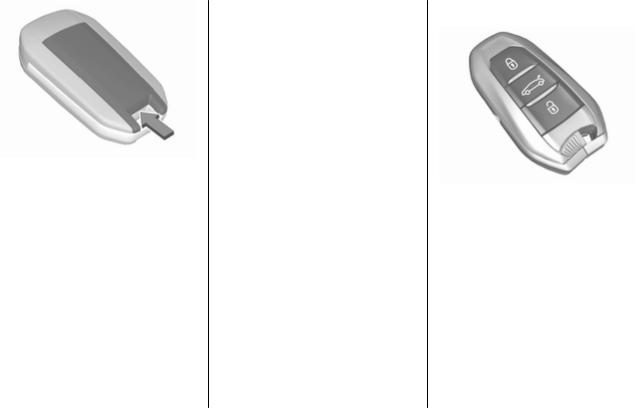
Electronic key system
Enables a keyless operation of the following functions:
●central locking system 3 24
●power tailgate 3 30
●ignition switching on and starting the engine 3 138
Theelectronickeysimplyneedstobe on the driver's person.
Additionally, the electronic key includes the functionality of the radio remote control 3 22.
Handle with care, protect from moisture and high temperatures and avoid unnecessary operation.

24 Keys, doors and windows
Replacing battery in electronic key
Replace the battery as soon as the system no longer operates properly or the range is reduced. The need for battery replacement is indicated by a message in the Driver Information Centre 3 104.
Batteries do not belong in household waste. They must be disposed of at an appropriate recycling collection point.
1.Remove the cover.
2.Extract the flat battery from its location.
3.Replace battery with a battery of the same type. Pay attention to the installation position.
4.Clip the cover in place.
Fault
If the central locking cannot be operated or the engine cannot be started, the cause may be one of the following:
●Fault in electronic key.
●Electronic key is out of reception range.
●The battery voltage is too low.
●Overload of the central locking system by operating at frequent intervals, the power supply is interrupted for a short time.
●Interference from higher-power radio waves from other sources.
To rectify the cause of the fault, change the position of the electronic key.
Manual unlocking 3 24.
Central locking system
Unlocks and locks doors, load compartment and fuel filler flap.
A pull on an interior door handle unlocks the respective door. Pulling thehandleoncemoreopensthedoor.
Note
In the event of an accident in which airbags or belt pretensioners are deployed, the vehicle is automatically unlocked.
Note
A short time after unlocking with the remote control the doors are locked automatically if no door has been
Keys, doors and windows |
25 |
opened. A precondition is that the setting is activated in the vehicle personalisation 3 105.
Remote control operation
Unlocking
Press O.
Unlocking mode can be set in the vehicle personalisation menu in the Info Display. Two settings are selectable:
●All doors, load compartment and fuel filler flap will be unlocked by pressing O once.
●Only the driver's door and fuel filler flap will be unlocked by pressing O once. To unlock all
doors, load compartment and fuel filler flap, press O twice.
Select the relevant setting in the Vehicle personalisation.
Vehicle personalisation 3 105.
Unlocking the tailgate
Press P longer to unlock the tailgate only.
Unlocking and opening the tailgate 3 30.
Locking
Close doors, load compartment and fuel filler flap.
Press N.
If the driver's door is not closed properly, the central locking system will not work.
Confirmation
Operation of the central locking system is confirmed by the hazard warning flashers. A precondition is that the setting is activated in the vehicle personalisation 3 105.
26 Keys, doors and windows
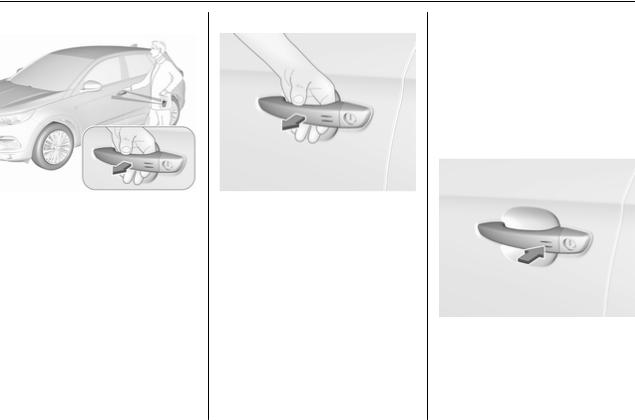
Electronic key system operation
The electronic key must be outside the vehicle, within a range of approx. 1 m of the relevant door side.
Unlocking
Pass a hand behind the door handle of one of the front doors to unlock the vehicle or press the tailgate button.
Unlocking mode can be set in the vehicle personalisation menu in the Info Display. Two settings are selectable:
●Only the driver's door and fuel filler flap will be unlocked by passing a hand behind the driver's door handle.
●All doors, load compartment and fuel filler flap will be unlocked by passing a hand behind the passenger's door handle or by pressing the tailgate button.
●Only the tailgate will be unlocked by pressing the tailgate button.
Vehicle personalisation 3 105. Locking
Press with a finger or thumb on one of the door handles (at the markings) or press the tailgate button.
All doors, load compartment and fuel filler flap will be locked.
Keys, doors and windows |
27 |
The system locks if any door has been opened and all doors are now closed.
If the driver's door is not closed properly,theelectronickeyremainsin the vehicle or the ignition is not off, locking will not be permitted and a warning chime sounds.
Keep the hand behind the door handle or keep the tailgate button pressed to close the windows.
If there have been two or more electronic keys in the vehicle and the ignitionwasononce,thedoorswillbe locked even if just one electronic key is taken out of the vehicle.
Unlocking and opening the tailgate
The tailgate can be unlocked and opened hands-free by pushing the touchpad switch under the tailgate mouldingwhentheelectronickeyisin range. The doors remain locked.
Load compartment 3 30.
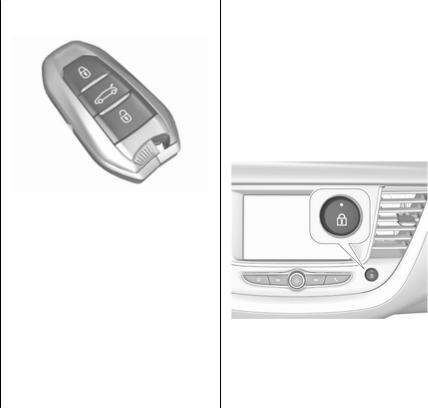
Operation with buttons on the electronic key
The central locking system can also be operated with the buttons on the electronic key.
Press O to unlock. Press N to lock.
Press P longer to unlock and open only the power tailgate.
Remote control operation 3 24.
Confirmation
Operation of central locking system is confirmed by the hazard warning flashers. A precondition is that the setting is activated in the vehicle personalisation 3 105.
Central locking button
Locks or unlocks all doors, the load compartment and fuel filler flap from inside the passenger compartment.
PressQ tolock.TheLEDinthebutton illuminates.
Press Q again to unlock. The LED in the button extinguishes.
28 Keys, doors and windows
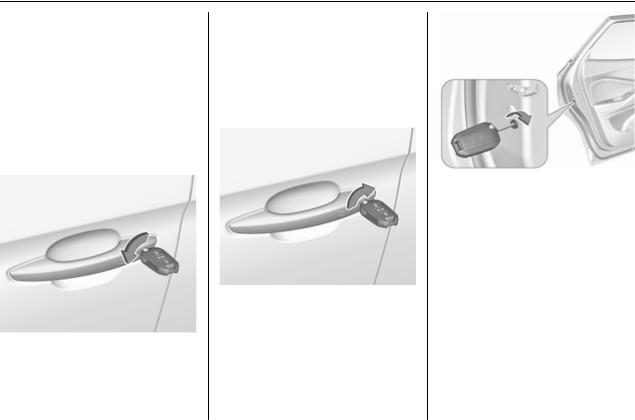
Operation with the key in case of a central locking system fault
In case of a fault, e.g. vehicle battery or remote control / electronic key battery is discharged, the driver's door can be locked or unlocked with the mechanical key.
Manual unlocking
Electronic key: press and hold the latch to extract the integral key.
Manually unlock the driver's door by inserting and turning the key in the lock cylinder.
The other doors can be opened by pulling the interior handle. The load compartment and fuel filler flap will possibly not be unlocked.
By switching on the ignition, the antitheft locking system is deactivated.
Manual locking
Manually lock the driver's door by inserting and turning the key in the lock cylinder.
To lock the other doors, remove the black cover by using a key.
Insert key carefully and move to the inner side of the door without turning the key.
Remove key and attach black cover.
The fuel filler flap and tailgate are possibly not locked.
Automatic locking
Automatic locking after driving off
This system allows automatic locking of the doors and tailgate as soon as the speed of the vehicle exceeds a certain speed.
 Loading...