


Contents
Contents |
-1-1 |
In brief ......................................... |
1-1 |
Keys, doors and windows .......... |
2-1 |
Seats, restraints and interior ....... |
3-1 |
Storage compartments................ |
4-1 |
Instruments and controls............. |
5-1 |
Lighting ....................................... |
6-1 |
Infotainment system.................... |
7-1 |
Climate controls .......................... |
8-1 |
Driving and operating.................. |
9-1 |
Vehicle care .............................. |
10-1 |
Service and maintenance ......... |
11-1 |
Technical data........................... |
12-1 |
Index ........................................ |
13-1 |
Back to overview

0-1 Introduction
Introduction
Vehicle specific data
Please enter your vehicle’s data here to keep it easily accessible. This information is available under the chapters “Service and maintenance” and "Technical data" as well as on the identification plate.
Fuel |
Designation |
|
|
|
|
|
|
|
|
|
|
|
|
|
|
|
|
||
|
|
|
|
|
|
|
|
|
|
Engine oil |
|
|
|
|
|
|
|
|
|
|
Grade |
|
|
|
|
|
|
|
|
|
Viscosity |
|
|
|
|
|
|
|
|
|
|
|
|
|
|
|
|
|
|
Tyre pressure |
Tyre size |
|
with up to 3 persons |
|
with full load |
||||
|
|
|
|
||||||
|
Summer tyres |
|
Front |
|
Rear |
|
Front |
|
Rear |
|
|
|
|
|
|||||
|
Winter tyres |
|
Front |
|
Rear |
|
Front |
|
Rear |
|
|
|
|
|
|||||
Weights |
|
|
|
|
|
|
|
|
|
Permissible Gross |
|
|
|
|
|
|
|
|
|
|
|
|
|
|
|
|
|
||
|
Vehicle Weight |
|
|
|
|
|
|
|
|
|
|
|
|
|
|
|
|
|
|
– |
EC kerb |
|
|
|
|
|
|
|
|
|
|
|
|
|
|
|
|
||
weight |
|
|
|
|
|
|
|
|
|
|
|
|
|
|
|
|
|
|
|
= |
Payload |
|
|
|
|
|
|
|
|
|
|
|
|
|
|
|
|
||
Back to overview

Introduction 0-2
Introduction
Your vehicle is an intelligent combination of forward-looking technology, impressive safety, environmental friendliness and economy.
It now lies with you to drive your vehicle safely and ensure that it performs perfectly. This Owner's Manual provides you with all the necessary information to that end.
Make sure your passengers are aware of the possible risk of accident and injury which may result from improper use of the vehicle.
You must always comply with the specific laws of the country that you are travelling through. These laws may differ from the information in this Owner’s Manual.
When instructed to seek the assistance of a workshop, we recommend that you consult an Opel Service Partner. All Opel Service Partners offer first-class service at reasonable prices. Experienced
mechanics, trained by Opel, work according to specific Opel instructions.
The Owner's Manual and the Service and Warranty Booklet should always be kept ready to hand in the glove box.
Make use of the Owner's Manual
The "In brief" chapter will give you an initial overview.
The table of contents at the beginning of the Owner’s Manual and within the individual chapters will show you where everything is.
Its index will help you find what you want.
Yellow arrows in the illustrations serve as points of reference or indicate some action to be performed.
Black arrows in the illustrations indicate a reaction or a second action to be performed.
This Owner’s Manual depicts lefthand drive vehicles. Operation is similar for right-hand drive vehicles.
The Owner’s Manual uses the internal engine codes. The corresponding sales designations are found in the chapter "Technical data".
Directional data, e.g. left or right, or front or back, in the descriptions always relate to the direction of travel.
9 Danger, 9 Warning, Caution
9 Danger
Text marked 9 Danger provides information on risk of fatal injury. Disregard of these instructions may endanger life.
9 Warning
Text marked 9Warning provides information on risk of accident or injury. Disregard of these instructions may result in injuries.
Back to overview

0-3 Introduction
Caution
Text marked Caution provides information on possible damage to the vehicle. Disregard of these instructions may lead to vehicle damage.
Symbols
The asterisk 3 signifies equipment not fitted to all vehicles (model variants, engine options, models specific to one country, optional equipment, genuine parts and accessories).
Page references are indicated with 3. 3 means “see page”.
We wish you many hours of pleasurable driving
Adam Opel GmbH
Back to overview

Introduction 0-4
Back to overview
1-1 |
In brief |
In brief
The most important information for your first journey.
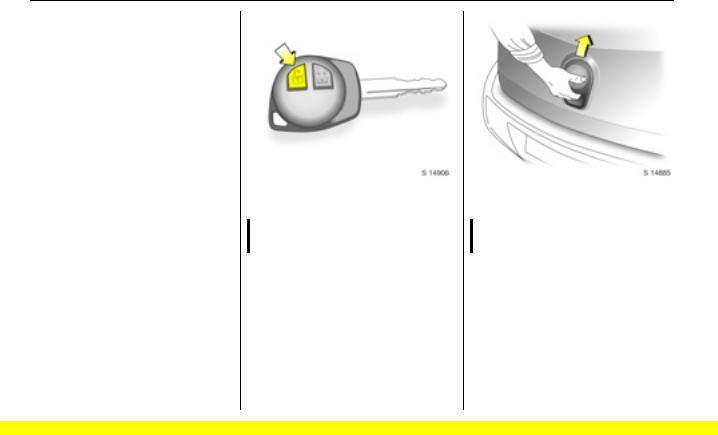
To unlock and open the vehicle: Press button c on remote control 3 or unlock with the key, pull door handle
Door locks 3 2-3, 5-12, keys 3 2-1, immobiliser 3 2-7, radio remote control 3 2-1, central locking system 3 2-3, anti-theft locking system 3 2-6.
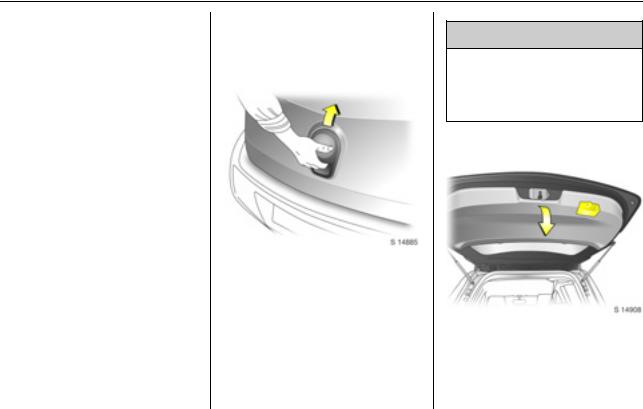
To unlock and open the tailgate: Press button c on remote control 3 or unlock with the key, operate button below the handle
Tailgate 3 2-5, radio remote control 3 2-1, central locking system 3 2-3.
Back to overview
In brief |
1-2 |
|
|
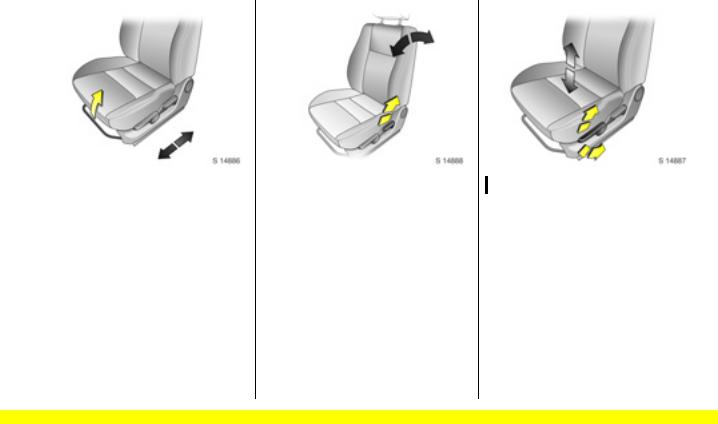
Longitudinal seat adjustment: Pull handle, slide seat, release handle
Seats 3 3-2.
Reclining seatbacks: Raise release lever
Move seatback to suit seating position.
Do not lean on seatback whilst adjusting it.
Seats 3 3-2.
Adjusting seat height 3: Raise or lower lever
Lever pumping action
Upwards: |
Raises seat |
Downwards: |
Lowers seat |
Seats 3 3-2. |
|
Back to overview
1-3 |
In brief |
|
|
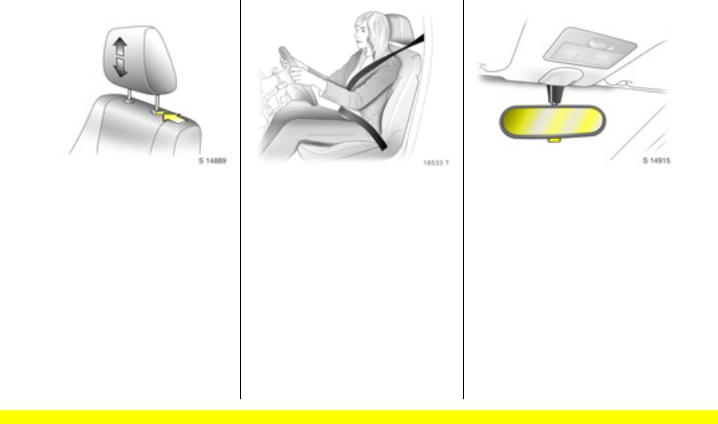
Adjusting head restraint height: Press catch, adjust height, then release
Head restraints 3 3-1.
Fitting seat belt: Pull belt out evenly from retractor, guide over shoulder and engage in buckle
The seat belt must not be twisted at any point. The lap belt must lie snugly against the body.
The seatbacks must not be tilted back too far (recommended maximum tilting angle approx. 25°).
To release seat belt, press red button on belt buckle.
Seat belts 3 3-5 to 3-8, airbag system 3 3-13, seat position 3 3-2.
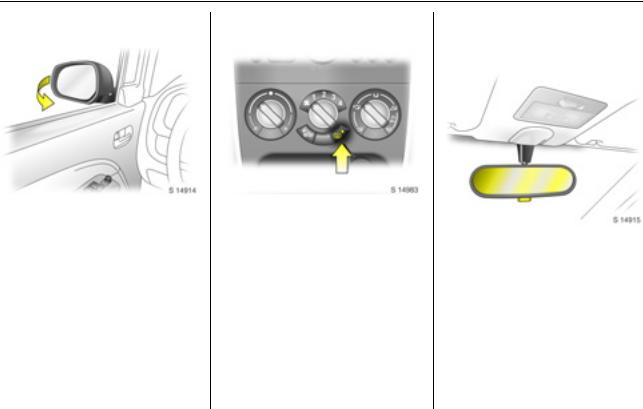
To adjust interior mirror: Swivel mirror housing
Swivel lever on underside of mirror housing to reduce dazzle at night.
Take care when driving with interior mirror adjusted for night vision. Rear view may be slightly distorted in this position.
Further information 3 2-9.
Back to overview
In brief |
1-4 |
|
|
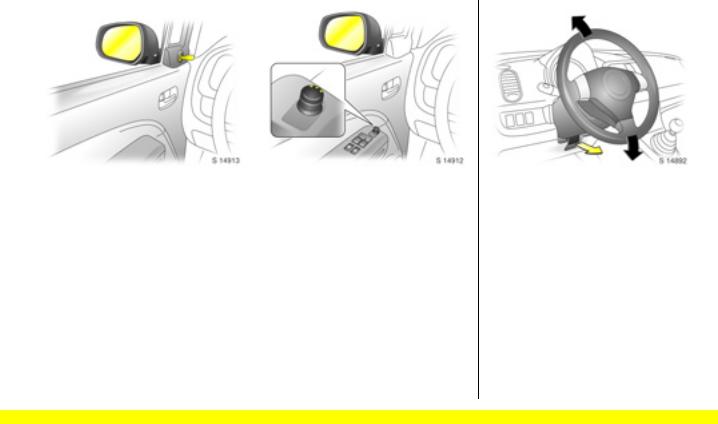
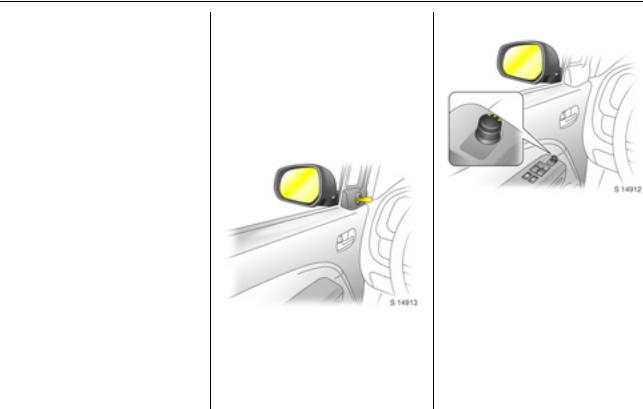
Adjusting manual exterior |
Adjusting power exterior |
mirrors: Swivel lever in |
mirrors 3: Four-way switch |
required direction |
in driver’s door |
Exterior mirrors 3 2-8, heated exterior |
Select corresponding mirror and |
mirrors 3 2-9, 8-5. |
adjust. |
|
Exterior mirrors 3 2-8, heated exterior |
|
mirrors 3 2-9, 8-5. |
|
|
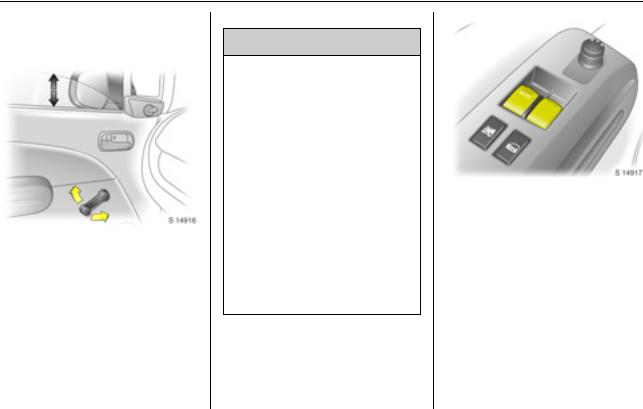
To adjust steering wheel 3: Pull lever forwards, adjust height, push lever back and engage
Adjust steering wheel only with vehicle stationary and steering column lock released.
Airbag system 3 3-13, further information 3 5-1.
Back to overview

|
1-5 |
In brief |
|
|
|
|
|
|
|
|
|
Back to overview
In brief |
1-6 |
1 |
Side air vents .................... |
|
3 8-5 |
2 |
Door window defroster |
|
|
|
vents ................................. |
|
3 8-5 |
3 |
Steering wheel mounted |
|
|
|
remote control 3 ............... |
|
3 7-2 |
4 |
Parking lamps ................... |
|
3 6-1 |
|
Turn signal lamps.............. |
|
3 6-2 |
|
High beam......................... |
|
3 6-2 |
|
Dipped beam..................... |
|
3 6-2 |
|
Headlamp flash ................. |
|
3 6-2 |
|
Rear fog lamp ................... |
|
3 6-3 |
5 |
Central information display |
||
|
for time and outside |
|
|
|
temperature .............. |
3 5-3, 5-4 |
|
|
Instrument cluster ............. |
|
3 5-8 |
|
Speedometer .................... |
|
3 5-5 |
|
Odometer ......................... |
|
3 5-6 |
|
Fuel gauge ........................ |
|
3 5-7 |
|
Service interval display 3 3 5-14 |
||
|
Transmission display 3..... |
3 5-7 |
|
|
Trip computer 3.............. |
|
3 5-14 |
6 Driver’s airbag ................. |
3 3-13 |
Horn .................................. |
3 5-2 |
7Windscreen wiper/washer . 3 5-2 Rear window wiper/washer 3 5-3
8 |
Tachometer ....................... |
3 5-6 |
9 |
Centre air vents................. |
3 8-4 |
10 |
Hazard warning ................. |
3 6-2 |
|
Control indicator for |
|
|
front passenger airbag |
3 3-18 |
|
deactivation 3 ................. |
|
11 |
Upper tray ......................... |
3 4-2 |
12 |
Infotainment system .......... |
3 7-1 |
13 |
Front passenger’s airbag |
3 3-13 |
14 |
Storage tray....................... |
3 4-2 |
15 |
Passenger airbag deactivation |
|
|
switch 3........................... |
3 3-17 |
16 |
Glove box .......................... |
3 4-1 |
17 |
Climate controls ................ |
3 8-1 |
18 |
Power outlet ...................... |
3 5-4 |
|
Cigarette lighter 3............. |
3 5-5 |
19 |
Gearshift lever........... |
3 9-4, 9-6 |
20 |
Storage tray |
|
21 |
Ignition switch................... |
3 9-1 |
22 |
Steering wheel adjustment 3 5-1 |
|
23 |
Fuse box ...................... |
3 10-12 |
24 |
Bonnet release ............... |
3 10-2 |
25 |
Front fog lamps 3............. |
3 6-3 |
|
Headlamp range |
|
|
adjustment 3.................... |
3 6-1 |
|
TCSS deactivation 3 |
3 9-11 |
|
||
Back to overview
|
1-7 |
In brief |
|
|
|
|
|
|
|
|
|
|
|
|
|
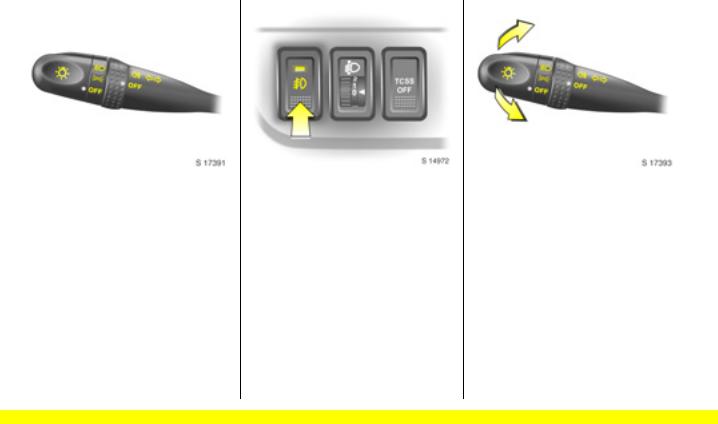
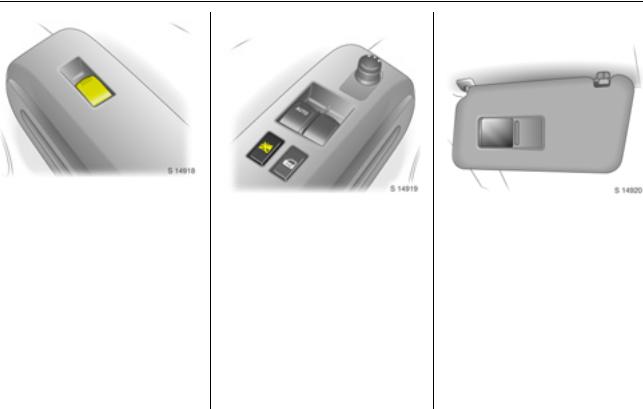
Exterior lamps controls:
Turn light switch:
P= Dipped beam or high beam
|
8 |
= |
Parking lamps |
|
|||
|
OFF |
= |
Off |
|
Turn adjustment band: |
||
|
r |
= |
Rear fog lamp |
|
OFF |
= |
Off |
Press button:
>= Front fog lamps 3
Headlamp warning device 3 5-13, further information 3 6-1, headlamp range adjustment 3 6-1, fog lamps 3 6-3, headlamps when driving abroad 3 6-3.
Headlamp flash, high beam and dipped beam:
Headlamp |
= |
Pull lever |
flash |
|
towards steering |
|
|
wheel |
High beam |
= Push lever |
|
|
|
forwards |
Dipped beam |
= |
Pull lever back |
|
|
towards steering |
|
|
wheel |
Further information 3 6-2.
Back to overview

|
|
In brief |
1-8 |
|
|
|
|
|
|
|
|
|
|
|
|
Turn signal lamps: |
Hazard warning lamps: |
Horn: Press j |
||||
Upwards |
= |
Right turn |
On |
= |
Press ¨ |
Airbag system 3 3-13, remote control |
Downwards |
= |
Left turn |
Off |
= |
Press ¨ again |
on steering wheel 3 3 5-1, 7-2. |
Further information 3 6-2. |
|
|
|
|
||
Back to overview

|
1-9 |
In brief |
||
|
|
|
|
|
|
|
|
|
|
|
|
|
|
|
Windscreen wipers:
MIST |
= |
Misting function |
OFF |
= |
Off |
INT |
= Timed interval wipe 3 |
|
LO |
= |
Slow |
HI |
= |
Fast |
Move lever up from position OFF: Single swipe.
Windscreen wipers 3 5-2, further information 3 10-5, 10-30, 10-31.
Windscreen washer system: Pull lever towards steering wheel
Windscreen washer system 3 5-3, further information 3 10-5, 10-30, 10-31.
Rear window wiper and washer systems: Rotate end of lever
f |
= |
Washer |
ON |
= |
Wiper on |
INT |
= Timed interval wipe 3 |
|
OFF |
= |
Wiper off |
f |
= |
Washer |
Rear window wiper/washer systems 3 5-3, further information 3 10-5, 1030, 10-31.
Back to overview

In brief |
1-10 |
Parking the vehicle:
Apply the parking brake firmly without actuating the release button. On a downhill or uphill slope, apply as firmly as possible. Depress foot brake at the same time to reduce operating forces.
Push key into ignition switch before turning to LOCK position and removing (vehicles with automatic transmission 3: depress foot brake and shift into P). Turn steering wheel until lock is felt to engage (anti-theft protection).
If the vehicle is parked on a level surface or a hill, select 1st gear before switching the ignition off, (vehicles with automatic transmission 3: shift into P). Also turn front wheels away from kerb if parked on an uphill slope.
If the vehicle is parked on a downhill slope, select reverse gear before switching the ignition off, (vehicles with automatic transmission 3: shift into P). Also turn front wheels towards kerb.
Lock doors and tailgate by pressing button e on the radio remote control 3. Press button e twice within 3 seconds to activate the anti-theft locking system 3.
Advice when parking:
Do not park the vehicle on an easily ignitable surface. The high temperature of the exhaust system could ignite the surface.
Close the windows.
The engine cooling fans may run after the engine has been switched off 3 10-1.
Radio remote control 3 3 2-1, central locking system 3 2-3.
Back to overview
2-1 Keys, doors and windows
Keys, doors and windows
Keys and locks ..................... |
2-1 |
Doors.................................... |
2-5 |
Vehicle security .................... |
2-6 |
Exterior mirrors..................... |
2-8 |
Interior mirror........................ |
2-9 |
Windows............................... |
2-10 |
Keys and locks
Keys
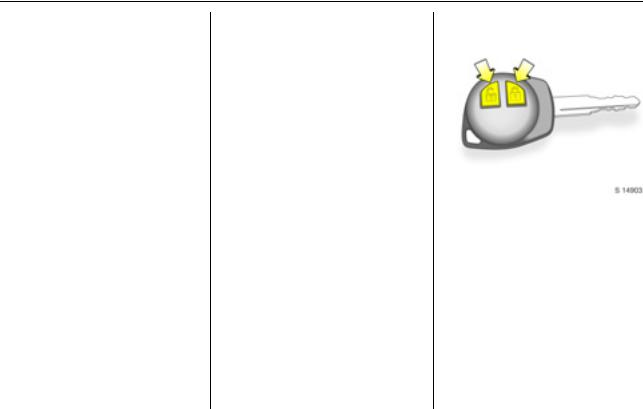
The key number is specified on the keys or on a key number tag 3. Remove key number tag from keys and make a note of the number.
The key is a constituent of the immobiliser 3. In case of loss, replacement keys can be ordered from your Opel Service Partner by quoting the key number.
Ordering keys from an Opel Service Partner guarantees problem-free operation of the immobiliser 3.
Keep spare key in a safe place. Locks 3 10-30.
Radio remote control 3
The remote control is used to operate:
Central locking system,
Anti-theft locking system 3.
The remote control has a range of approx. 5 metres. The range may be reduced due to environmental conditions or shadowing and reflection of the radio waves.
Treat the remote control unit with care: it should be protected against moisture, kept out of direct sunlight and should not be operated unnecessarily.
Back to overview

Keys, doors and windows |
2-2 |
Fault
If the central locking system cannot be operated with the remote control, this may be due to the following reasons:
The remote control is out of range.
The battery voltage of the remote control is too low. Change the battery in the remote control unit.
Interference from higher power radio waves from other sources.
Lock or unlock the doors manually using the key or central locking switch 3 2-3, 2-4.
Seek the assistance of a workshop to rectify the cause of the fault.
Changing battery in remote control unit
Replace the battery (CR 1620 or equivalent) in accordance with the chapter “Service and maintenance” 3 11-2 or when the range of the remote control starts to become reduced.
Remove screw on key cover and remove the transmitter.
Prise apart both halves of transmitter with a suitable screwdriver.
Replace battery, ensuring the new battery is installed correctly with positive (+) side facing the positive
(+) terminal.
Reattach both halves of transmitter and reinstall in holder, ensuring it engages correctly.
Replace cover and tighten screw.
Battery disposal
Batteries are not to be treated as household waste. They should be disposed of at a designated collection point for recycling.
Back to overview
2-3 Keys, doors and windows
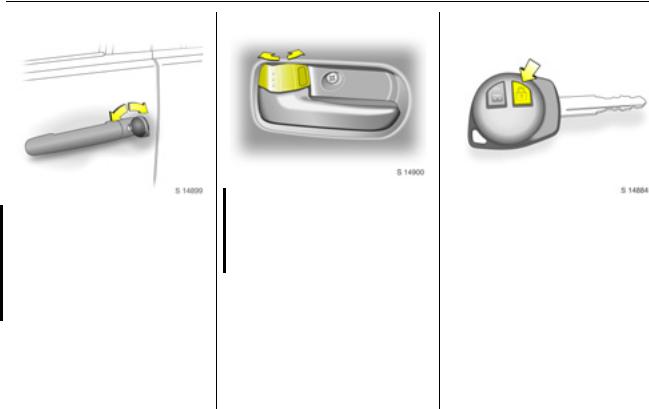
Door locks
The front doors may be manually locked and unlocked using the key.
On vehicles with central locking system 3, the entire vehicle can be unlocked by turning the key twice in the driver’s door lock.
The tailgate is unlocked when the driver’s door is opened.
To lock or unlock doors from inside the vehicle, press the interior lock.
To lock front doors from outside the vehicle, press the interior lock and keep exterior door handle raised when closing the door.
Central locking system 3
For front doors, rear doors and tailgate.
To lock:
Press button e on remote control:Hazard warning lamps flash once.
All doors and the tailgate are locked.
Always ensure that the doors, bonnet, tailgate and windows are properly closed before locking the vehicle.
Back to overview
Keys, doors and windows |
2-4 |
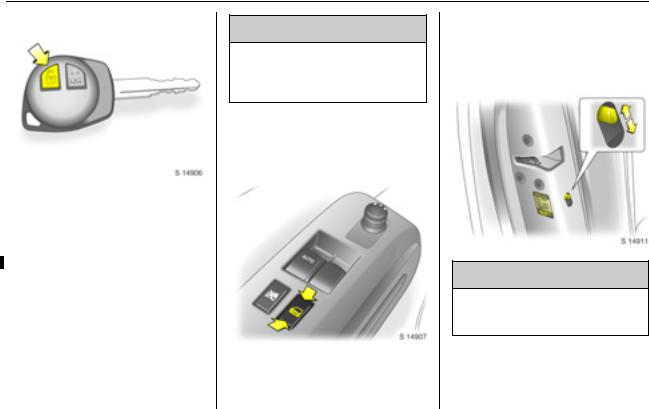
To unlock driver’s door only: Press button c on remote control once:
Hazard warning lamps flash twice.
To unlock entire vehicle:
Press button c on remote control twice:
Hazard warning lamps flash twice with each press.
If no door is opened within approx. 30 seconds after the vehicle has been unlocked via the remote control, the vehicle is relocked automatically.
9 Warning
For safety reasons, the vehicle cannot be locked or unlocked via the remote control if the key is in the ignition switch.
The vehicle can also be manually locked and unlocked by turning the key in the driver’s door lock.
Central locking switch m
Use the central locking switch to lock or unlock the doors and tailgate from inside the vehicle.
Press the front part of the switch to lock or the rear part of the switch to unlock all doors and tailgate.
Safety locks
9 Warning
Use the safety locks whenever children are occupying the rear seats.
To engage lock, open door and move lock lever to lower position. Door cannot then be opened from inside.
Back to overview
2-5 Keys, doors and windows
To disengage safety lock, raise lock lever.
Lockout protection
To prevent the driver from being inadvertently locked out, the driver’s door cannot be locked when it is open.
Doors
Tailgate
To open
The tailgate can be opened by operating the button below the handle and lifting the tailgate.
If the tailgate is open when the ignition is switched on, control indicator 9 illuminates in the instrument cluster.
9 Warning
Do not drive with tailgate open or ajar, e.g. when transporting bulky objects, since toxic exhaust gases could penetrate the vehicle interior.
To close
There is a handle on the inside of the tailgate for closing the luggage compartment.
Back to overview
Keys, doors and windows |
2-6 |
Close tailgate by pushing it down so it latches securely. Ensure tailgate is fully closed before driving.
Emergency tailgate release
If the central locking system 3cannot be operated with the remote control, the tailgate can be opened from inside the vehicle.
Fold rear seats forward to allow access to the tailgate (3 3-3) and push up on emergency lever using a suitable screwdriver to open the tailgate.
Vehicle security
Anti-theft locking system 3
9 Warning
Do not use the system if there are people in the vehicle. The doors cannot be unlocked from inside.
All doors are secured against opening and must be unlocked with the vehicle key. Unlocking is not possible in any other way, so keep spare key in a safe place.
To lock:
All doors and the tailgate must be closed.
Press button e on remote control twice within 3 seconds:
Hazard warning lamps flash twice. - or -
Turn key in driver's door lock towards rear of vehicle twice within
3 seconds.
Interior locks on all doors are positioned such that doors cannot be opened.
To unlock:
Back to overview

2-7 Keys, doors and windows
To unlock driver’s door only: Press  button c on remote control:
Hazard warning lamps flash twice. - or -
Turn key in driver’s door lock towards front of vehicle once.
To unlock entire vehicle: Press button c on remote control twice:
Hazard warning lamps flash twice with each press.
- or -
Turn key in driver's door lock towards front of vehicle twice.
Immobiliser 3
The system checks whether the vehicle may be started using the key that has been inserted. If the key is recognised as "authorised", the vehicle can be started. The check is carried out via a transponder housed in the key.
The immobiliser is automatically activated when the key is turned to the LOCK position and removed from the ignition switch.
The theft-deterrent control indicator starts flashing after the key is turned to positions LOCK or ACC, or removed from the ignition switch.
Fault
If control indicator o or A flashes after the ignition is switched on, there may be a fault in the immobiliser system. If the engine cannot be started:
Turn key to LOCK position and remove,
wait approx. 2 seconds,
then repeat starting procedure.
Back to overview
Keys, doors and windows |
2-8 |
If the control indicator fails to extinguish, try to start the engine using the spare key and seek the assistance of a workshop to rectify the cause of the fault.
Note
The immobiliser does not lock the doors. Therefore, after leaving the vehicle, always lock it 3 2-3.
Exterior mirrors
Convex mirrors
As exterior mirrors are convex, objects are closer than they appear. Use interior mirror to judge size and distance of objects.
Manual mirrors
Adjust mirrors by swivelling lever in required direction.
Power mirrors 3
Adjust with the four-way switch in driver’s door: Turn selector switch to left or right; four-way outer part of switch adjusts corresponding mirror.
The mirror glass swivels in the same direction as the activation of the fourway switch.
Return the selector switch to the central position to prohibit further adjustment.
Back to overview
2-9 Keys, doors and windows
Folding mirrors
For the safety of pedestrians, the exterior mirrors will swing out of their normal mounting position in the event of an accident-like impact.
Reposition the mirror by applying slight pressure to the mirror housing.
Heated mirrors 3
The heating operates in conjunction with the heated rear window using button Ü.
Heated rear window, heated exterior mirrors 3 8-5.
Interior mirror
Manual mirror
To adjust interior mirror, swivel mirror housing.
Swivel lever on underside of mirror housing to reduce dazzle at night.
Take care when driving with interior mirror adjusted for night vision. Rear view may be slightly distorted in this position.
Back to overview
Keys, doors and windows |
2-10 |
Windows
Manual windows
The door windows can be operated with the crank.
Power windows 3
9 Warning
Care must be taken when operating the power windows. There is a risk of injury, particularly for children, and a danger that articles could become trapped.
If there are children on the front passenger’s seat, press the z switch in the driver’s door to deactivate power window operation.
Keep a close watch on the windows when closing them. Ensure that nothing becomes trapped in them as they move.
Before leaving the vehicle, remove the ignition key in order to prevent unauthorized operation.
Operational with key in ignition switch position ON.
Driver’s and front passenger’s door windows are operated via two switches located in the driver’s door.
For incremental operation, briefly pull or press the appropriate switch.
For automatic opening of the driver’s door window, press the switch down fully and release it. Pull up the switch to stop the window movement.
Back to overview
2-11 Keys, doors and windows
An additional switch is located in the front passenger’s door.
In the event of difficulty due to frost or the like, pull the relevant window switch several times until the window is closed.
Child safety system
Press the z switch in driver’s door to deactivate front passenger’s door power window operation when a child is occupying the seat.
Press switch again to activate power window operation.
Sun visors
Use the sun visor to protect from glare by pulling it up, down or swivelling it to the side.
Depending on equipment version, sun visors also have vanity mirrors 3.
Back to overview
Seats, restraints and interior |
3-1 |
Seats, restraints and interior
Head restraints ..................... |
3-1 |
Front seats............................ |
3-2 |
Rear seats ............................ |
3-3 |
Seat belts.............................. |
3-5 |
Child restraints...................... |
3-9 |
Airbag system ....................... |
3-13 |
Head restraints
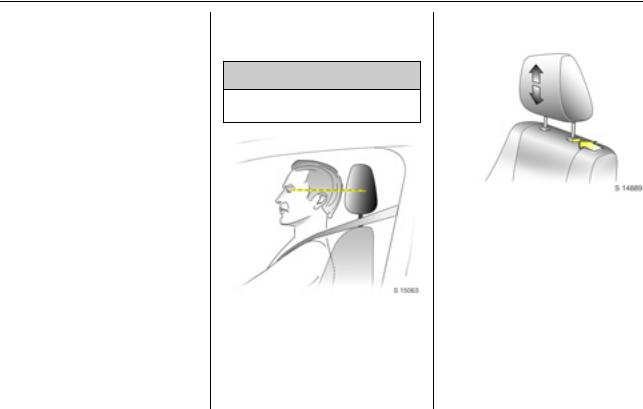
Head restraint position
9 Warning
Only drive with head restraints correctly adjusted.
For maximum protection, the middle of the head restraint should be at eye level. If this is not possible for extremely tall persons, set to highest position, and set to lowest position for extremely small persons.
Height adjustment
To adjust head restraint height, press catch, adjust height to suit then release the catch.
Removal
Press catch. Pull up and remove the head restraint.
Stow head restraints securely in luggage compartment.
Back to overview

3-2 Seats, restraints and interior
Front seats
Seat position
9 Warning
Only drive with the seats correctly adjusted.
Adjust driver’s seat such that, with the driver sitting upright, the steering wheel is held in the area of its upper spokes with the driver’s arms slightly bent.
Slide front passenger’s seat as far back as it will go.
The seatbacks must not be tilted back too far (recommended maximum tilting angle approx. 25°).
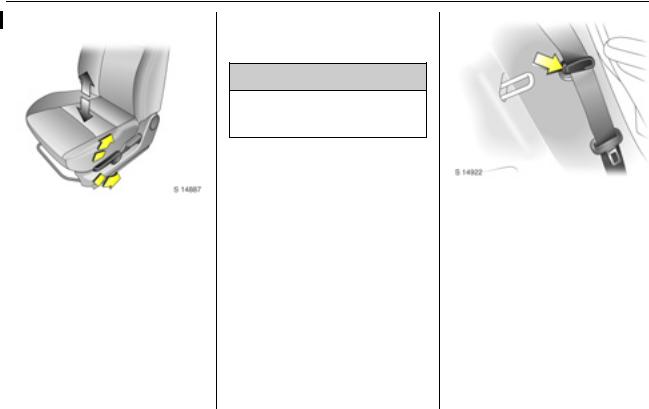
Longitudinal seat adjustment
9 Warning
Never adjust seats whilst driving, as they could move uncontrollably.
To adjust, pull the handle on the front seat, slide the seat and release the handle.
Ensure seat audibly latches into position before driving.
Reclining seatbacks
To adjust, raise the release lever, move seatback to suit seating position and release lever to lock seatback in position.
Do not lean on the seatback whilst adjusting it.
Back to overview
Seats, restraints and interior |
3-3 |
Adjusting seat height 3
To adjust, operate lever on side of seat.
Lever pumping action Upwards: Raises seat Downwards: Lowers seat
Rear seats
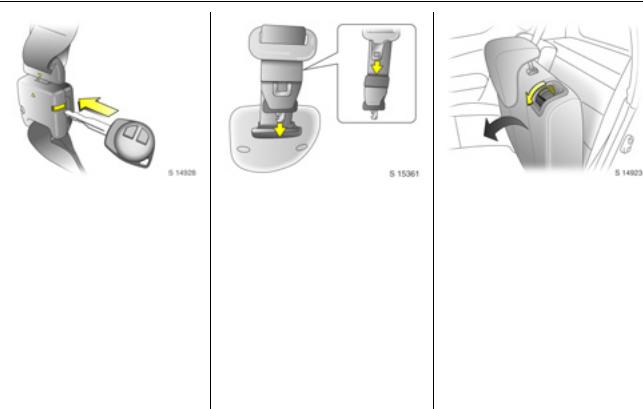
Folding rear seatbacks
9 Warning
When adjusting the rear seatbacks, use caution; beware of moving parts.
The luggage compartment can be enlarged by folding the rear seatbacks onto the seat cushions.
Ensure front seats are not in reclined position and push rear seat head restraints all the way down.
When folding the rear seatbacks, ensure the seat belts are unbuckled.
Route outboard rear seat belts, including the latch plates, through their respective belt holders (as illustrated), ensuring they are not twisted at any point.
Back to overview
3-4 Seats, restraints and interior
Unlatch detachable connector on centre rear seat belt by inserting the ignition key in the slot on the connector and allow the belt to retract.
Insert latch plate into the slit on the belt webbing and insert detached connector latch plate in roof holder slot to the rear of the belt webbing.
To fold outboard rear seatbacks separately 3, pull seatback release lever downwards, fold seatback forwards and down onto seat cushion.
Back to overview
 Loading...