


OPEL Corsa
Owner’s Manual
Back to overview
Downloaded from www.Manualslib.com manuals search engine
Back to overview
Downloaded from www.Manualslib.com manuals search engine

OPEL Corsa
Operation, Safety, Maintenance
Back to overview
Downloaded from www.Manualslib.com manuals search engine

Data specific to your vehicle
Please enter your vehicle’s data here so that it is readily accessible. Please refer to the sections "Servicing and maintenance" and "Technical data" and the identification plate.
Fuel
Designation
Engine oil
Grade
Viscosity
Tyre pressure
|
Tyre size |
|
Front |
|
Rear |
|
|
|
|
|
|
Summer tyres |
|
|
|
|
|
|
|
|
|
|
|
|
|
|
|
|
|
Winter tyres |
|
|
|
|
|
|
|
|
|
|
|
Weights
|
Gross vehicle weight rating |
– |
EC kerb weight |
= |
Loading |
Back to overview
Downloaded from www.Manualslib.com manuals search engine

Introduction
Your vehicle is an intelligent combination of forward-looking technology, impressive safety, environmental friendliness and economy.
It now lies with you to drive your vehicle safely and to see it performs perfectly. This Owner’s Manual provides you with all the necessary information to that end.
Make sure your passengers are aware of the possible risk of accident and injury which may result from improper use of the vehicle.
You must always comply with the specific laws of the country that you are in. These laws may differ from the information in this Owner’s Manual.
When this Manual refers to a workshop visit, we recommend your Opel Service Partner.
All Opel Service Partners provide first-class service at reasonable prices. Experienced mechanics trained by Opel work according to specific Opel instructions.
The Owner’s Manual, infotainment system instructions and the vehicle Service and Warranty Booklet should always be kept ready to hand in the vehicle glove compartment.
Make use of the Owner’s Manual
z The "In Brief" section will give you an initial overview.
zThe table of contents at the beginning of the owner’s manual and within the individual chapters will show you where everything is.
zIts index will help you find what you want.
zYellow arrows in the illustrations serve as points of reference or indicate some action to be performed.
zBlack arrows in the illustrations indicate a reaction or a second action to be performed.
zThis Owner’s Manual depicts left-hand drive vehicles. Right-hand drive vehicles are operated in the same way.
zThe Owner’s Manual uses the internal engine codes. The corresponding sales designations are found in the chapter "Technical data".
zDirectional data, e.g. left or right, or front or back, in the descriptions always relate to the direction of travel.
Symbols
6 Continue reading on next page.
3 signifies equipment not fitted to all vehicles (model variants, engine options, models specific to one country, optional equipment, Genuine Opel Parts and Accessories).
Page references are indicated with 3 . 3 means "see page".
9 Danger, 9 Warning, Caution
9 Danger
Text marked 9 Danger provides information on risk of endangering life. Failure to comply with the instructions could endanger life.
9 Warning
Text marked 9 Warning provides information on risk of accident or injury. Failure to comply with the instructions could lead to injury.
Caution
Text marked Caution provides information on possible damage to the vehicle Failure to comply with the instructions could lead to vehicle damage.
Safe driving!
Adam Opel GmbH
Back to overview
Downloaded from www.Manualslib.com manuals search engine
Back to overview
Downloaded from www.Manualslib.com manuals search engine

Contents
In Brief ....................................................... |
2 |
Keys, doors, windows, sun roof ............ |
26 |
Seats, Interior .......................................... |
48 |
Instruments, controls .............................. |
84 |
Lighting ................................................. |
108 |
Infotainment system ............................ |
118 |
Climate control .................................... |
120 |
Driving and operation ........................ |
136 |
Self-help, vehicle care .......................... |
190 |
Opel Service, maintenance ................. |
231 |
Technical Data .................................... |
250 |
Index ...................................................... |
270 |
Back to overview
Downloaded from www.Manualslib.com manuals search engine
2In Brief
In Brief
Unlocking the car: Turn the key in the driver’s door lock towards the front or press the button q
Open the door by pulling on the door handle. To open the tailgate, press in the button under the handle recess and pull the tailgate upwards.
Key 3 26,
Electronic immobiliser 3 27, Personalised key 3 39, Central locking with key 3 32, Remote control 31, Central locking 3 32, Anti-theft device 3 3 33, Alarm system 3 37,
Child lock 3 39.
3
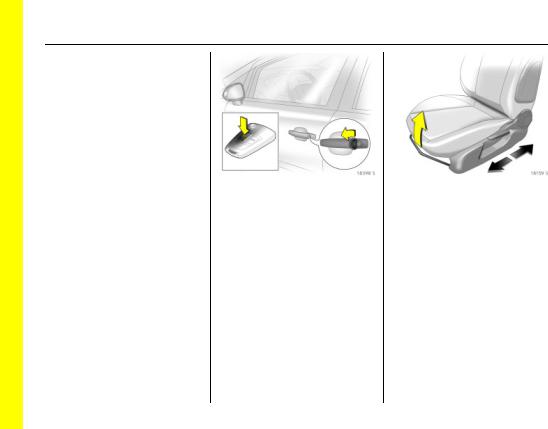
To adjust front seat leg room: Pull handle, slide seat, release handle
Seats 3 48, Seat position 3 50.
Back to overview
Downloaded from www.Manualslib.com manuals search engine
In Brief |
3 |
|
|
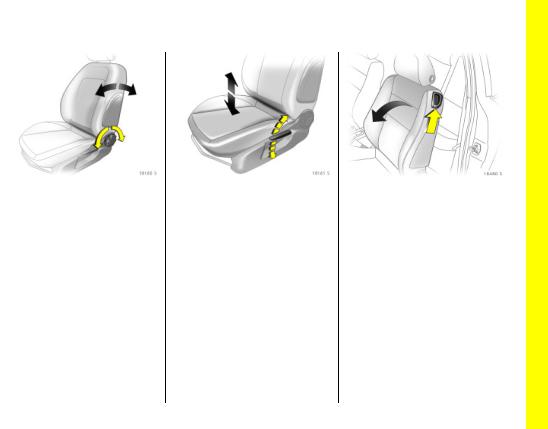
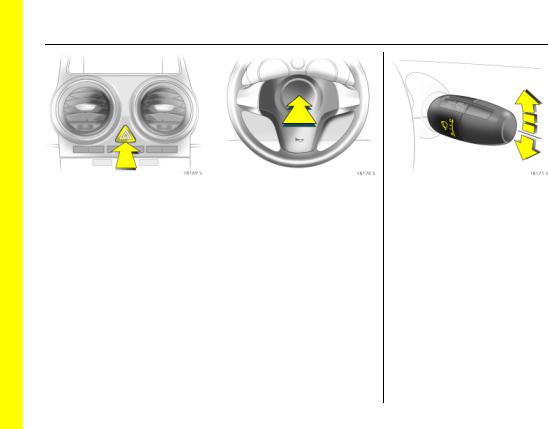
To adjust front seat backrests: Turn handwheel
Do not lean on seat backrest whilst adjusting it.
Seats 3 48,
Seat position 3 50,
Folding down the front passenger seat 3 49.
Front seat height 3: Operate lever on the door side of seat
Pump action of lever Upwards: Seat higher Downwards: Seat lower
Seats 3 49, Seat position 3 50.
To fold the front seat backrests forward 3: Lift the locking lever, fold the backrest forward, lower the locking lever, backrest engages folded forward 3, slide the seat forward 3
To push the seat back to upright, it engages in its original position 3. Lift the locking lever 3, move the backrest back to upright, lower the locking lever, backrest engages.
Folding the backrest forwards is possible only when the backrest is in an upright position.
Front seats 3 48.
Back to overview
Downloaded from www.Manualslib.com manuals search engine
4In Brief
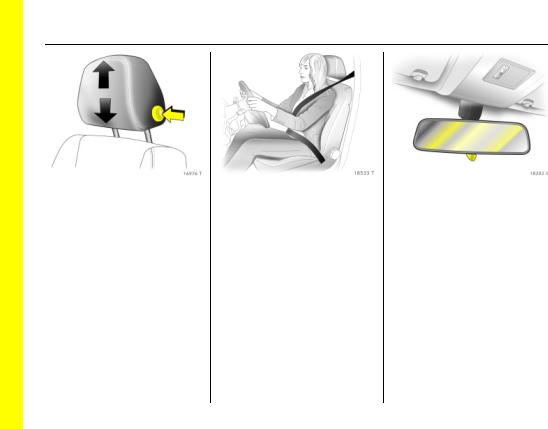
To adjust front seat head restraint height: press button to unlock, adjust height, engage
Head restraint 3 51,
rear head restraint adjustment 3 52, head restraint position 3 52.
Extend the seat belt and clip it into the buckle
The seat belt must not be twisted and must lie snugly against the body. The backrest must not be tilted back too far (maximum approx. 25 ).
To release belt, press red button on belt buckle.
Three-point seat belts 3 59, Airbag system 69,
Seat position 3 50.
To adjust interior mirror by swivelling
Swivel lever on underside of mirror housing to reduce dazzle at night.
Mirrors 3 42,
Autodimming interior mirror 3 44.
3
Back to overview
Downloaded from www.Manualslib.com manuals search engine
In Brief |
5 |
|
|
Exterior mirror adjustment
Select the mirror to be adjusted using the rocker switch and adjust using the four-way switch.
Mirror 3 42,
Aspherical exterior mirrors 3 42, Swinging in exterior mirrors 3 42, Heated exterior mirrors 3 13, 3 43.
Exterior mirror adjustment on vehicle fitted with electronic windows 3
Select the mirror to be adjusted using the rocker switch and adjust using the four-way switch.
Mirror 3 42,
Aspherical exterior mirrors 3 42, Swinging in exterior mirrors 3 42, Heated exterior mirrors 3 13, 3 43.
Steering wheel adjustment: Swivel lever down, adjust height and distance, swivel lever up, engage
Adjust steering wheel only when vehicle is stationary and steering column lock is released.
Airbag system 3 69
Back to overview
Downloaded from www.Manualslib.com manuals search engine

In Brief |
7 |
1 |
Side air vents .............................. |
3 120 |
2 |
Parking lamps, dipped beam ... |
3 106 |
|
Instrument illumination .............. |
3 112 |
|
Fog tail lamp .............................. |
3 108 |
|
Fog lamps ............................... |
3 108 |
|
Headlamp range |
|
|
adjustment 3 .............................. |
3 109 |
3 |
3 |
3 11 |
Turn signal ..................................... |
||
|
Headlamp flash |
|
|
dipped beam, main beam .......... |
3 11 |
|
Interior lighting ........................ |
3 111 |
|
Parking lamps 3 ......................... |
3 112 |
|
Cruise control 3 .......................... |
3 158 |
4Steering wheel
|
remote3 |
control 3......................... |
3 116 |
5 |
Horn ................................................ |
|
3 12 |
|
Driver’s airbag ............................... |
3 67 |
|
6 |
Instruments .................................... |
3 82 |
|
7 |
Windscreen wipers, |
|
|
|
windscreen washer system, |
|
|
|
rear window washer system ......... |
3 12 |
|
|
Trip computer 3 ............................ |
3 99 |
|
8 Centre air vents .......................... |
3 120 |
9Central information display for time, date, outside temperature,
|
infotainment system 3, |
|
|
check control 3 ............................. |
3 92 |
|
Trip computer 3 ............................ |
3 99 |
|
Climate control system 3 .......... |
3 126 |
10 Left seat heater 3 ......................... |
3 48 |
|
|
Steering wheel heater 3................ |
3 49 |
|
Tyre pressure loss |
|
|
monitoring system 3 ................... |
3 162 |
|
Central locking button .................. |
3 32 |
|
Warning lights ............................... |
3 12 |
|
Passenger airbag off switch ........ |
3 73 |
|
Ultrasonic parking sensor .......... |
3 160 |
|
Electronic stability 3 ................... |
3 157 |
|
Right seat heater 3 ....................... |
3 48 |
11 |
Front passenger airbag .............. |
3 67 |
12 |
Glove compartment ..................... |
3 80 |
13 |
Infotainment system ............... |
3 116 |
|
14 |
Climate control .......................... |
|
3 118 |
15 |
Accessory socket 3 ....................... |
3 78 |
|
|
Cigarette lighter 3 |
....................... |
3 78 |
16 |
Ashtray ......................................... |
|
3 79 |
17 |
3 |
|
|
Ignition switch ....................................... |
|
|
|
|
with steering wheel lock .............. |
3 16 |
|
18 |
Accelerator pedal........... |
3 147, 3 148 |
|
19 |
Brake pedal ........ |
3 148, 3 163, 3 165 |
|
20 |
Clutch pedal 3............................ |
|
3 142 |
21 |
Steering wheel adjustment ........... |
3 5 |
|
22 |
Releasing the bonnet .................. |
3 188 |
|
Back to overview
Downloaded from www.Manualslib.com manuals search engine

8In Brief
Back to overview
Downloaded from www.Manualslib.com manuals search engine

6In Brief
Back to overview
Downloaded from www.Manualslib.com manuals search engine

In Brief |
9 |
1 |
Side air vents .............................. |
3 120 |
2 |
Front passenger airbag ............... |
3 67 |
3 |
Left seat heater ......................... |
3 48 |
|
Steering wheel heater 3................ |
3 49 |
|
Tyre deflation |
|
|
detection system 3..................... |
3 162 |
|
Central locking button .................. |
3 32 |
|
3 |
3 12 |
|
Warning light ................................. |
|
|
Passenger airbag off switch ......... |
3 73 |
|
Ultrasonic parking sensor ......... |
3 160 |
|
Electronic stability3 ................... |
3 157 |
|
Right seat heater 3........................ |
3 48 |
4Central information display for time, date, outside temperature,
|
infotainment system 3, |
|
|
check control 3 ............................. |
3 92 |
|
Trip computer 3 ........................... |
3 99, |
|
Climate control system 3 ......... |
3 126 |
5 |
Centre air vents ......................... |
3 120 |
6 |
Turn signal ..................................... |
3 11 |
|
Headlamp flash |
|
|
dipped beam, main beam .......... |
3 11 |
|
Ambient lighting 3...................... |
3 111 |
|
Parking lamps 3 ......................... |
3 112 |
|
Cruise control 3 .......................... |
3 158 |
7Steering wheel
|
remote control 3.......................... |
3 116 |
8 |
Instruments .................................... |
3 82 |
9 |
Horn ................................................ |
3 12 |
|
Driver’s airbag .............................. |
3 67 |
10 |
Windscreen wipers, |
|
|
windscreen washer system, |
|
|
rear window washer system ......... |
3 12 |
|
Trip computer 3 ............................ |
3 99 |
11 |
Parking lamps, dipped beam .... |
3 106 |
|
Instrument illumination .............. |
3 112 |
|
Fog tail lamp ............................... |
3 108 |
|
Fog lamps 3 ................................ |
3 108 |
|
Headlamp range |
|
|
adjustment 3 .............................. |
3 109 |
12 |
Ignition switch |
|
|
with steering wheel lock .............. |
3 16 |
13 |
Accelerator pedal........... |
3 147, 3 148 |
|
14 |
Brake pedal ........ |
3 148, 3 163, 3 165 |
|
15 |
Clutch pedal 3............................ |
|
3 142 |
16 |
Steering wheel adjustment |
........... 3 5 |
|
17 |
Ashtray ......................................... |
|
3 79 |
18 |
Accessory socket 3 ....................... |
3 78 |
|
|
Cigarette lighter 3 |
....................... |
3 78 |
19 |
Climate control .......................... |
|
3 118 |
20 |
Infotainment system .............. |
3 116 |
|
21 |
Glove compartment .................... |
3 80 |
|
22 |
Releasing the bonnet .................. |
3 188 |
|
|
3 |
|
|
Back to overview
Downloaded from www.Manualslib.com manuals search engine
|
|
10 |
In Brief |
|
|
|
|
|
|
|
|
|
|
|
|
|
|
|
|
|
|
||||
|
|
Control indicators |
|
I |
Engine oil pressure, |
|
q |
Headlamp range adjustment, |
||||
|
|
|
|
|||||||||
|
|
w |
Deflation detection system 3, |
|
|
3 |
86. |
|
|
3 |
75. |
|
|
|
|
3 |
84, 3 164. |
|
p |
Alternator, |
|
8 |
Exterior lights, |
||
|
|
r |
|
|
|
|
||||||
|
|
Ultrasonic parking sensors 3, |
|
|
3 |
87. |
|
|
3 |
88, 3 108. |
||
|
|
|
fault, |
|
p |
Electro-hydraulic power |
|
> |
Fog lamps 3, |
|||
|
|
|
3 |
162. |
|
|
||||||
|
|
B |
|
|
|
|
assisted steering, |
|
|
3 |
88, 3 110. |
|
|
|
Adaptive driving light 3, fault, |
|
|
3 |
87. |
|
v |
Airbag systems, belt tensioners, |
|||
|
|
|
3 |
112, 3 117. |
|
O |
Turn signal lamps, |
|
||||
|
|
j |
|
|
|
|
|
3 |
61, 3 74. |
|||
|
|
Manual transmission |
|
|
3 |
11, 3 87. |
|
X |
Seat belt 3, |
|||
|
|
|
automated 3, starting the |
|
Y |
Fuel level, |
|
|||||
|
|
|
engine 3, |
|
|
|
3 |
89, 3 62. |
||||
|
|
|
3 |
85, 3 137. |
|
|
3 |
87, 3 90. |
|
r |
Fog tail lamp, |
|
|
|
! |
|
|
|
C |
Main beam, |
|
||||
|
|
Preheating system 3, |
|
|
|
3 |
88, 3 110. |
|||||
|
|
|
Diesel particle filter 3, |
|
|
3 |
11, 3 87. |
|
R |
Brake system, clutch system, |
||
|
|
|
3 |
85. |
|
W |
Coolant temperature, |
|
||||
|
|
Z |
|
|
|
|
|
3 |
89, 3 167, 3 246. |
|||
|
|
Exhaust gases 3, |
|
|
3 |
87, 3 244. |
|
u |
Anti-lock brake system, |
|||
|
|
|
3 |
85, 3 156. |
|
* |
Deactivate front passenger |
|
||||
|
|
A |
|
|
|
|
|
3 |
166. |
|||
|
|
Engine electronics, transmission |
|
|
airbag systems, |
|
v |
Electronic Stability Programme |
||||
|
|
|
electronics 3, immobiliser, diesel |
|
|
3 |
75. |
|
||||
|
|
|
fuel filter , fault, |
|
T |
Winter setting for automatic |
|
|
(ESP®Plus) 3, |
|||
|
|
|
3 |
27, 3 86, 3 142, 3 148, 3 156. |
|
|
|
3 |
151. |
|||
|
|
|
|
|
|
|
transmission 3 or automated |
|
|
Cruise control 3, |
||
|
|
S |
3 |
|
|
|
transmission 3, |
|
m |
|||
|
|
Engine oil level , |
|
|
3 |
140, 3 146. |
|
3 |
161. |
|||
|
|
|
3 |
86, 3 242. |
|
|
|
|
||||
|
|
|
|
|
|
1 |
Manual transmission |
|
|
|
|
|
|
|
|
3 |
|
|
|
automated SPORT mode 3, |
|
|
|
|
|
|
|
|
|
|
|
3 |
139, 3 146. |
|
|
|
|
|
|
|
|
|
|
|
|
|
|
|
|
|
|
|
|
|
|
|
|
|
|
|
|
|
|
|
Back to overview
Downloaded from www.Manualslib.com manuals search engine
In Brief |
11 |
|
|
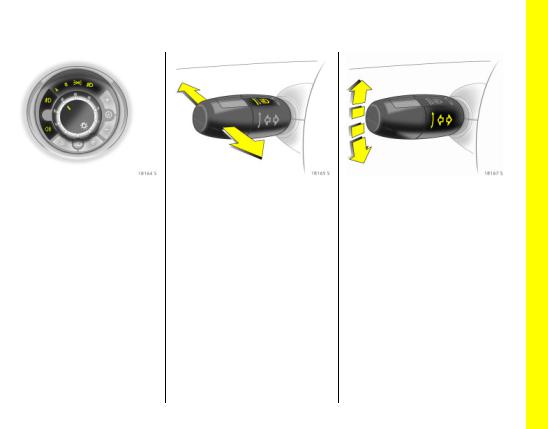
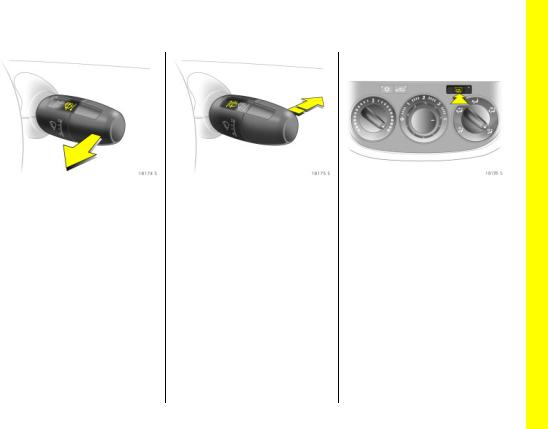
Exterior lights
Rotate
7= Off
8= Parking lamps
9= Dipped or main beam
AAutomatic dipped beam activation 3
Press
>= Fog lamps
r= Fog tail lamp
Lighting 3 108,
headlamp warning device 3 105.
3
Headlamp flash, main beam and |
Switch turn signal on |
|||||
dipped beam |
|
|
Right |
= |
Lever upwards |
|
Headlamp flash |
= |
Pull stalk towards |
Left |
= |
Lever downwards |
|
|
|
steering wheel |
Turn signals 3 109. |
|||
Main beam |
= |
Push stalk forwards |
||||
|
|
|
||||
Dipped beam |
= |
Lever forward again |
|
|
|
|
|
|
or toward steering |
|
|
|
|
|
|
wheel |
|
|
|
|
Main beam, headlamp flash 3 109.
Back to overview
Downloaded from www.Manualslib.com manuals search engine
12 In Brief
Hazard warning flashers |
Activate horn: |
|
Operated with the ¨ button. |
Press j in centre of steering wheel |
|
Hazard warning lamps 3 111. |
Airbag system 69, |
|
Steering wheel remote control 3 3 118. |
||
|
||
|
3 |
|
|
|
Windscreen wiper: Gently tap lever upwards
& = Fast
%= Slow
$= Timed interval wipe or automatic wiping with rain sensor 3
§= Off
For a single swipe when the windscreen wipers are off, press the stalk down.
Windscreen wipers 3 106, adjustable intermittent setting 3 106, further information 3 228, 3 248, trip computer 3 92.
Back to overview
Downloaded from www.Manualslib.com manuals search engine
In Brief |
13 |
|
|
Operating windscreen washer system: Stalk toward steering wheel
Windscreen washer system 3 248, further information 3 228, 3 248.
Rear window wiper 3 and Rear window washer system 3 operation
Wiper on |
= |
Push stalk forwards |
Wiper off |
= |
Push stalk forwards |
|
|
again |
Washing |
= |
Push lever forward |
|
|
and hold |
Rear window wipers and rear window washer system 3 107,
further information 3 228, 3 248.
Heated rear window, heated exterior mirrors
Operated with the Ü button.
Climate control 3 120, heated rear window 3 46.
Back to overview
Downloaded from www.Manualslib.com manuals search engine

14 In Brief
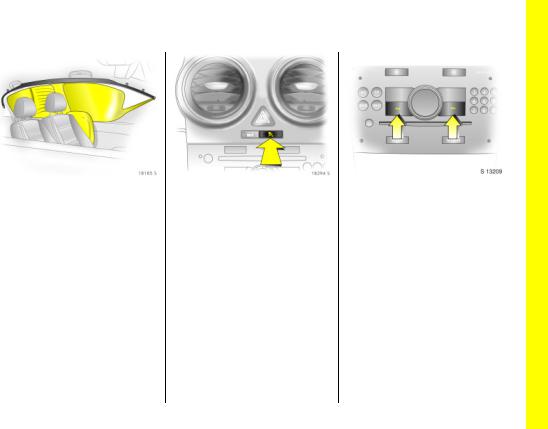
To clear fogged or icy windows
Air distribution to l, turn rotary switch for temperature and air flow; climate control 3: Button n must also be pressed; automatic climate control 3: button V must also be pressed.
Climate control 3 3 120.
To set automatic mode of climate control system 3
Press AUTO button, select temperature with rotary knob, open air vents.
6 Climate control system 3 3 128.
Manual transmission
Reverse gear: With vehicle stationary, wait 3 seconds after depressing the clutch, then lift the ring below the gear knob and engage gear.
If the gear does not engage, set the lever in neutral, release the clutch pedal and depress again; then repeat gear selection.
Manual transmission 3 144.
Back to overview
Downloaded from www.Manualslib.com manuals search engine
In Brief |
15 |
Before starting off, check
z Tyre pressure and tyre condition 3 169, 3 264.
z Engine oil level and fluid levels in engine compartment, 3 241 to 3 248.
z All windows, mirrors, exterior lighting and number plates are free from dirt, snow and ice and operational.
z Seats, seat belts and mirrors are correctly adjusted 3 48, 3 58, 3 42.
z Check brake function at low speed, particularly if the brakes are wet.
Automated manual |
Automatic transmission 3 |
|||||
transmission 3 |
P |
= |
Park position |
|||
N |
= |
Idling |
R |
= |
Reverse gear |
|
o |
= |
Driving position |
N |
= |
Neutral (idling) |
|
+ |
= |
Higher gear |
D |
= |
Automatic gear selection |
|
- |
= |
Lower gear |
3 |
= 1st to 3rd gear |
||
A |
= |
Switch between Automatic and |
2 |
= 1st and 2nd gear |
||
R |
|
Manual mode |
1 |
= |
1st gear |
|
= |
Reverse gear (with selector lever |
Only start engine in P or N. To come out |
||||
|
|
lock) |
||||
|
|
of P, turn the ignition, operate the foot |
||||
Always move the selector lever in the |
||||||
break and press the button. |
||||||
appropriate direction right up to the stop. |
Deactivate the selector lever lock by |
|||||
It will automatically return to the neutral |
||||||
pressing the button. |
||||||
position after each operation. |
||||||
6 Automatic transmission 3 144. |
||||||
The foot brake must be depressed when |
||||||
|
|
|
||||
starting. |
|
|
|
|
||
Automated manual transmission 3 3 136. |
|
|
|
|||
|
|
|
|
3 |
|
|
Back to overview
Downloaded from www.Manualslib.com manuals search engine
16 In Brief
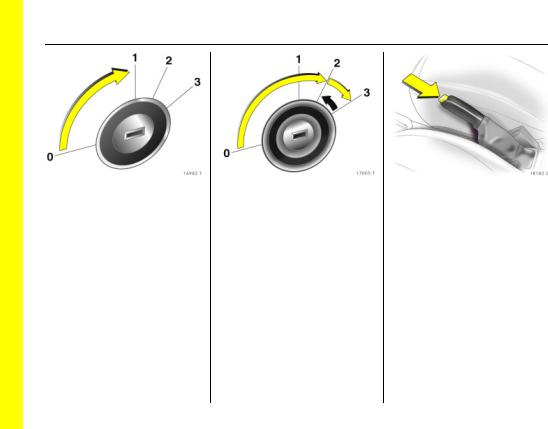
Steering wheel lock and ignition
Turn key to position 1. Move the steering wheel slightly to release the steering wheel lock.
0= Ignition off
1= Steering free, ignition off
2= Ignition on, with diesel engine: pre-heating
3 = Starting
Starting the engine
Depress clutch and brake pedals, select 3 P or N for automatic transmission, 3 N for manual transmission automated. Do not press the accelerator, in the case of diesel engines, release the key in position 2 until the warning light ! goes out, turn the key to position 3 and release once the engine is running.
Before restarting or switching off the engine, turn key back to 0.
To switch on the ignition, only turn the key to 2.
Releasing the hand brake: Raise lever slightly,
press release button, lower lever fully
Hand brake 3 167.
Back to overview
Downloaded from www.Manualslib.com manuals search engine

In Brief |
17 |
Parking the vehicle
z Apply hand brake firmly without operating release button. On a downhill or uphill slope, apply as firmly as possible. Apply foot brake at same time to reduce operating force.
z Switch off engine and ignition. Turn the ignition key to position 0 and pull it out. Turn the steering wheel until it is clear that the steering lock has engaged (anti-theft protection).
On vehicles with automatic transmission 3, the key can only be removed when the selector lever is in the P position.
On vehicles with manual transmission automated 3, control indicator R flashes for a few seconds after the ignition is switched off if the hand brake has not been applied.
z If the vehicle is standing on a level surface or a hill, select first gear before switching the ignition off with manual transmission automated 3, and with automatic transmission 3 move selector lever to P. Also turn front wheels away from kerb if parked on an uphill slope.
If the vehicle is parked on a slope, with manual transmission or manual transmission automated, 3 select reverse gear before switching the ignition off, and with automatic transmission 3 move selector lever to position P. Also turn front wheels towards the kerb.
zLock vehicle with key in lock or button p on the remote key fob.
To activate the anti-theft locking system 3and anti-theft alarm system 3, press button p twice.
Advice when parking
z Do not park the vehicle on an easy flammable surface. The high temperature of the exhaust system could ignite the surface.
zClose the windows and sun roof 3.
zThe engine cooling fans may run after the engine has been switched off 3 241.
zAfter running at high engine speeds or with high engine loads, operate the engine briefly at a low load or run in neutral for approx. 30 seconds before switching off in order to protect the turbocharger 3.
Remote control 3 31, Central locking system 3 32,
Anti-theft alarm system 3 3 37, Vehicle decommissioning 3 249.
Back to overview
Downloaded from www.Manualslib.com manuals search engine

18 In Brief
Interesting functions
Airbag system |
Side airbag system 3 |
|
The airbag system consists of several |
The side airbag is triggered in the event of |
|
a side-on collision to form a safety cushion |
||
internal systems. |
||
for the driver or front passenger in the |
||
Front airbag system 3 |
||
respective door area. This substantially |
||
The front airbag system will be triggered in |
||
reduces the risk of injury to the upper body |
||
the event of a serious accident involving a |
||
and pelvis. |
||
frontal impact and forms safety cushions |
|
|
for the driver and front passenger 3. The |
|
|
forward movement of the driver and front |
|
|
passenger is checked and the risk of |
|
|
injuries to the upper body and head |
|
|
thereby substantially reduced. |
|
Back to overview
Downloaded from www.Manualslib.com manuals search engine
In Brief |
19 |
|
|
Curtain airbag system 3
The curtain airbag system triggers in case of a side-on collision and provides a safety barrier in the head area on the respective side of the vehicle. This reduces the risk of injury to the head considerably in case of a side-on collision.
Airbag system 3 69.
Airbag systems which can be deactivated for the front passenger *3
The front and side airbag systems 3 for the front passenger must be deactivated if a child restraint system is to be fitted to the passenger seat. The curtain airbag system 3, the belt tensioners and all driver airbag systems remain active when the systems for the front passenger are deactivated. The passenger airbag systems are active in the as-delivered condition.
Airbag systems which can be deactivated 3 75.
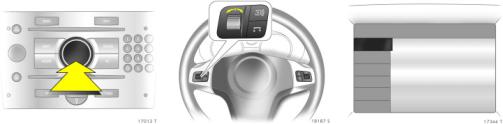
Operating menus via the information display 3
The menu options are selected via the menus and the arrow keys or the multifunction button of the infotainment system 3 or the left adjusting wheel 3 on the steering wheel. The relevant menu options appear on the display.
Selection using arrow keys 3: Press right or left arrow key.
Back to overview
Downloaded from www.Manualslib.com manuals search engine
|
|
20 |
In Brief |
|
|
|
|
|
|
|
|
|
|
|
|
||
|
|
|
|
|
Ü Board Computer19,5° |
19:36 |
||
|
|
|
|
|
||||
|
|
|
|
|
BC 1 |
|
All values |
|
|
|
|
|
|
BC 2 |
1 |
257.0 km |
|
|
|
|
|
|
Timer |
|||
|
|
|
|
|
Ø |
40 km/h |
||
|
|
|
|
|
|
|||
|
|
|
|
|
|
8 |
|
31.0 Ltr. |
|
|
|
|
|
|
Ø |
7.0 L/100km |
|
|
|
Selection using multifunction button 3: |
Selection using left adjusting wheel on |
Trip computer 3 |
|
|
||
|
|
rotate and press multifunction button. |
steering wheel 3: Rotate and press knurled |
Functions: |
|
|
|
|
|
|
|
|
wheel. |
|
|
|
|
|
|
To exit a menu, turn the multifunction |
z Range |
|
|
|
||
|
|
|
|
|
|
|||
|
|
button left or right to Return or Main and |
Information display 3 94. |
z Instantaneous consumption |
||||
|
|
select. |
|
|
||||
|
|
|
|
z Distance travelled |
|
|
||
|
|
|
|
|
|
|
||
|
|
|
|
|
z Average speed |
|
|
|
|
|
|
|
|
z Effective consumption |
|
||
|
|
|
|
|
z Average consumption |
|
||
|
|
|
|
|
z Stop watch |
|
|
|
|
|
|
|
|
Trip computer 3 3 101. |
|
||
|
|
|
|
|
|
|
|
|
|
|
|
|
|
|
|
|
|
Back to overview
Downloaded from www.Manualslib.com manuals search engine
In Brief |
21 |
|
|
Brakelight check right
OK
Check control 3
The check control software monitors z Remote control battery.
z Important exterior lighting lamps, including cables and fuses.
Check control 3 3 104.
Steering wheel remote control 3
The functions of the infotainment system 3 and the information display can be operated using the buttons and adjusting wheels on the steering wheel.
Further information is available in the infotainment system operating instructions.
Steering wheel remote control 3 3 118, Infotainment system 118.
AUX input 3
An external audio source such as a portable CD player can be connected via the AUX input with a 3.5 mm jack plug.
AUX input 3 3 119.
3
Back to overview
Downloaded from www.Manualslib.com manuals search engine
22 In Brief
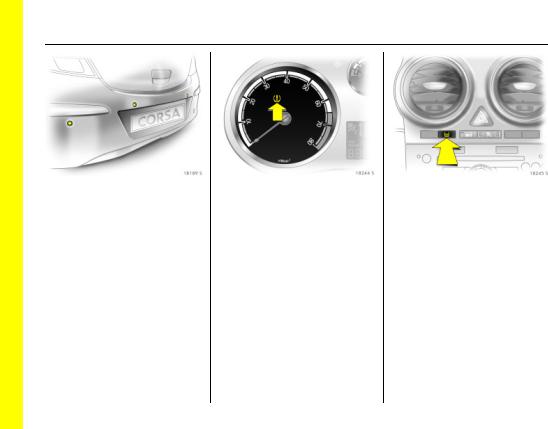
Ultrasonic parking sensors 3
When reverse gear is selected, the park pilot switches itself on automatically.
Manual activation is possible at speed below 25 km/h by using the r button in the instrument panel.
An acoustic warning sounds when the vehicle approaches an obstacle behind.
Ultrasonic parking sensors 3– page 162.
3
Tyre pressure loss monitoring system (DDS = Deflation Detection System) 3
If a tyre loses pressure, it grows smaller. It then rotates at a different speed than the other tyres. If the system detects a difference in speed, control indicator w illuminates red.
After tyre pressure is corrected or a tyre or wheel is changed, the system must be initialised by pressing the DDS button.
Deflation detection system 3 3 164.
Back to overview
Downloaded from www.Manualslib.com manuals search engine
In Brief |
23 |
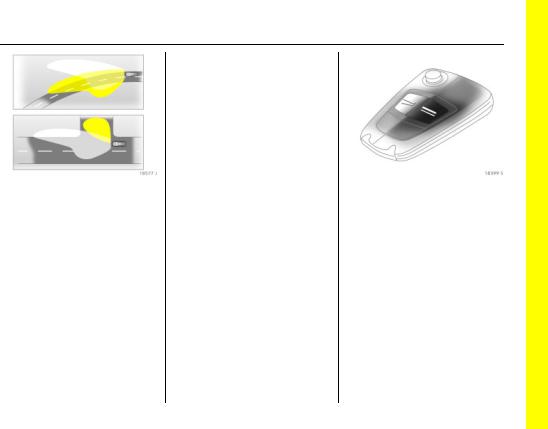
Adaptive Forward Lighting (AFL) 3 ensures better illumination of
z bends (curve lighting),
z crossings and narrow bends (cornering light).
Curve lighting (1)
The light beam pivots based on steering wheel position and speed (from approx. 10 km/h).
Cornering light (2)
An additional lamp throws a beam approx. 90 to the left or right, if the steering-wheel is turned approx. 90 , the turn signal is activated and the speed is below approx. 40 km/h.
Reversing function
If the lights are on, reverse gear is engaged, and the turn signal is activated, the cornering light on the appropriate side is switched on.
Adaptive headlight 3 112.
Personalised key
If the vehicle is used by a number of drivers, each driver can store his or her own preferred settings and vehicle functions using their key. These settings and functions are then activated when the relevant key is used.
A total of up to five vehicle keys can be programmed separately and used.
Personalised key 3 39.
Back to overview
Downloaded from www.Manualslib.com manuals search engine
24 In Brief
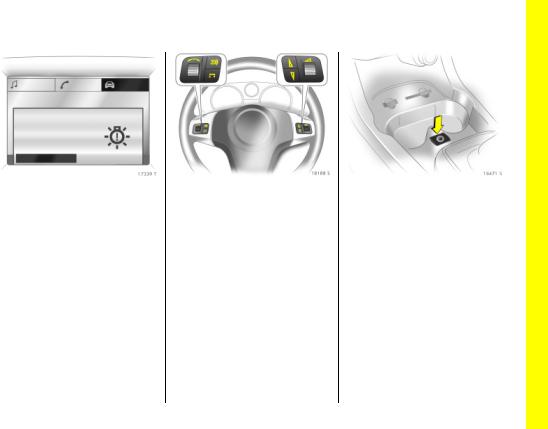
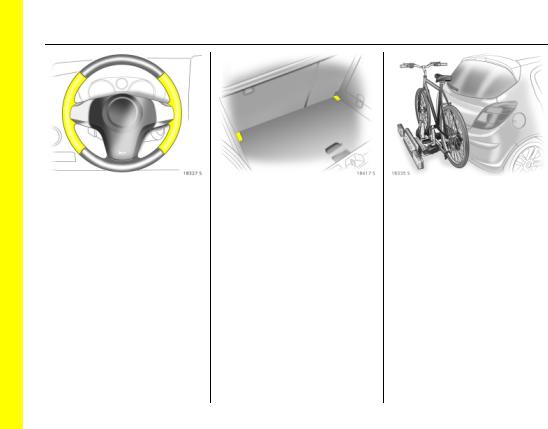
Heated steering wheel 3
Heating of the steering wheel and of the driver’s seat is switched on by a single, or repeated (as appropriate) activation of the switch ß -.
Heating of the steering wheel - the section marked out in the illustration.
Heated steering wheel 3 51.
Double load-bay floor 3
Double load-bay floor, which can be inserted in the baggage compartment in two positions.
If mounted in the upper position, the space between the load-bay floor and the spare wheel well cover 3 can be used as a stowage compartment.
In this position, if the rear seat backrests are folded forwards, an almost completely flat load bay is created.
Double load-bay floor 3 82.
Flex-Fix system 3
The Flex-Fix system allows two bikes to be attached to a pull-out carrier integrated into the vehicle floor.
If not in use, the Flex-Fix system can be collapsed back into the vehicle floor.
Flex-Fix system 3 174.
Back to overview
Downloaded from www.Manualslib.com manuals search engine
 Loading...